1
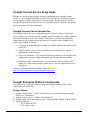
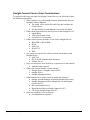
Application Note Onsight Connect Service Setup Guide v6.2 Librestream Onsight 1000/2000/2500 User Manual Doc #: 400213-01 July 2013 Information in this document is subject to change without notice. Reproduction in any manner whatsoever without the written permission of Librestream is strictly forbidden. Copyright © 2006 – 2013 Librestream Technologies Incorporated. All rights reserved. Name of Librestream Software: Onsight 1000 Onsight 2000 Onsight 2500 Copyright Notice: Copyright 2004 – 2013 Librestream Technologies Incorporated. All Rights Reserved. Patents Notice: United States Patent # 7,221,386, together with additional patents pending in Canada, the United States and other countries, all of which are in the name of Librestream Technologies Inc. Trademark Notice: Librestream, the Librestream logo, Onsight, Onsight Connect, Onsight Expert, Onsight Mobile, Onsight Enterprise, Onsight License Manager, Onsight TeamLink, Onsight Account Manager and Onsight Management Suite are either registered trademarks or trademarks of Librestream Technologies Incorporated in Canada, the United States and/or other countries. All other trademarks are the property of their respective owners. Application Note: Onsight Connect Service -1- © 2012 Librestream Technologies Inc. Table of Contents Table of Contents................................................................................................................ 2 Onsight Connect Service Setup Guide................................................................................ 3 Onsight Connect Service Introduction............................................................................ 3 Onsight Enterprise Platform Components .......................................................................... 3 Onsight Clients: .......................................................................................................... 3 Cloud Services Hosted by Librestream: ..................................................................... 4 On-Premise Enterprise Products:................................................................................ 4 Diagram 1: Onsight Connect Solution Architecture................................................... 5 Onsight Connect Service Setup Considerations ............................................................. 6 Onsight Account Manager: Configuration.......................................................................... 7 Client Policies ................................................................................................................. 7 There are four Client Policy Categories: .................................................................... 7 Onsight Management Suite Requirements.......................................................................... 8 Installing Onsight Connect for PC...................................................................................... 8 The Installation Process .................................................................................................. 9 OMS Configuration Package Requirements............................................................... 9 Installing Onsight Device v6.0 ......................................................................................... 10 Onsight Device Update Methods .................................................................................. 10 OMS Update Method.................................................................................................... 10 OMS Software Update Package Requirements ........................................................ 11 Onsight Device Update Procedure............................................................................ 11 Onsight Device Configuration Packages .................................................................. 11 Configuration of a New Onsight Device .......................................................................... 14 Manual Configuration Method ................................................................................. 14 Onsight Management Suite Configuration Method.................................................. 15 Wireless Network Considerations..................................................................................... 16 Best Practice for Anonymous User Wireless Profile – WPA/2 PSK........................ 16 Best Practice for Anonymous User Wireless Profile – WPA/2 Enterprise .............. 16 Best Practice for Roaming Devices .......................................................................... 17 Anonymous User Wireless Profile – WPA/WPA2 Enterprise Requirements .......... 17 Anonymous User Wireless Profile – WPA/WPA2 Personal Requirements............. 18 Anonymous User Wireless Profile – FIPS Requirements ........................................ 18 Anonymous User Wireless Profile – Hotspot Login ................................................ 19 Anonymous User Wireless Profile – Proxy Settings ................................................ 19 FAQ................................................................................................................................... 20 Application Note: Onsight Connect Service -2- © 2012 Librestream Technologies Inc. Onsight Connect Service Setup Guide Whether you are an existing Onsight customer transitioning to the Onsight Connect Service or a new customer installing Onsight for the first time, this document will guide you through the Onsight Connect Service setup procedure. Requirements for internal Onsight Management Suite and SIP servers are also described for customers who operate servers on premise for these components. Onsight Connect Service Introduction The Onsight Connect Service was announced in the Version 5.1 release. This hosted service allows a user to install and use Onsight Connect on multiple PC, iPhone, iPad and Librestream Onsight devices. The Onsight Connect Service also provides additional features that are not available when logged into a PC using the legacy Onsight Local Service login method, including: User based licensing that allows Onsight to be installed freely without the need to license PC’s. Global Contacts - Users will have the ability to search for contacts in their organization's global directory. Guest User Invitations - User can invite anyone to participate in an Onsight video collaboration session by simply entering the guest's name and email address. Roaming Profiles - Changes made to a user's personal contacts, profile or SIP settings are stored on the Onsight Connect Service, and are applied wherever the user logs in. For more information about the Onsight Connect Service, see http://www.librestream.com/products/onsight-connect.html. Onsight Enterprise Platform Components The complete list of Onsight enterprise components and network port and protocol requirements are listed below. Onsight Clients: Onsight Connect for PC – NOTE: This software was previously branded Onsight Expert in v5.1 and earlier Onsight Connect for iOS – iPhone 4/4S and iPad 2/3 Onsight Connect for Librestream Devices - Onsight 2000R, 2000EX, 2500R, 2500EX Network Protocols: o HTTP and/or HTTPS o TCP: 5060 or 5061 Application Note: Onsight Connect Service -3- © 2012 Librestream Technologies Inc. o UDP/RTP: Range as configured on the SIP Server o UDP 3478 o Onsight Endpoint Local Source Ports: UDP 6000 - 6006 (up to a max of 6200 if the lower range ports are in use on the Onsight Endpoint). The source port for SIP is random but will always send to destination TCP 5060 or 5061. Cloud Services Hosted by Librestream: Onsight Account Manager o User license management o Onsight global contact directory, optional Guest Services o Endpoint configuration of SIP and TeamLink accounts o HTTPS Onsight TeamLink o Firewall Traversal o HTTP or HTTPS Onsight SIP Service o SIP Proxy Server hosted by Librestream o TCP: 5060 or 5061 o UDP/RTP: Range as configured on the SIP Server. Librestream’s SIP Service uses 58024 to 58523 Onsight Management Suite o Librestream hosted access to Onsight Management Suite o Onsight endpoint software updates, configuration, contact directory o HTTPS On-Premise Enterprise Products: Onsight Management Suite (Windows Server) o Onsight Endpoint Software Updates, Configuration, Contact Directory o HTTP or HTTPS o Hosted by the customer’s Enterprise Server SIP Server o An Enterprise can configure and manage their own SIP Proxy Server, e.g. Cisco Video Communication Server or InGate SIParator Application Note: Onsight Connect Service -4- © 2012 Librestream Technologies Inc. Diagram 1: Onsight Connect Solution Architecture Application Note: Onsight Connect Service -5- © 2012 Librestream Technologies Inc. Onsight Connect Service Setup Considerations To prepare for the setup procedure for Onsight Connect Service you will need to know the following information: 1. Who is going to act as the Onsight Connect Administrator for your Onsight Customer Domain? The admin will be required to add Users and configure the Client Policies. See the Onsight Account Manager User Guide for details. 2. What current login method is used by users for the Onsight Device? admin/admin ‘Skip’ (Anonymous User) Local Service user accounts 3. What wireless security method is in use for the Onsight Device? WPA-PSK or WPA2-PSK PEAP EAP-TLS PEAP-GTC FIPS 4. Are certificates required for wireless network connections on the Onsight Device? EAP-TLS SIP-TLS (SIP Authentication transport) Validate Server 5. Does your enterprise use a Web Proxy to gain access to the internet? Authentication required? 6. What is the current software version running? Onsight Expert / Onsight Connect for PC Onsight Device Onsight Management Suite 7. What method will be used to install or update the Software? Onsight Account Manager download (Onsight Expert only) Onsight Management Suite (Onsight Device and Onsight Connect for PC) SD card (Onsight Device) Shared network drive (Onsight Connect for PC) CD image (Onsight Connect for PC) 8. Does your enterprise use a Web Proxy? Is Authentication requrired? Application Note: Onsight Connect Service -6- © 2012 Librestream Technologies Inc. Onsight Account Manager: Configuration The Onsight Account Manager (OAM) Administrator must configure the Customer Domain before adding Users. Refer to the Onsight Account Manager User Manual for details. Client Policies OAM can be configured to push the following settings to an Onsight endpoint when the Onsight Connect User logs in. Client policy settings will override the settings on an endpoint when a user logs into Onsight Connect. Ensure that you add only settings you wish to persist across all endpoints as these settings apply to all devices. Client Policies will also apply to Guest Users There are four Client Policy Categories: 1. Calls a. Encryption Mode b. Maximum Number of Connections c. Privacy Mode (Disable recording and snapshots for all participants) d. Disable recording and snapshots for local participant 2. Bandwidth Control a. Enable b. Maximum Bit Rate 3. Remote Management (OMS Web Service) a. Server URI b. Encryption Key c. Report Statistics 4. TeamLink a. Disable HTTP registration (use HTTPS) b. Always use TeamLink Refer to the OAM User Manual for details on Client Policies Adding Users There are three ways to Add Users to the Onsight Connect Service: 1. Manually 2. Import Users from: a. Contacts.xml or b. CSV file 3. User Self-Registration Application Note: Onsight Connect Service -7- © 2012 Librestream Technologies Inc. Librestream recommends importing Users from a CSV file, especially when you are adding a large group of Users at one time. Follow the formatting instructions available in OAM when importing Users from a CSV file. External endpoints such as a video conferencing rooms and other Non-Onsight Connect Domain endpoints, can also be imported from a CSV file to the Global Directory. Refer to the OAM User Manual for details on adding Users. Notify Users By default, New Users are notified of their new Onsight Connect account information by a Welcome email. If using the Self-registration method the Onsight Administrator must send the registration URL and Creation Key to the New User so that they can complete the registration form. Onsight Management Suite Requirements Onsight Management Suite must be upgraded to v5.1 or higher to configure the Onsight Connect Service on Onsight endpoints. If you are using OMS to remotely manage your endpoints, perform the Onsight Management Suite update first. If using Onsight Management Suite update to v5.1 or higher before proceeding. Installing Onsight Connect for PC To begin using the Onsight Connect Service on a PC you must install Onsight Expert v5.1 or Onsight Connect for PC v6.0 (or higher). The PC software was renamed to Onsight Connect for PC in the Version 6.0 release. For Onsight Connect Service customers, the PC installation process no longer requires a Release Key. V5.1 Onsight Expert or V6.0 Onsight Connect for PC (or higher) Users must login using an Onsight Connect account. This user name/password is provided by Onsight Account Manager via a Welcome email. If you are a legacy Onsight Expert user and you try to login with your old user name/password, you will be asked for a Release Key and you will not be able to continue. Application Note: Onsight Connect Service -8- © 2012 Librestream Technologies Inc. The Installation Process 1. Onsight Connect for PC can be installed using any of the following methods: a. Onsight Connect Service Download: New Onsight Connect Service Users receive a Welcome email directing them to download the latest software from the Onsight Connect server. See the Onsight Account Manager User Manual for details on setting up New Users. b. Onsight Management Suite pushes out a Software Update package. c. Users access the software on a shared network drive d. Users install from the CD image that is available from Librestream’s software download page, www.librestream.com/software. 2. Once the install is complete, launch Onsight from the Start Menu or desktop short cut. 3. Enter your Onsight Connect Service credentials to login and begin using Onsight. Refer to the Onsight Account Manager User Guide for details on setting up new Onsight Connect Users and Onsight updates. OMS Configuration Package Requirements Onsight Expert / Onsight Connect for PC rely on the PC’s network connection to communicate with the Onsight Connect Service. Because of this, there is no specific Onsight Connect Service settings required for the PC. However, if your enterprise uses a Web Proxy to control internet access then you may need to configure the Proxy Settings in the Onsight Connect for PC manually or in the OMS Configuration Package. You must be running Onsight Expert v5.1 or Onsight Connect for PC v6.0 to access the Onsight Connect Service. No other configuration is necessary to access the Service unless a Web Proxy is in use at your enterprise. If you do not use OMS you will have to manually configure the Web Proxy settings on all Onsight Connect endpoints. Application Note: Onsight Connect Service -9- © 2012 Librestream Technologies Inc. Installing Onsight Device v6.0 To begin using the Onsight Connect Service on the Onsight Device you must install v6.0 or higher. Before you begin the installation process, confirm the following: Each Onsight Device is currently at v4.5 or higher. o If you do not meet this requirement contact Librestream for details on installing v4.5. Each device is connected to the network. Each device is connected to an AC Power Adapter; updates will not proceed unless a power supply is attached. Onsight Management Suite v5.1 or v6.0 must be installed in order to create OAM enabled configuration packages. Onsight Device Update Methods There are three methods used to update existing Onsight Devices. Administrators can use OMS, update each Onsight Device manually using an SD card, or use the WiFi Update Method. The WiFi Update instructions are available from Librestream upon request. This document focuses on the more typical OMS update procedure. OMS Update Method The OMS update method is used most frequently for sizable installations of Onsight Devices. Devices using 802.1X Authentication will need a User to login to the Onsight Device in order to connect to the Network before the upgrade to v5.1 or higher will be pushed out from OMS. Devices using WPA/2-PSK Authentication will automatically be connected to the wireless network at the login screen and therefore the upgrade to v5.1 will be pushed out from OMS without the need for a user to login. The pre v5.1 configuration and User/Contact list will be preserved on the Onsight Device when it is updated to v5.1. However, the pre v5.1 Contact list is only available if logged into the legacy Local Service (not the hosted Onsight Connect Service). It is important to test your upgrade process locally before pushing the packages out to all Devices. Application Note: Onsight Connect Service - 10 - © 2012 Librestream Technologies Inc. OMS Software Update Package Requirements The following packages are required to update to v5.1 or higher: 1. Software Update Package to v5.1 or v6.0. 2. Onsight Device Configuration Package (see setup instructions below). 3. Certificate Package (optional but required for SIP-TLS, EAP-TLS or Validate Server). 4. User/Contact list (optional but required for Local Service i.e. Onsight Connect Service is not being used). Local Service uses a local database to authenticate the user at the login screen. It does not access the Onsight Connect Service. The Local Service relies on a User/Contact list being created and imported by your Onsight Administrator. Onsight Device Update Procedure 1. Upload the Onsight Device Software update package v5.1 or higher to OMS. 2. Create a Software Update Job on OMS including all Onsight Devices that are being upgraded. 3. Once you have received confirmation that the Software Update Job has completed continue with the setup process by creating the Configuration package. Onsight Devices must be updated to v5.1 or higher before pushing out any OMS Configuration packages. Users can still login to the Local Service once the Onsight Device is updated. It is recommended that you update all Onsight Devices to the same software version before continuing with the Configuration Package update. This will avoid a mixed pool of software versions across the Onsight Devices. Onsight Device Configuration Packages 1. Using OMS v5.1 or higher, create a new Onsight Device Configuration package or edit an existing package. 2. Under Security enable ‘Allow Onsight Account Manager Login’. (Enabled by default.) 3. Enter Valid Domains if you wish to allow only your Onsight account domain to be available for use on the Onsight Device, all other domains will not be allowed to login to the Onsight Connect Service. Leave it blank is you wish to allow any domain. 4. Enter Local Profile User Name to select the Local Profile’s wireless network that will be used for the Onsight Connect Service, leaving it blank or setting it to Application Note: Onsight Connect Service - 11 - © 2012 Librestream Technologies Inc. ‘none’ will default to the Anonymous User Wireless Profile. It is Best Practice to leave it blank and use the Anonymous User Wireless Profile. 5. If your Enterprise uses a Web Proxy to control internet access, enter the Proxy information under Proxy Settings. 6. Set the Remote Management Web Service settings to ensure communication with OMS is maintained. 7. Set the Network – Wireless - Preferred Networks configuration. 8. Create the Certificate Package (if required) to include: a. Wifi Profile certificates include ‘Install for anonymous user’ for 802.1X authentication 9. If required include the Configuration Access Control file in the configuration package. (See the Onsight Management Suite User Manual for details.) 10. Set the Time Zone and Time Servers to use. 11. Push out the Configuration Update Packages to all Onsight Devices. Onsight Devices must have accurate date and time set to use the Onsight Connect Service. SSL relies on time/date accuracy to perform authentication. Best Practice for OMS Onsight Device Configuration Package: When creating Certificate packages for 802.1X Authentication be sure to enable Install for anonymous user. This ensures the certificate is installed for the Anonymous User Wireless Profile that is used by the Onsight Connect Service to connect to the wireless network. Additional manual configuration on the Onsight Device will be required once the packages have been pushed out by OMS to configure the 802.1X username, password and User certificate selection for EAP-TLS. When creating 802.1X Authentication Certificate packages select the ‘Install for anonymous user’ option. For 802.1X Authentication, additional manual configuration of the Onsight Device will be required once the packages have been pushed out by OMS to configure the username, password and User certificate selection for EAP-TLS. Librestream strongly recommends that the Onsight Administrator change the admin password from the default to improve security. Anonymous User Wireless Profile The Anonymous User Wireless Profile is used to gain wireless network access for the Onsight Connect Service in order to authenticate the Onsight Connect User. It associates the Onsight Connect Service with a Wireless configuration rather than having to create a wireless network profile for each user. By default the Onsight Device is configured to make the Anonymous User’s wireless profile available for use by the Onsight Connect Service under Configuration/Security/Onsight Account/Onsight Account Service Local Profile- Application Note: Onsight Connect Service - 12 - © 2012 Librestream Technologies Inc. None. You have the option of choosing an existing Local Service User Profile to use with the Onsight Connect Service. E.g. admin Is the Anonymous User Secure? Yes, the Anonymous User profile provides a network connection that can use WPA, WPA2, or 802.1X (PEAP, PEAP-GTC or EAP-TLS) Authentication methods. In addition your Onsight Account will be authenticated to the Onsight Connect Service. The ability to make SIP calls is DISABLED while logged in under the Anonymous User Profile. The SKIP button can be disabled so that it is not available on the login screen; however the Anonymous User Wireless Profile is still used to access the network for the Onsight Connect Service unless another Local User Profile is designated as the source of the Wireless Profile. Diagram 2: Anonymous User Wireless Profile SI P/ TC P/ / DP /U P/ RT / TP HT S P SI / DP //U TP /R CP /T /S TP HT Application Note: Onsight Connect Service - 13 - © 2012 Librestream Technologies Inc. Configuration of a New Onsight Device New Onsight Devices are shipped with Version 6.0 (or higher) loaded. To configure a new Onsight Device for the Onsight Connect Service, you will need to set-up the Wireless Profile. There are two ways to configure the Onsight Devices: 1. Manual Configuration 2. Onsight Management Suite Configuration If using wired Ethernet for Networking you do not need to configure the Wireless Connection. An I/O Sled is required for Ethernet on the Onsight Devices. (The Onsight 1000 has a built-in Ethernet connector.) If your Onsight system administrator has enabled anonymous login, a Skip button is available to bypass the login process.This is a Local Service login which also allows you to configure the wireless network before attempting to login to the Onsight Connect Service. Librestream strongly recommends that the Onsight Administrator change the admin password from the default to improve security. Manual Configuration Method 1. Press the ‘Skip’ button to login as the Anonymous User. at the top of the Viewfinder to display the Network 2. Tap the Radio icon, Status screen. 3. Tap the ‘configure’ button to display the Wireless Configuration screen. 4. Press the ‘Advanced’ button to view ‘Wireless Adapter’ dialog. 5. Double-tap on the Network name of the Access Point to which you want to connect. 6. Enter the Security credentials for the Wireless Network. Press ‘Ok’. 7. Confirm you get a ‘Connected’ status to the Wireless network. 8. Press ‘Ok’ to exit the ‘Wireless Adapter’ dialog. 9. If your enterprise is using a Web Proxy, go to Configuration-Network-Proxy Settings. o Enable Use a proxy server. o Enter the Address. o Enter the Port. o If applicable, enable Bypass proxy server for local addresses. o If applicable, enable Proxy Requires Authentication. o Enter the User Name and Password. 10. Press ‘Accept’ to exit the Configuration screen. 11. Press the ‘Display’ mode button to display the Main menu. 12. Press ‘Sign out’ 13. At the login screen enter your Onsight Connect Account Username and Password. Application Note: Onsight Connect Service - 14 - © 2012 Librestream Technologies Inc. 14. Press ‘Login’. 15. You should now connect to Onsight Connect Service and be able to search your Global Directory and place a call. Onsight Devices must have accurate date and time set to use the Onsight Connect Service. SSL relies on date/time accuracy to perform authentication. Proxy Settings may need to be configured on the Onsight Device in order to connect to the Onsight Connect Service. See \Configuration\Network\Proxy Settings or configure them using Onsight Management Suite. On the User Authentication screen the Connect to a Wireless Network link is disabled by default; your Onsight Administrator must enable this feature before it is available. Onsight Management Suite Configuration Method 1. Follow steps 1 -8 in the Manual Configuration section above (or use an I/O sled and connect the Onsight Device to your wired network via the Ethernet connector). 2. From Configuration screen, select ‘Network/Management’ from the directory tree. 3. Check ‘Enable Remote Management Service’. 4. Enter the ‘Server URI’ for your OMS. E.g. http://oms.librestream.com/OnsightWebService/RemoteEndpointService.asmx. 5. Enter the ‘Encryption Key’ for your OMS. 6. Press ‘Connect’ to test. 7. Press ‘Accept’ to exit configuration. 8. Push out your Onsight Device configuration packages from OMS. Application Note: Onsight Connect Service - 15 - © 2012 Librestream Technologies Inc. Wireless Network Considerations To gain access to the Wireless network you must configure the Anonymous User Wireless Profile so that the Onsight Device can connect to the wireless network for Onsight Connect Service communication. Login as the Anonymous User by pressing the SKIP button on the login screen. If your network uses WPA/WPA2 Personal for authentication the Anonymous User Wireless Profile must be configured with the appropriate Network password. If your network uses WPA/WPA2 Enterprise for authentication the Anonymous User Wireless Profile must be configured with valid Device Authentication credentials e.g. username/password or device certificate. Best Practice for Anonymous User Wireless Profile – WPA/2 PSK Device authentication using WPA/2-PSK is the simplest to implement for use with the Onsight Connect Service. The WPA/2 PSK Network Key is configured on the Device either manually or using Onsight Management Suite, this eliminates the need to have individual users authenticate on the network. User authentication is managed by OAM with the ability to filter allowed domains on the device. Only users with active accounts within your OAM domain are allowed to log into the device and access the wireless network. Wireless authentication using WPA/2-PSK is the simplest to implement for use with the Onsight Connect Service. Best Practice for Anonymous User Wireless Profile – WPA/2 Enterprise Device authentication using WPA/2-Enterprise (with AES or TKIP Encryption) is supported using PEAP, EAP-TLS or PEAP-GTC. To setup Device Authentication an Anonymous User Wireless Profile must be created using Onsight Management Suite, the Anonymous User Wireless Profile will be configured with the appropriate security credentials to gain access to the network and eliminates the need to have individual users authenticate on the network. However, when using PEAP or PEAP-GTC, the Onsight Device can be configured to allow individual user credentials to be entered when prompted. Application Note: Onsight Connect Service - 16 - © 2012 Librestream Technologies Inc. User Authentication is managed by the Onsight Connect Service and includes the ability to filter allowed OAM domains on the Device. Only users with active accounts within your OAM domain are allowed to login to the Device and access the wireless network. If Onsight Management Suite is not available the WPA/2 Enterprise Anonymous User Wireless profile can be created manually by logging in locally on the Device and entering the appropriate security credentials for the Wireless Network. Once configured the Anonymous User Wireless Profile is available for use by the Onsight Connect Services. See the section Onsight Device – Initial Out of Box Configuration for details. Login to the Anonymous User profile by pressing the SKIP button on the login screen. If the ‘Skip’ button is disabled the Onsight Connect Service will need to be configured to connect to the wireless network using an existing Local Service User profile or using the admin profile’s network setup. Best Practice for Roaming Devices If the Onsight 2500R is going to be used at many locations it will need to have the Wireless Network configured at each site. To provide access to Wireless configuration at the Login screen you can enable Allow wireless configuration prior to login to provide the Connect to a wireless Network link on the login screen. This will allow users to enter the Network credentials to configure the Wireless network connection without having to login as the Anonymous User (SKIP). Go to Main Menu-Configuration-Security-Login to enable Allow wireless configuration prior to login. Anonymous User Wireless Profile – WPA/WPA2 Enterprise Requirements 1. PEAP requirements for Onsight Wireless Profile a. OMS Device Configuration Package containing Anonymous User Wireless Profile for PEAP b. Certificate Package: enable Install for anonymous user in the configuration package. If Validate Server is required, include any required Certificate Authority certificates, stored in Trusted Authorities. c. Onsight Connect Account Service Local Profile set to none, which ties it to the Anonymous User Wireless Profile. If ‘Skip’ is disabled set to either admin or another Local Service user profile that has the wireless network configuration. Application Note: Onsight Connect Service - 17 - © 2012 Librestream Technologies Inc. d. Configure User Name and Password manually on the Onsight Device. Set Allow saved network passwords and Respond automatically. Once the PEAP Network package has been delivered by OMS, a User must login by pressing Skip and complete the configuration 2. EAP-TLS requirements for Onsight Wireless Profile a. OMS Device Configuration Package containing Wireless Profile for EAPTLS b. Certificate Package: enable Install for anonymous user in the configuration package. Stored in My Certificates. Include any required Certificate Authority certificates, stored in Trusted Authorities. c. Onsight Connect Account Service Local Profile set to none, which ties it to the Anonymous User Wireless Profile. If ‘Skip’ is disabled set to either admin or another Local Service user profile that has the wireless network configuration. d. On the Onsight Device login as Anonymous User and manually configure Wireless network 802.1X Authentication settings. Select the certificate to use with the Wireless network and enter the Username so that it matches the certificate’s Issued user as specified in the Issued to field in the User Certificate section of the Authentication Settings for EAP-TLS. 3. PEAP-GTC requirements for Onsight Wireless Profile a. OMS Device Configuration Package containing Enabled PEAP-GTC option enabled. b. Onsight Connect Account Service Local Profile set to none, which ties it to the Anonymous User Wireless Profile. If ‘Skip’ is disabled set to either admin or another Local Service user profile that has the wireless network configuration. c. On the Onsight Device login as Anonymous User and manually configure Username, Password, and Token as required for the PEAP-GTC connection. Anonymous User Wireless Profile – WPA/WPA2 Personal Requirements 1. OMS Device Configuration Package containing Wireless Profile for WPA/WPA2 PSK (Pre-Shared Key/Network Password). Anonymous User Wireless Profile – FIPS Requirements 1. Enable FIPS and provide the Access ID in the OMS Device Configuration Package. Application Note: Onsight Connect Service - 18 - © 2012 Librestream Technologies Inc. Anonymous User Wireless Profile – Hotspot Login 1. Enable Hotspot login in the OMS Device Configuration Package. Anonymous User Wireless Profile – Proxy Settings 1. 2. 3. 4. Enable Use a proxy server. Enter the Proxy server’s Address and Port. If applicable, enable Bypass proxy server for local addresses. If applicable, enable Proxy Requires Authentication. a. Enter the User Name. b. Enter the Password. Application Note: Onsight Connect Service - 19 - © 2012 Librestream Technologies Inc. FAQ 1. Currently my device is running v5.0 (or v4.5) and all Users login using the ‘admin’ Username. When I update to v6.0 or higher how do I set up the device to use the Onsight Connect Service? a. Using OMS, set the Onsight Device Configuration parameter ‘Local Profile User Name’ to admin. This will allow you to use the same Wireless Profile for all users to connect using their Onsight Connect account. 2. Currently all Users login using a unique Username and Password, how do I set up the device to use Onsight Connect Service? Set the ‘Local Profile User Name’ on the Onsight Device: a. Best Practice: Configure the Anonymous User Profile to be used with Onsight Connect Service. See the Wireless Network Considerations Section. Or b. You can use one of the existing user accounts to associate with the Onsight Connect Service for the network connection at the login screen. However, this connection will be shared by all Onsight Connect Service Users. 3. Currently the Users login into the Onsight Device using unique or shared accounts and the Onsight Device is configured to use WPA-PSK or WPA2-PSK. Will the Onsight Device have access to the Onsight Connect Service using these Wireless Networks? a. Yes, in this case no further configuration is required to gain access to the Wireless network, the users will login using their Onsight Connect Account and will automatically connect to the wireless network. 4. I have several Onsight Devices in different time zones, how long will my Onsight Devices and Onsight PC’s be offline while the update is in progress? a. Onsight Devices: The Onsight Device v6.2 or higher Software update package can be pushed out without any interruption to your normal usage. Users can still login using the Local Service (admin, Skip or Username) after the update has been installed. However, if you want Onsight Device operators to begin using the Onsight Connect Service to login, the configuration packages must be pushed out from OMS (or manually configured) as outlined in this Setup Guide. Both the Local Service and Onsight Connect Service are supported on the Onsight Device in v6.2 and higher without the need for a Release Key. b. Onsight Expert/Onsight Connect for PCs: Once you have updated to v6.2 or higher, you will require your Onsight Connect Service username and password to login. Onsight Account Administrators must be sure all users Application Note: Onsight Connect Service - 20 - © 2012 Librestream Technologies Inc. are created in Onsight Account Manager before proceeding to update Onsight PC users to v6.2 or higher. Application Note: Onsight Connect Service - 21 - © 2012 Librestream Technologies Inc.