1
PRAELUDIUM III
PRAELUDIUM IV/E
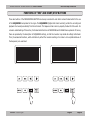
USER'S MANUAL / MANUALE D'ISTRUZIONI
ENGLISH/ITALIANO
PRAELUDIUM III
PRAELUDIUM IV/E
USER'S MANUAL
ENGLISH
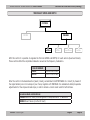
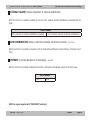
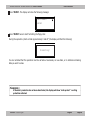
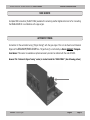
IMPORTANT SAFETY AND INSTALLATION INSTRUCTIONS
INSTRUCTION PERTAINING TO A RISK OF FIRE, ELECTRIC SHOCK, OR INJURY TO PERSONS.
ALARM SYMBOLS:
Generalmusic electronics products
could present labels similar to that
displayed in this section. Please follow
accurately the precautions descripted
in the safety instructions.
The exclamation mark within an equilateral triangle is
intended to alert.
The lightning flash with arrowhead symbol, within an equilateral triangle, is intended to alert the user to the presence of
uninsulated “dangerous voltage” within the product’s enclosure that may be of sufficient magnitude to constitute a risk of
electric shock to persons.
WARNING - When using electric products, basic precautions should always be followed, including the following:
1.
2.
Read all the Safety and Installation instructions and explanations of Graphic Symbols before using the product .
This product must be earthed. If it should malfunction or breakdown, grounding provides a path of least resistance for electric current to reduce the risk of electric shock. This
product is equipped with a cord having an equipment-grounding conductor and a grounding plug. The plug must be plugged into an appropriate outlet that is properly installed
and earthed in accordance with all local codes and ordinances.
DANGER - Improper connection of the equipment grounding conductor can result in a risk of electric shock. Check with a qualified electrician or serviceman if you are in doubt
as to whether the product is properly grounded. Do not modify the plug provided with the product, if it will not fit the outlet, have a proper outlet installed by a qualified electrician.
3.
To reduce the risk of injury, close supervision is necessary when this product is used near children.
4.
Do not use this product near water - for example, near a bathtub, washbowl, kitchen sink, in a wet basement, or near a swimming pool or the like.
5.
This product should only be used by a stand or cart that is recommended by the manufacturer.
6.
This product, either alone or in combination with an amplifier and headphones or speakers, may be capable of producing sound levels that could cause permanent hearing
loss. Do not operate for a long period of time at a high volume level or at a level that is uncomfortable. If you experience any hearing loss or ringing in the ears, you should
consult an audiologist.
7.
This product should be located so that its location or position does not interfere with its proper ventilation.
8.
This product should be located away from heat sources such as radiators, heat registers, or other products that produce heat.
9.
The product should be connected to a power supply only of the type described in the operating instructions or as marked on the product.
10. This product may be equipped with a polarized line plug (one blade wider than the other). This is a safety feature. If you are unable to insert the plug into the outlet, contact an
electrician to replace your obsolete outlet. Do not defeat the safety purpose of the plug.
11. The power-supply cord of the product should be unplugged from the outlet when left unused for a long period of time. When unplugging the power supply cord, do not pull on
the cord but grasp it by the plug.
12. Care should be taken so that objects do not fall and liquids are not spilled into the enclosure through openings.
13. The product should be serviced by qualified service personnel when:
A.
The power-supply cord or the plug has been damaged
B.
Objects have fallen, or liquid has been spilled into the product;or
C.
The products has been exposed to rain or moisture
D.
The product does not appear to be operating normally or exhibits a marked change in performance
E.
The product has been dropped, or the enclosure damaged.
14. Do not attempt to service the product beyond that described in the user-maintenance instructions. All other servicing should be referred to qualified service personnel.
15. WARNING - Do not place objects on product power cord or place it in a position where anyone could trip over, walk on or roll anything over it. Do not allow the product, or its
bench, or its pedal board to rest on or to be installed over power cords of any type. Improper installations of this type create the possibility of fire hazard and/or personal injury.
16. Electromagnetic interference (RFI). This electronic product utilizes digital sampled wave processing technology (S.W.P.) that may adversely affect radio/tv reception. Read FCC
information inside back cover for additional information.
SAVE THESE INSTRUCTIONS
PRAELUDIUM III - PRAELUDIUM IV/E - User's Manual
FOREWORD
FOREWORD
AHLBORN-ORGANUM/PRAELUDIUM is a Classical Organ line built with the most advanced DRAKE (DspRisc-Advanced-Keyboard-Engine) technology. The design authentically recalls with great precision the complex
sound parameters, that characterize the timbre and nuances of the classical pipe organ.
The following are significant functions and features of these instruments
1 ALTERNATIVE AND ACCESSORY STOPS
Each stop displayed in the instrument may avail itself of "Alternative stops" of exceptional sound quality. The
organist may freely select those stops which better respond to his/her personal taste; but, above all, select
the type of music repertoire he/she wants to play. In fact there are stops relating to many of the national
organ traditions and to many historic music trends.
In addition, there are "Accessory stops" which can be activated in each organ section (Swell, Great and
Pedal) by using tabs located in front of the instrument. These are special organ stops (horizontal and high
pressure reeds, tubular bells, Zimbelstern) with the addition of harpsichord and piano stops to be used as
necessary, to accompany vocal and instrumental ensembles.
2 ORGAN SETTING AND GENERAL CONTROLS
By using the CONTROLS button of the PROGRAMMING SECTION, it is possible to set the parameters of each
single stop and also to modify many general controls: tremolo regulation, manual inversion, "short octave",
historic and programmable, etc., to answer every organist's special need.
3 TRACKER TOUCH
As an alternative to the normal functioning of the organ, the organist may choose this special mode simulating
the touch of pipe organ with mechanic transmission action, controlling the sound attack and release. This
adjustable feature may add a more lively and personal performance.
AHLBORN Classical Organs
English
Page 1
PRAELUDIUM III - PRAELUDIUM IV/E - User's Manual
FOREWORD
3 SEQUENCER AND FLOPPY DISK DRIVE
The Sequencer and Floppy Disk Drive permit the concert player, the organ student, and the liturgical organist
to study, perfect and listen to personal performances with greater objectivity. This instrument is equipped with
a control unit for using the many functions characterized by the PROGRAMMING SECTION, positioned in the
front, with an alphanumeric display.
Users instructions are to be found in this manual in the general OPERATING PLAN, followed by illustrations on
single functions.
AHLBORN Classical Organs
English
Page 2
PRAELUDIUM III - PRAELUDIUM IV/E - User's Manual
INTRODUCTION
AHLBORN CLASSICAL ORGANS
The console of these instruments maintains the traditional requirements of pipe organs.
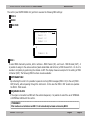
SWITCHING ON
The first time the instrument is turned on, a two minute decompressing phase for the sound library is required in order to utilize its
internal memory. The following indication will appear on the display, and it will disappear automatically when the decompression
is finished:
Wait Please!....
After the instrument is turned off, it will save the decompressed items relative to the sound library in memory thus avoiding any
waiting time for decompressing the organ next time it is turned on. This is possible because the instrument is equipped with a
backed memory which, once discharged, requires about three hours to recharge (the battery will last about five days). To update
the sound library it is necessary to force the decompressing and subsequent memory charge by pressing the EXIT button of the
PROGRAMMING SECTION while turning on the organ.
Organ Reset Procedure
It is possibile to restore the organ original factory setting (Voicing, Finishing), using the following procedure:
•
Switch on the organ keeping pressed the ENTER button of the PROGRAMMING SECTION for the entire initial
phase of bootstrap (Operating System Loading – more or less 5 seconds).
Attention! This procedure causes the deletion of all the editing executed in Voicing and Finishing section of the instrument. Please
take always care to save your data in the floppy disk driver.
STOPS
Control tabs carry the name of specific place stops. Each tab comprises a number of "Alternative stops" which can be freely selected by the organist. Three specific tabs, named REG. ACCESS. G.O./REC./PED. control special "Accessory stops" which can be
referred to any section of the organ. Detailed instructions are supplied on pages 16 -17 of this user's manual. The tabs are of the
light-up type: if the lower half of the tab is pressed, the stop will be activated, lighting up the tablet; if the upper part of the tab is
pressed, the corresponding stop will be deactivated and the light on the tab will turn off. Such a system permits a clear visualisation
of the stops drawn and correct use of the combination action. Tabs are numbered progressively above their name. The organist
may use this general number to quickly write down the selection chosen. The name of the stop is written on the central part of the
tab together with the number of "ranks" which form it. The bottom half of the tab shows the conventional "footage" of the stop.In
each section, stops are displayed from the lowest to the highest footage. When two stops have the same pitch, they appear in the
order given by the sound "family" to which they belong: Principals, Flutes and Bourdons, Strings, Mixtures, Undulating stops and
Reeds. This last group marked by red tabs is placed on the right-hand side of each section before the Couplers.
COUPLERS
Couplers I-Pedal and II-Pedal allow those stops which have been drawn on the manuals to play. Coupler I-II adds the stops drawn on
the Swell to the Great. The corresponding controls appear as TABS on the extreme right of the relative section. The thumb pistons
are "reversible": pressing once activates the couplers; pressing again, deactivates them. It is also possible to deactivate the couplers
manually when they have been activated with the thumb pistons and vice versa.
AHLBORN Classical Organs
English
Page 3
PRAELUDIUM III - PRAELUDIUM IV/E - User's Manual
INTRODUCTION
COMBINATION ACTION (BANK MODE - Default Setting)
This instrument offers 10 general combinations with 50 memories giving a total of 500 combinations with automatic
return to hand-set registration. The corresponding controls appear as THUMB PISTONS from 1 to 10 under Manual I.
THUMB PISTONS below Manual I (from left to right):
F
0
A.P.
T
COMBINATION SET
HAND-SET REGISTRATION
AUTOMATIC PEDAL
TUTTI
-/+
1 to 10
PL.I,PL.II
A
SELECTION OF MEMORY from 1 to 50
COMBINATIONS
PLENUM I, PLENUM II
GENERAL CANCEL
TO SET A COMBINATION:
1 Press the -/+ thumb pistons to set a memory. The corresponding memory in use will light up on the display. Each memory can store 10 different combinations.
2 Press the tabs of the desired registration.
3 Press and HOLD the F thumb piston and press any of the thumb pistons. The selected registration is now
memorised.
4 Bring all tabs to zero, using the A thumb piston and repeat the operation on thumb pistons which are still available.
When one memory is full, press the -/+ selector again and repeat the entire procedure to complete the other memories.
It is also possible to pass from one memory to another with an inserted combination. In such case, the memory number
on the display FLASH until inserted in a combination belonging to the newly selected memory.
TO MODIFY A STORED COMBINATION:
1 Press the numbered thumb piston corresponding to a previously memorised combination.
2 Add, cancel or change the stops required.
3 Press and HOLD the F thumb piston and press the same numbered thumb that was pressed in stage 1 above.
Release both pistons. The modified registration is now memorised.It is possible to effect a temporary change to the
combination by hand, without the use of the set control. In this case, if the same numbered thumb piston is pressed,
the original registration will be restored.
TO ERASE COMBINATIONS PARTIALLY OR TOTALLY:
1 Press the 'A' piston, checking that no stops are activated.
2 Select the memory which contains the combination you wish to erase.
3 Press and HOLD the 'F' thumb piston and press the numbered thumb pistons relative to the combination that is to be
cancelled. Its contents are now erased, whereas the contents of the other memories remain unchanged.
AHLBORN Classical Organs
English
Page 4
PRAELUDIUM III - PRAELUDIUM IV/E - User's Manual
INTRODUCTION
COMBINATION ACTION (SEQUENCE MODE)
This instrument offers 500 combinations with automatic return to hand-set registration. The corresponding controls
appear as THUMB PISTONS Manual I.
THUMB PISTONS below Manual I (from left to right):
F
COMBINATION SET
-/+
DECREMENTATION/INCREMENTATION
0
HAND-SET REGISTRATION
1 to 9, 0
NUMERICAL KEYS FOR DIRECT ADRESSING OF
COMBINATIONS
A.P. AUTOMATIC PEDAL
PL.I,PL.II, PLENUM I, PLENUM II
T
TUTTI
A
GENERAL CANCEL
TO SET A COMBINATION:
1 Press the tabs of the desired registration.
2 Press and HOLD the F thumb piston and press numerical keys. For position greater than 9, press numerical keys fast
one after the other. Release the keys. The combination you have choosen is flashing in the display. At this point the
registration is not memorised yet.
3 Press and HOLD the F thumb piston and press the "0" numerical thumb piston. Release both keys. The combination is
now saved and will be indicated permanently.
4 Bring all tabs to zero, using the A thumb piston and repeat the operation on thumb pistons still available.
TO MODIFY A STORED COMBINATION:
1 Call up a previously memorised combination. That operation is possible in 2 different ways :
a Press numbered thumb pistons (i.e. 7 or 3-4 or 4-2-7) The numerical call up will be executed with a short delay.
b Press - piston or + piston. Previous or next combination is called up without delay. In position General Memory = 0,
the - and + pistons have no effect. Actual memory will be indicated in the display.
2 Add, cancel or change the stops required.
3 Press and HOLD the F thumb piston and press the "0" numerical thumb piston. The modification is done. Release both
pistons. The modified registration is now memorized. It is possible to effectuate a temporary change to the combination
by hand, without using the set control. In this case, if the same numbered thumb is pressed, the original registration
will be stored.
TO ERASE COMBINATIONS PARTIALLY OR TOTALLY:
1 Select the memory which contains the combination you wish to erase.
2 Press the 'A' piston, checking that no stops are activated.
3 Press and HOLD the 'F' thumb piston and press "0" numerical thumb piston. It's content is now erased, while the
contents of the other memories remain unchanged.
• NOTE: Before every performance, make sure that the Crescendo is in the normal position (O)
AHLBORN Classical Organs
English
Page 5
PRAELUDIUM III - PRAELUDIUM IV/E - User's Manual
INTRODUCTION
AUTOMATIC RETURN TO HAND-SET REGISTRATION ('0'-PISTON):
While playing with a hand-selected registration, it may be necessary to use one or more combinations that have already
been fixed. In this way, the original hand-set registration will be either cancelled or modified. However, by pressing the
'0' piston, the original hand-set registration will be automatically restored. If you wish to cancel this also, press the General
Cancel piston 'A'.
PRESETS
The Presets are activated through the tumb pistons PL.I, PL.II, T. The corrisponding led indicators are located on
the
left of the display. Their contents are ADDED to the hand-set or combination registration inserted. They are:
PLENUM I, PLENUM II, TUTTI.
PROGRAMMABILITY OF THE PRESETS
All the presets indicated above can be programmed by the organist in the following manner:
1 Select the desired registration by means of the stop tabs.
2 Press and HOLD the 'F' thumb piston (to the extreme left under Manual I) and press one of the desired pistons.
Release both pistons. The selected registration is now memorised.
3 Press the General Cancel piston 'A' to turn off the tabs. Each time the reversible piston corresponding to the programmed preset is pressed, the stop tabs will NOT illuminate.
CRESCENDO (see note 3)
The Crescendo Pedal is located over the pedalboard, next to the swell expression pedal. The balanced pedal activates,
in gradual stages, 20 levels of sound intensity: from pp to ff. The Crescendo level is indicated on a digital display above
Manual II. The Crescendo operates on the entire organ, and its effect is ADDED to the registration either hand-set or
drawn by a combination piston.
PROGRAMMABILITY OF CRESCENDO (see note 3)
The contents of the 20 levels of the Crescendo are programmable by the organist as follows:
1 Move the Crescendo pedal to the position you wish to programme (a number from 1 to 20 appears on the display).
2 Select the desired registration by means of the stop tabs.
3 Press and HOLD the 'F' thumb piston (to the extreme left under Manual I) and press the piston marked '0' (situated
under Manual I) once. Release both pistons. The selected registration is now memorised.
4 Repeat operations 1, 2 and 3 for each Crescendo level required to be programmed.
5 Finally, press the General Cancel piston 'A' to switch off the tabs. Each time the Crescendo operates, the stop tabs
will NOT illuminate.
• NOTE 1:To visualize or not the Crescendo and the Preset contents visible, go to BLIND CMB control as described on page 40 (Generals).
• NOTE 3: only for organs supplied with it
AHLBORN Classical Organs
English
Page 6
PRAELUDIUM III - PRAELUDIUM IV/E - User's Manual
INTRODUCTION
AUTOMATIC PEDAL (operating mode "Normal")
For this useful device the reversible thumb piston A.P. is located below Manual I. The relative LED is located on the left of
the display). With Couplers I-PED and II-PED, this device engages only the Coupler corresponding to the Manual which is
played, excluding the other. If the Automatic Pedal is drawn together with TUTTI and CRESCENDO (see note 3), the stop
configuration on the Pedal is immediately adapted to the Manual being used.
PROGRAMMABILITY OF THE AUTOMATIC PEDAL (operating mode “Normal”)
In TUTTI and CRESCENDO (see note 3) the organist is free to programme his own modifications to the Pedal stops, when
the Automatic Pedal is inserted. To do so, carry out all the operations already described in the paragraphs "Programmability
of the Presets" and "Programmability of Crescendo" with the AUTOMATIC PEDAL INSERTED.
•
NOTE 1: In addition to the automatic Pedal function, it is also possible to select PEDAL to GREAT for a monophonic coupler of the
Great and Pedal stops. See at page 32 (Utilities).
BALANCES AND SWELL PEDALS
PRAELUDIUM III is equipped with volume controls for each of the sound sections:
1 GREAT VOLUME
Slider control is placed next to the Programming Section.
2 PEDAL VOLUME
Slider control is placed next to the Programming Section.
3 SWELL balanced pedal Is placed above the pedalboard.
Once the correct levels of Great and Pedal have been achieved, in relation to balance and environmental acoustics,
there should be no need to make frequent changes later. The swell pedal continuously changes the volume of the Swell
section, thus allowing any dynamic effect. The swell balanced pedal also modifies the timbre of the stops, analogous to
that which occurs in a pipe organ with the closure of the swell shutters.
TRANSPOSER
The Transposer is particularly useful when accompanying for voices or other instruments. The two transposer led buttons
that control this function are placed next to the Programming Section and are marked with the symbols # and b.
It is possible to vary the pitch of the music by 6 SEMITONES BELOW and by 6 SEMITONES ABOVE standard pitch.
The position of the Transposer will appear on the display only when it differs from normal: i.e. Transp. = +3
To erase rapidly the command, press the two buttons simultaneously.
• NOTE 2: Before every performance, when the Transposer is not required, make sure that it is in the normal position.
• NOTE 3: only for organs supplied with it
AHLBORN Classical Organs
English
Page 7
PRAELUDIUM III - PRAELUDIUM IV/E - User's Manual
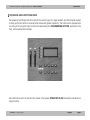
PROGRAMMING SECTION
PROGRAMMING SECTION
On the right side of the front panel above the keyboard is a section dedicated to the controls to modify the single
and general tabs of the instrument, and to the incorporated Sequencer and Floppy Disk Drive.
GENERAL INFORMATION
Use of the PROGRAMMING SECTION does not present difficulties as the sequence of the various functions
follow a constant system. It is however recommended, especially at the beginning, to follow the step-bystep instructions contained in this manual for specific items of each function. First, carefully examine the
exploratory examples of the various functions and controls, illustrated at the beginning of every paragraph
with system panels, to always have a clear view of their position. Keep in mind that all functions are carried
out in REAL TIME.
AHLBORN Classical Organs
English
Page 8
PRAELUDIUM III - PRAELUDIUM IV/E - User's Manual
DISPLAY
DISPLAY
All the functions carried out in this section are clearly visible on the alphanumeric liquid crystal DISPLAY (4 x
20) positioned in the front of the instrument.
GENERAL INFORMATION
After turning on the instrument, the display will show the name of the instrument, the indication of memory
position, and adjustable combinations; Crescendo (see note) (from 0 to 20) will appear in the lower right
side:
PRAELUDIUM IV
MEM= 1
CMB= 0
0
This is the starting position of the normal functioning of the organ
Note : only for organs supplied with it.
AHLBORN Classical Organs
English
Page 9
PRAELUDIUM III - PRAELUDIUM IV/E - User's Manual
PROGRAMMING SECTION: OPERATING BUTTONS
OPERATING BUTTONS
EXIT
EXIT
ENTER
ENTER
EXIT FROM THE FUNCTION IN USE OR FROM ITS VALUE.
ACCESS TO THE FUNCTION IN USE OR TO ITS VALUE
DECREASE OF THE FUNCTION IN USE OR TO ITS VALUE
INCREASE OF THE FUNCTION IN USE OR TO ITS VALUE
These four buttons are very important to set and modify the functions carried out in the PROGRAMMING
SECTION. Their use are illustrated in detail on pages 12-13 of this User's Manual SYSTEM PANELS.
AHLBORN Classical Organs
English
Page 10
PRAELUDIUM III - PRAELUDIUM IV/E - User's Manual
PROGRAMMING SECTION: FUNCTIONAL BUTTONS
FUNCTIONAL BUTTONS
CONTROLS
CONTROLS
DISK
REC
START
STOP
SELECTIONS AND MODIFICATIONS RELATIVE TO THE SINGLE TABS AND GENERAL CONTROLS
DISK
COMMANDS THE FUNCTIONS ON FLOPPY DISK DRIVE (incorporated)
REC
COMMANDS THE RECORDING ON SEQUENCER (incorporated).
START
STOP
COMMANDS THE START/STOP OF THE SEQUENCER
These four buttons are to be used together with the operative buttons for all possible modifications to the functions which relate to the single tabs and to the general controls of the instrument.
Their use is illustrated in individual paragraphs for each control.
AHLBORN Classical Organs
English
Page 11
PRAELUDIUM III - PRAELUDIUM IV/E - User's Manual
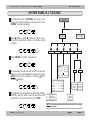
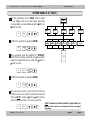
SYSTEM PANEL
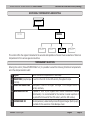
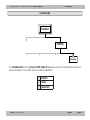
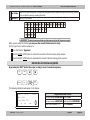
HOW TO OPERATE THE VARIOUS LEVELS OF A SYSTEM PANEL
This is a fundamental part of the User's Manual and it illustrates the exploration of the many OPERATING CONFIGURATIONS
introduced here. It is important to point out how each exploration is to be carried out by using the operative buttons
introduced in each dedicated SECTION (page 10).
BUTTON
FUNCTION
In the example here
shown, the control
"GENERALS" is being
explored with the voices it contains. They
can all be reached
through the "CONTROLS" button.
ENTER
CONTROL
To descend to the various exploration levels
VOICE
EXIT
To come up from the levels already explored
To move among the various options available
in the level and to vary the parameter value of
the single voices
Once the user has learned the exploration procedure shown in detail on this page, he/she will not find any difficulties in exploring
further FUNCTIONS or CONTROLS of the other System Panels contained in this User's Manual. Let's then start our exploration !
AHLBORN Classical Organs
English
Page 12
PRAELUDIUM III - PRAELUDIUM IV/E - User's Manual
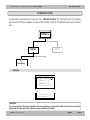
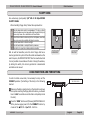
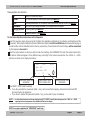
1 Press the CONTROLS button.
EXIT
SYSTEM PANEL
7 Press ENTER to confirm your choice.
EXIT
ENTER
ENTER
START
STOP
8 As explained in points 4 and 5, you can decide to make other
selections (by using the
DECR. or
INCR. buttons) or confirm
your last selection (by pressing ENTER). In the example below, the
option for the "Generals" control is confirmed by pressing ENTER.
2 The display will show the two FUNCTIONS: "Voicing" and "Finishing".
A cursor will indicate the position of the current option.
EXIT
ENTER
CONTROLS
DISK
REC
CONTROLS
Voicing
>Finishing
9 At this point the display will visualize the ten voices belonging to
the selected "Generals" control: Org.Tuning, Ensemble, Wind Sag,
GT/PD Encl, Mem.Lock, Ext Volume, Blind CMB, Contrast. Using
DECR. or
INCR. buttons and with the help of the cursor, select
3 To select one of the two FUNCTIONS, use the DECR. or INCR.
buttons (to explore the voices of "Generals" control, select the
the voice you wish to modify. Confirm your selection by pressing
function "Finishing" by pressing the ENTER button).
ENTER.
EXIT
ENTER
EXIT
ENTER
4 The display will flash the selected option. To the right, one or more
arrows indicate that you can make more selections, as there are
other controls in the function.
EXIT
10
Press
DECR. or
INCR. to modify the selected voice according
to its regulation range.
ENTER
EXIT
FINISHING
Tremulants
Utilities
Temperaments
11
DECR. or
INCR.
5 If you wish to change your selection, use the
buttons. If you wish to confirm your selection, press ENTER.
EXIT
6 Press
ENTER
DECR. or
EXIT
AHLBORN Classical Organs
ENTER
After the voice has been modified, you can follow the procedure
backwards by pressing EXIT at each step.
EXIT
ENTER
ENTER
INCR. to select "Generals" control.
EXIT
ENTER
REMINDER !!!
In our SYSTEM PANELS, it is called "voice" everything which is contained
within the squares with smooth corners. Always keep this as "starting
point" of your explorations !
REMINDER !
At all times it is possible to return to a normal starting position, from all
levels, by pressing the EXIT button for at least 2 seconds.
English
Page 13
PRAELUDIUM III - PRAELUDIUM IV/E - User's Manual
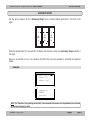
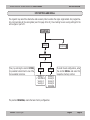
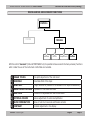
SECTION VOICING
FUNCTIONS OF THE "CONTROLS" BUTTON
1
EXIT
ENTER
CONTROLS
DISK
REC
START
STOP
By pressing the "CONTROLS" button the display will show the two functions: "Voicing" (selected according
to single tabs and their memorization) and "Finishing" (various accessory functions).
CONTROLS
VOICING
2
Press
DECR. or INCR.
FINISHING
buttons to select one of the two functions.
EXIT
3
ENTER
Make the selection as per point 2, then press "ENTER" to access the selection (in the example illustrated
in the following pages, the function "Voicing" has been selected).
EXIT
AHLBORN Classical Organs
ENTER
English
Page 14
PRAELUDIUM III - PRAELUDIUM IV/E - User's Manual
SECTION VOICING
SYSTEM PANEL N.1"VOICING"
1
The selected function "VOICING" will show on the
display the controls relative to the single tab. Press
"ENTER" to make a selection.
EXIT
2
ENTER
1
2
3
4
5
Altern. Reg.
Reg. Param.
Note Param.
Organ Preset
Voicing Memory
ENTER
Reg 1-->
F#0 Level
G0 Level
G#0 Level
In the display, the squares with smooth corners will
show the voices, contained within a single control (see
NOTE). They can be selected by using the
DECR.
or INCR. buttons.
EXIT
5
Finishing
Voicing
Press "ENTER" to confirm the selection.
EXIT
4
ENTER
Press
DECR. o INCR.
buttons to select one of
the controls (described in point 1) marked by circled
numbers.
EXIT
3
Controls
EXIT
ENTER
= -60db +6db
= -60db +6db
= -60db +6db
STORE
RECALL
Voicing 1
> VOICING 2
Voicing 3
Voicing 4
Voicing 1
Voicing 2
Voicing 3
Voicing 4
> ORIGINAL
F#6 Level = -60db +6db
1-> n. NAME OF SELECTED STOP
Level
Scal. Low
Scal. High
Realase
Pitch.Adj.
Tone Ctrl.
ENTER
The selected voice will always be written with CAPITAL
LETTERS, while the other voices will be written with
small letters. To exit this control, press "EXIT".
n.
3
3
> 3
3
=
=
=
=
=
=
flauto a camino 8'
flauto cavo 8'
FLAUTO STOPPO 8'
flauto traverso 8'
-60
-6
-6
0
-63
0
-0db
+6db
+6db
+20db
+63db
20
Preset 1
Preset 2
> PRESET 3
Preset 4
•NOTE : The parameters contained within the numbered squares, are described
in the following pages.
AHLBORN Classical Organs
English
Page 15
PRAELUDIUM III - PRAELUDIUM IV/E - User's Manual
SECTION VOICING
ALTERNATIVE STOPS
As mentioned in the Foreword, the organ has many "Alternative Stops". By entering this control, the display
will show the list of stops available in a single numbered tablet. A letter of the alphabet marks every alternative
stop.
CONTROLS
FINISHING
VOICING
1
Alternate Reg.
Example:
ALTERNAT. REG nn
.Cromorno 8'/a
> .CROMORNE 8'/B
.Clarinetto 8'/c
.cor.basset 8'/d
.vox humana 8'/e
REMINDER:
For a fast selection of the stops contained in the various tablets, press the chosen tablet for about two seconds: the
display will show the name of the alternative stops available for this tablet.
AHLBORN Classical Organs
English
Page 16
PRAELUDIUM III - PRAELUDIUM IV/E - User's Manual
SECTION VOICING
ACCESSORY STOPS
Use the same procedure for the "Accessory Stops" three numbered tablets positioned in the front of the
organ:
29
30
31
REG.
ACCESS.
REG.
ACCESS.
REG.
ACCESS.
G.O.
REC.
PED.
Press the selected tablet for two seconds; the display will show the names of all accessory stops available in
the organ.
Stops can be inserted in one or more sections (G.O./Rec./Ped.) and are operated by activating the respective
tablets.
Example:
ALTERNAT. REG nn
.Chamade 8'/a
.Campane (g-g)
.zimbelstern
> .CEMBALO
.pianoforte
NOTE: The "Zimbelstern" stop (rotating star with bells) is not connected to the manuals or to the pedalboard, but is activated
or deactivated through the tablet.
AHLBORN Classical Organs
English
Page 17
PRAELUDIUM III - PRAELUDIUM IV/E - User's Manual
SECTION VOICING
VOICING (Reg. Parameters)
With this control it is possible to modify in his values the following parameters of "voicing" for each single
stop:
1 LEVEL
2 SCALING
3 RELEASE
4 PITCH ADJUSTMENT
5 TONE CONTROL
Controls
Voicing
Finishing
2
Reg. Param.
1-> n. NAME OF SELECTED STOP
Level
=
-0db
Scal. Low = -6 +6db
Scal. High = -6 +6db
Realase
= 0 +20db
Pitch.Adj. =
+63db
Tone Ctrl. = 0 20
REMINDER:
For a fast selection of the stops contained in the various tablets, press the chosen tablet for about two seconds: the
display will show the name of the alternative stops available for this tablet.
AHLBORN Classical Organs
English
Page 18
PRAELUDIUM III - PRAELUDIUM IV/E - User's Manual
SECTION VOICING
LEVEL
1
With this control, it is possible to increase or decrease the volume of each stop.
VALUE RANGE
from
0 dB (maximum level) to
- 60 dB(OFF level)
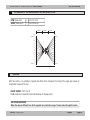
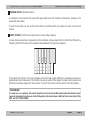
SCALING
2
With this control, it is possible to gradually increase or decrease the cound volume of extreme parts (bass and
treble) of a single stop.
VALUE RANGE
A
SCALING LOW (bass part) from -6dB
SCALING HIGH (treble part) from -6dB
to
to
+6dB
+6dB
EXTENSION OF THE ADJUSTMENTS IN THE MANUAL STOPS
LOW (bass part)
HIGH (treble part)
= From C1 to F3
= To F#3 to C6
��������
��������
��������
��������
��
������
��
��
��
��
��
��
���� ��
��
��
��
��
��
�
�
��
��
��
��
��
������
��
��
��
��
��
���� ��
���
AHLBORN Classical Organs
��������
����
English
Page 19
PRAELUDIUM III - PRAELUDIUM IV/E - User's Manual
B
SECTION VOICING
EXTENSION OF THE ADJUSTMENTS IN THE PEDAL STOPS
LOW (bass part)
HIGH (treble part)
= From C1 to F2
= From F#2 a G3
��������
��������
��������
��
������
��
��
��
��
��
��
������
��
��
��
��
��
�
�
��
��
��
��
��
������
��
��
��
��
��
������
���
3
����
RELEASE
With tihs control, it is possible to regulate the effect which simulates the moment the organ pipe ceases to
sound after release of the key.
VALUE RANGE: from 0 to 20
The 0 position corresponds to the total absence of release sound.
IMPORTANT REMINDER
When the calue is different from 0, the organist may check the range of release value through the touch.
AHLBORN Classical Organs
English
Page 20
PRAELUDIUM III - PRAELUDIUM IV/E - User's Manual
4
SECTION VOICING
PITCH ADJUSTMENT
•RECIPROCAL TUNING RELATIONSHIP BETWEEN SEVERAL STOPS.
With this control, it is possible to create various acoustic undulations between stops in order to avoid an
unnatural sound inactivity of the ensemble. This regulation should be carried out by inserting TWO OR
MORE STOPS (even on different sections with Couplers), one of which will be the object of the regulation
with respect to the others.
VALUE RANGE
from
- 63
to
+ 63
The intermediate 0 position corresponds to the total absence of acoustic undulations.
Negative values FLATTEN the sound, and positive values SHARPEN the sound.
Example:
Stops
Principal 8'
Flute 8'
diff.
I case II case III case
+26
+32
+37
+13
-10
-18
13
42
55
Case I
light undulation
Case II
strong undulation
Case III
very strong undulation
It is advisable to establish larger differences for the low stops (16' - 8') and smaller differences for the higher
stops (4' - 2' Mutations-Mixtures), as the undulation effect turns out to be very marked with the latter. Given
the complex and delicate nature of this variation, the organist can avoid extreme and unnatural solutions,
by following his/her musical awareness. This control regulates also the speed of the acoustic undulation of
the organ' s undulating stops (as Unda maris/Vox coelestis, etc.).
IMPORTANT REMINDER
The PITCH ADJUSTMENT control is strictly related to the value assigned to the ENSEMBLE control (see description
in page 38 ). It is recommended to regulate it at a medium level (2 or 3) before starting the current adjustment.
4
TONE CONTROL
With this control, it is possible to reduce (filter) the high frecuency portion of each stop.
VALUE RANGE
AHLBORN Classical Organs
from
0 (maximum filtering) to
20 (absent filtering)
English
Page 21
PRAELUDIUM III - PRAELUDIUM IV/E - User's Manual
SECTION VOICING
VOICING (Note Parameters)
Acces to this control is possible to regulate the volume of each note in each single stop:
VALUE RANGE
from
+ 6 dB (maximum level)
to
-60 dB (OFF level)
This control is especially useful when undesirable resonance acoustic effects occur on some notes of a stop.
Controls
Voicing
Finishing
3
Note Param.
Reg 1--> n.
F#0 Level = -60db
G0 Level = -60db
G#0 Level = -60db
+6db
+6db
+6db
REMINDER!
1)
For a fast selection of the stops contained in the various tablets, press the chosen tablet for about two seconds: the
display will show the name of the alternative stops available for this tablet.
2)
For a fast note selection, simultaneously press the "F" Fixer and the note (Manual I) you intend to modify.
AHLBORN Classical Organs
English
Page 22
PRAELUDIUM III - PRAELUDIUM IV/E - User's Manual
SECTION VOICING
ORGAN PRESETS
With this control, it is possible to select one of the four configurations of alternate stops (Presets) set by the
factory for the entire organ.
Controls
Voicing
Finishing
4
Organ Preset
Preset 1
Preset 2
> PRESET 3
Preset 4
AHLBORN Classical Organs
English
Page 23
PRAELUDIUM III - PRAELUDIUM IV/E - User's Manual
SECTION VOICING
STOP SETTING AND RECALL
The organist may select the alternative and accessory tabs to enable the organ single tablets. His programmation comprend also all the voicing data (see from page 18 to 22), thus creating his own voicing settings for the
entire organ or part of it.
Controls
Voicing
Finishing
5
Voicing Memory
Then, by entering the control STORE,
it is possible to store them in one of the
four available memories.
STORE
RECALL
Voicing 1
> VOICING 2
Voicing 3
Voicing 4
Voicing 1
Voicing 2
Voicing 3
Voicing 4
> ORIGINAL
To recall the set configuration, enter
the control RECALL and select the
respective memory number.
The position ORIGINAL, resets the basic factory configuration.
AHLBORN Classical Organs
English
Page 24
PRAELUDIUM III - PRAELUDIUM IV/E - User's Manual
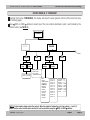
CONTROLS BUTTON FUNCTIONS (Finishing)
SYSTEM PANEL N. 2 "FINISHING"
1
Selecting the function "FINISHING", the display will show the seven general controls of the instrument (see
the following page).
2
Press
DECR. or INCR.
buttons to select one of the nine controls described in point 1 and marked by the
circled number (see NOTE 1).
CONTROLS
FINISHING
VOICING
...follows
1.
2
3.
4
Tremulants
Utilities
Temperaments
Generals
Tremulants
Swell
Tremulants
Great
Speed = 2.0Hz 6.3Hz
> Depth = 1.0db 6.0db
Temper.
selection
Temper.
Editing.
Tracker = On/Off
> ShortOct= Yes/No
Man. Inv.=Yes/No
AP=Normal/Ped->GT mono
Equal
Meantone
Modif.Meant.(Norden)
Werkmeister III
> KIRNBERGER III
Neidhardt III
Tartini/Vallotti
D'Alembert
Kellner (1976)
Free temp.1
Free temp.2
Free temp.3
Free temp.4
note=C
note=C#
note=D
note=D#
note=E
note=F
note=F#
note=G
note=G#
note=A
note=A#
note=B
0.0c
0.0c
0.0c
0.0c
0.0c
0.0c
0.0c
0.0c
0.0c
0.0c
0.0c
0.0c
Org. Tuning
Ensemble
> Wind Sag
GT/PD Encl
Mem.Lock
MasterOnIP
Ext. Volume
BlindCMB
Contrast
=
=
=
=
=
=
=
=
=
0.0c
1 8
0 8
Yes/No
Yes/No
Ext/Int
0 127
Yes/No
0 15
NOTE 1: Circled numbers always marks the controls. When the number is followed by a dot (see controls n. 1 and 3) it
means that the control contains other sections that can be selected by using the
DECR. or INCR.
buttons.
AHLBORN Classical Organs
English
Page 25
PRAELUDIUM III - PRAELUDIUM IV/E - User's Manual
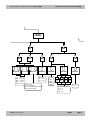
CONTROLS BUTTON FUNCTIONS (Finishing)
FINISHING
... follows
5.1.1
5.
6.
MIDI
Effects
5.
5.2.
5.3.
6.1
6.2
MIDI 1
MIDI 2
MIDI Pipe
Reverb
3D effect
5.1.3
6.1.1
6.1.2
6.1.1
Pipe MIDI Channel
Reverb selection
Reverb editing
INT.3D Effect
5.2.1
MIDI Channel (In)
Swell
=
Great
=
> Pedal
=
Common=
5.1.2
5.2.2
MIDI Channel (Out)
1� 16, Off
1� 16, Off
1� 16, Off
1� 16, Off
AHLBORN Classical Organs
5.1.3
5.2.3
MIDI Functions
Swell = 1�16,Off
Great = 1��16,Off
>Pedal = 1�16,Off
Softw.Thru =
Seq. Clock =
>Plug Type =
Keyb.Union =
Yes/No
Internal/External
Midi/PCFast/PCSlow/Mac (solo su MIDI1)
Yes/No (solo su MIDI2)
Rev. OFF
Preset 1
Preset 2
> PRESET 3
Preset 4
6.1.2.1
6.1.2.2
6.1.2.3
6.1.2.4
Preset 1
Preset 1
Preset 1
Preset 1
Type = RECITAL ROOM � CHURCH
Level = 0 � 60
> Time = 0 � 127
Delay = 0 � 127
English
Size = 0 � � 127
Page 26
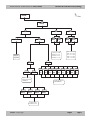
PRAELUDIUM III - PRAELUDIUM IV/E - User's Manual
CONTROLS BUTTON FUNCTIONS (Finishing)
... follows
FINISHING
7.
Channeling
7.1
7.2
Output
7.3
Inputs
7.1.1
7.2.1
7.1.2
Channel. Selection
Aux IN 1
Channel. Editing
Equalizers
7.2.2
7.3.1
Aux IN 2
Bass
Mid Lo
Mid
Mid Hi
Treble
Input Level = +12 --> -60db
>To Reverb = 0%--> 100%
To Internal = 0%--> 100%
To External = 0%--> 100%
Single Reg.
>Reg. Family
7.3.2
Internal
External
= -12 ---> +12db
= -12----> +12db
= -12----> +12db
= -12----> +12db
= -12----> +12db
1.2.2
1.2.1
Single Reg.
Reg. Family
7.1.2.1.1
7.1.2.1.2
Chest Layout
Output Matrix
7.1.2.2.1
7.1.2.2.2
7.1.2.2.3
7.1.2.2.4
Swell
Flues
Swell
Reeds
Swell
Great
Flues
Reg.1-->n.
>Chest type= Cusp L-->Mono R
To Matrix N=1-->4
Access.
7.1.2.2.5
Great
Reeds
7.1.2.2.6
7.1.2.2.7
7.1.2.2.8
7.1.2.2.9
Great
Pedal
Flues
Pedal
Reeds
Access.
Access.
Pedal
>Chest type= Cusp L-->Mono R
>Output= Internal/External
7.1.2.1.2.1
7.1.2.1.2.2
7.1.2.1.2.3
7.1.2.1.2.4
Matrix IN 1
Matrix IN 2
Matrix IN 3
Matrix IN 4
To internal = 0%-->100%
> To External= 0%-->100%
AHLBORN Classical Organs
English
Page 27
PRAELUDIUM III - PRAELUDIUM IV/E - User's Manual
CONTROLS BUTTON FUNCTIONS (Finishing)
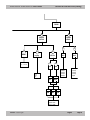
FINISHING
8.1
Reverb.
8.
9.
ADVANCED
FUNCTIONS
FINISHING
MEMORY
Language
> English
German
Dutch
9.2
Store
Recall
8.3.
8.2
To internal=0%->100%
To ext.
=0%->100%
9.1
MIDI Filter
8.3.1.
8.3.2.
MIDI 1
MIDI 2
8.3.1.1.
8.3.1.2.
Input
Output
8.3.1.1.1
8.3.1.1.2
8.3.1.1.3
Swell
Great
Pedal
Finishing 1
Finishing 2
> Finishing 3
Finishing 4
Finishing 1
Finishing 2
Finishing 3
Finishing 4
> Original
> Note
= Yes/No
Registers = Yes/No
Ctrl.Chg. = Yes/No
AHLBORN Classical Organs
English
Page 28
PRAELUDIUM III - PRAELUDIUM IV/E - User's Manual
CONTROLS BUTTON FUNCTIONS (Finishing)
TREMULANT SPEED AND DEPTH
CONTROLS
VOICING
FINISHING
1.
Tremulants
2
Utilities
3.
Temperaments
4
Generals
With this control it is possible to regulate the Tremolo SPEED and DEPTH, for each section (Swell and Great).
These controls affect the amplitude modulation as well as the frequency modulation.
VALUE RANGE:
SPEED:
DEPTH:
from 2.0 to 6.3 Hz
from 1.0 to 6.0 dB
Enter the control in the desired section (Swell / Great), as illustrated in SYSTEM PANEL N. 2. Insert (by means of
the organ tablets) one or more stops of your choice, together with TREMOLO. It is advisable to attempt separate
adjustments for flue stops and reed stops, in order to obtain a correct result valid for both families.
Recommended combinations:
FLUES:Bourdon 8' alone /Viola da gamba 8' alone/Bourdon 8' + Nazardo 2
REEDS:Oboe 8' alone (or other 8' reed)
AHLBORN Classical Organs
'
2/3
English
Page 29
PRAELUDIUM III - PRAELUDIUM IV/E - User's Manual
CONTROLS BUTTON FUNCTIONS (Finishing)
USEFUL FUNCTIONS (MANUAL AND PEDALBOARD)
CONTROLS
VOICING
FINISHING
1.
Tremulants
2
Utilities
3.
Temperaments
4
Generals
With this control it is possible to have access to useful functions pertaining to the organ general setting:
1
TRACKER TOUCH
(Mechanical Action)
2
SHORT OCTAVE
(The first lower octave set as in some antique organs)
3
MAN. INVERSION
(Manuals Inversion)
4
AUTOMATIC PEDAL
(Dual function for the Automatic Pedal)
AHLBORN Classical Organs
English
Page 30
PRAELUDIUM III - PRAELUDIUM IV/E - User's Manual
1
CONTROLS BUTTON FUNCTIONS (Finishing)
TRACKER TOUCH (Mechanical action)
As indicated in the foreword, this organ offers pipe organ touch with mechanic transmission, working on the
sound start and release.
To insert this function, set the control to ON. When in the OFF position, the organ will return to the normal
function.
2
SHORT OCTAVE (The first lower octave set as in some antique organs)
In many European countries, but especially in Italy and Spain, antique organs from the 16th to the 18th century,
frequently had the first octave of the keyboard and pedalboard, following this sequence:
D
re
C
do
F
fa
E
mi
G
sol
B
si
A
la
B
si
C
do
This is called "short octave". The music originally written for these organs is difficult or impossible to execute on
keyboards with normal extension. This function may also be useful to the organist to study musical pieces to be
performed on antique organs with "short octave". To insert this function, set the control on the YES position.
REMINDER !
To avoid errors or confusion, this control should be set on the normal NO position when the function is not
required. Remember that when set on the YES position (the short octave is ON) the first 4 notes, from DO to
RE#, are NOT FUNCTIONING.
AHLBORN Classical Organs
English
Page 31
PRAELUDIUM III - PRAELUDIUM IV/E - User's Manual
3
CONTROLS BUTTON FUNCTIONS (Finishing)
MANUAL INVERSION (Manuals Inversion)
The inversion is possible with: GREAT on man. II /SWELL on man. I This function can facilitate the execution
of certain organ works and can be useful for studying in preparation for playing a pipe organ with a different
manual configuration. To insert this function, set the control on the YES position.
REMINDER !
To avoid errors or confusion, this control should be set on the normal NO position when the function is not
required.
4
AUTOMATIC PEDAL (Dual function for the Automatic Pedal)
With this control it is possible to select one of the following AUTOMATIC PEDAL functions:
1) Normal
The normal functioning of AUTOMATIC PEDAL and its programmability have been illustrated at page 6 of
this User's Manual INTRODUCTION.
2) PED GT mono (Monophonic union of Great and Pedal stops).
This is a special function offered in addition to the normal AUTOMATIC PEDAL.
Insert one or more stops in the Pedal, then play the Great manual. The stops will couple with the
keyboard "monophonically": that is, they adjust to the lowest pitched note of the chord.
This happens automatically in the first two and a half octaves of the keyboard (DO-1/SOL-3).
This function can be useful to obtain more support when accompanying choral singing, without using the
pedalboard.
To select the normal functioning of the automatic pedal, set on the Normal position. To select the monophonic
function, set on PED. GT mono.
REMINDER !
To avoid errors or confusion, this control should be set on the Normal position when the function is not
required.
AHLBORN Classical Organs
English
Page 32
PRAELUDIUM III - PRAELUDIUM IV/E - User's Manual
CONTROLS BUTTON FUNCTIONS (Finishing)
HISTORICAL TEMPERAMENTS AND EDITING
CONTROLS
VOICING
FINISHING
1.
Tremulants
2
Utilities
3.
Temperaments
4
Generals
This control offers the organist interested in the accurate interpretation of ancient music a selection of historical
temperaments from various ages and countries.
TEMPERAMENT SELECTION
Entering this control (follow SYSTEM PANEL N. 2) it is possible to select the following 9 historical temperaments
and 4 free temperaments to edit:
1
2
3
4
5
EQUAL
This is the normal temperament in use today.
MEANTONE (1/4 syntonique In use from the 16th to the 18th century throughout Europe.
comma).
MODIFIED MEANTONE
Developed in 1688 for the organ "Schnitger" of the Ludgeri Church in
Norden, Germany.
WERCKMEISTER III
Proposed in 1691 by the organist and musical theoretician Andreas
Werckmeister, it is recommended for the German musical repertoire of
the period from the end of the 17th century until the 18th century.
KIRNBERGER III
This temperament, elaborated by Johann Philipp Kirnberger (Bach's pupil),
is suitable for the execution of late Baroque music.
AHLBORN Classical Organs
English
Page 33
PRAELUDIUM III - PRAELUDIUM IV/E - User's Manual
6
NEIDHARDT III
7
TARTINI-VALLOTTI
8
D'ALEMBERT
9
KELLNER
CONTROLS BUTTON FUNCTIONS (Finishing)
This temperament is quite similar to the Equal. It was developed in 1724 by
the musical theoretician Johann Georg Neidhardt.
This Italian temperament, developed in 1754 by Francescantonio Vallotti and
described by Giuseppe Tartini, was later revived in England by Thomas Young.
It can be effectively used for the 18th century Italian repertoire.
This temperament, described in 1752 by Jean Le Rond D'Alembert, represents
the "accord ordinaire" in use in France in the 17th and 18th century. It is
therefore suitable for French music of that period.
This is a modern temperament elaborated in 1976 by the musicologist Herbert
Anton Kellner for the execution of Bach music. It is based on theological concepts
associated to the mystic of numbers.
Memories available for the organist to edit the temperaments.
10
FREE TEMP. 1
11
FREE TEMP. 2
12
FREE TEMP. 3
13
FREE TEMP. 4
AHLBORN Classical Organs
English
Page 34
PRAELUDIUM III - PRAELUDIUM IV/E - User's Manual
CONTROLS BUTTON FUNCTIONS (Finishing)
TEMPERAMENT EDITING (programmable temperaments)
Four temperaments can be edited (follow SYSTEM PANEL N.2); especially sections called:
FREE TEMPERAMENT 1 - 2- 3- 4.
The system used is that of "value ratio in cents" (+ or -) with respect to the normal equal temperament (value
0.0).
Temperament operation is executed on one octave of the keyboard (from C to B) and the values given to
each single note are automatically transmitted in "real time" to the ENTIRE ORGAN. It is strongly advisable to
execute all the acoustic trials using the central octave (C3-B3) of the Great, with the Principal 8' stop, as the
point of reference. This allows an accurate evaluation of the acoustic undulations of the intervals examined to
develop the temperament.
FREE TEMP. 1 :
> note=C
note=C#
note=D
+ 0.4 c.
+ 0.4 c.
+ 0.4 c.
1
Disable all stops and insert only PRINCIPAL 8' of the Great
2
Follow the instructions illustrated in pages 12-13 of this User's Manual, SYSTEM PANELS, to come to the chosen
FREE TEMP. and start to edit your temperament (see example on the display);
The value of each note increases or decreases of 1/10 cents (0.1).
REMINDER !
1)
The TONE TRANSPOSER of the instrument functions only when you insert the normal temperament
EQUAL (Equal A-440). When the historical temperaments or temperaments to edit are in use, the
Transposer is automatically disabled.
2)
Historical temperaments and temperaments to edit function only on DIAPASON LA-440. To modify the
diapason, use control ORGAN TUNING, and follow the instructions illustrated in section "Generals" of
this User's Manual.
AHLBORN Classical Organs
English
Page 35
PRAELUDIUM III - PRAELUDIUM IV/E - User's Manual
CONTROLS BUTTON FUNCTIONS (Finishing)
The notes are positioned in the following order (increasing or decreasing):
C
C#
D
D#
E
F
F#
G
G#
A
A#
B
REMINDER:
For a faster notes selection, PRESS SIMULTANEOUSLY the fixer "F" and the note that you wish to modify
(from any octave of Manual I only).
NOTE: To edit temperaments it is necessary to have a theoretical as well as practical knowledge of the
matter. However it can be easily carried out by following the tables of value ratio in cents for each note,
supplied by specialized texts.
AHLBORN Classical Organs
English
Page 36
PRAELUDIUM III - PRAELUDIUM IV/E - User's Manual
CONTROLS BUTTON FUNCTIONS (Finishing)
MISCELLANEOUS AND ACCESSORY FUNCTIONS
CONTROLS
VOICING
FINISHING
1.
2
3.
4
Tremulants
Utilities
Temperaments
Generals
With the control "Generals" (follow SYSTEM PANEL N.2) it is possible to have access to the many accessory functions
which render the use of the instrument comfortable and versatile.
1
ORGAN TUNING
Fine pitch adjustment of the instrument
2
ENSEMBLE
Ensemble effect of the stops
3
WIND SAG.
(Slight reduction of pressure of the bellows in rich stops combinations)
4
GREAT-PEDAL ENCLOSED
Expression to the Great and Pedal
5
MEM. LOCK
Protection of adjustable and fixed combinations
6
EXTERNAL VOLUME
Volume adjustment of external amplification
7
BLIND COMBINATION
Show or hide the Crescendo and Presets contents
8
CONTRAST
Contrast adjustment in the display
AHLBORN Classical Organs
English
Page 37
PRAELUDIUM III - PRAELUDIUM IV/E - User's Manual
1
CONTROLS BUTTON FUNCTIONS (Finishing)
ORGAN TUNING (Fine pitch adjustment of the instrument)
VALUE RANGE
From -100.0 cents (- 1 semitone)
To + 100.0 cents (+1 semitone)
The intermediate position of 0.0 cents corresponds to the perfect tuning of the instrument, according to diapason
LA - 440 Hz.
With this control it is possible to fine-tune the pitch of the organ in relation to another musical instrument (or to
modify the diapason of an historical or programmable temperament).
2
ENSEMBLE (Ensemble effect of the stops)
With this control it is possible to increase or decrease the depth of the acoustic undulation among the various
stops, having previously done an adjustment using the control PITCH ADJUSTMENT. If the undulation ratio
between the stops is =0, the control ENSEMBLE will not work.
VALUE RANGE
From 1 (minimum undulation)
To 8 (maximum undulation).
1
Insert (using the organ stops) a fairly rich stop, on the manuals as well as the pedal.
2
Reach the desired value and verify the ensemble effect.
AHLBORN Classical Organs
English
Page 38
PRAELUDIUM III - PRAELUDIUM IV/E - User's Manual
3
CONTROLS BUTTON FUNCTIONS (Finishing)
WIND SAG (Slight reduction of pressure of the bellows in rich stops combinations)
With this control it is possible to create the typical bellows effect which, when playing the organ with rich stops
combinations (such as Ripieni and Tutti),it will have a slight reduction of pressure.
Once the control has been set, it affects the polyphony singularly on every section, increasing the ensemble
effect.
From 0 (absence of effect)
4
VALUE RANGE
to 8 (maximum effect)
GREAT-PEDAL ENCLOSED (Expression to the Great and Pedal)
With this control the EXPRESSION pedal simultaneously controls the volumes for Swell Organ, Great Organ and
Pedal disconnecting the relative slider controls.
This is the pedal to be used for this function:
Expression II (Swell)
REMINDER !
In normal operating conditions, ensure that the control is set to the NO position.
5
MEM. LOCK (Protection of adjustable and fixed combinations)
With this control it is possible to inhibit the fixing function on the adjustable combinations, fixed combinations
(Mixture, Reeds, Tutti) and the contents of the Crescendo, thus avoiding the accidental modification of stop
contents.
AHLBORN Classical Organs
English
Page 39
PRAELUDIUM III - PRAELUDIUM IV/E - User's Manual
6
CONTROLS BUTTON FUNCTIONS (Finishing)
EXTERNAL VOLUME (Volume adjustment of external amplification)
With this control it is possible to adjust the volume of the possible external amplification connected with the
organ.
VALUE RANGE
From 0 (volume of external amplification excluded)
To 127 (maximum volume of external amplification)
7
BLIND COMBINATION (Show or hide the Crescendo and Presets contents)
- see note -
With this control it is possible to visualize or not the Crescendo and Presets contents (Plenum I, Plenum II and
Tutti).
7
CONTRAST (Contrast adjustment in the display)
- see note -
With this control it is possible to adjust the contrast on the liquid crystal display (4x20) of the front panel.
VALUE RANGE
From 0
To 15
NOTE: for organs supplied with "CRESCENDO" pedal only
AHLBORN Classical Organs
English
Page 40
PRAELUDIUM III - PRAELUDIUM IV/E - User's Manual
MIDI SETTING
MIDI SETTING
CONTROLS
FINISHING
5.
MIDI
MIDI (Musical Instrument Digital Interface) is a standard code for interchange of data between musical instruments. The principal advantage of MIDI lies in the possibility of connecting different instruments by means of
simple IN-OUT-THRU connections, permitting a reciprocal exchange of information. The information exchanged
via MIDI concerns the primary operations carried out by the instruments. In practice, it is possible to "play"
another MIDI compatible instrument by means of the organ keyboards, or vice-versa. Connecting, for example,
the organ MIDI OUT socket to the MIDI IN socket of another instrument, it is possible to play both instruments
by means of the organ keyboards and pedalboard. The MIDI THRU socket enables more than two instruments to
be connected with one another, utilizing the first as principal transmitter. Two complete MIDI sockets (IN-OUTTHRU), which can be monitored independently, are available in the instrument. It is suggested to use the MIDI
2 socket for the installation of equipment to be connected permanently to the organ (i.e.: in combination with
a pipe organ or with a classic organ Archive Module). The MIDI control (see SYSTEM PANEL N.2) offers the possibility to select, activate and deactivate the MIDI channels assigned to each organ section, separating all entering settings (MIDI IN) from exiting settings (MIDI OUT). It is also possible to select the use of the INTERNAL or
EXTERNAL CLOCK in case of a connection of the organ via MIDI with an external Sequencer.
AHLBORN Classical Organs
English
Page 41
PRAELUDIUM III - PRAELUDIUM IV/E - User's Manual
MIDI SETTING
The control (see SYSTEM PANEL N.2) permits to execute the following MIDI settings:
1
MIDI 1
2
MIDI2
3
MIDI PIPE
MIDI2 CHANNELL (OUT)
Swell = 1
> Great = 2
Pedal = 4
Common = 16
1
MIDI 1
To select MIDI channels by section, both in entrance - MIDI Channel (IN) - and in exit - MIDI Channel (OUT) - it
is possible to assign to the various sections (Swell-Great-Pedal and Common) a MIDI channel from 1 to 16 or to
exclude it completely by positioning the channel on OFF. The display shows an example for the setting of MIDI
2 Channel (OUT). The following MIDI functions are also available:
A
SOFTWARE THRU
By activating this control it is possible to pass all incoming MIDI messages (MIDI 1 IN) to the exit (MIDI 1
OUT) directly, without passing through the instrument. In this case the MIDI 1 OUT socket also operates
the MIDI 1 THRU socket.
B
SEQUENCER CLOCK
if the organ is connected via MIDI with the external Sequencer, it is possible to select the use of INTERNAL
or EXTERNAL CLOCK with this control.
REMINDER !
If this function is set as External on MIDI 1, it will automatically be forced as Internal by MIDI 2.
AHLBORN Classical Organs
English
Page 42
PRAELUDIUM III - PRAELUDIUM IV/E - User's Manual
C
PLUG TYPE permits the following settings:
Midi
PC Fast/PC Slow
MAC
2
MIDI SETTING
Qualification for the functioning of MIDI 1 socket (IN-OUT-THRU)
Qualification for the functioning of the COMPUTER socket for connections with
PC/Windows. Should you encounter problems with PC Fast, it is suggested
to use PC Slow.
Qualification for the functioning of the COMPUTER socket for a connection
with Macintosh.
MIDI 2
Same functioning possibilities to select MIDI channels by section (Swell-Great-Pedal and Common) as described
in previous paragraph MIDI 1.
The following MIDI functions are also available:
A
SOFTWARE THRU
By activating this control it is possible to pass all incoming MIDI messages (MIDI 2 IN) to the exit (MIDI 2
OUT) directly, without passing through the instrument. In this case the MIDI 2 OUT socket also operates
the MIDI 2 THRU socket.
B
SEQUENCER CLOCK
If the organ is connected via MIDI with the external Sequencer, it is possible to select the use of INTERNAL
or EXTERNAL CLOCK with this control.
REMINDER !
If this function is set as External on MIDI 2, it will automatically be forced as Internal by MIDI 1.
C
KEYBOARDS UNION
By qualifying this function it is possible to transmit the notes MIDI codes of manual couplers also.
AHLBORN Classical Organs
English
Page 43
PRAELUDIUM III - PRAELUDIUM IV/E - User's Manual
1
MIDI SETTING
MIDI PIPE
This control is useful to coordinate the settings to select MIDI channels by section (Swell-Great-Pedal) in case
there is a combination between the PRAELUDIUM III with a pipe organ, which is made possible thanks to the
MIDI interface panel AHLBORN P.O.M.I. (Pipe Organ Midi Interface). It is possible to set the MIDI channel from
1 to 16, or set to OFF to completely exclude the organ section.
REMINDER !
The exit connection (MIDI OUT) can only be that of socket MIDI 2. It is suggested to set the
section MIDI channels (Swell-Great-Pedal) differently from MIDI 2 OUT.
REMINDER!
If the clock is positioned on EXTERNAL (in one of the two MIDI sockets), the Sequencer
incorporated in the organ WILL NOT FUNCTION.
AHLBORN Classical Organs
English
Page 44
PRAELUDIUM III - PRAELUDIUM IV/E - User's Manual
Function Effects
EFFECTS
CONTROLS
FINISHING
6.
Effects
With the control "Effects" (follow SYSTEM PANEL N.2) it is possible to have access to the following effects, which
permit an amplification of the instrument similar to that of an installation in large music halls.
1
REVERB
Selection and adjustment of reverberation effects
2
3D EFFECT
Adjustment to room size for the simulated effect
AHLBORN Classical Organs
English
Page 45
PRAELUDIUM III - PRAELUDIUM IV/E - User's Manual
1
Function Effects
REVERB Selection and adjustment of reverberation effects
Entering this control it is possible to select the following two functions:
a
Reverb Selection
The organist may deactivate completely (Rev. OFF) or recall one of the four reverberation configurations previously memorized in the organ (Preset).
b
Reverb Editing
For every Preset it is possible to select:
Type
Level
Time
Delay
2
Type of digital reverberation in relation to the typical architectonic structures where
the pipe organ is installed (Recital Room - Concert Hall - Church).
Exit level of the reverberation effect on the amplification of the instrument (from a
maximum of 0 dB to a minimum of -60 dB);
Setting of decay time of the reverberation effect (from a minimum of 0 to a maximum
of 127);
Setting of timing of the first reflection between the principal sound and the reverberation
sound (from a minimum of 0 to a maximum of 127).
3D EFFECT (Adjustment to room size for simulated effect)
This effect permits a different spatial dimension of the sound of the instrument on the basis of tri-dimensional
simulations of the room where the organ is installed
VALUE RANGE
From 0 (complete exclusion of the effect) To 10 (maximum room size)
REMINDER
This effect operates only on the internal amplification of the instrument or when headphones are used.
AHLBORN Classical Organs
English
Page 46
PRAELUDIUM III - PRAELUDIUM IV/E - User's Manual
Channeling
CHANNELLING
CONTROLS
FINISHING
7.
Channelling
This CHANNELLING function (follow SYSTEM PANEL N°2) allows access to the following three controls of
sound channelling, for the internal as well as external amplification.
AHLBORN Classical Organs
1
Outputs
2
Inputs
3
Equalizers
English
Page 47
PRAELUDIUM III - PRAELUDIUM IV/E - User's Manual
1
Channeling
Outputs
This function allows access to the following two controls:
A Channel Selection Exit channelling mode, either for individual stops (Single Reg.) or for family of
stops (Reg. Family).
B Channel Editing
This control has two sections:
• Single Reg. Differentiated channelling of the organ for each stop;
• Reg. Family Differentiated channelling of the organ for family of stops.
Single Reg.
7.
Channelling
7.1.
2.
Outputs
Inputs
7.1.2.
Channel. Editing
7.1.2.1
Single Reg.
For each stop it is possible to select the wind-chest configurations (Chest Layout) and program the exit channelling
system (Output Matrix).
IMPORTANT REMINDER
To listen to the modifications made on "Single Reg." in real time, make sure that in "Channel. Selection" you select
the operating mode "SINGLE REG.".
AHLBORN Classical Organs
English
Page 48
PRAELUDIUM III - PRAELUDIUM IV/E - User's Manual
Channeling
OUTPUT MATRIX
For a better understanding of the entire channelling system for individual stops, we start with the description of
Output Matrix, instead of Chest Layout. Output Matrix is a channelling system organized by matrix; the structure
has 4 inputs and 2 outputs. Each Output Matrix input (Matrix IN 1, Matrix IN 2, Matrix IN 3, Matrix IN 4)
can be assigned to one or both outputs (INTERNAL/EXTERNAL) with different percentage of sound.
CHEST LAYOUT
In this section it is possible to assign for each stop the type of wind-chest configuration (Chest Type) and the
Output Matrix inputs where to send it to (To MatrixIN). The Chest Type voice contains the following wind-chest
configurations (acoustic simulation of the organ pipe's position on the corresponding wind-chest ):
1
CENTRAL PEAK CONFIGURATION
Monophonic basses at the centre and progressive separation of the sound towards the treble (this configuration allows to optimise the efficiency of acoustic sound boxes in the basses).
C side / C sharp side channelling (*)
2
C sharp side / C side channelling (*)
LATERAL WINGS CONFIGURATION
Monophonic treble at the centre and progressive separation of the sound towards the basses.
C side / C sharp side channelling (*)
AHLBORN Classical Organs
C sharp side / C side channelling (*)
English
Page 49
PRAELUDIUM III - PRAELUDIUM IV/E - User's Manual
3
Channeling
WING CONFIGURATION (from left)
Progression of the bass sounds towards the treble (from
left to right)
4
WING CONFIGURATION (from right)
Progression of the bass sounds towards the treble (from
right to left).
5
TOTAL SOUND SEPARATION
Total separation of the sounds (C side and C sharp
side)
6
C sharp side / C
side channelling
(*)
COMPLETE MONO CONFIGURATION
Monophonic exit of the sounds on both channels.
7
C side / C
sharp side
channelling (*)
MONO CONFIGURATION - LEFT SIDE
REMINDER !
To obtain best results from the external
amplification system, for all channelling
available in the instrument, always use the
acoustic boxes in pairs.
Monophonic exit of the sounds on the left channel only
8
MONO CONFIGURATION - RIGHT SIDE
Monophonic exit of the sounds on the right channel
only.
IMPORTANT REMINDER
Channelling C side/C sharp side": when the chromatic succession of sounds, starting from the lowest pitch, begins from the
left channel.
Channelling C sharp side/C side": when the chromatic succession of sounds, starting from the lowest pitch,begins from the
right channel.
AHLBORN Classical Organs
English
Page 50
PRAELUDIUM III - PRAELUDIUM IV/E - User's Manual
Channeling
Reg. Family differentiated channelling of the organ for family of stops.
7.
Channelling
7.1.
2.
Outputs
Inputs
7.1.2.
Channel. Editing
7.1.2.2
Reg. Family
For each family of stops in each section, it is possible to select one of the wind-chest configurations already
described for Single Reg. (Chest Type paragraph in the previous pages), and to which outputs (INTERNAL/
EXTERNAL) you have to send the family of stops.
Stops from each organ section have been divided in the following three families:
Flues
Reeds
Access.
All labial stops such as Principal, Flutes and Bourdon, Strings, Mixtures, Undulating Stops
Reed stops such as Trumpet, Oboe, Cromorno, Regale, Vox Humana (the last ones are grouped
to the right of each section and the corresponding tablets are written in red), etc.
All special stops grouped under the name "Accessories" (for more details see the chapter on
page 17 of this User's Manual).
IMPORTANT INFORMATION
To listen to the modifications made on "Reg. Family" in real time, make sure to select the operating mode
"REG. FAMILY" in "Channel. Selection".
AHLBORN Classical Organs
English
Page 51
PRAELUDIUM III - PRAELUDIUM IV/E - User's Manual
2
Channeling
Inputs
This function allows access to the following two controls: (follow SYSTEM PANEL N. 2)
A
AUX IN 1
B
AUX IN 2
Both controls allow to program the following voices:
• Input Level
• To Reverb
• To Internal
• To External
Specific volume control.
It selects whether to send AUX IN to the Reverberation effect and which percentage to use.
It selects whether to send AUX IN to the internal amplification and which percentage to
use.
It selects whether to send AUX IN to the external amplification and which percentage To
use.
REMINDER !
The volume control set to the minimum range (-60) corresponds to OFF.
REMINDER !
The percentage set to 0% implies the total exclusion of the Reverberation effect.
AHLBORN Classical Organs
English
Page 52
PRAELUDIUM III - PRAELUDIUM IV/E - User's Manual
3
Channeling
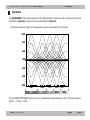
Equalizers
The EQUALIZERS function allows operation of a five band equalization system for each exit signal of the internal
amplification (Internal) as well as for external amplification (External).
Here below is shown the graph of the equalization system incorporated in the instrument.
+12dB
+8dB
+4dB
0dB
-4dB
-8dB
-12dB
50Hz
BASS
300Hz
MID-LO
1KHz
3KHz
MID
MID-HI
7KHz
TREBLE
The gain REGULATION RANGE (which is the only equalization control available) for each of the five frequency
bands is: - 12 dB / + 12 dB.
AHLBORN Classical Organs
English
Page 53
PRAELUDIUM III - PRAELUDIUM IV/E - User's Manual
Channeling
ADVANCED FUNCTIONS
CONTROLS
FINISHING
8.
AdvancedFunctions
The following advanced functions are available with the "Advanced Functions" control (follow SYSTEM PANEL
N°2).
AHLBORN Classical Organs
1
REVERB
Advanced channelling functions of the reverb
2
LANGUAGE
Language selection for software setting
3
MIDI FILTER Advanced functions for operating MIDI
English
Page 54
PRAELUDIUM III - PRAELUDIUM IV/E - User's Manual
1
Channeling
REVERB (Advanced channelling functions of the reverb)
It selects whether to channel the reverberation effect only, to the exits of the internal amplification (To Internal)
as well as external amplification (External) and which percentage to use.
2
LANGUAGE (Language selection for software setting)
This function allows for the selection of the following languages to use for the software setting:
• English
• German
• Dutch
REMINDER !
For language selection to become effective turn off the instrument.
3
MIDI FILTER (Advanced functions for operating MIDI)
This function allows the expert player to manage independently the following "Input" and "Output" functions of the
MIDI 1 and MIDI 2 sockets, when these are connected with another MIDI instrument or a Personal Computer:
It is possible, for each organ section (Swell-Great-Pedal), as well as independently, to enable the filters to
receive (Input) and transmit (Output) MIDI message codes corresponding to the following parameters (see
NOTE):
Note
Restricts messages of notes only;
Registers
Restricts message codes of stops only;
Control Change Restricts message codes of Control Change only.
NOTE: For a complete description of the MIDI parameters which can be filtered by the Input and Output controls,
please see MIDI Implementation Chart on the last pages of this User's Manual.
AHLBORN Classical Organs
English
Page 55
PRAELUDIUM III - PRAELUDIUM IV/E - User's Manual
Channeling
SETTING AND RECALL OF GENERAL SET UP OF THE INSTRUMENT
CONTROLS
FINISHING
9.
Finishing Memory
With this control the organist may arrange or recall his/her personal configurations relative to all the general
settings of the instrument (such as: canalisation by section, stop families or single stops, manual inversion, short
octave, Tremulant adjustment, etc.), with the exception of the programmable temperaments' settings. Entering
the section STORE, the organist may fix his/her configurations in one of the four available memories (Finishing 1,
Finishing 2, Finishing 3, Finishing 4).
Finishing 1
Finishing 2
> Finishing 3
Finishing 4
To recall the fixed configuration, enter the control RECALL, and select the relative memory number.
Finishing
Finishing
Finishing
Finishing
> Original
1
2
3
4
The position ORIGINAL, reactivates the configuration set by the factory.
AHLBORN Classical Organs
English
Page 56
PRAELUDIUM III - PRAELUDIUM IV/E - User's Manual
Disk Functions
DISK BUTTON FUNCTIONS
1
Press the "DISK" button
EXIT
4
ENTER
Press the DECR. or INCR. buttons to select one of
the listed operations (see following page for the list of
functions for every single operation).
EXIT
CONTROLS
2
START
STOP
REC
DISK
ENTER
The display will flash the following:
5
DISK:
After having made a selection using
DECR. or
INCR. buttons, press "ENTER" to confirm access to
the function.
EXIT
ENTER
Loading DIR!
3
After a few seconds the display will show the five
operations carried out by the Floppy Disk Drive
(incorporated).
DISK
SAVE
LOAD
AHLBORN Classical Organs
RENAME
ERASE
FORMAT
English
Page 57
PRAELUDIUM III - PRAELUDIUM IV/E - User's Manual
Disk Functions
SYSTEM PANEL N. 3 ("DISK")
1
The five operations of the "DISK" control, shown
on the display and run by the Floppy Disk Drive
(incorporated), can be selected using the DECR. or
INCR. buttons.
DISK
LOAD
SAVE
EXIT
2
3
4
2
Finishing
3
4
5
6
Combinations
Temperaments
ALL
Sequencer
DISK FORMAT
Confirm!
1:
2:
3:>
: --------------: --------------: --------------32:
ENTER
Confirm the selection by pressing ENTER.
EXIT
5
1
Voicing
ENTER
Every operation (with the exception of "FORMAT")
holds the six functions marked by a ringed numbers.
Select the desired function by using the
DECR. or
INCR. buttons.
EXIT
FORMAT
ENTER
Confirm the selection by pressing ENTER.
EXIT
ERASE
RENAME
ENTER
The square with smooth corners shows the thirty-two
positions which can be utilized to operate the Floppy Disk
files (see NOTE). Using the DECR. or INCR. buttons,
select the position relative to the Floppy Disk file.
EXIT
ENTER
AHLBORN Classical Organs
NOTE: Procedures for functions (marked by a ringed number), as
well as for files' positions, will be described at length in the pages
that follow.
English
Page 58
PRAELUDIUM III - PRAELUDIUM IV/E - User's Manual
Disk Functions
FLOPPY DISK
Use exclusively good quality 3,5" HD. 2 M. Byte MICRO
FLOPPY DISKS.
When handling floppy disks, follow these precautions:
1
2
3
4
5
Do not place disks next to loudspeakers, TV sets, or other
electric appliances which generate high magnetic fields; as
these may cause the cancellation of saved data.
Do not store disks in extremely hot or cold places, or where
they can come into contact with dust or smoke.
Do not leave disks in direct sunlight.
Do not bend disks or subject them to pressure.
Do not try to open the metal protection shutter.
UNPROTECT
N.B. As with all cassettes, also the micro floppy disk has a
memory protection system. When the small window above the
switch is open, the MEMORY PROTECT function is activated and
it is not possible to save data on the disk. Closing the window,
by sliding the switch, the memory protection is deactivated
and data can be saved.
PROTECT
DISK INSERTION AND FORMATTING
In order to utilize a new disk, it is necessary to carry out the
FORMAT operation (formatting of the disk) in the following
manner:
LIGHT
PRESS THE KEY TO REMOVE
THE FLOPPY DISK
1 Make sure the disk is inserted only in the direction as shown
here (when inserting the floppy disk in the drive, you should
hear a "click" sound to ensure the disk is completely inside
the slot).
2 Press the "DISK" button and (following SYSTEM PANEL N.3
at the previous page) search for the FORMAT function by
means of the
DECR. or INCR. buttons.
AHLBORN Classical Organs
English
Page 59
PRAELUDIUM III - PRAELUDIUM IV/E - User's Manual
3
Disk Functions
Press "ENTER". The display will show the following message:
DISK FORMAT:
Confirm!
4
Press "ENTER" twice to start formatting the floppy disk
During the operation (which will last approximately 1'and 20") the display will flash the following:
Formatting!
You are reminded that this operation must be carried out exclusively on new disks, or on old disks containing
data you wish to erase.
REMINDER !
If the disk's protection has not been deactivated, the display will show "write protect" = writing
protection activated.
AHLBORN Classical Organs
English
Page 60
PRAELUDIUM III - PRAELUDIUM IV/E - User's Manual
Disk Functions
OPERATIONS ON DISK
The floppy disk drive permits the following operations:The floppy disk drive permits the following operations:
1
2
3
4
5
SAVE
LOAD
RENAME
ERASE
FORMAT
Saving of the files
loading and recall of files
Change name of the files
Cancellation of the files
formatting of the floppy disk (as described in the preceding pages)
Every operation carried out on disk will be confirmed by the corresponding wording flashing on the display. For
example, while carrying out the operation of saving (SAVE) the following wording will flash on the display:
Saving!
As already illustrated in SYSTEM PANEL N.3, the first four operations can be operated on the following
controls:
1 VOICING
Configurations relative to the alternate and accessory stops and "organ voicing"
(abbreviation VOI)
2 FINISHING
Settings relative to the general setting of the organ, such as: Tremulant-UtilitiesGenerals-Midi (abbreviation FIN)
3 COMBINATIONS All which is inside the adjustable and collective Combinations of the organ (abbreviation
CMB)
4 TEMPERAMENTS Settings relative to the four programmable temperaments (abbreviation TEM)
5 ALL
All the above settings, has been saved in one file (abbreviation ALL)
6 SEQUENCER
Musical executions recorded through the Sequencer (abbreviation SEQ).
All above controls can use the thirty two memory positions available on disk.
AHLBORN Classical Organs
English
Page 61
PRAELUDIUM III - PRAELUDIUM IV/E - User's Manual
Disk Functions
NAMING OF THE FILES
It is possible to name files, during the SAVE and RENAME operations, by using the operating buttons with the
five octaves of Manual I, which will function as an alphanumeric keyboard when pressed simultaneously with the
"F" fixer. The keyboard shown here illustrates in detail the alphanumeric function.
1
c1
+ Space
CAPS/small
c3
c2
= _
AHLBORN Classical Organs
A B C D E
F
G H
c4
I
2
3
4
5
6
7
8
9
0
c5
J K L M N O P Q R S T U V W X Y Z
English
Page 62
PRAELUDIUM III - PRAELUDIUM IV/E - User's Manual
Disk Functions
ERROR MESSAGES
Solution
MESSAGE
DESCRIPTION
1
Invalid Disk Format
Not compatible disk format: insert a 3.5" HD Disk ->Insert 3.5HD Disk
and press the DISK button again, or proceed to the -> ENTER to FORMAT.
initialization by pressing ENTER.
2
Fatal Error
Fatal error; contact a technician. (Make sure the disk is of
the right type).
3
File Not Found
During a file search on disk , it was not found because
non existent.
4
Write Protect
Disk with memory protect activateted: desactivate -> Remove Disk Protection
protection.
5
No Available Space On Disk
The space available on disk is not sufficient. Delete one -> Remove Files.
or more files.
6
No Available Space On Root
Directory
The space available on directory is not sufficient. Delete -> Remove Files.
one or more files.
7
8
Formatting Error
Formatting is not possible. Try again or change disk.
Disk Not Found
Disk not found into the Drive,or defective disk, or not ->Insert 3.5HD Disk
formatted disk, or different size disk: insert a 3.5" HD -> ENTER to FORMAT.
Disk and press the DISK button again, or proceed to the
initialization by pressing ENTER.
9
Incompatible File
File not compatible with the instrument (file not loaded): -> File Not Loaded.
it is not possible to operate.
-> Retry.
IMPORTANT INFORMATION: From these ERROR MESSAGES, it is possible to return at the starting position by pressing
the EXIT button.
REMINDER : To return to the normal functioning of the organ, from any of these error messages, press the EXIT
button.
AHLBORN Classical Organs
English
Page 63
PRAELUDIUM III - PRAELUDIUM IV/E - User's Manual
Rec-Start-Stop Functions
FUNCTIONS OF "REC" AND START/STOP BUTTONS
These two buttons of the PROGRAMMING SECTION are closely connected to each other and are fundamental for the use
of the SEQUENCER incorporated in the organ. The SEQUENCER (Digital multi-track recorder) permits the recording and
playback of a musical piece directly from the instrument. This Sequencer has a memory capacity of about 40.000 events. For
a clearer understanding of this section, the fundamental functions of RECORDING and PLAYBACK are explained. Of course,
these are preceded by the description of SEQUENCER settings, so that the musician may decide all settings beforehand.
Then, the accessorial functions, which contribute to perfect the musical recording or to render a more sophisticated use of
the Sequencer, are examined.
AHLBORN Classical Organs
English
Page 64
PRAELUDIUM III - PRAELUDIUM IV/E - User's Manual
Rec-Start-Stop Functions
METRONOME AND SEQUENCER SETTINGS
Pressing the "CONTROLS" button for about two seconds allows you to execute all settings
relative to the Metronome and some of the operating modes of the Sequencer.
(see NOTE).
The following indications will appear on the display:
METRONOME:
Tempo
Metronome
Level
=
=
=
EXIT
ENTER
CONTROLS
DISK
START
STOP
REC
30
Off
0
Lead
=
Timing =
Rec.Mode =
> Signature=
No
30
Overdub
1/8
They refer to the following parameters:
1
Tempo
2
Metronome Activation/deactivation of the acoustic metronome while playing (On/Off).
Acoustic level of the Metronome. The value range goes from 0 dB (maximum volume) to -24 dB (minimum
Level
3
Setting of the metronome tempo. The adjustment range is that of a normal mechanic metronome: from 30 to
240 beats per m/s.
volume).
4
Lead
Activation/deactivation of the pause beat before recording starts (Yes/No). When this function is on, it stops
recording data in the Sequencer during the first metronome measure. It is recommended to deactivate this
function when the organ is connected to a sequencer or external computer.
5
Timing
Selection of the metre-operating mode for the advancement of the musical sequence in use. Settings can be
adjusted by number of measures (Measure), or by minute and seconds (mm:ss).
NOTE: always use the operating buttons to move inside the voices which appear on the display, or to modify the various parameters.
AHLBORN Classical Organs
English
Page 65
PRAELUDIUM III - PRAELUDIUM IV/E - User's Manual
Rec-Start-Stop Functions
6
Rec. Mode
selection of the recording mode. The setting can be adjusted either to substitute the previous recording (Replace)/
or to overdub the previous recording (Overdub).
7
Signature
setting of the measure.
REMINDER ! The musical measure selection must take place only when the Sequencer is empty.
When you are inside this function you may use the acoustic Metronome for study.
For this type of use it will be necessary to:
1 Go to the function "Signature"
2 Press the START / STOP button to activate the acoustic metronome during study sessions
3 press the START / STOP button to deactivate the acoustic metronome during study sessions
RECORDING OF MUSICAL SEQUENCE
By pressing the "REC" button the organ is ready to record a musical sequence.
EXIT
ENTER
CONTROLS
DISK
REC
START
STOP
The following indications will appear on the display:
REC:
T=30
Met = Off
Free Mem= 100%
sw
gt
pd
com
AHLBORN Classical Organs
00:00
0
SEQUENCER TRACK STATUS
Track name visualized in UPPER
CASE Track in PLAY
Track name visualized in LOWER CASE
Track name visualized :
--
Track selected for RECORDING
Track DISABLED
English
Page 66
PRAELUDIUM III - PRAELUDIUM IV/E - User's Manual
Rec-Start-Stop Functions
These parameter are referred to:
1
2
3
4
5
6
T
00:00
Met
Free Mem
sw/gt/pd/com
0
Setting of metronome tempo.
The musical sequence metering will appear (see NOTE 1).
activation/deactivation of the acoustic metronome while playing -On/Off (see NOTE 1).
free memory percentage available in the SEQUENCER will appear.
recording tracks (see NOTE 1).
Crescendo position. (see NOTE 2)
To start recording the musical piece in the Sequencer
1
Insert the necessary organ stops (using the lit tablets, the adjustable combinations, the collective combinations and the
Crescendo). These stops (including the choices of Alternative Stops) and all the modifications carried out while playing, as
well as all other controls activated (section volumes, expressions, Crescendo and metronome tempo), will be memorized
by the Sequencer. See note 2.
2 Select the organ sections on which you wish to make the recording. Press ENTER/EXIT to reach the chosen section track.
The section initials will appear in three different ways, according to the pressure exercised on the DECR. or INCR.
buttons, as shown on the display here below:
REC:
T=30
Met = Off
Free Mem= 100%
sw
-PD
-CLEAN TRACK READY FOR
RECORDING
00:00
PRERECORDED TRACK
FOR PLAYBACK ONLY
0
TRACK EXCLUDED FROM
RECORDING
3 Press START / STOP to start recording
• If you have selected the pause beat (LEAD = Yes), wait one beat before playing, otherwise that beat will NOT
be memorized by the Sequencer.
• If you haven't selected the pause beat (LEAD = No), you may start to play immediately.
NOTE 1: • to select these functions use the operating buttons EXIT / ENTER. To modify their settings use the
operating buttons the parameter to be modified will flash on the display.
DECR. or INCR.
NOTE: for organs supplied with "CRESCENDO" pedal only
AHLBORN Classical Organs
English
Page 67
PRAELUDIUM III - PRAELUDIUM IV/E - User's Manual
Rec-Start-Stop Functions
• While recording (see example on the display):
A metering of the musical sequence will constantly appear in real time.
B The available free memory percentage is updated in real time. Press STOP to carry out an optimisation of used me-
mory which will in turn increase available free memory. Separate tracks recording will permit the best use of available
memory for the Sequencer.
C Independently from the acoustic signal, scansion of the metronome tempo, will always show on the display as follows:
REC:
T=96 03:21
Met = On
Free Mem= 85%
sw
gt
pd
com
DOWN BEAT
0
REC:
T=96 03:23
Met = On
Free Mem= 84%
sw
gt
pd
com
4 When you have finished playing, press the START / STOP button to stop the SEQUENCER.
OTHER BEATS
0
5 If you press again the START / STOP button, recording will continue from the point it was stopped. If you keep pressed
EXIT, you will definitely exit from the recording and from the SEQUENCER.
REMINDER !
While recording, if the function Rec.Mode was selected on "Overdub", the musical execution will overdub on the
old musical piece (unless it was cancelled in the Sequencer).
TRACKS CANCELLATION
Pressing the "REC" button for about two seconds, prepares the organ for the cancellation of single tracks of the
SEQUENCER. The following indications will appear on the display:
CLEAR SEQ.:
> All Sequencer
Swell Track
Great Track
Pedal
Common
AHLBORN Classical Organs
Track
Track
English
Page 68
PRAELUDIUM III - PRAELUDIUM IV/E - User's Manual
Rec-Start-Stop Functions
These parameter are referred to:
1
2
3
4
5
All Sequencer
Swell Track
Great Track
Pedal Track
Common Track
Cancellation
Cancellation
Cancellation
Cancellation
Cancellation
of
of
of
of
of
the
the
the
the
the
entire Sequencer.
track relative to the
track relative to the
track relative to the
track relative to the
Swell section.
Great section.
Pedal section.
Common section.
PLAYBACK OF A MUSICAL SEQUENCE
Press the "START/STOP" button to play the musical
pieces contained by the SEQUENCER.
The following indications will appear on the display:
EXIT
ENTER
CONTROLS
DISK
PLAY:
SW
They refer to:
1
2
4
5
6
T
00:00
SW/GT
-0
GT
REC
T=30
--
00:00
--
Setting of metronome tempo.
Meter setting (see NOTE).
Tracks originally used for the musical piece.
Tracks originally not used in the musical piece.
Crescendo position.
START
STOP
0
It may be useful for the organ student, during his/her study, to playback each individual track or to exclude one or more tracks,
using the remaining tracks as study base. Press the ENTER/EXIT buttons to reach the chosen section track. Then press the
DECR. or INCR. buttons to activate or exclude the same track from playback. Press the START / STOP button and the
Sequencer will pause. Press the button again and listening will restart from that point. To listen to the musical piece from the
beginning, press the START/STOP button, keep pressed the EXIT button, and the START / STOP button in consecutive order.
To cancel the entire contents of the SEQUENCER, follow the procedure explained in the previous page.
NOTE: to modify the settings of metronome tempo during playback, press the operating buttons DECR. or INCR.
AHLBORN Classical Organs
English
Page 69
PRAELUDIUM III - PRAELUDIUM IV/E - User's Manual
External Connection Panel
CONTROLS AND CONNECTIONS
The connection panel is located in the upper part of the hollow between the manuals and the pedalboard, to the extreme
right of the console.
MASTER (General and headphones volume)
The general volume of the instrument acts both on the internal amplification and on the headphones (PHONES). The
display will show the level (from 0 to 127) for a few seconds. The volume of external amplification may be controlled by
the MASTER button on the remote control.
PHONES (Headphones)
Headphones Connection socket (Impedance: min. 30 ohms / max. 600 ohms). By inserting the jack, the internal speakers
will be automatically disengaged. The volume of the headphones is regulated by the Master control (see above).
MIC / LINE (Level L/R)
Microphone general volume controls. Independent controls for the sensitivity of the AUX IN 1 inputs, when non used as
microphone inputs.
REMINDER !
When AUX IN 1 inputs are not used for the microphone but as Line input, it is suggested to
adjust both sensitivity controls (Level L/R) to the minimum (total anti-clock rotation).
MIC / LINE - AUX IN 1 (L / MONO)
Stereo input (left channel) or monophonic input for microphone or other external sound sources (tape-recorder, other
musical instruments, etc.).
MIC / LINE - AUX IN 1 (R)
Stereo input (right channel) for microphone and other external sound sources (tape-recorder, other musical instruments,
etc.).
MIDI 1 (IN - OUT - THRU)
MIDI connecting sockets (Musical Instrument Digital Interface).
COMPUTER
Connecting socket for Personal Computer or MAC.
AHLBORN Classical Organs
English
Page 70
PRAELUDIUM III - PRAELUDIUM IV/E - User's Manual
External Connection Panel
REAR PANEL FOR EXTERNAL CONNECTIONS
3
4
5
1
2
The panel is in the lower right side. The panel is divided in five different sections:
1 REMOTE BOX POWER SWITCH.
Remote control turn-on command for amplified speakers or speaker amplifiers.
2 OUTPUT (L-R)
External Output Channelling
3 AUX IN 2
INPUT stereo sockets for external source plug.
4 MIDI 2 (IN - OUT - THRU)
MIDI sockets
5 AUTOMATIC TUNING.
Automatic tuning socket, connected to a pipe organ (see page 73).
AHLBORN Classical Organs
English
Page 71
PRAELUDIUM III - PRAELUDIUM IV/E - User's Manual
External Connection Panel
REMOTE BOX POWER SWITCH
Remote control turn-on command for amplified speakers or speaker amplifiers
This command generates a 12 V D.C. - 1A. output signal which automatically turns on all the speakers connected
together, when the instrument is turned on. In case of a short circuit, the connection will be automatically cut
off. After eliminating the cause, turn on the instrument and the connection will be restored.
OUTPUT
It is possible to connect two speakers (or speaker amplifiers) to these sockets.
For operating instructions refer to the CHANNELLING chapter of this User's Manual.
IMPORTANT INFORMATION:
When positioning the speaker cabinets, the left and right sections should not be spaced too far away from
each other (recommended distance: 2 ÷ 4 meters). The effect should be similar to that of the wind-chest
of a pipe organ.
Do not place the speakers too far away from the organ console. An excessive distance would cause an irritating time lag due to the propagation of sound in the room.
AUX IN 2
L/Mono-R (0 dB - 47 Kohms).
Extra auxiliary input left/right for external sound sources (tape-recorder, other musical instruments, etc.).
AHLBORN Classical Organs
English
Page 72
PRAELUDIUM III - PRAELUDIUM IV/E - User's Manual
External Connection Panel
MIDI SOCKETS
Complete MIDI connection (IN-OUT-THRU) available for connecting another digital instrument or for connecting
the PRAELUDIUM III in combination with a pipe organ.
AUTOMATIC TUNING
Connection for the automatic tuning ("Organ Tuning") with the pipe organ. This is to be found on all Classical
Organs of the ORGANUM/PRAELUDIUM line. "Organ Tuning" is controlled by a Room (Ambient) Temperature Sensor. This sensor is available as optional accessory and can be ordered with the code 970238.
Beware! The "Automatic Organ Tuning" socket, is located inside the "REAR PANEL" (See following picture)
AHLBORN Classical Organs
English
Page 73
PRAELUDIUM III - PRAELUDIUM IV/E - User's Manual
MIDI Implementation chart
MIDI IMPLEMENTATION CHART
Models: Praeludium III - Praeludium IV/E
Function
Recognized
Remarks
Basic
Channel
Default
Changed
1-16
1-16
1-16
1-16
There are 3 Basic Channels
(c)
Channel
Mode
Default
Messages
Altered
Mode 3
x
*************
30-103
30-74
*************
o
o
x
x
x
o
o
o
o
o
o
o
o
o
o
o (0-500)
*************
Mode 3
x
x
30-103
30-74
x
o
o
x
x
x
o
o
o
o
o
o
o
o
o
o
o (0-500)
x
o
o
x
o
o
x
Mode 1: Omni On, Poly
Mode 3: Omni Off, Poly
o
o
x
o
o
o
Note
Number
Velocity
After
Touch
Pitch Bender
Control
Change
Transmitted
True Voice
Note On
Note Off
Key’s
Ch’s
(C)
4
(n)
7
(C)
7
(n)
92
(C)
83
(C)
(n)
(n)
70
Program
Change
Crescendo
Section Volumes
Int. Main Vol.
Tremolo
General Controls
Organ Tuning
Stops On/Off
Stops On/Off
(C)
Gen. Combinations
True #
Clock
System
Commands
Real Time
Local ON/OFF
All Notes OFF
Aux Message
Active Sense
Reset
(n)
one of basic Channels
(C)
Common Channel
(1)
(2)
Ahlborn Reserved Code
tt: 0= -100 cents, 64= 0 cent, 127=+100 cents
AHLBORN Classical Organs
(3)
ee: 0= Stop Off, 64= stop On
bb: 0-127= Stops Bank
xx: 0-127= Stop index of current Bank
(n)
and an extra Common
For Manuals
For Pedals
(1)
(2)
(1) (3)
(1)
(4)
RPN: Bc 65 00, Bc 64 01, Bc 06 tt
NRPN: Bn 63 ee, Bn 62 bb, Bn 06 xx
only for MIDI PIPE
Bc 00 hh, Bc 20 ll, Cc pp
Mode 2: Omni On, Mono
Mode 4: Omni Off, Poly
(4)
o:Yes
x:NO
hh: 64 = MSB Bank Select
ll: 0-3= LSB Bank Select
pp: 0-127=Gen. Combination index of current Bank
if (ll=0 and pp=0)�Return to Handset
English
Page 74
PRAELUDIUM III - PRAELUDIUM IV/E - User's Manual
Summary
SUMMARY
FOREWORD
INTRODUCTION
SWITCHING ON
STOPS
ORGAN RESET PROCEDURE
COUPLERS
COMBINATION ACTION
PRESETS
CRESCENDO
AUTOMATIC PEDAL (operating mode "Normal")
BALANCES AND SWELL PEDALS
TRANSPOSER
PROGRAMMING SECTION
DISPLAY
OPERATING BUTTONS
FUNCTIONALS BUTTONS
SYSTEM PANELS
FUNCTIONS OF THE "CONTROLS" BUTTON
SYSTEM PANEL N.1"VOICING"
ALTERNATIVE STOPS
ACCESSORY STOPS
VOICING (Reg. Parameters)
1)
2)
3)
4)
5)
1
3
3
3
3
3
4
6
6
7
7
7
8
9
10
11
12
14
15
16
17
18
LEVEL
SCALING(Low/High)
RELEASE
PITCH ADJUSTMENT
TONE CONTROL
AHLBORN Classical Organs
19
19
20
21
21
English
Page 75
PRAELUDIUM III - PRAELUDIUM IV/E - User's Manual
Summary
VOICING (Note Parameters)
1) LEVEL
ORGAN PRESETS
STOP SETTING AND RECALL
SYSTEM PANEL N. 2 "FINISHING"
TREMULANT SPEED AND DEPTH
USEFUL FUNCTIONS (MANUAL AND PEDALBOARD)
1) TRACKER TOUCH (Mechanical action)
2) SHORT OCTAVE (The first lower octave set as in some antique organs)
3) MANUAL INVERSION (Manuals Inversion)
4) AUTOMATIC PEDAL (Dual function for the Automatic Pedal)
HISTORICAL TEMPERAMENTS AND EDITING
TEMPERAMENT SELECTION
TEMPERAMENT EDITING (programmable temperaments)
MISCELLANEOUS AND ACCESSORY FUNCTIONS
1) ORGAN TUNING (Fine pitch adjustment of the instrument)
2) ENSEMBLE (Ensemble effect of the stops)
3) WIND SAG (Slight reduction of pressure of the bellows in rich stops combinations)
4) GREAT-PEDAL ENCLOSED (Expression to the Great and Pedal)
5) MEM. LOCK (Protection of adjustable and fixed combinations)
6) EXTERNAL VOLUME (Volume adjustment of external amplification)
7) BLIND COMBINATION (Reading of set Combinations, Plenum I,Plenum II, Tutti and Crescendo)
8) CONTRAST (Contrast adjustment in the display)
MIDI SETTING
1) MIDI 1
2) MIDI 2
3) MIDI PIPE
EFFECTS
1) REVERB (Selection and adjustment of reverberation effects)
22
22
23
24
25
29
30
31
31
32
32
33
33
35
37
38
38
39
39
39
40
40
40
41
42
43
44
45
46
2) 3D EFFECT (Adjustment to room size for simulated effect)
AHLBORN Classical Organs
46
English
Page 76
PRAELUDIUM III - PRAELUDIUM IV/E - User's Manual
Summary
CHANNELLING
1) OUTPUTS
2) INPUTS
3) EQUALIZERS
ADVANCED FUNCTIONS
1) REVERB
2) LANGUAGE
3) MIDI FILTER
SETTING AND RECALL OF GENERAL SET UP OF THE INSTRUMENT
DISK BUTTON FUNCTIONS
SYSTEM PANEL N. 3 ("DISK")
DISK INSERTION AND FORMATTING
OPERATIONS ON DISK
NAMING OF THE FILES
ERROR MESSAGES
FUNCTIONS OF "REC and START/STOP" BUTTONS (Sequencer)
METRONOME AND SEQUENCER SETTING
RECORDING OF MUSICAL SEQUENCE
TRACKS CANCELLATION
PLAYBACK OF A MUSICAL SEQUENCE
CONTROLS AND CONNECTIONS
MASTER (General and Headphones Volume)
PHONES (Headphones)
MIC / LINE (Level L/R)
MIC / LINE - AUX IN 1 (L / MONO)
MIC / LINE - AUX IN 1 (R)
MIDI 1 (IN - OUT - THRU)
COMPUTER
AHLBORN Classical Organs
47
48
52
53
54
55
55
55
56
57
58
59
61
62
63
64
65
66
68
69
70
70
70
70
70
70
70
70
English
Page 77
PRAELUDIUM III - PRAELUDIUM IV/E - User's Manual
Summary
REAR PANEL FOR EXTERNAL CONNECTIONS
1) REMOTE BOX POWER SWITCH
2) OUTPUT
3) AUX IN 2
4) MIDI 2
5) AUTOMATIC TUNING
MIDI Implementation Chart
AHLBORN Classical Organs
71
72
72
72
73
73
74
English
Page 78
The information in this publication has been carefully prepared and checked. The manufacturers however decline all liability for eventual errors. All rights are reserved. This publication
may not be copied, photocopied or reproduced in part or in whole without prior written consent from AHLBORN Classical Organs. AHLBORN Classical Organs reserves the right
to apply any aesthetic, design, specification or function modifications it considers necessary
to any of its products without prior notice. AHLBORN Classical Organs declines all liability
for damage to property or persons resulting from improper use of the instrument.
Code 271395
Rev. Vers. 1.01 January 2006
Schulze Pollmann S.r.l. Via Metauro, 17 - 61033 Fermignano (PU) - Italy
Tel.: +39-(0541)-959511 Fax: +39-(0541)-957404/959674 - Web: http://www.ahlbornorgans.com - E-mail: [email protected]