1
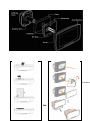
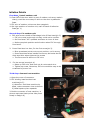
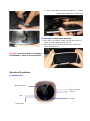
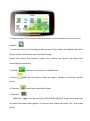
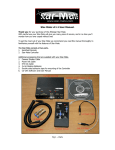
Made for OnlineCameraShop.NL
Intelligent Door Peephole Viewer User Manual
WINCORE Series
Version V1.2
Lead New Generation Intelligent Lives
Contents
1 × Indoor & Outdoor control unit
1 × Micro-SD card
1 × User manual
1 × Warrant card
1 × Fixed sheet steel
1 x Lithium battery, built-in Li-Pol
1 × Power adapter
1 x USB data wire 3 meters
1 × Tow pairs screws, select one only pair which is according to the door thickness
Specification:
Indoor control unit
Screen
Outdoor control unit
View angle
Door peephole diameter limits
Door thickness limits
Power source
Charging
142×88×13.5mm
5” HD LCD Touch Screen
61×61×14.1mm
165 degrees
12mm ~ 60mm
30mm~ 100mm
1400mAh, 3.5V~4.5V
Battery charge directly via the Micro USB at the bottom
of the host machine; Use adapter to charge.
Language 1. Domestic Version (English & Chinese)
2. Oversea Version (English, Spanish, French, German,
Portuguese, Russian, Italian, Turkish, Ukrainian, Arabic,
Farsi, Hindi, Vietnamese, Filipino, Thai).
Install illustration
2.Fixed lens, connect it to the ho
Ins
tallation Details
First Step:Install outdoor unit
2. Clear out of the door which is part of outdoor unit area, make it
clearly, could be more easy to stick on the door by adhesive
foam.
3. FPC wire of outdoor unit across door peephole
4. Set right position of outdoor unit, tear off back of adhesive
foam(pic 1)
Second Step: Fix outdoor unit
1. FPC wire across middle of flat shape hole of fixed steel(pic 2)
△ FPC wire must be through via flat, could not be voluble.
△ On fixed steel “UP” upwards and faces to inner of door.
△ Notice peephole position and direction when FPC through
fixed steel.
2.
Press fixed steel on door, fix the first screw(pic 3)
△ Blue arrowhead points out correct position, red is wrong
△ Press fixed steel when installs first screw, and notes do not
slide steel disc when tightens the screws
△ The fist screw fix above on FPC wire
3
Fix the second screw(pic 4)
△ Raise up FPC wire, and look out do not scratch wire.
△ Tighten up screw, otherwise, FPC wire would be easy to be
scratched by screw nut.
Third Step: Connect host machine
1. Open the cover of connector
2. FPC binding head buckles host
machine(pic 5)
1).Attention: hold host machine by
hand, make connector close to thumb
2).Metal square piece upwards
3. Buckle connector of host machine, in
picture mark two black points side press
slowly to flat(pic 6)
4. Then cover after connect done(pic7), please
notes mark position on reference
Fourth Step: Install host machine
1. Press FPC wire softly, make it bend and close to
back of host machine side (pic 8)
2. Host machine slot aim at fixed steel, buckle on
steel slowly(pic 9)
Remark: The show-how is in display
rack(50mm), such as most of doors
Structure illustration
A. Outdoor Unit
IR/Motion Sensor
Outdoor Speaker
Camera
LED
Doorbell
Outdoor MIC
3. IR/Motion sensor: Any subject/People that has temperature and take moving, stay
in front of door over 15s( time can be setting), it can know auto, doorbell light will be
on
specially at night, can see clearly,auto transfer data to host machine
4. LED: support day/night vision, IR range 3 meters
5. Outdoor MIC: Leave record video and leave voice message to host. And if host
machine be installed SIM card, can talk with host via mobile directly
6. Outdoor Speaker: Receive host voice that is from host’s mobile base on SIM card
inside of host machine
7. Camera: 165°Wide angle lens, monitoring in front of door, take photo and record
video
6.Doorbell: When press
will be on for inside light, and inform host that
somebody is in front of door.
B. Indoor unit(Host machine)
Indoor MIC
Reset
Phone Dial Camera
Power On/Off
1. Indoor MIC: Speaker hole, talk with others
2. Phone Dial:Press
, Call
any number base on SIM card(850/900/1800/1900
MHz )
3. Camera:
Press
, can monitor outdoor and watch in front of door
subject, take photo or not can be option
4. Power On/Off: Press
, Could turn On/Off
device
5. Reset: Turn Off device forcibly, but will save ex-operation information
6. USB:
Bottom of machine, recharge and transfer file data port
I. Photos: After take photo, check
, top right conner be shown photo’s
quantity.
II. Video:After record video, check
, top right conner be shown video’s
quantity.
III. Mode Switch: Home Mode/Outside Mode
IV. Menu: Function details
C. Function panel
1. Photos/Video: Check photos/video document, can be canceled one by one or all.
Number:
1. Guest can talk to host through phone, auto call the number that default bind with
device, totally five number that could be binding.
Noted: Only these five numbers’ phone can initiative call device, the others call,
remind busy beep sound.
2. Dialed:
3. Inbox:
How many calls has been called details
MMS be sent details, what are guests’ photos to send host mobile
phone
4. Calendar:
check date (day/month/year)
5. Monitor:
1)Monitor Trigger: Can be setting 1s/3s/5s/10s/15s/20s/off, means how long time
can auto take photo when guest is in front of door, when be setted “off”, won’t take
photo.
2)Monitor Warning: Can be setting 20s,30s and off, means how long time
doorbell button can ne known subject whether is in front of door,the light also will be
on. when be setted “off”, won’t know, and light won’t on neither.
3)Sensibility: Can be setting Low,Medium and High, means what’s monitor level,
mostly be setted “High”
4)MMS Alert Switch: On/Off, it bases on SIM card in device before use, bind a
GSM mobile phone number first, Sets”On”. Otherwise, no any MMS to binding
phone.
5)LED switch: On/Off, when guest press doorbell or monitor warning, the LED will
be on, if be setted Off, the light will not light on.
6. File System:
Edit photo/video document, can check/delete.
7. Settings:
1)Time and date: set home city/date & format/time & format
2)Tone settings: set different tone of doorbell, change press button tone, voice
volume
Remark: Can change any tone what you like, specially tone should be in TF-card first,
can download to TF-card, and choose it from there directly, tone should be MP3
format.
3)Display setting: change wallpaper picture/LED back light brightness and be
shown of Time/Pen calibration, set touching of calibration
Remark: if change wallpaper picture, the picture should be in TF-card first, picture:
480*272 jpg format.
4)Record Format: Take photo, Preview Size 320*240, 3 shots, 5 shots ( option)
Record video, 3s/5s/10s/15s(option)
Remark: If choose record video, then MMS alarm could not work at the same
condition;Record video for leaving message default 10S.
5)Language:English, German, French, Spanish, Portuguese, Russian, Italian,Turkish,
Ukrainian, Arabic, Farsi,Hindi, Vietnamese, Filipino,Thai can be option(domestic
version only Chinese and English language)
6)Restore factory settings: Factory reset
8. Help
1)Installation guide: diagram for installation
2)System Information: none
3)Copyright: none
4)Contact us: none
Function explanation
1. When guests approach the door, the doorbell button lights, tell guests to press it; When
guests leave the monitor area, the light goes out.
2. If the guest presses the button, the doorbell rings. and the panel show the guest and take
a photo.
3.1 After the ring, if there is no answer ( the ring time can be setted), the doorbell will say:
“Hello, I am not at home, please leave a message after beep ring the doorbell, thank you! “.
3.2 Within 5 seconds if guests press the button again, the doorbell beeps, then records the
video message (the video last for 10 seconds defaulted).
3.3 After the video message, the doorbell will say: “If you are in a hurry to find me, please
ring the doorbell again to call my phone, thank you!” Within 5 seconds if guests press the
button again, the doorbell will call the host (dials the pre-set number), put through, guests
can speak with the host via the doorbell.
Intelligent security function
1. If guests stay before the door for more than 3 seconds without pressing the doorbell
button, the indoor button will light and flicker, warning there are guests out of the door.
2. MMS is against illegal visitor behavior: If guest stay before the door for more than
15seconds (the time can be setted) without pressing the doorbell button, the viewer will take
photo for the guest, and store it into the T-card and send a MMS alarm to the host (can be
chosen to use or not) and the alarm sounds at the same time (can be chosen to use or not).
3. When guest presses the doorbell button, the viewer takes photo and stores it, the indoor
bell rings at the same time; the indoor screen lights, shows the guest outdoor.
Communication function
If urgent, Guests can press the doorbell button again to remote call with the host phone of
binding.
Features
1. Support infrared monitoring and infrared night-vision function (within 3m).
2. 5.0’’ HD LCD, touch screen, more convenient.
3. 2 million pixels security wide-angle camera,
4. Double-battery design, never halt. You can take out the lithium battery, recharge it,
another build-in battery can support this machine for a week at the most.
5. Support calendar function
Notice
9. SIM-mode & NO SIM-mode
Only put in a effective SIM-card (charge as a cellphone), can it realize the MMS alarm and
remote calls function, but if there is no SIM-card, it can also support all the function,
except the MMS alarm and remote calls.
5. Home-mode & Outdoor-mode
Home-mode is defaulted, if you are not at home , you can shift the mode via the control
panel. Under the outdoor-mode, press the doorbell button, the doorbell will directly begins
from saying: “Hello, I am not at home, please leave a message after beep ring the doorbell,
thank you! “