1
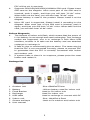
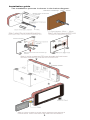
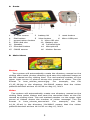
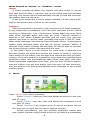
GSM Peephole Viewer
User Manual
Version:V1.1
Time:2013-Oct
Features
1.
First GSM peephole viewer support mobile communication and
MMS alarm in the world. Visitor can communicate with the
host’s mobile phone if dial peephole.
2.
5’ inch high-resolution and high-lighting LCD and touch screen.
3.
24-hours monitor with motion sensor. Indoor unit will auto
camera or auto record in 1 second if there is someone come to
the door , supports up to 32G Micro SD.
4.
2 Mega pixels CMOS sensor with wide view and 120 view angle.
5.
Clear IR night view. Someone can be clearly viewed within 3
meters even in the dark.
6.
It works with double battery including main battery and
embedded subsidiary battery. When the main battery is taken
out and recharged, the system continuously works with
embedded subsidiary battery.
7.
Support phone surveillance, when the phone with the phone
number bound in the peephole can call the peephole and
monitor the outside.
8.
Intelligently reminding. When visitor is coming, LED light on the
view button of the indoor unit will automatically work and
remind the host. If the visitor leaves, the LED light will go out.
9.
Calendar is supported to meet various requirements.
10. MP3 melody and wallpaper can be selected and edited.
Security remarks
1.
Don’t put the product on uneven plane, handle with care and
prevent the fall.
2.
Don’t crush the screen or the mirror of outdoor unit. Once the
mirror or display is broken, please keep off the glass and liquid.
3.
Take care of the FPC wire in installation, FPC wire would be
badly connected or easily broken. If badly connected, you need
get the support from professional engineer, and thus the broken
4.
5.
6.
FPC will be not in warranty.
Supports GSM 850/900/1800/1900MHz SIM card. Please insert
SIM card as the diagram. After most part of the SIM card is
inserted, push it again, and then you will hear “di da” voice.
When take out the card, you will also hear “di da” voice.
Lithium battery is used in the product. Please install it as the
diagram.
Micro SD card is supported. Please install it according to the
diagram. After most part of the SIM card is inserted, push it
again, and then you will hear “di da” voice. When take out the
card, you will also hear ‘di da’ voice.
Failure Diagnosis
1.
The buttons of indoor unit flash, which means that the power of
Li-ion battery is not enough and need recharging. Two recharge
modes are supported, one is to recharge it with Micro USB
interface, another is to take out the battery and use attached
recharger to recharge it.
2.
It fails to view or continuously give an alarm. The cause may be
that the FPC is not connected correctly, please re-connect FPC
to guarantee that the FPC is correctly connected with indoor
and outdoor unit.
3.
If system halts or there is no response, please press the reset
button and restart it.
Package list
1
2
3
4
5
6
7
8
Outdoor unit
Battery
Fixed Bracket
Recharger
USB cable
Indoor unit
Screws and tape
User manual
Size: 66x66x14.5mm
Lithium battery used for indoor unit
Used to fix indoor unit
Used for indoor unit
Used to recharge or connect with PC
Size: 144x82x14.5mm
Used to fix outdoor and indoor unit
1
Installation guide
The installation process is shown in the below diagram.
2
A Parts
1
4
7
9
11
13
15
5’’ inch screen
2 battery lid
3 reset button
Dial button
5 View button
6 Micro USB port
power/return button
8 Micro SD slot
SIM card slot
10 Battery slot
Speaker
12 Infrared light
Doorbell button
14 Microphone
CMOS sensor
16 Motion Sensor
B Main Menu
Photos
The system will automatically create the directory named as the
visiting date under photos directory and save the captured image as
the file named as the visiting time. The red marked number on the
upper right corner of photos shows the number of visitor. The file
format is hour_minute_second.jpg. For example, the file
13_05_06.jpg in the directory 20130815 means that the visitor
presses doorbell at time 13:05:06 on Aug 15, 2013.
Video
The system will automatically create one directory named as the
visiting date under Videos and save the recorded video as the file
named as visiting time. The red marked number on the upper right
corner of Videos shows the number of visitor message. The file
format is hour_minute_second.avi. For example, the file
14_01_02.avi in the directory 20130815 means that the visitor
presses doorbell at time 14:01:02 on Aug 15, 2013.
3
Mode Switch to "Home" or "Outdoor" mode
Home
If visitor presses doorbell, the system will auto shoot or record
and save the file after 1 second, and at the same time the doorbell
will ring, the viewer will be automatically turned on and the host can
see clearly who’s at the door,
If the host would like to know what’s outside, he can press main
button and press photo button on the screen.
Outdoor
After the doorbell is pressed, it will remind you of video message.
If ring stops and no feedback, the first voice reminder will be “Good
morning or afternoon, I am not at home, please leave me your voice
after press doorbell again and hear du voice. Thanks”. Within 5
seconds if the visitor presses doorbell and du voice ring, and the
system will start to record video message and save it into TF card.
After video message, the second voice reminder will be “if emergency,
please press doorbell again and call my phone, thanks”. Within 5
seconds if the visitor presses the doorbell, he will be able to connect
the bound phone number and talk with the host.
If the visitor stays in front of door for more than 3 seconds, the
doorbell button will light and remind the visitor to press it. And the
main button in the indoor unit will light and remind the host of visitor
coming. If no main button is pressed for more than the specified time,
peephole viewer will automatically take photo and save, and then
send multimedia message to the host ( you can turn off this function)
and the indoor unit will give alarm (you can turn off this function),
and the system can also automatically send message to the bound
mobile phone.
C Menu
Press "Menu" into menu interface,
Press “Photos”, user can view and delete all photos in the unit
and TF card,
Press “Video”, user can view and delete all messages in the
unit and TF card,
Press “Number” into custom up to 5 phone numbers can be
set, and one of them can be set as highest priority.
Phone surveillance, you can monitor peephole viewer and
hear what’s outside using bound phone to connect the embedded
4
phone number.
Unbound phone can’t be automatically connected with
peephole viewer, but it will be shown in the screen and give tips
on whether connect it or not. The SIM card can show the phone
not connected.
Press "Dialed" into called phone records, user can view and
delete it.
Press "Inbox" into short message record, user can view and
delete it.
Press "Calendar" into calendar item, it is convenient for user
to use it at home.
Press " FileSystem" into file manager item, user can view,
delete and format the video, image and message file.
Press " Monitor"
1 Monitor Trigger
When visitor comes, the system will automatically start to take
photo or record, the response time can be set as 1, 3, 5, 10, 15,
20 seconds or off. If it automatically take photo or send warn too
frequently (when the people traffic is large), you are suggested to
turn off this function.
2 Monitor Warning
When visitor comes, the system will intelligently turn on alarm
system, the alarm response can be set as 20 second or 30 second,
or off.
3
Sensibility
The surveillance sensitivity of outdoor unit covers low, middle
and high level. User can set it based on desirable requirement.
4 MMS Alert Switch
User can use the time mentioned in the reminding message to
find the photo. If the people traffic at the door is large, you are
suggested to turn off this function. Within 2 minutes only one
multimedia message will be sent out even if the visitor presses
doorbell for multiple times. Special attention: There exists latency
for the reason of mobile ISV.
5
Led Switch
When the visitor is detected, the indication light of doorbell
button will light. User can turn off this function.
6 Dialed voice switch
After SIM card is inserted and host out mode will be turned on.
Users can turn off this function. Only message is sent out and
phone will be not connected.
5
7 Data account
Custom press "options" to add PS account,
1 Account name
2 APN
3 Username
4 Password
5 Auth. type options is Normal or Secure
7 Advanced settings
1 Homepage 2 Connection type 3 User proxy address
4 Proxy address
5 Proxy port
6 Proxy user name
7 Proxy password 8 Primary DNS
9 Secondary DNS 10 IP address 11 Subnet mask
Press " Setting"
1 Time and Date
1 Set home city
Select the corresponding city based on user’s location.
2 Set date and format
3 Set time and format
Select the item to be updated, the small keyboard will be
provided for setting. After update, please press save button.
2 Tone settings
1 Door ring
User can select one among 10 defined melody, or specify the
other audio based on requirement. In ring setting->ring
audio->1, update->11, and select the file in memory card, the
supported format will be mp3.
2 Door ring Vol
User can adjust the volume, 1~7 levels are supported, the
default is level 5.
3 Ring Duration
The lasting time of ring can be set as 10, 20, 30, 45, 60,90
seconds, the default is 20 seconds.
4 Warning Ring
6 pieces of audio are provided, you can also select it from
the saved file.
5 Warning volume
1~7 levels of volume are provided, the default is 5.
6 Warning Duration
10, 20, 30 seconds can be selected and set.
7 Keypad
Users can set the voice of pressing button or muse it.
3 Display setting
1 Wallpaper
9 pieces of wall paper are defined in the system, user can
select it or customize it as the JPG image with 480x272 pixels
6
press "User defined" .
2 LCD backlight
User can set the lighting level as 1~5 levels, the default is
level 3. And the back lighting time is 10 seconds, the longest
time can be set as 60 seconds.
3 Pen calibration
Click anywhere on the screen with your stylus to start
calibration.
4 Record format
The system will provide the video with resolution is 480x272
dipi, the image can be captured as single, 3 pictures, or 5
pictures. The video recording time can be set as 3, 5, 10 or 15
seconds.
5
Language
1 Domestic Version
User can select Chinese or English
2 Oversea Version
User can select English, Spanish, French, German,
Portuguese, Russian, Italian, Turkish, Ukrainian, Arabic, Farsi,
Hindi, Vietnamese, Filipino, Thai)
6 Restore factory settings
Press “Restore settings and Restart” and press "Yes" then
system will restart. All setting will be restored as that defined
in the factory.
Press
1.
2.
3.
4.
"Help"
Installation guide
System information
Copyright
Contact us
USB connected with PC
1. The storage can be used as U disk and recharge peephole
viewer
2. Serial port can be only used as recharge.
7