1
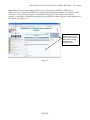
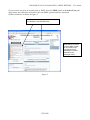
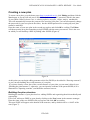
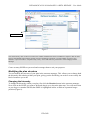
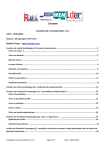
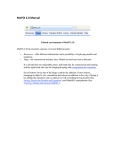
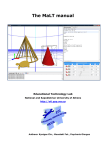
PEDAGOGICAL PLAN MANAGER 1.0 BETA RELEASE – User Guide
PEDAGOGICAL PLAN MANAGER 1.0
BETA RELEASE
USER GUIDE
ITD-CNR
January 2007
ITD-CNR
PEDAGOGICAL PLAN MANAGER 1.0 BETA RELEASE – User Guide
INDEX
Introduction..........................................................................................................................................3
An overview.........................................................................................................................................4
Creating a new plan..............................................................................................................................8
Building the plan structure...............................................................................................................8
Modifying the plan structure............................................................................................................9
Changing the hierarchy ................................................................................................................9
Changing the order.....................................................................................................................10
Entering contents............................................................................................................................12
Editing contents..........................................................................................................................12
Adding comments to a field .......................................................................................................12
Inheriting data ............................................................................................................................12
Editing the “Tools” fields ..........................................................................................................14
Editing the “Resources” fields ...................................................................................................15
Editing an existing plan......................................................................................................................16
ITD-CNR
PEDAGOGICAL PLAN MANAGER 1.0 BETA RELEASE – User Guide
Introduction
The Pedagogical Plan Manager is a tool designed for creating, editing and viewing pedagogical
plans. To help manage various degrees of complexity in plans, the Manager adopts the notions
Hierarchical Pedagogical Plan (HiPP) and Single-Node Pedagogical Plan (SNiPP). It is important to
have a clear understanding of the notions HiPP and SNiPP, as these are keys terms adopted
throughout the Pedagogical Plan Manager and in the support material.
HiPPs are plans with a tree-like hierarchical structure. This structure is made up of one or more
nodes called SNiPPs. Each SNiPP is a pedagogical plan in its own right and may also have its own
child SNiPPs. In other words, a SNiPP can be the root node of a HiPP, and a HiPP may embrace
part of a plan or the entire plan.
Figure 1 shows three exemplars of HiPP/SNiPP structure.
Figure 1
The Pedagogical Plan Manager has an editing environment for creating and editing plans, and a
viewing environment for navigating them.
You can enter these environments simply by clicking on the corresponding buttons on the home
page (http://remath.itd.cnr.it) .
The viewer is presently under further development so we suggest you use the WYSIWYG Editor
for the moment.
This guide explains how to use the beta version Editor, which runs on the Mozilla Firefox browser.
Testing of the Pedagogical Plan Manager with other browsers is currently in progress.
ITD-CNR
PEDAGOGICAL PLAN MANAGER 1.0 BETA RELEASE – User Guide
An overview
Once in the Editing environment, you will find a list of pedagogical plans. The name of the author
and the main topics are specified for each plan. To open a plan, simply click on its title and enter the
required password (default passwords will be communicated to all the partners).
Figure 2 shows a screenshot of the Editor as you will see it.
toolbar
password window
structure manager
content area
Figure 2
The Editor screen is divided into four general areas:
Top – the banner identifying the plan you have opened;
Left – the control panel comprising:
o toolbar (navigation and help);
o structure manager for viewing and building the structure;
o password window to set privileges;
Centre – the content area, where plan data are edited;
ITD-CNR
plan title
descriptor menu
PEDAGOGICAL PLAN MANAGER 1.0 BETA RELEASE – User Guide
Right – the expandable menu of plan descriptors to set which particular fields or groups of
fields you want to edit.
When you open a plan, the Identity descriptors are shown by default in the content area.
The expandable descriptor menu on the right of the screen lets you choose exactly which fields you
want to display in the content area at any given time.
The descriptors are grouped into 4 sets (Identity, Rationale, Target, Specification), which in turn are
divided into subsets. To open or close a set (or subset) of descriptors, click the white arrow in that
set’s name bar. To display or hide any descriptor in the content area, click its checkbox in the menu.
If you close a (sub)set at a given point in the work session, its status will be retained when you
reopen it (Figure 3).
Detailed explanations of the various fields (or set of fields) are provided in the yellow bubbles
(Figure 3).
Note that the contents
shown in the content
area correspond to the
descriptors currently
selected in the
descriptor menu.
Bubble containing
an explanation of
the field.
Figure 3
ITD-CNR
PEDAGOGICAL PLAN MANAGER 1.0 BETA RELEASE – User Guide
Select View in the structure manager allows you to set the focus at HiPP or SNiPP level.
When you enter a plan, the root SNiPP is selected by default and its contents are displayed in the
content area. If you want to display a child SNiPP, simply click on the title in the structure
manager: a red border will appear around this activated SNiPP, whose contents will be displayed in
the central area (Figure 4).
Note that the contents
shown in the content
area correspond to the
descriptors currently
selected in the
descriptor menu.
Figure 4
ITD-CNR
PEDAGOGICAL PLAN MANAGER 1.0 BETA RELEASE – User Guide
If you want an overview of an entire plan or HiPP, select the HiPP option in the Select View pulldown menu: the red border will enclose the root SNiPP (parent) and any associated
SNiPPs (children), as shown in Figure 5.
The content area displays the contents of all
the SNiPPs in the selected HiPP.
Note that the contents
of each SNiPP shown
in the content area
correspond to the
descriptors currently
selected in the
descriptor menu.
Figure 5
ITD-CNR
PEDAGOGICAL PLAN MANAGER 1.0 BETA RELEASE – User Guide
Creating a new plan
To create a new plan, go to the home page (http://remath.itd.cnr.it), click Editing and then click the
New button. A pop-up will ask you to enter the default “create plan” password, which is the name
of your DDA written in lower case, i.e. alnuset, aplusix, casyopee, cruiser, mopix, machinelab.
This will automatically become the password for accessing your plan. You can subsequently change
the password for your new plan in the editor, but the default password for creating any new plan
cannot be modified.
Enter the name of your new plan in the second pop-up box and click OK to confirm. The Editor
will then open the new plan containing a single SNiPP with the name you entered. This is the root
on which you will build up a HiPP by adding other SNiPPs (Figure 6).
Figure 6
At this point you can begin adding contents to this first SNiPP (as described in “Entering contents”)
or you can start building the overall structure of your plan.
If you have already a clear idea of the overall structure of your plan, you can start it directly (see
“Building the plan structure”); otherwise, you can input the contents of the parent SNiPP (as it is
illustrated in “Inputting contents”) and build the structure later on.
Building the plan structure
Building the structure of your plan involves adding SNiPPs and organizing them hierarchically and
sequentially.
First of all, add a new SNiPP to your plan by clicking on the New button in the structure manager.
Enter the name of the new SNiPP in the pop-up box and click OK to confirm.
This new SNiPP will appear at the bottom of the structure, and by default will be a “child” of the
root (Figure 7).
ITD-CNR
PEDAGOGICAL PLAN MANAGER 1.0 BETA RELEASE – User Guide
3 new SNiPPs
Figure 7
Note: theoretically, there is almost no limit to the number of SNiPPs that can be included in a sequence. Bear in mind
however that SNiPPs contain all the learning resources needed for enactment, so a high number of resource-rich
SNiPPs in a plan will make it computationally “heavy” and could effect the performance of the Pedagogical Plan
Manager.
Create as many SNiPPs as you need and rearrange them to suit your purposes.
Modifying the plan structure
You can modify the structure of your plan in the structure manager. This allows you to change both
the hierarchy and ordering within your plan, giving you the flexibility you need to create exactly the
kind of structure you want.
Changing the hierarchy
To change the hierarchy within your plan, first click the Reorder button in the structure manager.
Now click on the SNiPP you want to shift and drag it up or down the plan map. You will notice that
as you drag over another SNiPP, that SNiPP is highlighted in blue to indicate a potential target
position (Figure 8).
ITD-CNR
PEDAGOGICAL PLAN MANAGER 1.0 BETA RELEASE – User Guide
The SNiPP named
“Partitioning of the unit” is
being moved to become a
child of “Introduction to
rational number
represented by fractions”.
Figure 8
If you drop on that target, your “uprooted” SNiPP will automatically become a child of this new
parent, and will be positioned as the last child in the “family unit” (HiPP), i.e. after any siblings
(Figure 9).
This is the result of the
operation. A new HiPP
has been created
within your plan.
Figure 9
If you are not satisfied with the result, simply click on the SNiPP again and drag it to a new
position. When you want to save the new plan structure, click on the Done Reordering button in
the structure manager.
WARNING: if the SNiPP you want to shift has any child SNiPPs of its own (i.e. if it is the root of
a HiPP), then these will be shifted en bloc with the parent, as a family unit.
Tip: when making modifications, it is best to hold SNiPPs on the right-hand side of the structure so
that you can clearly see the target destination highlighted in blue.
Changing the order
When you drag and drop one SNiPP on another in the structure manager, the uprooted SNiPP will
automatically be repositioned as the last child of the target parent, i.e. after any other siblings in the
“family unit”.
If you want to change the sequential order of SNiPPs at any given level in the hierarchy, you first
need to identify the parent and then “shuffle” sibling SNiPPs via the parent until the desired
sequence is obtained (Figures 10 and 11).
ITD-CNR
PEDAGOGICAL PLAN MANAGER 1.0 BETA RELEASE – User Guide
Suppose you want to shift
the SNiPP “Attributing a
name to a point” up in the
order.
Figure 10
Rather than moving the target
SNiPP itself, go to the first sibling
SNiPP (“Partitioning of the unit”)
and drag and drop that SNiPP
over its parent, so that it goes to
the bottom of the list.
Do the same for the other siblings
until you reach the desired order.
This is the correct order.
Click on Done reordering to
confirm.
Figure 11
This means that to shift a given SNiPP up the order, you will need to drag & drop a sibling onto the
parent. That sibling will then go to the bottom and consequently “push” your SNiPP up the order.
Repeat this action until your SNiPP is in the desired position.
Moving a SNiPP down the order involves dragging & dropping the SNiPP itself on the parent so
that it goes to the bottom of the order (Figure 11).
To achieve complex reordering at a given level in the hierarchy, you need to perform suitable up or
down shifts, remembering that in order to get a particular SNiPP into a given position, you may
need to operate on the siblings.
ITD-CNR
PEDAGOGICAL PLAN MANAGER 1.0 BETA RELEASE – User Guide
Entering contents
To activate and edit a field in the content area, first ensure that its descriptor is checked in the
descriptor menu. To activate a field for editing, click anywhere inside that field within the content
area.
Three buttons will appear: Edit (see “Editing a text”), Comment (see “Adding comments to a
field”), Inherit (see “Inheriting data”).
Some fields are presented by default as lists. These fields have two extra buttons, Add item and
Reorder, which allow you to enter or modify the list.
Editing contents
When the field is activated, click on the Edit button and begin editing. Use the options available in
the toolbar to input and format text, and to insert images, hyperlinks and HTML code as well.
Click OK to save, otherwise the changes made while editing will be lost.
Figure 12
Note that if you paste text that is already formatted, the field editor will ask you if you want to clean
the HTML code; click OK to confirm.
Adding comments to a field
You can add comments to any field in your plan. Click on the Comment button to add your
comment in the field editor.
As with field contents, you can add text, images, hyperlinks and html code. Click OK to save the
data. These will appear above the field contents as indented italic text.
Inheriting data
When editing a field, you can inherit automatically all the data en bloc from the corresponding field
in the parent SNiPP. In this way you can construct your plan in a top-down, cascade fashion.
To inherit data, open field editor, click on the Inherit button and click OK to confirm.
The inherit function inherits all the data from a given parent field and data can only be edited at its
source (inherited data appear in grey in the content area to show that they are inactive) (Figure 13).
ITD-CNR
PEDAGOGICAL PLAN MANAGER 1.0 BETA RELEASE – User Guide
Figure 13
Because Inherit lets you operate at the root of a HiPP, it simplifies the task of updating or
adjusting your plan globally. For example, if you need to update the Curricular Goals of your plan
in response to curriculum changes, you don’t need to re-edit that field in each and every SNiPP of
your plan: you simply update it at the root point in the plan where the inheritance chain begins.
Note that if you want to reuse data from a different field in the same SNiPP or from the same field in a non-parent
SNiPP (e.g. a sibling), simply copy and paste that data using the field editor or your computer clipboard. In contrast
with inherited data, data copied into another field can always be re-edited.
Note that the Inherit button is not available in:
• the root SNiPP of your plan (there are no corresponding parent fields to inherit from);
• the Identity>Title and Identity>Description fields;
• the Tools and the Resources field sets.
Note that you will need to refresh the browser page before you can edit the field you have inherited from.
ITD-CNR
PEDAGOGICAL PLAN MANAGER 1.0 BETA RELEASE – User Guide
Editing the “Tools” fields
In accordance with the specific needs of the ReMATH project, different fields are available for
bringing to light the educational affordances of the DDAs to be used within pedagogical plans.
The Tools field provides the opportunity for describing the set of tools that students are to use,
which may include computational tools such as DDAs as well as those of non-computational type.
Each individual tool can be described at different levels:
· Tool > Description is for general outlining of the tool;
· Tool > Features is for basic features or functionalities that the tool offers, e.g. drag and drop,
line drawing, etc.;
· Tool > Components is for those cases where the tool has a distinct sub-environment
(a microworld, an exercise type, etc.) - some tools are effectively clusters of such
components;
· Tool > Component Features is for any features that are specific to a given component.
If you want to add a tool, go to Tools in the content area and click on New Tool.
Enter the name of the new tool in the pop-up window. Click OK and the fields for describing that
new tool will open in the content area underneath any other tool description already in the SNiPP.
Provide a short description of the tool in the Description field or point to an online description.
Provide a link for accessing the tool, if it is available online (Figure 14).
Figure 14
Choose whether you want to provide details at feature or component level and click on “New
feature” or “New component” accordingly (Figure 14).
In the appropriate fields enter specific descriptions for each new feature or component (Figure 15).
ITD-CNR
PEDAGOGICAL PLAN MANAGER 1.0 BETA RELEASE – User Guide
The description
of the tool
component has
been added.
Figure 15
Note that for describing a tool in any detail beyond the general Description, you will need to adopt either the
Tool>Features or Tool>Components/Features option: you cannot use both fields for the same tool in a given SNiPP.
Indeed, when you create either a Feature or Component, the field for adding the other option will no longer appear in
the content area (if you change your mind after creating the instance, simply delete it and start again).
Each time you add a new tool to a SNiPP its fields will appear after any description of tool/s already
in the SNiPP.
Editing the “Resources” fields
The term Resources refers both to those that are needed for the activity to be carried out by students
(input resources) and those that are produced as a result of an activity (output resources).
Input resources may include, for example, a text of a problem to be solved using a DDA, a
worksheet, a table to be filled in, an assessment test, an article to be read, a web site to be visited,
etc.
An output resource might be, for example, a completed worksheet or spreadsheet table, a text, a
graphic representation, a discussion report. The output resource may be directly based on an input
resource (e.g. input resource - blank worksheet with problem text: output resource - completed
worksheet); conversely, it may be something produced from scratch (e.g. a report of an oral
discussion).
You can provide an overall description of the resources for a SNiPP in the Description field. To
add a new Input Resource, click on New Input Resource and enter the name in the pop-up
window. A new resource will appear underneath any input resources already in the SNiPP. Enter
the description of the resource in the Description field and then provide access to its contents by
clicking on the Resource contents button. Three options will then be proposed:
Upload contents (this allows you to upload a file from your computer to the server);
ITD-CNR
PEDAGOGICAL PLAN MANAGER 1.0 BETA RELEASE – User Guide
-
Create contents (this opens the editor window for you to enter the resource contents
directly, in the form of text, images, hyperlinks, etc.);
Link to Output Resource in external SNIPP (this allows you to choose from a list of all
the output resources created up to that moment in your plan) (Figure 16).
Figure 16
To add a new Output Resource, click on New Output Resource, enter a name in the pop-up
window and provide a description in the Description field.
Editing an existing plan
To edit an existing pedagogical plan, go to the home page, click Editor, choose the title you want to
edit from the list and enter the password. Now go to the structure manager, set Select View either to
HiPP or SNiPP and click on the part of the plan you want to focus on.
If you select the SNiPP view and then click on any SNiPP in the plan, a red border will appear
around that title in the structure map to indicated that it is active, and its contents will be displayed
in the contents area.
If by contrast you select the HiPP view, then all the titles in that HiPP will become active and their
the contents will be displayed.
To make editing easier, set the extendible menu on the right of the screen so that only those fields
you want to edit are displayed.
Note that changes made in the content area will only appear in the structure manager when you have refreshed the
browser page.
For any technical question, please write to: [email protected]
ITD-CNR