1
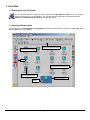
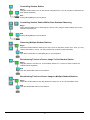
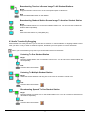
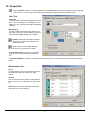
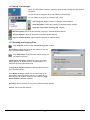
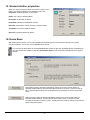
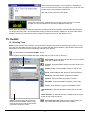
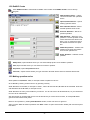
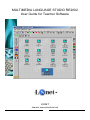
MULTIMEDIA LANGUAGE STUDIO RE2002
User Guide for Teacher Software
LSNET
Internet: www.winschool.net
1
Index
1. Interface
1.1 Starting Teacher’s Program..………
1.2 Language Studio Mode……………..
1.3 Studio Mode………………………….
3
3
3
4
8. Group conference
8.1 Making Pairs…………………………..
8.2 Making Groups ……………………….
8.3 Digital Teacher conversation………..
15
15
16
16
2. Buttons
2.1 Other Buttons………………………..
2.2 Virtual Recorder Buttons…………...
2.3 ReWrite Text Editor Buttons……….
2.4 ReCall Group Conference Buttons..
2.5 Language Library Buttons………….
2.6 Multimedia Buttons………………….
4
4
4
5
5
5
5
9. Using Text Files
9.1 Sending Text Exercises……………...
9.2 Saving Text Answers………………...
16
16
16
10. Properties
17
3. Icons
6
11. Tool Manager
11.1 Selecting Tool Programs…………...
11.2 Using Tool Manager………………..
11.3 Sending and Copying Files…….…..
18
18
19
19
4. Menus
4.1 File-menu…………………………….
4.2 Edit-menu…………………………….
4.3 Classroom-menu…………………….
4.4 View-menu…………………………...
7
7
7
7
8
13. Student Station Properties
20
14. Exam Boss
20
15. ReABC
15.1 Sending ReABC Tests…………......
15.2 ReABC Create…………………...….
15.3 Making ReABC Tests……………....
15.4 ReABC Create Properties………….
21
21
22
22
23
5. Editing Classroom
8
6. Basic Functions
6.1 Selecting Student Station…………..
6.2 Audio/Video Transfer By Dragging..
6.3 Audio Transfer by Dragging………..
6.4 Transfer by Shortcut Menu…………
8
9
9
11
12
7. Audio File Transfer
7.1 Defining Language Library………….
7.2 Defining Network Path………………
7.3 Transferring From Language Library
7.4 Saving Recording Files……………..
13
13
13
14
14
FinnNetSchool Multimedia LanguageStudio
is protected by copyright laws and international treaties.
All rights reserved © 2001 Renet Oy Remote Network Ltd.
The right to use is granted only for the registered system and in its entirety.
Any separation of the product components is prohibited.
The granted rights must not be transferred to a third party under any circumstances.
Unauthorized or distribution of this material, both electronic and printed, or any portion of it, may result severe civil
and criminal penalties, and will be prosecuted to the maximum extent possible under the law.
Renet Oy Remote Network Ltd is not responsible of any damage, direct or indirect, which may be caused by either
the software or hardware mentioned in this guide.
All legal issues will be governed by the laws in force in Finland.
19.04.2002
2
1. Interface
1.1 Starting Teacher’s Program
You can start the teacher's program by double clicking the LanguageStudio 2002 icon on the desktop.
If you cannot find the icon on the desktop, you may also click the Start button and select Programs,
Re2002 and LanguageStudio 2002 from the appearing menus.
1.2 Language Studio mode
The appearance of the Multimedia LanguageStudio interface is divided in three categories: Classroom, Control- and Studio -Function Buttons.
Language Studio buttons
Volume Control Slider
Flags
Multimedia Studio buttons
Student Station icon
Teacher's desk
Toolbox
3
1.3 Studio mode
The appearance of the MultimediaStudio interface is divided in three categories: Classroom, ReWrite and Studio Function Buttons.
The classroom is a space for student station
icons, which you can arrange to resemble
the actual classroom setting. You will control
the system with the studio function buttons.
2. Buttons
When you click button of software following function is started in selected student stations.
2.1 Other Functions Buttons
Log Request, a log request is transferred to the selected student stations. As student fills in his or her
name, the name is immediately updated under student icon.
Arrange student stations programs, the programs of student station will be arranged.
Start ReABC, start ReABC function
2.2 ReRec Virtual Recorder Buttons
Rewind, the current recording will go to begin.
Play, the current recording is replayed.
Stop, any of the current function is stopped.
Record, a student recorder begins to record a students´ speech as it replays the master recording.
Delete Recording, When you click on this button, the current student recording is cleared.
Save Recording, This button saves recording file from selected student stations.
Minimize virtual recorder, the student recorders of selected student stations are minimized.
Restore virtual recorder, the student recorders of selected student stations are restored.
Maximize virtual recorder, the student recorders of selected student stations are maximized.
Close virtual recorder, the student recorders of selected student stations are closed.
4
2.3 ReWrite Text Editor Buttons
Save a text files, saves answer text file from selected student stations.
Print text, prints answer text files from selected student stations.
Minimize virtual recorder, the student text editors of selected student stations are minimized.
Restore virtual recorder, the student text editors of selected student stations are restored.
Maximize virtual recorder, the student text editors of selected student stations are maximized.
Close virtual recorder, the student text editors of selected student stations are closed.
2.4 ReCall Group Conference Buttons
Start ReCall, the ReCall of selected student stations are started.
Make a Pair, the selected student stations will form a pair with discussion connection.
Make a Group, the selected student stations will form a group with discussion connection.
Stop Conference, the student stations will stop discussion connection.
Close Conference, ReCall of the selected student stations are closed.
2.5 Language Library Buttons
Undefined Flag, A button into which you may appoint a recording library (see Defining Language Library).
Defined Flag, The flag image on the button refers to a recording library of the appointed language (see
Transferring Audio File).
2.6 Multimedia Buttons
Broadcast: Audio and Video Selected, both image and sound can be broadcasted.
Broadcast: Audio Selected, only sound can be broadcasted.
Classroom: Control Selected, functions of language studio can be used.
Classroom: Edit Selected, design of classroom, like location of student icons, can be changed.
Lock, locks to the mouse and keyboard of selected student stations.
Unlock, unlocks to the mouse and keyboard of selected student stations.
Blank Screen, turns off monitors of selected student stations.
Unblank Screen, turns on monitors of selected student stations.
Properties, opens Properties window.
Disconnect, ends all active audio broadcasting.
5
3. Icons
Active Student Station (Blue), Normal student station in a classroom.
Inactive Student Station (Grey), Student station not recognized by the teacher's station. Indicates normally that the station is not in use.
Allowed When Dragging (Green), When you drag the student station or teacher’s icon, the green monitor will show you allowed places where to drop.
Not Allowed When Dragging (Red), When you drag the student station or teacher’s icon, the red monitor will show you not allowed places where to drop.
Selected Student Station, Student station selected by teacher. The square around the icon appoints at a
station or a group of station which your next function will affect.
Student Station Starting Virtual Recorder, Student station starting the ReRec virtual recorder.
Student Station In Recorder Mode, student station where the Recorder is running. The symbol on the
top right corner of the icon displays the current status of the recorder. For example, Play or Forward.
Student Station Running Group conference, student station where the ReCall is running.
Student Station in Conversation ,student Station is having the conversation.
Student Station Running Text Editor, student station where the ReWrite Text Editor is running
Locked Student Station, student station locked by teacher.
Calling Student Station, student at the station is calling for teacher’s attention.
Student Station using ReABC, student station where the ReABC Test is running
A number of combinations are possible according to the use of the system.
Teacher’s Desk, Teacher’s monitor and keyboard icon and Toolbox button
6
4. Menus
There are four menus on the teacher’s program: File, Edit, Classroom and View.
4.1 File menu
New, opens New Profile -window, where you can create new classroom design. Write the name of you new profile to the text field on
top of window and click OK-button.
Open, opens Open Profile –window wherefrom you can select
classroom profile you want to use.
Save As, opens Save Profile As –windows where you can save
user profile which are currently open with different name. Write to
name you want to the text field on top of window and click Save button.
You can also delete useless profile. Select the profile from the list
and press the Delete-key from keyboard.
Save, saves changes to current profile.
Exit, closes Language Studio program.
4.2 Edit Menu
Edit menu will come visible when Classroom Edit is activated.
Add Workstation, adds new undefined student station to the classroom.
Delete, removes the selected student station.
Select All, selects all student stations.
4.3. Classroom Menu
Update User List, updates information of classroom.
Reset All Workstations, resets multimedia hardware.
Reboot Selected Workstations, reboots selected student stations.
Reboot All Workstations, reboots all student stations.
Shut Down Selected Workstations, turns off selected student computers.
Shut Down All Workstations, turns off all student computers.
Properties, opens Properties window (see Properties).
Tool Manager, opens Tool Manager window (see Tool Manager).
7
4.4. View Menu
Recorder Buttons, Hide or show ReRec buttons.
ReWrite Buttons, Hide or show ReWrite buttons.
Croup conference, Hide or show ReCall buttons.
Other Functions, Hide or show Other Functions buttons.
Flags, Hide or show Flag Library buttons.
LanguageStudio, Hide or show all buttons except multimedia function buttons.
About ReBoss2002, opens About-window.
5. Editing Classroom
You may edit the classroom to the resemble the seat order in the actual classroom. Select edit tool by
pressing classroom button. Then, move the cursor on the icon which location you wish to reset. Hold
down the left mouse button and move the icon with your mouse. When you are done, release the button.
You can increase the number of selected icons by holding the [CTRL] key and moving the pointer over
additional targets and clicking the left mouse button. You can also select a number of student station by
lassoing the icons while holding down the left mouse button and moving the mouse.
You can select all student stations by double clicking the left mouse button on the unoccupied space of
the classroom.
You may rename each student station icon. As default the system displays the network names but usually
it is not very convenient. Just move the pointer on the name field under student station icon and click
once. Then, type in the student’s name and press [ENTER] key.
You can save each classroom settings on your disk. This way you can load any setting after another and
you do not need to re-edit the classroom over and over again. Open File menu and select Save As (see
Menus).
Later on, you may revert the setting by choosing File menu and selecting Open (see Menus).
6. Basic Functions
FinnNetSchool functions are based on intuitive Drag-and-Drop principle. It is very common in many other
applications, which makes it easy for you to learn these procedures. First, select the Control Mode by
clicking the Classroom button.
The following are instructions about how you can broadcast and receive image and sound. This function
is very illustrative and useful tool in order to instruct and observe student work. There are two ways to
perform these functions: dragging and using the shortcut menu.
8
6.1 Selecting Student Station
Begin
Move the cursor on the student station to be selected. Click the left mouse button. A square appears
around the icon.
End
Click another student station icon or on unoccupied space of classroom.
Selecting Multiple Student Stations
Begin
Hold down the left mouse button on unoccupied space of classroom. Lasso the student station to be
selected and release the mouse button.
Unless the student stations are in clustered group on the classroom you may start by selecting the first
station as you were selecting only one. Then, hold down [CTRL] key and click on other student stations to be selected. When done, release [CTRL] key.
You may also double click on the unoccupied space of classroom.
End
Click on a unselected student station or the unoccupied space of classroom.
6.2 Audio and Video Transfer By Dragging
When you are transferring both image and sound, you should select Audio/Video for Broadcast. The
following are the audio/video functions available by dragging,
Observing One Student Station
Begin
Drag the student station icon on teacher’s monitor icon. You do not have to select the student
station separately.
End
Click left mouse button or press [ESC] key on your keyboard.
Broadcasting Student Station Screen Image To Group Of Student
Stations
Begin
Select the student stations and drag the student station icon on one of the student
station icons.
End
Click left mouse button or press [ESC] key.
Broadcasting Student Station Screen Image To All Student
Begin
Drag the student station icon on the unoccupied space of classroom.
End
Click left mouse button or press [ESC] key.
9
Controlling Student Station
Begin
Drag the student station icon on the teacher’s keyboard icon. You do not have to select the student station separately.
End
Press [CRTL]-[END] on your keyboard.
Controlling Student Station While Other Stations Observing
Begin
Select student stations to be observing the control. Then, drag the student station icon on the
teacher’s keyboard icon.
End
Press [CRTL]-[END] on your keyboard.
Observing Multiple Student Stations
Begin
Select the student stations and drag one of the icons on teacher’s monitor icon. Then, you may
observe the station in a loop. You may set the loop continuous (see Properties).
End
Click left mouse button or press [ESC] key on your keyboard.
Broadcasting Teacher’s Screen Image To One Student Station
Begin
Drag the teacher’s monitor icon on the student station icon. You do not have to select the
student station separately.
End
Click the ReBoss560 button on the taskbar.
Broadcasting Teacher’s Screen Image to Multiple Student Stations
Begin
Select the student stations and drag teacher’s monitor icon on one of the student icons.
End
Click the ReBoss560 button on the taskbar.
10
Broadcasting Teacher’s Screen Image To All Student Stations
Begin
Drag the teacher’s monitor icon on the unoccupied space of classroom.
End
Click the ReBoss560 button on the taskbar.
Broadcasting Student Station Screen Image To Another Student Station
Begin
Drag the student station icon on the other student station icon. You do not have to select the
student station separately.
End
Click left mouse button or press [ESC] key.
6.3 Audio Transfer By Dragging
Audio transfer is a handy function if you do not have to observe or control students. In language studio environment you often or only to listen to students’ speech, broadcast your own speech or have a discussion.
When you are transferring only sound you should select Audio for Broadcast.
Listening To One Student Station
Begin
Drag the student station icon on teacher’s monitor icon. You do not have to select student station separately.
End
Click the Disconnect button.
Listening To Multiple Student Station
Begin
Select the student stations and drag one of the icons on teacher’s monitor icon
End
Click the Disconnect button.
Broadcasting Speech To One Student Station
Begin
Drag the teacher’s monitor icon on the student station icon. You do not have to select the student station separately.
End
Click the Disconnect button.
11
Broadcasting Speech To Multiple Student Station
Begin
Select the student stations and drag the teacher’s monitor icon on one of the student station
icons.
End
Click the Disconnect button.
Broadcasting Speech To All Student Stations
Begin
Drag the teacher’s monitor icon on the unoccupied space of classroom.
End
Click the Disconnect button.
Discussing With One Student Station
Begin
Drag the student station icon on the teacher’s keyboard icon. You do not have to select student
station separately.
End
Click the Disconnect button.
Discussing With Multiple Student Station
Begin
Select the student stations and drag the teacher’s monitor icon on one of the selected
student station icons.
End
Click the Disconnect button.
6.4 Audio/Video Transfer By Shortcut Menu
When you move the cursor on a student station icon and click the right mouse button, the shortcut menu appears on the screen. You may select your option on the menu by clicking the left mouse button.
You should select Audio/Video for Broadcast when you are using Audio/Video transfer by the shortcut
menu.
Student station Menu
Teacher’s Menu
12
7. Audio File Transfer
7.1 Defining Language Library
Before you may use the Language Library, you need to define the flag buttons and appoint the directories.
When you click a flag button with right mouse button the Language Library window appears on the
You may define the flag key details here. This is, adding, changing, or removing flag symbols and appointed audio file directories.
The selected language is shown in identifier field. You can change it by clicking another flag symbol on the
tabs below.
Path-button, opens Select Folder window there you can select path where sound files are stored.
Empty-button, erases all information from the current flag
Send Flags-button, will transfer all the flags and paths to the recorders of student stations.
7.2 Defining Network Path
The folders need to be shared before you can refer to them from the language library. You may perform
the sharing by clicking the folder icon with the right mouse button in operating system. Then, select Sharing from the appearing menu. Select Shared with the name and Read Only or Full from the definition windows appearing on the screen.
You cannot share server folders remotely but it has to be done locally.
When you have selected the correct language and the flag defining it, click the Path button. Select the
correct location for the files on the Browse For Folder -window appearing on the screen.
First select the Network Neighborhood on the Browse For Folder -window then select computer and the
correct folder. Click OK button and the flag is defined.
13
7.3 Transferring From Language Library
The flag buttons on the Language Library panel on the left edge of the interface are made to make your language lab operating easy. Each of six buttons can be defined to appoint to a directory with audio files. If no flag
symbol is shown on a button, it has not been defined (see Buttons).
If you desire, you may transfer any audio file to each student station independently to the others. This allows to teach multiple languages in multiple
levels at the same time.
When you click a defined flag button, the list of the appointed audio files appearing on the screen. You may then select any of the files by clicking the
identifying name. The total duration appears on the bottom of the window
when you click on an identifier.
If there are any subdirectories under appointed path, you see them in list. You
can open subdirectory by clicking it and select sound file from there.
Quick Preview –button, activates and deactivates Quick Preview. If Quick Preview is activate program
will automatically start playing file when it is selected from the list.
Preview –button, opens Preview-windows where selected file can be previewed more accurately.
Send–button, sends selected file to virtual recorders of selected students. If virtual recorders are closed
they will be automatically opened.
Language File Icons
You can send files in many formats to students. Type of the file can be seen by the icon next to file in the
list.
Subdirectory, can contain files and more subdirectories
Wave Sound File
MP3 Sound File
Video File, digital video file (mpg, avi, mov, dat)
Text File, will be opened in ReWrite Text Editors of selected student stations
7.4 Saving Recording Files
You collect students recordings to any place in local network you want.
Click Save recordings -button that will open Save Recordings –window.
In Save Recordings –window First select Network Neighborhood then select computer and the folder where
you want recording to be saved.
Write name you want recording to be called to File name -text
field. Recording will be saved with name you type and student
name, for example EngTest-John.wav.
14
Then Saving of Students’ Recordings -window appearing on the screen. The window displays Saving
time for one recording, target where to save recordings and how many student stations was selected.
Saving starts when you click Start Saving -button on
bottom of window.
You will see information how saving is proceeding in
windows.
Now saving –frame will show name of the recording
that is currently saved and two progress bar, upper
bar indicates status of current recording, lower bar
status of all recordings.
Status-frame will show all the recordings, which have
been already saved and amount of saved recordings.
If you click Cancel-button during saving, saving will be
stopped. When all student recordings are saved OKbutton will appear click OK-button to close window.
8. Group conference
Start ReCall to selected student stations by clicking Start ReCall –button.
The student icon will turn to Group conference –icon when ReCall is started.
8.1 Making Pairs
Click Make a Pair -button.
Groupconference window will appear displaying selected students whose have ReCall activated. Names will be listed in
two columns. Names next to each other will be in pair. In example James and Jack would form pair one and Eric and
David would be in pair two.
Randomize button will shuffle students.
If you have odd number of students selected (like 3 or
5), you may select with One Along -button will there
be one student without the pair or one group of three
talkers.
OK -button will make pairs displayed in columns.
Cancel -button will close window.
After pair is formed, student station icon will show In Conference -icon and name of the partner will be
displayed under student’s name.
15
8.2 Making Groups
Start ReCall Group conference programs and select two to four students to be in conference group.
Click Make a Group -button
Program will show list of names to be in group and ask you confirmation. Press OK to form group, Cancel
to quit grouping.
When you click Stop Conference -button , Group conference will end in selected stations.
8.3 Digital Teacher conversation
Teacher can make conversation with one to three students. First select student station(s), which have ReCall started, you want to talk with. Activate teacher’s conference function by clicking Teacher Conference -button located in right top corner of teacher’s desk, (next to teacher’s monitor). Button is not visible
before you check Allow digital conference –checkbox in Properties -window.
Group conference -icon will appear to teacher’s monitor.
Drag and drop student’s monitor icon over teacher’s monitor icon. Teacher’s and students’ icons will turn
to In Conference-icon.
You can end conversation by clicking Stop Conference -button from Group conference –button group.
You can stop teacher’s conference function by clicking button located next to teacher’s monitor icon.
9. Using Text Files
9.1 Sending Text
You can transfer text exercises to student stations same way as sending sound files.
Click the Flag –button that contains correct text file. Select text file by clicking it.
Click Send–button to send file to selected students. If student stations do not have ReWrite Text Editor
activated it will be opened automatically.
If you want to start ReWrite Text Editors up without sending any exercise click Restore Text Editor-button.
9.2 Saving ReWrite Text Files
You collect students recordings to any place in local network you want.
Click Save Text files -button that will open Save Text Files –window.
In Save Text Files –window First select Network Neighborhood then select computer and the folder where you
want recording to be saved.
Write name you want texts to be called to File name -text field. Texts will
be saved with name you type and student name, for example EngTestJohn.txt
You can text files from student stations by clicking Print Student´s Texts -button.
You can close ReWrite Text Editor from student stations clicking Close Text Editors -button.
16
10. Properties
Click Properties -button or select Properties from the Classroom -menu the Properties -window appears
on the screen. You can open the window also by selecting Properties from the shortcut menu.
User Tab
Language
You may select the interface language from this
menu. If your language is not available you can
create your own language files with the ReMess
software.
Background
You may select the background graphics from
the menu in the right. Any selection may be previewed in the sample window in the middle.
Palette -button will open Color- Window
where you can select background color
instead of picture.
Font -button will open Font- Window
where you can select font to used.
If Confirm Functions -check box is selected
program ask confirmation before doing function.
If Traditional Buttons -check box is selected buttons which where in older versions, like Start Up Recorders is
shown.
Workstations Tab
Active
In Active -tab you can see information about student stations, which are currently in classrooms.
Inactive
You can see information about student stations,
which are set to be in classroom but are turned
off.
Search-button will start searching missing student stations from the network.
17
Settings Tab
Student Screen Delay
Time in seconds that each student screen image
is shown on observation.
Teacher Screen Delay
Time in seconds that each student station icon
blinks on the screen displaying the following student station observation.
Continuous Loop
When you check this option the loop observation
continues until you press [ESC] key. If you uncheck this option the loop ends once it has completed displaying each student station screen.
Dual Screen
When you check this option the continuous loop
will not show the teacher’s screen between
student stations.
Switchable when Broadcasting
When you check this option student can switch
between broadcasted screen and own screen by
pressing F12.
Show Name When Observing
When you check this option the student stations taskbar will show students’ name.
Checking Show EXAM -button will make Exam Boss –button visible in main window.
Checking Allow digital conversation will make Teacher Conference –button visible in main window.
11. Tool Manager
With Tool Manager you can create shortcuts to the programs which could be remotely started in student’s
stations, sending or copying files to student stations and allow students to only use wanted programs.
11.1 Selecting Tool programs
Click on the Classroom menu and select Tool Manager. Tool Manager -window appears on the screen. You
can also open Tool Manger -window with right mouse click on Toolbox-button.
Add
When you click on this button, Select Execution
File window will appear on the screen. Select the
exe file that you wish to create a shortcut.
You can change the identifying name of the link by
double-clicking to Name –field. The text box
comes active and you can write new name on it.
Remove-button, will remove selected program
from Tool List.
OK-button, will confirms changes and closes window.
Cancel-button, will closes window without saving changes..
18
11.2 Using Tool manager
When you click toolbox located in teacher’s desk, the tool manager function window
will appear.
You will see list of programs, which are added to Tool Manager
You can select the program by clicking it with mouse.
Open Program, Opens program in selected student stations.
Close Programs, Closes all programs in selected student stations.
Copy file, Opens Send and Copy file –window.
Block Programs, Blocks all but selected programs in selected student stations.
Close Programs, Allows all programs in selected student stations.
Open in Teacher Station, Opens selected program in Teacher station.
11.3 Sending and Copying Files
Click Copy file -button to open Send and Copy file –window.
File to Send –textbox will show file that will be send to copied to selected student stations.
Click Path-button to open browse window where you
can select correct file.
If Send file to selected is selected file will be opened by
default program of student stations, example book1.xls
would be opened by Microsoft Excel.
If Copy file to Student’s drives is selected file will be copied to students stations.
From Where To Copy –frame you can select path in student stations where file will be copied to. If Folder do not
exist program will create it. Frame is only enabled if Copy
file to Student’s drives is selected.
Send File –button will send or copy file to selected student stations.
Cancel –button will close window.
19
13. Student station properties
When you click the student station icon with the right mouse
button, and select properties from appearing menu the
Properties -window appears on the screen.
Name, user name of student station.
IP Number, IP Number of Station
ID Number, identifier of multimedia network
Recorder, Recording in virtual recorder of student station.
Text Editor, Text file in students station
Allowed: Programs allowed in station.
14. Exam Boss
With Exam Boss Function you can send speaking and listening exams and exercises directly from analog
source to students. You do not have to digitalize them before.
You can start up Exam Boss by clicking Exam-button located in right bar. By default button is disabled you
can set it enable and visible by selecting Show Exam-button –check box from Settings-tab of Propertieswindow.
Start listening button will start broadcasting analog sound from teacher station to
selected student stations and locks keyboard and mouse of them. If “Record exam to
file” is selected then analog sound is digitised during broadcast, it can be saved after
exam.
Start recording button will start broadcasting analog sound from teacher station to
selected student stations, locks keyboard and mouse of them, maximizes virtual
recorders and starts recording in them. Virtual Recorders must be started up in stations
before using this function.
20
Test On-window will appear. During window is activated you
can not use any other functions of system but you can see from
student icons in what situation students are.
After test is over press Test Over button.
During the test there are small window in top-right corner of screen. From that
window you can see elapsed time and size of digitised master file.
If Start Recording where selected then students’ recordings will be automatically collected after test like told in
7.4 Saving Recording Files. Also broadcasted analog sound will be saved in digital form to same folder where
students’ answers are collected, file name is otherwise same but there are text Master in front.
15. ReABC
15.1 Sending Tests
ReABC is test program where teacher can send tests for students to answer by selecting right option or by writing to the text field. ABC test files are very easy to create with ABC Create software. After students have fill the
test answers and results will be automatically returned to the teacher.
To start ReABC click Activate ReABC -button.
Files –window shows all available ABC tests. Select test you want to use by clicking it .
Select Path, opens browse window where you can select
path that contains ABC files
Arrange, arranges ReABC window and main window vertically.
Always on top, makes ReABC window to stay on top
Send, sends selected ABC test file to selected stations.
Minimize, minimizes ReABC programs to taskbar.
Restore, restores ReABC programs to window.
Maximize, maximizes ReABC programs to full screen.
Close, closes ReABC programs and ReABC window.
If Show Results is checked students will see they score after
test.
If Save Answers is checked answers of students will be saved
to path shown under check box.
Status –window shows all student stations which have ReABC Test running,
name of the current Test file and is test
unfinished, finished or saved.
Select Saving Path, opens browse window where you
can select path where answers will be saved.
21
15.2 ReABC Create
User ReABC Create to make tests to ReABC Test. Double-click ReABC Create -icon to start up
program.
New Question Series – Clears
current and starts new questions
series.
Open Question Series – Opens
existing question series.
Save Question Series – Saves
created question series to file.
Previous Question – Moves to
previous question.
Next Question – Moves to next
question. If current question is last
of the series then this button has
little + sign, it means that click of
this button will create new question.
Dublicate question - Creates new
question and copies information
from current question to it.
Erase Question – Deletes current
question.
Add picture, Opens window where you can select bitmap picture to be added to question.
Font, Open window where you can select font used in question.
Properties, Opens Properties-windowInfo Text, Opens window where you type instruction text that will be shown to students before test.
15.3 Making question series
Write question to Question –field, for example ”What is capital of France?”
Go to A-field by clicking it with mouse or by pressing Tab key.
Write alternative to the field, for example “London”., When A -field has text, B -field will be activated. Write second alternative to the B -field, for example ”Paris”.
Write alternative as many of ten fields as you want to. You do not have to fill all alternatives, so you could have
from two to ten alternatives.
Set right answer by clicking letter that is next to field where you wrote correct answer, for example B. Background of letter will become yellow.
Move to next question by clicking Next Question -button, which has arrow to right icon.
After you have filled all wanted questions click Save -button to open Save window. Select path and name question series.
22
15.4 ReABC Create Properties
Click Properties-button to open Properties-window.
Language, you can select language for software.
If Answers will be typed is checked, students will not see
options but write they answers. If answers is same as any
of options teacher has wrote answer is correct.
Allow return to previous, defines can student return to
previous questions.
If Limited time is selected student has only specified
time to answer to the question, time can be set with text
box next to check box. Not available if Allow return to
previous is checked.
Check Capitals, defines is capitals checked, only available if Answer will be typed is checked.
Show Results to User, defines can students see they
scores.
Save Results to Folder, defines are results saved after
test. If selected saving path can be typed to text field below checkbox or browsed by clicking Path –button next to
text field
Send Result to Email, defines will result be sent to specified email address after test. If selected email address can
be typed to the text field under checkbox.
23
LSNET
Brescia Italy - Atlanta Georgia (USA)
24