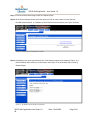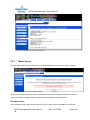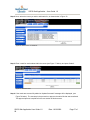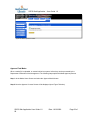
1
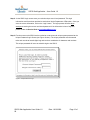
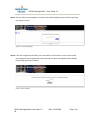
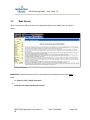
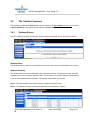
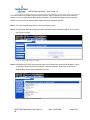
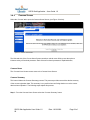
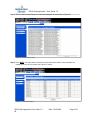
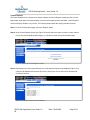
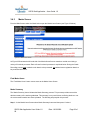
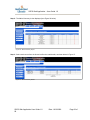
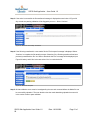
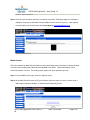
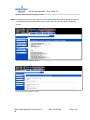
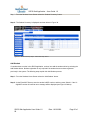
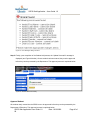
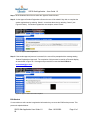
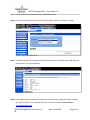
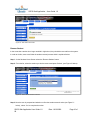
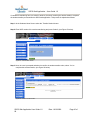
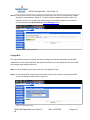
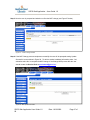
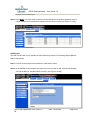
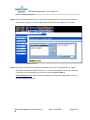
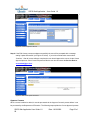
School Records and Certification (SRCS) Application User Guide 1.0 Department of Education Updated May 12, 2008 SRCS Web Application – User Guide 1.0 Table of Contents 1 1.1 1.2 1.3 1.4 2 2.1 2.2 2.3 2.4 2.5 2.6 2.7 2.8 2.9 2.10 3 Introduction .................................................................................................................................3 Document Purpose .................................................................................................................3 Document Scope.....................................................................................................................3 Audience and Assumptions.....................................................................................................3 Abbreviations, Acronyms, and Definitions...............................................................................3 SRCS Overview ...........................................................................................................................4 Application Purpose ................................................................................................................4 How Are MCP Numbers Used In The SRCS? ........................................................................4 What Data Is Displayed Within The SRCS?............................................................................5 What Are The SRCS Data Validation Standards? ..................................................................5 Regular Student/ Course Registration Process.......................................................................5 Late Student/ Course Registration Process ............................................................................6 Grade Reporting Process........................................................................................................6 Generating the Win School Student/Course Export File .........................................................7 Generating the Win School Course Marks Export File............................................................9 Additional Assistance ............................................................................................................10 SRCS Functional Processes ....................................................................................................11 3.1 3.2 3.3 3.4 Browser Specifications ..........................................................................................................11 Login Process........................................................................................................................11 Main Screen ..........................................................................................................................14 File Transfer Processes ........................................................................................................15 3.4.1 3.4.2 3.4.3 Students Screen ...................................................................................................... 15 Courses Screen ....................................................................................................... 24 Marks Screen........................................................................................................... 28 3.5 Online Data Entry Processes ................................................................................................35 3.5.1 3.5.2 3.5.3 Students Screen ...................................................................................................... 35 Courses Screen ....................................................................................................... 48 Marks Screen........................................................................................................... 55 SRCS Web Application User Guide 1.0 Date: 10/19/2009 Page 2 of 58 SRCS Web Application – User Guide 1.0 1 Introduction 1.1 Document Purpose This SRCS Web Application User Guide is meant to provide High School Administrators with a manual to assist them in their understanding and use of the School Records and Certification System (hereafter referred to as the SRCS web application). 1.2 Document Scope This user guide will explain how to use the SRCS web application, including step by step explanations of all the major functional processes that schools must perform within the application. The SRCS web application also functions as the primary user interface for the Annual General Return (AGR) application; however, the AGR application will not be covered within this manual. 1.3 Audience and Assumptions The intended target audience for this document is SRCS web application end-users i.e. High School Administrators. 1.4 Abbreviations, Acronyms, and Definitions The following definitions, acronyms and abbreviations are used throughout this document and have been provided here for reference purposes: Acronyms Definition AGR GNL HSC OCIO SRCS Annual General Return Government of Newfoundland and Labrador High School Certification System - Mainframe Office of the Chief Information Officer School Records and Certification System SRCS Web Application User Guide 1.0 Date: 10/19/2009 Page 3 of 58 SRCS Web Application – User Guide 1.0 2 SRCS Overview 2.1 Application Purpose The web application is used by high schools throughout Newfoundland and Labrador for two functional purposes: • Student/ Course Registration – From October to November schools electronically register L1, L2, L3, and L4 students and their course loads with the Government of Newfoundland and Labrador (hereafter referred to as the GNL). • Grade Recording – From June to July schools electronically record and report academic marks for L1, L2, L3, and L4 students, to the GNL. In order to effectively deliver this functionality, three different processes have been created: • Regular Student /Course Registration Process • Late Student /Course Registration Process • Grade Reporting Process Sections 2.5- 2.7 within this document provide an overview of these processes. 2.2 How Are MCP Numbers Used In The SRCS? Within the web application all student data, course data and grade data is tracked using student MCP numbers. If a student does not yet have an MCP number they can be assigned a temporary pseudo MCP number until they receive an actual number. A student must either have an actual MCP number or a pseudo MCP number before their data can be entered into the system. Schools cannot add a pseudo MCP number to the system. If a school requires a new pseudo MCP number they must contact the Certification Office at: Tel. (709) 729-7919 or Fax (709) 729-0611. Certification staff will then create the new pseudo MCP number, and after the nightly refresh has completed the requesting school will be able to add student/course data for the student to the web application using the new pseudo MCP number. SRCS Web Application User Guide 1.0 Date: 10/19/2009 Page 4 of 58 SRCS Web Application – User Guide 1.0 2.3 What Data Is Displayed Within The SRCS? Only high school students active within the past three years will be displayed in the web application. If a school wishes to access a former student, they must contact the Certification Office to have the current term added to that student’s record. After the nightly refresh the student should appear on web. The school can then add data to the system for that student. 2.4 What Are The SRCS Data Validation Standards? The SRCS web application has strict data validation standards. For example two students cannot have the same vital information i.e. Last Name, First Name, and Date of Birth, at least one of these values must be unique. Student’s vital information uploaded to the web must match the existing records on the Department of Education’s mainframe. If a change to student data is required the school must contact the Certification Office at: Tel. (709) 729-7919 or Fax (709) 729-0611. Then, after the nightly refresh, the student should appear on the school’s list of current students. The school can then add data to the system for that student. Detailed functional procedures for submitting student and/or course registration data to the SRCS web application can be viewed in Section 3 of this document. 2.5 Regular Student/ Course Registration Process Within the web application, schools are categorized based on their chosen data upload method, which is specified in each school’s profile. Based on this setting within the web application, schools are classified as either File Transfer, or Online Data Entry. Section 3.4 of this document explains the functional procedures for File Transfer schools, while Section 3.5 explains the functional procedures for Online Data Entry schools. The Regular Student/Course Registration Process is as follows: The first step in the process for a File Transfer school is to enter student/course data into it’s individual school administration system. There are several applications presently being used by schools to complete this process including; WinSchool, SOMAC and Power School. While the OCIO does not mandate schools to use a specific software application, schools are required to communicate to the Certification Office in advance which software application they will be using for the upcoming Registration and/or Grade Reporting period. SRCS Web Application User Guide 1.0 Date: 10/19/2009 Page 5 of 58 SRCS Web Application – User Guide 1.0 The next step in the registration process starts in the middle of October and runs for a three week period. During this stage of the process File Transfer schools upload their student/course data from their individual administration systems to the SRCS web application. Simultaneously, Online Data Entry schools enter their student/ course data. Once registrations begin, the data received each day is uploaded to the GNL mainframe nightly. The nightly refresh updates the web application with the most recent student/course information. 2.6 Late Student/ Course Registration Process Schools may need to submit student/course registration data after the regular registration period has passed. To accommodate this special circumstance a Late Student/Course Registration process has been created. Unlike the Regular Registration process, the Late Student/Course Registration process is not executed on a nightly basis during the registration period. Instead this is executed on request after the regular registration process has completed. For more information on this process please contact the Certification Office at: Tel. (709) 729-7919 or Fax (709) 729-0611. 2.7 Grade Reporting Process In addition to tracking student/course registration data, the SRCS web application is also used to facilitate the electronic recording and reporting of academic marks for L1, L2, L3, and L4 students to the GNL. This Grade Recording process transpires in June to July of each year. As with the registration process schools are classified as either File Transfer, or Online Data Entry. Within this document Section 3.4 explains the SRCS functional procedures for File Transfer schools, while Section 3.5 explains the functional procedures for Online Data Entry schools. Unlike the Regular Student/Course Registration process there is no nightly refresh. Instead, the application remains open for a two week period so that schools have time to enter their student marks. Then, after the reporting period is complete a single run of the Grade Reporting process occurs. During the Grade Recording process only academic mark data is to be processed, no student/course registration data is to be processed at this time. There is no Late Grade Reporting process. If a school needs to update student grades after the Grade Reporting process has completed they must contact the Certification Office at: Tel. (709) 729-7919 or Fax (709) 729-0611. SRCS Web Application User Guide 1.0 Date: 10/19/2009 Page 6 of 58 SRCS Web Application – User Guide 1.0 2.8 Generating the Win School Student/Course Export File The Student/Course Export File includes one record for each student selected as well as all courses for which the student is scheduled. If you need the template, it can be downloaded to from the following site: http://www.ed.gov.nl.ca/edu/k12/teaching/winschool/ The following instructions will load the required template into Win School, if you did registrations last year, skip to step 5 as the template is already in your database: Step 1: Launch the ASCII Transfer module. The main window will open. Step 2: In the ASCII Transfer main window, select ‘File’. Next select ‘Load Template from Disk’. Browse to the location of where you saved the template on drive C. Under Drives, select ‘C’: and the following information will be displayed Figure 1. Load Template From Disk Step 3. Under File name, select COURSE.CAT and click OK. Step 4. The save template window will be displayed with the name of the template. Click ‘OK’. SRCS Web Application User Guide 1.0 Date: 10/19/2009 Page 7 of 58 SRCS Web Application – User Guide 1.0 Step 5. On the window listing templates, double click on ‘Student/Course Registration- 20??’ template. The template will list to the screen. The template downloads the course number from the student request file. This allows schools to put the scholarship course in the request file, does not require the student to be scheduled into the scholarship course. If your students do not have courses in the request file, complete the steps below, titled ‘Creating Requests From Students Timetable’. Close the template window to get the students list screen. Step 6. On the Student List screen, select the students that are scheduled into Level 1, 2 or 3 courses. Sort the students by grade and select all Level 1, 2 and 3 students as well as any grade nine students one or more Level 1, 2 or 3 courses. For these grade nine students, all courses that the student is registered for will be downloaded, however, when the information is later uploaded into the web these students will only be registered for the high school courses. Step 7. Select the Import/Export menu. Next select Export. The message ‘The current student template is missing the Student Number or Student Name’; select ‘OK’. Under Drives, select ‘C:’. Enter the file name as COURSTUD.TXT and click ‘OK’. The Export Students window will be displayed stating the export has been completed. Step 8. Quit ASCII Transfer module. Step 9. Launch the School Setup Module. Step 10. Select ‘School’ then ‘Transfer Recording’. Check the following parameters to ensure that it is set to ‘No’. Figure 2. School Setup Transfer Recording SRCS Web Application User Guide 1.0 Date: 10/19/2009 Page 8 of 58 SRCS Web Application – User Guide 1.0 Creating Requests From the Students Timetable Step 1: Close ASCII Transfer Module. Launch the Scheduler Module. Step 2: Select all Students. Step 3: Select Schedule from the menu, then Change Students. From the options select Remove Requests. Step 4: Select Schedule from the menu, then Change Students. From the options select ‘Create Requests from Timetable’. Step 5: If students are doing the Scholarship exam, add it to the students request file. Step 6: Return to ASCII Transfer module and begin at step 5. 2.9 Generating the Win School Course Marks Export File The Course Marks Export File includes one record for each course that a student completed in the home school or another school and for which there is a valid final mark. If the mark is incomplete or the student is writing a deferred exam, leave the mark field blank. Step 1: Launch the ASCII Transfer module. The main window will open. Step 2: In the ASCII Transfer main window double click any template that is listed. The Template editor and Data List windows opens. Step 3: Close the Template Editor Window. Step 4: In the Data list window, choose Newfoundland then Course Marks Export. Step 5: In the directory dialog that opens, a default file name will appear with the following format, fbbbsss.dat: Step 6: Choose the directory C:\ and click OK. The file will be transferred to the hard drive. Step 7: A “Class Course Register” report is then displayed to the screen. This report should be printed and a copy sent to the Department and the District office. Step 8: Quit ASCII Transfer Module. SRCS Web Application User Guide 1.0 Date: 10/19/2009 Page 9 of 58 SRCS Web Application – User Guide 1.0 2.10 Additional Assistance For all non-web application specific requests such as requesting a pseudo MCP number please contact the Certification Office at: Certification Office Department of Education 3rd Floor, West Block Confederation Building 100 Prince Philip Drive St. John's, NL Tel. (709) 729-7919 Fax (709) 729-0611 For all other application specific questions, please contact the GNL IT Service Desk Office at: IT Service Desk Office of the Chief Information Officer Telephone: 1-709-729-HELP (4357) E-mail: [email protected] The service desk hours of operation are: Regular Hours: Monday-Friday 8:30 a.m.-4:30 p.m. Summer Hours: Monday-Friday 8:30 a.m.-4:00 p.m. SRCS Web Application User Guide 1.0 58 Date: 10/19/2009 Page 10 of SRCS Web Application – User Guide 1.0 3 SRCS Functional Processes The following section provides detailed functional process instructions for the SRCS web application. The purpose of this section is to provide end-users with a guide to assist them in understanding and performing functional processes within the application. 3.1 Browser Specifications The application only supports Internet Explorer (IE). 6.0+ browser(s). 3.2 Login Process Step 1: Launch the SRCS web application Login screen: • open the Government of Newfoundland and Labrador website: http://www.gov.nl.ca/ • select ‘Departments and Agencies’ from the menu located on the left • select ‘Education’ • at the bottom of the screen in the ‘Administrators’ section select ‘High School Records and Reporting’ • the SRCS Login screen should now open as seen below in Figure 3, and the URL should be: https://stjh-p001.gov.nl.ca/HRCS10GP/pkgmain.show_login Figure 3 – Main Login Page SRCS Web Application User Guide 1.0 58 Date: 10/19/2009 Page 11 of SRCS Web Application – User Guide 1.0 Step 2: At the SRCS Login screen enter your schools unique user id and password. This login information would have been provided to each school by the Department of Education. Once you enter the correct information, click on the ‘Login’ button. The login process will allow three attempts at entering the correct user id and password. If the information is lost or forgotten, please contact the Service Desk at [email protected] . Step 3: First time users to the SRCS are then asked to create a second unique system password at the Unique Password Login Screen (see Figure 4 below). The unique password must be entered twice and must be at least 8-digits long and can be a combination of characters and numbers. This unique password will serve as a double login to the SRCS. Figure 4 - Unique Password Login SRCS Web Application User Guide 1.0 58 Date: 10/19/2009 Page 12 of SRCS Web Application – User Guide 1.0 Step 4: The user will then be prompted to enter their school defined password at the School Login Page (see Figure 5 below). Figure 5 – School Login Expired Step 5: If the user is logged into the SRCS, but is are inactive for 20 minutes or more, as soon as the user attempts to use the system they will be required to re-enter their password at the Session Expired Page (see Figure 6 below). Figure 6 - Session Expired SRCS Web Application User Guide 1.0 58 Date: 10/19/2009 Page 13 of SRCS Web Application – User Guide 1.0 3.3 Main Screen When a user logs into SRCS the first screen displayed by default is the AGR Screen (see Figure 7 below). Figure 7 – Main Screen IMPORTANT: Users should then refer to the functional section that applies to their school ONLY; Either A. Section 3.4 File Transfer Processes Or B. Section 3.5 Online Data Entry Processes SRCS Web Application User Guide 1.0 58 Date: 10/19/2009 Page 14 of SRCS Web Application – User Guide 1.0 3.4 File Transfer Processes The processes explained with Section 3.4 of the document are for File Transfer schools only. If you are a Online Data-Entry school please proceed directly to Section 3.5 of this document. 3.4.1 Students Screen From the AGR Screen select the ‘Students’ button to open the Students Screen, (see Figure 8 below). Figure 8 – Students Home Screen Students Home The ‘Students Home’ button at the top left side of the screen returns users to the Students Home Screen. Students Summary The ‘Student Summary’ button initiates the Student Summary process. This process provides users with a tabular summary of the student registration data. This summary is very useful when confirming whether or not the correct data has been uploaded. The following steps explain this process: Step 1: From the Students Home Screen select the ‘Student Summary’ button. Step 2: The Student Summary is created and displayed as shown below in Figure 9. SRCS Web Application User Guide 1.0 58 Date: 10/19/2009 Page 15 of SRCS Web Application – User Guide 1.0 Figure 9 – Student Summary Report Students File Transfer The Student File Transfer process is used to upload student registration data from a schools individual school administration system to the SRCS. The following steps explain the transferring of student registration data to the SRCS: Step 1: From the Students Home Screen select the ‘File Transfer’ button. Step 2: Select ‘Browse’ to locate the file you wish to upload. Once it is found select ‘Submit’ to upload this file to the SRCS web application (see Figure 10 below). Figure 10 – File Transfer Screen SRCS Web Application User Guide 1.0 58 Date: 10/19/2009 Page 16 of SRCS Web Application – User Guide 1.0 Step 3: The student file transfer results are then shown. Records not passing validation will be flagged with an error as seen below in Figure 11. SRCS Web Application User Guide 1.0 58 Date: 10/19/2009 Page 17 of SRCS Web Application – User Guide 1.0 Figure 11 – File Transfer Validation Results Step 4: All data validation errors must be investigated by the user and corrected before the file can be successfully uploaded. Prior to attempting a file upload users should review all data to ensure that it is in the correct format and will pass validation. If data validation errors continue to persist SRCS Web Application User Guide 1.0 58 Date: 10/19/2009 Page 18 of SRCS Web Application – User Guide 1.0 even after the data has been checked and corrected the user should contact the Service Desk at [email protected] . Once the file has been successfully transferred a message informing the user of this is displayed (see Figure 12 below). Figure 12 – File Transferred Successfully Step 5: If this is the first time the file has been submitted, proceed directly to Step 6. However if the file has been submitted previously: • The user prompted asking them to confirm that they wish to re-submit the file, select ‘Submit’ at this prompt. • Followed by the message ‘Previous File Submission Entries Reversed’ and select ‘Continue’ to this prompt. Step 6: If the file is accepted successfully the File Accepted Screen will be displayed (see Figure 13 below). At this screen the user MUST select each course to confirm that the correct students are registered. SRCS Web Application User Guide 1.0 58 Date: 10/19/2009 Page 19 of SRCS Web Application – User Guide 1.0 Once the student registrations have been confirmed, the user must complete the Approve File Transfer process. The Approve Transfer process is explained in the next section. Figure 13 – File Accepted – Confirm Registration Details Approve Student File Transfer SRCS Web Application User Guide 1.0 58 Date: 10/19/2009 Page 20 of SRCS Web Application – User Guide 1.0 Once a student registration file is uploaded it must be approved before it can be processed by the Department of Education. The following steps explain in detail this approval process: Step 1: From the Students Home Screen select the ‘Approve Transfer’ button. Step 2: Select ‘Submit’ to confirm that the student and course registrations are complete (see Figure 14 below). Figure 14 – Approve Student File Transfer Step 3: If the transfer is approved users will be notified ‘Student and Course Registrations Approved’. The completion of this process is noted by a Fireworks display as seen below in Figure 15. If the approval process fails the user should contact the Service Desk at [email protected] . Figure 15 – Student and Course Registrations Approved. Student Reports SRCS Web Application User Guide 1.0 58 Date: 10/19/2009 Page 21 of SRCS Web Application – User Guide 1.0 This button initiates the Student Reports creation process. Student Reports are useful when confirming whether or not the correct student data has been uploaded. These Student Reports can be ordered by Student, or by Course. The following steps explain this report generation process: Step 1: From the Students Home Screen, select the ‘Reports’ button. Step 2: At the Student Reports Screen select either a Student Report Ordered by Student, or by Course (see Figure 16 below). Figure 16 – Select Type of Report To Create. Step 3: Depending on the report type selected, either of the following two reports will be displayed. Figure 17 shows the Students and Courses Report ordered by Students, while Figure 18 shows the Students and Courses Report Ordered by Courses. Figure 17 – Students Report Ordered by Student SRCS Web Application User Guide 1.0 58 Date: 10/19/2009 Page 22 of SRCS Web Application – User Guide 1.0 Figure 18 – Students Report Ordered by Course. Log Out The Log Out button logs a user out of the SRCS application. SRCS Web Application User Guide 1.0 58 Date: 10/19/2009 Page 23 of SRCS Web Application – User Guide 1.0 3.4.2 Courses Screen Select the ‘Courses’ tab to open the Courses Home Screen, (see Figure 19 below). Figure 19 – Courses Home Screen The left-hand side of the Course Home Screen contains a vertical menu offering users the option to initiate a variety of functional processes. Each of these functional processes is explained below; Courses Home The ‘Courses Home’ button returns users to the Courses Home Screen. Courses Summary This button initiates the Courses Summary process. This process provides users with a tabular summary of the course registration data. This summary is very useful when confirming whether or not the correct data has been uploaded. The following steps explain this process: Step 1: From the Courses Home Screen select the ‘Courses Summary’ button. SRCS Web Application User Guide 1.0 58 Date: 10/19/2009 Page 24 of SRCS Web Application – User Guide 1.0 Step 2: The Courses Summary Report is created and displayed, as seen below in Figure 20. Figure 20 – Course Summary Report Step 3: Users MUST now select each course from the list and confirm that the correct students are registered for the correct courses (see Figure 21 below). Figure 21 – Course Details Report SRCS Web Application User Guide 1.0 58 Date: 10/19/2009 Page 25 of SRCS Web Application – User Guide 1.0 Course Reports This button located on the Courses Home Screen initiates the Course Reports creation process. Course Reports are useful when confirming whether or not the correct data has been uploaded. Course Reports can be ordered by Student, or by Course. The following steps explain this report generation process: Step 1: From the Courses Homepage, select the ‘Reports’ button. Step 2: At the Course Reports Screen (see Figure 22 below) select the report you wish to create, either a Course List with Enrolled Students Report, or a Student List with Course Enrollment Report. Figure 22 – Select Type Of Course Report To Create. Step 3: Depending on the report type selected, one of the following reports will be displayed; Figure 23 is a report of All Students and Courses by Course, while Figure 24 is a report of All Students and Courses by Student. Figure 23 – All Students and Courses by Course Report SRCS Web Application User Guide 1.0 58 Date: 10/19/2009 Page 26 of SRCS Web Application – User Guide 1.0 Figure 24 – All Students and Courses by Student Report SRCS Web Application User Guide 1.0 58 Date: 10/19/2009 Page 27 of SRCS Web Application – User Guide 1.0 3.4.3 Marks Screen From the Main Screen select the ‘Marks’ tab to open the Marks Home Screen (see Figure 25 below). Figure 25 – Marks Home Screen As Figure 25 illustrates the left-hand side of the Marks Home Screen contains a vertical menu listing a variety of functional processes. Each of these functional processes is explained below. During the Grade Recording process only academic mark data is to be processed, no student/course registration data is to be processed at this time. Final Marks Home The ‘Final Marks Home’ button returns users to the Marks Home Screen. Marks Summary The ‘Marks Summary’ button initiates the Marks Summary process. This process provides users with a tabular summary of the student grade data. This summary is very useful when confirming whether or not the correct student marks have been uploaded. The following steps explain this process: Step 1: At the Marks Home Screen select Marks Summary button and then press ‘Continue’ SRCS Web Application User Guide 1.0 58 Date: 10/19/2009 Page 28 of SRCS Web Application – User Guide 1.0 Step 2: The Marks Summary is then displayed (see Figure 26 below) Figure 26 – Marks Summary Report Step 3: Select each course from the list and confirm the mark details, as shown below in Figure 27. Figure 27 – Marks Summary Details SRCS Web Application User Guide 1.0 58 Date: 10/19/2009 Page 29 of SRCS Web Application – User Guide 1.0 Final Marks File Transfer The Marks File Transfer process is used to upload student marks from a schools individual school administration system to the SRCS web application. The following steps explain the transferring of student grade data to the SRCS: Step 1: From the Marks Home Screen select the ‘File Transfer’ button. Step 2: Select the ‘Browse’ button to retrieve the marks file to be uploaded, and then select ‘Submit’ (see Figure 28 below). Figure 28 – File Transfer Screen SRCS Web Application User Guide 1.0 58 Date: 10/19/2009 Page 30 of SRCS Web Application – User Guide 1.0 Step 3: If the action is successful the file transferred message is displayed as seen below in Figure 29. Any records not passing validation will be flagged by an error. Select ‘Continue’. Figure 29 – Marks File Successfully Transferred Step 4: If the file being transferred is a new marks file the ‘File Accepted’ message is displayed. Select ‘Continue’ to complete the file transfer process. Otherwise, if the file being transferred has been previously transferred the ‘Do You Want to Re-submit the File?’ message will be displayed (see Figure 30 below), and If this is the case select ‘Yes’ to re-submit the file. Figure 30 – Marks File Accepted Step 5: All data validation errors must be investigated by the user and corrected before the Marks file can be successfully uploaded. The user should review the marks data being uploaded to ensure it’s in the correct format to pass validation. SRCS Web Application User Guide 1.0 58 Date: 10/19/2009 Page 31 of SRCS Web Application – User Guide 1.0 Step 6: Once the mark data has been successfully uploaded users MUST select each course from the list and confirm that correct mark data has been transferred to the SRCS (see Figure 31 below). The next step in the process is to approve these marks. This Approve Final Marks process is explained in the next section of this document. Figure 31 – Confirm Marks for Each Course Approve Final Marks When a marks file is uploaded, or entered online into SRCS, before it can be processed by the Department of Education it has be approved. The following steps explain this Mark Approval process: Step 1: At the Marks Home Screen and select the ‘Approve Marks’ button. Step 2: Next the Approve Courses Screen will be displayed (seen Figure 32 below). Users MUST now select each course and confirm the student mark information for each course. SRCS Web Application User Guide 1.0 58 Date: 10/19/2009 Page 32 of SRCS Web Application – User Guide 1.0 Figure 32 – Approve Final Marks Step 3: Once all mark information has been successfully entered the ‘Final Marks Approved’ message is displayed, along with an animated Fireworks display as seen below in Figure 33. If the approval process fails the user should contact the Service Desk at [email protected] . Figure 33 – Marks Approved Marks Reports This button initiates the Mark Reports creation process. Mark Reports are useful when confirming whether or not the correct student grade data has been uploaded to the SRCS. These Mark Reports can be ordered by Student or Course. The following steps explain this report generation process: Step 1: From the Marks Home page, select the ‘Reports’ button. Step 2: At the Mark Reports Screen (see Figure 34 below) select the report you wish to create, either a Mark Report Ordered by Student, or a Mark Report Ordered by Course. SRCS Web Application User Guide 1.0 58 Date: 10/19/2009 Page 33 of SRCS Web Application – User Guide 1.0 Figure 34 – Select Type Of Course Report To Create. Step 3: Depending on the type of report selected, one of the following reports will be displayed; Figure 35 is the Mark Report Ordered by Student report, while Figure 36 is the Mark Report Ordered by Course. Figure 35 – Mark Report Ordered by Student Figure 36 – Mark Report Ordered by Course SRCS Web Application User Guide 1.0 58 Date: 10/19/2009 Page 34 of SRCS Web Application – User Guide 1.0 3.5 Online Data Entry Processes The processes explained with Section 3.5 of the document are for Online Data-Entry schools only. If you are a File Transfer school please disregard Section 3.5 of this document. 3.5.1 Students Screen From the AGR Screen select the ‘Students’ button to open the Students Home Screen, (see Figure 37 below). Figure 37 – Students Home Screen - Online Data-Entry School Students Home The ‘Students Home’ button located at the top of the menu on the left hand side of the screen returns users to the Students Home Screen. Students Summary The ‘Student Summary’ button initiates the Student Summary process. This process provides users with a tabular summary of the student registration data. This summary is very useful when confirming whether or not the correct data has been uploaded. The following steps explain this process: SRCS Web Application User Guide 1.0 58 Date: 10/19/2009 Page 35 of SRCS Web Application – User Guide 1.0 Step 1: From the Students Home Screen select the ‘Student Summary’ button. Step 2: The Student Summary is displayed as shown below in Figure 38. Figure 38 – Student Summary Report - Online Data-Entry School Add Student If a student does not exist in the SRCS application, a school can add the student online by selecting the Add Student button. Student registration is only required if the student has never been registered previously in the system. The following steps explain this Add Student process: Step 1: From the Students Home Screen select the ‘Add Student’ button. Step 2: At the Enter MCP Screen, enter the student’s MCP number, and then press ‘Submit’. If the 12digit MCP number is invalid an error message will be displayed (see Figure 39 below). SRCS Web Application User Guide 1.0 58 Date: 10/19/2009 Page 36 of SRCS Web Application – User Guide 1.0 Figure 39 – Invalid MCP If the 12-digit MCP number has previously been entered into the system, and is presently assigned to the same school the ‘Student Already Enrolled’ error message will be displayed (see Figure 40 below). Figure 40 – Student Already Enrolled If the 12-digit MCP number is already in the system, and is assigned to a different school, the user will be informed that the student is already assigned to another school. The user will then be asked if they wish to transfer the student to the new school (see Figure 41 below). SRCS Web Application User Guide 1.0 58 Date: 10/19/2009 Page 37 of SRCS Web Application – User Guide 1.0 Figure 41 – Confirm Student Transfer Step 3: If the 12-digit MCP number is valid and has never been enter into the system previously, users will be brought to the Add Student Screen (see Figure 42 below). SRCS Web Application User Guide 1.0 58 Date: 10/19/2009 Page 38 of SRCS Web Application – User Guide 1.0 Figure 42 – Add Student Data – Online Data-Entry School Step 4: Enter valid information into all form fields. If a field is left unpopulated, or populated with invalid data an error message will be displayed and the student will not be added, (see Figure 43 below). SRCS Web Application User Guide 1.0 58 Date: 10/19/2009 Page 39 of SRCS Web Application – User Guide 1.0 Figure 43 - Error Messages Adding a Student Step 5: Finally, upon completion of the Student Add process, the ‘Update Successful’ message is displayed (see Figure 44 below). Once a student has been entered, they must be approved before they can be processed by the Department. This approval process is explained below. Figure 44 – Student Added Successfully. Approve Student All students newly entered into the SRCS have to be approved before they can be processed by the Department of Education. This approval process is explained below: SRCS Web Application User Guide 1.0 58 Date: 10/19/2009 Page 40 of SRCS Web Application – User Guide 1.0 Step 1: At the Students Home Screen select the ‘Approve Student’ button. Step 2: At the Approve Student Registrations Screen the user will be asked if they wish to complete the student registrations by selecting ‘Submit’, or terminate the action by selecting ‘Cancel’ (see Figure 45 below). If all student registrations are complete, select ‘Submit’. Figure 45 –Approve Student Registrations Step 3: If the student approval process is successful, the user will be prompted with a message stating ‘Student Registrations Approved’. The completion of this process is noted by a Fireworks display as seen below in Figure 46. If the approval process fails contact the Service Desk at [email protected] . Figure 46 –Approve Student Successful Completion Edit Student If a user wishes to edit a student’s registration information they must use the Edit Student process. This process is explained below: SRCS Web Application User Guide 1.0 58 Date: 10/19/2009 Page 41 of SRCS Web Application – User Guide 1.0 Step 1: At the Students Home Screen select the ‘Edit Student’ button. Step 2: From the list select the student you wish to edit and press ‘Submit’, (see Figure 47 below). Figure 47 – Select Student to Edit Screen. Step 3: At the Edit Student screen update the student’s detail information as desired with valid data, then press ‘Submit’, (see Figure 48 below). Figure 48 – Edit Student Screen. Step 4: If the update process completes successfully the user will see an ‘Update Successful’ message (see Figure 49 below). If the process errors the user should contact the Service Desk at [email protected] . SRCS Web Application User Guide 1.0 58 Date: 10/19/2009 Page 42 of SRCS Web Application – User Guide 1.0 Figure 49 – Edit Student Successful. Remove Student In the event that a student is no longer enrolled in high school, they should be removed from the system. In order to do this, users must follow the student removal process which is explained below: Step 1: At the Students Home Screen select the ‘Remove Student’ button. Step 2: From the list, select the student you wish to remove and press ‘Submit’, (see Figure 50 below). Figure 50 – Select Student to Remove Screen. Step 3: Next the user is prompted and asked to confirm the student removal action (see Figure 51 below), select ‘Yes’ to complete the action. SRCS Web Application User Guide 1.0 58 Date: 10/19/2009 Page 43 of SRCS Web Application – User Guide 1.0 Figure 51 – Confirm Student Removal Screen. Step 4: If the student removal process completes successfully the user will be prompted stating ‘Update Successful’ as seen below in Figure 52. If the Remove Process fails the user should contact the Service Desk at [email protected] . Figure 52 – Remove Student Successful. Transfer Student SRCS Web Application User Guide 1.0 58 Date: 10/19/2009 Page 44 of SRCS Web Application – User Guide 1.0 If a student is transferring from one school to another, the school receiving the student needs to complete the student transfer process within the SRCS web application. This process is explained as follows: Step 1: At the Students Home Screen select the ‘Transfer Student’ button. Step 2: Enter MCP number of the student transferring and press ‘Submit’, (see Figure 53 below). Figure 53 – Transfer MCP Screen. Step 3: Next, the user is prompted and asked to confirm the student transfer action, select ‘Yes’ to complete the student transfer, (see Figure 54 below). Figure 54 – Confirm Transfer Screen. SRCS Web Application User Guide 1.0 58 Date: 10/19/2009 Page 45 of SRCS Web Application – User Guide 1.0 Step 4: If the student removal process completes successfully the user will be prompted stating ‘Update Successful’ as seen below in Figure 55. To edit the student’s address information select ‘Yes’, otherwise, select ‘No’ to complete the student transfer. If the student transfer process fails the user should contact the Service Desk at [email protected] . Figure 55 – Student Transfer Successful. Change MCP The change MCP process is commonly used when a student who had been assigned a pseudo MCP number later receives their actual MCP, and therefore the SRCS has to be updated with the new number. The following steps explain this process: Step 1: From the Students Home Screen select the ‘Change MCP’ button. Step 2: At the Change MCP window enter the new MCP number, then select the student whose MCP you wish to change as shown below in Figure 56. Figure 56 – Change MCP Screen. SRCS Web Application User Guide 1.0 58 Date: 10/19/2009 Page 46 of SRCS Web Application – User Guide 1.0 Step 3: Next the user is prompted and asked to confirm the MCP change (see Figure 57 below). Figure 57 – Confirm Change to MCP. Step 4: If the MCP Change process completes successfully the user will be prompted stating ‘Update Successful’ as seen below in Figure 58. To edit the student’s address information select ‘Yes’, otherwise select ‘No’ to complete the MCP change. If the Change MCP process fails the user should contact the Service Desk at [email protected] . Figure 58 – MCP Update Successful. SRCS Web Application User Guide 1.0 58 Date: 10/19/2009 Page 47 of SRCS Web Application – User Guide 1.0 3.5.2 Courses Screen The left-hand side of the Course Home Screen contains a vertical menu allowing users to initiate a variety of functional processes, (see Figure 59). Each of these functional processes is explained below. Figure 59 – Courses Home Screen for a Data-Entry School Courses Home The ‘Courses Home’ button returns users to the Courses Home Screen. Courses Summary This button initiates the Courses Summary process. This process provides users with a tabular summary of the course registration data. This summary is very useful when confirming whether or not the correct data has been uploaded. The following steps explain this process: Step 1: From the Courses Home Screen select the ‘Courses Summary’ button. Step 2: The Courses Summary Report is created and displayed as shown below in Figure 60. SRCS Web Application User Guide 1.0 58 Date: 10/19/2009 Page 48 of SRCS Web Application – User Guide 1.0 Figure 60– Course Summary Report Step 3: Users MUST now select each course from the list and confirm the student registration data. I.e. confirm that the correct students are registered for the correct courses (see Figure 61 below). Figure 61 – Course Details Report Add Course The Add Course button is only available to Online Data Entry schools. The following steps explain the Add Course process: Step 1: From the Courses Home screen select the ‘Add Course’ button. Step 2: At the Add/Edit Course Screen, first select the course you wish to add, and then the semester you wish to add it for, and then select ‘Continue’ (see Figure 61 below). SRCS Web Application User Guide 1.0 58 Date: 10/19/2009 Page 49 of SRCS Web Application – User Guide 1.0 Figure 61 – Add/Edit Course Screen Step 3: At the Course Registration Screen, select the students to add to the course and press ‘Add’, as shown below in Figure 63. Once the appropriate students have been added, select ‘Submit’. Figure 63 – Course Registration Window Step 4: If the Add Course process completes successfully the user will be prompted with an ‘Update Successful’ message (see Figure 64 below). If you wish to add another course select ‘Continue’. If the Add Course process fails the user should contact the Service Desk at [email protected] . After a course is added the user should next approve the course via the Course Approval process. SRCS Web Application User Guide 1.0 58 Date: 10/19/2009 Page 50 of SRCS Web Application – User Guide 1.0 Figure 64 – Add Course Update Successful. Edit Course If a school needs to edit course information they must follow the Edit Course process. The following steps explain this process: Step 1: From the Courses Home Screen select the ‘Edit Course’ button. Step 2: At the Edit Course Screen, select the course you wish to edit (see Figure 65 below). Figure 65 – Add/Edit Course Screen Step 3: At the Course Registration Screen, use the ‘Add’ or ‘Remove’ buttons to edit course registrations as desired (see Figure 66 below). Once all course edits have been completed, select ‘Submit’ to process the request. SRCS Web Application User Guide 1.0 58 Date: 10/19/2009 Page 51 of SRCS Web Application – User Guide 1.0 Figure 66 – Course Registration Window Step 4: If the Edit Course process completes successfully the user will be prompted with a message stating ‘Update Successful’ (see Figure 67 below). If you wish to edit another course select ‘Continue’. After all course edits are complete the user should approve the course via the Course Approval process. If the Course Edit process fails the user should contact the Service Desk at [email protected] . Figure 67 – Edit Course Update Successful. Approve Courses When a course is added or edited, it must be processed via the ‘Approve Courses’ process before it can be processed by the Department of Education. The following steps explain the Course Approval process: SRCS Web Application User Guide 1.0 58 Date: 10/19/2009 Page 52 of SRCS Web Application – User Guide 1.0 Step 1: From the Courses Home Screen select the ‘Approve Courses’ button. Step 2: At the Approve Courses Screen select ‘Submit’ to confirm course registrations (see Figure 68 below). Figure 68 – Confirm Course Registrations Step 3: If the Course Approval process is success the user will see a ‘Course Registrations Approved’ message, (see Figure 69 below). If the process fails please contact the Service Desk at [email protected] . Figure 69 –Course Registrations Approved. Course Reports This button initiates the Course Reports creation process. Course Reports are useful when confirming whether or not the correct data has been Course data has been uploaded. These Course Reports can be ordered by student enrollment or course enrollment. The following steps explain this reporting process: SRCS Web Application User Guide 1.0 58 Date: 10/19/2009 Page 53 of SRCS Web Application – User Guide 1.0 Step 1: From the Courses Home page, select the ‘Reports’ button. Step 2: At the Course Reports Screen select the report you wish to create, either a Course List with Enrolled Students Report, or a Student List with Course Enrollment Report (see Figure 70 below). Figure 70 – Select Type Of Course Report To Create. Step 3: Depending on the report type selected, one of the following reports will be displayed; Figure 71 is the All Students and Courses by Course Report, while Figure 72 is All Students and Courses by Student Report. Figure 71 – All Students and Course By Course Report SRCS Web Application User Guide 1.0 58 Date: 10/19/2009 Page 54 of SRCS Web Application – User Guide 1.0 Figure 72 – All Students and Course by Student Report 3.5.3 Marks Screen From the Main Screen select the ‘Marks’ tab to open the Marks Home Screen (see Figure 73 below). Figure 73 – Marks Home Screen - Data-Entry School As Figure 73 illustrates the left-hand side of the Marks Home Screen contains a vertical menu listing a variety of functional processes. Each of these functional processes is explained below. Final Marks Home The ‘Final Marks Home’ button as seen above in Figure 73 returns users to the Marks Home Screen. SRCS Web Application User Guide 1.0 58 Date: 10/19/2009 Page 55 of SRCS Web Application – User Guide 1.0 Marks Summary The ‘Marks Summary’ button initiates the Marks Summary process. This process provides users with a tabular summary of the student grade data. This summary is very useful when confirming whether or not the correct student marks have been uploaded. The following steps explain this process: Step 1: At the Marks Home Screen select Marks Summary button and then press ‘Continue’ Step 2: The Marks Summary Report as shown below in Figure 74. Figure 74 – Marks Summary Report Step 3: Select each course from the list and confirm its mark summary details, (see Figure 75 below). Figure 75 – Marks Summary Details Enter/Edit Marks The ‘Enter/Edit Marks’ is used by these schools to directly enter marks for each student and their respective courses into the SRCS web application. The following steps explain this method of entering student grades into the system: Step 1: From the Marks Home Screen select the ‘Enter/Edit Marks’ button. SRCS Web Application User Guide 1.0 58 Date: 10/19/2009 Page 56 of SRCS Web Application – User Guide 1.0 Step 2: Next, select the course you wish to add marks for, as shown below in Figure 76. Figure 76 – Select Course To Add Marks. Step 3: Enter a mark for each student within the course (see Figure 77 below), and press ‘Submit’. Figure 77 – Edit/Enter Marks. Step 4: If the marks are success fully added an ‘Update Successful’ message will be displayed, (see Figure 78 below). The next step in the process is to approve the marks file that was transferred. This approval process is explained in the next section of this document. SRCS Web Application User Guide 1.0 58 Date: 10/19/2009 Page 57 of SRCS Web Application – User Guide 1.0 Figure 78 –Marks Update Successful. Approve Final Marks When a marks file is uploaded, or entered online into system, before they can be processed by the Department of Education it has be approved. The following steps explain this Mark Approval process: Step 1: At the Marks Home Screen and select the ‘Approve Marks’ button. Step 2: Next the Approve Courses Screen will be displayed (seen Figure 79 below). SRCS Web Application User Guide 1.0 58 Date: 10/19/2009 Page 58 of SRCS Web Application – User Guide 1.0 Figure 79 – Approve Course Marks Step 3: Users must then select each course confirm that the correct mark data has been entered correctly. Any invalid or incorrect mark data that has accidentally been entered must be corrected at this time, (see Figure 80 below). Figure 80 –Confirm Marks Update Successful. Step 4: Once all mark information has been successfully entered the ‘Final Marks Approved’ message is displayed, along with an animated Fireworks display as seen below in Figure 81. If the approval process fails the user should contact the Service Desk at [email protected] . SRCS Web Application User Guide 1.0 58 Date: 10/19/2009 Page 59 of SRCS Web Application – User Guide 1.0 Figure 81 – Marks Approved Marks Reports This button initiates the Mark Reports creation process. Mark Reports are useful when confirming whether or not the correct student grade data has been uploaded. These Mark Reports can be ordered by Student or Course. The following steps explain this report generation process: Step 1: From the Marks Home page, select the ‘Reports’ button. Step 2: At the Mark Reports Screen select the report you wish to create, either a Mark Report Ordered by Student, or a Mark Report Ordered by Course (see Figure 82 below). Figure 82 – Select Type Of Course Report To Create. Step 3: Depending on the type of report selected, either of the following reports will be displayed; Figure 83 is the Mark Report Ordered by Student report, while Figure 84 is a Mark Report Ordered by Course. SRCS Web Application User Guide 1.0 58 Date: 10/19/2009 Page 60 of SRCS Web Application – User Guide 1.0 Figure 83 – Mark Report Ordered by Student Figure 84 – Mark Report Ordered by Course SRCS Web Application User Guide 1.0 58 Date: 10/19/2009 Page 61 of