1
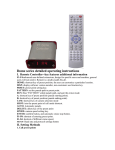
VNS-HC8510A series detailed operating instructions
一. Remote Controller--key features additional information
F1-F4:advanced user-defined extensions, design for specific users and machine, general users will not need it.
Remote is a multi-model-fits-all.
HOME: shortcut key of preset position, the user can customize a particular location.
DISP: display software version number, non-customers use function key.
PRSET: preset point setting key.
PATTERN: set the parade path to preset point.
RUN: Run "PATTERN" setted parade path, and quit the cruise mode.
A: shortcut key of preset position (parade starting point).
B: shortcut key of preset position (parade ending point).
CAM: shortcut key of camera selection mode
SHOT: into the preset point of call mode shortcut.
AUTO: Automatic parade.
DELETE: delete key of the preset point
SPEED: camera speed setting key.
ENTER: confirm button, and automatic cruise stop button.
P1-P8: shortcut of entering preset point.
S1-S4: shortcut of different cruise speed.
SETUP: Baud rate and protocol settings button
二. Setting Methods
1. Call preset points
Press the "SHOT" button to enter Preset point call mode, respectively, enter the numbers 0-9 can be directly
invoked 9 below preset point, do not need to press "ENTER" button to confirm, the camera will reach preset point
position.
If want to enter 9 or more preset point, please press "-/--" key
To delete the wrong, please press "C" key and press "ENTER" key, the camera will arrive the preset point location.
2. Remove existing preset points
Press "DELETE" button for 3 seconds to enter delete mode preset points, respectively, enter a number 0-9 can
directly delete the following nine preset points, do not need to press "ENTER" button to confirm.
If you want to delete more than 9 preset points, please press "-/--" key, then you can enter values greater than 9.
To delete the wrong, please press "C" key, then press "ENTER" key, the camera will delete this preset point.
3. Set up a new preset points
Press "PRSET" button for 3 seconds to enter preset point setting mode, enter the numbers 0-9 respectively, can be
directly preset settings the 9-below point, do not need to press "ENTER" button to confirm. To set up more than 9
preset points, press "-/--" key, you can enter values greater than 9. To elete the wrong, plese press "C" key, then
press "ENTER" key to confirm, when the preset point was successfully set.
4. Set tour path of preset points
The first step, set preset points. Example, pre-set point 1,point 2 and points 3, the location of these three preset
points and camera lens positions are different, that is, non-linear three positions.
The second step, determine the parade path. Such as a parade of the three-point manner is 1-2-3-2-1 ... ..., that is
1/4
repeated among 123 parade.
The third step, the memory parade path. Press "PATTERN" button 3 seconds into the parade path of preset points,
the beginning of setting mode, enter a number 1,2,3,2,1, respectively, the camera will reach the preset point
position, that is to guide the camera to go a complete manual parade between 3 points, and then press button
"PATTERN" 3 seconds to complete the setup.
The fourth step, press "RUN" button to start to run this parade pattern. The camera will follow a ready pre-set path
to start parade, and also will stay in the running(the stay location is the all preset points). To exit the cruise mode,
just press"RUN" button.
5. To set the starting point to the end of the parade path
Methods: The first step, set preset points. Click "PRSET" button 3 seconds to enter preset point setting mode,
respectively, enter the letters AB directly to set start and end point. If you are running and found anti-AB path, then
re-set the AB, can be exchanged AB location.
The second step, press "AUTO" key to run the AB model. camera repeatedly uniform parade between AB, press
S1-S4 can change the speed of parade. To stop the parade , press "ENTER" button.
6. To set the baud rate and protocol
Methos: Press "SETUP" button 3 seconds into camera’s set the baud rate and protocol mode, use the "up-down
“key to select "P" protocol or "D" protocol, use the "left-right" key to change the baud rate, there are 1200 bps, 2400
bps, 4800 bps, 9600 bps optional, and then press "ENTER" button.
三. Camera Address Setting
1. DIP Switch Description
Open the camera, you will see the PCBA, there is a 10-bit mode DIP switch, which DIP 1-6 is the camera address;
DIP7-8 is the baud rate,DIP7hit the ON , DIP8hit the OFF, baud rate is 1200bps; DIP7hit the OFF , DIP8hit the OFF,
baud rate is 2400bps; DIP7hit the ON , DIP8hit the ON, baud rate is 4800bps; DIP7hit the OFF , DIP8hit the ON,
baud rate is 9600bps;DIP 9 is the camera protocol, the switch hit the ON is a Pelco-P, hit the OFF switch is Pelco-D;
DIP 0 is a RS485 terminal resistance, hit the ON switch is to connect a 120Ω resistor
2. Camera Address Setting
Camera addresses are set aside in the form of binary code on switch. To simultaneously control more than one
camera at the same time, need to set up different address. For example, if you want to set on the 4th camera’s
address, first decimal 4 must be converted into a binary, that is 100. Then hit the DIP 3 switches ON, while hit in the
other switch among DIP 1-6 OFF.
3. To simultaneous control several cameras, the specific address settings, please see the following
comparison table (in the following table, use 1 to indicate when DIP switch position is ON, and use 0 for OFF)
2/4
Camera number
Camera address
DIP-switch position
(decimal)
(binary)
(camera switch position 1-6)
NO.1
0 0 0 0 0 1
1 0 0 0 0 0
NO.2
0 0 0 0 1 0
0 1 0 0 0 0
NO.3
0 0 0 0 1 1
1 1 0 0 0 0
NO.4
0 0 0 1 0 0
0 0 1 0 0 0
NO.5
0 0 0 1 0 1
1 0 1 0 0 0
NO.6
0 0 0 1 1 0
0 1 1 0 0 0
NO.7
0 0 0 1 1 1
1 1 1 0 0 0
NO.8
0 0 1 0 0 0
0 0 0 1 0 0
NO.9
0 0 1 0 0 1
1 0 0 1 0 0
NO.10
0 0 1 0 1 0
0 1 0 1 0 0
NO.11
0 0 1 0 1 1
1 1 0 1 0 0
NO.12
0 0 1 1 0 0
0 0 1 1 0 0
NO.13
0 0 1 1 0 1
1 0 1 1 0 0
NO.14
0 0 1 1 1 0
0 1 1 1 0 0
NO.15
0 0 1 1 1 1
1 1 1 1 0 0
NO.16
0 1 0 0 0 0
0 0 0 0 1 0
NO.17
0 1 0 0 0 1
1 0 0 0 1 0
NO.18
0 1 0 0 1 0
0 1 0 0 1 0
NO.19
0 1 0 0 1 1
1 1 0 0 1 0
NO.20
0 1 0 1 0 0
0 0 1 0 1 0
NO.21
0 1 0 1 0 1
1 0 1 0 1 0
NO.22
0 1 0 1 1 0
0 1 1 0 1 0
NO.23
0 1 0 1 1 1
1 1 1 0 1 0
NO.24
0 1 1 0 0 0
0 0 0 1 1 0
NO.25
0 1 1 0 0 1
1 0 0 1 1 0
NO.26
0 1 1 0 1 0
0 1 0 1 1 0
NO.27
0 1 1 0 1 1
1 1 0 1 1 0
NO.28
0 1 1 1 0 0
0 0 1 1 1 0
NO.29
0 1 1 1 0 1
1 0 1 1 1 0
NO.30
0 1 1 1 1 0
0 1 1 1 1 0
3/4
NO.31
0 1 1 1 1 1
1 1 1 1 1 0
NO.32
1 0 0 0 0 0
0 0 0 0 0 1
4. Multi-cameras Selection Control
The first step, set the camera address. According to the method described above, to definite of the camera number
and set the corresponding address of the camera.
The second step, select the camera. Click "CAM" key to enter the ball machine selection mode, respectively, enter
the numbers 0-9, can directly select the 9-below camera, do not need to press "ENTER" button to confirm. To set up
nine or more numbered camera, press "-/--" key, you can enter values greater than 9, to delete the wrong, press "C"
key, to confirm press "ENTER" key, then this number of camera choose successfully.
The third step is to use other keys to control on the camera’s operations.
四. Highlight
1. The maximum operating speed of the camera is of 63.
2. A PTZ controller is defaulted can control 32 cameras, and most can control up to 127 (from No. 33 to start
somewhere, need to use the software Write), up to 32 preset points can be set.
3. "A" and "B" can only be used to set the start and end location of the two cruise mode, and between the "A" and
"B" it can not set other preset points.
To set more pre-set points, the method please accordance with Article 4 to set up.
4. Remote control of other key features please refer to the original manual.
Appendix Operation Setting for AY-HC8510A Series
1. Camera Address Setting
A Press CAM Key, then choose the Address of the Camera need to be setted
B Press “PRESET” "SETUP" button 3 seconds separately
2. Baud Rate Setting
A Press "SETUP" button 3 seconds into camera’s set the baud rate and protocol mode,
use the "up-down “key to select "P" protocol or "D" protocol,
B Press “PRESET” "SETUP" button 3 seconds separately
4/4