1
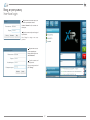
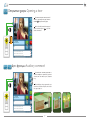
Руководство Пользователя Soft Receiver Soft Receiver User Manual SoftReceiver UTENTE_RU-EN 24805920 12-07-13 Вход в программу Inerface login RU Введите имя пользователя и пароль, назначенные установщиком системы. Доступ Пользователь Нажмите “Изменить” чтобы назначить новый пароль. Абонент Пароль Выход Изменить Вход EN Type the username and password assigned by the installer. Press “Change“ to assign a new access password. RU Введите имя пользователя и текущий пароль. Изменение пароля Пользователь Введите новый пароль и нажмите “Изменить”. Абонент Пароль Новый пароль EN Type the username and current password. Повторите пароль Type your new password and press “Change”. Изменить Отмена 2 Описание основного окна и функций клавиш Main window and function buttons description RU EN Выход из приложения Closes the application Настройки Application setup Блокировка входящих вызовов. Все вызовы будут отражены в списке пропущенных Locks incoming calls. Call trace remains in the list of lost calls Функция AUX 2 (настраивается установщиком) AUX 2 command (configured by the installer) Функция AUX 1 или подсветка лестницы Aux1 command or stairway lighting Открытие двери выбранной вызывной панели Opens the door of the displayed entry panel Активация и просмотр выбранной вызывной панели или камеры Displays images from selected entry panel or camera Ответ на входящий вызов или переадресация вызова Answers an incoming call or forwards a call Окончание вызова Ends active call Переадресация вызова Transfers a call Линия Line Ожидание вызова Call waiting Входящий вызов Incoming call Исходящий вызов Outgoing call Серый цвет означает, что функция недоступна Grey key indicates function disabled RU EN RU Область просмотра камер и вызывных панелей EN Display area for callers and plant cameras. Информация об активных вызовах Details on active calls. RU Режимы просмотра RU Имя пользователя RU Список пропущенных вызовов. EN Viewing Modes EN Username. EN List of lost calls. Иконка – Icon 3 Описание – Description Вызывная панель Entry panel Камера Camera Группа консьержей Porters Group Консьерж Porter Icona – Icon Descrizione – Description Группа абонентов Contacts Group Абонент Contact Абонент с IP устройством Contact on IP line Абоненты на аналоговой линии Contact on analogic line Настройки Device setup RU Первоначально список “КОНТАКТЫ” будет пустым. Для изменения списка необходимо зайти в меню, нажав клавишу . Наполнение списка “ИЗБРАННЫЕ” Нас тро й ки Контакты Язык RU Перетащите в правое окно иконки устройств, которые должны быть отображены в списке “КОНТАКТЫ”. Темы Клавиша 2 позволяет перемещать выбранные иконки в окне списка; для удаления иконки из списка, перетащите ее в левое окно. Также в список можно добавить группу абонентов или пультов консьержей; вызов группы переадресуется всем членам группы. At startup the window “CONTACTS” will be empty. EN Choose the contents of the Contacts window The content is freely configurable by the user pressing the button . EN Drag in the right window the icons that represent the devices you want to see in the window “CONTACT”. 2 The 2 buttons allow you to change the position of the selected contacts in the window; to remove a contact from the list, drag it in the left window. Inside the area contacts are also allowed groups of contacts or groups of IP Porters; direct call to a group will be forwarded to all members of the group. Закрыть Выбор языка программы Нас тро й ки Контакты Язык RU Темы Выберите вкладку “Язык”, затем выберите нужный язык из списка. Нажмите “Закрыть” для возврата к основному окну программы. Choice of program interface language EN Select “Language”, then select the desired language. Press the button “Close” to return to the main screen. Закрыть 4 Режим просмотра и поиска Viewing and Searching mode Контакты Изменяемый список наиболее часто вызываемых и отображаемых устройств. RU Панели и камеры КОНТАКТЫ RU Данное окно содержит список панелей и камер, доступных для абонента. ПАНЕЛИ И КАМЕРЫ Contacts Entry panels & Cameras The window contains the list of contacts or groups of contacts. among the reachable ones, that the user wishes to contact quickly. EN EN The window contains a list of all the Entry panels and cameras of the plant that are accessible to the user. ПОИСК КОНТАКТЫ ПАНЕЛИ И КАМЕРЫ ПОИСК Поиск Данное окно позволяет быстро находить нужные устройства из всего доступного для абонента списка. RU Ricerca КОНТАКТЫ RU Введите один или несколько символов названия искомого устройства, сразу будет отображен результат поиска. ПАНЕЛИ И КАМЕРЫ ПОИСК Search EN Type one or more letters of the name or surname of the contact searched, the search result is displayed immediately. EN The window allows you to quickly search for the desired contact between all those present in the plant and accessible to the user (even the ones not annexes to the “Contact “ window). 5 Ответ на вызов Answering a call 1 RU Если вызываемое устройство оборудовано камерой, вызывающий пользователь отображается одновременно со звонком вызова, но без аудио. 2 EN If the calling device is equipped with camera, when the call comes in the caller is displayed on the screen simultaneously with the call tone, but audio communication is not enabled yet. 3 RU Для ответа на вызов и активации аудио связи с вызывающим пользователем нажмите клавишу “ответ” или клавишу вызываемой линии. EN To answer the call and enable audio communication with the caller, press “answer” or the key corresponding to the calling line. 6 Открытие двери Opening a door RU При активном подключении к вызывной панели (с аудио\видео или аудио) нажатие клавиши открывает замок двери. EN With a call enabled toward the entry panel (audio or audiovisual) press to open the electric lock installed. Доп. функции Auxiliary command RU Дополнительные клавиши управления позволяют активировать различные устройства системы, такие как замки, ворота, освещение и т.д. EN The auxiliary keys can be programmed to operate devices connected to the plant, such as electric locks, gates, lights, etc. . 7 Переадресация вызова Transferring a call 1 RU При активном вызове (рис. 1), нажмите клавишу активной линии, чтобы перевести вызов в режим ожидания (рис. 2), вызывающий (у абонентского устройства или вызывной панели) услышит мелодию. 2 Для возобновления сигнала нажмите клавишу линии связи снова. EN With a call enabled (fig.1), press the key on the line to be placed on hold (fig.2), the caller (entry panel or receiver) will hear a melody while waiting. To resume the communication, press the “Line” key again. 3 4 RU После перевода вызова в режим ожидания, выберите из списка нужного абонента, на которого будет переадресован вызов (используйте при необходимости окно “поиск”) (рис. 3) и выполните вызов (рис. 4); Вызов будет отображен в окне Л2>. EN After placing the caller on hold, refer to the user list and select the user to whom the call should be transferred, if necessary using the “search” window (fig.3) and perform the call (fig.4); the call in progress will be displayed on window L2>. 8 Переадресация вызова Transferring a call 5 6 RU После того, как соединение установится, будет активирована ранее недоступная клавиша: Соединение (аудио/видео) линий Л1> и Л2>. EN Once the communication with the receivere is established, a previously unusable button will activate: Establishes communication (audio/ video) between lines L1> and L2>. RU После установки соединения между вызывной панелью и абонентским устройством, линии Soft Receiver освобождаются. 7 EN Communication between the entry panel and the receiver is established and the Soft Receiver linea are free. 9 Активация вызывной панели и просмотр камер Self-activation RU В списке “Панели и Камеры” выберите любую панель или камеру A (из списка доступных); нажмите клавишу B для активации изображения. КОНТАКТЫ Последовательное нажатие позволяет циклически просматривать камеры и панели из списка . ПАНЕЛИ И КАМЕРЫ 2 Активация панели или камеры приводит к включению видео; для получения аудио сигнала нажмите . Для открытия замка двери, связанной с вызывной панелью необходимо нажать клавишу . EN From the list “Entry panels & Cameras” select any entry panel or camera A (among the reachable ones); press the key B to display the images. SEARCH Utente: Sig. Sertec By repeatedly pressing it is possible to view the images on the listed devices in cyclic sequence. Self-activation enables only the video connection; to enable audio communication press . The opening of the gate coupled to the displayed entry panel is still possible using the button . КОНТАКТЫ ПАНЕЛИ И КАМЕРЫ 2 SEARCH Utente: Sig. Sertec 10 RU Возможные обновления настоящего документа представлены на сайте www.bpt.it. EN Any updates made to this document are available at this site: www.bpt.it. Изготовитель сохраняет за собой право на внесение любых изменений в продукцию в целях улучшения функциональности. The manufacturer reserves the right to make any modification to the product in order to improve its functionality. BPT S.p.A. a Socio Unico Via Cornia, 1 33079 Sesto al Reghena (PN)-Italy http: www.bpt.it e-mail: [email protected]