1
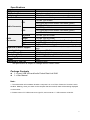
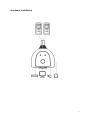
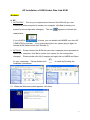
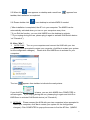
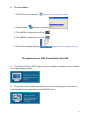
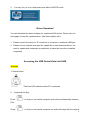
2-PORT USB, VGA AND AUDIO POCKET DATA LINK KVM USER MANUAL (DS-11404) Table of Contents Introduction …………………………………………………...............3 Specifications …………………………………………………….......4 Hardware Installation ………………………………………………..5 AP Installation of Pocket Data Link KVM……...…………….……..6 The Icon Status ………………………………………………………10 The Application of Pocket Data Link KVM ………………………...10 Driver Download ……………………………………………………. 11 Accessing the Pocket Data Link KVM ………………………….….11 Remark ………………………………………………………………. 12 Troubleshooting ………………………………………………..……..13 2 2-PORT USB, VGA AND AUDIO POCKET DATA LINK KVM Introduction The USB Pocket Data Link KVM switch allows a single keyboard, video display monitor, and mouse to be switched to access multiple computers. The switch provides more table space in addition to saving the cost of multiple keyboards and monitors. The data link function lets users to perform Data Transfer between two computers. The PIP mode is the value added to this device. Features ◆ ◆ ◆ ◆ ◆ ◆ ◆ ◆ Access multiple PCs with one set of Keyboard, Mouse, Monitor and Speakers. Space saving. Compatible USB 1.1/2.0 specifications. Picture in Picture (PIP) function. Performs Data Transfer between two computers. Data Link function conforms High speed USB specification. Select PCs by using Remote Control button or Hot -key commands or AP. Support SVGA, VGA, XGA, WXGA, UXGA, WUXGA, QXGA and multi-sync. monitors (the max. resolution is up to 2048*1536). ◆ Using application software to switch independently. ◆ Switching independent KVM and Audio. ◆ Supports DDC, DDC2, and DDC2B. ◆ Switch Mode: Windows: 1. Switch button 2. Keyboard Hot-Key 3. Application Icon ◆ No extra power is required. ◆ Windows XP / Vista, *7 (Home and Professional edition) compatible. 3 Specifications Function PC Port USB Device Port Cable Length Port Selection Specification 2 2 (only for one keyboard and one mouse) KVM cable 1.2M each Switch button or Hot-key commands or AP selection 1 x USB Type A Male PC1 Cable Connector PC2 1 x 3.5mm Mini-Phone Stereo Jack Male (green) 1 x HDB -15 Male 1 x USB Type A Male 1 x 3.5mm Mini-Phone Stereo Jack Male (green) 1 x HDB -15 Male Keyboard 1 x USB Type A Female 1 x USB Type A Female 1 x 3.5mm Mini-Phone Stereo Jack Female (green) 1 x HDB-15 Female (blue) 2 x Blue LED USB Keyboard and USB Mouse (also support Multimedia Keyboard & Mouse support type) Operating Voltage USB power (DC 5V) Power Consumption 190mA Resolution (Max.) 2048*1536(QXGA ) / 1920*1440(WUXGA) Operating System Windows XP / Vista / 7 Weight 355g Dimension (L x W x H) 82x88x25(mm) * The specification is subject to change without further notice. KVM Connector Mouse Audio Monitor LED Package Contents 1 x 2-port USB VGA and Audio Pocket Data Link KVM 1 x User Manual Note: 1. This KVM Switch will not detect whether a computer is on or off if the “Power On” function is set in the Bios. Meaning, when you switch to the computer that is turned off, there will be nothing displayed on the monitor. 2. Please connect “R” USB connector to right PC, and connector “L” USB connector to left PC. 4 Hardware Installation 5 AP Installation of USB Pocket Data Link KVM Windows A. XP 1. AUTO PLAY: Turn on your computers and connect the KVM with your two computers (when prompted to restart your computer, click Yes to restart your system for the configuration changes). The icon appears to indicate the ready status. If you click Exit to leave, you can double-click KMDS icon from MY COMPUTER to activate. If you unplug during the use, please plug-in again to activate KVM Switch device (ref. Remark 4). 2. AP PLAY: Please connect the KVM with your two computers (when prompted to restart your computer, click Yes to restart your system for the configuration changes). Please double click My Computer and right-click on KMDS and Open for your computers. Please double-click to install by following the installation procedures. 2.1 When the Welcome screen appears, click Next. 6 2.2 Create a desktop icon. 2.3 Click Install to start the installation. 2.4 When the following screen appears, click Finish. 7 icon appears on desktop and a small icon 2.5 When the appears from taskbar, the installation is completed. 2.6 Please double click from desktop to activate KMDS if needed. (*After installation is completed, the AP is in your computer. The KMDS can be automatically activated when you turn on your computers every time. **If you Exit the function, you can click KMDS from the desktop to activate. ***If you unplug during the use, please plug-in again to activate KVM Switch device “ref. Remark 4”). B. Vista / Win 7 1. AUTO PLAY: Turn on your computers and connect the KVM with your two computers (when prompted to restart your computer, click Yes to restart your system for the configuration changes). Please click Run KMDS.exe to activate for your computers. The icon appears from taskbar to indicate the ready status. If you click Exit to leave, you can click KMDS from COMPUTER to activate again. If you unplug during the use, please plug-in again and click Run KMDS.exe to activate KVM Switch device (ref. Remark 4). 2. AP PLAY: Please connect the KVM with your two computers (when prompted to restart your computer, click Yes to restart your system for the configuration changes). Click COMPUTER to pop-up the screen to find the AP files: 1)KMDS 8 and 2)RAM Disk. Please right-click on KMDS and Open for your computers. 2.1 Please double-click procedures. When the to install KMDS by following the installation icon appears on desktop and a small icon appears from taskbar, the installation is completed. 2.2 Please double click from desktop to activate KMDS if needed. (*After installation is completed, the AP is in your computer. The KMDS can be automatically activated when you turn on your computers every time. **If you Exit the function, you can click KMDS from the desktop to activate ***If you unplug during the use, please plug-in again to activate KVM Switch device “ref. Remark 4”). 9 C. The Icon Status: 1. KVM PIP function selected: 2. Data transfer: (left-click on icon to pop-up or close) and pop-up window 3. The KMDS on computers is off-line: 4. The KMDS on computers is on-line: 5. The function display window: (Right-click on icon to pop-up or close) The Application of USB Pocket Data Link KVM A. The Picture in Picture (PIP) mode is the value added to this device and is suitable for a single display monitor. B. This product also combines the Data-Link function allowing you to copy files on desktop between two computers under KVM PIP mode. 10 C. It is easy for you to cut and paste texts within KVM PIP mode. Driver Download You can download the latest software for supported KVM device. Please visit our homepage to have the updated driver. (http://www.digitus.info). 1. Please connect the device’s “R” connector to computer or notebook USB port. 2. Please visit our website and open the update file to start download driver. You need to update both computers or notebooks to have the new driver installed completely. Accessing the USB Pocket Data Link KVM Windows 1. Switch button *The blue LED indicates which PC is selected. 2. Keyboard Hot-Key: Press x 2 and you can switch computer and audio simultaneously between PCs. Press x 2 and you can switch computer but audio still stays with the original 11 one. 3. Click Switch KVM to switch computer and audio simultaneously between PCs. 4. Click Switch Audio to switch audio but computer still stays with the original one. 5. Click KVM PIP to start the PIP to perform data transfer. 6. Click Exit to leave the function. 7. appears to indicate the data transfer is in The pop-up window progress and KMDS function is temporary inactive to avoid the unforeseen loss of data. Remark: 1. The file transfer and cut & paste text function: We recommend you to use same operating language between two computers to avoid error code happened. 2. The file transfer function: Only support desktop file transfer. Please note, the same file name will be overwritten without further notice. 3. The Picture in Picture (PIP) mode: It is not suitable for media watching in inset window. The PIP mode can only be activated from the computer that is 12 connected with keyboard and mouse. Please do not change the screen 4. 5. 6. 7. resolution of computers during the KVM PIP mode. Please do not unplug USB Cable KVM or stop data transfer while the current data transfer is in progress or KMDS is functional. Please also do not switch the computer by using keyboard Hot-Key during the data transfer. This can cause the unforeseen loss of data or temporary inactive. We recommend you to have the PC authority be “ADMINISTRATORS” not “USERS” or “GUEST”. If any unforeseen circumstances occur during the use, you must click Exit to leave function then unplug & plug both USB / VGA connectors and click KMDS icon to activate. Please note, we do recommend users not to use this device with all OS Windows (64bit) to avoid any unforeseen circumstances. Troubleshooting Q1: When switching the computer on, the keyboard is not detected, or keyboard / mouse shows error message. A: If computer BIOS does not support USB boot-up, the system is unable to detect mouse and keyboard during computer start. Q2: What if the computer BIOS is correct but the computer is still unable to detect the mouse and keyboard? A: We suggest user to directly connect the USB KVM switch to USB port on PC, not connect through PCI card, Card Bus, or USB Hub. Q3: The keyboard is functional, but the mouse is not. A: While using the device, we suggest user to plug on mouse first then follow by keyboard at the appointed location on USB KVM Switch. Q4: When switching to PC2, the computer still displays as PC1. A: Our USB KVM switch does not aim when turning the computer on. can use Keyboard Hot-Key to operate the switch. The user Q5. What should I do if any unforeseen circumstances occur during the operation? A: Please use Keyboard Hot-Key to switch or refer to Remark 6. 13