1
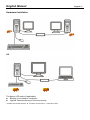
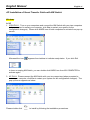
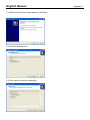
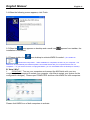
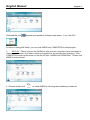
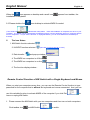
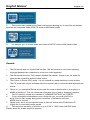
USB 2.0 Smart Transfer Cable User Manual English LINDY No. 42617 www.LINDY.com For Home and Office Use Tested to Comply with FCC Standards © LINDY ELECTRONICS LIMITED & LINDY-ELEKTRONIK GMBH - FIRST EDITION (MAR 2010) English Manual English 2 Introduction The Smart Transfer Cable with KM Switch lets you access multiple computers and associated monitors by sharing a single keyboard and mouse to switch between two computers. This product has the Data Link function allowing you to copy files on desktop between two computers. And it is easy for you to cut texts and paste them between computers. The PIP mode is the value added to this device. Features ◆ ◆ ◆ ◆ ◆ ◆ ◆ ◆ Picture in Picture (PIP) function. KM function allows user to control computers and associated display monitors. File transfer between two computers. Copy and Paste text between two computers. Performs Data Transfer between two computers. Data Link function conforms high speed USB specification. No CD software driver to install is needed. Switch Mode: 1. Mouse movement. 2. Application icon. ◆ No extra power is required. ◆ Windows XP, Vista and *7 (Home and Professional edition) compatible. Specifications Function Item Number PC Port Cable Length Operating Voltage Power Consumption Operating System Weight Dimension (L x W x H) Specification 42617 2 1.5m or 2m USB power (DC 5V) 85mA Windows XP / Vista / *7 45g 40 x 15 x 10 (mm) or 45 x 20 x 10 (mm) * The specification is subject to change without further notice. Package Contents 1 x Smart Transfer Cable with KM Switch 1 x User Manual English Manual Hardware Installation OR The device LED status (if applicable): Blinking: Connected to computers. Lighted: Data transferring or functions activity. * Please connect the device’s “R” connector to PC2 and “L” connector to PC1. English 3 English Manual English 4 AP Installation of Smart Transfer Cable with KM Switch Windows A. XP 1. ICON PLAY: Turn on your computers and connect the KM Switch with your two computers (when prompted to restart your computer, click Yes to restart your system for the configuration changes). Please click KMDS icon of both computers to activate from pop-up screen. 2. Afterward the icon appears from taskbar to indicate ready status. If you click Exit to leave or unplug KM Switch, you can double-click KMDS icon from MY COMPUTER to activate again. 3. AP PLAY: Please connect the KM Switch with your two computers (when prompted to restart your computer, click Yes to restart your system for the configuration changes). The pop-up screen appears as below. Please double-click to install by following the installation procedures. English Manual 3.1 When the Welcome screen appears, click Next. 3.2 Create a desktop icon. 3.3 Click Install to start the installation. English 5 English Manual English 6 3.4 When the following screen appears, click Finish. 2.5 When the icon appears on desktop and a small icon installation is completed. 2.6 Please double click appears from taskbar, the from desktop to activate KMDS if needed. (*The small icon indicates the ready status. **After installation is completed, the AP is in your computer. The KMDS can be automatically activated but please connect KM Switch with your computers before turn on computers. ***If you exit the function or unplug KM Switch, you can click KMDS from the desktop to activate). B. Vista / Win 7 1. ICON PLAY: Turn on your computers and connect the KM Switch with your two computers (when prompted to restart your computer, click Yes to restart your system for the configuration changes). Please open COMPUTER and then click KMDS for both computers. Please click KMDS icon of both computers to activate. English Manual Afterward the icon English 7 appears from taskbar to indicate ready status. If you click Exit to leave or unplug KM Switch, you can click KMDS from COMPUTER to activate again. 2. AP PLAY: Please connect the KM Switch with your two computers (when prompted to restart your computer, click Yes to restart your system for the configuration changes). Click COMPUTER to pop-up the screen to find the AP files: 1)KMDS and 2)RAM Disk. Please click KMDS from the screen. 2.1 Please double-click to install KMDS by following the installation procedures. English Manual English 8 When the icon appears on desktop and a small icon installation is completed. 2.2 Please double click appears from taskbar, the from desktop to activate KMDS if needed. (*The small icon indicates the ready status. **After AP installation is completed, the AP is in your computer. The KMDS can be automatically activated but please connect KM Switch with your computers before turn on computers. ***If you exit the function or unplug KM Switch, you can click KMDS from the desktop to activate). C. The Icon Status: 1. KM Switch function selected: 2. KVM PIP function selected: 3. Data transfer: (left-click on icon to pop-up or close) and pop-up window 4. The KMDS on computers is off-line: 5. The KMDS on computers is on-line: 6. The function display window : Remote Control Function of KM Switch with a Single Keyboard and Mouse When you start your computers every time, you can use the Remote Control function to type password for the computer that is without the keyboard and mouse connected. And, you can use this valuable function to activate KMDS of the computer if you click Exit leave or unplug KM Switch. to 1. Please connect the KM Switch with your two computers and then turn on both computers. Click taskbar icon and KM Switch to switch. English Manual English 9 2. (During the process the screen appears. This is to let you switch back to original computer to avoid any unforeseen circumstances). 3. Now, you can type your password to start the computer. 4. The mouse cursor will be back to the original computer and then click KM switch again to slide the mouse cursor to the other computer. Please follow the AP installation procedures to select ICON PLAY or AP PLAY if needed. The Application of Smart Transfer Cable with KM Switch A. This device lets you access two computers and associated monitors by sharing a single keyboard and mouse. It is easy to move the cursor by a mouse sliding to control between two computers. B. The Picture in Picture (PIP) mode is the value added to this device and is suitable for a single display monitor. English Manual English 10 C. This product also combines the Data-Link function allowing you to copy files on desktop between two computers under KVM PIP mode or KM Switch mode. D. It is easy for you to cut and paste texts within KVM PIP mode or KM Switch mode. Remark: 1. The file transfer and cut & paste text function: We recommend to use same operating language between two computers to avoid error code happened. 2. The file transfer function: Only support desktop file transfer. Please note, the same file name will be overwritten without further notice. 3. The Picture in Picture (PIP) mode: It is not suitable for media watching in inset window. The PIP mode can only be activated with the computer that is connected with keyboard and mouse. 4. Please do not unplug KM Switch device while the current data transfer is in progress or KMDS is functional. This can cause the unforeseen loss of data or temporary inactive. 5. The PC authority should be a member of “ADMINISTRATORS” not “USERS”. 6. If any unforeseen circumstances occur during the use, you must click Exit to leave function then unplug & plug both connectors of KM device and click KMDS icon to activate. 7. Please note, we do not recommend users to use this device with OS Windows XP (64bit) due to slow data transfer speed. 8. The maximum resolution of monitor is up to 2,560 x 1,920 under KVM PIP mode. Please select the screen resolution properly. Radio Frequency Energy, Certifications FCC Warning This equipment has been tested and found to comply with the limits for a Class B Digital device, pursuant to part 15 of the FCC Rules. These limits are designed to provide reasonable protection against harmful interference in a residential installation. This equipment generates, uses, and can radiate radio frequency energy and, if not installed and used in accordance with the instructions, may cause harmful interference to radio communications. However, there is no guarantee that interference will not occur in a particular installation. If this equipment does cause harmful interference to radio or television reception, which can be determined by turning the equipment off and on, the user is encouraged to try to correct the interference by one or more of the following measures: Reorient or relocate the receiving antenna Increase the separation between the equipment and receiver Connect the equipment into an outlet on a circuit different from that to which the receiver is connected Consult the dealer or an experienced technician for help You are cautioned that changes or modifications not expressly approved by the party responsible for compliance could void your authority to operate the equipment. This device complies with part 15 of the FCC Rules. Operation is subject to the following two conditions: 1. This device may not cause harmful interference, and 2. This device must accept any interference received, including interference that may cause undesired operation CE Statement, EMC Compatibilty This device complies with EN Standards EN55022 and EN55024 according to the relevant EC EMC Directive. It must be used with shielded cables only to maintain EMC compatibility. Dieses Produkt entspricht den einschlägigen EMV Richtlinien der EU und darf nur zusammen mit abgeschirmten Kabeln verwendet werden. LINDY Herstellergarantie LINDY gewährt für dieses Produkt über die gesetzliche Regelung hinaus eine zweijährige Herstellergarantie ab Kaufdatum. Die detaillierten Bedingungen dieser Garantie finden Sie auf der LINDY Website aufgelistet bei den AGBs. WEEE (Waste of Electrical and Electronic Equipment), Recycling of Electronic Products In 2006 the European Union introduced regulations (WEEE) for the collection and recycling of all waste electrical and electronic equipment. The wheelie bin symbol shown indicates that this product must not be disposed of with household waste. Instead the product must be recycled in a manner that is environmentally friendly. For more information on how to dispose of this product, please contact your local recycling centre or your household waste disposal service. Each individual EU member state has implemented the WEEE regulations into national law in slightly different ways. Please follow your national law when you want to dispose of any electrical or electronic products. More details can be obtained from your national WEEE recycling agency. Germany / Deutschland Die Europäische Union hat mit der WEEE Direktive umfassende Regelungen für die Verschrottung und das Recycling von Elektro- und Elektronikprodukten geschaffen. Diese wurden von der Bundesregierung im Elektround Elektronikgerätegesetz – ElektroG in deutsches Recht umgesetzt. Dieses Gesetz verbietet vom 24.März 2006 an das Entsorgen von Elektro- und Elektronikgeräten über die Hausmülltonne! Diese Geräte müssen den lokalen Sammelsystemen bzw. örtlichen Sammelstellen zugeführt werden! Dort werden sie kostenlos entgegen genommen. Die Kosten für den weiteren Recyclingprozess übernimmt die Gesamtheit der Gerätehersteller. LINDY No 42617 1st Edition, March 2010 www.lindy.com