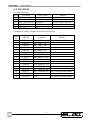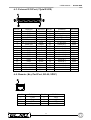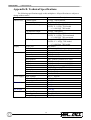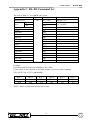
1
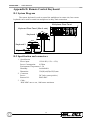
DIGITAL MULTIPLEXER
D7261A-RPE model
USER MANUAL
D7261A-RPE - USER MANUAL
FOREWORD
FOR THE INSTALLER:
Please follow carefully the specifications relative to electric and security systems realization
further to the manufacturer’s prescriptions indicated in the manual provided.
Provide the user the necessary indication for use and system’s limitations, specifying that
there exist precise specifications and different safety performances levels that should be
proportioned to the user needs. Have the user view the directions indicated in this document.
FOR THE USER:
Periodically check carefully the system functionality making sure all enabling and disabling
operations were made correctly.
Have skilled personnel make the periodic system’s maintenance. Contact the installer for
verifying the correct system operation in case its conditions changed (e.g.: variations in the areas
to protect due to extension, change of the access modes etc…
)......................................................
This device has been projected, assembled and tested with the maximum care, adopting
control procedures in accordance with the laws in force. The full correspondence to the functional
characteristics is given exclusively when it is used for the purpose it was projected for, which is as
follows:
Outdoor B/W minicamera
Any use other than the one mentioned above has not been forecasted and therefore it is not
possible to guarantee its correct operativeness.
The manufacturing process is carefully controlled in order to prevent defaults and bad
functioning. Nevertheless, an extremely low percentage of the components used is subjected to
faults just as any other electronic or meccanic product. As this item is meant to protect both
property and people, we invite the user to proportion the level of protection that the system offers
to the actual risk (also taking into account the possibility that the system was operated in a
degraded manner because of faults and the like), as well reminding that there are precise laws for
the design and assemblage of the systems destinated to these kind of applications.
The system’s operator is hereby advised to see regularly to the periodic maintenance of the
system, at least in accordance with the provisions of current legislation, as well as to carry out
checks on the correct running of said system on as regular a basis as the risk involved requires,
with particular reference to the control unit, sensors, sounders, dialler(s) and any other device
connected. The user must let the installer know how well the system seems to be operating,
based on the results of periodic checks, without delay.
Design, installation and servicing of systems which include this product, should be made by
skilled staff with the necessary knowledge to operate in safe conditions in order to prevent
accidents. These systems’ installation must be made in accordance with the laws in force. Some
equipment’s inner parts are connected to electric main and therefore electrocution may occur if
servicing was made before switching off the main and emergency power. Some products
incorporate rechargeable or non rechargeable batteries as emergency power supply. Their wrong
connection may damage the product, properties and the operator’s safety (burst and fire).
YOUR DEALER::
2
USER MANUAL - D7261A-RPE
WARNING!
TO PREVENT FIRE OR ELECTRIC SHOCK,
DO NOT EXPOSE THIS PRODUCT TO RAIN OR MOISTURE.
CAUTION!
!
RISK OF ELECTRIC SHOCK
DO NOT OPEN!
The lightning flash with the arrowhead
symbol, within an equilateral triangle, is
intended to alert the user to the presence of
uninsulated ’’dangerous voltage’’ within the
products enclosure that maybe of sufficient
magnitude to constitute a risk of electric
shock to persons.
!
The exclamation point, within an
equilateral triangle, is intended to alert the
user to the presence of important operating
and maintenance (servicing) instructions in
the literature accompanying the products.
WARNING!
This equipment generates, uses and can radiate radio frequency energy and if not
installed and used in accordance with the instructions in this manual, may cause interference
to radio communications. It has been tested and found to comply with the limits for a Class
A computing device pursuant to subpart J of part 15 of FCC rules which are designed to
provide reasonable protection against such interference when operated in a commercial
environment. This equipment has also been tested and found to comply with the
requirements for a CE Class A device safety standards.
Operation of this equipment in a residential area may cause interference, in which case
the user is required to take all measures are necessary, at the user’s expense, to correct the
interference.
1
D7261A-RPE - USER MANUAL
Table of Contents
1. Features....................................................................................................................... 5
2. System Installation & Operations................................................................................. 6
2.1 Basic Connections.............................................................................................. 6
2.2 Optional Connections......................................................................................... 6
2.3 System Connect and Install ................................................................................ 7
2.3.1 VCR Record ........................................................................................... 7
2.3.2. Playback................................................................................................. 8
2.4 Alarm Processor ................................................................................................ 8
2.4.1 Video Loss.............................................................................................. 8
2.4.2 Alarm In.................................................................................................. 8
2.4.3 Motion Detect ......................................................................................... 9
2.4.4 Alarm List ............................................................................................... 9
3. Basic Operation......................................................................................................... 10
3.1 Front and Rear Panel 16CH Model .................................................................. 10
3.2 Front and Rear Panel 9CH Model .................................................................... 10
3.3 Front and Rear Panel 4CH Model .................................................................... 10
3.4 Function Keys Description ............................................................................... 11
3.4.1 LIVE/VCR Key .................................................................................... 11
3.4.2 FREEZE Key........................................................................................ 11
3.4.3 SEQ Key............................................................................................... 11
3.4.4 LIST Key.............................................................................................. 12
3.4.5 OSD Key .............................................................................................. 12
3.4.6 LOCK Key............................................................................................ 12
3.4.7 MENU Key........................................................................................... 13
3.4.8 MODE SELECT KEY (2x2,3x3,4x4) ................................................... 13
3.5 Call Monitor .................................................................................................... 13
4. Set Up Menu ............................................................................................................. 14
4.1 Timer Set Up ................................................................................................... 15
4.1.1 Date/Time Set Up ................................................................................. 15
4.1.2 Date Display Mode................................................................................ 16
4.1.3 Date/Time Display................................................................................. 16
4.1.4 Date/Time Position................................................................................ 16
4.1.5 VCR Date/Time Position....................................................................... 16
4.2 Display Set Up................................................................................................. 16
4.2.1 Split Resolution..................................................................................... 17
4.2.2 Spot Monitor Dwell .............................................................................. 17
4.2.3 Sequence Dwell..................................................................................... 17
4.3 Camera Set Up ................................................................................................ 17
4.3.1 Camera Title ......................................................................................... 17
4.3.2 Power ON Detect.................................................................................. 18
4.4 Alarm Set Up................................................................................................... 18
4.4.1 Internal Buzzer...................................................................................... 19
4.4.2 Response Duration ................................................................................ 19
4.4.3 Motion Detect ....................................................................................... 19
2
USER MANUAL - D7261A-RPE
4.4.3.1 Motion Detect ............................................................................ 19
4.4.3.2 Condition Set Up........................................................................ 19
4.4.3.2.1 Detect Area ............................................................................. 20
4.4.3.2.2 Sensitivity................................................................................ 20
4.4.4 Alarm In................................................................................................ 20
4.4.5 Alarm Full Screen.................................................................................. 20
4.4.6 Video Loss Alarm ................................................................................. 21
4.4.7 Clear Alarm List .................................................................................... 21
4.5 Load Default Set Up ........................................................................................ 21
4.5.1 Load Installer Set Up ............................................................................ 21
4.5.2 Load Factory Password ......................................................................... 22
4.5.3 Default Factory Setting ......................................................................... 22
4.6 Language......................................................................................................... 24
4.7 Engineer Set Up............................................................................................... 24
4.7.1 Engineer Table ...................................................................................... 24
4.7.2 VCR Set Up.......................................................................................... 25
4.7.2.1 VCR Playback Set Up ................................................................ 25
4.7.2.1.1 Digital AGC ............................................................................ 26
4.7.2.2 VCR Source ............................................................................... 26
4.7.2.3 Rec Time .................................................................................... 26
4.7.2.4 VCR Rec Mode .......................................................................... 26
4.7.2.5 Rec Density................................................................................ 26
4.7.2.6 Sync-Trig Edge .......................................................................... 26
4.7.2.7 Playback Adjust .......................................................................... 27
4.7.2.8 VCR Input Check ....................................................................... 27
4.7.2.9 VCR Type .................................................................................. 27
4.7.2.10 VCR Output ............................................................................. 27
4.7.3 Change Password .................................................................................. 27
4.7.4 Camera Auto-Detect ............................................................................. 27
4.7.5 RS-485.................................................................................................. 27
4.7.5.1 RS-485 ID Setup ........................................................................ 28
4.7.5.2 Baud Rate................................................................................... 28
4.7.5.3 Bits : 8........................................................................................ 28
4.7.5.4 Stop : 1 ...................................................................................... 28
4.7.5.5 Parity : None .............................................................................. 28
4.7.5.6 RS 485 Time Correction............................................................. 28
4.7.6 Software Information ............................................................................ 28
4.7.7 Monitor Adjust...................................................................................... 29
4.7.8 Save Installer Set Up............................................................................. 29
4.7.9 Load Factory Set Up ............................................................................. 29
4.8 Password ......................................................................................................... 30
Appendix A. Connector Pin Assignment ........................................................................ 31
A.1. RS-485 (RJ-11 6P6C) .................................................................................... 31
A.2. RS-485 ID ..................................................................................................... 32
A.3. External I/O Port (37pin DSUB) .................................................................... 33
A.4. Remote (Key Pad Port, RJ-45, 8P8C) ............................................................ 33
3
D7261A-RPE - USER MANUAL
Appendix B. Technical Specifications ............................................................................ 34
Appendix C. RS-485 Command Set............................................................................... 35
Appendix D. Remote Control Keyboard ........................................................................ 36
D.1 System Diagram.............................................................................................. 36
D.2 Specification and connectors ........................................................................... 36
4
USER MANUAL - D7261A-RPE
1. Features
1.1. Duplex operation allows video recording and video playback (from VCR).
1.2. Outstanding picture quality provided by 858 x 524 (NTSC/EIA), 864 x 624 (PAL/
CCIR) pixel display with 256 gray levels and 16 million colors.
1.3. Compatible with B&W video cameras (EIA or CCIR standard) and color cameras
(NTSC or PAL standard) video sources.
1.4. Loop back connectors are available for every camera inputs, internal termination can
be disabled using on screen menu.
1.5. Ensure the fastest possible recording regardless of whether inputs are synchronized
or not. Provide up to 30 unique frames per second for both monitor and VCR
recording.
1.6. Motion detection area and sensitivity are programmable for each camera’s input
individually.
1.7. Alarm history log up to 255 records of event, including: Video loss, Motion detect
and Alarm Input.
1.8. Two independent monitor outputs: Main Monitor is used to display multi-windows,
digital images. Call Monitor provide full screen, live analog output.
1.9. Brightness, Contrast, Saturation and Hue is adjustable.
1.10.
Main monitor, VCR input and VCR output are all equipped with BNC and
Super-VHS connectors.
1.11. Support Double/Triple density time-lapse VCR.
1.12. Support synchronous (VCR Trigger) record and asynchronous (24hr..) record.
1.13. Diversified multi-windows display mode, Ex Full screen, Quad, 3x3, 4x4.
1.14. Powerful function of Alarm Processor permit elastic alarm trigger and response
set up.
1.15. On Screen Display available for: date, time, alarm & video loss indication, and
2-character camera title.
1.16. Built-in color bar pattern generator for monitor calibration.
1.17. Provide RS485 communication port for remote control.
1.18. Provide Digital Auto-Gain Control (8 segment, range: 70% - 140%) for each
camera.
1.19. Digital auto gain control for VCR play back.
1.20. Sequence mode available.
5
D7261A-RPE - USER MANUAL
2. System Installation & Operations
STANDARD VCR
VIDEO MONITOR
RECORD
PLAY
CALL MONITOR
VIDEO CAMERAS
SYSTEM CONTROL KEYBOARD
REMOTE KEYBOARD
SENSOR
PLAY
RECORD
S VIDEO MONITOR
S-VHS VCR
2.1 Basic Connections
l
l
l
l
Cameras
Connect the Camera to the VIDEO IN.
Main Monitor
Connect ‘Main Monitor’ BNC connector or the 4 pin mini Din connector (S-VHS)
to the video input of the video monitor.
VCR
Connect the VCR In (BNC or S-VHS) and VCR OUT (BNC or S-VHS) connectors
to the VCR’s Video output and Video input respectively.
Power
Connect the DC 12V /1.5AMP (or > 1.5 AMP) adapter to the DC jack on the rear
panel.
2.2 Optional Connections
l
l
l
l
Call Monitor
Connect the ‘Call Mon.’ BNC connector to the video input of an NTSC compatible
video monitor.
RS485 Port
Connect the RJ11 RS485 port to a PC or remote keyboard for external control.
Remote KeyPad
Connect the RJ45 Remote KeyPad Port to the external KeyPad device.
External IO Connector
Connect the EXT IO board to the 37pin DSUB on the rear panel, from this
expansion board you can get the following signals in or out (refer to Appendix A.3)
6
USER MANUAL - D7261A-RPE
2.3 System Connect and Install
l
External I/O Connection
1. Alarm In
TTL level input, you may use NC or NO type of alarm signal her, but the set up
must be matched. Please refer to section 4.4.3 for set up procedure.
NO
2.
Multiplexer
Alarm In
NC
Multiplexer
Alarm In
Alarm Out
Two types of Alarm Out signal are provided: Alarm NO and Alarm NC.
Connect these pins and to the alarm input of the VCR or other device like siren
or flash light.
Alarm COM
Alarm NC
Alarm NO
3.
4.
5.
VCR Trigger
TTL level input, connect to VCR trigger out.(Apply to SYNC mode VCR
recording)
Set Alarm
TTL level input, normal open (NO). Short this pin to ground will activate
Alarm output, if enabled in setup menu.
Reset Alarm
TTL level input, normal open (NO). Short this pin to ground will stop Alarm
output, if enabled in setup menu.
2.3.1 VCR Record
The multiplex allows recording of multiple cameras onto a single videotape. This
operation is always performed in the background, and does not interfere with other
operations. All the other features remain available while a recording is being made. Like,
tape playback does not affect recording. It is possible to review a previously recorded
tape while recording continues on a second VCR.
There are two types of operation for the VCR recording:
A) Synchronous: Time Lapse VCR must be used in this mode, the Trigger(or SW)
Signal must be connected from the VCR to Multiplexer. The recording operation is
conducted according to the Trigger(or SW) signal form the VCR.
B) Asynchronous: either a Time Lapse VCR or normal VCR can be used in this
mode. If time lapse VCR is used, the recording time must be set according to the VCR
setting: it ranges from Real, SYNC, 4 hr, 6 hr, 8 hr, 12 hr, 18 hr, 24 hr, 28 hr, 30hr, 48 hr,
72 hr, 168hr, 240 hr, 480 hr, 720 hr to 960 hr. If a normal VCR is used, the recording
time must be set to Real mode.
For optimum tape recording and play back, the multiplexer must be configured
correctly. Please refer to section 4.6.2 VCR SET UP for detail descriptions.
7
D7261A-RPE - USER MANUAL
2.3.2. Playback
To review a previously recorded tape, the Video Output connector of VCR must
be connected to Multiplexer’s VCR IN connector (either BNC or S-VHS). Decoding of
recorded tapes consists of automatically separating the multiplexed camera fields and
then grouping each camera’s fields together for display. Using the coded data that was
inserted into each recorded field, the unit can automatically reconstruct each camera’s ID,
status, date, time information. The images can be displayed in any multi-windows format
on the Main monitor, just like in live camera mode. Moreover, user can enable or disable
the OSD of the recorded date, time and alarm information.
2.4 Alarm Processor
There are two affairs will trigger Alarm Out, Video Loss and Alarm In. Alarm
Processor can handle all triggered Alarm and react properly.
2.4.1 Video Loss
If the video decoder can not detect the video signal from a particular camera
channel, that camera is considered as ‘Video Loss’. The following action will be
proceeded:
1) The ‘Alarm NC’ output will be open.
2) The ‘Alarm NO’ output will be short to ground.
3) The internal Buzzer will start beeping (if enabled).
4) The corresponded window on the Main Monitor will display background
color, and corresponded window on the Main Monitor will show ‘Loss’.
5) Encode the camera as ‘video loss’ to the VCR output.
The above actions will keep until the following conditions are met:
1) The alarm response duration time has elapsed.
2) Press any key to stop.
2.4.2 Alarm In
The following responses will be activated (if enabled), when any one of the Alarm
In pins is active:
1) The ‘Alarm NC’ output will be open.
2) The ‘Alarm NO’ output will be short to ground.
3) The corresponded window on the Main Monitor will show ‘ALARM’.
4) Encode the camera as ‘ALARM’ for the VCR OUT.
5) The Internal buzzer will start beeping (if enabled).
6) Switch the Call Monitor to the alarmed camera channel. If more than one
camera, these alarm cameras will be displayed in sequence.
The above actions will keep until the following conditions are met:
1) All the Alarm In pins become non-active condition.
2) The alarm input release time has been past, and no more Alarm In has been
sensed again.
3) The alarm output response duration time has elapsed.
4) Press any key to stop.
8
USER MANUAL - D7261A-RPE
2.4.3 Motion Detect
The response triggered by motion detection is the same as Alarm In, please refer to
section 2.4.2 for detail.
2.4.4 Alarm List
The alarm events will be logged in the non-volatile memory. By pushing the LIST
key, the list will be displayed by the OSD as shown below. The first column is the item
number, followed by the date and time of the alarm and the ‘type of alarm’: A means
Alarm Input, L means Video Lost. The last column is the channel number of the alarm.
You may browse the list using the direction key, the LEFT/RIGHT key will scroll
one page up and down, while UP/DOWN key will move the cursor one row up or down.
You may also use the Mode Select key (2*2, 3*3) to jump to the top or bottom of the
list.
Alarm Data List
001 00 / 10 / 01 10:00:30
002 00 / 10 / 03 11:21:45
003 00 / 10 / 13 14:05:35
004 00 / 11 / 08 18:26:55
005 00 / 11 / 23 05:38:42
006 00 / 11 / 24 02:01:31
007 00 / 12 / 05 21:34:24
008 00 / 12 / 14 02:52:48
009 00 / 12 / 15 21:29:19
010 00 / 12 / 24 02:15:47
--- End of Data ---
A
A
L
A
A
A
A
L
A
L
01
12
15
03
06
07
11
02
09
09
9
D7261A-RPE - USER MANUAL
3. Basic Operation
3.1 Front and Rear Panel 16CH Model
3.2 Front and Rear Panel 9CH Model
3.3 Front and Rear Panel 4CH Model
10
USER MANUAL - D7261A-RPE
3.4 Function Keys Description
3.4.1 LIVE/VCR Key
Pressing this key will switch the display between live camera and VCR playback.
When LIVE/VCR LED is “On”, all the displayed video comes from live camera, otherwise,
all video come from VCR playback. Both Camera title and date/time display will be
reversed, to be distinguished with the live mode.
3.4.2 FREEZE Key
When the multiplexer is in sequence mode, press the FREEZE key will stop the
sequence, press it again will return to sequence mode.
When the multiplexer is not in Sequence mode, press it once will freeze the video
image on the screen. Pressing FREEZE key again or press any key will release freeze mode.
If in the Full screen, press it once will freeze the video image on the screen in frame mode.
Frame mode is suitable for static image. If user press freeze-key again, multiplexer will
change from frame mode to field mode. Press freeze-key again, multiplexer will release
FREEZE mode.
3.4.3 SEQ Key
Press SEQ key will make the multiplexer enter sequence mode. There are totally three
sequences, you may select different sequence by pressing SEQ key.
Digital Multiplexer (4CH)
SEQ1: Full screen
CH1
CH2
CH3
CH4
Digital Multiplexer (9CH)
SEQ1: Full screen
CH1
CH2
.
.
.
.
CH8
CH9
SEQ2: Quad
CH1
CH2
CH5
CH6
CH1
CH2
CH3
CH4
CH7
CH8
CH3
CH9
Digital Multiplexer (16CH)
11
D7261A-RPE - USER MANUAL
SEQ1: Full screen
CH1
CH2
.
.
.
CH15
.
CH16
SEQ2: Quad
CH1
CH2
CH5
CH6
CH9
CH10
CH13
CH14
CH3
CH4
CH7
CH8
CH11
CH12
CH15
CH16
SEQ3: 3x3
CH1
CH2
CH3
CH1
CH2
CH10
CH4
CH5
CH6
CH11
CH12
CH13
CH7
CH8
CH9
CH14
CH15
CH16
3.4.4 LIST Key
Pressing LIST key will show the Alarm History Log on the screen. You may browse
the list using the direction key: the LEFT/RIGHT key will scroll one page up or down, while
UP/DOWN key will move the cursor one row up or down. You may also use the Mode
Select Key (2x2, 3x3) to go to the top or bottom of the list.
3.4.5 OSD Key
Pressing OSD key, the Date/Time & Title OSD will be turned On/Off.
3.4.6 LOCK Key
Keep press LOCK key over 3 seconds, the keypads will be locked/ unlocked. This
function is to prevent accidental changing the system setup. When the keyboard is locked,
the LOCK key LED will be lit. The other key will be void simultaneously. In this mode, if
the other key is pressed, the screen will show <<< Key Lock >>>. Lock mode will be
removed if you keep press the LOCK key over 3 seconds again.
12
USER MANUAL - D7261A-RPE
3.4.7 MENU Key
Press MENU key simultaneously, the Set Up Menu will appear, please refer to section
4 for detail operation.
3.4.8 MODE SELECT KEY (2x2,3x3,4x4)
Press MODE SELECT KEY (2X2 , 3X3 , 4X4) to select difference splits of screen
mode
2X2 press this key to be 4 splits of screen, all models support this mode.
3X3 press this key to be 9 splits of screen, 9CH and 16CH model support this mode.
4X4 press this key to be 16 splits of screen, only 16CH model support this mode.
3.5 Call Monitor
The Call Monitor is always switching full screen video of all installed cameras. When
the main monitor is switching full screen, the call monitor is show the same video too. After
the Spot Time between switching of call monitor. The call monitor will return switching
mode. If you want to switch call monitor and not affect to main monitor. You can press
ESC key + Channel key simultaneously, the call monitor will switching to the channel video.
After the Spot Time between switching of call monitor, the call monitor will return switching
mode.
13
D7261A-RPE - USER MANUAL
4. Set Up Menu
The set up menu is composed in hierarchy architecture, it allows the user to configure
the multiplexer according to the application environment. Many advanced functions can be
activated, many options can be selected via the operation of setup menu. To enter the Setup
Menu, press “MENU” key, the following ‘Set Up Menu’ will be appear:
1
2
3
4
5
6
7
8
Set Up Menu
Timer Set Up
Display Set UP
Camera Set Up
Alarm Set Up
Load Default Set Up
Language
Engineer Set Up
Quit
English
There is a cursor (highlighted bar) which can be moved up and down by the Direction
keys. All the items in the setup menu contain several ‘sub menu’. Each sub menu will be
described step-by-step in the following sections.
If you want to exit the Set Up Menu, you may either select 8 Quit and press ENTER,
or press ESC key on the front panel. The following menu will be displayed on the screen:
Quit
1 Set Up Data Save
2 Quit Without Save
If you move the cursor to 1 Set Up Data : Save and press ENTER, the modifications
you made before will be saved into the non-volatile memory (EEPROM).
If you move the cursor to 2 Quit Without Save and press ENTER, or press ESC key
on the front panel, the modification you made will keep affective, but not saved into
EEPROM. So, if you power OFF and ON the machine, these modifications will be
disappeared.
14
USER MANUAL - D7261A-RPE
4.1 Timer Set Up
This menu allows you to setup the current date/time. In the main menu, move the cursor
to 1 Timer Set Up , press the ENTER key, the following menu will appear on the screen:
1
2
3
4
5
6
Timer Set Up
Date/Time Set Up
Date Display Mode
Date/Time Display
Date/Time Position
VCR Date/Time Position
Quit
Y/M/D
2Rows
4.1.1 Date/Time Set Up
In the Timer Set Up menu, move the cursor to 1 Date/Time Set Up , press ENTER
key, the following menu will appear:
Date/Time Set Up
1
2
3
4
5
6
7
8
Year
Month
Date
Hour
Minute
Second
Quit and Update
Quit Without Update
2002
8
9
16
5
49
A. Item 1~6 allows you to set up the date and time, use RIGHT/LEFT keys to adjust.
B. If you want to give up all the changes, move cursor to 8 Quit Without Update , then
press ENTER key, all the adjusted items will be discarded.
C. If you want to save the changes, move the cursor to 7 Quit and Update , then press
ENTER key, the adjusted items will be memorized.
15
D7261A-RPE - USER MANUAL
4.1.2 Date Display Mode
There are three different types of date/time OSD: Y/M/D, M/D/Y and D/M/Y. Move
the cursor to 2 Date Display Mode , then use RIGHT/LEFT keys to select the option.
4.1.3 Date/Time Display
The date/time OSD can be shown in one or two rows, move the cursor to 3 Date/Time
Display , then use RIGHT/LEFT keys to select the option.
4.1.4 Date/Time Position
In the Timer Set Up menu, move the cursor to 4 Date/Time Position , press ENTER
key, the menu will disappear, only the date/time display left on the main monitor. Use the
Direction(??? ?) keys to adjust the position of date/time display.
4.1.5 VCR Date/Time Position
When VCR playback video is shown on the screen, both Camera title and date/time
display will be reversed, to be distinguished with the live mode. This menu allows you to
locate the VCR date/time position.
In the Timer Set Up menu, move the cursor to 5 VCR Date/Time Position , press
ENTER key, the menu will disappear, only the playback date/time display left on the screen,
you can use the direction keys (??? ? ) to move it to any position you want.
4.2 Display Set Up
This menu allows you to tune the quality of the displayed image. In the set up menu,
move the cursor to 2 Display Set Up, press ENTER key, the following menu will appear.
Item 1~4 allows you to adjust the display quality, just use RIGHT/LEFT(? ?) keys to adjust
the OSD bars.
Display Set Up
1 Brightness
116
2 Contrast
130
3 Saturation
150
4 Hue
128
5 Split Resolution
6 Spot Monitor Dwell
7 Sequence_1 Dwell
8 Sequence_2 Dwell
9 Sequence_3 Dwell
10 Quit
IIIIIIIIIIIII
IIIIIIIIIIIII
IIIIIIIIIIIII
IIIIIIIIIIIII
High
5
5
5
5
16
USER MANUAL - D7261A-RPE
4.2.1 Split Resolution
If there is a flicker phenomenon because of the sharp video, you can set the Split
Resolution to ‘Low’ to eliminate it. In the split mode, use LEFT/RIGHT keys (? ?) to set
up.
4.2.2 Spot Monitor Dwell
The call monitor is always switching full screen video of all installed cameras, this item
allows you to set the Spot Time between switching. The timer value range from 1 to 255,
that means the dwell time of each camera video on the call monitor range from 1 second to
255 seconds. Move the cursor to 6 Spot Monitor Dwell , use RIGHT/LEFT (? ?) keys to
change the dwell time.
4.2.3 Sequence Dwell
You can use direction keys (??) to move cursor to 7 Sequence_1 Dwell or 8
Sequence_2 Dwell or 9 Sequence_3 Dwell , and you can use direction keys (? ?) to
change sequence dwell time. The value range from 1 to 255, that means the dwell time of
each page (Full , quad ,3X3) on the main monitor range from 1 second to 255 seconds.
PS:Digital Multiplexer (4CH) have one sequence (Sequence_1),
Digital Multiplexer (9CH) have two sequences (Sequence_1, Sequence_2),
Digital Multiplexer (16CH) have three sequences (Sequence_1, Sequence_2,
Sequence_3).
4.3 Camera Set Up
This menu allows you to enter title for each camera. In the main menu, move the
cursor to 3 Camera Set Up , press ENTER key, the following menu will appear:
Camera Set Up
1 Camera Title
2 Power ON Detect
3 Quit
OFF
4.3.1 Camera Title
Each display window on the main monitor has a ‘Title’ for the user to tell the position
of that camera. The Title can be turned on or off by pressing OSD key on the front panel.
The default title for each camera is CH1~CH16.
This menu allows you to enter special Title (up to 12 characters) for each camera. In
the Camera Set Up menu, move the cursor to 1 Camera Title , press ENTER key, the
following list of cameras will appear:
17
D7261A-RPE - USER MANUAL
Camera Title
1 Camera _ 1
10 Camera _10
2 Camera _ 2
11 Camera _11
3 Camera _ 3
12 Camera _12
4 Camera _ 4
13 Camera _13
5 Camera _ 5
14 Camera _14
6 Camera _ 6
15 Camera _15
7 Camera _ 7
16 Camera _16
8 Camera _ 8
17 Quit
9 Camera _ 9
A. Use Up/Down key to select camera, press ENTER key to enter ‘title edit’ page.
B. Use the 2x2 key to move the cursor in the entry field.
C. Use the direction keys (??? ?) to move the cursor in the character lists to the one you
need, then press ENTER key to select. Press ESC after title edit is finished.
4.3.2 Power ON Detect
The item allows you to enable/disable camera auto-detect when Power-ON. Use
direction keys (? ?) to select ON/OFF.
4.4 Alarm Set Up
This menu allows you to set up how the multiplexer should respond to the triggered
alarm. In the Set Up Menu, move the cursor to 4 Alarm Set Up , press ENTER, the
following menu will appear:
Alarm Set Up
1 Internal Buzzer
2 Response Duration
3 Motion Detect
4 Alarm In
5 Alarm Full Screen
5 Video Loss Alarm
6 Clear Alarm List
7 Quit
ON
10
Dis
Dis
18
USER MANUAL - D7261A-RPE
4.4.1 Internal Buzzer
This item allows you to set the internal buzzer activated or not when an alarm is
triggered or video loss. In the Alarm Set Up menu, move the cursor to 1 Internal Buzzer ,
use direction keys (? ?) to select ON/OFF.
4.4.2 Response Duration
This item allows you to decide how long time the internal buzzer and Alarm Out relay
will keep after alarm is triggered.
In the Alarm Set Up menu, move the cursor to 2 Response Duration , then use
direction keys (? ?) to adjust the value. The value could range from 1 to 9999, which means
the alarm output can keep from 1second to 9999seconds.
4.4.3 Motion Detect
This menu allows you to configure how Motion Detection works. Each camera can
have it’s ‘Detect Area’ and ‘Sensitivity’ defined individually.
In the Alarm Processor menu, move the cursor to 3 Motion Detect , press ENTER key,
the following menu will appear:
Motion Detect
1 Motion Detect
2 Condition Set Up
3 Quit
OFF
4.4.3.1 Motion Detect
This item allows you to enable or disable the motion detect function of this
multiplexer.
4.4.3.2 Condition Set Up
This menu allows you to set up the detect area and sensitivity for each camera inputs.
Condition Set Up
1 Camera_1
10 Camera_10
2 Camera_2
11 Camera_11
3 Camera_3
12 Camera_12
4 Camera_4
13 Camera_13
5 Camera_5
14 Camera_14
6 Camera_6
15 Camera_15
7 Camera_7
16 Camera_16
8 Camera_8
17 Quit
9 Camera_9
Move the cursor to Camera_1 , preset ENTER key, the following menu appear:
19
D7261A-RPE - USER MANUAL
Camera_ 1
1 Detect Area
2 Sensitivity
3 Exit
4.4.3.2.1 Detect Area
This item allows you to set up the motion detect area.
Move the cursor to 1 Detect Area , press ENTER key, the screen will be covered by
192 ‘detection grids’. You can use the direction key and ENTER key to enable/disable the
grids. (small circle: disabled; big circle: enabled)
The default ‘cursor size’ is only one grid, that means you can only toggle the setting
one grid each time. You can use the Mode Select keys to change the cursor size from 1x1
grid to 2x2, 3x3 or 4x4 grids, this makes the set up process more easier. You may also use
PAGE key to turn the grids all on or all off.
4.4.3.2.2 Sensitivity
This item allows you to set up the sensitivity of motion detection.
Move the cursor to 2 Sensitivity , press ENTER key, two OSD bars and Motion detect
area grids will be shown on the screen now. The upper bar shows the current detected
amount of motion of this camera. The lower bar allows you to set up the ‘trigger level’, once
the detected motion amount become larger than this level, the alarm will be triggered. (If
Motion Detect function is ON)
4.4.4 Alarm In
In the Alarm Set Up menu, move the cursor to 3 Alarm In , press ENTER, the
following menu will appear:
Alm In Type
define signal type of external alarm sensor is Normal-Open or
Normal-Close. O= Normal-Open, C= Normal-Close.
Alm In Enable define each Alarm In pin is enabled or not. √=enabled, • =disabled.
1
In type
2
3
4
5
6
7
8
9 10 11 12 13 14 15 16
O O O O O O O O O O O O O O O O
Enable
ESC For Return
4.4.5 Alarm Full Screen
When an alarm event is detected at certain camera, the channel will turn to a full screen
view. Use direction keys (? ?) to select En/Dis.
20
USER MANUAL - D7261A-RPE
4.4.6 Video Loss Alarm
This item allows you to enable or disable the multiplexer to detect Video Loss as an
alarm event. Use direction keys (? ?) to select En/Dis.
4.4.7 Clear Alarm List
In the Alarm Set Up menu, move the cursor to 6 Clear Alarm List , press ENTER key,
the following menu will appear:
Clear Alarm List
1 Quit and Clear
2 Quit Without Clear
Move the cursor to 1 Quit and Clear press ENTER key, the alarm list data will be
erased. If you move the cursor to 2 Quit Without Clear , and press ENTER key, the alarm
list data won’t be erased. This arrangement is to avoid user erase the list by mistake.
4.5 Load Default Set Up
This menu allows you to restore the machine to the default configuration which was
done by the installer (engineer).
In the Set Up Menu, move the cursor to 5 Load Default Set Up , press ENTER key,
the following menu will appear:
Load Default Set Up
1 Load Installer Set Up
2 Load Factory Password
3 Quit
4.5.1 Load Installer Set Up
This item allows you to recall the “Installer’s Configuration” from the on-board
non-volatile memory. Move the cursor to 1 Load Installer Set Up and press ENTER key,
the following menu will appear:
21
D7261A-RPE - USER MANUAL
Load Installer Set Up
1 Quit and Load
2 Quit Without Load
Move the cursor to 1 Quit and Load and press ENTER key, the Configuration will
load from the on-board non-volatile memory. If you move the cursor to 2 Quit Without
Load , press the ENTER key, the Configuration will not change.
4.5.2 Load Factory Password
This item allows you to reload the factory password in case you forget your own
password.
4.5.3 Default Factory Setting
1.2 Date Display Mode : Y/M/D
1.3 Date/Time Display : 2Rows
2.1 Brightness : 115/115(NTSC/PAL)
2.2 Contrast : 162/160 (NTSC/PAL)
2.3 Saturation : 255/230 (NTSC/PAL)
2.4 Hue : 128/128 (NTSC/PAL)
2.5 Split Resolution : High
2.6 Spot Monitor Dwell : 5
2.7 Sequence_1 : 5
2.8 Sequence_2 : 5 (for 9 channel & 16 channel)
2.9 Sequence_3 : 5 (for 16 channel)
3.2 Power ON Detect : OFF
4.1 Internal Buzzer : ON
4.2 Response Duration : 10
4.3.1 Motion Detect : OFF
4.4 Alarm In : All Normal Open & All Disable
4.4.5 Alarm Full Screen : Dis
4.4.6 Video Loss Alarm : Dis
7.1 Engineer Table: All camera Install & No Covert & Terminal Resistor on & Gain
Control=5
7.2.1.1 DAGC : Dis
7.2.1.2 Brightness : 106/114 (NTSC/PAL)
-
-
22
USER MANUAL - D7261A-RPE
7.2.1.3 Contrast : 171/166 (NTSC/PAL)
7.2.1.4 Saturation : 302/281 (NTSC/PAL)
7.2.1.5 Hue : 128/128 (NTSC/PAL)
7.2.2 VCR Source : BNC
7.2.3 Rec Time : 24Hr
7.2.4 VCR Rec Mode : Field
7.2.5 Rec Density : Standard
7.2.6 Sync-Trig : Fall
7.2.7 Playback Adjust : Auto
7.2.8 VCR Input Check : OFF
7.2.9 VCR Type : VCR
7.2.10 VCR Output : Normal
7.3 Change Password : 9667
7.5.1 RS-485 ID Setup : 224
7.5.2 Baud Rate : 9600bps
23
D7261A-RPE - USER MANUAL
4.6 Language
This item shows the language of the Set Up Menu.
4.7 Engineer Set Up
In the Set Up Menu. Move the cursor to 7 Engineer Set Up and press the ENTER key,
the following menu will appear:
Engineer Set Up
1 Input Password
2 Engineer Set Up
3 Quit
9999
If you want to entry ‘Engineer Set Up’ menu, you must input password.
Move the cursor to 1 Input Password , use direction keys (? ?) to adjust the password,
then move the cursor to 2 Engineer Set Up , press the ENTER key, the Engineer Set Up
menu will appear. Now you can adjust these parameters that’s only available for the
engineer.
Engineer Set Up
1 Engineer Table
2 VCR Set Up
3 Change Password
4 Camera Auto-Detect
5 RS-485
6 Software Information
7 Monitor Adjust
8 Save Installer Set Up
9 Load Factory Set Up
10 Quit
9667
4.7.1 Engineer Table
In the Engineer Set Up menu, move the cursor to 1 Engineer Table , press ENTER key,
the following menu will appear:
1
2
3
4
5
6
7
8
9 10 11 12 13 14 15 16
v
v
v
v
v
v
v
v
v
v
v
v
v
v
v
v
Term_Res
v
v
v
v
v
v
v
v
v
v
v
v
v
v
v
v
Gain
5
5
5
5
5
5
5
5
5
5
5
5
5
5
5
5
Install
Covert
ESC For Return
Install √ = camera installed, • =camera not installed
24
USER MANUAL - D7261A-RPE
Covert The second row of the configuration table allows you to make some of the
camera’s input invisible (covert) on both main and spot monitor, while VCR keep
recording the camera’s video. √ = camera invisible, = camera visible. The
default setting is every camera visible.
Terminal The third row of the configuration table allows you to enable/disable the
terminal resister of each camera. √ = terminal resister is enabled, • =terminal
resister is disabled.
If the camera loop-back connector is not used, the terminal resister should be
enabled to get correct signal termination, this is the default condition.
Otherwise, the terminal resister should be disabled.
Gain Control You can use key direction ( ) to select camera.
And then press ENTER will be change value (range 1~8),
1 is smallest gain value, 8 is largest gain value.
4.7.2 VCR Set Up
To set up the VCR recording correctly is one of the most important part of using the
multiplexer.
In the Engineer Set Up menu, move the cursor to 2 VCR Set Up , press ENTER key,
the following menu will appear:
VCR Set Up
1 VCR Playback Setup
2 VCR Source
3 Rec Time
4 VCR Rec Mode
5 Rec Density
6 Sync-Trig Edge
7 Playback Adjust
8 VCR Input Check
9 VCR Type
10 VCR Output
11 Quit
BNC
24Hr
Field
Standard
Fall
Auto
OFF
VCR
Normal
4.7.2.1 VCR Playback Set Up
When VCR playback video is shown on the main monitor, the picture quality can be
adjusted in this menu. This function can only be executed when the main monitor displaying
VCR playback video (VCR mode), otherwise, ‘—Not VCR Mode—‘ massage will be
shown on the main monitor.
In the VCR Set Up menu, move the cursor to 1 VCR Playback Setup, press the
ENTER key, the following menu will appear. Then you can adjust these parameters to get
the best display quality on the monitor.
Item 2~5 allows you to adjust the display quality, just use RIGHT/LEFT(? ?) keys to
adjust the OSD bars.
25
D7261A-RPE - USER MANUAL
1
2
3
4
5
6
VCR Playback Set Up
Digital AGC
Dis
Brightness
116 IIIIIIIIIIIII
Contrast
138 IIIIIIIIIIIII
Saturation
232 IIIIIIIIIIIII
Hue
128 IIIIIIIIIIIII
Quit
4.7.2.1.1 Digital AGC
Digital AGC (Digital auto gain control) is used to control playback video level. That
means if VCR recording cause lower video level, when you playback by MUX, the video
level will be recovered by DAGC (If DAGC is enabled). You can use direction keys (? ?)
to change (enable or disable).
4.7.2.2 VCR Source
There’re two types of connector for VCR IN: BNC and S-VHS (4pin mini-DIN), you
must connect either one to the VCR’s Video OUT when you want to play back previously
recorded video tape. This item allows you to select the connector type according to the real
application. In the VCR Set Up menu. Move the cursor to 2 VCR Source , press
LEFT/RIGHT (? ?) keys to select BNC or S-VHS.
4.7.2.3 Rec Time
This item allows you to select the record period, you can select one of the following
options: Real/ SYNC/ 4Hr/ 6Hr/ 8Hr/ 12Hr/ 18Hr/ / 24Hr/ 28Hr/ 30Hr/ 48Hr/ 72Hr/
168Hr/ 240Hr/ 480Hr/ 720Hr/ 960Hr.
“Real” means real time mode, the recorded period depends on the length of the tape. If
you use 120 minutes tape, you can record 2 hour. If you use 180 minutes tape, you can
record 3 hour.
“SYNC” means multiplexer output the video synchronized with VCR, the ‘VCR
trigger’ input (in the external IO connector) must be connected to the VCR (Sw Out). If the
Time Lapse VCR provides the Sw Out (or Trig Out) signal, it’s recommended to use Sync
mode.
4.7.2.4 VCR Rec Mode
This item allows you to select the VCR record mode. There’re two modes, one is Field
Mode and the other is Frame Mode. Press LEFT/RIGHT (? ?) keys to select it.
4.7.2.5 Rec Density
This item allows you to select the recording density of VCR. You may select
Standard/ Double/ Triple according to the Time Lapse VCR setting. The double/triple
density is sometimes called ‘virtue real time’ VCR, you can get higher recording bandwidth
if you use this kind of time lapse VCR.
4.7.2.6 Sync-Trig Edge
This item allows you to select rising or falling edge of the sync (trigger) signal from
the VCR.
26
USER MANUAL - D7261A-RPE
4.7.2.7 Playback Adjust
This item allows you to select the sampling video of playback. There’re six choices
(Auto,1,2,3,4,5) for choosing.
4.7.2.8 VCR Input Check
This function can be used by the engineer to check the VCR playback video is good or
not. Change this item to ‘ON’, and select VCR playback mode, there will be two rows on the
screen, the first row display the total number of fields come from the VCR, the second row
display the field with error encoding data detected.
4.7.2.9 VCR Type
This item allows you to select the VCR IN & VCR OUT are for normal VCR or DVR.
4.7.2.10 VCR Output
This item allows you to select the signal that VCR Output for VCR (Normal) or
Gateway.
4.7.3 Change Password
The password can be changed to any four-digit number, use Left/Right (? ?) keys to
change to your preferred number, press ESC when finished, the password will be saved into
non-volatile memory. If the user forget this new password, he can recall the factory
password by using Load Factory Password in Load Default Set Up menu. The factory
password is 9667.
4.7.4 Camera Auto-Detect
The multiplexer can check the camera BNC connectors for video signal and judge the
camera is connected or not. If any one of the cameras is not exist, it’s recommended to set
that channel as ‘not installed’. Otherwise that camera will be recognized as ‘video loss’,
besides, the VCR record bandwidth is wasted.
In the Engineer Set Up menu, move the cursor to 4 Camera Auto-Detect , press
ENTER key, the configuration table will appear. The camera which is not exist will have a
dot symbol in the corresponding position.
1
2
3
v
v
v
Term_Res
v
v
v
v
Gain
5
5
5
5
Install
4
5
6
7
8
9 10 11 12 13 14 15 16
v
v
v
v
v
v
v
v
v
5
5
5
5
5
v
v
v
v
v
v
v
v
v
v
v
v
v
5
5
5
5
5
5
5
Covert
Install √ = camera installed, • =camera not installed
4.7.5 RS-485
This menu show the detail of RS 485 protocol, the settings are fixed, and can’t be
changed by the user or installer. In the Engineer Set Up menu, move the cursor to 5 RS-485 ,
press the ENTER key, the following menu will appear:
RS-485
1 RS-485 ID Setup
224
27
D7261A-RPE - USER MANUAL
2
3
4
5
6
7
Baud Rate
Bits 8
Stop 1
Parity None
RS485 Time Correction
Quit
9600bps
4.7.5.1 RS-485 ID Setup
This item can only be accessed by the installer, the RS485 ID address of this
multiplexer can be modified here. (Refer to Appendix A.2)
4.7.5.2 Baud Rate
This item can only be accessed by the installer, The Baud Rate of this multiplexer can
be modified here. You may select 2400bps, 4800 bps, 9600 bps, 19200 bps or 38400 bps for
the baud rate.
4.7.5.3 Bits : 8
This menu shows the detail of RS-485 protocol, the settings are fixed, and can’t be
changed by the user or installer.
4.7.5.4 Stop : 1
This menu shows the detail of RS-485 protocol, the settings are fixed, and can’t be
changed by the user or installer.
4.7.5.5 Parity : None
This menu shows the detail of RS-485 protocol, the settings are fixed, and can’t be
changed by the user or installer.
4.7.5.6 RS 485 Time Correction
In RS-485 menu, move the cursor to 6 RS485 Time Correction , press the ENTER
key, the following menu will appear:
RS485 Time Correction
1 Quit and Correct
2 Quit Without Correct
In the RS-485 Time Correction menu, move the cursor to 1 Quit and Correct , press
ENTER key, then the other multiplexers which was connected by RS 485 will be calibrated
to the same date/time with this set.
4.7.6 Software Information
This menu presents the software information including the version and date code. In
the Engineer Set Up menu, move the cursor to 6 Software Information , and press ENTER,
the following menu will appear:
28
USER MANUAL - D7261A-RPE
1
2
3
4
5
6
7
Software Information
Filename
D6A10206
Date
2002/02/07
Channel Number
16
System Type
NTSC
VCR Encode Type
04
HW Version
060AC6
Quit
4.7.7 Monitor Adjust
This function allows you to adjust the screen center pointer and fine tune the monitor’s
performance using color bar pattern generated by the multiplexer. Move the cursor to 7
Monitor Adjust , press ENTER key, the following menu will appear.
Monitor Adjust
1 Screen Center Adjust
2 Show Color Bar
3 Quit
Move the cursor to 1 Screen Center Adjust and press Enter key, the menu will be
cleared. And then use direction keys( ) to adjust the screen center point. Push ESC to exit
when monitor adjustment is finished.
Move the cursor to 2 Show Color Bar , press ENTER key, the color bar will show up.
Push ESC to exit when monitor adjustment is finished.
4.7.8 Save Installer Set Up
In the Engineer Set Up menu, move the cursor to 8 Save Installer Set Up, press
ENTER key, the following menu will appear:
Save Installer Set Up
1 Quit and Save
2 Quit Without Save
Move cursor to 1 Quit and Save and press ENTER, all parameters will be saved as
installer setting.
4.7.9 Load Factory Set Up
This item allows you to recall the “Factory’s Default” from the read only memory.
29
D7261A-RPE - USER MANUAL
4.8 Password
The factory password is 9667.
30
USER MANUAL - D7261A-RPE
Appendix A. Connector Pin Assignment
A.1. RS-485 (RJ-11 6P6C)
Pin No.
1
2
3
4
5
6
Definition
+12V
GND
DA ( D +)
DB ( D -)
-
Direction
Power
Power
IO
IO
-
The default RS485 port connector is RJ11 6P6C connector:
RJ11 Cable 6P6C pin definition:
31
D7261A-RPE - USER MANUAL
A.2. RS-485 ID
a. System ID setting
Item
ID address
1 00H,0
2 01H–DFH, 1~223
3 E0H–EFH, 224~239
4 F0H–FEH, 240~254
5 FFH, 255
Device name
Host controller
Speed dome
Multiplexer
Control keyboard
Matrix
Remark
Keyboard or computer
Total 223 Dome sets
224~239 ( Mpx1~Mpx16)
Keyboard or computer
b. Multiplexer (MPX) Channels and Camera ID Mapping
MPX
NO
1
2
3
4
5
6
7
8
9
10
11
12
13
14
15
16
MPX ID
Camera ID
E0H,224
E1H,225
E2H,226
E3H,227
E4H,228
E5H,229
E6H,230
E7H,231
E8H,232
E9H,233
EAH,234
EBH,235
ECH,236
EDH,237
EEH,238
EFH,239
01H – 10H,1~16
11H – 20H,17~32
21H – 30H,33~48
31H – 40H,49~64
41H – 50H,65~80
51H – 60H,81~96
61H – 70H,97~112
71H – 80H,113~128
81H – 90H,129~144
91H – A0H,145~160
A1H – B0H,161~176
B1H – C0H,177~192
C1H – D0H,193~208
D0H – DFH,209~223
None
None
32
Remark
Channel 1~16
Only 15 Dome can be connect
Can connect to normal camera
Can connect to normal camera
USER MANUAL - D7261A-RPE
A.3. External I/O Port (37pin DSUB)
Pin No.
1
2
3
4
5
6
7
8
9
10
11
12
13
14
15
16
17
18
19
Definition
GND
GND
GND
GND
RX-232 (reserved)
TX-232 (reserved)
Alarm NO
Alarm COM
Alarm NC
GND
GND
GND
GND
GND
GND
Alarm In 16
Alarm In 15
Alarm In 14
Alarm In 1
Direction
Power
Power
Power
Power
Output
Input
Output
Output
Output
Power
Power
Power
Power
Power
Power
Input
Input
Input
Input
Pin No.
20
21
22
23
24
25
26
27
28
29
30
31
32
33
34
35
36
37
Definition
Reserved
Reset Alarm
Day / Night output
Day / Night switch
Set Alarm
VCR trigger
Alarm In 13
Alarm In 12
Alarm In 11
Alarm In 10
Alarm In 9
Alarm In 8
Alarm In 7
Alarm In 6
Alarm In 5
Alarm In 4
Alarm In 3
Alarm In 2
A.4. Remote (Key Pad Port, RJ-45, 8P8C)
Pin No.
1
2
3
4
Definition
GND
KeyGND
Key+
Pin No.
5
6
7
8
33
Definition
LED+12V
LED+
+12V
Direction
Input
Input
Output
Input
Input
Input
Input
Input
Input
Input
Input
Input
Input
Input
Input
Input
Input
Input
D7261A-RPE - USER MANUAL
Appendix B. Technical Specifications
The following specifications apply to this multiplexer. All specifications are subject to
change without notice.
Item
Description
Video Level
Camera Inputs
1.0Vpp, 75Ω terminated
Camera Outputs
Loop through of camera inputs
Main Monitor Output
Composite: 1.0Vpp, 75Ω loaded
S-VHS- Y: 1.0Vpp, 75Ω loaded
- C: 0.286Vpp, 75Ω loaded
Call Monitor Output
1.0Vpp, 75Ω loaded
VCR Inputs
Composite: 1.0Vpp, 75Ω terminated
S-VHS- Y: 1.0Vpp, 75Ω terminated
- C: 0.286Vpp, 75Ω terminated
VCR Outputs
Composite: 1.0Vpp, 75Ω loaded
S-VHS:- Y: 1.0Vpp, 75Ω loaded
- C: 0.286Vpp, 75Ω loaded
Display
Gray Level
256 (8bits)
Color Palette
16M colors (24bits)
Resolution
720x480(NTSC/EIA), 720x576(PAL/CCIR)
Connectors
Power
DC Jack
Camera In
BNC Female Connector
Camera Out
BNC Female Connector
Main Monitor
BNC Female Connector & S-VHS
Call Monitor
BNC Female Connector
VCR In
BNC Female Connector & S-VHS
VCR Out
BNC Female Connector & S-VHS
Alarm input
DSUB 37 pin male (TTL level)
Alarm output
2(NO,NC)2.0A/24V
RS-485
RJ-11 ( 6P6C)
Remote control
RJ-45 ( 8P8C)
Power Supply Input Voltage:
12V + - 10% DC
Power Consumption
14W (MAX)
Safety Approval
CE, FCC
Dimension
Width
R : 432mm
Height
R : 44mm
Depth
R : 270mm
Net Weight
3.106 Kg
Environmental Operation Temperature
0 ~ 40
Humidity
0%~90% RH, Non-condensation
Storage Temperature
-20 ~70
34
USER MANUAL - D7261A-RPE
Appendix C. RS-485 Command Set
The texts of Data 0, 1 is in ASCII code format
Command
OP_code
Data 0,1
Channel select
A0
“01”~”0G”
Screen mode Right
“MR”
select
Left
“ML”
Sequence
“S1”~”S3”
Up key
“DU”
Down key
“DD”
Left key
“DL”
Right key
“DR”
Enter
“DZ”
Live/VCR
“KV”
Freeze
“KA”
ESC
“KE”
List
“KL”
Date/Time
“SD”
Title
“ST”
Menu
“SP”
Key Lock
“SK”
Universal End
“UE”
Note
Channel 1~16
Detail setting must reference
User’s manual
Sequence 1~3
Example:
If the Keyboard ID is 00H, the Multiplexer ID is E0H.
If you want to select camera 0 on the main monitor, you can use ‘01’ command.
(The ASCII Code of ‘01’ is 30 & 31H.)
Byte 1
Byte 2
Receiver ID Transmitter ID
E0H
00H
Byte 3
OP Code
A0H
Byte 4
Data0
30H
NOTE : These six bytes must be sent out in 12ms.
35
Byte 5
Data1
31H
Byte 6
Checksum
41H
D7261A-RPE - USER MANUAL
Appendix D. Remote Control Keyboard
D.1 System Diagram
The remote keyboard is used to control the multiplexer in remote site, four remote
keyboard can be used to control one multiplexer in daisy chain connection.
Multiplexer Rear Panel
Keyboard Rear Panel (Max.4 sets)
Keyboard 1
Keyboard 2
D.2 Specification and connectors
1. Specification
Power input:
12Volt DC(-15%~+15%)
Power Consumption:
0.5Watt
Environment Temperature 0 ~50
Humidity:
less than90%
Dimension:
350(W)x60(D)x35(H) mm
2. Connector
Power:
DC Jack (center positive)
Remote I/O:
RJ45 8P8C
3. Cable:
RJ45 8P8C one to one, 1000 meter maximum.
36
USER MANUAL - D7261A-RPE
DIGITAL MULTIPLEXER mod. D7261A-RPE - USER MANUAL
June 2004 edition
Product specifications as described above do not bind the manufacturer and may be altered without prior notice.
EL.MO. SpA
Tel. +39 0499203333 (4 linee R.A.) - Fax +39 0499200306 - Ass. Tecnica +39 0499200426 - www.elmo.it - [email protected]