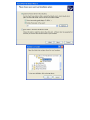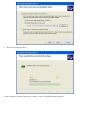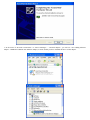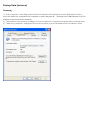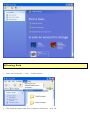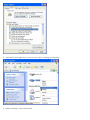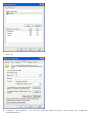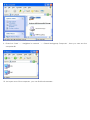
1
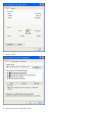
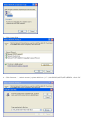
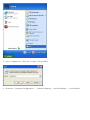
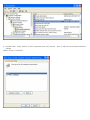
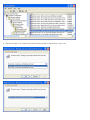
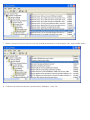
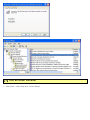
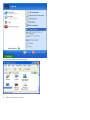
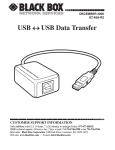
USB 2.0 10/100M Fast Ethernet Adapter User’s Manual 1. Introduction The USB Ethernet 10/100 adapter performs good plug and play connection of PC peripherals “out -side the box” and mark a significant advance in desktop cable management. Using the USB Ethernet 10/100 adapter you can simplify your PC network connections in the home, office and on the travel. 2. Product Features USB specification Ver. 2.0 compliant. Supports USB Suspend/Resume Function. High-Speed USB Device. Supports wakeup frame, link status change and magic packet wake-up . Supports 2000/ XP /2003 Supports plug and play. 3. System Requirements IBM PC or compatible PC with 486DX-100 MHz CPU or higher Available USB port CD-ROM drive At least 16MB of DRAM 4. Installation of the USB Ethernet 10/100 adapter: Follow the steps on installing the USB Ethernet 10/100 adapter software 1. Power on your computer and make sure that the USB port is enable and working properly. 2. Insert the “USB 2.0 to Fast Ethernet Adapter” to the USB port , it will be identified and indicate“ Found New Hardware Wizard”, please select “No, not this time”, click “Next “ to continue. 3. Select “Install from a list or specific location (Advanced)”, and click “Next” to continue. 4. Select “ Include this location in the search”, click “Browse” and select the folder that contains driver for your hardware, then click “OK”, press “Next” to continue . 5. Please start installing the driver. 6. After installation completed, please click “Finish” to close “Found New Hardware Wizard”. 7. In the menu of “Network Connections” or “Device Manager” – “Network adapter”, you will see a new adding Ethernet adapter – ADM851X USB TO Fast Ethernet Adapter, it made out that you have installed the driver of this adapter. Sharing Data (instance) Foreword: 1) Both computers’ operating system is Microsoft Windows XP Professional version 2002 Service Pack 2 Let’s call these two computers as Computer A and Computer B (Through the USB Ethernet 10/100 Adaptor to the Local Area network) 2) 3) The purpose of this instance is telling you how to make two computers exchange visits and share Data. These two computers’ workgroup must be set as same, such as: DOMAIN (refer to the below chart) Installation and Setup for Computer A and B (1) Install NETBEUI protocol 1. Open ‘ Control Panel’ --- ‘ Network connections’ , double click ‘ Local Area Connection’ 2. Click ‘ Properties’ 3. Click ‘ install … ’ 4. Select ‘Protocol’ and click ‘Add...’ 5. Click ‘Have Disk…’ 6. Click ‘Browse…’ , select access ( system disk icon ) : F: \VALUEADD\MSFT\NET\NETBEUI , click ‘OK’ 7. Select ‘ NetBEUI Protocol’ , click ‘ OK’ 8. Click ‘Yes’ to restart your computer 9. Completed the installation of NetBEUI Protocol ( 2) Setup Group Policy 1. Click ‘start , then select and click ‘Run’ 2. Key in ‘ apedit.msc’ , click ‘OK’ to open ‘ Group Policy ’ 3. Enter into ‘ Computer Configuration ’ --- ‘Windows Settings’--- ‘Security Settings’ --- ‘Local Policies’ 4. Double click ‘ Deny access to this computer from the network’ , then it will show the below interface , please Select ‘Guest’ a cancel it. 5. Enter into ‘Computer Configuration’--- ‘Windows Settings’---‘Security Settings’---‘Local Policies’—‘Security Options’ ; select and double click ‘Network access : Sharing and security model for local accounts’ 6. Please change it as ‘Classic-local users authenticate as themselves’, click ‘OK’. 7. Select ‘Accounts: Limit Local account use of blank passwords to console logon only ‘and double click it. 8. It will show the below interface , please select ‘Disabled’ , click ‘OK’ . ( 3) Turn on GUEST Account 1. Click ‘Start’ , select and click ‘Control Panel’ 2. Double click ‘User Accounts’ 3. Select and click ‘Guest’ 4. Click ‘Turn on the Guest Account’ 5. Guest Account is turned on (4) Sharing Data 1. Open ‘My Computer’ – ‘Tools’ – ‘Folder Options’ 2. Click ‘Display simple folder view in Explorer’s Folders list’ , click ‘OK’ 3. Click disk G with right key on your mouse, select ‘Sharing and Security…’ 4. Select ‘Sharing’ , click ‘New Share’ 5. Key in ‘Share name’ 6. Click ‘Permissions…’ , you can set it according to yourself requirement , here , everybody can share reading and writing , click ‘OK’ . 7. Click ‘OK’ 8. In folder of ‘ My Computer ’ , you can find a disk icon held in the palm , which means you completed setting shareware . 9. Enter into ‘Start’ --- ‘ Neighbor in network ’ --- ‘Check Workgroup Computer’ , then you can see the computer list 10. Just open one of the computer , you can find the shareware .