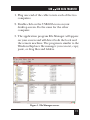
1
DECEMBER 2000
IC149A-R2
USB ↔ USB Data Transfer
B
S
U
to
B
S
U
a
at
D
er
sf
n
a
Tr
CUSTOMER SUPPORT INFORMATION
Order toll-free in the U.S. 24 hours, 7 A.M. Monday to midnight Friday: 877-877-BBOX
FREE technical support, 24 hours a day, 7 days a week: Call 724-746-5500 or fax 724-746-0746
Mail order: Black Box Corporation, 1000 Park Drive, Lawrence, PA 15055-1018
Web site: www.blackbox.com • E-mail: [email protected]
USB ↔ USB DATA TRANSFER
FEDERAL COMMUNICATIONS COMMISSION
and CANADIAN DEPARTMENT OF COMMUNICATIONS
RADIO FREQUENCY INTERFERENCE STATEMENT
Class B Digital Device. This equipment has been tested
and found to comply with the limits for a Class B
computing device pursuant to Part 15 of the FCC Rules.
These limits are designed to provide reasonable
protection against harmful interference in a residential
installation. However, there is no guarantee that
interference will not occur in a particular installation.
This equipment generates, uses, and can radiate radio
frequency energy, and, if not installed and used in
accordance with the instructions, may cause harmful
interference to radio communications. If this
equipment does cause harmful interference to radio or
telephone reception, which can be determined by
turning the equipment off and on, the user is
encouraged to try to correct the interference by one of
the following measures:
• Reorient or relocate the receiving antenna.
• Increase the separation between the equipment and
receiver.
1
USB ↔ USB DATA TRANSFER
• Connect the equipment into an outlet on a circuit
different from that to which the receiver is
connected.
• Consult an experienced radio/TV technician for
help.
Caution:
Changes or modifications not expressly
approved by the party responsible for
compliance could void the user’s authority to
operate the equipment.
To meet FCC requirements, shielded cables and power
cords are required to connect this device to a personal
computer or other Class B certified device.
This digital apparatus does not exceed the Class B limits for
radio noise emission from digital apparatus set out in the Radio
Interference Regulation of Industry Canada.
Le présent appareil numérique n’émet pas de bruits
radioélectriques dépassant les limites applicables aux appareils
numériques de classe B prescrites dans le Règlement sur le
brouillage radioélectrique publié par Industrie Canada.
TRADEMARKS
Any trademarks mentioned in this manual are acknowledged
to be the property of the trademark owners.
2
USB ↔ USB DATA TRANSFER
CONTENTS
1. Specifications . . . . . . . . . . . . . . . . . . . . . . . . . . . 4
2. Introduction. . . . . . . . . . . . . . . . . . . . . . . . . . . . 5
2.1 Overview . . . . . . . . . . . . . . . . . . . . . . . . . . . . 5
2.2 What the Package Includes . . . . . . . . . . . . . 5
2.3 Features . . . . . . . . . . . . . . . . . . . . . . . . . . . . 6
2.4 System Requirements . . . . . . . . . . . . . . . . . 7
3. Installation . . . . . . . . . . . . . . . . . . . . . . . . . . . . . 8
3.1 Driver Installation . . . . . . . . . . . . . . . . . . . . 8
3.2 Program Installation . . . . . . . . . . . . . . . . . . 10
3.3 Running the USB-LINQ Program . . . . . . . 10
4. Operation. . . . . . . . . . . . . . . . . . . . . . . . . . . . . . 13
4.1 Power Management and Remote
Wake-up Function . . . . . . . . . . . . . . . . . . . . 13
4.2 Program Un-installation . . . . . . . . . . . . . . . 13
3
USB ↔ USB DATA TRANSFER
1. Specifications
Hardware Requirements—PC that supports USB;
486DX, 66-MHz CPU or higher
Software Requirements—Windows 95B or 98
Standards—USB 1.1
Connectors—(1) USB Type A male on a 10.5"
(26.7-cm) pigtail cable, (1) USB Type B female
Additional USB Cable Included —Connectors: (1)
USB Type B male, (1) USB Type A male, Length:
6 ft. (1.8 m)
Power—From the interface
Size—15⁄8" W x 21⁄4"L (4.1 x 5.7 cm)
4
USB ↔ USB DATA TRANSFER
2. Introduction
2.1 Overview
The USB ↔ USB Data Transfer cable provides peer-topeer file transfer between two computers via the USB
port. It gives you true plug-n-play capability while
transferring files at much greater speed than traditional
file-transfer methods via serial or parallel port. With the
cable, data can travel at speeds more than 6 Mbps. In
most applications, files will transfer smoothly at speeds
greater than 4 Mbps. The cable’s application program—
which is similar to the standard Windows Explorer
interface—makes file transfer as easy as drag-and-drop.
You simply plug in the cable and install the program
one time.
2.2 What the Package Includes
Your USB ↔ USB Data Transfer package includes the
following items:
• (1) USB ↔ USB Data Transfer cable
• (1) 6-ft. (1.8-m) USB type B male to USB type A
male cable
5
USB ↔ USB DATA TRANSFER
• (1) Driver and software installation diskette
• This user’s manual
If anything is missing or damaged, contact Black Box
immediately at 724-746-5500.
2.3 Features
The USB ↔ USB Data Transfer cable offers these
features:
• Single-chip (ASIC) USB host-to-host
communication.
• High-speed data transfer rate from 6 Mbps.
• Single-cable solution for data communication.
• Supports Windows 95 and 98.
• File transfer is as easy as drag-and-drop.
• Includes print function for remote files.
• Includes power-management and remote-wakeup
functions.
6
USB ↔ USB DATA TRANSFER
• Complies with USB specification 1.1.
2.4 System Requirements
Before you use the USB ↔ USB Data Transfer cable,
make sure your computer is IBM PC compatible with the
following minimum system requirements:
• Intel compatible 486DX-66 MHz CPU or higher.
• One standard USB port (4-pin).
• Any of the following operating systems:
1. Windows 95 OSR2.1 (B version) with USB version
1214.
2. Windows 98.
7
USB ↔ USB DATA TRANSFER
3. Installation
3.1 Driver Installation
Follow the steps below to install the USB ↔ USB Data
Transfer cable for the first time:
1. Power on both computers where you will connect
the USB Transfer cable. Make sure that the USB
port on each PC is enabled and working properly.
2. Plug the USB cable into the USB port. Windows
will detect an unknown device and run the “Add
New Hardware Wizard” to help you set up the new
device.
3. Insert the USB cable driver diskette into the floppy
drive and click Next to continue.
4. If you’re using Windows 98, follow the steps below.
If you’re using Windows 95, skip to step 5.
a. Select “Search for the best driver for your device”
and click Next.
b. Select “Specify a Location” and click Browse.
Change the folder of your floppy drive (for
example, A:\WIN98) and click OK.
8
USB ↔ USB DATA TRANSFER
c. Double-check the directory that Windows
prompts. Click Next.
d. Windows will detect the driver (usbbc.inf) and
show the “USB Bridge Cable (Windows 98).” Click
NEXT to continue until installation is complete.
e. Click Finish when installation is complete.
5. For Windows 95 users:
a. Select Others and click Browse. Change the folder
of your floppy drive (for example, A:\WIN95) and
click OK.
b. Double-check the directory that Windows
prompts. Click OK.
c. Click Finish to install drivers.
d. Windows will prompt “Please insert Windows 95
CD-ROM and click OK.”
e. Click Browse and change the folder of your floppy
drive (for example, A:\WIN95) and click OK.
f. Double-check the directory that Windows
prompts. Click OK to continue until installation is
complete.
9
USB ↔ USB DATA TRANSFER
3.2 Program Installation
After installing the device driver for the USB Data
Transfer cable, you need to install the application
program for transferring files. Follow the steps listed
below.
1. Insert the driver diskette into the floppy disk drive
and run the setup.exe program.
2. The Setup program will begin installing the
program.
3. Follow the instructions on every dialog box to
finish the installation.
4. After installation is complete, a icon called
USB149A will appear on your desktop. This icon is
a shortcut to the application program.
5. Repeat steps 1 through 4 for the other computer.
3.3 Running the Application Program
Follow these steps to run the USB ↔ USB Data Transfer
cable application program.
10
USB ↔ USB DATA TRANSFER
1. Plug one end of the cable to into each of the two
computers.
2. Double-click on the USB149A icon on your
desktop screen. Do the same for the other
computer.
3. The application program File Manager will appear
on your screen and will detect both the local and
the remote machine. The program is similar to the
Windows Explorer file manager: you can cut, copy,
paste, or drag files and folders.
Figure 1. File Manager screen.
11
USB ↔ USB DATA TRANSFER
4. You can also print text or document files from the
remote machine to your local printer by clicking
on the file and running the File→Print command.
5. Two LED-like indicators on the bottom-right
corner of the File Manager show the connection
status of the remote and local PC. The left LED is
for the local PC, and the right LED is for the
remote PC. A green LED indicates that the
connection is good; a red LED indicates that a
connection has not been found. Both LEDs must
be green for a proper link and operation. If one
LED is red, either the USB Data Transfer cable is
not properly connected, or the software is not
properly installed, or the PC is in suspend mode.
6. Click on the Help Topics icon (rightmost icon)
for more information on how to use the program.
12
USB ↔ USB DATA TRANSFER
4. Operation
4.1 Power Management and Remote Wake-up Function
The USB ↔ USB Data Transfer cable supports power
management of USB. When either of the two connected
PCs goes into suspend mode, the cable will draw less
than 500 µA of current from it. This is essential for a
notebook or other mobile PC.
The application program also includes the remote
wake-up function. Whenever the remote machine goes
into suspend mode, you just click on any file or folder
inside the remote machine’s directory and the remote
machine will resume normal operating mode.
However, you can disable this function to avoid
suspend-wakeup sequence while operating the
application. Click the Option menu, then click Setting,
and disable the Allow System to Suspend option.
4.2 Program Un-installation
You can un-install the application program and driver by
selecting the Uninstall USB149A from the USB149A
program group and follow the on-screen instructions to
complete the process.
13
© Copyright 2000. Black Box Corporation. All rights reserved.
1000 Park Drive • Lawrence, PA 15055-1018 • 724-746-5500 • Fax 724-746-0746