1
End User Manual and Technical Specifications WebHat Newsletter -‐ Version 7.0 WebHat 9 Manuale per l’utente The information included in this manual is only provided for information and may be
modified without prior notice. The software may be used according to the terms
and conditions of the license agreement. No part of this documentation shall be
reproduced or transmitted in any form or with any means, digital or mechanical,
including photocopies, recording of information and data recovery systems, for
purposes other than the user’s personal use, without the explicit written
authorization of KeyCode.
The names of the products mentioned in this document are brand names and/or
trade marks of the relative owners and are only indicated for identification purposes.
KeyCode and WebHat documentation, software and brand: Copyright by
KeyCode. All rights reserved.
WebHat 2 User Manual Contents
1. INTRODUCTION TO THE SYSTEM 7 2. NEWSLETTER. 2.1. SENDING A MESSAGE TO SUBSCRIBED USERS 2.2. ARCHIVE 2.3. SETTINGS MANAGEMENT
2.4. STATISTICS 8 9 19 20 23 3. NEWSLETTER AGENCY 3.1. HOW DOES W EBHAT NEWSLETTER AGENCY WORK? 3.2. CUSTOMER AND USER MANAGEMENT
28 28 28 4. LIST MANAGEMENT AND PERSONALIZATION
(THROUGH DATADYN) 4.1. CREATING A LIST
4.2. MODIFYING A LIST
4.3. CONTACT MANAGEMENT 33 33 34 35 5. MOBILE DEVICES
37 6. UPDATES AND ASSISTANCE
6.1. ASSISTANCE 38 38 WebHat 3 User Manual Introduction
What is the purpose of this manual?
The purpose of this manual, as well as of all the manuals related to WebHat (for
the complete list, check the site www.keycode.it), is to provide clear and simple
instructions for using the application to the best advantage. The basic objective is
to allow easy, fast and also complete learning.
What does this manual include?
This manual includes all the necessary instructions for using the WebHat
Newsletter platform. Each chapter and section includes detailed descriptions of the
interface functionalities and step-by-step instructions for performing each operation.
Where should you look for further information?
Further information on the different interfaces, on the new implementation and on
the additional modules is available on the WebHat product website
(www.webhatcms.com and www.webhatnewsletter.com). In addition, within the
different windows of the application itself, the link to the on-line guide and/or to the
video tutorials is available by clicking on the (?) button.
WebHat 4 User Manual Introducing WebHat.
Content as a resource
If properly managed, contents represent the keystone of corporate “knowledge”. They
spread information towards interlocutors such as customers, suppliers and
resellers. It is therefore essential to provide updated news in terms of both form and
content. Publishing out-of-date information on websites may turn out to be
counterproductive. When receiving news that is not updated, the user judges the
communication tool to be not reliable, with a consequent negative judgement of the
company that has given such information. In order to give an important added value to
all web projects, it is therefore essential to ensure constant updating of contents.
As already said, such requirement must be ensured by suitable tools enabling a
quick and economical action. So, WebHat comes forward as a solution to the
problems related to the update of digital contents.
The advantages of WebHat
Constant updating: the tool described ensures optimal and flexible management of
web contents, providing a means through which the information published can be
adjusted. In this way, times are reduced, as it is not necessary to rely on external
structures for operations that are often minor.
Easy to use: WebHat takes advantage of Internet for simplifying and facilitating
the content updating operations; all this is achieved through a revolutionary
user-friendly interface, which is – at the same time – very similar to the most
common programmes used on PCs, MACs or Unix/Linux workstations.
Lower costs: the intervention of web agencies for updating operations is often costly.
With WebHat, on the other hand, it is possible to manage the news spread through a
website in a completely independent manner.
WebHat 5 User Manual WebHat 6 User Manual 1.
Introduction to the system
The WebHat Newsletter application is an e-mail marketing platform developed by
KeyCode through PHP, JavaScript, AJAX and HTML languages interfaced with
the most common database servers.
The use of this software is possible by using a simple browser, such as Internet
Explorer, Firefox, Safari or Google Chrome, and having, within WebHat web
pages, an HTML/xHTML professional and visual editor (WYSIWYG) similar to
the most common word processing programmes such as Microsoft Word or
Open Office.
WebHat Newsletter is a software that can be used for managing and organizing your
own e-mail marketing campaigns using a front-end part ("Control Panel" that is
displayed with a browser), which is hidden to the public and to which it is only
possible to access by entering a username and password.
WebHat 7 User Manual 2.
Newsletter
With WebHat Newsletter, a large list of e-mail addresses can be managed. At any
time, it is possible to perform a maintenance operation on the subscribed users
(modify, delete and carry out statistical analyses) and to send the same e-mail (HTML
or text) to the entire list, to one of the categories or to a number of users selected
according to advanced filters.
Composing each of the messages to be sent to the list is simple, quick and intuitive.
Furthermore, if you want to send the e-mail in HTML format, the visual editor is
also available for composing the message. HTML e-mails have the great
advantage of feedback: it will be possible to know how many users have read the
e-mail sent to the list and how many sent e-mails have been read by a certain user.
In addition, for the tracked links inserted through the “Link with statistics”
function of the visual editor, it will be possible to keep track of the number of
times that certain links have been clicked on by the users who display the
newsletter.
In order to facilitate the use of the software, after having accessed the system, the
Wizard window is displayed (this window can also be accessed from “Modules ->
Additional modules -> Newsletter -> Wizard”). The window guides the user
through the four main steps of an e-mail marketing campaign.
WebHat 8 User Manual The functionalities offered are the following:
1. Create: this step simplifies the creation of a new list; in the “List name” field,
it is possible to specify a name for the list of contacts to be created. By
clicking on the “Create” button, a new database of contacts with the name
specified will be automatically generated; such list will automatically
include the fields Name, Surname and E-mail, in addition to the fields used
by the system (ID and Unique ID). The fields can be modified, added or
deleted through DataDyn (check the relative section of the manual)
2. Import: with the second step, it is possible to import your own list of
addresses through CSV files. The procedure requires loading the file and,
after its analysis for checking its validity, the data are inserted in the selected
list. In this step, it is also possible to analyze your own list of addresses for
checking syntactical correctness and the validity of the mail service activated.
In this way, the addresses with errors can be disabled before sending any email.
3. Compose: in the third step, it is possible to start composing the message and to
develop the entire e-mail marketing campaign. Once the corresponding list has
been selected, just start composing with the “Compose” button (for information
on the composition phase, check section “2.1. Sending a message to subscribed
users”).
4. Analyze: the fourth and last step can be used for checking the statistics
regarding each of the messages that have been sent; also in this case, just
select the message you want to check from the list and press the
“Analyze” button for displaying the relevant statistics (for information on
the statistic analysis phase, check section “2.5. Statistics”).
Note: certain functionalities might not be available or might be limited with respect to what
has been described in this manual, depending on the authorizations given to the user
accessing the system. For further information in this regard, refer to the communication
agency.
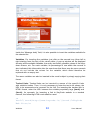
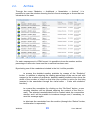
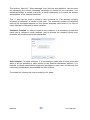
2.1. Sending a message to subscribed users
The window for sending the message is accessed from the menu “Modules ->
Additional modules -> Newsletter -> Send new message”. The window that will be
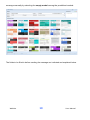
displayed is shown in the following image: it is possible to load a predefined model
(among the 250 models provided with the platform) or a personal model (created by
the communication agency). For expanding or collapsing the predefined models and
personal models categories, just click on the + or – button located in the Predefined
Models or Personal Models title bar. Alternatively, it is possible compose the
WebHat User Manual 9 message manually by selecting the empty model among the predefined models.
The fields to be filled in before sending the message are indicated and explained below.
WebHat 10 User Manual Sender. The name of the company, organization or person that is writing and sending
the newsletter.
E-mail. The sender’s e-mail address. A valid e-mail address must be indicated, as
this will be address to which the reading reports will be sent (see the Statistics section
of the manual). Some users could also use the sender’s address for answering the
newsletter.
Note: for safety reasons, it is only possible to send newsletters from an owned
domain; it is therefore necessary to specify a username and to choose a domain
among those that are available in the drop-down menu, so as to compose an
address with the format any_thing@own_domain.it. For any change, removal or
addition to owned domains, refer to the partner.
Subject. In this field, which can only contain text, the subject of the e-mail to be sent
must be indicated. It is also possible to enter variables that make reference to an
individual recipient for personalizing the newsletter already in the e-mail subject (see
the section Variables below).
Attachments. By clicking on the “+” icon it is possible to select one or more files to
be attached to the newsletter from the hard disk. It is important to point out that the
files are not physically attached to the newsletter; they are loaded on the KeyCode
servers, and a link to such files is indicated in the e-mail: this is to avoid possible
problems due to anti-spam and anti-virus filters on the receiver’s mail server (or
directly on the client), and to keep the newsletter weight within an acceptable range
(which could be unpleasant for the addressee if it is too heavy). In addition, it is
possible to track the link to the attachment in order to know who has downloaded
WebHat 11 User Manual the file and when the file has been consulted (see the section Tracked Links below).
Recipients. The list to which the newsletter is to be sent must be selected. Clicking
on the corresponding icon will open a window that will show the list of available
entities to which the newsletter can be sent (entities that have, inter alia, at least
one “E-Mail” field and one “Unique ID (for newsletter or key)” field), with the
corresponding number of active users inside it.
Format. It is possible to select the format in which the newsletter is to be sent. If
HTML is selected, it will be possible to compose the message through the visual
editor.
If the Text format is selected, it will not be possible to have feedback on the
readings and, therefore, the statistics for the newsletter being composed will not
be available.
Message body. It represents the e-mail text (message). It can be written in HTML
through the visual editor or only in text. It is important to point out that when e-mails
are sent in HTML format (i.e. written through the visual editor), it is possible to
receive feedback on the number of people who have read the e-mail with respect to
those to whom such e-mail has been sent.
It is possible t o set off this field starting from a predefined graphic style (model).
Clicking on the corresponding icon (the first one available in the visual editor, on
the top left corner) will open a list including all the available models; when one of
them is selected, the content of the visual editor will be replaced with the default
content of the selected model. At this point, it will be possible to insert all the
contents to be sent using the typical functionalities of formatting, chart insertion,
images, etc. offered by the visual editor.
WebHat 12 User Manual Inside the “Message body” field, it is also possible to insert the variables available for
the selected list.
Variables. For inserting the variables, just click on the second icon (from left to
right starting from the top) of the visual editor. A pop-up window will be displayed
showing all the available variables: the entity text fields, possible values of the dropdown menus, etc. For each variable, its percentage of use within the records is
also indicated; this information lets the user know that there may be some records
that do not include the values for the variable, which would therefore be
replaced with an empty text.
The same variables can also be inserted in the e-mail subject by simply copying their
format.
Tracked Links. Tracked links can be inserted by means of the specific Links
with statistics button. Then, it is only necessary to enter the text to be shown, the
URL to be accessed and a comment for the link. For inserting the tracked link in
HTML format, enter the URL between the suitable proprietary tags {track} and
{/track}; for example, for inserting a link to KeyCode website in a tracked
manner, the following HTML code shall be used:
<a
href=”{track}http://www.keycode.it/{/track}”>KeyCode
Web Site</a>
WebHat 13 User Manual Note: the tracking of links is only supported for the a tags, while any link
inserted in an image through the map and area tags are completely supported
by WebHat.
The insertion of tracked links may also be done automatically: by selecting the
corresponding checkbox “Track all links” in the part below the interface, all the
links included in the newsletter will be replaced with the tracked links.
Special characters. In order to be sure that all the users can see special
characters (symbols, accented letters, etc.) correctly, it is advisable to insert them
through the specific “Special Characters” function, which codifies them through the
corresponding HTML entity.
As tracked links, special characters can also be automatically inserted through
the corresponding checkbox “Convert special characters into HTML
entities”.
Once the necessary fields have been filled in, it is possible:
to display the preview of the newsletter that will be sent (by clicking on
the “Browser preview” button);
to display the preview in the most scattered mail customers (by clicking on
the “Mail clients preview” button);
to save as draft. If the newsletter being composed has been loaded from a
draft, when it is saved, the previous version of the newsletter is overwritten.
To save a new copy, click on next;
to make a test sending, by selecting the e-mail address in which the
newsletter that is being created is to be received; the “test sending”
modality is not based on the DataDyn entity and, for such reason, the
variables are not replaced and any links with statistics are not tracked.
The message will not be in the archive of sent newsletters, and it will not
be possible to check its statistics.
to make an anti-spam check. The newsletter is checked with an anti-spam
filter installed on KeyCode servers that assesses the possibility the e-mail
in question could be considered spam; in addition, the reasons for which
the newsletter has been classified as spam or not are indicated. It is
important to highlight that such result is absolutely indicative, as each
single anti-spam filter during the receipt phase may classify the newsletter
in a different way, depending on its setting.
Mail clients preview. The window that is displayed by clicking on “Mail clients
preview” can be used to select the customers for which to obtain a preview of how the
WebHat 14 User Manual message will look like in the composition phase.
Once the desired customers have been selected, click on “Generate previews” to start
creating the preview images.
WebHat 15 User Manual The preview creation phase takes several minutes: thanks to the WebHat Newsletter
window interface, obviously, it is possible to continue working on other
functionalities while the previews are generated in background. Once the
procedure has been completed, click on each preview to display them in detail:
previews are images for all practical purposes; therefore, they can be easily saved on
your PC.
Sending. Once the preview analysis has been completed, the message can be
sent by clicking on the “Next” button. At this point, the second window used for
sending (shown in the figure below) is displayed for selecting recipients in three
different modalities:
WebHat 16 User Manual to all the users subscribed to the list.
to one or more categories (this modality is present only in case the selected
list of contacts includes a “Linear category (multiple choice)” field).
to a selection through filters. Filters can be applied to all the fields of the
list to which the newsletter is sent (whether it is the default entity of the
“Newsletter” module or an entity specifically created by the user).
The window used for selecting recipients is shown below.
It is advisable to pay maximum attention when filling in the filters, mainly as
regards opening and closing round brackets (the number of round brackets that
have been opened manually must be equal to the number of round brackets that
have been closed manually). In case of setting the filters incorrectly, the newsletter
could not be sent or it could have no recipients that can be selected.
In case of errors within the filters that have been set, the system will display a
warning message to inform the user of the fact that the newsletter will not be sent
correctly.
Once the list of contacts to which the Newsletter is to be sent has been selected,
WebHat 17 User Manual click on the “Next” button to complete the operation. Now, the last step of the
procedure will be shown.
The interface shown above can be used to establish when the newsletter is to be
sent. It is possible to send it immediately after clicking on the next button for the last
time or to programme a date and time for sending it, as well as to specify whether
and when you want to receive a report including the reading statistics. Such report
will be sent by e-mail to the address entered in the sender field in the
composition window; in case of having an Apple device with iOS operating system
and WebHat Newsletter or WebHat Newsletter HD application, a Push
Notification will also be sent (if the device has been associated and enabled for
such functionality).
Once the selection indicated above has been made, click on the “Next” or “Schedule”
button for the Newsletter to be handled by WebHat and sent on the date and at the
time established.
WebHat 18 User Manual 2.2. Archive
Through the menu “Modules -> Additional -> Newsletter -> Archive”, it is
possible to open the window showing the list of sent messages or those that are
scheduled to be sent.
For each message sent in HTML format, it is possible to know the number and the
percentage of users who have read the e-mail that has been sent.
By selecting one of the newsletters included in the list, it will be possible:
to access the detailed reading statistics by means of the “Statistics”
button. In addition to showing the reading percentage of the sent e-mail with
respect to the number of recipients, detailed reading statistics also show the
detail of the number of clicks on the links (the counter is active for the links
inserted in the newsletter through the visual editor – “Links with statistics”
function).
to re-send the newsletter (by clicking on the “Re-Send” button, a new
sending interface will be opened showing the content of the filed email). The selected newsletter/draft will be loaded inside the composition
window, and it will be possible to introduce changes and, if necessary, to
send the message again.
to eliminate the newsletter from the archive (through the “Delete” button,
confirmation is requested).
WebHat 19 User Manual Note: if a newsletter “scheduled to be sent” is deleted, the scheduled newsletter
will not be sent to the recipients.
The fields included in the archive are the following ones.
Headers. It indicates the subject and the sender of the e-mail that has been sent (or
that is waiting to be sent).
Customer. It indicates the customer to which the message is associated (only in case
of WebHat Newsletter Agency license).
Destination. It shows the name of the list of recipients.
Composed on. It indicates the message composition date.
Status. It indicates the message status: it may include the sending or scheduling date
and time, or the saving date and time in case it is a draft.
Type. It indicates the type of the newsletter sent: HTML or text.
Attachments. The presence of a clip icon in this column indicates the presence of one
or more attachments inside the message.
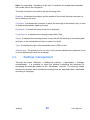
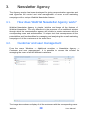
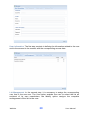
2.3. Settings management
Through the menu “Modules -> Additional modules -> Newsletter -> Settings
management”, it is possible to open the window containing the interface for
managing the settings related to the “Newsletter” module. The following image
shows such window, which contains the settings that are specified below, subdivided
according to language.
WebHat 20 User Manual Subscription invitation. This is the text that will be displayed on the web pages above
the text box for subscribing to the Newsletter.
Subscription button. This is the text that will be displayed on the web pages in the
button for subscribing to the Newsletter.
Subscription answer. This is the text that will be displayed on the web pages after a
correct subscription request.
Subscription wrong. This is the text that will be displayed on the web pages after an
incorrect subscription request (incorrect e-mail address).
General category. It is the category to which the sent message belongs.
Incorrect captcha. This is the text that will be displayed on the web pages after
entering the Captcha incorrectly.
WebHat 21 User Manual Sender for confirmation. It is the name of the sender of the e-mail that will be sent to
the user for confirming the newsletter subscription request.
Sender’s e-mail for confirmation. It is the e-mail address of the sender of the e-mail
that will be sent to the user for confirming the newsletter subscription request.
Confirmation e-mail subject. It is the subject of the e-mail that will be sent to the user
for confirming the newsletter subscription request.
Confirmation e-mail. It is the text of the e-mail that will be sent to the user for
confirming the newsletter subscription request.
Unsubscription queue. It is the text that is put at the end of every e-mail sent through
the newsletter and which explains to the user how to unsubscribe.
Confirmation page. It is the page to which the user will be directed when the
newsletter subscription is confirmed (this must be a free page).
Unsubscription page. It is the page to which the user will be directed when
unsubscribing to the newsletter (this must be a free page).
Send unsubscription link. This is used to establish whether every e-mail sent shall
be followed by the link through which the user can unsubscribe to the newsletter. In
most cases – also in order to comply with privacy – this setting must be set to “Yes”.
Unsubscription notice. It is used to establish whether the site administrator must be
notified when a user unsubscribes.
Display captcha. It specifies whether the captcha shall be displayed or not when
subscribing.
Temporary bounces. Through this setting, it is possible to decide the predefined
action to be performed on a contact that has generated a temporary bounce.
Temporary bounces are problems that can be solved along time (mailbox full,
automatic answer for the holiday mode, etc…); therefore, the recommended action is
disabling the user for a limited period.
Permanent bounces. Through this setting, it is possible to decide the predefined
action to be performed on a contact that has generated a permanent bounce.
Permanent bounces are problems that cannot be solved along time (non-existent
mailbox, non-registered domain, etc…); therefore, the recommended action is
disabling the user permanently.
The configuration of these settings is very important for the correct operation of the
newsletter; it is therefore advisable to modify them with accuracy and paying a lot of
attention. In any case, the default values ensure good operation.
WebHat 22 User Manual Once the settings have been modified, in order to apply such changes, click on the
disk located on the window top right corner.
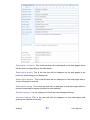
WebHat 23 User Manual 2.4. Statistics.
WebHat Newsletter provides advanced statistics regarding the HTML e-mails
that have been sent. From the window that includes the archive of sent messages,
it is possible to access the detailed statistics of each message that has been sent.
The detailed statistics of a sent HTML newsletter (which are displayed by
selecting a newsletter from the archive and clicking on the “Statistics” button)
show a tabbed interface that groups different types of analyses on the reading
data:
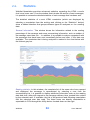
General information. This window shows the information related to the reading
percentage of the message and some summarizing information, such as subject of
the message, send date, etc… In addition, it is possible to make a comparison with
the messages that have been sent immediately before and after, if the data are
available. The newsletter that is being analyzed is marked in the chart below with
the thickest grey bar.
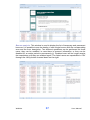
Reading statistics. In this window, the complete list of the users who have opened
and displayed the message is represented; by selecting a user from the
corresponding list, it is possible to display additional information such as the reading
date and time, delay with respect to the message delivery time, tracked links visited
by the selected user, if available, the list of the previous and following newsletters
that the selected user has read. The listed users are directly contactable or
exportable in CSV through the Utility button located down on the right.
WebHat 24 User Manual It is also possible to look for a single user from the list through the corresponding
search field.
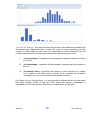
Reading time. This window is subdivided into two sections: the first one, which is
called “Trend of readings within 24 hours”, can be used to analyze the variation
of readings in relation to the day hours, so as to identify the time slots at which
the greatest number of readings is registered and to consequently programme the
sending at the most suitable time. The second one, which is called “Trend of
readings within the 14 days following the sending date”, can be used to check the
concentration of readings in the two weeks following the sending date.
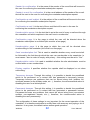
WebHat 25 User Manual Tracked link analysis. This window shows the preview of the selected newsletter with
the tracked links highlighted. Next to each link, there is a box containing the total
number of clicks made by users and the percentage of clicks calculated with the
modality selected from the drop-down menu located on the top right corner:
1.
clicks/recipients. It specifies the percentage of recipients that have clicked
on the link.
2.
clicks/readings. It specifies the percentage of readers that have clicked on
the link.
3.
clicks/total clicks. It specifies the number of clicks received by a certain
link in relation to the total number of clicks, so as to identify the newsletter
“strongest” link, the one that has had the greatest success.
By clicking on one of these boxes, it is then possible to display the list of all the users
who have actually clicked on the link. Such users are directly contactable or
exportable in CSV through the Utility button located down on the right.
WebHat 26 User Manual Bounce analysis. This window is used to display the list of temporary and permanent
bounces. It is possible to see the details of each single bounce with the corresponding
error and the error description. Two different operations can be performed on these
users: they can be modified, in case there is incorrect information, or they can be
disabled for a certain period or permanently (t). Disabled users will no longer receive
the newsletters until they are enabled again. The listed users are exportable in CSV
through the Utility button located down on the right.
WebHat 27 User Manual 3.
Newsletter Agency
The Agency version has been developed for giving communication agencies and
web agencies full control and total management of more e-mail marketing
campaigns with a unique WebHat Newsletter license.
3.1. How does WebHat Newsletter Agency work?
WebHat Newsletter Agency is simple, intuitive and keeps all the features of
WebHat Newsletter. The only difference is the presence of an additional window
through which the communication agency will be able to create customers with the
corresponding users and authorizations. A unique tool that encompasses all the
potentialities and functionalities for managing and analyzing the e-mail marketing
campaigns of all the customers at the same time.
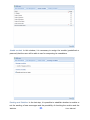
3.2. Customer and user management
From the menu “Modules -> Additional modules -> Newsletter Agency ->
Customer and user management”, it is possible to access the window for
managing the users of all the different customers.
The image above shows a display of all the customers with the corresponding users.
WebHat 28 User Manual The options “New list”, “New message” and “Archive and statistics” can be used
for managing the e-mail marketing campaign on behalf of the customer: it is
therefore possible to create a new list, to send a newsletter or to check the archive
and statistics of the selected customer.
The “+” key can be used to create a new customer or, if an already existing
customer is selected, to create a new user. The maximum number of customers
that can be managed depends on the license acquired; while there is no limit of
users that can be assigned to each customer.
Customer Creation. In order to create a new customer, it is necessary to enter the
name and a reference e-mail address, and to allocate the domains which such
customer will be able to send the newsletters.
User Creation. For each customer, it is necessary to create one or more users with
which it will be possible to have access to the WebHat Newsletter platform. It is
possible to assign personalized rights and privileges to each user, so that only the
necessary functionalities are available for each of them.
The wizard for creating the user is made up of 4 steps.
WebHat 29 User Manual User information. The first step consists in defining the information related to the user
and to the account to be created, with the corresponding access data.
List Management. In the second step, it is necessary to assign the corresponding
user lists to the new user. The Use option enables the user to select the list as
recipient of its own newsletters; the Modify option assigns the complete
management of the list to the user.
WebHat 30 User Manual Usable models. In this window, it is necessary to assign the models (predefined or
personal) that the user will be able to use for composing its newsletters.
Sending and Statistics. In the last step, it is possible to establish whether to enable or
not the sending of new messages and the possibility of checking the archive and the
WebHat 31 User Manual statistics.
By clicking on “Save” the process is completed; the user is created and assigned to
the customer that had been previously selected.
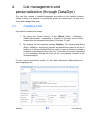
WebHat 32 User Manual 4.
List management and
personalization (through DataDyn)
The user lists created in WebHat Newsletter are based on the DataDyn module,
thanks to which it is possible to personalize, create and delete them, as well as to
check and manage their data.
4.1. Creating a list
A list can be created in two ways:
1.
By using the Create section of the Wizard (Start > Modules >
Additional modules > Newsletter > Wizard): In this case, the list will be
created with the standard fields Name, Surname, E-mail.
2.
By creating the list manually through DataDyn: The window New Entity
(Start > DataDyn > New Entity) requires an identification name for the list, in
addition to a series of settings that are useful in case of wanting to include a
newsletter subscription form on the site. Those users who have subscribed
to the newsletter through the form will be automatically inserted in the
corresponding list.
For the manual procedure (option 2), the data requested (differentiated for
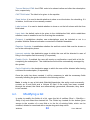
each language) are:
WebHat 33 User Manual Top and Bottom HTML: the HTML code to be shown before and after the subscription
form, respectively.
CAPTCHA label: The label to be given to the captcha.
Send button: it is used to decide whether to show or not the button for submitting. If it
is hidden, it will have to be manually created.
Label column: it is used to decide whether to show or not the left column with the form
field labels.
Input data: the default value to be given to the visible/active field, which establishes
whether a user is enabled or not for receiving the newsletter.
Extranet: it establishes whether new subscriptions must be included or not in a
possible WebHat Extranet activation connected to WebHat Newsletter.
Requires Captcha: it establishes whether the anti-bot control field must be shown or
not in the subscription phase.
Incorrect captcha: the destination page to which the user will be directed in case of
filling in the captcha field incorrectly (if requested).
Enable Opt-In: if enabled, the user will receive a confirmation e-mail with a link for
completing the subscription. The visible/active field will be automatically managed by
the system.
Opt-In Destination: the destination page to which the user will be directed after having
confirmed the subscription (if requested).
Once the entity has been created, it will be necessary to add the necessary fields
manually following the guide included in the following section.
Note: in order to use a list inside WebHat Newsletter, the entity must necessarily
contain an E-mail field and a Unique ID field. If the entity has been created
through the wizard, the fields are automatically generated; otherwise, they have
to be created.
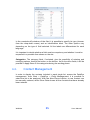
4.2. Modifying a list
In order to modify the fields of a list, open the list of entities (Start > DataDyn >
Entity List) and select the desired list. The Fields key located on the bottom gives
access to the creation of a new field or to the list of existing fields, which can be
modified, deleted or reordered with a simple drag-and-drop action.
WebHat 34 User Manual In the create/modify window of the field, it is possible to specify its type (chosen
from the drop-down menu) and an identification label. The other options vary
depending on the type of field selected. All the labels are differentiated for each
language.
It is important to decide whether a field must be compulsory and whether it must be
requested in a possible form shown on the site.
Categories. The category fields, if selected, give the possibility of entering and
modifying options, through the button on the bottom. As for the other fields, it will be
possible to apply filters on the categories during the sending phase.
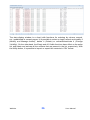
4.3. Contact Management
In order to display the contacts included in each single list, access the DataDyn
management: from Start > DataDyn > Entity Management, it is possible to
select the list to be analyzed. With the New Record option, a new contact can
be manually entered; while Show Data shows all the contacts that have already
been entered.
WebHat 35 User Manual The data display window is a chart (with functions for ordering by column, search,
etc.) subdivided in several pages. It is possible to select a single record and modify it
(Modify and Manage button), delete it (Delete) or activate/deactivate it (Change
Visibility). On the other hand, the Empty and All Visible functions have effect on the entire
list, and delete and activate all the contacts that are present in the list, respectively. With
the Utility button, it is possible to import or export the contacts in CSV format.
WebHat 36 User Manual 5.
Mobile Devices
WebHat Newsletter statistics are also usable by Apple mobile devices using the
iOS operating system. WebHat Newsletter (for iPhone and iPod Touch) and
WebHat Newsletter HD (for iPad) applications can be downloaded as usual from
the App Store.
The window related to mobile devices can be reached from Start > Tools >
Mobile Devices, and it shows the list of all the devices associated to WebHat
current activation. Through keys + and – it is possible to add or remove a
device; and it is necessary to select a device for accessing the corresponding
settings.
For adding a device, click on the + key: a 6-figure code to be entered in the device
is generated. For safety reasons, the code lasts 3 minutes: if the device is not
associated within this lapse of time, the code will be regenerated.
The device setting is very simple: just enter the user access data following the guide
that is directly available in the application.
Once the device has been correctly associated, it is possible to assign a name and
description to it, and then to enable the functions to which it will have access.
WebHat 37 User Manual 6.
Updates and assistance
WebHat Newsletter is an E-mail Marketing system in constant update. Depending
on the contract entered into with the reseller, there are different forms of updates
available for each copy of WebHat Newsletter.
Every time there is a new update release or a major product release, update courses
are also available for both end users and KeyCode partners.
For further information, contact
www.webhatnewsletter.com.
6.1. the
reseller
or
visit
the
website
Assistance
KeyCode offers complete assistance for its own products through the following
channels.
For assistance, on the site www.webhatnewsletter.com, you can find KeyCode staff
telephone numbers and skype usernames.
WebHat 38 User Manual