1
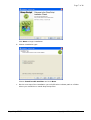
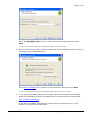
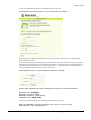
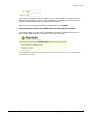
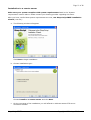
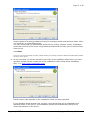
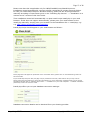
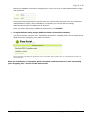
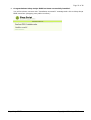
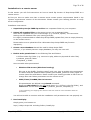
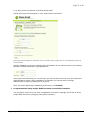
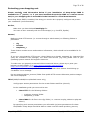
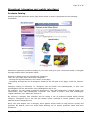
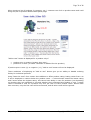
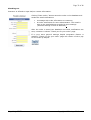
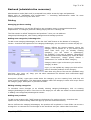
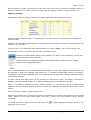
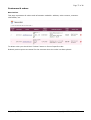
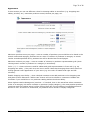
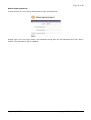
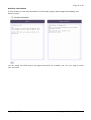
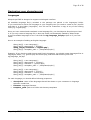
Page 1 of 48
Shop-Script FREE
User Guide
Software Version: Shop-Script FREE 2.0
Last Revised: May 4, 2007
www.shop-script.com
Shop-Script FREE
Copyright © WebAsyst LLC
Page 2 of 48
Table of Contents
Introduction & Overview............................................................................................................3
Installation and configuration ................................................................................................4
System requirements ...............................................................................................................4
Available versions.......................................................................................................................5
Installing Windows Executable Version........................................................................6
Installation to your local computer .............................................................................6
Installation to a remote server ....................................................................................11
Installing Zip Version .............................................................................................................15
Installation to your local computer ...........................................................................15
Installation to a remote server ....................................................................................22
Protecting your shopping cart ..........................................................................................25
Accessing administrative mode........................................................................................27
Recovering administrator’s login and password ...................................................28
Storefront (shopping cart public interface)..................................................................29
Products Catalog .......................................................................................................................29
Shopping cart ..........................................................................................................................31
Checking out ............................................................................................................................32
Backend (administrative resources).................................................................................33
Catalog.............................................................................................................................................33
Managing products catalog.............................................................................................33
Adding new categories/subcategories ....................................................................33
Editing existing categories..............................................................................................33
Adding new products ..........................................................................................................33
Table of products ..................................................................................................................35
Editing product entry..........................................................................................................36
Product images.......................................................................................................................36
Special offers ...........................................................................................................................36
Customers & orders.................................................................................................................37
New Orders ...............................................................................................................................37
Configuration...............................................................................................................................38
General configuration.........................................................................................................38
Appearance ...............................................................................................................................39
Admin login/password ......................................................................................................40
Designing your shopping cart ...............................................................................................42
Languages .....................................................................................................................................42
Templates ......................................................................................................................................43
Editing templates in HTML-editor ...................................................................................44
Troubleshooting.............................................................................................................................45
Shop-Script PRO & Shop-Script PREMIUM.....................................................................48
Shop-Script FREE
Copyright © WebAsyst LLC
Page 3 of 48
Introduction & Overview
Shop-Script FREE is fully functional free PHP shopping cart software
Shop-Script FREE benefits:
-
Absolutely free to download and use
No programming is required to install and manage Shop-Script
Open Source
Easy design integration (in any HTML editor)
Search Engine Optimized (SEO)
Compatible with PayPal
Easy localization
All basic ecommerce features
Licensing
To use Shop-Script FREE software you should accept terms and conditions of Shop-Script FREE
End User License Agreement. For the full text of Shop-Script FREE End User License Agreement
please refer to Shop-Script website: http://www.shop-script.com/license-free.html
Authors
Shop-Script is product of WebAsyst LLC, a privately owned international company.
Our international team of software experts has more than 12 years experience in developing
custom software solutions for business and other large enterprises. Drawing upon this vast
knowledge base, the company’s team now specializes in the development and hosting of webbased solutions for business and organizations.
For more information about WebAsyst LLC please refer to www.shop-script.com/contacts.html
Support
If you have any questions about the software and/or WebAsyst’s services please refer to
“Support” section at Shop-Script website: www.shop-script.com/support.html.
Please note that we do not provide support on questions regarding modification of PHP/HTML source files (e.g. How can I
add a feature? How can I integrate Shop-Script with my custom PHP script?).
More information regarding WebAsyst products and services can be found in Terms Of Service section of Shop-Script
website: http://www.shop-script.com/terms-of-service.html
Other Shop-Script products
Besides Shop-Script FREE version there are commercial packages available – Shop-Script PRO and
Shop-Script PREMIUM.
Commercial packages start from $179 and provide many advanced ecommerce features, such as
credit card processing, shipping quotes with UPS, USPS, FedEx, DHL and many more features.
For more information please refer to “Shop-Script PRO & PREMIUM” section of this document (in
the bottom) and/or to www.shop-script.com website.
Shop-Script FREE
Copyright © WebAsyst LLC
Page 4 of 48
Installation and configuration
System requirements
Shop-Script FREE software works on Windows, UNIX, Linux, FreeBSD, MacOS X platforms. ShopScript products require following software to be installed on your web server (in assumption that
you already have HTTP-server software installed, e.g. Apache, IIS):
•
PHP 4.3.0 or higher
Required PHP settings (php.ini):
file_uploads = On
magic_quotes_gpc = On
•
MySQL database
If you are going to install Shop-Script to a remote server, please contact your hosting provider to
verify server specifications.
Shop-Script FREE
Copyright © WebAsyst LLC
Page 5 of 48
Available versions
Shop-Script FREE software is available in two versions:
•
Windows Installer
This version of Shop-Script FREE is an installation wizard which will install Shop-Script
FREE to your local machine or to a remote server. Recommended for all Windows users.
Installation wizard makes installation process of Shop-Script as easy as installation of a
regular Windows application.
•
Zip-archive
This version is a zip archive containing all Shop-Script files. No express installation wizard
is included in this version. Installation is performed according to instructions given below in
the “Installing Zip Version” section of this User Guide.
Both versions of Shop-Script FREE can be downloaded from the “Download” section of Shop-Script
website: www.shop-script.com.
Please note that Windows and Zip version are just different versions of the same product.
Features of both versions are absolutely the same. The only difference is in the installation
process.
We urge you to download Windows Executable since this is much easier and more
convenient to install. Zip version is suitable for Linux/FreeBSD/MacOS X users.
Shop-Script FREE
Copyright © WebAsyst LLC
Page 6 of 48
Installing Windows Executable Version
The easiest way to install Shop-Script FREE!
In this section you will find instructions on how to install Windows Executable Version of ShopScript FREE to your local machine or to a remote server. Recommended for all Windows users.
Installation wizard makes installation process of Shop-Script as easy as installation of a regular
Windows application.
Installation to your local computer
1. Make sure your system complies with the system requirements listed in the ‘System
requirements’ section above.
If you are familiar with such terms as PHP, MySQL and already have all required software
installed please proceed to Step 2.
Otherwise, if your computer does not have required software installed (Apache or IIS, PHP
and MySQL), you can install all required software at once using EasyPHP.
Please do the following:
a. Download EasyPHP package from www.easyphp.org.
EasyPHP is a complete software package allowing to use all the power and the
flexibility that offers the dynamic language PHP and the efficient use of databases
under Windows. Package includes an Apache server, a MySQL database, a fully PHP
execution, as well as easy development tools for your website or your applications.
After download is complete, run the EasyPHP executable file and follow the
instructions provided by EasyPHP installation wizard. In the installation options
please change Install Folder to “C:\EasyPHP” because a shorter directory name is
easier to remember.
b. Run EasyPHP on your computer after you finish its installation.
c. Create a new MySQL database that will be used for your shopping cart system.
To do this you need to create an empty folder named shop_data in the
“C:/EasyPHP/MySQL/Data” directory.
After you create this folder you should have an empty folder
“C:/EasyPHP/MySQL/Data/shop_data”, where MySQL database files will be stored.
By creating this folder you will create a new database named shop_data.
Having installed EasyPHP, you have made your computer compatible with ShopScript’s system requirements.
2. After you have verified that system requirements are met, run Shop-Script FREE
installation wizard (.exe file):
a. The following window will appear:
Shop-Script FREE
Copyright © WebAsyst LLC
Page 7 of 48
Click Next to begin installation.
b. Choose installation type:
Choose Install to this machine and click Next.
c. On the next step of the installation you will offered to indicate path to a folder
where you would like to install Shop-Script files:
Shop-Script FREE
Copyright © WebAsyst LLC
Page 8 of 48
Enter “C:\EasyPHP\www\” as it is shown on the screenshot above and click
Next.
In case you install Shop-Script not with EasyPHP, indicate your custom folder.
d. On the next step you will be offered to input URL of the installation folder which you
have specified (C:\EasyPHP\www\):
Enter http://localhost/ as it is shown on the screenshot above and click Next.
In case you install Shop-Script not with EasyPHP, indicate URL of your custom folder.
e. If you specified Install location URL correctly, files will be copied to the specified
folder and installation wizard will automatically run post-install script install.php:
http://localhost/install.php
If this does not happen automatically, please point your web browser (e.g. IE,
Firefox) to the URL mentioned above.
Shop-Script FREE
Copyright © WebAsyst LLC
Page 9 of 48
In case you install Shop-Script not with EasyPHP, this URL may vary.
Install.php script should appear in your web browser as follows:
If this page does not appear as presented on the screenshot above, please refer to ‘Troubleshooting’
section of this User Guide.
If you install Shop-Script on IIS, this page may be presented incorrectly. Note that for IIS you may need
to specify file access permissions for certain files and folders. For more information regarding setting up
file access permissions please refer to “Installing Zip Version” -> “Installation to your local computer” ->
“Manual installation (advanced)” section of this User Guide.
install.php offers you to input database connection settings:
Please input database connection settings according to the screenshot above:
Database
Database
Database
Database
host: localhost
username: root
password: [leave blank]
name: shop_data
In case you install Shop-Script not with EasyPHP, these settings may vary.
Below the database connection settings form, there is a form to input
administrator’s login and password:
Shop-Script FREE
Copyright © WebAsyst LLC
Page 10 of 48
Using login and password you provide here you will be able to access your store
backend (administrative mode). After installation is complete you will be able to
change administrator’s login and password at anytime.
After you finish specifying installation preferences, click Install!
f.
Congratulations! Shop-Script FREE has been successfully installed.
You will be shown a screen with "Installation successful" message and a link to
Shop-Script FREE storefront (shopping cart public interface):
If this page does not appear as presented on the screenshot above, please refer to ‘Troubleshooting’
section of this User Guide.
Shop-Script FREE
Copyright © WebAsyst LLC
Page 11 of 48
Installation to a remote server
Make sure your system complies with system requirements listed in the ‘System
requirements’ section above. Please contact your hosting provider regarding this issue.
After you have verified that system requirements are met, run Shop-Script FREE installation
wizard (.exe file):
a. The following window will appear:
Click Next to begin installation.
b. Choose installation type:
Choose Install to a remote server and click Next.
c. On the next step of the installation you will offered to indicate remote FTP server
connection details:
Shop-Script FREE
Copyright © WebAsyst LLC
Page 12 of 48
Please indicate FTP settings obtained from your hosting provider and specify a folder where
you would like to install Shop-Script.
You may select folder to upload Shop-Script files by clicking “Browse” button. Installation
wizard will connect to FTP server using details provided and will allow you to select a folder
from the list.
Click Next.
If you are not sure which folder to select, please contact your hosting provider to obtain information about folders
structure on the server.
d. On the next step you will be offered to input URL of the installation folder which you have
specified. Please provide a valid URL of the installation folder (Shop-Script installation
URL), e.g. http://www.yourdomain.com/:
Install location URL depends on the installation folder you have specified.
If you specified Install location URL correctly, Shop-Script files will be uploaded to the
specified folder on the server, and installation wizard will automatically configure file
access permissions on the server.
Shop-Script FREE
Copyright © WebAsyst LLC
Page 13 of 48
Please note that this is applicable only for UNIX/FreeBSD/Linux/MacOSX servers.
Installation wizard automatically executes chmod commands for certain files and folders.
In case you install Shop-Script on Windows hosting, please set file access permissions
manually according to instructions given in the “Installing Zip Version” -> “Installation to a
remote server” section of this User Guide.
Then installation wizard will automatically run post-install script install.php in your web
browser. If this does not happen automatically, please point your web browser to the
install.php manually: simply point your browser to the Installation URL + install.php, e.g.
e.g. http://www.yourdomain.com/install.php.
Install.php script should appear in your web browser as follows:
If this page does not appear as presented on the screenshot above, please refer to ‘Troubleshooting’ section of
this User Guide.
If you install Shop-Script on IIS, this page may be presented incorrectly. Note that for IIS you may need to
specify file access permissions for certain files and folders. For more information regarding setting up file access
permissions please refer to “Installing Zip Version” -> “Installation to your local computer” -> “Manual installation
(advanced)” section of this User Guide.
Install.php offers you to input database connection settings:
Database connection details can be obtained from your hosting provider.
Shop-Script FREE
Copyright © WebAsyst LLC
Page 14 of 48
Below the database connection settings form, there is a form to input administrator’s login
and password:
Using login and password you provide here you will be able to access your store backend
(administrative mode). After installation is complete you will be able to change
administrator’s login and password at anytime.
After you finish specifying installation preferences, click Install!
e. Congratulations! Shop-Script FREE has been successfully installed.
You will be shown a screen with "Installation successful" message and a link to Shop-Script
FREE storefront (shopping cart public interface):
If this page does not appear as presented on the screenshot above, please refer to ‘Troubleshooting’ section of
this User Guide.
After the installation is complete, please carefully read instructions in the “Protecting
your shopping cart” section of this User Guide!
Shop-Script FREE
Copyright © WebAsyst LLC
Page 15 of 48
Installing Zip Version
Installation to your local computer
In this section you will find instructions on how to install Zip Version of Shop-Script FREE on your
computer.
At first you have to make sure that you have required software installed on your computer (HTTP
server, PHP, MySQL) - see ‘System requirements’ section for details.
If you are familiar with such terms as PHP, MySQL and already have all required software installed
please refer to ‘Manual installation (advanced)’ paragraph under this section.
If you are not quite sure regarding what software is already installed on your machine, please
refer to the instructions under ‘Installation with EasyPHP’ paragraph below.
Shop-Script FREE
Copyright © WebAsyst LLC
Page 16 of 48
Installation with EasyPHP (recommended)
Following instructions are recommended for users who are not familiar with web technologies and
for those who do not have required software installed on their computers (see ‘System
requirements’ section for details).
Installation instructions:
1. Download the latest version of EasyPHP from www.easyphp.org.
EasyPHP is a complete software package allowing to use all the power and the flexibility
that offers the dynamic language PHP and the efficient use of databases under Windows.
Package includes an Apache server, a MySQL database, a fully PHP execution, as well as
easy development tools for your website or your applications.
After download is complete, run the EasyPHP executable file and follow the instructions
provided by the installation wizard. In the installation options we recommend changing
Install Folder to “C:/EasyPHP” because a shorter directory name is easier to remember.
2. Run EasyPHP on your computer after you finish its installation.
3. Create a new database that will be used for your shopping cart system.
To do this you need to create an empty shop_data folder in the
“C:/EasyPHP/MySQL/Data” directory.
After you create this folder you should have an empty folder
C:/EasyPHP/MySQL/Data/shop_data, where MySQL database files will be stored.
By creating this folder you will create a new database named shop_data.
4. Unpack Shop-Script FREE archive into an EasyPHP home folder - “C:/EasyPHP/www”.
If you do not have compression software installed, we suggest you to download WinZip
software from www.winzip.com and unpack Shop-Script FREE archive using this software.
Please make sure to unpack and copy all content of Shop-Script FREE archive
(else you will not be able to install the software).
5. Run install.php
To do this simply point your browser to http://localhost/install.php.
Install.php script should appear in your web browser as follows:
Shop-Script FREE
Copyright © WebAsyst LLC
Page 17 of 48
Install.php offers you to input database connection settings:
Please input database connection settings according to the screenshot above:
Database
Database
Database
Database
host: localhost
username: root
password: [leave blank]
name: shop_data
Below the database connection settings form, there is a form to input administrator’s login
and password:
Using login and password you provide here you will be able to access your store backend
(administrative mode). After installation is complete you will be able to change
administrator’s login and password at anytime.
After you finish specifying installation preferences, click Install!
Shop-Script FREE
Copyright © WebAsyst LLC
Page 18 of 48
6. Congratulations! Shop-Script FREE has been successfully installed.
You will be shown a screen with "Installation successful" message and a link to Shop-Script
FREE storefront (shopping cart public interface):
Shop-Script FREE
Copyright © WebAsyst LLC
Page 19 of 48
Manual installation (advanced)
Please follow instructions provided below only if you already have:
•
•
HTTP server installed (e.g. Apache, IIS);
Your system meets system requirements provided in ‘System requirements’ section of
this document.
Shop-Script Zip Version installation procedure:
1. Create a separate folder or a virtual server where all Shop-Script FREE files will be
stored (Shop-Script root folder).
2. Unpack Shop-Script FREE archive to this folder.
Please make sure to unpack all content of the archive. Otherwise Shop-Script may
function improperly.
3. Create a new database that will be used for your shopping cart system (if you
already have an empty database, you may use it as well).
4. Enable write permissions for following files and folders:
all files inside cfg/ folder (e.g. connect.inc.php, tables.inc.php and others)
products_pictures/ folder
templates_c/ folder
o
o
o
How to enable write permissions?
•
Windows Apache users:
Please skip this step. You do not need to enable write permissions since they are
already enabled.
•
Windows IIS users:
IIS runs as the IUSER_[machine name] local user, thus to enable write
permissions on folders and files specified above please grant IUSER_[machine
name] rights to rewrite these files and folders.
You will not be able to continue with the installation until permissions are not
properly set.
•
UNIX/Linux/FreeBSD/Mac OS users:
File permissions are defined using chmod command.
Please set chmod 666 for the files listed above (i.e. all files in the cfg/ folder),
and chmod 777 for the listed folders (i.e. products_pictures, templates_c).
* See “Protecting your shopping cart” section of this User Guide for more information about file
permissions.
You will not be able to continue with the installation until permissions are set
properly.
5. Run install.php
Simply point your browser to
Shop-Script FREE
Copyright © WebAsyst LLC
Page 20 of 48
http://<Shop-Script URL including folder>/install.php
e.g. http://localhost/shop/install.php
Install.php script should appear in your web browser as follows:
If this page does not appear as presented on the screenshot above, please refer to ‘Troubleshooting’ section
of this User Guide.
Specify database connection settings and administrator’s login/password:
Using login and password you provide here you will be able to access your store
backend (administrative mode). After installation is complete you will be able to change
administrator’s login and password at anytime.
After you finish specifying installation preferences, click Install!
6. Congratulations! Shop-Script FREE has been successfully installed.
You will be shown a screen with "Installation successful" message and a link to ShopScript FREE storefront (shopping cart public interface):
Shop-Script FREE
Copyright © WebAsyst LLC
Page 21 of 48
If this page does not appear as presented on the screenshot above, please refer to ‘Troubleshooting’ section
of this User Guide.
Shop-Script FREE
Copyright © WebAsyst LLC
Page 22 of 48
Installation to a remote server
In this section you will find instructions on how to install Zip Version of Shop-Script FREE on a
remote server.
At first you have to make sure that a remote server meets system requirements listed in the
‘System requirements’ section of this document. Please contact your hosting provider to verify
server configuration.
Installation instructions:
1. Unpack Shop-Script FREE zip archive into a separate folder on your computer.
2. Upload all unpacked files to the remote server into a separate folder.
Files can be uploaded with your FTP manager (e.g. CuteFTP, ftpzilla). FTP connection
settings can be obtained from your hosting provider.
It is highly recommended to install Shop-Script FREE (upload files) into an empty directory
on the remote server!
Please make sure to upload ALL files. Otherwise Shop-Script FREE may function
improperly.
3. Create a new database that will be used for Shop-Script FREE.
However, if you already have an empty database you may use it as well.
4. Enable write permissions for the following files and folders:
• all files inside cfg/ folder (e.g. connect.inc.php, tables.inc.php and all other files)
• products_pictures/ folder
• templates_c/ folder
How to enable write permissions?
•
Windows IIS servers (Windows hosting):
IIS runs as the IUSER_[machine name] local user, thus to enable write permissions
on folders and files specified above please grant IUSER_[machine name] rights to
rewrite these files and folders. Please contact your hosting provider to learn how to
change files and folders permissions on the remote server.
•
UNIX/Linux/FreeBSD/Mac OS servers:
File permissions are defined using chmod command.
Please set chmod 666 for the files listed above (i.e. all files in the cfg/ folder), and
chmod 777 for the listed folders (i.e. products_pictures, templates_c).
* See “Protecting your shopping cart” section of this User Guide for more information about file
permissions.
You will not be able to continue with the installation until permissions are not properly set.
5. Run install.php
Simply point your browser to
http://<Shop-Script URL including folder>/install.php
Shop-Script FREE
Copyright © WebAsyst LLC
Page 23 of 48
(e.g. http://www.mywebsite.com/shop/install.php)
Install.php script should appear in your web browser as follows:
If this page does not appear as presented on the screenshot above, please refer to ‘Troubleshooting’ section of
this User Guide.
Specify database connection settings (this information can be obtained from your hosting
provider) and administrator’s login/password:
Using login and password you provide here you will be able to access your store backend
(administrative mode). After installation is complete you will be able to change
administrator’s login and password at anytime.
After you finish specifying installation preferences, click Install!
6. Congratulations! Shop-Script FREE has been successfully installed.
You should be shown a screen with "Installation successful" message and a link to ShopScript FREE storefront (shopping cart public interface):
Shop-Script FREE
Copyright © WebAsyst LLC
Page 24 of 48
If this page does not appear as presented on the screenshot above, please refer to ‘Troubleshooting’ section of
this User Guide.
After the installation is complete, please carefully read instructions in the “Protecting
your shopping cart” section of this User Guide!
Shop-Script FREE
Copyright © WebAsyst LLC
Page 25 of 48
Protecting your shopping cart
Please carefully read information below if your installation of Shop-Script FREE is
available for 3rd parties, i.e. if you have installed Shop-Script FREE to a remote server
and/or your shopping cart is accessible in the Internet or a Local Area Network.
Once Shop-Script FREE is installed, first thing you need to do is properly configure and protect
your installation (and information).
At first,
Make sure you have deleted install.php file.
You have to do it manually with the FTP manager (e.g. CuteFTP, ftpzilla).
Second,
Make sure that HTTP access (i.e. access through a web browser) to following folders is
prohibited:
•
•
•
cfg
includes
templates_c
These folders contain secure and sensitive information, which should not be available for 3rd
parties.
If you are using Apache HTTP server, these folders are already protected by .htaccess files
(they are included in the package). For other web servers (e.g. IIS) please refer to your
operating system manual and support resources.
To make sure you properly protected folders mentioned above, please try to point your
browser to these folders, e.g. http://www.mywebsite.com/shop/cfg/,
http://www.mywebsite.com/shop/cfg/connect.inc.php.
Pointing your browser to any of these folders or files inside these folders should bring up
“Forbidden” error message.
Do not protect products_pictures/ folder from public HTTP access. Otherwise product images
will not be displayed.
Third (UNIX/FreeBSD/Linux/MacOSX users only),
Verify proper access permissions for the certain folders and files (chmod):
In the installation guide you were told to set:
•
chmod 777 for the following folders:
o
o
•
products_pictures/ folder
templates_c/ folder
chmod 666 for all files in the cfg/ folder (i.e. connect.inc.php, tables.inc.php and
others).
By specifying such access permissions you will enable (re)write permissions for these
files/folders. Shop-Script should be able to create new files inside products_pictures,
Shop-Script FREE
Copyright © WebAsyst LLC
Page 26 of 48
templates_c folders (e.g. upload product picture files) and rewrite existing files inside cfg
folder (e.g. save database settings).
Depending on server configuration proper chmod value may differ – for example, this
depends on the user group to which Apache HTTP server (and PHP) belongs.
Recommended chmod values - 777 for folders and 666 for the files - will work on all
systems.
However, on some systems setting chmod 777 for the listed folders may be
insecure!
To get to know which chmod value should be set on your server please contact your
hosting provider - simply ask them such a question: “Which access permissions value
(chmod) should I set for the folder to make my PHP scripts be able to create files in this
folder? Will setting chmod 777 for the folder be insecure? What chmod value would you
suggest to set?”.
After your hosting provider suggests you a proper chmod value, please set it for the folders
listed above.
Forth,
Finally, please follow to ‘Settings’ section of Shop-Script FREE administrative mode to
configure your shopping cart settings (e.g. define email address, shopping cart URL, name
and other information).
Shop-Script FREE
Copyright © WebAsyst LLC
Page 27 of 48
Accessing administrative mode
To access administrative back end you should point your browser to
http://<Shop-Script URL>/admin.php
You can login as administrator using the following form:
During installation you were requested to enter administrator login and password. Please input
this information here and you will be automatically redirected to the administrative mode.
If you are logged in as administrator a red link
>> ADMINISTRATE <<
appears on the top of the front end.
To change administrator login and/or password, go to the 'Configuration'->'Admin login/password'
department of the administrative mode once logged in.
Shop-Script FREE
Copyright © WebAsyst LLC
Page 28 of 48
Recovering administrator’s login and password
If you forgot your administrative login and/or password, a new login and a new password can be
generated using forgot_password.php routine. This routine can be found in the extra folder.
Simply copy forgot_password.php from this folder the to Shop-Script FREE root folder and run
it:
Point your browser to http://<Shop-Script URL>/forgot_password.php, e.g.
http://www.mystore.com/forgot_password.php
Follow instructions given to you by this routine.
WARNING: After using forgot_password.php you need to delete this file from ShopScript FREE root folder. If you do not delete this file, there is a potential risk that
someone can change your administrative mode login information.
Shop-Script FREE
Copyright © WebAsyst LLC
Page 29 of 48
Storefront (shopping cart public interface)
Products Catalog
Shop-Script FREE storefront home page looks similar to what is presented on the following
screenshot:
Storefront represents products catalog of your store and gives your customers ability to navigate
through product offers and place orders.
Products in Shop-Script are grouped into categories.
There are two ways users can access categories:
- clicking the big links located in the center of the page;
- navigating through the list of categories located in the left part of the page, under the “Search”
field.
Category nesting is unlimited, i.e. categories can be broken into subcategories, in their turn
subcategories can be also broken into subcategories and so on.
For example, you can create a category “Electronics”, then add subcategory “Audio & Video” into
“Electronics”, then add subcategory “Cameras” into “Audio & Video”, then add subcategory
“Digital cameras” into “Cameras” and so on.
By clicking a category title customer will be shown a list of products located inside clicked
category. Categories list to the left will always reflect customer’s current position (with the
asterisk) at the categories tree.
Once user goes deeper into a category there appear search fields to help him/her quickly find
products. By default, there are three fields allowing you to specify product’s name and price
limitations.
Shop-Script FREE
Copyright © WebAsyst LLC
Page 30 of 48
When viewing a list of products (in category, etc.), customer can click on product name and it will
bring him/her to product detailed description page:
“Add to cart” button is displayed for a product only if:
•
•
product price is positive (greater than zero);
product is in stock (‘In stock’ checkbox is enabled for this product).
If product price is zero (0) or negative (<0), “Add to cart” button will not be displayed.
These conditions of displaying an “Add to cart” button give you an ability to disable ordering
facility for individual products.
Using “Rate this item” form visitors have abilities to affect product rating. Rating varies from 0 to
5 and is displayed to visitors below the product name – 0 colored stars means the lowest rating
and 5 stars means the highest rating. All visitors have ability to vote for products (not depending
on whether they are registered or not and whether they purchased this product or not). A single
visitor is allowed to vote for a product only once per visit. If visitor pushes “Rate!” button more
than one time, only the first vote will be accounted, and all other votes will be ignored.
Shop-Script FREE
Copyright © WebAsyst LLC
Page 31 of 48
Shopping cart
Adding products to the shopping cart is as simple as clicking the “add to cart” button. This button
is seen opposite any item in the list of products. It is also present on the product’s personal page
that contains its description and pictures and gives customer a chance to rate it and discuss the
item with other customers.
Once customer clicks the “add to cart” button, he/she is redirected to shopping cart page.
At this stage the customer can view order amount, review the choice and remove items he/she no
longer wants from the cart or empty it blank. The cart status is shown each time customer adds
an item to the cart. From here he/she can either proceed to checkout or get back to shopping. By
default, “Back to shopping” takes the customer to the store homepage.
Shop-Script FREE
Copyright © WebAsyst LLC
Page 32 of 48
Checking out
Customer is offered to input his/her contact information.
Clicking “Place order!” button saves the order to the database and
sends two email notifications:
•
•
a message with order information to customer;
an order notification for store administrator. This email is
sent to the email address provided in store settings
(‘General settings’ screen at backend).
After the order is saved into database and email notifications are
sent, customer is shown “Thank you for your order” page.
If in your store general settings PayPal integration feature is
enabled, “Thank you for your order” page will contain a link to pay
for the order by PayPal:
Shop-Script FREE
Copyright © WebAsyst LLC
Page 33 of 48
Backend (administrative resources)
Administrative mode (back end) is protected from public access by login and password.
Please refer to ‘Installation and configuration’ -> ‘Accessing administrative mode’ for more
information on how to log into back end.
Catalog
Managing products catalog
Once in the backend, you will be offered to use navigation menu to access administrative
departments. To configure products catalog simply click the “Catalog” tab.
The first section is called “Categories and products”. Here you can add new
categories/subcategories, edit existing categories and manage products.
Adding new categories/subcategories
To add a new category/subcategory to the list click “Add” button at the bottom of a category
column. A window with options for the category/subcategory you are about to create will pop up:
Parent: defines the parent category where the
category will be placed to. If you choose parent
other than Root (e.g. an already existing
category), you will create a subcategory.
For example, if you have a category “Electronics”
and would like to add subcategory “Audio & Video”
inside “Electronics”, simply specify Parent =
“Electronics” for “Audio & Video” category.
Category name: type in the name you wish the
category to bear.
Logo: you can upload any image you think will be
best to describe products of the category.
Note that only picture files can be uploaded using
this form: .jpg, .jpeg, .gif, .bmp, .pcx. No other extensions are allowed. Such restrictions apply
due to security issues.
Description (HTML): type some words about the category you are creating here, and they will
come up as its description. This description appears under the category’s name once buyer enters
the category page. Description is provided in HTML.
Editing existing categories
To introduce some changes to an already existing category/subcategory click on existing
category/subcategory’s name. From here on the steps you can take are similar to those described
in Adding new categories/subcategories section.
Adding new products
To add a new product click “Add” button at the bottom of a product column. A window with
options for the product being added will pop up (see the screenshot below).
Parent: defines the category/subcategory the product will be placed to. Root folder can act as a
storage bin: its contents are not brought to the storefront and your visitors don’t see them.
Shop-Script FREE
Copyright © WebAsyst LLC
Page 34 of 48
Product name: specify name of the product you are adding here.
Product code: if you mark you products with
codes (e.g. SKU, ISBN), you can input one
here.
Price (number only): evaluate the product
here.
If you specify negative or zero price for a
product, it will disable “Add to cart” button for
this product in storefront and customers will
not have the ability to order this product.
List price (number only): list price is often
referred to as “Manufacturer's Suggested
Retail Price” (MSRP), and often is subject to
discounts. Actually, the primary purpose of
stating the list price is to show customers that
the product is sold for less in your shop. For
example, you can survey the market and see
how much the product costs in other shops,
provide this figure in list price field and then
give a lower value in price field; thus a
discount
is
emphasized.
The
system
automatically calculates amount of money a
customer saves.
In stock: check this box if the product is in
stock, or uncheck it if you currently lack the
product (in case you uncheck this box
customers will not be able to order this
product).
Picture: here you can upload product image in
regular size.
Each product image can be uploaded in three
sizes: regular, thumbnail and enlarged. Please
refer to ‘Backend’ -> ‘Product images’ section
of this document for more details.
Thumbnail: here you can upload product image in thumbnail size.
Enlarged picture: here you can upload product image in enlarged size.
Note that only picture files can be uploaded using this form: .jpg, .jpeg, .gif, .bmp, .pcx. No other
extensions are allowed. Such restrictions apply due to security issues.
Note that Shop-Script FREE does not automatically resize images, i.e. it does not create
thumbnails and regular pictures from a single enlarged image. You should size the pictures at your
sole discretion before uploading them.
Description (HTML): type some words about the product you are adding here, and they will come
up as its description. This description appears on the product’s detailed information page (as
opposed to Brief description). Pay attention to HTML in parentheses - this means you need to
accompany the description with HTML tags to make it look the way you want.
Shop-Script FREE
Copyright © WebAsyst LLC
Page 35 of 48
Brief description (HTML): the words you will enter here will come up under the product’s name in
the list of products (i.e. when customer views a list of category products, search results, etc.).
Table of products
Clicking the name of category summons a table of products this category contains:
Products search within category: using this form, you can search for products by their names or
product codes.
Enabled: this checkbox defines presence of the product in storefront. Uncheck it and the buyer will
not see it in your store.
Product code: if you tag goods with special codes (e.g. SKUs, ISBNs), they will be shown here.
Product name: that is the name of the product as buyers see it.
Rating: this field depicts rating of the products you offer. In the storefront, buyers can
rate the product using this form:
Note that you can manually increase or decrease product rating. See the ‘Editing
product entry’ paragraph below.
Price: this field shows price of the product denominated in your store default currency which can
be specified in back end settings (see ‘Back end’ -> ‘General configuration’ section for details).
The figure in this field is editable; you can change the price right here, without opening product
modification window.
In stock: shows how many pieces of the product you still have in stock. The figure in this field is
editable; you can change it right here, without opening product modification window.
Picture (Thumbnail, Enlarged picture): shows whether or not picture files are defined and
uploaded for the product. Adding pictures is covered in ‘Adding new products’ paragraph in this
section.
Sold: shows the number of sold product unit.
Add to special offers list: clicking the thumb-up icon allows you to bring the product to the “special
offers” section of the store home page. This link is shown only for products with a picture
uploaded.
To delete a product, simply click the red cross icon (
right part of the screen.
Shop-Script FREE
) located opposite product’s name in the
Copyright © WebAsyst LLC
Page 36 of 48
Editing product entry
To edit a product entry you need to click the product name or product code link in the table of
products. The click summons a window that is very similar to ‘Add new product’ window save for
one field - Rating.
Rating: this field shows current rating of the product. You can actually adjust the value provided
here. This opportunity is given to administrators for they could oppose buyers purposefully
increasing or decreasing product’s rating and keep it fair.
It is recommended to define product rating from 0 to 5 (it could be a float value, e.g. 1.345).
Product images
In Shop-Script FREE each product may come with 3 product images (three different sizes):
•
•
•
regular: this image is shown to user when viewing product detailed information page;
thumbnail: shown to user when viewing products inside a category or search results;
enlarged: shown in popup window.
If product misses thumbnail image (i.e. the image is not uploaded), then regular image will be
shown to visitors in front end.
Special offers
Bottom part of the front-end home page is reserved for special offers. You can showcase new
products, bestsellers, discounted items or whatever you think fits there.
To add a product to special offers list you need to click the thumb-up icon ( ) in the table of
products (located in the column named Add to special offers list). Only products that are
accompanied with pictures can be added to special offers list. Picture brought to the storefront
special offers section is the one you uploaded as regular sized picture (but not thumbnails or
enlarged pictures).
Shop-Script FREE
Copyright © WebAsyst LLC
Page 37 of 48
Customers & orders
New Orders
This page represents all orders and information available: address, order content, customer
information, etc.
To delete order you should click “Delete” button in front of specific order.
Ordered product prices are actual for the moment when the order has been placed.
Shop-Script FREE
Copyright © WebAsyst LLC
Page 38 of 48
Configuration
General configuration
In this section you can define a number of core settings of your store.
Store name – enter here the name of your online store. It will appear in the title bar of your
browser (in the top left corner) and will be included in email messages (e.g. order notifications)
sent to your customers from the store.
Store URL – specify valid URL of your store. URL should contain http prefix and a slash as suffix.
Do not include index.php in the URL. Example: http://www.yourshop.com/shop/.
General contact email address – this email address will be used as reply address in email
messages sent to your customers from the store.
Order notifications email – please indicate an email address here where order notification
messages will be sent.
Currency left symbol – enter currency symbol which will appear to the left from the price value.
For example, if you indicate “$” here, prices in storefront will be presented as such: $531.00
Currency right symbol – enter currency symbol which will appear to the right from the price value.
For example, if you indicate “$” here, prices in storefront will be presented as such: 531.00$.
Enable PayPal integration - when enabled, customer will be offered to pay by PayPal on the last
step of checkout.
Your PayPal account email address - leave blank if PayPal integration is disabled.
Shop-Script FREE
Copyright © WebAsyst LLC
Page 39 of 48
Appearance
In this section you can set different colors for drawing tables in storefront (e.g. shopping cart
tables, pricelist, etc.) maximum products count/columns per page, etc.
Maximum products count per page – enter a number of products you would like to be listed in the
search results and category products list at a time. If number of products in category or search
results exceeds specified value, products list will be divided into several pages.
Maximum columns per page – enter a number of columns in products representation grid (when
viewing search results or products in a category in storefront).
Color 1, 2, 3 – these colors are used for tables and grids representation in front end (e.g. my
shopping cart table, ). Play with it to see how it works. Note that changing these colors does not
change general color appearance of your store (e.g. the color of header and right and left
columns).
Enable shopping cart facility – when checked customers can add products to the shopping cart
and place orders. Otherwise “Add to cart” button will not be shown to customers. Disable this
checkbox if you would like to run products catalog without checkout ability.
Show highest rated subcategories’ products – if checked, then in the storefront when customers
clicks on a category link which contains no products (empty category), the most popular products
(products with the highest rating) will be fetched from the current category’s subcategories and
shown to user. If this box is unchecked, no products will be shown in empty categories.
Shop-Script FREE
Copyright © WebAsyst LLC
Page 40 of 48
Admin login/password
In this section you can change administrator login and password.
Simply input your new login and/or new password along with the old password and click “Save”
button. The information will be updated.
Shop-Script FREE
Copyright © WebAsyst LLC
Page 41 of 48
Auxiliary information
In this section you can edit information in the auxiliary pages (About page and Shipping and
delivery page).
You can easily use HTML tags in the page body field. For example, use <b></b> tags to make
your text bold.
Shop-Script FREE
Copyright © WebAsyst LLC
Page 42 of 48
Designing your shopping cart
Languages
Shop-Script FREE is designed to support multilingual interface.
All available language file(s) included in the package are placed in the languages/ folder.
If you would like to add a new language to your shopping cart you need to create a new .php-file
and place it in this folder (languages). Your file can be created as a copy of any of the existing
ones (e.g. english.php).
Once you have created and translated a new language file, you should point Shop-Script to load
it. If you only create a language file, it does not make it automatically loaded by Shop-Script.
A list of available languages is set in the PHP file cfg/language_list.php. Open it in your text
editor.
Here is an example of adding an English language.
$lang_list[0] = new Language();
$lang_list[0]->description = "English";
$lang_list[0]->filename = "english.php";
$lang_list[0]->template_path = "./templates/tmpl1/";
Example: If you decide to add German and French languages, you should create languages files in
languages/ folder, e.g. german.php and french.php, and then add following lines into
cfg/language_list.php:
$lang_list[1] = new Language();
$lang_list[1]->description = "German";
$lang_list[1]->filename = "german.php";
$lang_list[1]->template_path = "./templates/tmpl1/";
$lang_list[2] = new Language();
$lang_list[2]->description = "French";
$lang_list[2]->filename = "french.php";
$lang_list[2]->template_path = "./templates/tmpl1/";
For each language you should define following properties:
•
•
•
description: name of the language that will be shown to your customers in language
selection combo-box
filename: language filename
template_path: path to a folder with Smarty templates
Shop-Script FREE
Copyright © WebAsyst LLC
Page 43 of 48
Templates
Shop-Script software uses Smarty templates engine (http://smarty.php.net). Smarty is a very
popular template engine which is used by the big number of PHP web solutions. Smarty allows
you to change look & feel of your shopping cart as you like.
Design is defined in templates - HTML files located in the templates/tmpl1/ subfolder of the
directory where you installed Shop-Script. Design is fully separated from PHP source files.
The main front end template is index.tpl.html (this template defines general layout of the
storefront design). Please open this file in your text or HTML editor (e.g. Macromedia
Dreamweaver, Microsoft FrontPage, Adobe GoLive) and make necessary changes in it (change
colors, logos, etc.).
To redesign your shopping cart you should have basic HTML knowledge and/or experience of using
a HTML editor.
Feel free to edit any .tpl.html template file, but be very careful. Any incorrect modification (e.g.
deleting a Smarty element) can run to malfunction of your store.
Folder templates_c is used by Smarty to parse templates and compile PHP files. Make sure that
Shop-Script scripts are allowed to write in this folder (if they are not, a warning will appear). This
folder is also should be protected from public access (see “Protecting your shopping cart” section
of this User Guide for details).
Shop-Script FREE
Copyright © WebAsyst LLC
Page 44 of 48
Editing templates in HTML-editor
Shop-Script software uses Smarty templates engine (http://smarty.php.net). Smarty is a popular
template engine which is used by the big number of PHP web solutions.
Design layout is defined in HTML templates - HTML files located in the templates/tmpl1/
subfolder of the directory where Shop-Script is installed. Design is separated from PHP source
files.
The main storefront template is index.tpl.html (this template defines layout of your shopping
cart design). Please open this file in your HTML editor and make necessary changes in it (change
colors, logos, etc.).
Note:
When modifying template files we urge you to keep track on which files were modified and which
were not - it will be much easier for you to upgrade your Shop-Script installation to the latest
version of the software in this case. When upgrading to the newer version you have to overwrite
all existing files with the files from the updated package archive. In case you know which files
were modified, you will be able to easily apply changes to the files from updated package.
Shop-Script FREE
Copyright © WebAsyst LLC
Page 45 of 48
Troubleshooting
If your question is not answered here, please contact us:
http://www.shop-script.com/support.html
Include detailed description of your question and we will reply to you shortly.
During installation an error message appears: "File cfg/connect.inc.php is not writable".
How can I fix it?
Make sure you set (enabled) write permissions for the folders products_files,
products_pictures, temp, templates_c and all files inside cfg/ folder.
Please refer to “Installing Zip Version” -> “Installation to a remote server” section of this
User Guide for more information.
What is CHMOD? How do I change access permissions on files and folders?
CHMOD is a contraction of "change mode". CHMOD is a command to change files/folders
access permissions in UNIX-based operating systems (e.g. Linux, FreeBSD, MacOSx).
Please refer to more information on how to perform chmod in the World Wide Web (f.e.
you may try to search for this information on Google using keywords "what is chmod",
"how to chmod").
Fatal error: Call to undefined function mysql_connect() in
.../includes/database/mysql.php on line 13
This could be due to the fact that MySQL is not installed on your server or not supported in
your PHP installation.
If you run PHP5, by default MySQL support is turned off, and you need to enable it
manually. To do such please open your php.ini file (PHP settings file) and uncomment
MySQL inclusion line:
;extension=php_mysql.dll
Simply remove semicolon (;) at the beginning of the line:
extension=php_mysql.dll
Then save the file, restart HTTP server (Apache/IIS) and rerun Shop-Script.
Installation failed: "Couldn't connect to the database server" / "Couldn't connect to the
database"
At first, check your database connection settings. If settings are correct, make sure you
have enabled file access permissions as it is described in the installation instructions.
Installation completed successfully. But I can not login as administrator / can not add
items to my shopping cart. Why?
Make sure sessions are supported by PHP installation on your server.
If you run Shop-Script FREE on your local server with Windows operating system, please
open your PHP settings file (php.ini) in any text editor. Find a line where session.save_path
settings variable is defined. This line should look like this:
session.save_path = [folder]
Shop-Script FREE
Copyright © WebAsyst LLC
Page 46 of 48
Here you should input valid existing [folder], then save php.ini and restart Apache/IIS
server.
For example, you may set
session.save_path = c:\temp_sessions
and then create temp_sessions folder on your c:\ drive.
If you run Shop-Script FREE on a remote server please contact your hosting provider
support team.
Installation completed successfully. But when I run my shopping cart I get "Warning:
Smarty error: unable to read resource: "./templates/tmpl1/index.tpl" in
/home/.../smarty/Smarty.class.php on line ..."?
Please make sure you uploaded ALL Shop-Script FREE package (archive) content to your
web server (including files from templates/tmpl1/ folder).
As administrator I can not upload product picture or change system settings. Why?
Make sure that in PHP settings on the server where Shop-Script is installed it is set:
file_uploads = On
Also, make sure you set (enabled) write permissions for the folders products_files,
products_pictures, temp, templates_c and all files inside cfg/ folder.
Please refer to “Installing Zip Version” -> “Installation to a remote server” section of this
User Guide for more information regarding setting file access permissions.
I'm trying to vote for the product, but customer's rating is not updated. Why?
Probably you have already made a vote for the product. You may vote for a single product
only once per session.
How do I change "Hello and welcome to Shop-Script!" greetings line?
This line/phrase (as well as all other shopping cart interface phrases) is defined in language
file: includes/language/english.php.
Simply open this file with your text editor (e.g. notepad) and make necessary changes in
the greetings line and/or other phrases.
How do I remove “Not enough functions? Buy full version!” from my online storefront?
This is very easy. In order to remove this information open core templates file –
index.tpl.html located in the templates/tmpl1/ subfolder of your Shop-Script FREE directory
– in any text or HTML editor.
HTML code responsible for this ad representation is enclosed in comments giving you
additional instructions on how to remove it.
Do I have to keep a link to www.shop-script.com if I use Shop-Script FREE?
Yes, you have to keep a direct link to www.shop-script.com from your Shop-Script FREE
based online store. This is a required condition of Shop-Script FREE license agreement
(http://www.shop-script.com/license-free.html).
Shop-Script FREE
Copyright © WebAsyst LLC
Page 47 of 48
Only customers of Shop-Script PRO and Shop-Script PREMIUM software can remove this
link from their online stores.
I get following errors. What can I do?
Warning: Illegal offset type in .../smarty/smarty.class.php on line 602
Warning: Smarty error: unable to read resource: "./install/step1.tpl.html" in
.../smarty/smarty.class.php on line 1144
For information about it please refer to:
http://www.webhostingtalk.com/archive/thread/354694-1.html
http://forum.cerberusweb.com/archive/thread/3799-1.html
http://bugs.php.net/bug.php?id=30l
http://bugs.php.net/bug.php?id=30914
The problem is that Zend Optimizer version is not compatible with the PHP version on the
server. This causes inability to initialize Smarty templates library.
Please consider upgrading Zend Optimizer version. Contact your hosting provider regarding
this issue.
Shop-Script FREE
Copyright © WebAsyst LLC
Page 48 of 48
Shop-Script PRO & Shop-Script PREMIUM
Shop-Script FREE is light and completely free shopping cart software.
Besides Shop-Script FREE there are professional packages available:
Shop-Script PRO - $179
Cost-effective feature rich shopping cart software
Provides all most demanded ecommerce features. The software is optimized to
work with a large number of products and categories; offers credit card
processing facilities, shipping quotes with UPS, USPS, FedEx, DHL, customer
accounting system, sales reports, newsletter and customer survey systems, bulk
products management tools and more.
Shop-Script PREMIUM - $299
Ultimate solution from Shop-Script family
Besides offering all Shop-Script FREE and PRO's facilities, Shop-Script PREMIUM
provides many exclusive features including support for complex (configurable)
products, support for downloadable products, affiliate program and link
exchange marketing tools, order notifications by SMS, product picture galleries
and more. It is a comprehensive shopping cart solution designed to increase
your sales.
Please see the detailed description of all Shop-Script family at www.shop-script.com
Thank you for using Shop-Script!
Shop-Script FREE
Copyright © WebAsyst LLC