1
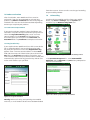
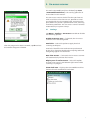
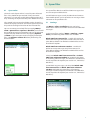
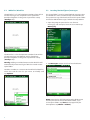
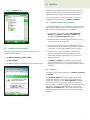
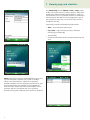
Installation Manual
and User Guide
ESET Mobile Antivirus For Windows Mobile
Copyright © 2009 by ESET, spol. s r. o.
ESET Mobile Antivirus For Windows Mobile was developed by
ESET, spol. s r.o. For more information visit www.eset.com.
All rights reserved. No part of this documentation may be
reproduced, stored in a retrieval system or transmitted in any
form or by any means, electronic, mechanical, photocopying,
recording, scanning, or otherwise without permission in
writing from the author.
ESET, spol. s r.o. reserves the right to change any of the
described application software without prior notice.
Customer Care Worldwide: www.eset.eu/support
Customer Care North America: www.eset.com/support
REV.20091014‑014
contents
1. Installation of ESET Mobile Antivirus.........4
1.1 Minimum system requirements....................................... 4
1.2 Installation.................................................................... 4
1.2.1
Installation on your Device......................................4
1.2.2
Installation using your computer.............................4
1.3 Product activation......................................................... 6
1.3.1 Username and password .................................................6
1.3.2 Registration key .............................................................6
1.4 Uninstalling................................................................... 6
2. On-access scanner.................................. 7
2.1 Settings........................................................................ 7
2.2 Testing On-access Scanning............................................ 8
3. On-demand scanner................................8
3.1
3.2
3.3
3.4
Running a Whole device scan.......................................... 8
Scanning a folder........................................................... 9
Settings........................................................................ 9
Scan objects setup........................................................10
4. Virus found........................................... 10
4.1 Quarantine....................................................................11
5. Spam filter............................................ 11
5.1
5.2
5.3
5.4
Settings........................................................................11
Whitelist / Blacklist....................................................... 12
Locating blocked (Spam) messages................................. 12
Deleting Spam Messages............................................... 13
6. Update..................................................13
6.1 Updating using your computer....................................... 13
6.2 Settings....................................................................... 13
7. Viewing Logs and statistics.................... 14
8. Troubleshooting.....................................15
8.1 Connection to update server failed ................................. 15
8.2 Unsuccessful Installation............................................... 15
9. Technical support................................. 16
1. Installation of ESET Mobile Antivirus
1.1
Minimum system requirements
To install ESET Mobile Antivirus, your mobile device
must meet the following minimum requirements:
ESET Mobile Antivirus
Processor
Memory
Operating System
Recommended
Minimum
400 Mhz
200 Mhz
1 MB
Windows Mobile 5, 6.0, 6.1
Most PDA and Smartphone mobile devices fulfill these
requirements.
1.2
Installation
Save all open documents and exit all running
applications before installing.
You can install ESET Mobile Antivirus directly on your
device or use your computer.
1.2.1 Installation on your Device
Figure 1-2: Installation progress
When you see the message that the program was
installed successfully, tap ok to complete installation.
To install ESET Mobile Antivirus directly on your device,
download the .cab installation file by WiFi, Bluetooth
file transfer or email attachment (it is similar to an .msi
file on your PC).
After downloading the .cab file, tap Start > File
Explorer to locate the file and tap it to launch the
installer.
Figure 1-3: Successful installation
After installation, you can modify the program
settings. However, the default configuration provides
the maximum level of protection against malicious
programs.
1.2.2 Installation using your computer
Figure 1-1: Installation package
To install ESET Mobile Antivirus using your computer
(via Active Sync in Windows XP or Windows Mobile
Device Center in Windows 7 and Vista), download and
run the installation package (.exe file) on the computer
to which your mobile device is connected and then
follow the instructions in the installation wizard.
Warning: For successful installation in Windows Vista
and Windows 7, it is necessary to be logged in as a user
with admin privileges.
4
Verify that your system meets the minimum
requirements for ESET Mobile Antivirus (see section 1.1,
“Minimum system requirements”) and click Next.
After the installation package has been copied to
your mobile device, click OK to exit the installer on
your computer. To finish installation, follow the steps
described in section 1.2.1, “Installation on your device”.
Figure 1-4: Launching the installer on your computer
In the next window, accept the End User License
Agreement (EULA) and then click Finish to begin
installation on your mobile device.
Figure 1-6: Installing the .cab file on your device
When installation is complete, the installer displays a
message indicating that the program was successfully
installed (Figure 1-3). Tap ok to exit installation. Then,
activate ESET Mobile Antivirus by following the steps in
section 1.3, “Product activation”.
Figure 1-5: Installation on the computer is complete
Figure 1-7: Installation is complete
5
1.3 Product activation
After installation, ESET Mobile Antivirus must be
activated. If you are not prompted to activate your
product, tap Menu > Activate from the main program
window. There are two activation methods depending
on how you acquired your product.
from the Internet. These transfers are charged according
to your mobile provider.
1.4
Uninstalling
To uninstall ESET Mobile Antivirus from your mobile
device, tap Start > Settings, tap the System tab
and then tap the Remove Programs icon.
1.3.1 Username and password
If you purchased your product from a distributor, you
received a username and password with your purchase.
Select the Login/Password option, enter a current
contact address in the e-mail field and then enter
the information you received in the Username and
Password fields. Tap Activate to complete activation.
1.3.2 Registration key
If you acquired ESET Mobile Antivirus with a new device
(or as a boxed product), you received a Registration
key with your purchase. Select the Registration key
option, enter a current contact address in the e-mail
field and then enter the information you received in the
Key field. Tap Activate to complete activation. Your
new authentication data (Username and Password) will
automatically replace the Registration key and be sent
to the email address you specified.
Figure 1-9: The Remove Programs icon in the Settings menu
In the Remove Programs list, select ESET Mobile
Antivirus and tap Remove. Tap Yes when prompted to
confirm uninstallation.
Figure 1-10: Select a program to be uninstalled
Figure.1-8: Program activation
Warning: When activating and updating ESET Mobile
Antivirus, a small amount of data must be downloaded
6
2. On-access scanner
The main ESET Mobile Antivirus window (tap Start
> ESET Mobile Antivirus) is the starting point for all
instructions in this manual.
The On-access scanner checks files that you interact
with in real time. Files that are run, opened or saved
are checked for viruses automatically. Scanning takes
place before any action is performed on a file, ensuring
maximum protection. The On-access scanner launches
automatically at system startup.
2.1
Settings
Tap Menu > Settings > On Access to enable or disable
the following options:
Enable On Access scan – If selected, the On-access
scanner runs in the background.
Figure 1-11: Confirm uninstallation
After the program has been removed, tap ok to close
the Remove Programs window.
Heuristics – Select this option to apply heuristic
scanning techniques.
Heuristics identifies new malware not yet detected
by the virus signature database by analyzing code and
recognizing typical virus behavior.
Run after restart – If selected, the On-access scanner
will automatically initiate after restart.
Display scan in action status – Select this option
to show scan status in the bottom right corner while
scanning is in progress.
Show Shell Icon – Displays the ESET Mobile Antivirus
icon on the main mobile device window.
Figure 2-1: On-access scanner settings
7
3. On-demand scanner
2.2
Testing On-access Scanning
To verify that real-time protection is working properly,
select the Display scan in action status check box
in the On-access settings window (see section 2.1,
“Settings”).
You can use the On-demand scanner to check your
mobile device for the presence of infiltrations.
By default, specific, predefined file types are scanned.
To run the On-demand scanner, tap Scan in the lower
left corner of the main ESET Mobile Antivirus window.
Then, open a file or initiate an activity (i.e., play a music
file or take a picture). A Scanning… message should
appear briefly in the bottom right corner (Figure 2-2).
NOTE: The Display scan in action status option uses
additional battery power. We recommend deselecting
this option (default setting) after testing real-time
protection.
Figure 3-1: An On-demand scan in progress
3.1
Running a Whole device scan
A Whole device scan checks memory, running processes,
their dependent dynamic link libraries (DLLs) and files
that are part of internal and removable storage.
Figure 2-2: On-access scanning
NOTE: The memory scan is not performed by default. To
activate it, tap Menu > Settings > General and select
the Memory Scan check box.
From the main ESET Mobile Antivirus window, tap
Scan > Whole device. System memory is scanned
first (including processes found running in it and their
dependent DLLs), and then files and folders are scanned.
The full path and file name of each file scanned will be
displayed briefly.
8
Figure 3-2: Whole device scan
3.2
Scanning a folder
To scan a single folder on your device, tap Start > ESET
Mobile Antivirus. From the lower left corner, tap Scan
> Folder, tap the folder you wish to scan and tap Select
to begin scanning the selected folder. If Memory Scan
is enabled (Menu > Settings > General > Memory
Scan), it is performed as well.
Figure 3-4: Select a folder to scan
3.3
Settings
To modify parameters related to scanning, tap Menu >
Settings > General.
NOTE: To abort a scan in progress, tap Menu > Stop
Scan from the bottom right.
Figure 3-5: The Settings menu
The General settings window allows you to specify
what action to take if a virus is found. Select the Show
alert dialog option to display virus alert notifications.
Figure 3-3: Scanning a folder
The drop-down menu allows you to select an action
to be performed automatically for infected files.
You can select from the following options: Delete
infected file (file will be removed), Do nothing (not
recommended) and Move to quarantine.
The Stored logs drop-down menu allows you to define
the maximum number of logs to be stored.
If the Memory scan option is selected (default setting),
the device memory will automatically be scanned for
active malicious programs prior to the actual file scan.
9
4. Virus found
If the Heuristics option is selected, ESET Mobile
Antivirus uses heuristic scanning techniques. Heuristics
is an algorithm-based detection method that analyzes
the code and searches for typical virus behavior. Its main
advantage is the ability to identify malicious software
not yet known by the current virus signature database.
Archive nesting allows you to specify the depth of
nested archives to be scanned.
If a virus is found, ESET Mobile Antivirus will prompt
you to take an action. We recommend you select
Delete infected file. If you select Do nothing (not
recommended), no action will be performed and the
infected file will remain on your mobile device. If you
select Move to quarantine, the file will be moved to
quarantine and deleted.
Select Archive deletion to automatically
delete archive files containing infected objects.
Figure 4-1: Action if a virus is found
Figure 3-6: General settings
3.4
Scan objects setup
To specify the file types to be scanned on your mobile
device, tap Menu > Settings > Extensions.
When a virus is detected, ESET Mobile Antivirus displays
the Show alert dialog check box. Deselect this option
to prevent alert windows from displaying in the future.
All future actions will be performed automatically.
NOTE: If an infiltration is detected in an archive, the
Delete archive option is available in the alert window.
Select this option along with the Delete infected file
option to delete all infected archive files.
The Extension settings window will display (Figure
3-7), showing the most common file types exposed to
infiltration. Select the file types you wish to be scanned.
To exclude an extension from scanning, deselect its
check box.
To scan all files, deselect the Extension sensitive
check box.
Figure 4-2: Virus found
Figure 3-7: Advanced scan parameter setup
10
5. Spam filter
4.1
Quarantine
The main task of quarantine is to safely store infected
files. Files should be quarantined if they cannot be
cleaned, if it is not safe or advisable to delete them or if
they are being falsely detected by ESET Mobile Antivirus.
Files stored in the quarantine folder can be viewed in a
table that displays the date and time of quarantine and
the path to the original location of the infected files.
You can restore quarantined files by tapping Menu >
View > Quarantine > Options > Restore (each file will
be restored to its original location). You can also choose
to permanently remove the files by tapping Options
> Delete. If you want your choice to apply to multiple
files, tap Options > Select all before performing the
desired action.
The Spam filter blocks unsolicited SMS messages that
are sent to your mobile device.
Unsolicited messages usually include advertisements
from mobile phone service providers or messages from
unknown or unspecified users.
5.1
Settings
Tap Menu > View > Statistics to see statistical
information about the number of received and blocked
messages.
In the Spam filter settings (Menu > Settings > Spam
Filter), the following filter modes are available:
Block SMS from contact list – Enable this option to
allow SMS messages only from senders that are not in
your address book. The Whitelist and Blacklist entries
override this option.
Block SMS from unknown senders – Enable this
option to accept messages only from contacts in
your address book. The Whitelist and Blacklist entries
override this option.
Select both Block SMS from contact list and Block
SMS from unknown senders to automatically block
all incoming SMS messages. The Whitelist and Blacklist
entries override this option (see section 5.2, “Whitelist/
Blacklist“).
To not block any messages, deselect both Block SMS
from contact list and Block SMS from unknown
senders to disable the Spam filter. All incoming
messages will be accepted. The Whitelist and Blacklist
entries override this option (see section 5.2, “Whitelist/
Blacklist“).
Figure 4-3: Quarantine
Figure 5-1: Spam filter
11
5.2 Whitelist / Blacklist
5.3
Locating blocked (Spam) messages
The Whitelist is a list of telephone numbers from which
all SMS messages are accepted. Entries listed here
override all options in the general spam filter setup
(Settings tab).
The Spam folder is used to store blocked messages that
are routed to it and is automatically created when the
first spam message is deleted. To locate the Spam folder
and review blocked messages, follow the steps below:
1. Open the program your device uses for text
messaging. For example, from the Start menu tap
Messaging.
Figure 5-2: The Whitelist
The Blacklist is a list of telephone numbers from which
all SMS messages are blocked. Entries listed here
override all options in the general Spam filter setup
(Settings tab).
Warning: Adding a number/contact to the Blacklist will
automatically move messages from that sender to the
Spam folder.
Figure 5-4: Tap Messaging
2. Tap Messages to open the list of received items.
To add a number or a contact to the Whitelist/Blacklist,
select the tab for the list you want to modify and
tap Options.
Figure 5-5: Tap Messages
Figure 5-3: The Blacklist
12
NOTE: Your device will likely point to the folder most
recently visited. To switch to another folder, such
as the Spam folder, tap Show in the upper left (for
Smartphones tap Menu > Folders).
6. Update
3. Select the Spam folder.
By default, ESET Mobile Antivirus is installed with an
update task to ensure that the program is regularly
updated. You can also perform updates manually.
After installation, we recommend you run the first
update manually. To do so, tap Menu > Update.
6.1
Updating using your computer
If your mobile device is not connected to the Internet,
you can also update the virus signature database using
your computer by following the steps below:
1. Disable Internet updates under Miscellaneous
settings (tap Menu > Settings > Update and
deselect the Internet update option).
2. Download the file containing the most recent virus
signature database to your PC.
Figure 5-6: Spam folder
5.4 Deleting Spam Messages
To delete spam messages from your mobile device,
follow the steps below:
1. Tap Menu >Settings > Spam Filter.
2. Tap Clear spam.
3. Tap Yes to confirm the deletion of all spam messages.
3. Connect your device to your PC (Windows XP and
earlier require that ActiveSync be installed. Windows
7 and Vista uses Windows Mobile Device Center).
4.Copy the virus signature database update file
(EsetAV_WM.upd) to the ESET Mobile Antivirus
installation directory (Program Files\ESET\ESET
Mobile Antivirus).
5.Tap Menu > Update. ESET Mobile Antivirus will
check the update file and, if the update file is not
damaged, the latest virus signature database will be
installed.
6.2 Settings
To configure the update settings, tap Menu > Settings
> Update.
The Internet update check box enables or disables
automatic updates. To set the time interval for the
automatic update, use the Auto update drop-down
menu. You can also specify the Internet server from
which updates are downloaded (we recommend leaving
the default setting of updmobile.eset.com). In the
Login and Password fields, enter the username and
password you received after purchasing ESET Mobile
Antivirus.
Figure 5-7: Deleting Spam Messages
13
7. Viewing Logs and statistics
The Choose log section (Menu > View > Logs) stores
all file scan results and scan status reports, along with
information about locked and infected files. Logs are
created when a scan is initiated or when an infiltration
is detected. All infected files are highlighted in red. At
the end of each log entry is the reason why the file is
included in the log.
System logs contain the following information:
• Time – Date and time of the event
• Log name – Log file name (usually in the form
EsetAV_log_number.log)
• Scanned files
Figure 6-1: Update settings
• Actions performed or errors encountered during the
scan
Figure 7-1: Opening scan log
Figure 6-2: Downloading updates
NOTE: To prevent unnecessary bandwidth usage, virus
signature database updates are issued as needed,
when a new threat occurs. While virus signature
database updates are free with your active license, you
may be charged by your mobile service provider for
data transfers. Please check with your mobile service
provider. You can also update the virus signature
database using your computer (see section 6, “Update“)
Figure 7-2: Choose log
14
8. Troubleshooting
This section provides solutions to common questions
about ESET Mobile Antivirus.
8.1
Connection to update server failed
This error message is displayed after an unsuccessful
update attempt if the program is not able to contact the
update servers.
Try the following solutions:
1. Check your Internet connection
Open your Internet browser to http://www.eset.com
to verify that you are connected to the Internet
Figure 7-3: Log details
The statistics screen (Menu > View > Statistics)
displays a summary of files scanned by the On-Access
scanner and a summary of SMS Messages received.
In addition, the totals of files quarantined by the OnAccess scanner display here next to the sum of files in
the Quarantine (this figure includes the results of the
On-demand scan).
2.Check if the program is using the correct
update server.
To check the server address, tap Menu > Settings
> Update and you should see updmobile.eset.com
in the Internet server field.
8.2 Unsuccessful Installation
If an error message displays when you begin
installation, the most common cause is installing the
wrong version of ESET Mobile Antivirus for your device
(installing ESET Mobile Antivirus for Pocket PC on a
Smartphone or vice versa). When downloading the
installation file from the ESET homepage, please make
sure you are downloading the correct product version
for your device.
Figure 7-4: Statistics
15
9. Technical support
For administrative assistance or technical support
related to ESET Mobile Antivirus or any other ESET
security product, our Customer Care specialists are
available to help. To find a solution to your technical
support issue, you can choose from the following
options:
To find answers to the most frequently asked questions,
access the ESET Knowledgebase, here:
http://kb.eset.com
The Knowledgebase contains an abundance of useful
information on resolving the most common and current
issues, with easy-to-use drill-down categories and an
advanced keyword search.
To contact ESET Customer Care, use the support
request form available here:
http://www.eset.com/support/contact.php
16