1
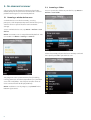
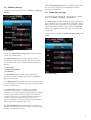
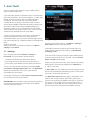
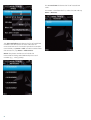
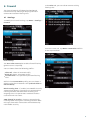
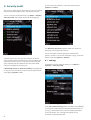
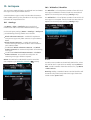
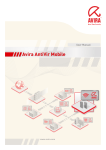
ESET Mobile Security
Symbian
Installation Manual and User Guide
Click here to download the most recent version of this document
Contents
1. Installation
.....................................................3
of ESET Mobile Security
1.1
Minimum
.........................................................................3
system requirements
1.2
Installation
.........................................................................3
1.2.1
Installation
.......................................................................3
on your device
1.2.2
Installation
.......................................................................3
using your computer
1.3
Uninstallation
.........................................................................4
2. Product
.....................................................5
activation
2.1
Activation
.........................................................................5
using login and password
2.2
Activation
.........................................................................5
using registration key
2.3
Trial
.........................................................................5
activation
3. Update
.....................................................6
3.1
Settings
.........................................................................6
4. On-access
.....................................................7
scanner
4.1
Settings
.........................................................................7
5. On-demand
.....................................................8
scanner
5.1
Running
.........................................................................8
a whole device scan
5.2
Scanning
.........................................................................8
a folder
5.3
General
.........................................................................9
settings
5.4
Extensions
.........................................................................9
settings
6. Threat
.....................................................10
found
6.1
Quarantine
.........................................................................10
7. Anti-Theft
.....................................................11
7.1
Settings
.........................................................................11
8. Firewall
.....................................................13
8.1
Settings
.........................................................................13
9. Security
.....................................................14
audit
9.1
ESET Mobile Security
Settings
.........................................................................14
10. Antispam
.....................................................16
10.1 Settings
.........................................................................16
10.2 Whitelist
.........................................................................16
/ Blacklist
Copyright ©2011 by ESET, spol. s r.o.
ESET Mobile Security was developed by ESET, spol. s r.o.
For more information visit www.eset.com.
All rights reserved. No part of this documentation may be
reproduced, stored in a retrieval system or transmitted in any
form or by any means, electronic, mechanical, photocopying,
recording, scanning, or otherwise without permission in
writing from the author.
ESET, spol. s r.o. reserves the right to change any of the
described application software without prior notice.
Customer Care: www.eset.com/support
REV. 2.5.2011
10.3 Locating
.........................................................................17
spam messages
10.4 Deleting
.........................................................................17
spam messages
11. Viewing
.....................................................18
logs and statistics
12. Troubleshooting
.....................................................20
and support
12.1 Troubleshooting
.........................................................................20
12.1.1
Unsuccessful
.......................................................................20
installation
12.1.2
Update
.......................................................................20
failed
12.1.3
Downloading
.......................................................................20
file timed out
12.1.4
Activation
.......................................................................20
failed. IMEI already registered
12.2 Technical
.........................................................................20
support
1. Installation of ESET Mobile
Security
NOTE: The Symbian user interface varies by device
model. The installation file may appear in a different
menu or folder on your device.
1.1 Minimum system requirements
To install ESET Mobile Security for Symbian, your
mobile device must meet following system
requirements:
Minimum system requirements
Operating system S60 3rd Edition Feature Pack 1 or
2 (Nokia only)
S60 5th Edition (Nokia only)
Symbian 3 (Nokia only)
Available free
space
2 MB
1.2 Installation
Save all open documents and exit all running
applications before installing. You can install ESET
Mobile Security directly on your device or use your
computer to install it.
After successful installation, activate ESET Mobile
Security by following the steps in the Product
activation 5 section.
1.2.1
Installation on your device
To install ESET Mobile Security directly on your device,
download the .sis installation file onto your device by
Wi-Fi, Bluetooth, USB file transfer or email attachment.
Locate the file on your device. Tap the file to launch the
installer and then follow the prompts in the installation
wizard.
Installation progress
After installation, you can modify the program settings.
However, the default configuration provides the
maximum level of protection against malicious
programs.
1.2.2
Installation using your computer
To install ESET Mobile Security using your computer,
connect your mobile device to the computer via Nokia
PC Suite. After the device is recognized, run the
downloaded installation package (.sis file) and follow
the instructions in the installation wizard.
Launching the installer on your computer
Then follow the prompts on your mobile device.
Installing ESET Mobile Security
3
1.3 Uninstallation
To uninstall ESET Mobile Security from your mobile
device, tap Menu > Applications (or Installed
applications).
NOTE: The Symbian user interface varies by device
model. These options may be slightly different on your
device.
Removing ESET Mobile Security
Select ESET Mobile Security and tap Options >
Remove (or Uninstall). Tap Yes when prompted to
confirm the uninstallation.
Removing ESET Mobile Security
4
2. Product activation
The main ESET Mobile Security window (Menu >
Applications > ESET Mobile Security) is the starting
point for all instructions in this manual.
2.1 Activation using login and password
If you purchased your product from a distributor, you
received a login and password with your purchase.
Select the Login/Password option and enter the
information you received in the Login and Password
fields. Enter your current contact address in the Email
field. Tap Menu > Activate to complete the activation.
You will receive a confirmation email about a successful
product activation.
2.2 Activation using registration key
If you acquired ESET Mobile Security with a new device
(or as a boxed product), you received a Registration key
with your purchase. Select the Registration key
option, enter the information you received in the Key
field and your current contact address in the Email
field. Tap Menu > Activate to complete the activation.
Your new authentication data (Login and Password)
will automatically replace the Registration key and will
be sent to the email address you specified.
The main ESET Mobile Security window
After a successful installation, ESET Mobile Security
must be activated. If you are not prompted to activate
your product, tap Menu > Activate.
Each activation is valid for a fixed period of time. After
the activation expires, it will be necessary to renew the
program license (the program will notify you about this
in advance).
2.3 Trial activation
If you do not have a license and would like to evaluate
ESET Mobile Security before making a purchase, select
the Activate trial option. Fill in your Email address to
activate ESET Mobile Security for a limited time. You
will receive a confirmation email after successfully
activating the product. Trial license can only be
activated once per mobile device.
NOTE: During activation, the device must be connected
to the Internet. A small amount of data will be
downloaded. These transfers are charged according to
your service agreement with your mobile provider.
Program activation
There are three activation methods; the one that
applies to you will depend on the manner in which you
acquired your ESET Mobile Security product.
5
3. Update
By default, ESET Mobile Security is installed with an
update task to ensure that the program is updated
regularly. You can also perform updates manually.
After installation, we recommend you run the first
update manually. To do so, tap Menu > Action >
Update.
3.1 Settings
To configure update settings, tap Menu > Settings >
Update.
The Internet Update option enables or disables
automatic updates.
You can specify the Update Server from which updates
are downloaded (we recommend leaving the default
setting of updmobile.eset.com).
To set the time interval for the automatic updates, use
the Auto Update option.
In the Default APN Connection option, choose a type
of connection that will be used for downloading
updates.
Update settings
NOTE: To prevent unnecessary bandwidth usage, virus
signature database updates are issued as needed, when
a new threat is added. While virus signature database
updates are free with your active license, you may be
charged by your mobile service provider for data
transfers.
6
4. On-access scanner
The On-access scanner checks files that you interact
with in real time. Files that are run, opened or saved are
checked for threats automatically. Scanning takes
place before any action is performed on a file, ensuring
maximum protection with default settings. The Onaccess scanner launches automatically at system
startup.
4.1 Settings
Tap Menu > Settings > On-access to enable or disable
following options:
Enable On-access Scan – If enabled, the On-access
scanner runs in the background.
Heuristics – Select this option to apply heuristic
scanning techniques. Heuristics proactively identify
new malware not yet detected by the virus signature
database by analyzing code and recognizing typical
virus behavior. Its disadvantage is that additional
time is required to complete the scan.
On-access scanner settings
7
5. On-demand scanner
You can use the On-demand scanner to check your
mobile device for the presence of infiltrations. Certain
predefined file types are scanned by default.
5.2 Scanning a folder
To scan a particular folder on your device, tap Menu >
Action > Scan folder.
5.1 Running a whole device scan
A whole device scan checks memory, running
processes, their dependent dynamic link libraries (DLLs)
and files that are part of internal and removable
storage.
To run a whole device scan, tap Menu > Action > Scan
device.
NOTE: A memory scan is not performed by default. You
can enable it in Menu > Settings > General.
Scanning a folder
Select the memory of your device or memory card and
then specify the folder you wish to scan.
Running a whole device scan
The program scans system memory first (including
running processes and their dependent DLLs) and then
scans files and folders. The full path and file name of
each scanned file will be displayed briefly.
NOTE: To abort a scan in progress, tap Cancel in the
bottom right corner.
Selecting a folder to scan
8
5.3 General settings
To modify scanning parameters, tap Menu > Settings >
General.
If the Archive Deletion option is enabled, archive files (
zip, rar and jar) containing infected objects will be
automatically deleted.
5.4 Extensions settings
To specify the file types to be scanned on your mobile
device, tap Menu > Settings > Extensions.
The Extensions window will be displayed, showing the
most common file types exposed to infiltration. Select
On for the file types you wish to scan or Off to exclude
extensions from scanning. If you enable the Archives
option, all supported archive files (zip, rar and jar) will
be scanned.
To scan all files, switch the Extension Sensitive option
to Off.
General settings
Switch the Show Alert Dialog option to On to display
threat alert notifications.
The Default action option allows you to select an
action to be performed automatically when infected
files are detected. You can choose from the following
options:
Quarantine,
Delete Infected File,
Do Nothing.
Extensions settings
The Stored Logs option allows you to define the
maximum number of logs to be stored in the Menu >
Logs > Scan section.
If the Memory Scan is enabled, the device memory will
be automatically scanned for malicious programs prior
to the actual file scan.
If the Heuristics option is enabled, ESET Mobile
Security will use heuristic scanning techniques.
Heuristics is an algorithm-based detection method that
analyzes code and searches for typical virus behavior.
Its main advantage is the ability to identify malicious
software not yet recognized in the current virus
signature database. Its disadvantage is that additional
time is required to complete the scan.
The Archive Nesting option allows you to specify the
depth of nested archives to be scanned. (The higher the
number, the deeper the scan.)
9
6. Threat found
If a threat is found, ESET Mobile Security will prompt
you to take an action.
Quarantine List
Threat alert dialog
We recommend you select Menu > Delete. If you
select Quarantine, the file will be moved from its
original location to quarantine. If you select Menu >
Ignore, no action will be performed and the infected file
will remain on your mobile device.
If an infiltration is detected in an archive (e.g., .zip file),
you can enable archive deletion by tapping Menu >
Enable archive deletion and then delete the archive (
Menu > Delete).
6.1 Quarantine
The main task of the quarantine is to safely store
infected files. Files should be quarantined if they cannot
be cleaned, if it is not safe or advisable to delete them
or if they are being falsely detected by ESET Mobile
Security.
Files stored in the quarantine folder can be viewed in a
log that displays the date and time of quarantine and
original location of the infected file. To open
quarantine, tap Menu > View > Quarantine.
10
You can restore quarantined files by tapping Menu >
Restore (each file will be restored to its original
location). If you wish to permanently remove the files,
tap Menu > Delete.
7. Anti-Theft
The Anti-Theft feature protects your mobile phone
from unauthorized access.
If you lose your phone or someone steals it and replaces
your SIM card with a new (untrusted) one, an Alert SMS
will be secretly sent to certain user-defined phone
number(s). This message will include the phone
number of the currently inserted SIM card, the IMSI
(International Mobile Subscriber Identity) number and
the phone's IMEI (International Mobile Equipment
Identity) number. The unauthorized user will not be
aware that this message has been sent, since it will be
automatically deleted from the Sent folder.
To erase all data (contacts, messages, applications)
stored on your device and all currently inserted
removable media, you can send a Remote wipe SMS to
the unauthorized user's mobile number in the following
form:
#RC# DS password
where password is your own password set in Menu >
Settings > Password.
7.1 Settings
First, set your password in Menu > Settings >
Password. This password is required when:
sending a Remote wipe SMS to your device,
accessing the Anti-Theft settings on your device,
uninstalling ESET Mobile Security from your device.
To set a new password, type your password in New
password and Retype password fields. The Reminder
option (if set) displays a hint in case you do not
remember your password.
To change existing password, Enter current password
first and then fill in new password.
IMPORTANT: Please choose your password carefully as
this will be required when uninstalling ESET Mobile
Security from your device.
Setting a security password
To access Anti-Theft settings, tap Menu > Settings >
Anti-Theft and enter your password.
To disable automatic checking of inserted SIM card
(and possible sending of Alert SMS), set Enable SIM
matching to Off.
If the SIM card currently inserted in your mobile device
is the one you wish to save as trusted, set the Current
SIM is trusted option to On.
If you are using more than one SIM card, you may want
to distinguish each one by modifying its SIM Alias (e.
g., Office, Home etc.).
In Alert SMS, you can modify the text message that will
be sent to the predefined number(s) after an untrusted
SIM card is inserted in your device.
The Run after restart option triggers automatic startup of all Anti-Theft features (Alert SMS, protection
against uninstalling ESET Mobile Security etc.) and the
On-access scanner after each restart of the device. If
this option is set to Off, the Anti-Theft and On-access
will start only after you open ESET Mobile Security.
11
The Trusted SIM tab shows the list of trusted SIM
cards.
To remove a SIM from the list, select the SIM and tap
Menu > Remove.
Anti-Theft settings
The Alert Recipients tab shows the list of predefined
numbers that will receive an Alert SMS after an
untrusted SIM card is inserted in your device.To add a
new number, tap Menu > Add. To add a number from
the contact list, tap Menu > Add contact.
NOTE: the phone number must include the
international dialing code followed by the actual
number (e.g., +16105552000).
Predefined phone numbers list
12
Trusted SIM list
8. Firewall
In the Rules tab, you can edit or remove existing
filtering rules.
The Firewall controls all inbound and outbound
network traffic by allowing or denying individual
connections based on filtering rules.
8.1 Settings
To modify the Firewall settings, tap Menu > Settings >
Firewall.
Firewall rules list
To create a new rule, tap Menu > New Rule and fill in
all the required fields.
Firewall settings
The Start after reset option enables firewall filtering
(phone restart is required).
You can choose from the following profiles:
Allow All - allows all network traffic,
Block All - blocks all network traffic,
Custom Rules - lets you define your own filtering
rules.
While in the Custom Rules profile, you can choose a
default action for all inbound traffic (Default Allow or
Default Block).
Block roaming data - if enabled, ESET Mobile Security
automatically detects if your device is connected to a
roaming network and blocks both incoming and
outgoing data. This option does not block the data
received via Wi-Fi or GPRS.
Creating a new rule
APN allowed in roaming - choose a connection for
receiving MMS messages in a roaming network. MMS
messages from other connections will be blocked by
ESET Mobile Security.
13
9. Security audit
To see each item's details, select the item and tap
Options > Details.
The Security audit checks the phone's status regarding
battery level, bluetooth status, free disk space, etc.
To run a Security audit manually, tap Menu > Action >
Security audit. A detailed report will be displayed.
Running Processes
The Running Processes option shows the list of all
processes running on your device.
Security audit results
A green check next to each item indicates that the
value is above the threshold or that the item does not
represent a security risk. A red cross means that the
value is below the threshold or that the item could
represent a potential security risk.
To see the process details (full path name of the
process, process UID and its memory usage), select the
process and tap Options > Details.
9.1 Settings
To modify Security audit parameters, tap Menu >
Settings > Security audit.
If Bluetooth Status or Device Visibility is highlighted
in red, you can turn off its status by selecting the item
and tapping Options > Fix.
Security audit settings
If the Fix automatically option is enabled, ESET Mobile
Security will automatically attempt to fix the items at
risk (e.g., bluetooth status, device visibility) without
user interaction. This setting only applies to an
automatic (scheduled) audit.
14
The Audit Period option allows you to choose how
often the automatic audit will be performed. If you
wish to disable the automatic audit, select Never.
You can adjust the threshold value at which the Free
Disk Space and Battery Level will be considered as
low.
In the Items to Audit tab, you can select the items to
be checked during the automatic (scheduled) security
audit.
Automatic audit settings
15
10. Antispam
The Antispam module blocks unsolicited SMS and MMS
messages sent to your mobile device.
Unsolicited messages usually include advertisements
from mobile phone service providers or messages from
unknown or unspecified users.
10.1 Settings
10.2 Whitelist / Blacklist
The Blacklist is a list of phone numbers from which all
messages are blocked. Entries listed here override all
options in the Antispam settings (Settings tab).
The Whitelist is a list of phone numbers from which all
messages are accepted. Entries listed here override all
options in the Antispam settings (Settings tab).
Tap Menu > View > Statistics to see statistical
information about received and blocked messages.
In the Antispam settings (Menu > Settings > Antispam
), the following filtering modes are available:
Block unknown contacts – Enable this option to
accept messages only from contacts in your address
book.
Block known contacts – Enable this option to
receive messages only from senders not included in
your address book.
Enable both Block unknown contacts and Block
known contacts to automatically block all incoming
messages.
Disable both Block unknown contacts and Block
known contacts to turn off the Antispam. All
incoming messages will be accepted.
NOTE: The Whitelist and Blacklist entries override
these options (see Whitelist / Blacklist 16 section).
Blacklist
To add a new number to the Whitelist/Blacklist, select
the tab for the list you wish to modify and tap Menu >
Add. To add a number from the contact list, tap Menu
> Add contact.
Warning: Adding a number/contact to the blacklist will
automatically and silently move messages from that
sender to the Spam folder.
Antispam settings
16
10.3 Locating spam messages
The Spam folder is used to store blocked messages
categorized as spam according to the Antispam
settings. To locate the Spam folder and review blocked
messages, tap Menu > Messaging > Inbox.
Spam folder
10.4 Deleting spam messages
To delete spam messages from your mobile device,
follow the steps below:
1. Tap Menu >Settings > Antispam from the ESET
Mobile Security main window,
2. Tap Menu > Purge spam folder,
3. Tap Yes to confirm the deletion of all spam
messages.
Deleting Spam messages
17
11. Viewing logs and statistics
The Scan log section (Menu > Logs > Scan) contains
logs providing comprehensive data about completed
scan tasks. Logs are created after each successful Ondemand scan or when an infiltration is detected by the
On-access scan. All infected files are highlighted in red.
At the end of each log entry is an explanation of why
the file was included in the log.
Scan logs contain:
log file name (usually in the form Scan.Number.log),
date and time of the event,
list of scanned files,
actions performed or errors encountered during the
scan.
Security audit log
The Firewall Log (Menu > Logs > Firewall) contains
the information about the firewall events blocked by
ESET Mobile Security. The log is updated after every
communication performed through the firewall.
Firewall Log contains:
date and time of the event,
name of the rule used,
action performed (based on the rule settings),
source IP address,
destination IP address,
protocol used.
Scan log
The Security audit log section (Menu > Logs >
Security audit) stores detailed results of the latest
security audit.
Firewall log
The Statistics screen (Menu > View > Statistics)
displays a summary of files scanned by the On-access
scanner and received/blocked messages.
18
If you wish to reset current statistics, tap Menu >
Reset counters.
NOTE: All statistical data get calculated starting from
the latest restart of the device.
Statistics
19
12. Troubleshooting and support
12.1 Troubleshooting
This section provides solutions to common questions
related to ESET Mobile Security.
12.1.1
Unsuccessful installation
The most common cause of an error message displayed
during installation is that the wrong version of ESET
Mobile Security has been installed on your device.
When downloading the installation file from the ESET
website, please make sure you are downloading the
correct product version for your device.
12.1.2
Update failed
This error message is displayed after an unsuccessful
update attempt if the program is not able to contact
the update servers.
Try the following solutions:
1. Check your Internet connection – open your Internet
browser to http://www.eset.com to verify that you are
connected to the Internet.
2. Verify that the program is using the correct update
server – tap Menu > Settings > Update and you
should see updmobile.eset.com in the Update Server
field.
12.1.3
Downloading file timed out
The Internet connection was unexpectedly slowed
down or interrupted during the update. Try to run the
update again later, please.
12.1.4 Activation failed. IMEI already
registered
ESET Mobile Security has already been activated for this
IMEI (International Mobile Equipment Identity)
number. Trial license can only be activated once per
mobile device.
12.2 Technical support
For administrative assistance or technical support
related to ESET Mobile Security or any other ESET
security product, our Customer Care specialists are
available to help. To find a solution to your technical
support issue, you can choose from the following
options:
To find answers to the most frequently asked
questions, access the ESET Knowledgebase at:
http://kb.eset.com
The Knowledgebase contains an abundance of useful
information for resolving the most common issues with
categories and an advanced search.
20
To contact ESET Customer Care, use the support
request form available at:
http://eset.com/support/contact