1
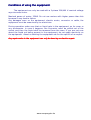
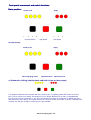
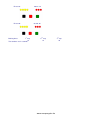
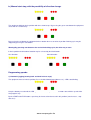
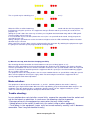
User’s Manual
Suitable to supply a 3-phase motor from a single-phase 230V 50Hz system.
For AC automatic controlled
Honey extractor equipment
Please read the manual before operating the equipment!
There is danger of electric shock inside
inside the machine during operation!
Valid from Mar/1/2009
www.mezpergeto.hu
Conditions of using the equipment:
The equipment can only be used with a 3-phase 230/400 V nominal voltage
asynchronous motor.
Maximal power of motor: 250W. Do not use motors with higher power than this
because it may lead to failure.
Any damages seen on the equipment, electric motor, connector or cable, the
equipment must be examined by an electrician.
During operation make sure that no liquid gets in the equipment, on its cover or
any accessories. In case it happens, the connector must be pulled out of the
socket and then the liquid shall be removed from the area. If you are not sure
about the liquid not being present in the equipment, do not apply electricity on
the equipment. About re-starting the equipment ask for the opinion of an expert.
Any repair works in the equipment can only be done by an electric expert.
www.mezpergeto.hu
Front panel arranement and switch functions:
Basic position:
Grade scale
1.
2.
3.
Steps
4.
Selection button
1.
Stop button
2.
3.
Start button
At programming
Grade scale
1.
2.
Steps
3.
4.
Next step (prog.store)
1.
2.
3.
Speed decrease Speed increase
a.) Automatic shifting (rotating back and forth in two or three steps)
The equipment indicates basic position with three short beeps. The lighting yellow LED shows the chosen
phase. The first phase last shorter, the fourth phase lasts longer. With time the speeds are proportionally
increasing closer to the fourth phase. This gives opportunity to program the equipment according to the type
and consistency of the honey. The required values are easily accessible and usable. If no one is working in the
extractor, for start you shall press and release the green button.
www.mezpergeto.hu
After pressing and releasing the green START button the first step of first phase starts. After passing the first
programmed period, after braking (approx 6-15 second upto the phase) the equipment changes direction and
new timing begins.
After braking and direction change the third timing begins.
After the third step, after braking cycle (approx 10 seconds) the equipment gets into basic position. This is
indicated by three short beeps. The red LEDs turn to dark, only the actual time program is indicated by one of
the four LEDs.
The control can be stoppen anytime by pressing the red STOP button. Then the equipment gets into basic
position after the actual braking time.
In case of keeping the green button pressed, by pressing the black button the equipment skips the first phase
and works only in two phases. The repeated starts will be done also in two phases. To return to phase three is
only possible by removing the equipment from power supply.
(For immediate disconnecting keep the red button pressed while you press the greed button for a moment. In
this case the braking cycle will be canceled.)
Durations of steps are pre-programmed and they are increasing according to the phases. In basic position we
can jog between phases using the black selection switch. In this case one of the four LEDs on the left indicates
the actual selected phase. The equipment is programmed to the following durations (the values are in seconds,
in the selectable step is in brackets):
Phase #1:
Phase #2:
25, 40, 25
35, 45, 30
www.mezpergeto.hu
Phase #3:
40, 65, 35
Phase #4:
50, 80, 40
Braking times:
st
1 step
15
The numbers are in seconds.
nd
2 step
12
www.mezpergeto.hu
rd
3 step
10
b.) Manual start-stop, with the possibility of direction change.
The equipment indicates basic position with three short beeps. By pressing the green start button the equipment
starts and runs continuously.
By pressing the red button the equipment brakes rotation then resets to basic position. Braking cycle may be
skipped by pressing the start button.
Warning! By pressing start button at the end of the braking cycle, the drive may re-start.
In basic position the direction of rotation may be selected by the black button.
One direction:
Other direction:
Programming speeds:
a.) Automatic jogging (rotating back and forth in three steps)
The equipment must be in basic position. Press the black button long (about 5 sec.). LEDs start blinking.
Keep the button pressed until the LEDs go off. Then releasing the button the motor starts with the speed of the
first program step.
By the START and STOP buttons speed may be increased or decreased in this position (start-increase ; stopdecrease).
www.mezpergeto.hu
The set speed may be stored by pressing the black button long (approx. 10 sec.).
When the LEDs are off the button may be released. The set speed is now stored and after the first program step
it will operate using this speed set. The equipment changes direction and the speed may be set for the next
program step.
Storing the speed is done the same way as before: pressing down the black button long until the LEDs go off.
Then the button may be released.
In case the button is pressed short (shorter than 10 sec) the set speed will not be stored, it only jumps to the
speed of the next step.
During setting the speed when it reaches the lowest or highest value the LEDs tart blinking and then the other
direction may be selected.
When setting the speeds is done, turn the equipment off at the connector. By switching the equipment on again
it is going to re-start with speeds programmed for normal operation.
b.) Manual start-stop, with direction changing possibility
After choosing direction of rotation, the black button must be pressed long (approx. 5 sec)
When the LEDs stop blinking releasing the black button the equipment starts rotating in the shoosen direction.
Then the greed button can increase and the red button can decrease the speed of rotation. When the requested
speed is set and later we intend to operate the equipment with this spead, press the black button long (approx.
10 sec.) until the LEDs go off.
The equipment stores the setting, brakes, then it re-starts rotation with the set speed. When setting the speed is
done, turn the equipment off using the supply switch. Re-connecting the terminals the equipment will use
speeds programmed for normal operation.
Mode selection:
The equipment is able to operate in two modes: “a” and “b”. Swithcing between the modes is done by
continuous pressing the black button. When the LEDs stop blinking, keep the black button down and press the
red button. Then the equipment gives a continuous beeping sound. Turn the equipment off by the system
switch. Re-connecting the equipment will operate with the other mode.
Trouble shooting:
In case rotation does not start after several trials, remove the connector from the socket and
ask for the help of an electrician. In such cases the followings shall be inspected:
- Damages present in the equipment or accessories that may inhibit starting.
- Voltage present in the socket (it worth to try the socket using an other equipment).
- Fuse blown in the equipment (cover must be turned manually carefully until it becomes
removable. Then it may be checked visually.)
www.mezpergeto.hu
When checking the fuse, be careful the equipment is not connected to
the electric system.
Input voltage: 230V / 50Hz
Max. power consumption: 400W
Inlet fuse:
4A (max 5A quick break)
Outlet voltage: 3 x 230V (frequency-dependant)
Nominal output power: 250W
Adjustable range: 10Hz – 30Hz, 500-1300 rpm (2 poles)
Swithcing frequency: 6kHz (sinusoidal modulated PWM)
Control mode:
non-regenerative, vectored frequency adjustment
Connecting aid:
fuse
fuse
L phase
N phase
PE ground
PE ground
to U motor
to V motor
to W motor
www.mezpergeto.hu