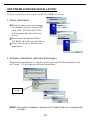
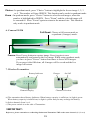
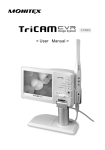
1
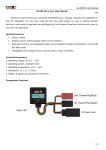
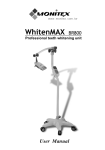
CA M
Intraoral Camera
User Manual
TABLE OF CONTENTS:
PREFACE ----------------------------------------------------------------- 1
DISCLAIMER ------------------------------------------------------------ 1
PRECAUTIONS & CAUTIONS ---------------------------------------- 1
WORKING ENVIRONMENT ----------------------------------------- 1
OPTIONAL ACCESSORIES ------------------------------------------
2
CONNECTIONS OF DOCKING STATION --------------------------
3
VARIOUS MODELS & INSTALLATIONS --------------------------- 4
DOCKING STATION AND TV/MONITOR SETTINGS ------------ 13
SOFTWARE & DRIVER INSTALLATION -------------------------- 15
OPERATION ----------------------------------------------------------- 20
SPECIFICATIONS ----------------------------------------------------- 23
TROUBLESHOOTING ------------------------------------------------ 26
PREFACE :
1. Prior to using MoniCAM intraoral camera, please read this User Manual carefully
and keep it for future reference.
2. If any damage or problem occurs, do not continue to use or try to repair by yourself.
Please contact your dealer.
3. Defects of the products, which caused by natural disasters such as bad weather or
improper temperature and by faulty materials, will be checked. Explanations
will be given accordingly.
4. The specifications are subject to change and revision without prior notice.
DISCLAIMER :
1. We shall not assume any responsibility if any malfunction or damage caused by
improper operation, removal, modification or maintenance.
2. We shall not assume any responsibility if any malfunction or damage caused by
operation in improper ambient environment.
3. We shall not assume any responsibility if any malfunction or damage caused by
force majeure.
PRECAUTIONS & CAUTIONS :
1. The intraoral camera should not be autoclaved. Please clean it with mild
detergents or disinfectants.
2. Please use the attached disposable plastic barrier (sheath) for protection when
operating.
3. Do not touch the connectors with conductive material such as metal or with
moisture to avoid short circuit or possible damages.
4. Do not disassemble the device by yourself, which would cause unexpected damages.
5. Do not press the device or the accessories such as cables to avoid any damage.
6. If this camera will not be used for some time, please disconnect the power cord.
WORKING ENVIRONMENT :
1. Please install this device in the dry place. Do not expose it to sunlight directly
or install it in a dusty or humid place or at the improper temperature (too hot or
too cold).
2. Operating environment:
Ambient temperature: -20℃~ +50℃
Relative Humidity: 30% ~90%
3. Transportation and storage environment:
Ambient temperature: -20℃~ +60℃
Relative Humidity: 10% ~90%
1
OPTIONAL ACCESSORIES :
MIC001-Barrier
MIC005-Video cable
MIC002-Camera cable
MIC006-S-Video cable
MIC009-Transmitter Charger
MIC012-Holder
MIC003-USB cable
MIC004-VGA cable
MIC007-IR sensor
MIC008-Remote control
MIC010-Docking station adapter
TM2-Wireless Transmitter
DS520, DS526, DS528, DS529,
DS530, DS535, DS537,
DS539-Docking Station
PX520-P/N (Optional)-Intraoral Camera
TM3-Wireless Receiver
2
MIC011-Software & Driver CD
DS510-Docking Station
(Built-in Type)
CONNECTION OF DOCKING STATION :
USB
VGA
On/Off
S-Video
AC Power
Video out
Pedal
Video in
IR
Camera socket
3
VARIOUS MODELS & INSTALLATIONS :
Please check the proper MoniCAM model for connection and installation.
A. Wireless / Wired Models:
! IMPORTANT
If you do not like to use wireless transmitter, camera cable is also available.
Prior to using the wireless transmitter, please charge for two hours. When the
charging is completed, please remove the charger from the transmitter.
Please switch on the transmitter, and press "FREEZE" button to start your
operation. LED lights will be on instantly when FREEZE button is pressed.
1. Model No.: MN-DS530 (Standard)
Accessories :
MIC001 - Barrier
MIC002 - Camera cable
MIC003 - USB cable
MIC004 - VGA cable
MIC005 - Video cable
MIC006 - S-Video cable
MIC007 - IR sensor
MIC008 - Remote control
MIC009 - Transmitter Charger
MIC010 - Docking Station power adapter
MIC011 - Software & Driver CD
MIC012 - Holder
PX520 - P (Optional) - PAL Intraoral camera
PX520 - N (Optional) - NTSC Intraoral camera
TM2 - Wireless Transmitter.
DS530 - Wireless / Wired Docking Station
Installation:
USB to PC
VGA to Monitor
Video Out to TV/Monitor
S-Video to TV/Monitor
IR Sensor
Pedal
Adapter
4
2. Model No.: MN-DS535 (With USB)
Accessories :
MIC001 - Barrier
MIC002 - Camera cable
MIC003 - USB cable
MIC005 - Video cable
MIC006 - S-Video cable
MIC007 - IR sensor
MIC008 - Remote control
MIC009 - Transmitter Charger
MIC010 - Docking Station power adapter
MIC011 - Software & Driver CD
MIC012 - Holder
PX520 - P (Optional) - PAL Intraoral camera
PX520 - N (Optional) - NTSC Intraoral camera
TM2 - Wireless Transmitter
DS535 - Wireless / Wired Docking Station
Installation:
USB to PC
Video Out to TV/Monitor
S-Video to TV/Monitor
IR Sensor
Pedal
Adapter
5
3. Model No.: MN-DS537 (With VGA)
Accessories :
MIC001 - Barrier
MIC002 - Camera cable
MIC004 - VGA cable
MIC005 - Video cable
MIC006 - S - Video cable
MIC007 - IR sensor
MIC008 - Remote control
MIC009 - Transmitter Charger
MIC010 - Docking Station power adapter
MIC012 - Holder
PX520 - P (Optional) - PAL Intraoral camera
PX520 - N (Optional) - NTSC Intraoral camera
TM2 - Wireless Transmitter
DS537 - Wireless / Wired Docking Station
Installation:
VGA to Monitor
Video Out to TV/Monitor
S-Video to TV/Monitor
IR Sensor
Pedal
Adapter
6
4. Model No.: MN-DS539 (With Video / S-Video)
Accessories :
MIC001 - Barrier
MIC002 - Camera cable
MIC005 - Video cable
MIC006 - S-Video cable
MIC007 - IR sensor
MIC008 - Remote control
MIC009 - Transmitter Charger
MIC010 - Docking Station power adapter
MIC012 - Holder
PX520 - P (Optional) - PAL Intraoral camera
PX520 - N (Optional) - NTSC Intraoral camera
TM2 - Wireless Transmitter
DS539 - Wireless / Wired Docking Station
Installation:
Video Out to TV/Monitor
S-Video to TV/Monitor
IR Sensor
Pedal
Adapter
7
B. Wired Models:
1. Model No.: MN-DS520 (Standard)
Accessories :
MIC001 - Barrier
MIC002 - Camera cable
MIC003 - USB cable
MIC004 - VGA cable
MIC005 - Video cable
MIC006 - S-Video cable
MIC007 - IR sensor
MIC008 - Remote control
MIC010 - Docking Station power adapter
MIC011 - Software & Driver CD
MIC012 - Holder
PX520 - P (Optional) - PAL Intraoral camera
PX520 - N (Optional) - NTSC Intraoral camera
DS520 - Wired Docking Station
Installation:
USB to PC
VGA to Monitor
Video Out to TV/Monitor
S-Video to TV/Monitor
IR Sensor
Pedal
Adapter
8
2. Model No.: MN-DS526 (With USB)
Accessories :
MIC001 - Barrier
MIC002 - Camera cable
MIC003 - USB cable
MIC005 - Video cable
MIC006 - S-Video cable
MIC007 - IR sensor
MIC008 - Remote control
MIC010 - Docking Station power adapter
MIC011 - Software & Driver CD
MIC012 - Holder.
PX520 - P (Optional) - PAL Intraoral camera.
PX520 - N (Optional) - NTSC Intraoral camera.
DS526 - Wired Docking Station.
Installation:
USB to PC
Video Out to TV/Monitor
S-Video to TV/Monitor
IR Sensor
Pedal
Adapter
9
3. Model No.: MN-DS528 (With VGA)
Accessories :
MIC001 - Barrier
MIC002 - Camera cable
MIC004 - VGA cable
MIC005 - Video cable
MIC006 - S-Video cable
MIC007 - IR sensor
MIC008 - Remote control
MIC010 - Docking Station power adapter
MIC012 - Holder
PX520 - P (Optional) - PAL Intraoral camera
PX520 - N (Optional) - NTSC Intraoral camera
DS528 - Wired Docking Station
Installation:
VGA to Monitor
Video Out to TV/Monitor
S-Video to TV/Monitor
IR Sensor
Pedal
Adapter
10
4. Model No.: MN-DS529 (With Video / S-Video)
Accessories :
MIC001 - Barrier
MIC002 - Camera cable
MIC005 - Video cable
MIC006 - S-Video cable
MIC007 - IR sensor
MIC008 - Remote control
MIC010 - Docking Station power adapter
MIC012 - Holder
PX520 - P (Optional) - PAL Intraoral camera
PX520 - N (Optional) - NTSC Intraoral camera
DS529 - Wired Docking Station
Installation:
Video Out to TV/Monitor
S-Video to TV/Monitor
IR Sensor
Pedal
Adapter
11
5. Model No.: MN-DS510 (Built-in Type, with Video / S-Video)
Accessories :
MIC001 - Barrier
MIC002 - Camera cable
MIC005 - Video cable
MIC006 - S-Video cable
MIC007 - IR sensor
MIC008 - Remote control
MIC010 - Docking Station power adapter
MIC012 - Holder
MIC013 - Cable
PX520 - P (Optional) - PAL Intraoral camera
PX520 - N (Optional) - NTSC Intraoral camera
DS510 - Wired Docking Station
Installation:
Video Out to TV/Monitor
S-Video to TV/Monitor
Cable
IR Sensor
Pedal
Adapter
NOTE : The Built-in type is designed to be installed inside the dental unit.
12
DOCKING STATION, WIRELESS TRANSMITTER AND
TV/MONITOR SETTINGS:
Channel and Transmitter settings are only for Wireless/ Wired Models
MN-DS530, MN-DS535, MN-DS537 and MN-DS539
Before operating, be sure to set Docking Station, Transmitter and
TV/Monitor as stated below.
1. Docking Station setting (Please see the bottom of docking station)
PAL / NTSC
Switch always remains at W
Channels on Docking Station (1-4)
a) Please select No. 1 to PAL (P) or NTSC (N) according to the system used
in your country and switch on.
b) No. 2 always remains at "W" setting no matter wireless transmission or
wired camera is used.
For wireless transmission, please connect the wireless receiver to the
camera socket.
13
2. Wireless Receiver
Synchronize the channel selection between
Transmitter and Receiver. For example if
you choose channel 1 of Transmitter, you
also have to select the same channel 1 of
Receiver. If you choose channel 2 of
Transmitter, you have to select channel 2
of Receiver. So do the other cases.
3. Wireless Transmitter
Battery Indicator
Channel Display
Channel Selection
On / off
Charger
a) Connect Transmitter to the camera socket and turn on the power.
Select the channel to be used.
b) Please ensure to use the same channel with Docking Station.
4. TV / Monitor
Please set S-Video, Video or VGA on TV/ Monitor according to the signal
source from docking station.
NOTE: You can adjust the brightness, contrast or color of TV / Monitor
to have better effects on images.
14
SOFTWARE & DRIVER INSTALLATION:
Software and Driver are required ONLY for USB connection
1. Driver Installation
1 When the connections and settings
are complete, please connect USB
cable to PC. Win XP (WIN 2000)
will automatically detect the new
device.
2 Please insert the attached CD to
CD-ROM. PC will search for Driver.
3 Click "Next Step" to finish Driver
Installation.
2. Software Installation ( Monitex Soft Image )
When Driver Installation is complete, please open the CD file and double click
the "Setup". PC will start the software installation.
Setup
NOTE: During the installation, please click "Setup" button to complete the
process.
15
3. Software Application
Power on Docking Station and the camera (Press "Freeze" or "Full/Quad" button.
LED lights of the camera will be on. ).
From the PC "Start" menu, please click "Monitex Soft Image" to enter
"Monitex-login" window.
For the first time user, please enter the new account data and click "Add data"
to establish a new account. Then click "Enter" into "Monitex image".
16
Enter the saved account number and click "Search" to find out the account.
Click "Search" to show all saved accounts. Highlight the account and then
click "Enter" into "Monitex image".
NOTE: You may use the "Edit" or "Delete" to edit saved data or delete data.
When click "Enter" into "Monitex image", press "Capture" and "Still Image Capture"
window will pop up.
! IMPORTANT :
For the first use of this software, please click "Source" to select Driver (Bose view).
17
To take pictures, press "Freeze" button on the camera to freeze the image. Then
click the "Capture" button on Still Image Capture window to save it and press
"Freeze" to go back to the live image. Or use "Freeze" button to save images
temporarily in Docking Station memory. Then use the remote control "Previous
Image / Next Image" to recall the images and press "Capture" button to save
one by one.
To have a full screen of a saved image, please highlight the image and click "Compare".
18
To compare saved images, please click "Select/Cancel". Highlight the
images and then click "Compare" (2-4 images).
19
OPERATION:
1. Please properly connect and install MoniCam (See Various Models and Installation).
Ensure the settings are complete (See Docking Station,Wireless Transmitter and
TV/Monitor Settings).
2. Turn on Docking Station and Wireless Transmitter. Press "Freeze" or "Full/ Quad"
to power on the camera (LED lights of the camera will be on). The image will be
displayed on the screen.
NOTE: Keep pressing "Freeze" button for 2 seconds, the camera will be off
(LED lights of the camera wand will be off). To restart the camera,
please press "Full / Quad" button.
3. If you want to use USB connection, please install Software and Driver (See
Software & Driver Installation). Then open "Monitex Soft Image" (See
Software Application).
4. We suggest you use the attached disposable plastic sheath (barrier) for protection
during operation.
! IMPORTANT :
Please turn off /on the Docking Station or exit the Software for resetting.
5. Docking Station
Full / Quad (
) : Press the button to capture image in full screen or quadrant
(4 images) mode.
Freeze : Press FREEZE to capture image and press it again to save the image
automatically and return to the live image (The number of the stored image will
appear on the upper right corner of the monitor screen). While using quadrant
mode, you have to press "FREEZE" button four times to freeze all 4 images.
If you press "FREEZE" button the fifth time, all 4 images will be saved
temporarily and the live image will return.
20
Choice : In quadrant mode, press "Choice" button to highlight the frozen image 1, 2, 3
or 4. The number will turn GREEN. This function only works in quadrant mode.
Zoom : In quadrant mode, press "Choice" button to select frozen images, when the
number is highlighted in GREEN. Press "Zoom" and the selected image will
be zoomed in. Press "Zoom" again to return to the normal size. This function
only works in quadrant mode.
6. Camera PX520
Full/Quad: Choose a full screen mode or
a quadrant (4 images) mode.
Freeze: Press Freeze button to capture image. Press it again to save
automatically and return to the live image. While using quadrant mode,
you have to press "Freeze" button four times to freeze all 4 images.
If you press it the fifth time, all 4 images will be saved and the live
image will return.
7. Wireless Transmitter
Charger
Battery Indicator
Channel Display
On/Off
Channel Selection
a) The transmitter has a Battery Indicator. When battery capacity is sufficient, its light is green.
When battery capacity is insufficient, its light is yellow and you may recharge the battery.
b) Select channels from 1 to 4.
c) The power switch is on the side of Transmitter.
! IMPORTANT :
Before use, please remember to set Docking Station and Transmitter TM2 on the same channel (1, 2, 3 or 4)
21
8. Remote Control
Delete: Press shaded quadrant to delete the specific image from
the quadrant. Press "Freeze" to re-capture image for the
quadrant.
Zoom: Press shaded quadrant to zoom specific image from the
quadrant.
Press the button again to return to normal size.
Delete Single Image: This function will delete the SINGLE image
that is displayed on the screen.
All Clear: This will delete all stored images. When it is pressed, you will
be asked "ARE YOU SURE?" To proceed, press the "All Clear"
button again and this will delete all stored images.
Freeze : Press this button to capture the image shown on Monitor.
Press it again to save this image and the live image will return.
Full / Quad: Press this button to capture the image in full screen or
quadrant (4 images).
Previous Image and Next Image:
Allows you to scroll the stored images.
! IMPORTANT :
1) Before using Remote Control, please take out the plastic insulating pad from
the button battery.
2) One button battery is used in Remote Control. Please replace it when the
battery is low.
22
SPECIFICATIONS:
1. Specifications of Docking Stations (DS530, DS535, DS537 and DS539)
Dimensions (L x W x H)
19.3cm x 9.8cm x 5.1cm
Weight
278g
Image Input Control
Wireless / Wired camera wand, Remote control,
Pedal, Docking Station panel or PC
(Applicable in USB connection)
Image Output
USB, VGA,Video, S-Video (Optional)
Function
Full / Quad, Zoom, Freeze, Memory, Choice
System
PAL / NTSC
Wireless Channel
4 channels
Wireless / Wired
Dual application
Memory
28 full images (112 quad images)
Remote Control Function
Freeze / Memory, Delete, Full / Quad, Zoom
Power Requirement
Input Volt: 100~240V AC
Output Volt: 5.0V DC
2. Specifications of Docking Stations (DS520, DS526, DS528 and DS529)
Dimensions (L x W x H)
19.3cm x 9.8cm x 5.1cm
Weight
278g
Image Input Control
Wired camera wand, Remote control, Pedal,
Docking Station panel or PC
(Applicable in USB connection)
Image Output
USB, VGA,Video, S-Video (Optional)
Function
Full / Quad, Zoom, Freeze, Memory, Choice
System
PAL / NTSC
Memory
28 full images (112 quad images)
Freeze / Memory, Delete, Full / Quad, Zoom
Remote Control Function
Power Requirement
Input Volt: 100~240V AC
Output Volt: 5.0V DC
23
3. Specifications of Built-in Type Docking Stations (DS510)
Dimensions (L x W x H)
11.2cm x 10.8cm x 3.1cm
Weight
118g
Image Input Control
Wired camera wand, Remote control, Pedal,
Docking station panel
Image Output
Video and S-Video
Function
Full / Quad, Zoom, Freeze, Memory, Choice
System
PAL / NTSC
Memory
28 full images (112 quad images)
Remote Control Function
Freeze / Memory, Delete, Full / Quad, Zoom
Power Requirement
Input Volt: 100~240V AC
Output Volt: 5.0V DC
4. Specifications of Intraoral Camera (PX520)
Dimensions (L x W x H)
21cm x 1.9cm x 1cm.
Weight
37g
Resolution
420 / 480 Horizontal TV lines
System
PAL / NTSC
Camera
SONY 1/4" CCD, 443,000 pixels
White Balance
Image Output
Auto
Wireless / Wired
Light Source
6 Ultra-bright white LED light
Function
Freeze / Memory, Full / Quad
24
5. Specifications of Wireless Transmitter (TM2)
Dimensions (L x W x H)
5.4cm x 2.8cm x 3.3cm
Weight
44g
Transmission Channels /
Frequency
4 channels / 2.4 GHz
Rechargeable Battery
1 built-in 3.7V (500mAh) Li-ion battery
which can supply 30 minutes of
continuous imaging per full charge
Charger
Input Volt: 100~240V AC
Output Volt: 4.5~9V DC
Recharging Time
60 minutes
Battery Power Indicator (LED)
Full charge: red ; Insufficient: yellow
6. Specifications of Wireless Receiver (TM3)
Dimensions (L x W x H)
5.3cm x 6.6cm x 1.7cm
Weight
47g
Receiving Channels /
Frequency
4 channels / 2.4 GHz
25
TROUBLESHOOTING:
When failure or error occurs, please refer to following solutions to check the device.
If problems remain, please contact your dealer.
Description
Solution
When it is turned on, Docking
Station does not work.
Check if the power adapter is
connected correctly.
The camera does not light on.
1) Press "Freeze" or "Full / Quad".
2) Check if the camera cable is
connected correctly.
3) Check if the transmitter is fully
charged or turned on.
No image on Monitor or TV
1) Check if the cable is connected
correctly.
2) Check if the signal source on Monitor
or TV is set correctly.
3) For PC, please make sure if Driver is
already installed. Then check if
Driver is selected in the "Source".
4) Check if the channel setting of
Docking Station is correct and
Transmitter is well connected.
Stains on the image
1) Clean the camera lens.
2) If stains cannot be eliminated,
please contact your dealer.
Blurred or shadowed image
or signal disturbance
1) It is normal if it appears in the first
minute for warming up.
2) Check if P/N (PAL/NTSC) setting is
correct.
3) Turn off /on Docking Station or exit
the software for resetting.
26
INDUSTRIAL CO., LTD
6F, 70 GUANG-FU ROAD SEC. 1,
SAN-CHONG CITY, TAIPEI, TAIWAN
TEL : 886-2-29993869 FAX: 886-2-29993647
E-mail : [email protected]
http://www.monitex.com.tw