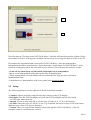
1
SATLOOK Micro +
Owners Manual
Version: 2.00
Thank You for purchasing an Emitor SATLOOK Micro + instrument.
This manual covers the operation and maintenance of the SATLOOK Micro + instrument.
All information in this publication is based on the latest product information available at the
time of printing.
Emitor AB reserves the right to make changes at any time without notice and without incurring
any obligation.
No part of this publication may be reproduced without written permission.
This manual should be considered a permanent part of the instrument and should remain with
it if it is resold.
If a problem should arise, or if You have any questions about the instrument, consult an
authorized Emitor dealer.
! Notice !
Operating a SATLOOK Micro + instrument requires special skills. Please read this owner's
manual thoroughly before operating the instrument.
Content:
1
2
Description ............................................................................................................................................ 3
Operation............................................................................................................................................... 3
2.1
Unpacking ..................................................................................................................................... 3
2.2
On – Off ........................................................................................................................................ 4
2.3
Batterycheck.................................................................................................................................. 5
3
Functions............................................................................................................................................... 5
3.1
Connection and installing a satellite dish – Signalmeter mode .................................................... 5
3.1.1
Beeper ................................................................................................................................... 6
3.1.2
13/18V , 22 kHz and DiSEqC............................................................................................... 6
3.1.3
DiSEqC 1.2 actuator control ................................................................................................. 6
3.1.4
Attenuator.............................................................................................................................. 7
3.1.5
Maxhold ................................................................................................................................ 7
3.2
Digital Readout – Digital mode .................................................................................................... 7
3.2.1
NIT - Network Information Table ........................................................................................ 8
3.3
Matching function - New!............................................................................................................. 8
3.4
Satellite-Identification / Memory positions/ Transfer of transponder information to PC............. 9
3.5
Setup ........................................................................................................................................... 10
4
Maintenance ........................................................................................................................................ 11
5
Technical specification ....................................................................................................................... 12
DiSEqC is a trademark of EUTELSAT
2(12)
1 Description
The SATLOOK MICRO + is a Swedish made SAT-TV instrument.
The unit is made for exact alignment and adjustment of satellite-dishes. It is intended for
professional use when high accuracy and precise information are needed.
It´s easily operated without a lot of unnecessary buttons and knobs. The basic functions are easy
to get a hold on and takes only a few minutes to learn.
The instrument is provided with a 3" LCD which either shows Sat-signal strength or Digital
information.
The SATLOOK Micro + is unique as it can measure satellite signal from two LNBs at the same
time. Signal strength is presented graphical on the LCD-display in form of thermometer-scales.
It can also present pitchtones (the higher tone the better signal) on a loudspeaker.
SATLOOK Micro + shows Digital information like BER (bit error rate), constellation-diagram
(QPSK) and S/N (signal/noise ratio).
The NIT function can identify the various TV-satellites by reading out the NIT in the
Bitstream (NIT = Network Information Table). The NIT also contains info about the
transponders TV and Radio-channels.
SATLOOK Micro + can store 100 positions of Satellite transponder information.
The instrument can easily scan through the memory positions and identify the various Satellite
transponders.
The polarisation of the LNB is switchable 13V/18V and the Hi-Lo band with
22 kHz-tone. The DiSEqC-function controls all DiSEqC-accessories (like switches, LNB´s and
actuators).
The power of the instrument is supplied by a built in and rechargeable battery.
Even though the instrument has a lot of functions it is still very light and flexible.
2 Operation
2.1 Unpacking
Start with unpacking the instrument and check that the following items are in the cardboard
box:
1. SATLOOK Micro + instrument
2. Nylon carrying case with shoulder strap
3. Car-adaptor 12V
3(12)
4. External power supply 220V/13.5V
5. 2 x Adaptor F-female/F-female
6. Owner's Manual
7. Program CD
8. Serial cable
The instruments connections for coaxial- and power-cables are illustrated in the picture below.
The big control knob has functions as e.g. tuning and moving in the meny-system.
The two control buttons are used to turn on/off the instrument and to navigate in the menusystem.
RS 232
Control knob
2 x F-input
Reset
DC-charger
Left
controlbutton
Right
controlbutton
2.2 On – Off
Turn the instrument on by pressing down the left (red) control button for about a second and
then drop the button.
Turn the instrument off by pressing down the left (red) control button more than 3 seconds and
then drop the button.
In general the installation of a satellite dish with the SATLOOK Micro + is done like this:
1. Find a satellite in the Signalmeter mode (and maximize).
2. Identify the satellite with the SAT-ID or NIT functions.
3. Verify the quality of the signal in Digital mode.
Alternatively
1. Use the Matching function to find the satellite that you are looking for.
2. Enter the Signalmeter mode to make an exact adjustment.
3. Verify the quality of the signal in Digital mode.
4(12)
2.3 Batterycheck
As the instrument has been stored for some time before transportation it is important to check
the battery-condition. To do this, turn the meter on by pressing down the left (red) control
button for about a second.
When starting the instrument, the LCD and the blue LEDs turns on. The meter starts in
Signalmeter-mode. The loudspeaker (beeper function) is off when the instrument is turned on.
The LCD-display shows, in the shape of a battery, the status of the battery condition, see picture
below. The capacity is 100% when the battery symbol is filled and 0% when the symbol is
empty.
If the battery needs recharging, use the power-supply enclosed.
NOTE, the instrument should be turned off when the battery is recharged.
Recharging from discharged battery to about 85% capacity takes aprox. 3 hours.
3 Functions
3.1 Connection and installing a satellite dish – Signalmeter mode
When the battery is charged the instrument is ready to use.
Connection of coaxial-cable and LNB is preferably done when the instrument is turned off.
In case of connecting when the instrument is on and if a short-circuit occur, it's no harm done
due to the fact that the instrument is protected against such a failure and will automatically turn
off itself. After correcting the problem, restart the instrument and it will operate normally.
The instrument starts in the Signalmeter-mode which makes it easy to detect the satellite/s
You're looking for.
Two LNBs can be connected and measured at at the same time (LNB-A and LNB-B).
However, the Digital readout can only be done on LNB-A (read more about Digital readout in
the next section of the manual).
If You want to switch on the loudspeaker function (beeper), place the marker with help of the
large control knob on the “BEEPER”– position and push the right (black) control button.
When a satellite is received, the signal bar immediately shows "a higher temperature" which
increases as the signal is getting stronger (see picture on page 6).
5(12)
Menu
Signal bars
Battery
Left (red) controlbutton
Right (black) controlbutton
3.1.1 Beeper
If the loudspeaker (Beeper function) is switched on, it will present higher and higher tones as
the signal level is getting better.
3.1.2 13/18V , 22 kHz and DiSEqC
It is easy to set up 13/18V, 22 kHz on/off and DiSEqC-signals with help of the control knob and
the control buttons.
Simply place the marker over 13/18V with the control knob. Push the right (black) control
button and the supply voltage will switch. Current status (13/18V, 22 kHz on/off and the
voltage draw (mA) of the LNB) are displayed on the LCD-screen below the bar-graphs.
Notice that the control-signals are only available at LNB-A (all tones are blocked at LNB-B).
The instrument support the DiSEqC level 1.0 (and Toneburst), 1.1 and 1.2 standard (only
LNB-A input). Activate the function by entering the DiSEqC position in the menu.
3.1.3 DiSEqC 1.2 actuator control
The SATLOOK Micro + controls DiSEqC 1.2-actuators
Enter the function via “DiseqC” in the main menu and then via “Motor” in the sub-menu. The
unit runs such an actuator east/west with the “Go East” and “Go West” functions.
Notice that the actuator-control is only available at the LNB-A input.
Signal-strength is also shown in this mode.
Some motors can be calibrated with the “Calibr.”-command.
The “Limits”- function sets East and West limits. They can be erased with the “Clr. Limit”command. Actuator positions can be stored with the “Position”-command.
6(12)
3.1.4 Attenuator
If the incoming signal is so strong that the bargraphs show max-values, reduce the incoming
signal with the “Atten”-function.
3.1.5 Maxhold
Shows the max-peakes of the signalvalues and will only change when higher values are
received (makes it easier to align a dish and find max signal).
3.2 Digital Readout – Digital mode
Enter the Digital part of the meter via the “Digital”-command in the main-menu.
The following picture will be displayed.
NIT-Information
BER and SNR
The window displays the following Digital readout:
Freq:
SR:
FEC:
AFC:
CB:
UCB:
BER:
SNR:
The tuned in frequency.
Symbol rate. The instrument readout, automatically, the correct symbol rate of the
transmission.
Forward Error Correction. The instrument readout, automatically, the correct FEC.
Automatic frequency control -the instrument automatically adjust the frequency
and tells the offset frequency from center of carrier.
Corrected Bits –Bits that have been corrected in Viterbi.
Should be as low as possible.
Uncorrected Blocks – Blocks unable to be repaired. Value should be zero.
Very small numbers of uncorrected block will result in loss of picture (mosaic).
Bit Error Rate.
The Signal/Noise Ratio.
7(12)
When performing Digital installations, please notice:
•
•
•
3.2.1
The constellation diagram is like ”a shower of hail”. No signal will spread out the noise
over the window. The better signal, the more concentrated and focused ”hailstorms” in
the windows.
SNR. The signal/noise ratio should be as high as possible. A good signal should have at
least 8.0 dB S/N-ratio.
BER. The Bit Error Rate should be as low as possible. As the values are really small, on
the other side of zero (presented as something raised to minus something), they should
be as high as possible.
A BER at 5.00 –05 is therefore better than 9.00 –04.
A BER at 4.00 –05 is therefore better than 5.00 –05.
It can be said, in general, that a signal should be at least x.xx –04 to be accepted.
NIT - Network Information Table
The word "searching" will lit on the right hand
side of the picture as soon as a digital transponder
is found. After about 5 seconds, if the satellite is
transmitting NIT, the satellite position will appear
and in some cases also the satellite name, e.g.
Astra 19.2
The "Channels"-function will show a list of the
present TV- and Radio-channels on that certain
transponder/frequency.
3.3 Matching function - New!
When using the matching function it is very easy to align the satellite dish towards the
particular satellite you are looking for.
1. Choose the “matching”-function from the main menu, using the right (black) control
button and a list of satellites will be shown on the display.
2. Select the satellite you a looking for from the list.
3. Turn the satellite dish until the instrument signals with a beep that the wanted satellite is
found. The match is also verified by the NIT information shown on the display, if
avaible.
On the display you can see how the signal strenght varies when you are turning the
satellite dish. When a satellite is found you will also see a bar with the signal/noise ratio
in percentages.
Note that the instrument only will utter a beep when the chosen satellite is found.
4. Enter the signalmeter mode (see 3.1.) where you can read the strenght of the signal and
adjust the dish more exactly.
5. Eventually go to the digital mode (see 3.2.) to verify the quality of the signal.
8(12)
3.4 Satellite-Identification / Memory positions/ Transfer of transponder
information to PC
SATLOOK Micro + is preset with transponder info for the following satellites:
Astra 28
Astra 19
Hotbird
Eutelsat 7
Sirius
Thor
Hellas
(3 transponders)
(3 transponders)
(3 transponders)
(3 transponders)
(3 transponders)
(3 transponders)
(2 transponders)
SATLOOK Micro + can also memorize individual and unique transponder information. It can
hold up to 100 individual transponders in its memory.
Scanning through the memory bank only takes seconds and makes satellite identification easy
and reliable.
1. Store the Satellite-transponders in the Digital-mode.
2. Make sure the instrument is tuned to the “right” satellite/transponder (i.e. the
transponder to be memorized).
3. Go to the “Memory” function.
4. Select the “Save” function.
5. Choose a free memory position (with the control knob).
6. Select “Save” with the right (black) control button.
7. Edit a name for the transponder-memory (press the left (red) control button once –
“text”). Use the knob to select the first letter (e.g. A in ASTRA 28) and save it with the
right (black) control button. Move to the next letter (e.g. S) and so on.
8. When finished with then name, save the position by pressing the left (red) control button
“menu” and then select “Save & Exit”. The transponder data is now stored in the
memory bank.
- Using the memory positions – identifying a satellite!
* Find a satellite in the signalmeter-mode.
* Select the “Sat-ID”-function.
* The meter will scan through the memory bank and present a list with the identified
transponders.
- Transfer preset transponder information to other SATLOOK Micro +
Connect the SATLOOK Micro +, that has the transponder information that should be
transferred to other SATLOOK Micro +, to a PC. Start the PC program that comes with the
instrument and the picture that you can see on the next page will appear on the computer
screen.
9(12)
1
2
Press the button “Get data from SATLOOK Micro” and this will start the transfer of data. When
the transfer is done it will appear a window on the screen for saving this data in a file on the PC.
Disconnect the instrument and connect the SATLOOK Micro + that the transponder
information should be transferred to. Press the button “send data to SATLOOK Micro” and a
window will appear where the saved file is to be chosen. This will start the transfer of data.
- Some advice when doing an individual and unique list of transponders
* Many saved transponders will prolong the time of identification.
* Three transponders on each satellite are recommended for high accuracy and short
identification time.
* Identification of transponders with low symbol rate cannot be done.
3.5 Setup
The following features can be adjusted to fit the individual installer:
* Contrast. Adjust (with the control knob) the contrast of the LCD-display.
* Backlight. Turn the LCD-backlight on or off (the LCD-backlight can also be turned
on/off in the menu system).
* Autooff. Chose no auto turn off or set the auto off timer to 5, 15, 30 or 60 minutes.
* Set LNB. Select the type of LNB LO to use. E.g. Standard Universal or any of the other many
different types there is to choose between.
* Version. Here you can find information about this specific SATLOOK Micro +, like for
example serial no. and firmware version.
10(12)
4 Maintenance
The instrument is equipped with a rechargeable NiMh-battery and it is important that the
battery is maintained. Recharging should be done with the enclosed car-adaptor or the external
power supply, 12v, 2 Amp, center-pin -plus and chassi -earth.
Note, do not use other methods. The instrument may be damaged or its life-span
may be shortened. Furthermore the instrument can be operated, for shorter periods of time
with the external power supply.
Contact your dealer for more information.
SATLOOK Micro + is designed for outside use in rough conditions but it should not be exposed
for rain or snow as this can damage or shorten the lifetime of the instrument.
11(12)
5 Technical specification
Input frequency:
Input level:
Input/output impedance:
920-2150MHz.
35-100 dBuV.
75 Ohm, F-connectors.
Measuring method (Analog): - Signal presentation on LCD display in form
of thermometer scales.
- Pitch-tone, highest tone on loudspeaker.
Measuring method (Digital): - BER (bit error rate)
- S/N (signal/noise-ratio)
- Constellation (QPSK)
Max-level:
- Thermometer scales showing max.
- Maxhold function.
- BER, S/N and QPSK showing max values.
Satellite-identification:
Yes, by reading out the NIT in the Bitstream.
Info about the TV and Radio channels.
Memory:
100 transponders can be stored with name.
Memory locks on:
FEC, Symbol-rate Frecuency, 13/18v, 22kHz.
Memory search:
The instrument scans the memory positions and presents
the matching transponders.
Presentation:
On LCD 3”-display.
PC-connection:
Power out:
22 kHz tone:
DiSEqC:
DiSEqC actuator:
Battery:
Operational:
Weight:
Accessories:
Yes, RS232-connector.
Yes, 13-18V.
Yes, on/off.
Yes, all 1.0 and 1.1. Also Toneburst on/off.
Built in positioner for DiSEqC 1.2.
Rechargable 12v, 1.8 amp/hour.
About 2 hour on a fully charged battery.
About 1.5 kg incl.battery.
Nylon carrying-case.
Power-supply of 220v/13.5v, 1.7amp.
Car-charger.
2 x F-female / F-female-adapters.
12(12)