1
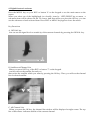
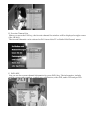
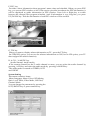
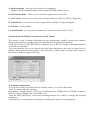
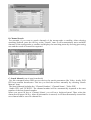
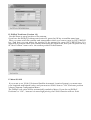
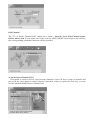
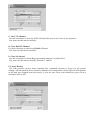
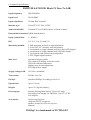
SATLOOK Mark IV
Free To Air
Owners Manual
Emitor AB
Owner's Manual
Thank You for purchasing a Emitor SATLOOK Mark IV FTA instrument.
This manual covers the operation and maintenance of the SATLOOK Mark IV FTA-instrument.
All information in this publication is based on the latest product information available at the
time of printing.
Emitor AB reserves the right to make changes at any time without notice and without incurring
any obligation.
No part of this publication may be reproduced without written permission.
This manual should be considered a permanent part of the instrument and should remain with
it if it is resold.
If a problem should arise, or if You have any questions about the instrument, consult an
authorized Emitor dealer.
! Notice !
Operating a SATLOOK Mark IV FTA instrument requires special skills. Please read this
Owner's Manual thoroughly before operating the instrument.
Contents:
1. Description
2. Operation
3. Functions
4. Digital Free To Air receiver
5. Maintenance
6. Technical Specification
DiSEqC is a trademark of EUTELSAT
1. Description:
EMITOR SATLOOK Mark IV FTA is a measuring-instrument developed and
manufactured in Sweden for exact alignment and adjustment of satellite-dishes.
The instrument is provided with a 4.5" TFT-color monitor which either shows Digital FTA
/ Analog TV-channel or the frequency spectrum 920-2150 MHz (normal or expanded
mode).
It's very easy to detect satellite signals in the spectral-mode and the spectrum can be
expanded for correct adjustment of the polarisation.
Channel search is done with a large knob on the side of the instrument and by help of the
two digit LED-display on the front-panel.
Switching between spectrum/Digital/Analogue-mode are made easy by pushing a button.
Soundfrequencies between 5.5 – 8.5 MHz can be tuned in and listened to.
The polarisation of the LNB is switchable with a 22 kHz-tone and/or with 13V/18V.
DiSEqC-accessories (like switches) can also be controlled. The instrument is protected
from short-circuit when connecting the LNB.
The main functions of the Digital Free To Air receiver are controlled on the instrument´s
key-pad but can also be fully controlled with the attached remote-control.
Power to the instrument is supplied by a built in, rechargeable battery.
The battery is recharged from the external battery charger or the car-adaptor.
Even though the instrument has a lot of functions it is still very flexible and easy to use.
SATLOOK Mark IV FTA weights only about 5,5kg incl. the battery and carrying-case.
2. Operation:
A. Unpacking.
Start with unpacking the instrument and check that the following items are in the cardboard
box:
1. SATLOOK Mark IV FTA instrument.
2. Nylon carrying case with shoulder strap.
3. Car-adaptor 12v.
4. External power supply 220v/13.5v.
5. Remote control for the Digital FTA receiver.
6. Adaptor BNC-male/F-female.
7. Owner's Manual.
The instrument keypad and the close by the connections for coaxial- and power- cables are
illustrated in the picture below
Mainswitch, power On/Off.
The big knob has functions for; tuning, marker-control, and to move the expanded spectrum.
The two small knobs adjust volume and audio-frequency 5.5-8.5 MHz.
Frontdisplay:
LED 1
LED 2
LED 3
LED 4
LED 5
LED 6
LED 7
LED 8
LED 9
LED 10
Batterycheck
Signalstrength
Tuningdisplay
Expanded spectrum
Band I/II
Offset
13/18v
22 KHz
Inverted video
LED 11-20 Shows signalstrength
B. Batterycheck.
As the instrument has been stored for some time before transportation it is important to check
the battery-condition.
To do this turn the mainswitch On.
When starting the instrument, the monitor turns on in spectrum-mode and LED nr 2 on the
front-display will be lit. The two digit LED-display indicates "SP" for spectrum.
The loudspeaker is switched off when the instrument is turned on.
Push the No 6 button on the keypad to read the battery condition. The condition is indicated on
the two digit LED-display with a value between LO, 1-9, HI.
If the battery needs recharging, use the power-supply enclosed.
NOTE, The instrument should be turned off when the battery is recharged.
The two digit LED-display (automatically turned on when recharging) shows "CH", for
charging, while recharging.
Recharging from discharged battery to about 85% capacity takes aprox.3 hours.
C. Connection and installing a satellite dish.
When the battery is charged the instrument is ready to use.
Connection of coaxial-cable and LNB is preferably done when the instrument is turned off. In
case of connecting when the instrument is On and if a short-circuit occur, it's no harm done due
to the fact that the instrument is protected against such a failure and will automatically turn off
itself.
After correcting the problem, restart the instrument and it will operate normally.
The instrument starts in the spectrum-mode which makes it easy to detect the satellite/s You're
looking for. If You want to switch on the loudspeaker function (beeper), press the No 8 button
(on/off).
When a satellite is received, the monitor immediately show white "peaks" which are getting
bigger when the signal is increasing, see picture.
If the loudspeaker (beeper function, button nr 8) is switched On there are higher and higher
tones when the signal level is getting stronger.
Audio carriers can be tuned in when pushing button nr #. The two small knobs below the
keypad adjust the volume and the audio-frequency between 5.5 and 8.5 MHz.
Both the beeper- and the audio- function can be operational at the same time.
If You want to see what satellite You're receiving (and view some TV-channels), change to
picture-mode with button No 1 for analogue channels and with button No 3 for Digital
channels.
It is advisable that You, before switching between spectrum and picture, use the knob on the
side of the instrument which controls the marker on the monitor. Put the marker on a suitable
peak and switch to picture with button No 1.
As there are different transmission standards and coding systems etc. it is not certain that a
satellite immediately can be identified. Push button No 4 and use the knob for tuning in the
frequency-range and try to find a certain channel for identification.
If the LNB is of a Universal type, change polarity by pushing button Nr 0 (13/18v) and
Hi-Lo band with button nr * (22 kHz).
Both functions are indicated with LED´s on the front-panel.
The instrument does also support the DiSEqC level 1.0 standard. Activate the function by
pressing the nr 5 button and the corresponding digit for the DiSEqC-function wanted (see
below).
Push button Nr 2 to return to the spectrum-mode.
If you chose to use Digital channels to identify the satellite you are receiving, this is the method:
Have you never used digital channels transmitted on the satellite you are looking for, you need
to do a channelsearch.
In the channelsearch menu, choose with satillite you would like to search for and searchmode
(second from buttom), then press “OK”.(see 4. for more info.) When channelsearch is ready exit
the menusystem and view List. Choose your satellite, and one of the channels that are now
displayed in the channellist.
If you already have done channelsearch on the satellite that you are locking for, just choose the
satellite from the List followed by a channel.
When the required satellite is found, maximize the incoming signal by the following methods:
1. Max lengths on peaks in spectrum-mode.
2. Max value on the two digit LED-display.
3. Max height on LED-bar.
4. Highest tone from the loudspeaker.
5. Max Digital signal in Digital FTA mode (button nr 3 followed by nr 1).
If the incoming signal is so strong that the displays show max-values, reduce the incoming
signal by pushing button Nr 7 (offset).
When using the expanded spectrum-function (button nr 2), it is easy to see the suppression of
the polarity. This function is consequently used for adjustment of the right polarisation.
3. Functions:
Keypad, normal mode:
1. Picture/Invert.
2. Spectrum/Expanded spectrum (on/off)
3. Digital Free To Air Receiver. ----------------------------------- See below 3.
4. Tuning, display 00-99 on/off.
5. DiSEqC-mode. ----------------------------------------------------See below 5.
6. Batterycondition, display LO,0-9,HI.
7. Signalstrength offset, on/off.
8. Beeper, on/off.
9. Freq.band I/II.
0. 13/18v.
*. 22 KHz on/off.
#. Audio on/off.
1. Is used for switching to picture-mode. If the instrument is equipped with the optional
inverted video, push the button for a couple of seconds and the picture will be inverted. To go
back to normal video, repeat the pressing of the button.
2. This function is used for showing the frequency-spectrum. In this mode the knob on the side
of the instrument controls the marker of the monitor.
Another push on the button will expand the spectrum. It is a good help for adjusting the right
polarisation.
Return to full spectrum by pushing the button again.
When this mode is switched on it is indicated by LED 4 On.
3. Digital Free To Air Receiver.
Turn the Digital receiver On/off when pushing button nr 3. When Digital receiner is swithed on
it is indicated by the right point in the LED digits.
The keypad has the following functions when the Digital receiver is On.
1. Info/signal On/off
2. Up Arrow
3. Digital Free To Air Receiver off
4. Left Arrow
5. Ok
6. Right Arrow
7. List
8. Down Arrow
9. Page up
* Exit
0 Menu
# Page down
Learn about the Digital FTA manual later in this document and get full description of the
functions.
4. Normally, the instrument present signal-strength on the two digit LED-display. Pressing
button nr 4 activates the tuning indication with a value from 00-99.
Pressing the button again returns to the signal-strength mode.
5. Activates the DiSEqC-mode. Press the nr 5 button and the corresponding command-button
(ex. for LNB 1, press button nr 5 and button nr 1). Short-list for the different DiSEqC-commands
is printed above and also as a sticker in the carrying-case.
DiSEqC-mode:
1. LNB 1
2. LNB 2
3. LNB 3
4. LNB 4
5.
6.
7. Hi LO
8. Horizontal
9. Toneburst A
0. Vertical
*. Lo LO
#. Toneburst B
6. Shows for a couple of seconds the battery condition with a value between LO, 1-9, HI.
7. This function is used when the incoming signal is so strong that the instrument shows maxvalues when the dish has not been maximized. The offset-function reduces the incoming
signal. The function is indicated by LED 6 when switched On.
8. Turn the loudspeaker on/off. Increasing signal level is indicated by higher pitch tones.
9. For switching between the two frequency-bands: 950-1750 MHz and 950-2150 MHz.
0. For switching the polarity with 13/18v in the coaxial-cable. 13/18v is also indicated on the
front-display with LED 8, On/off.
*. For switching the 22 Khz-tone on/off.
#. Turns the audio on/off. The audio is tuneable from 5.5 to 8.5 MHz. Volume and audiofrequency between 5.5 and 8.5 MHz are adjusted with the two small knobs below the keypad.
4. Digital free to air reciever:
Press the MENU key on your RCU or button ’0’ on the keypad to see the main menu on the
screen.
When you select one of the highlighted (or colorful) icons by LEFT/RIGHT key at menu , a
sub-menu item will be shown on the TV screen. And then when you press the OK key, you can
see the sub-menu of each selected item. Press EXIT or MENU key again to leave the menu.
Key Functions
A. SIGNAL key
You can see the signal level or sensitivity of the current channels by pressing the SIGNAL key.
B. Satellite and Channel List
When you press LIST key of the RCU or button ‘7’ on the keypad.
you first can see the satellite list and you
must select the satellite which you want by pressing the OK key. Then, you will see the channel
list of selected satellite
C. All Channel List
When you press the OK key, the channel list window will be displayed at right corner. The top
line of this menu indicates satellite of the current channel.
D. Favorite Channel List
When you press the FAV key, the favorite channel list window will be displayed at right corner
( like OK key).
The favorite channels can be selected at FAV item of the TV or Radio Edit Channel menu.
E. INFO KEY
You can see the current channel information by press INFO key.. The information include
satellite, transponder number, symbol rate, polarization, video PID, audio PID and pcr PID.
F. EPG key
Provides a short information about program’s name, time and schedule. When you press EPG
key, you can see EPG window as left. If the service provider broadcasts the EPG information, it
will be displayed as guide information in EPG window. Press Left or Right key to switch
between the current/next program schedule. And if information is very long line, you press
UP/DOWN key. Then the information of sub EPG window will be scrolled.
G. TTX key
When you want to display teletext information at TV, press the TTX key.
(In STB(OSG) option, you can see the teletext information as OSG, but in VBI option, your TV
must support the teletext function)
H. A.CH / A.MODE key
(Audio channel, Audio mode)
If the current channel has the 2 audio channel or more, you can select the audio channel by
pressing A.CH key and select the audio mode by pressing A.MODE key..
The audio mode is rotated as STEREO, LEFT
and RIGHT
System Setting
This menu contains 6 items :
Menu Language, Menu Color, OSD Mixing
Ratio, Local Timer, Video Mode, LNB Pass,
Channel Mode.
You can change the parameter by pressing the
LEFT/RIGHT key or press numeric key.
A. Menu Language : You can choose between 9 languages.
(English, France, German,Italian,Turkey, Spanish, Polish, Arabic, Persia )
B. OSD Mixing Ratio : Allows you to customize appearance of the OSD
C. Local Timer : Allows you to select the local time relative to GMT by LEFT or Right Key.
D. Video Mode : you can choose video output mode as RGB or Composite Signal.
E. LNB Pass : Not available.
F. Channel Mode : you can choose channel list which you want as FTA or CAS
Channel Search & DiSEqC Positioner & USALS System
This menu is used to change information as the transponder, satellite, transponder number,
transponder frequency, symbol rate and polarization for searching the channels.
Press the OK key or LEFT/RIGHT key or numeric key on RCU to change as desired parameter
to search new channels.
For your reference, you can see signal receiving status diagram on the menu as signal level or
number. If the signal receiving status is shown as bad, you may need to change some options in
this menu to improve signal receiving.
A. Antenna Configuration
If you press OK key on satellite Item of channel search, you will see this menu.
Here, you can change the Antenna
Information : Antenna Name, LNB Type, LNB Frequencies, DiSEqC Switch, DiSEqC Positioner,
USALS, Position, 22KHz Tone, and LNB Power.
Press the LEFT/RIGHT key or the corresponding numeric key on RCU to change the required
parameters.
Alternatively, you can adjust the settings by checking the signal receiving diagram.
B. Channel Search
For example, if you want to search channels of the transponder or satellite, After selecting
searching method, press the OK key at the “Search” item. it will automatically trace available
channels of the transponder or satellite and display the searching status by showing processing
rate and the result of channel list captured
C. Search Manual (one of search methods)
Use this command when DSR can not receive the search parameters like Video, Audio, PCR
PID from satellite broadcaster. This lets you find the services manually by selecting "Search
Manual“ item.
The Search Manual includes the "Channel Number", "Channel Name", "Video PID",
"Audio PID" and "PCR PID". The channel number will be automatically inputted as the next
number of the last channel number.
When you press OK key at "Channel Name", you will see a keyboard panel. Then, select the
character and press OK key. After all information is entered, it will be automatically created the
new channel and be saved in channel list.
D. DiSEqC Positioner (Version 1.2)
Use this menu to setup position of the antenna,
if you have the DiSEqC positioner and control it, press the OK key at satellite name item.
First, you must select the satellite and transponder which you want to tune by LEFT/RIGHT
key. And then you can adjust the position of the antenna by press LEFT/RIGHT key. If it
approach at position which you want by monitoring the signal level, then you can press OK key
in “Save Position” item to save the current position of the antenna.
E. Menu USALS
If you want to set USALS (Universal Satellite Automatic Location System), you must enter
your longitude and latitude value, and you must set USALS item to “ON” and enter position
value at Antenna Configuration Menu.
The DiSEqC code value will be automatically sended to Motor. If you also set DiSEqC
Positioner to “ON”, because it is more high priority, the USALS function will not work.
Edit Channel
The “TV or Radio Channel Edit” menu has 6 items : Favorite, Lock, Edit Channel Name,
Delete, Move, Sort. If you select one of the icons by LEFT/RIGHT key and press the OK key,
the corresponding submenu functions will be operated.
A. Set Favorite Channel (FAV)
This menu is used to choose your favorite channels. Press OK key to select a channel and
press OK key once again to cancel selection. And then, when you press the FAV key, you can
see the selected channel lists in Channel List.
B. Lock Channel (LOCK)
This command allows you to lock specified channel and prevent others from viewing it. Press
OK key to lock the selected channel and press OK key once again to cancel selection.
C. Edit Channel Name (EDIT)
The channel names are automatically
captured when you search them at Channel
Search menu. But if no names are available
or you do not like it, you can use this sub
menu to modify the current searched channel
name as the meaningful channel name.
Select a Channel and press OK key, then
editing panel will appear.(see the keyboard
panel at right)
D. Delete Channel (DEL)
This menu allows you to delete channels.
Press OK key to select channels to be
deleted and press OK key to cancel
operation. Finally, when you exit this menu,
The selected channels will be deleted,
E. MOVE Channel (MOVE)
This menu is used to change the order of
displayed channels.
Press OK key to select a channel which you
want to move and move it to the other
position. Press OK key again, and then the
Channel will be moved.
Press EXIT key to cancel operation.
F. SORT Channel (SORT)
The channels is listed by searched order,
When you want to list by Character order,
if you press OK key, your channel list will be
re-ordered by Character order..
Parental Control and more.
In this menu, you can create the censorship setting by using special secret code. This menu has
System Lock, Change Password, Clear TV Channel, Clear RADIO Channel, Clear All
Channel , Factory Restore .
If you select one of the highlighted titles and press the OK key, a sub menu will be shown on
the TV screen. Each of them is described in detail below.
A. System Lock
Press LEFT/RIGHT key to select lock or unlock. If the “System Lock” is set to “LOCK”, you
will be requested to enter your password, when entering Parental Control menu (in this menu).
The default password is “0000”
You must remember it, if you changed your password.
B. Change Password
This menu is used for you to change from current password code to other. Initially the default
password code is “0000”. If you want to change the current password, type “0000”. And then,
“New Password” message will be displayed. And enter your new password code number.
Finally, you will get a message of “Verify Password”. If you enter the same code with new
password, the new password is updated at internal memory of DSR. Please memorize it or
keep it in secure place to avoid system access denial and any hassle.
C. Clear TV Channel
Use this sub-menu to clear the all TV Channel that you do not want to use anymore.
You must use this menu carefully.
D. Clear RADIO Channel
Use this sub-menu to clear the all Radio Channel.
You must use this menu carefully.
E. Clear All channel
Use this sub-menu to delete all programmed channels in channel list.
You must use this menu carefully. (include C. and D.)
F. Factory Restore
Use with extreme caution when selecting this command, because it wipes out all custom
settings. All information about channels, antenna and transponder will be replaced with default
as the unit was shipped from the factory. If you are sure about your intentions, press OK key
and select YES or NO.
5. Maintenance.
The instrument is equipped with a rechargeable battery and it is important that the battery is
maintained.
Recharging should be done with a car-adaptor (enclosed) or with an external power supply of
at least 12v,2 Amp, center-pin -plus and chassi -earth.
Note, do not use other methods. The instrument may be damaged or its life-span
may be shortened.
Note, the instrument can be operated, for shorter periods of time, by an external
power supply which must be of at least 12v/2 Amp.
Contact Your dealer for more information.
Adjustments for vertical hold, brightness and contrast are located under the instrument.
Contact Your dealer for proper adjustments.
SATLOOK Mark IV FTA is designed for outside use in rough conditions but it should not be
exposed for rain or snow as this can damage or shorten the lifetime of the instrument.
6. Technical Specification:
EMITOR SATLOOK Mark IV Free To AIR.
Input frequency:
950-2150 MHz.
Input level:
30-100 dBuV.
Input impedance:
75 ohm, BNC-kontakt.
Monitor type:
Color-TFT, 4.5" PAL, NTSC.
Audio bandwidth:
Tuneable 5.5 to 8.5 MHz, Mono. Volume control.
Demodulation method: QPSK demodulation
Input Symbol Rate:
1 – 45MS/s
FEC:
1/2, 2/3, 3/4, 5/6 and 7/8
Measuring method:
1. Full spectrum, normal or expanded mode.
2. Color-TFT 4.5" -monitor with full picture.
3. Levelcheck on single channel with two digit LED display.
4. Levelcheck on single channel with LED-bar display.
5. Levelcheck with audio from loudspeaker.
6. FTA Digital signal readout.
Max-level:
Spectral with max peaks.
Two digit LED-display with max value.
LED-bar with max indication.
Highest tone from loudspeaker.
FTA Digital max signal.
Supply voltage LNB:
13v/18v, switchable.
Tone switch:
22 KHz. On/Off.
DiSEqC:
Standard DiSEqC according to level 1.0.
Operational:
Aprox. 1 hour.
Weight:
Aprox. 5.5 kg incl. battery.
Powersupply:
Internal rechargeable battery 12 volt 3.0 Amp.
External power supply, In: 100-230V, Out: 13.5 V DC.
Car-adaptor.
Accessories:
Nylon carrying-case.
Adaptor BNC/F-connector.
Remote-control for FTA set-top box.
Manual.
DiSEqC is a trademark of EUTELSAT