1
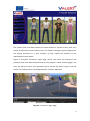
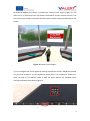
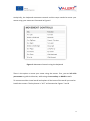
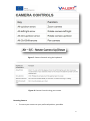
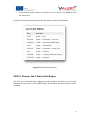
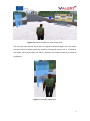
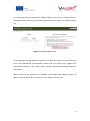
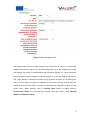
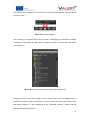
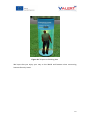
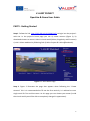
V-ALERT PROJECT
OpenSim & Game User Guide
PART I. Getting Started
Step 1. Follow the link: http://193.108.160.203:9000/wifi/ to login into the project’s
web site. In the project’s home page you can a) create account (figure 1), b)
download viewers to access V-Alert’s virtual world (Kokua, Singularity and Firestorm)
c) visit V-Alerts websites by following links (V-Alert Project & V-Alert@Facebook).
Figure 1: V-Alert Home Page
Step 2. Figure 2 illustrates the page that appears when following the “Create
Account” link. It is recommended to fill out the form entirely. It is advised to use a
single word for first and last name. At this page you can choose your avatar (inside
the virtual world you will be able to completely change his appearance).
1
Figure 2: Create new account
The viewers that have been chosen are either Kokua or Firestorm (they have very
similar environment and are easy to use). The viewer’s settings are preconfigured for
the testing processes in a way someone to fully exploit the facilities of the
implemented virtual world.
Figure 3 illustrates Firestorm’s login page, where you insert the username and
password that have been administered (at the project’s create account page). You
have the option to store your password and to choose the place to log in into the
world. The Grid has been preconfigured and is V-Alert’s Mainland.
Figure 3: Firestorm’s login page
2
By selecting Log In your avatar is landed into V-Alerts initial region (Figure 4). The
main aim is to familiarize with the avatar movements and the camera control. You
can control your avatar movement and the camera either using the keyboard or the
mouse.
Figure 4: Kokua’s Initial Region
Try to investigate the initial region by moving around your avatar. Maybe the easiest
way to move around is to use keyboard’s arrow keys. The movement modes are:
walk, run and fly. The default mode is walk the other options are available when
clicking the button illustrated at figure 5.
Figure 5: Walk/Run/FLy
3
Analytically, the keyboard movement controls and the steps needed to move your
avatar using your mouse are illustrated at Figure 6.
Figure 6: Movement Controls using the Keyboard
There is the option to move your avatar using the mouse. First, you can left click
your avatar to guide its direction, while using the arrow keys or WASD to walk.
To move around the virtual world and explore all the items of the world you need to
handle the camera. The key button is “ALT” as illustrated at Figures 7 and 8.
4
Figure 7: Camera Controls using the keyboard
Figure 8: Camera Controls using your mouse
Resetting Camera
•
To return your camera to your preferred position, press Esc.
5
•
If you find that your camera is zoomed in or out too far, use Ctrl-9 to reset
the zoom level.
At Figure 9 some keyboard shortcuts for the avatar control are illustrated.
Figure 9: Avatar Menu Controls
PART II. Discover the V-Alert Initial Region
The area you are landed after logging through Firestorm or Kokua to the V-Alert
Mainland is the V-Alert’s initial region. Figure 10 illustrates the place that the avatar
is landed.
6
Figure 10: Avatar Landed into V-Alert Mainland
The first step that the user has to do is to register in Moodle (Figure 11). The avatar
interacts with any object inside the world by clicking the mouse into it. To observe
the object and read all label the avatar’s position and camera need to be properly
configured.
Figure 11: Moodle Registration
7
By interacting with the Registration Booth (Figure 11) the user is transmitted to a
web page where someone by following instructions can register to Moodle (Figure
12).
Figure 12: Moodle Registration
At the registration page (Figure 13) please try to give your real personal information
since the implemented recommender system that the project uses suggests the
educational material or the “help” given through the game depending upon this
information.
When you finish the registration to Moodle, touch Registration Booth (Figure 11)
again to Login at Moodle’s site and enrol your avatar to the course.
8
Figure 13: Moodle Registration
The second object that the avatar meets in the initial area of V-Alert is a stand with
images (illustrated at Figure 14). By interacting with any of the images (by clicking
the mouse) the avatar is teleported to the illustrated picture (i.e. the Information
Room). Another way to teleport to specific regions is to use the map of the viewer.
The “map” button is located at Firestorm’s bas as shown at Figure 15. By clicking the
map a screen similar to figure 16 appears at the viewer and by clicking with the
mouse at an area of the map, our avatar is automatically teleported. Figure 16, also
shows other useful buttons, such as Nearby Chat (useful to depict history),
Conversation button (to communicate through chat with other users), Moving
Modes and Camera Control.
9
Figure 14: Teleporting to different areas
Figure 15: Firestorm’s bar – Activate MAP of the world
Figure 16: Using the MAP
10
One button that probably all users will use is the Inventory Button, also located at
Firestorm’s bar.
Figure 17: Inventory Button
The inventory is the place where all the avatar’s belongings are stored for example
notecards as illustrated at Figure 18 or Landmarks which are areas that the Avatar
can teleport to.
Figure 18: View of the inventory showing the Notecards
Moving around to the initial region of the V-Alert gives you the opportunity to
familiarize with the avatar’s movements, camera control and help users interact with
the world’s objects. To get teleported to the “Phishing Scenario” please find the
object illustrated at Figure 19.
11
Figure 19: Teleport to Phishing Area
We hope that you enjoy your stay at the World and become wiser concerning
Internet Security issues.
12
PART III. Additional information
The following is a list of recommended tutorials:
Moving and Viewing
Moving and Flying: http://www.youtube.com/watch?v=EK2bczvyHoM
Advanced movement control: http://www.youtube.com/watch?v=bL877z9uNrs
The mini-map: http://www.youtube.com/watch?v=zmEeVrX-qMs
The world map: http://www.youtube.com/watch?v=gpOYwHT7Xag
Teleporting: http://www.youtube.com/watch?v=HL5aqEERlrI
Camera Control: http://www.youtube.com/watch?v=1gDD13njjCE
Interaction with others
Chat: http://www.youtube.com/watch?v=thBdLhXkzEQ&feature=channel
13