1
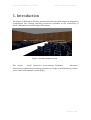
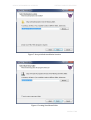
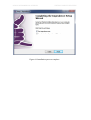
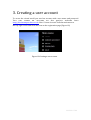
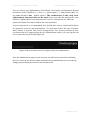
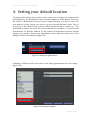
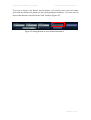
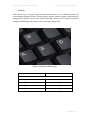
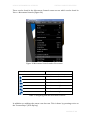
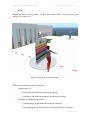
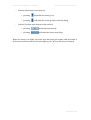
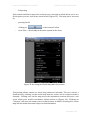
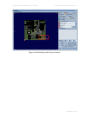
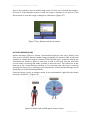
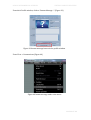
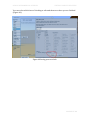
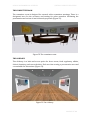
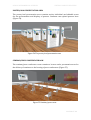
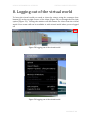
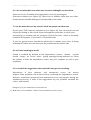
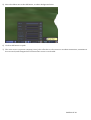
SCHOOL OF BIOMEDICAL SCIENCES
VIRTUAL CAMPUS USER GUIDE
School of Biomedical Sciences
Virtual Campus
User Guide
PAGE 1 OF 44
SCHOOL OF BIOMEDICAL SCIENCES
VIRTUAL CAMPUS USER GUIDE
CONTENTS
1.
INTRODUCTION AND OVERVIEW OF THE PROJECT
Page 3
2.
SOFTWARE INSTALLATION
Page 4
3.
CREATING AN ACCOUNT
Page 13
4.
SETTING YOUR DEFAULT LOCATION
Page 15
5.
NAVIGATING & COMMUNICATING
Page 18
6.
EDITING THE AVATARS APPEARANCE
Page 34
7.
THE BIOSIM VIRTUAL CAMPUS FEATURES
Page 36
8.
LOGGING OUT OF THE VIRTUAL WORLD
Page 40
9.
FAQ
Page 41
10.
TROUBLESHOOTING
Page 42
11.
THINGS TO TRY IF YOU CANNOT SPEAK IN VIRTUAL WORLD
PAGE 2 OF 44
SCHOOL OF BIOMEDICAL SCIENCES
VIRTUAL CAMPUS USER GUIDE
1. Introduction
The School of Biomedical Sciences virtual world/virtual world campus is designed to
complement the existing teaching resources available in the University of
Ulster’s Blackboard virtual learning environment.
Figure 1 Virtual committee room
The virtual
world immersive environment facilitates
advanced
interaction/communications among students in a range of simulations e.g. virtual
court rooms and committee areas (Fig 1).
PAGE 3 OF 44
SCHOOL OF BIOMEDICAL SCIENCES
VIRTUAL CAMPUS USER GUIDE
2. Installing the necessary software
A virtual world is an advanced 3D environment which facilitates a high level of
interaction and communication among users. To access the virtual world you need a
software client or viewer. If you do not already have this installed the section will
guide you through this process.
The Imprudence Virtual World Client Software Viewer
The first thing you need to do is install the client software. There are a range of
virtual world clients available but for this project we are using a free open source
client called the “Imprudence viewer”. When installed and configured correctly
this software will allow you to connect to and enter the virtual world and navigate
around it. The Imprudence client is available for download from the download
section (Figure 2) on the project website here at this web address
http://biosimcampus.ulster.ac.uk.
Figure 2 Downloading the Imprudence client
By clicking the Software Client link you will be redirected to the Imprudence
Download page. Different client versions are available at the top of this Download
page (Figure 3). Always use a stable version.
PAGE 4 OF 44
SCHOOL OF BIOMEDICAL SCIENCES
VIRTUAL CAMPUS USER GUIDE
Figure 3 Choosing the correct viewer
Click the corresponding link and the software will be downloaded to your desktop.
Once the Imprudence client has been downloaded to your computer, double-click on
it to launch the installation wizard and follow the instructions (Figures 4 - 11).
Unless otherwise necessary please follow the default settings.
Figure 4 Installing the Imprudence client
PAGE 5 OF 44
SCHOOL OF BIOMEDICAL SCIENCES
VIRTUAL CAMPUS USER GUIDE
Figure 5 Accept default installation location
Figure 6 Creating Start Menu folder
PAGE 6 OF 44
SCHOOL OF BIOMEDICAL SCIENCES
VIRTUAL CAMPUS USER GUIDE
Figure 7 Creating additional tasks
Figure 8 Starting installation
PAGE 7 OF 44
SCHOOL OF BIOMEDICAL SCIENCES
VIRTUAL CAMPUS USER GUIDE
Figure 9 Client will install the necessary files
Figure 10 Important information
PAGE 8 OF 44
SCHOOL OF BIOMEDICAL SCIENCES
VIRTUAL CAMPUS USER GUIDE
Figure 11 Installation process complete
3. Creating a user account
To access the virtual world you need an account with a user name and password.
You can create an account on the project website here
http://biosimcampus.ulster.ac.uk. Select “Create Account” from the main menu at
the top-right corner and fill in the form on the registration page (Figure 18).
Figure 18 Creating a user account
PAGE 13 OF 44
SCHOOL OF BIOMEDICAL SCIENCES
VIRTUAL CAMPUS USER GUIDE
You can choose any alphanumeric First Name, Last Name and Password. Special
characters such as hyphens ( - ), dots ( . ), apostrophes ( ‘ ), ampersands ( & ), etc,
are not allowed, nor blank spaces. The underscore is the only nonalphanumeric character that can be used. Please note that the password is case
sensitive (‘MyPassWord’ and ‘mypassword’ will be interpreted as different
passwords) while First and Last Name are case insensitive.
A secure password is recommended. You should also enter a valid email address
for password recovery and notifications. You can then choose the type of avatar:
male, female or neutral. This can be changed later. For security reasons all user
accounts need to be approved by the site administrator before you can log into the
site or enter the virtual world (Figure 20).
Figure 20 New accounts need to be approved by the administrator
Once the administrator approves the account, you will receive an email confirming
this. You can now use the user name and password to administrate your account e.g.
change password and gain access to the virtual world.
PAGE 14 OF 44
SCHOOL OF BIOMEDICAL SCIENCES
VIRTUAL CAMPUS USER GUIDE
4. Setting your default location
The Imprudence client can be used to enter and access a number of virtual worlds
and simulators. The Biomedical Sciences virtual campus is called Biosim. To access
the School of Biomedical Sciences Virtual Campus (Biosim) you need to enter the
web address of the region you wish to go into the Imprudence client. This is
necessary as the client needs to know which virtual world to connect to. The
Imprudence viewer can store the access details for a number of virtual world
destinations. To add the address for the School of Biomedical Sciences Virtual
Campus you need to launch the Imprudence client and then select the “Grid
Manager” button on the bottom (Figure 21).
Figure 21 Setting the grid address
Clicking on “Add New Grid” will create a new empty grid template for a new entry
(Figure 22).
Figure 22 New grid template
PAGE 15 OF 44
SCHOOL OF BIOMEDICAL SCIENCES
VIRTUAL CAMPUS USER GUIDE
To connect to the School of Biomedical Sciences virtual campus (Biosim) you need
to enter the following information into the required fields (Figure 23).
-
Grid name: Biosim
-
Login URI: http://biosimcampus.ulster.ac.uk:9000
Figure 23 Configuring the Imprudence client
You need to save the new grid information by clicking on “Apply” or “Ok”. Biosim will
be automatically added to the list of grids on the left (Figure 24)
Figure 24 Biosim added to the grid list
PAGE 16 OF 44
SCHOOL OF BIOMEDICAL SCIENCES
VIRTUAL CAMPUS USER GUIDE
To access or login to the Biosim virtual campus you need to enter your user name
(first and last name) and password into the appropriate windows. You also need to
ensure that Biosim is selected in the “Grid” window (Figure 25).
Figure 25 Setting Biosim as your default destination
PAGE 17 OF 44
SCHOOL OF BIOMEDICAL SCIENCES
VIRTUAL CAMPUS USER GUIDE
5. Navigating & Communicating
BEFORE STARTING:
If you have correctly installed the voice client and your microphone is working
then you should have a white dot above your head, and green sound waves will
emit when you start to speak (see Figures 42 and 43 in the “Chat Voice” section”).
a. If there is no white dot then it means voice isn’t working properly
b. Try relauncing the viewer using the Imprudence launcher located directly
in the program’s folder and not the shortcut on the desktop.
b. If there are no sound waves your microphone is either not working or not
enabled. Voice can be enabled/disabled from either the Preferences
window (ctrl + p to open it) or the Talk button on the bottom-right corner
of the viewer.
To check your microphone is working run the program ‘Sound Recorder’ which is
normally located in All Programs -> Accessories -> Sound Recorder.
PAGE 18 OF 44
SCHOOL OF BIOMEDICAL SCIENCES
VIRTUAL CAMPUS USER GUIDE
NAVIGATING
When you first enter the virtual world, the avatar (or character) will appear in the
middle of the BioSim virtual campus (Figure 26).
Figure 26 Entering the virtual campus
Before you start to explore the environment you need to spend some time learning
how to navigate in the virtual world using the basic navigation controls e.g.
walking.
PAGE 19 OF 44
SCHOOL OF BIOMEDICAL SCIENCES
VIRTUAL CAMPUS USER GUIDE
Walking
The easiest way to explore the virtual environment is by walking around the
environment using the avatar. There are three ways to make an avatar walk either by
using the key board or the viewer itself. Keyboard control can be achieved by either
using the WASD (Figure 27) keys or the arrow keys (Figure 28)
Figure 27 Keyboard WASD keys
Key
Action
Pressing W
Move the avatar forward
Pressing A
Move the avatar back
Pressing S
Turn the avatar left
Pressing D
Turn the avatar right
Table 1: Navigating with the W, A, S, D keys
PAGE 20 OF 44
SCHOOL OF BIOMEDICAL SCIENCES
VIRTUAL CAMPUS USER GUIDE
Figure 28 Keyboard arrow keys
Arrow key
Action
Pressing Up
Move the avatar forward
Pressing Down
Move the avatar back
Pressing Left
Turn the avatar left
Pressing Right
Turn the avatar right
Table 2: Navigating with the arrow keys
You can also navigate/walk using the movement controls (Figure 29)
Figure 29 Movement Controls
PAGE 21 OF 44
SCHOOL OF BIOMEDICAL SCIENCES
VIRTUAL CAMPUS USER GUIDE
These can be found in the Movement Controls menu access which can be found in
View -> Movement Controls (Figure 30).
Figure 30 Movement Controls under View menu
Control
Action
Move the avatar forward
Move the avatar back
Move the avatar left
Move the avatar right
Turn the avatar left
Turn the avatar right
Table 3: Navigating with the movement controls
In addition to walking the avatar can also run. This is done by pressing twice on
the “forward keys” (W or Up key).
PAGE 22 OF 44
SCHOOL OF BIOMEDICAL SCIENCES
VIRTUAL CAMPUS USER GUIDE
Flying
Maybe the most exciting feature for first time users inside virtual worlds is the
ability to fly (Figure 31).
Figure 31 Flying in the virtual world
There are four ways to make an avatar fly:
-
with the keys E, C:
o pressing E will make the avatar fly and go up
o pressing C will make the avatar go down and stop flying
-
with the keys Page Up, Page Down:
o pressing Page Up will make the avatar fly and go up
o pressing Page Down will make the avatar go down and stop flying
PAGE 23 OF 44
SCHOOL OF BIOMEDICAL SCIENCES
-
-
VIRTUAL CAMPUS USER GUIDE
from the Movement Controls menu:
o pressing
will make the avatar go up
o pressing
will make the avatar go down and stop flying
from the Toolbar at the bottom of the window:
o pressing
will make the avatar fly
o pressing
will make the avatar stop flying
When the avatar is in flight, the same keys that make the avatar walk will make it
fly forward and back, and turn left and right e.g. the “W” key will move it forward.
PAGE 24 OF 44
SCHOOL OF BIOMEDICAL SCIENCES
VIRTUAL CAMPUS USER GUIDE
Teleporting
Each virtual world has a map of the world you are currently in which allows you to see
all the places you can visit in the virtual world (Figure 32). The map can be accessed
by
-
pressing Ctrl-M
-
clicking on
-
from View -> World Map in the menu system of the client
at the bottom Toolbar
Figure 32 Accessing the World Map under View menu
Teleporting allows avatars to travel long distances instantly. The user selects a
destination by clicking on the world map and the avatar can be teleported there
instantly. Clicking once on the map selects the destination location shown as a red
circle with exact world coordinates shown below it (Figure 33). Clicking on
“Teleport” will move the avatar travel to that location. A double click any place on the
map will also make the avatar teleport to that destination.
PAGE 25 OF 44
SCHOOL OF BIOMEDICAL SCIENCES
VIRTUAL CAMPUS USER GUIDE
Figure 33 World Map and Teleport button
PAGE 26 OF 44
SCHOOL OF BIOMEDICAL SCIENCES
VIRTUAL CAMPUS USER GUIDE
Communicating in the virtual world
The BioSim virtual campus allows multiple methods of communication between
users. These include public and private text chat, notecards, voice chat, your
profile, and streaming audio and video. Many of these are activated by toolbar at the
bottom of the client (Figure 34)
TEXT CHAT
The chat toolbar is activated by pressing the chat button in the bottom left corner of
the screen.
Figure 34 Chat bar disabled and enabled on the bottom Toolbar
Entering text in the Chat Text Entry Box (Figure 35) and hitting enter will display the
chat text on the screen above the box (Figure 36) if chat history is closed, or in the
history box if it is open.
Figure 35 Enter text in chat bar
Figure 36 Text displayed inside the virtual world
PAGE 27 OF 44
SCHOOL OF BIOMEDICAL SCIENCES
VIRTUAL CAMPUS USER GUIDE
Chat is also visible to anyone within range in the 3D view area. Normal chat range is
20 meters. If the Whisper button is used, the range is changed to 10 meters; if the
Shout button is used, the range is changed to 100 meters (Figure 37)
Figure 37 Say, Whisper and Shout buttons
INSTANT MESSAGES (IM)
Instant messages (IM) are private conversations between two users. While Local
Chat can be read by anyone within range (normally 20 meters), IMs work from
anywhere within the virtual campus. Each IM will get a separate tab in the
Communicate window. When a new line of text is received, the tab will flash
several times; incoming IMs make a sound to alert the user. The white box at the
bottom of the Communicate window is for entering text; this text is sent by
pressing the Enter key or clicking on the Send button. A new Instant Message can be
started by one of the following methods.
Point the mouse cursor at another avatar in the environment, right-click the mouse
and select “Send IM…” (Figure 38).
Figure 38 Profile and send IM tags in avatar’s menu
PAGE 28 OF 44
SCHOOL OF BIOMEDICAL SCIENCES
VIRTUAL CAMPUS USER GUIDE
From their Profile window, click on “Instant Message…” (Figure 39)
Figure 39 Instant message button in the profile window
From View -> Communicate (Figure 40)
Figure 40 Instant message under view menu
PAGE 29 OF 44
SCHOOL OF BIOMEDICAL SCIENCES
VIRTUAL CAMPUS USER GUIDE
Pressing Ctrl-T (Figure 41)
Figure 41 Launching the communicate window
VOICE CHAT
The BioSim virtual campus has a voice chat feature that allows users to talk to each
other. A white dot should be visible over the avatar’s head indicating that voice
communication is available (Figure 42). This dot also helps users to identify other
avatars which have voice enabled.
PAGE 30 OF 44
SCHOOL OF BIOMEDICAL SCIENCES
VIRTUAL CAMPUS USER GUIDE
Figure 42 Avatar with voice enabled with white dot appears over its head
Visible green waves around the white dot indicate that voice is being transmitted
from that avatar (Figure 43).
Figure 43 Green waves over the avatar’s head
Voice may be generally disabled the first time Imprudence is used after it was
installed. If this is the case, the “Talk” button won’t be visible (Figure 44) and voice
functionality needs to be enabled from the Voice Chat menu accessed under
Preferences. This menu can be opened by pressing CTRL + P (Figure 45)
PAGE 31 OF 44
SCHOOL OF BIOMEDICAL SCIENCES
VIRTUAL CAMPUS USER GUIDE
Figure 44 Talk button is not available
Figure 45 Enabling voice chat from Preferences
When voice chat is enabled, the “Talk” button becomes visible on the bottom-right
corner. Voice functionality can be enabled and disabled for your avatar by clicking on
the “Talk” button (Figure 46).
Figure 46 Talk button disabled and enabled
PAGE 32 OF 44
SCHOOL OF BIOMEDICAL SCIENCES
VIRTUAL CAMPUS USER GUIDE
NOTE: Imprudence is beta software, meaning that
unexpected errors can always happen. Sometimes, the process of
enabling voice from the Preferences window is not correctly
completed by the viewer, having as a result a greyed “Talk” button
which can’t be clicked, and no white dot over the avatar’s head.
Disabling and enabling voice again should fix the problem.
Within the Preferences window you will find the “Push To Talk” option. Push to
Talk mode lets you control when your voice is transmitted. When in toggle mode,
press and release the “Talk” button to switch your microphone on and off. When
not in toggle mode, the microphone is active only when the trigger is held down.
PAGE 33 OF 44
SCHOOL OF BIOMEDICAL SCIENCES
VIRTUAL CAMPUS USER GUIDE
6. Editing the avatars appearance
Your default avatar’s appearance is identical to the image below. To change the
avatars appearance e.g. facial features or the clothes it is wearing you need to right
click over your avatars body and select ‘edit appearance’ (Figure 47).
Figure 47 Editing your appearance
This brings up the “appearance” menu and from this you can change the avatars
facial features and clothes (Figure 48).
Figure 48 Editing appearance menu
PAGE 34 OF 44
SCHOOL OF BIOMEDICAL SCIENCES
VIRTUAL CAMPUS USER GUIDE
You can select which item of clothing to edit and then save when you are finished
(Figure 49).
Figure 49 Saving your new look
PAGE 35 OF 44
SCHOOL OF BIOMEDICAL SCIENCES
VIRTUAL CAMPUS USER GUIDE
7. Biosim virtual campus features
There are seven buildings on the Biosim virtual campus each with a specific
purpose and custom design.
Figure 50 Biosim virtual campus
THE COURTROOM
The court room is used for simulations/scenarios related to forensic and legal
medicine (Figure 51). The court room contains the following areas.
Judge seating
Witness stand
Jury seating
Clerk to the court
Defense council
Public seating
Figure 51 The court room
PAGE 36 OF 44
SCHOOL OF BIOMEDICAL SCIENCES
VIRTUAL CAMPUS USER GUIDE
THE COMMITTEE ROOM
The committee room is designed for research ethics committee meetings. There is a
designated area for the secretary and seating for other attendees facilitating the
presentation and review of mock research proposals (Figure 52).
Figure 52 The committee room
THE eLIBRARY
The eLibrary is a hub and access point for three areas, food regulatory affairs,
clinical chemistry and research ethics. Each area has seating, a presentation area and
a round table for discussions (Figure 53).
Figure 53 The eLibrary
PAGE 37 OF 44
SCHOOL OF BIOMEDICAL SCIENCES
VIRTUAL CAMPUS USER GUIDE
POSTER/ORAL PRESENTATION AREA
The poster/oral presentation area contains twelve individual and editable areas
for the presentation and display of posters. Students can upload posters here
(Figure 54).
Figure 54 The poster/oral presentation area
SEMINAR/PRESS CONFERENCE ROOM
The seminar/press conference room contains a lectern and a presentation area for
the delivery of seminars or the hosting of press conferences (Figure 55).
Figure 55 Seminar/press room
PAGE 38 OF 44
SCHOOL OF BIOMEDICAL SCIENCES
VIRTUAL CAMPUS USER GUIDE
SOCIAL CAFÉ
There is a designated social area with seven seating zones and a central bar area
for socializing (Figure 56).
Figure 56 Social area
PROBLEM BASED LEARNING AREA
The problem based learning area has three seating areas each with presentation
boards facilitating problem based learning activities and role playing (Figure 57).
Figure 57 Problem based learning area
PAGE 39 OF 44
SCHOOL OF BIOMEDICAL SCIENCES
VIRTUAL CAMPUS USER GUIDE
8. Logging out of the virtual world
To leave the virtual world you need to close the viewer using the common close
button (X) at the top-right corner of the client (Figure 58) or through the File>Quit
option (Figure 59). Closing the window will disconnect the client from the virtual
world. Your avatar will not be available in with virtual world when you are logged
off.
Figure 58 Logging out of the virtual world
Figure 59 Logging out of the virtual world
PAGE 40 OF 44
SCHOOL OF BIOMEDICAL SCIENCES
VIRTUAL CAMPUS USER GUIDE
9. FAQ
1. Will I be able to use voice once I’ve installed everything?
Not necessarily. By default, voice is disabled in Imprudence. You may need to
enable it from the Preferences window (See Figure 45)
2. How can I know if voice is enabled?
If you see both a white dot over your avatar’s head and a “Talk” button on the
bottom-right corner it means voice is enabled in the viewer.
3. Once I have voice enabled, will other users hear everything I say?
Not necessarily. With voice enabled you can switch the “Talk” button off, and your
voice will not be transmitted.
6. Do I have to enable voice every time I launch the Imprudence viewer?
No. Settings are saved, and next time you launch the Imprudence viewer they will be
as you left them the last time.
PAGE 41 OF 44
SCHOOL OF BIOMEDICAL SCIENCES
VIRTUAL CAMPUS USER GUIDE
10. Troubleshooting
1. I have just created an account for Biosim but instead of getting the
message “Your account awaits for administrator approval “ I just see again
the “Create new account” form.
If you don’t see the expected message it’s likely that one or more details don’t have
the correct format. Remember that First Name, Last Name and Password must be
alphanumeric, special characters are not allowed. The underscore is the only
special character that can be used.
2. I have just created an account for Biosim but I can’t log in.
Due to security reasons, new accounts need to be accepted by the administrator
before they become active and can be used. Contact your administrator to make
sure your account has been approved.
Also, remember that the password is case sensitive.
3. I don’t see the white dot over my avatar’s head or the “Talk” button on the
bottom-right corner.
Please see if voice is enabled in the Imprudence viewer by checking the
Preferences window (see Figure 45). When voice is disabled, both the white dot
ant the “Talk” button became invisible.
PAGE 42 OF 44
SCHOOL OF BIOMEDICAL SCIENCES
VIRTUAL CAMPUS USER GUIDE
6. I can’t see white dots over other user’s avatars although I can hear them.
Please see if voice is enabled in the Imprudence viewer by checking the
Preferences window (see Figure 45). When voice is disabled, white dots over other
avatars become invisible although it is still possible to hear them.
7. I see the white dot over my avatar’s head, but people can’t hear me.
Be sure your “Talk” button is switched on (see Figure 46). You can switch it on and
off just by clicking it. Also check if your microphone works fine; to check your
microphone is working run the program ‘Sound Recorder’ which is normally
located in All Programs -> Accessories -> Sound Recorder.
If you see green waves around the white dot, it means your voice is being
transmitted. If other user can’t hear you, the problem may be on their side.
8. I can’t hear anything in-world.
Sound is enabled by default in the Imprudence viewer, default sounds
should always be heard when typing, opening/closing windows, etc. Check
the volume of both the Imprudence viewer and your computer, as well as your
earphones.
9. I’ve tried all the suggestions above and still can’t get voice working.
Imprudence is beta software, and unexpected errors can always
happen. Some problems can be fixed just by restarting the Imprudence viewer.
However, sometimes unexpected and undetected errors may happen during the
installation process; if none of the suggestions fix your problem, uninstall the
viewer and reinstall.
Things to try if you cannot hear in virtual world:
1) Make sure voice is enabled – CTRL P, then check the box next to voice.
2) Check ‘device settings’ within this page, make sure the devices match yours and click on reconnect to voice.
3) Make sure your mike and speakers work OK, if anyone wants a set posted out, let me know. In windows use ‘sound
recorder’, to test your mike and speakers. Install your mike/speaker before you launch imprudence.
4) If everything is working you will be able to click on the talk button:
5) Move the sliders next to the talk button, to reduce background noise.
6) Click on talk button to speak.
7) The voice server is a private company (vivox), who offer this as a free service to academic institutions, sometimes it
does not work, and I imagine this is because their server is overloaded.
PAGE 44 OF 44