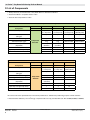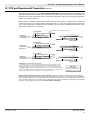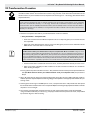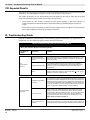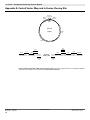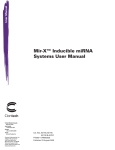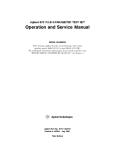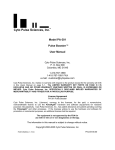
1
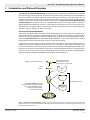
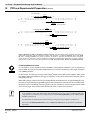
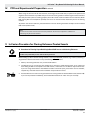
User Manual
In-FusionTM Dry-Down
PCR Cloning Kit
User Manual
United States/Canada
800.662.2566
Asia Pacific
+1.650.919.7300
Europe
+33.(0)1.3904.6880
Japan
+81.(0)77.543.6116
Clontech Laboratories, Inc.
A Takara Bio Company
1290 Terra Bella Ave.
Mountain View, CA 94043
Technical Support (US)
E-mail: [email protected]
www.clontech.com
Cat. Nos. 639602, 639604,
639605, 639606, 639607,
639608 & 639609
PT3941-1 (PR9Z3434)
Published January 2010
In-Fusion™ Dry-Down PCR Cloning Kit User Manual
Table of Contents
I. Introduction and Protocol Overview...................................................................................... 3
II. List of Components................................................................................................................. 6
III. Additional Materials Required................................................................................................ 7
IV. PCR and Experimental Preparation........................................................................................ 8
A. Preparation of Linearized Vector by Restriction Digestion................................................................................... 8
B. PCR Primer Design.................................................................................................................. ................8
C. PCR Amplification of Insert...................................................................................................................................10
D. Control Reaction................................................................................................................................. ....................11
V. In-Fusion Procedure for Cloning Enhancer-Treated Inserts................................................ 11
A. Procedure for Treating Unpurified Single-Band PCR Inserts with Cloning Enhancer.......................................11
B. In-Fusion Cloning Procedure for Cloning Enhancer-Treated Inserts.................................................................12
VI. In-Fusion Procedure for Gel- & Spin-Column-Purified PCR Inserts.................................... 13
A. Procedure for Spin-Column Purification of Multiple- and Single-Band PCR Inserts.......................................13
B. In-Fusion Cloning Procedure for Gel- & Spin Column-Purified PCR Inserts....................................................13
VII.Transformation Procedure..................................................................................................... 15
VIII. Expected Results................................................................................................................... 16
IX. Troubleshooting Guide.......................................................................................................... 16
X. References.............................................................................................................................. 17
Appendix A: Control Vector Map and In-Fusion Cloning Site................................................... 18
List of Figures
Figure 1. The In-Fusion Cloning Method.............................................................................................................................. 3
Figure 2. Flow Chart of the In-Fusion Dry-Down PCR Cloning Kit Protocols.................................................................... 4
Figure 3. Universal Primer Design for the In-Fusion System............................................................................................. 9
Figure 4. Examples of primers designed for In-Fusion cloning....................................................................................... 10
Figure 5. pUC19 Linearized Vector Map & In-Fusion Cloning Site................................................................................... 18
List of Tables
Table I. Recommended Nanograms of Vector per In-Fusion Reaction............................................................................ 12
Table II. Recommended Microliters of Cloning Enhancer-Treated Insert per In-Fusion Reaction................................. 12
Table III. Recommended In-Fusion Reactions for Gel- & Spin Column-Purified Inserts................................................ 13
Table IV. Troubleshooting Guide for In-Fusion Experiments............................................................................................ 16
Contact Us For Assistance
Customer Service/Ordering:
Technical Support:
Telephone: 800.662.2566 (toll-free)
Telephone: 800.662.2566 (toll-free)
Fax: 800.424.1350 (toll-free)
Fax: 650.424.1064
Web: www.clontech.com
Web: www.clontech.com
E-mail: [email protected]
E-mail: [email protected]
Protocol No. PT3941-1
www.clontech.com
Version No. PR9Z3434
2
Clontech Laboratories, Inc.
A Takara Bio Company
In-Fusion™ Dry-Down PCR Cloning Kit User Manual
I. Introduction and Protocol Overview
The In-Fusion™Dry-Down PCR Cloning Kits are designed to join multiple pieces of DNA which have 15 base
pairs of homology at their linear ends. A typical use for this technology would be cloning of PCR products
into vectors without the need for restriction enzyme cleavage of the vector or insert and without the use
of ligase or blunt-end polishing. Using our proprietary In-Fusion Enzyme, this kit rapidly generates precise
constructs with inserts in the desired orientation. Furthermore, the In-Fusion Dry-Down PCR Cloning Kits
w/Cloning Enhancer allow direct use of an unpurified PCR product in the cloning reaction. In-Fusion is
high-throughput-compatible and universal—it works with any insert and any vector at any restriction site,
and allows you to disregard restriction sites within the insert. The linearized vector can be generated using
restriction enzymes (single or double cut) or by PCR.
The In-Fusion PCR Cloning Method
The In-Fusion method is simple and efficient. First, design PCR primers that have at least 15 bases of homology with sequences flanking the desired site of insertion in the cloning vector (refer to Section IV.B of
this manual). Using those primers, amplify the DNA insert by PCR. Directly treat the PCR product with our
proprietary Cloning Enhancer (Cat. Nos. 639613, 639614 & 639615), or spin column-purify. Then, combine
the PCR product with the linearized vector in the In-Fusion cloning reaction.
In general, the In-Fusion reaction consists of a simple 30 min incubation of the PCR product with the linearized cloning vector, followed by transformation into E. coli (Figure 1). Each reaction generates inserts
in the correct orientation and precise constructs without incorporation of any additional nucleotides. This
procedure can be easily automated. With many vectors, optional blue/white selection on X-Gal plates can
be used to screen out rare non-linearized vector background. The protocol works best using high-quality,
highly concentrated PCR-generated DNA fragments with minimal background.
Amplify your gene of interest
PCR
product
Gene-specific primers
with 15 bp extensions
homologous to vector ends
Any
Linearized
vector
Single-tube protocol
The In-Fusion Enzyme creates
single-stranded regions at the ends
of the vector and PCR product,
which are then fused due
to the 15 bp homology
Recombinant
vector
Figure 1. The In-Fusion Cloning Method. During the 30 min incubation, the In-Fusion Enzyme creates single-stranded
regions at the ends of the vector and PCR product, which are then fused due to the 15 bp homology. The resulting clone
can be used to transform E. coli.
Clontech Laboratories, Inc. www.clontech.com
A Takara Bio Company
Protocol No. PT3941-1
Version No. PR9Z3434
3
In-Fusion™ Dry-Down PCR Cloning Kit User Manual
I.
Introduction and Protocol Overview continued
Generate a linearized vector
Design gene-specific primers with 15 bp extensions homologous to vector ends
15 bp
M 1
2
Amplify your gene of interest
M 1
2
15 bp
PCR product
If you obtain pure PCR product
with a single specific band,
no background
If you obtain PCR product
with nonspecific background,
isolate the target fragment
by gel extraction
Treat with DpnI
Spin-Column purify
OR
Add 2 µl of Cloning Enhancer to 5 µl of PCR product
and incubate 15 min at 37º C, 15 min at 80º C
Mix the purified PCR insert and vector
together at a 2:1 molar ratio
Determine the volume of Cloning Enhancertreated insert and linearized vector to use
in the In-Fusion reaction
Spin-Column Protocol
Cloning Enhancer Protocol
Treat with Cloning Enhancer
Set up the In-Fusion cloning reaction
Add the following to
each In-Fusion
Dry-Down pellet:
x μl Vector
x μl Insert
x μl dH2O
15 min at 37º C
15 min at 50º C
10 μl Total Volume
Incubate cloning reaction
x
x
Recombinant
vector
Dilute reaction with TE Buffer
Transform competent E. coli with the diluted reaction mixture
Screen clones
Figure 2. Flow Chart of the In-Fusion™ Dry-Down PCR Cloning Kit Protocols
Protocol No. PT3941-1
www.clontech.com
Version No. PR9Z3434
4
Clontech Laboratories, Inc.
A Takara Bio Company
In-Fusion™ Dry-Down PCR Cloning Kit User Manual
I.
Introduction and Protocol Overview continued
The In-Fusion Enzyme promotes single-strand annealing reactions (SSA), and in this manner can assemble
DNA molecules that share short sequence overlaps (or homologies) at their ends, such as a PCR amplified
insert and a linearized vector. When the In-Fusion Enzyme is incubated with double stranded inserts and
a linearized vector in the provided buffer, the enzyme’s exonuclease activity excises nucleotides from the
3’ ends of the molecules, exposing the overlapping sequence. The exposed overlapping ends are free to
anneal (SSA), forming non-covalently joined molecules that undergo final repair within the target E.coli
strain. The resulting product is an assembled vector and insert. The reaction is seamless, adding no more
bases than you chose to have present.
If you generate nonspecific PCR products that contain additional unwanted background bands, it is still
possible to clone using the In-Fusion method. Rather than using the Cloning Enhancer, nonspecific PCR
inserts should be gel purified and then used directly in an In-Fusion cloning reaction. When gel-purifying an
insert, DO NOT use the Cloning Enhancer treatment. Figure 2 illustrates the differences in the experimental
workflow required for cloning pure, clean PCR inserts versus PCR inserts containing nonspecific products.
You can choose to spin column-purify PCR products if you would rather not use the Cloning Enhancer.
The In-Fusion method does not require the presence of (nor is it affected by) A-overhangs, so you can use
any thermostable polymerase for amplification, including proofreading enzymes. To obtain high yields
of small fragments (< 4 kb), we recommend using the Advantage® HF 2 enzyme provided in Clontech’s
Advantage HF 2 PCR Kits (Cat. Nos. 639123 & 639124). For accurate, efficient production of long PCR inserts
(>1 kb), we recommend using our Advantage HD Polymerase Mix (Cat. No. 639241).
The In-Fusion Dry-Down PCR Cloning Kit Formats
The In-Fusion Dry-Down PCR Cloning Kits provide reaction components in a lyophilized format for maximal
convenience and flexibility. All of the necessary cloning reaction materials, except the vector and the PCR
insert, are supplied in the reaction tube, thus reducing the variability between reactions. Simply pre-treat
your PCR insert with the Cloning Enhancer or gel purify, add 10 μl of distilled water containing the vector
and insert to the dry-down reaction tube and incubate for 30 minutes. For added convenience, the dry-down
kits are available in multiple sizes. For high-throughput cloning, a 96-well format is available. Always store
any unused dry-down reaction tubes in a desiccator at 20°–22°C.
Cloning Enhancer is included with catalog numbers 639607, 639608 & 639609, and is also sold separately in
25, 50 & 100 rxn sizes (Cat. Nos. 639613, 639614 & 639615, respectively). Some of our In-Fusion Dry-Down
PCR Cloning Kits include Fusion-Blue™ Competent Cells (Cat. Nos. 639602, 639604 & 639609). We also offer
cell-free kits for users who wish to supply their own competent cells. The In-Fusion Dry-Down PCR Cloning
Kits are available in 8 reaction, 24 reaction & 96 reaction sizes, with or without Cloning Enhancer or Competent Cells. Please see Section II for a list of components in each of our In-Fusion Dry-Down Kits.
Attention
Note:
Cutting wells from the 96-well plate may disturb the seals on remaining wells, thereby damaging the efficacy of the
dry-down pellets. If you do not plan on using all 96 pellets in the 96 rxn kit at one time, we recommend that you
instead purchase one of the 8 rxn or 24 rxn kits.
Clontech Laboratories, Inc. www.clontech.com
A Takara Bio Company
Protocol No. PT3941-1
Version No. PR9Z3434
5
In-Fusion™ Dry-Down PCR Cloning Kit User Manual
II. List of Components
• Always store any unused In-Fusion™ Dry-Down Mix in a desiccator at 20–22°C.
• Store Fusion-Blue™ Competent Cells at –70°C.
• Store all other components at –20°C.
In-Fusion™ Dry-Down PCR Cloning Kits
Cat. Nos.
639602
639604
639606
649605
Rxns.
8 rxns
24 rxns
24 rxns
96 rxns
In-Fusion Dry-Down Mix
8 pellets
(1 x strip of 8)
24 pellets
(3 x strip of 8)
24 pellets
(3 x strip of 8)
96 pellets
(96-well plate)
pUC19 Control Vector, linearized*
(50 ng/μl)
5 μl
5 μl
5 μl
5 μl
10 μl
10 μl
10 μl
10 μl
2 ng
4 ng
Not Included
Not Included
500 μl
(10 tubes)
1250 μl
(25 tubes)
Not Included
Not Included
4 ml (2 tubes)
12 ml (6 tubes)
Not Included
Not Included
Components
2 kb Control Insert (40 ng/μl)
Test Plasmid (0.2 ng/μl)
Fusion-Blue Competent Cells**
(50 μl/tube)
Component
Amounts
SOC Medium (2 ml/tube)
Optically Clear PCR Cap Strips
1
3
3
12
Microseal® A Film
Not Included
Not Included
Not Included
1
In-Fusion™ Dry-Down PCR Cloning Kits w/Cloning Enhancer
Cat. Nos.
Components
639607
639608
8 rxns
24 rxns
96 rxns
In-Fusion Dry-Down Mix
8 pellets
(1 x strip of 8)
24 pellets
(3 x strip of 8)
96 pellets
(96-well plate)
pUC19 Control Vector, linearized*
(50 ng/μl)
5 μl
5 μl
5 μl
2 kb Control Insert (40 ng/μl)
Rxns.
639609
10 μl
10 μl
10 μl
50 μl (1 tube)
50 μl (1 tube)
200 μl (4 tubes)
500 μl
(10 tubes)
Not Included
Not Included
SOC Medium (2 ml/tube)
4 ml (2 tubes)
Not Included
Not Included
Optically Clear PCR Cap Strips
1
3
12
Microseal A Film
Not Included
Not Included
1
Cloning Enhancer (50 μl/tube)
Fusion-Blue Competent Cells**
(50 μl/tube)
®
Component
Amounts
*The amount of vector provided in the In-Fusion Dry-Down Kits is sufficient for performing only the control reactions.
**Transformation efficiency >1.0 x 10⁸ cfu/µg. Competent cells are only provided with (Cat. Nos. 639602, 639604, & 639609).
Protocol No. PT3941-1
www.clontech.com
Version No. PR9Z3434
6
Clontech Laboratories, Inc.
A Takara Bio Company
In-Fusion™ Dry-Down PCR Cloning Kit User Manual
III. Additional Materials Required
The following materials are required but not supplied:
• TE Buffer (pH 8.0) required for diluting In-Fusion reaction prior to transformation
10 mM Tris-HCl
1 mM EDTA
• Sodium Acetate (3 M) required only if concentrating DNA by precipitation
• Glycogen (20 µg/µl) required only if concentrating DNA by precipitation
• Ampicillin (100 mg/ml stock) required for the plating of the In-Fusion control reaction
• LB (Luria-Bertani) medium (pH 7.0)
1.0% Bacto-tryptone
0.5% Yeast extract 1.0% NaCl for 1 liter
10g
5g
10g
Dissolve ingredients in 950 ml of deionized H2O. Adjust the pH to 7.0 with 5 M NaOH and bring the volume up to 1 L. Autoclave on liquid cycle for 20 min at 15 lb/in2. Store at room temperature or at 4°C.
• LB/antibiotic plates
Prepare LB medium as above, but add 15 g/L of agar before autoclaving. Autoclave on liquid cycle for 20 min at 15 lb/in2. Let
cool to ~55°C, add antibiotic (e.g., 100 µg/ml of ampicillin), and pour into 10 cm plates. After the plates harden, then invert
and store at 4°C.
• SOC medium
2%
0.5%
10 mM
2.5mM
10 mM
20 mM
Tryptone
Yeast Extract
NaCl
KCl
MgCl2•6H2O
glucose
1. For 1 liter, dissolve 20 g of tryptone, 5 g of yeast extract, and 0.5 g of NaCl in 950 ml of deionized H 2O.
2. Prepare a 250 mM KCl solution by dissolving 1.86 g of KCl in deionized H2O for a total volume of 100 ml. Add 10 ml of
this stock KCl solution to the solution prepared in Step 1.
3. Adjust pH to 7.0 with 5 M NaOH, then bring the volume to 980 ml with deionized H2O.
4. Prepare a 1 M solution of MgCl2 by dissolving 20.33 g of MgCl2•6H2O in deionized H2O for a total volume of 100 ml.
5. Autoclave both solutions on liquid cycle at 15 lbs/in2 for 20 min.
6. Meanwhile, make a 2 M solution of glucose by dissolving 36 g of glucose in deionized H2O for a total volume of 100 ml.
Filter-sterilize this solution.
7. Let the autoclaved solutions cool to about 55°C, then add 10 ml of the filter-sterilized 2 M glucose solution and 10 ml of
1 M MgCl2. Store at room temperature or 4°C.
• NucleoSpin® Extract II Kit (Cat. Nos. 740609.50 & 740609.250) PCR products do not need to be purified for successful In-Fusion
cloning. If, however, multiple nonspecific bands are observed (See Section IV.C), we recommend that you first gel-purify your
fragment of interest using the NucleoSpin Extract II Kit (Section VI.B).This kit can also be used to purify your linearized vector.
• Cloning Enhancer (Cat. Nos. 639613, 639614 & 639615) [Optional]
•Competent Cells
Some of the In-Fusion Dry-Down PCR Cloning Kits include Fusion-Blue™ Competent Cells. If your In-Fusion Dry-Down Kit does
not include competent cells, we strongly recommend the use of competent cells with a transformation efficiency >1 x 10⁸ cfu/µg.
Clontech sells Fusion-Blue (chemically) Competent Cells separately in 24-transformation (Cat. No. 636700) and 96-transformation (Cat. No. 636758) formats. Clontech also offers Stellar™ Electrocompetent Cells (Cat. No. 636765) for cloning. Both
Fusion-Blue and Stellar cell lines offer a transformation efficiency >1 x10⁸ cfu/µg.
Clontech Laboratories, Inc. www.clontech.com
A Takara Bio Company
Protocol No. PT3941-1
Version No. PR9Z3434
7
In-Fusion™ Dry-Down PCR Cloning Kit User Manual
IV. PCR and Experimental Preparation
PLEASE READ ENTIRE PROTOCOL BEFORE STARTING.
A. Preparation of Linearized Vector by Restriction Digestion
Protocol
To achieve a successful In-Fusion reaction, you must first generate a very pure linearized vector (with very
low background of uncut vector present). Restriction enzymes will generate different amounts of background,
due to differences in cutting efficiency. Generally speaking, two enzymes cut better than any single enzyme.
Efficiency of digestion will always be better if the restriction enzyme sites are as far apart as possible. In addition, increasing the enzyme digestion time and digestion reaction volume will reduce the background.
Prepare a linearized vector as follows.
1. We recommend cutting the vector with two different enzymes to reduce background, unless there is only
one site available for cloning.
2 µg Vector
10 µl 10X Enzyme buffer
10–20 U Restriction enzyme*
X µl Deionized water (to 100 µl)
100 µl Total Volume
We recommend adding half the units of enzyme (2.5–5 U/µg) at the beginning of the reaction. Add the
remaining enzyme units approximately 30 min later.
*
2. Incubate your restriction digest as directed by the restriction enzyme supplier. For many enzymes,
incubation from 3 hours to overnight can increase linearization and reduce background.
3. After digestion, purify the linearized vector using any available PCR purification kit. We recommend using
the NucleoSpin® Extract II Kit (Cat. Nos. 740609.50 & 740609.250).
Note:
To ensure that background is low in a critical cloning experiment, first gel-purify the vector.
4.
[Control] Check the background of your vector by transforming 5–10 ng of the linearized and purified vector into
Fusion-Blue Competent Cells (See Transformation Procedure, Section VII).
If the background is high, continue digesting the vector for a longer time after the addition of more restriction enzyme(s). Incubate 2 hours to overnight. Gel-purify the remainder of the vector and transform
again.
B. PCR Primer Design
Protocol
Primer design and quality are critical for the success of the In-Fusion reaction. You can join two or more
fragments, e.g. vector and insert (or multiple inserts), as long as they share 15 bases of homology at each
end (Figure 3 outlines the guidelines for primer design; Figure 4 gives specific examples of primers).
Therefore, design PCR primers that will generate the homologous region in the PCR product during the
amplification.
Every In-Fusion primer must serve two purposes: it should contain an “In-Fusion-Ready” homologous
sequence and be gene specific. The 15 base pairs towards the 5’ end of the primer must match the 15 base
pairs at the linear end of the DNA fragment to which it will be joined. The 3’ end of the primer is the gene
specific portion of the primer. The 3’ end of the primer must have a melting temperature (Tm) suitable for
PCR. If you are using software to design your primers, please note that the Tm should be calculated based
upon the 3’ (gene-specific) end of the primer, and NOT the entire primer. If the calculated Tm is too low,
increase the length of the gene-specific portion of the primer until you reach a Tm of between 58º–65º C.
The Tm difference between the forward and reverse primers should be ≤ 4º C, or you will not get good
amplification.
Protocol No. PT3941-1
www.clontech.com
Version No. PR9Z3434
8
Clontech Laboratories, Inc.
A Takara Bio Company
In-Fusion™ Dry-Down PCR Cloning Kit User Manual
IV. PCR and Experimental Preparation continued
Clontech provides an online tool (at www.clontech.com/ifprimers) that simplifies the In-Fusion PCR primer
design for standard cloning reactions. Simply provide your vector sequence, the restriction enzyme(s) used
to linearize the vector (if that is the chosen method for linearization), and the primer sequence required to
amplify your region of interest.
We generally use desalted oligos in PCR reactions. However, oligo quality can depend on the vendor and
varies from lot to lot. If your oligo supply is particularly poor (i.e., has many premature termination products), or your PCR primer is longer than 45 nucleotides, you may need to use PAGE purified oligos, but in
general we find that this is unnecessary.
Forward Primer
NNNNNNNNNNNNNNN
Linearized
Vectors with
5' Overhangs
NNNNNNNNNNNNNN
15 14 13 12 11 10 9
8
7
6 5
4
3
2
1
append with your specific sequence
*
1 2
*
3
4
5
6
7 8
9 10 11 12 13 14 15
NNNNNNNNNNNNNN
NNNNNNNNNNNNNNN
Reverse Primer
Forward Primer
NNNNNNNNNNNNNNN
Linearized
Vectors with
Blunt ends
1
NNNNNNNNNNNNNNNNNN
15 14 13 12 11 10 9
8
7
6 5
4
3
2
1
*
*
2
3
4 5
6
7
8 9 10 11 12 13 14 15
NNNNNNNNNNNNNNNNNN
NNNNNNNNNNNNNNN
Reverse Primer
Forward Primer
NNNNNNNNNNNNNNN
Linearized
Vectors with
3' Overhangs
NNNNNNNNNNNNNNNNNNNNNN
15 14 13 12 11 10 9
8
7
6 5
4
3
2
1
*
1
*
2
3
4 5
6
7
8
9 10 11 12 13 14 15
NNNNNNNNNNNNNNNNNNNNNN
NNNNNNNNNNNNNNN
Reverse Primer
Guidelines for universal primer design
To determine the 15 b homology sequence to be incorporated into each
primer, start at the 5’ end of each DNA strand in the linearized vector (*).
The region of homology for a particular primer consists of bases that are
complementary to the first 15 bases at the 5’ end of a particular DNA strand.
This means that the bases complementary to 5' overhangs are included in
the primer sequence, but the bases in 3’ overhangs are not.
Brackets indicate bases
to be included in the
15 b region of homology
Figure 3. Universal Primer Design for the In-Fusion System. Successful insertion of a PCR fragment requires that the
PCR insert share 15 bases of homology with the ends of the linearized vector. This sequence homology is added to the
insert through the PCR primers. For vectors with sticky ends, bases complementary to 5’ overhangs are included in the
primer sequence; bases in the 3’ overhangs are not. See Figure 4 for specific examples. An online tool is also provided
to assist in primer design and can be found at www.clontech.com/ifprimers
Clontech Laboratories, Inc. www.clontech.com
A Takara Bio Company
Protocol No. PT3941-1
Version No. PR9Z3434
9
In-Fusion™ Dry-Down PCR Cloning Kit User Manual
IV.
PCR and Experimental Preparation continued
5' Forward Primer
SalI
5'-G AAG TTA TCA GTC GAC XXX XX...-3'
5'-...ATA CAT TAT ACG AAG TTA TCA G
3'-...TAT GTA ATA TGC TTC AAT AGT CAG CT
A
vector sequence
AGC TTT CTA GAC CAT TCG TTT GGC G...-3'
AA GAT CTG GTA AGC AAA CCG C...-5'
3'-...X XXX XXT TCG AAA GAT CTG GTA-5'
HindIII
3' Reverse Primer
SmaI
5'-ACC GGA CAT ATG CCC GGG XXX...-3'
5'-...TCA GTC GAC GGT ACC GGA CAT ATG CCC
3'-...AGT CAG CTG CCA TGG CCT GTA TAC GGG
B
GGG AAT TCC TGC AGG ATC CGC T...-3'
CCC TTA AGG ACG TCC TAG GCG A...-5'
3'-...XXX GGG CCC TTA AGG ACG TCC-5'
SmaI
KpnI
5'-AG TTA TCA GTC GAC GGT ACC XXX...-3'
5'-...CAT TAT ACG AAG TTA TCA GTC GAC GGT AC
3'-...GTA ATA TGC TTC AAT AGT CAG CTG C
C
C GGA CAT ATG CCC GGG AAT T...-3'
CA TGG CCT GTA TAC GGG CCC TTA A...-5'
3'-...XXX CCA TGG CCT GTA TAC GGG CC-5'
KpnI
Figure 4. Examples of primers designed for In-Fusion cloning. The above figure shows examples of primers designed with recognition sites for restriction enzymes that generate: 5’ overhangs (Panel A), blunt ends (Panel
B), and 3’ overhangs (Panel C). The primer sequences are shown in bold. The Xs represent bases corresponding to the gene or sequence of interest. Additional nucleotides (indicated with a black box) have been added to
each primer in order to reconstruct the restriction sites. They are not part of the 15 bases of sequence homology.
C. PCR Amplification of Insert
Protocol
It is important to use only 10–100 ng of plasmid DNA as a PCR template. However, if you are amplifying a
pool of cDNA, the amount of template DNA depends on the relative abundance of the target message in
your mRNA population.
For best results, we recommend using our Advantage® HD Polymerase Mix (Cat. No. 639241), which offers
high-fidelity, efficient amplification of long gene segments (>1 kb), and an automatic hot start that reduces
nonspecific products.
When PCR cycling is complete, analyze your PCR product by electrophoresis on an agarose/EtBr gel to confirm that you have obtained a single DNA fragment and to estimate the concentration of your PCR product.
Quantify the amount of DNA by measuring against a known standard or molecular weight marker ladder
run on the same gel. The linearized vector provided in the kit is useful for this purpose.
Attention
IMPORTANT:
•
If you generate a single, clean PCR product with little background, you can purify your PCR-amplified insert
using spin columns (see Section VI), or simply treat your insert with Cloning Enhancer (Cat. Nos. 639613, 639614
& 639615; see Section V).
•
If multiple bands are observed, we recommend that you first gel-purify your fragment (see Section VI).
•
We recommend NucleoSpin® Extract II (Cat. Nos. 740609.50 & 740609.250) for gel purification of PCR-amplified inserts.
Protocol No. PT3941-1
www.clontech.com
Version No. PR9Z3434
10
Clontech Laboratories, Inc.
A Takara Bio Company
In-Fusion™ Dry-Down PCR Cloning Kit User Manual
IV.
PCR and Experimental Preparation continued
D. Control Reactions
When using the In-Fusion kit for the first time, we strongly recommend that you perform the positive and
negative control reactions in parallel with your In-Fusion cloning reaction. Performing the control reactions
will verify that the system is working properly. The 2 kb Control Insert included in the In-Fusion Dry-Down
PCR Cloning Kits has already been purified, so there is no need for further treatment prior to the cloning
reaction.
To perform the control reactions, proceed with the In-Fusion Cloning Procedure for Spin Column-Purified
PCR Inserts (Section VI.A).
Note:
The amount of control vector and control insert provided in the In-Fusion Liquid Kits is sufficient for
performing only the control reactions.
V. In-Fusion Procedure for Cloning Enhancer-Treated Inserts
A. Procedure for Treating Unpurified Single-Band PCR Inserts with Cloning Enhancer
Protocol
IMPORTANT:
DO NOT treat purified PCR products with the Cloning Enhancer.
Before setting up the In-Fusion cloning reaction, treat unpurified PCR products (e.g. inserts) containing a
single band of desired size without nonspecific background as follows:
1. Add 2 µl of Cloning Enhancer to 5 µl of the PCR reaction.
2. Incubate at 37°C for 15 minutes, then at 80°C for 15 minutes in a PCR thermal cycler. If you used more
than 100 ng of DNA as a template in the PCR reaction, extend the 37°C incubation step to 20 minutes.
If you are using water baths or heat blocks instead of a thermal cycler, preset them at 37°C and 80°C,
respectively, and extend each of the incubation steps to 20–25 minutes.
BREAK
3. Proceed with the In-Fusion Cloning Procedure for Cloning Enhancer-Treated PCR Inserts (Section V.B).
If you cannot proceed immediately, store treated PCR reactions at –20°C until you are ready.
Clontech Laboratories, Inc. www.clontech.com
A Takara Bio Company
Protocol No. PT3941-1
Version No. PR9Z3434
11
In-Fusion™ Dry-Down PCR Cloning Kit User Manual
V.
In-Fusion Procedure for Cloning Enhancer-Treated Inserts continued
IMPORTANT:
Before proceeding to the cloning reaction, be sure your target insert has been pretreated with the Cloning Enhancer,
as described in Section V.A. DO NOT follow this procedure if your insert has been purified.
Attention
B.In-Fusion Cloning Procedure for Cloning Enhancer-Treated Inserts
1. Use Table I to determine the final amount of linearized vector to use in your In-Fusion reaction.
Table I. Recommended nanograms of vector per in-fusion
reaction
Protocol
Vector Size
Nanograms Recommended
<4 kb
100 ng
4 to 6 kb
100 to 150 ng
6 to 10 kb
200 ng
>10 kb
Up to 400 ng
2. Use Table II to determine the final amount of Cloning Enhancer-treated PCR insert (from Section V.A) to
use in your In-Fusion reaction.
Table II. Recommended microliters of cloning enhancertreated insert per in-fusion reaction*
Insert Length
Microliters of Cloning Enhancer-Treated
Insert
<1 kb
1 µl
1 to 4 kb
1 to 2 µl
4 to 8 kb
4 µl
8 to 12 kb
7 µl
*If you have a very weak PCR product, we recommended adding more of
the Cloning Enhancer treated insert (up to 7 µl).
3. Mix the insert and vector and adjust the final volume to 10 µl using deionized H2O. The final volume must
not exceed 10 µl.
4. Set up the In-Fusion reaction:
Note:
Improved efficiency is observed for In-Fusion reactions with a total volume of vector + insert that is 5 µl or less.
Attention
a. Peel back the aluminum seal(s) from the tube(s) you plan on using and take care to avoid disturbing
the seals of the remaining tubes.
b. Add 10 µl of vector + insert DNA + H2O (from Step 3) to each In-Fusion Dry-Down pellet.
Mix well by pipetting up and down.
5. Incubate the reaction for 15 min at 37°C, followed by 15 min at 50°C, then place on ice.
6. Dilute the In-Fusion reaction mixture with 40 µl TE buffer (pH 8) and mix well.
BREAK
7. Proceed with Transformation (Section VII). If you cannot transform cells immediately, store
cloning reactions at –20°C until you are ready.
Protocol No. PT3941-1
www.clontech.com
Version No. PR9Z3434
12
Clontech Laboratories, Inc.
A Takara Bio Company
In-Fusion™ Dry-Down PCR Cloning Kit User Manual
VI. In-Fusion Procedure for Gel- & Spin Column-Purified PCR Inserts
A. Procedure for Spin-Column Purification of Multiple- and Single-Band PCR Inserts
Depending on whether your PCR reaction contains a single band of desired size, or yields multiple bands
or nonspecific background on a gel, prepare your PCR product as follows (see Figure 2):
Protocol
1. If nonspecific background or multiple bands are visible on your gel, isolate your target fragment by
gel extraction, then spin column-purify (see Step 2). If you obtain a single band of the desired size, add
1 μl of DpnI to 50 μl of the PCR reaction and incubate at 37°C for 60 min.
Note:
Gel-purified inserts do not require DpnI treatment prior to spin column purification.
2. Spin-column purify your PCR product (e.g., insert) by using a silica-based purification system, such
as NucleoSpin® Extract II Kit (Cat. Nos. 740609.50 & 740609.250). During purification, avoid nuclease
contamination and exposure of the DNA to UV light for long periods of time.
3. After spin column purification (following either DpnI treatment or gel extraction), proceed with the InFusion Cloning Procedure for Spin Column-Purified PCR Inserts (Section VI.B).
IMPORTANT:
DO NOT treat gel-purified or spin column-purified inserts with the Cloning Enhancer (Figure 2).
Attention
B.In-Fusion Cloning Procedure for Gel- & Spin Column-Purified PCR Inserts
Protocol
In general, maximum cloning efficiency is achieved when using a 2:1 molar ratio of insert:vector. Typically,
100 ng of a 4 to 5 kb linearized vector plus 50 ng of a 1 kb PCR fragment is found to work well in a 10 µl
In-Fusion reaction. Adjust the amount of your input DNA if the size of your vector or PCR fragment is different from above. Clontech provides an online tool to assist in determining the correct amount of insert and
vector to achieve a 2:1 ratio (http://bioinfo.clontech.com/infusion).
Table iII. Recommended in-fusion reactions for Gel & sPIN COLUMN-purified inserts
Rxn Component
Cloning Rxn
Negative Control
Rxn
Positive Control Rxn
PCR insert
50–200 ng
–
50 ng**
Linearized vector
100–300 ng
100 ng*
100 ng*
Deionized water
to 10 µl
to 10 µl
to 10 µl
*Use 1 µl of the 50 ng/µl solution of linearized pUC19 Control Vector included in the kit.
**Use 2 µl of the 40 ng/µl solution of 2 kb Control Insert included in the kit.
1. Mix your purified PCR insert and vector together at a 2:1 molar ratio in 10 µl of deionized H2O.
If necessary, co-precipitate your DNA as follows: Mix the vector and PCR insert together at the
correct molar ratio in a 50–100 µl volume. Add 1 µl glycogen (20 µg/µl), and 1/10 volume sodium
acetate (3 M) and mix. Then add 3 volumes of ethanol (–20°C) to precipitate, and then centrifuge at
maximum speed for 10 min at 4°C. Wash the pellet once with 70% ethanol. Air dry the pellet, and suspend
the DNA pellet in H2O to a volume of 10 µl.
Clontech Laboratories, Inc. www.clontech.com
A Takara Bio Company
Protocol No. PT3941-1
Version No. PR9Z3434
13
In-Fusion™ Dry-Down PCR Cloning Kit User Manual
VI. In-Fusion Procedure for Gel- & Spin Column-Purified PCR Inserts continued
2. Set up the In-Fusion reactions:
a. Peel back the aluminum seal(s) from the tube(s) you plan on using and take care to avoid disturbing
the seals of the remaining tubes.
b. Add 10 µl of vector + insert DNA + H2O (from Step 1) to each In-Fusion Dry-Down pellet.
Mix well by pipetting up and down.
3. Incubate the reaction for 15 min at 37°C, followed by 15 min at 50°C, then place the tube on ice.
4. Dilute the In-Fusion reaction mixture with 40 µl TE buffer (pH 8) and mix well.
BREAK
5. Proceed with Transformation (Section VII). If you cannot transform cells immediately, store cloning
reactions at –20°C until you are ready.
Protocol No. PT3941-1
www.clontech.com
Version No. PR9Z3434
14
Clontech Laboratories, Inc.
A Takara Bio Company
In-Fusion™ Dry-Down PCR Cloning Kit User Manual
VII.Transformation Procedure
Protocol
In addition to the cloning reaction, we recommend that you perform positive and negative control transformations which consist of a transformation control using a circular vector of known concentration and a
known amount of your linearized vector (Competent cells should give >1 x 10⁸ cfu/µg; See Section VIII for
Expected Results).
Note:
If your In-Fusion Dry-Down Kit does not include competent cells, we strongly recommend the use of competent
cells with a transformation efficiency >1 x 10⁸ cfu/µg. Clontech sells Fusion-Blue Competent Cells separately in
24-transformation (Cat. No. 636700) and 96-transformation (Cat. No. 636758) formats. Clontech also offers Stellar™
Electrocompetent Cells (Cat. No. 636765) for cloning. Both Fusion-Blue and Stellar cell lines offer a transformation
efficiency >1 x 10⁸ cfu/µg.
1. Transform competent cells with 2.5 µl of diluted reaction mixture as follows:
a.Using Fusion-Blue™ Competent Cells:
• Thaw one vial of frozen Fusion-Blue Competent Cells on ice. Tap tube gently to ensure that the cells
are suspended.
• Add 2.5 µl of the diluted reaction mixture to the cells. Mix gently to ensure even distribution of the
DNA solution. Leave the tube on ice for 30 min.
Note:
Attention
DO NOT add more than 5 µl of diluted reaction to 50 µl of competent cells. More is not better. Using too much
of the reaction mixture inhibits the transformation. For example, 0.5–1 µl of an undiluted In-Fusion reaction in
50 µl of cells typically yields over 1,000 colonies, while 2 µl of the same reaction will yield fewer than 100 colonies.
Since it can be difficult to pipette 1 µl accurately (e.g. if you are using “yellow tips” with a p20 pipettor), we have
suggested (Section V.C.6 and Section VI.C.4) that you dilute the In-Fusion reaction with TE buffer before performing the transformation—especially if you wish to use a small volume of competent cells (e.g. HTP cloning).
• Heat shock the cells in a water bath at 42°C for 45 sec, and then place them directly on ice for 1 min.
• After a heat shock, add 450 µl of SOC medium to the cells and then incubate at 37°C for 60 min
while shaking at 250 rpm.
b. If using other competent cells with In-Fusion™ Kits, follow the transformation protocol provided with the
cells (DO NOT add more than 5 µl of diluted reaction to 50 µl of competent cells) and proceed to
Step 3.
2. Take 1/10 of the cells (25–50 µl) from each transformation, bring the volume to 100 µl with SOC medium,
and then spread on separate LB plates containing 100 µg/ml of ampicillin or other appropriate antibiotic for your
cloning vector.
3. Centrifuge the remaining mix at 6000 rpm for 5 min, resuspend the cells in 100 µl fresh SOC and spread
the remainder of the transformation mix on a separate LB plate containing the appropriate antibiotic. Incubate
all plates at 37°C overnight.
4. The next day, pick individual isolated colonies from each experimental plate. Isolate plasmid DNA
using a standard method of your choice (e.g. miniprep).To determine the presence of insert, analyze DNA
by restriction digest or PCR screening.
Clontech Laboratories, Inc. www.clontech.com
A Takara Bio Company
Protocol No. PT3941-1
Version No. PR9Z3434
15
In-Fusion™ Dry-Down PCR Cloning Kit User Manual
VIII. Expected Results
The positive control plates typically develop several hundred white colonies when using cells with a minimum
competency of 1 x 10⁸ cfu/μg. The negative control plates should have few colonies.
The number of colonies on your experimental plates will depend on the amount and purity of the PCR
product and linearized vector used for the In-Fusion cloning reaction.
• The presence of a low number of colonies on both plates—typically, a few dozen colonies—is
indicative of either transformation with too much of the reaction, poor DNA quality, or poor primer quality.
• The presence of many (hundreds) of colonies on the negative control is indicative of contamination
with a PCR template plasmid carrying antibiotic resistance.
IX. Troubleshooting Guide
If you do not obtain the expected results, use the following guide to troubleshoot your experiment. To
confirm that your kit is working properly, perform the control reactions.
Table IV. Troubleshooting Guide for In-Fusion EXPERIMENTS
A. No or Few Colonies Obtained from Transformation
Description of
Problem
Low
transformation
efficiency
Explanation
Solution
Transformed with too
much In-Fusion reaction
mixture
Do not add more than 5 µl of diluted In-Fusion reaction (or 1 µl of
undiluted In-Fusion reaction) to 50 µl of competent cells (See Section VII for details).
Suboptimal PCR product
Repeat PCR amplification and purify product using a different
method of purification. Alternatively, perform phenol:chloroform
extraction on your original PCR product, followed by ethanol
precipitation.
Bacteria were not competent
Low DNA concentration
in reaction
Low quality DNA
fragments
Wrong molar ratio
Primer sequences are
incorrect
Check transformation efficiency. You should obtain >1 x 10⁸ cfu/µg;
otherwise use fresh competent cells.
It is imperative to obtain the highest DNA concentration possible in
your In-Fusion reaction. Either the amount of vector or the amount of
PCR fragment was too low. For Cloning Enhancer-treated inserts, we
recommend using between 100 ng and 400 ng of vector, depending
on its size (see Table I). In the case of gel-purified inserts, we recommend using between 100 and 300 ng of vector (Table III).
The 2:1 molar ratio of PCR fragment to linear vector used in the
In-Fusion protocol may not have been optimal. We recommend
using between 100 ng and 300 ng of vector for cloning gel purified
inserts. Clontech provides an online tool to assist in determining the correct amount of insert and vector to achieve a 2:1 ratio
(http://bioinfo.clontech.com/infusion).
Check primer sequences to ensure that they provide 15 bases of
homology with the region flanking the insertion site (see Section IV).
Protocol No. PT3941-1
www.clontech.com
Version No. PR9Z3434
16
Clontech Laboratories, Inc.
A Takara Bio Company
In-Fusion™ Dry-Down PCR Cloning Kit User Manual
IX. Troubleshooting Guide continued
Table IV. Troubleshooting Guide for In-Fusion EXPERIMENTS
B. Large Numbers of Colonies Contained No Insert
Description of
Problem
Large numbers of colonies obtained with no
insert
Explanation
Solution
Incomplete linearization
of your vector
It is important to remove any uncut vector prior to use in
the In-Fusion reaction. If necessary, recut your vector and
gel-purify.
Contamination of InFusion reaction by plasmid with same antibiotic
resistance
If your insert was amplified from a plasmid, closed circular
DNA (vector) may have carried through purification and
contaminated the cloning reaction. To ensure the removal
of any plasmid contamination, we recommend linearizing
the vector template before performing PCR. Alternatively,
the PCR product can be treated with DpnI to remove the
parental vector template after PCR amplification (Weiner et
al., 1994; Fisher et al., 1997).
Plates too old or contained incorrect antibiotic
Be sure that your antibiotic plates are fresh (<1 month old).
Check the antibiotic resistance of your fragment.
C. Clones Contain Incorrect Insert
Large number of colonies
contain incorrect insert
PCR product containing
nonspecific sequences
If your PCR product is not a single distinct band, then it may
be necessary to gel-purify the PCR product to ensure cloning
of the correct insert. See Section VI for more information.
X. References
D’Arpa, P. (2003) Strategies for Cloning PCR Products. In PCR Primer: A Laboratory Manual, Eds. Dieffenbach, C. W, & Dveksler, G. S. (Cold Spring Harbor Laboratory Press, NY), pp.405-420.
Fisher, C. L. & Pei, G. K. (1997) Modification of a PCR-based site-directed mutagenesis method. BioTechniques 23(4):570–574.
Innis, M. A., Gelfand, D. H., Sninsky, J. J. & White, T. J., Eds. (1990) PCR Protocols: A Guide to Methods
and Applications (Academic Press, Inc., San Diego, CA).
Sambrook, J. & Russell, D. W. (2001). Molecular Cloning: A Laboratory Manual (Cold Spring Harbor Laboratory Press, NY).
Weiner, M. P., Costa, G. L., Shoettlin, W., Cline, J., Mathur, E. & Bauer, J. C. (1994). Site-directed mutagenesis of double-stranded DNA by the polymerase chain reaction. Gene 151:119–123.
Clontech Laboratories, Inc. www.clontech.com
A Takara Bio Company
Protocol No. PT3941-1
Version No. PR9Z3434
17
In-Fusion™ Dry-Down PCR Cloning Kit User Manual
Appendix A: Control Vector Map and In-Fusion Cloning Site
lacZα
In-Fusion
Cloning Site
lacZα
(part B)
(part A)
MCS
pUC19
pUC
ori
2690 bp
Ampr
EcoRI
SacI
KpnI
SmaI
XmaI
GAATTCGAGC TCGGTACCCG GGGATC
CTTAAGCTCG AGCCATGGGC CCCTAG
Partial
BamHI
Site
XbaI
In-Fusion
Cloning Site
AccI
HincII
SalI
PstI
SphI
HindIII
GATCCTCT AGAGTCGACC TGCAGGCATG CAAGCTTGG
CTAGGAGA TCTCAGCTGG ACGTCCGTAC GTTCGAACC
Partial
BamHI
Site
Figure 5. pUC19 Linearized Vector Map & In-Fusion Cloning Site. Sequence and digest information is available in PT4065-5
and can be downloaded from our website at www.clontech.com/manuals.
Protocol No. PT3941-1
www.clontech.com
Version No. PR9Z3434
18
Clontech Laboratories, Inc.
A Takara Bio Company
In-Fusion™ Dry-Down PCR Cloning Kit User Manual
Notice to Purchaser
Clontech products are to be used for research purposes only. They may not be used for any other purpose, including,
but not limited to, use in drugs, in vitro diagnostic purposes, therapeutics, or in humans. Clontech products may not
be transferred to third parties, resold, modified for resale, or used to manufacture commercial products or to provide a
service to third parties without written approval of Clontech Laboratories, Inc.
This product is covered by U.S. Patent No 7,575,860 and European Patent No. EP1741787.
Fusion-Blue™ Cells are manufactured and tested by Novagen for Clontech Laboratories, Inc.
Novagen® is a registered trademark of EMD Biosciences, Inc.
LIMITED LICENSE
Use of this product is covered by one or more of the following US patents and corresponding patent claims outside
the US: 5,079,352 and 6,127,155. The purchase of this product includes a limited, non-transferable immunity from suit
under the foregoing patent claims for using only this amount of product for the purchaser’s own internal research.
No right under any other patent claim (such as method claims in U.S. Patents Nos. 5,210,015, 5,487,972, 5,994,056 and
6,171,785) and no right to perform commercial services of any kind, including without limitation reporting the results
of purchaser’s activities for a fee or other commercial consideration, is hereby conveyed by the purchase of this product expressly, by implication, or by estoppel. This product is for research use only. Diagnostic uses require a separate
license from Roche. Further information on purchasing licenses may be obtained by contacting the Director of Licensing, Applied Biosystems, 850 Lincoln Centre Drive, Foster City, California 94404, USA.
U.S. Patent No. 5,436,149 for LA Technology is owned by Takara Bio Inc.
TaqStart® Antibody and other Hot Start Antibodies are licensed under U.S. Patent No. 5,338,671.
DH5™, DH5a™, DH10B™ and ElectroMax™are trademarks, and Max Efficiency® is a registered trademark of Invitrogen
Corporation.
Microseal® is a registered trademark of Bio-Rad Laboratories, Inc.
NucleoSpin® and NucleoTrap® are registered trademarks of Macherey-Nagel GmbH and Co., KG.
Clontech, the Clontech Logo and all other trademarks are the property of Clontech Laboratories, Inc., unless noted otherwise. Clontech is a Takara Bio Company. ©2010 Clontech Laboratories, Inc.
Clontech Laboratories, Inc. www.clontech.com
A Takara Bio Company
Protocol No. PT3941-1
Version No. PR9Z3434
19