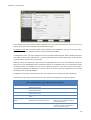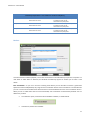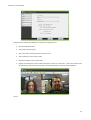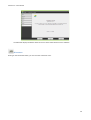
1
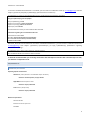
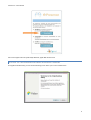
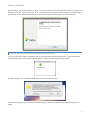
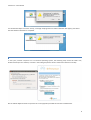
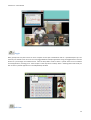
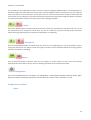
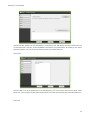
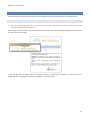
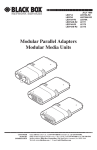
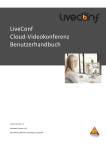
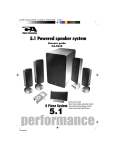
Teleconference Service
--- e:Presence --User Manual
Version 1.2
June 2013
e:Presence – User Manual
CONTENTS
CONTENTS
1
INTRODUCTION
2
USING A PERSONAL COMPUTER TO PARTICIPATE IN A TELECONFERENCE
3
INVITATION TO PARTICIPATE IN A TELECONFERENCE
3
REQUIREMENTS
4
HARDWARE/SOFTWARE
4
BANDWIDTH REQUIREMENTS
5
INSTALLING THE TELECONFERENCE SOFTWARE
5
INSTALLING THE TELECONFERENCE SOFTWARE IN MICROSOFT WINDOWS
6
INSTALLING THE TELECONFERECNE SOFTWARE IN APPLE MAC OS
7
INSTALLING THE TELECONFERECNE SOFTWARE IN LINUX
8
PARTICIPATION IN THE TELECONFERENCE USING A PERSONAL COMPUTER
10
USING THE SERVICE DURING THE TELECONFERENCE
11
PARTCIPATING IN THE TELECONFERENCE USING Η.323 TERMINALS
21
JOINING THE TELECONFERENCE ROOM USING Η.323 TERMINAL
22
PARTICIPATING IN THE TELECONFERENCE USING VIDYOROOM TERMINAL
23
JOINING THE TELECONFERENCE ROOM USING VidyoRoom TERMINAL
24
TELECONFERENCE PARTICIPATION HISTORY
26
TROUBLESHOOTING
27
DESKTOP USERS
27
Η.323 TERMINAL USERS
31
1
e:Presence – User Manual
INTRODUCTION
e:Presence teleconference service is based on Vidyo’s® advanced video conferencing technology. It offers a handy
management environment with increased capabilities and implements an extremely easy process for the end user, in
order to access directly the video conference meeting. Within the next sections, all the necessary instructions for those
that use their personal computer as well as for those who use H.323 or VidyoRoom terminals in order to participate in a
teleconference are given. Moreover, the most common problems as well as their suggested solutions/advices are
quoted.
2
e:Presence – User Manual
USING A PERSONAL COMPUTER TO PARTICIPATE IN A TELECONFERENCE
INVITATION TO PARTICIPATE IN A TELECONFERENCE
The invitation to participate in a teleconference is sent through an e-mail by [email protected] with the subject
“[epresence] Πρόσκληση σε τηλεδιάσκεψη (Invitation to teleconference)”, where all the necessary information
regarding the teleconference is included (subject, starting/ending date and time, moderator name, participation and
confirmation hyperlinks). The format of the invitation mail is the following:
[Text in English follows later on]
[Η πρόσκληση που ακολουθεί είναι προσωπική. Η προώθηση της σε άλλο άτομο θα κάνει αδύνατη την συμμετοχή σας στην
τηλεδιάσκεψη.]
Παρακαλούμε να συμμετέχετε στην τηλεδιάσκεψη με θέμα "xxxxx ".
Αναλυτικές πληροφορίες για την τηλεδιάσκεψη:
Ημ/νία και ώρα έναρξης: 2012-01-24 09:45:00
Ημ/νία και ώρα λήξης: 2012-01-24 10:30:00
Πρόσκληση από: xxxxxxxx
Μπορείτε να συνδεθείτε στην τηλεδιάσκεψη χρησιμοποιώντας προσωπικό υπολογιστή με λειτουργικό σύστημα Microsoft Windows, Apple
Mac OS ή Linux
Για να λάβετε μέρος στην τηλεδιάσκεψη ακολουθήστε τον παρακάτω σύνδεσμο μέσα στα χρονικά πλαίσια που αναφέρονται παραπάνω.
https://epresence.grnet.gr/conference/portal.php?string_id=xxxxx
Θα σας παρακαλούσαμε να επιβεβαιώσετε την παρουσία σας στην τηλεδιάσκεψη ακολουθώντας τον παρακάτω σύνδεσμο:
https://epresence.grnet.gr/admin/confirm.php?string_id=xxxxx
Υποστηρικτικό υλικό μπορείτε να αναζητήσετε στην ιστοσελίδα: /http://epresence.grnet.gr/support.php
-----[The following invitation is strictly personal. Forwarding this invitation to another person will make your participation to the conference
impossible.]
You are invited to join a teleconference meeting with subject "xxxxx".
Information regarding the teleconference:
Start date: 2012-01-24 09:45:00 (Local Greek time)
End date: 2012-01-24 10:30:00 (Local Greek time)
Invitation sender: xxxxx
You may join the teleconference using a personal computer with operating system Microsoft Windows, Apple Mac OS or Linux.
Please click on the following link within the aforementioned dates in order to join this meeting.
https://epresence.grnet.gr/conference/portal.php?string_id=xxxxxx
Please click on the following link in order to confirm your participation to this meeting:
https://epresence.grnet.gr/admin/confirm.php?string_id=xxxxxxx
Support material may be found in the following webpage: http://epresence.grnet.gr/support.php
In order to participate in the teleconference you should click on the first hyperlink (participation link) within the date
and time specified by the email. To confirm your participation in the teleconference you should click on the second one
(confirmation link) anytime before it begins; this way, the moderator (the one who organizes the event) will be notified
that you are available for the scheduled teleconference.
3
e:Presence – User Manual
In case the scheduled teleconference is cancelled, you will receive a notification email by [email protected] with the
subject “[epresence] Ακύρωση τηλεδιάσκεψης (teleconference cancelation)”:
Η τηλεδιάσκεψη της οποίας τα στοιχεία ακολουθούν και στην οποία ήσασταν προσκεκλημένος ακυρώθηκε.
Στοιχεία τηλεδιάσκεψης που ακυρώθηκε:
Όνομα τηλεδιάσκεψης: xxxxx
Ημ/νία και ώρα έναρξης: 2012-01-24 09:45:00
Ημ/νία και ώρα λήξης: 2012-01-24 10:30:00
Πρόσκληση από: xxxxxxxx
The teleconference to which you were invited has been cancelled.
Information regarding the cancelled teleconference:
Teleconference name: xxxxx
Start date: 2012-01-24 09:45:00 (Local Greek time)
End date: 2012-01-24 10:30:00 (Local Greek time)
Invitation sender: xxxxx
Moreover, about 10 minutes before the end of the scheduled teleconference , you will receive a notification email from
[email protected] with subject “[epresence] Προειδοποίηση για λήξη τηλεδιάσκεψης (Notification regarding
teleconference ending)” .
Η τηλεδιάσκεψη σας με όνομα 'xxxxx' θα λήξει σε περίπου 10 λεπτά.
Your conference named 'xxxxx' will end in about 10 minutes.
It should be noted that while you are being connected to the teleconference and less that 2 minutes before it ends,
you will hear a notification sound.
REQUIREMENTS
HARDWARE/SOFTWARE
Operating Systems and Browsers
Windows XP, Vista, Windows 7 and Windows 8 (32- και 64-bit)
Browsers: Internet Explorer, Firefox, Chrome
Apple MAC OS 10.5 Leopard or later
Browsers: Firefox, Chromium
Linux Ubuntu (12.04, 12.10)
Browsers: Firefox, Chromium
Minimum requirements
Windows XP SP2
Based on Pentium D processor
1Gb RAM
4
e:Presence – User Manual
256Mb Video RAM
40 Mb free disk space
Recommended configuration
Windows XP SP3
Based on i3 ή i5 ή Core 2 Quad processor with DDR2 ή DDR3 RAM or Core 2 Duo with DDR3 RAM
2Gb RAM
256Mb Video RAM
40 Mb free disk space
Recommended WebCams
Logitech HD Pro WebCam C920
Logitech QuickCam Pro 9000
Logitech QuickCam Pro for Notebooks
Recommended sound devices
Microsoft Lifechat LX-3000
Plantronics DSP 400
CyberAcoustics AC-840, AC-850
Phoenix Duet or Solo Speakerphone
Konftel 300
ClearOne Chat 60, 160
BANDWIDTH REQUIREMENTS
As a minimum requirement, your network connection should support 256 Kbps (upstream rate) and 256 Kbps
(downstream rate) assuming that you make all the necessary configuration (see Section “TroubleShooting”).
However, it is recommended that your supported network upstream rate be no less than 512 Kbps and your
downstream rate be at least 2 Mbps.
INSTALLING THE TELECONFERENCE SOFTWARE
The teleconference software used by e:Presence is VidyoDesktop (developed by Vidyo®). In case you have not already
installed VidyoDesktop in your personal computer, you are automatically redirected in the following web page at your
first attempt to use the service. You are then requested to download the installation file in your personal computer. By
clicking on the “Download” button, your operating system is automatically taken into account (Microsoft Windows,
Macintosh OS X, Linux etc.) and the appropriate version of VidyoDesktop is downloaded. Then, you are prompted to
appropriately store the VidyoDesktop installation file.
5
e:Presence – User Manual
The service supports the use of Microsoft Windows, Apple MAC OS and Linux.
INSTALLING THE TELECONFERENCE SOFTWARE IN MICROSOFT WINDOWS
If using Microsoft Windows, you will see the following screen when you run the installation file.
6
e:Presence – User Manual
By clicking Next, you will be prompted to agree on the license agreement of the application. When you do that, the
following screen will appear. Click Finish for the installation to be completed. The installation of VidyoDesktop is
required only once in every personal computer (notice that you may need admin rights to install the software).
INSTALLING THE TELECONFERECNE SOFTWARE IN APPLE MAC OS
In case your personal computer is Macintosh with an operating system of Macintosh OS X 10.5 or later, the following
steps should be made. First, download and execute the *.dmg file. The following window will appear.
By double clicking on the icon VidyoDesktopInstaller you will see the next screen.
You should choose Open. You will then be prompted to agree on the license agreement and the following screen will
appear.
7
e:Presence – User Manual
You should select Open once more. Finally, a message notifying of the successful installation will appear; press OK so
that the software installation is completed.
INSTALLING THE TELECONFERECNE SOFTWARE IN LINUX
In case your personal computer has a Linux-based operating system, the following steps should be made. First,
download and open the *.deb file, as shown in the next figure (Ubuntu 12.04 is used as the reference Linux OS).
We use Ubuntu Software Center to open the file. In the popped up window we choose the Install button.
8
e:Presence – User Manual
After the installation is completed you may continue with joining the teleconference room.
9
e:Presence – User Manual
PARTICIPATION IN THE TELECONFERENCE USING A PERSONAL COMPUTER
After clicking on the “Join Room” button, VidyoDesktop will be automatically executed and you can participate in the
teleconference room along with the other participants. (The next time you will click on the participation link you will be
automatically directed to the teleconference room as long as you have not uninstalled Vidyo software or no newer
version of it is available by the service).
Note: It is required that Java is installed, enabled and updated both in your PC as well as your browser.
Before joining your teleconference room you should choose the speakers, the microphone and the camera that you
wish the service to use, as shown below.
10
e:Presence – User Manual
To avoid echo during the teleconference, only the suggested by the service devices (speakerphones) should be used (with
echo cancellation software/hardware built-in). In any other case, it is recommended that, at least, headphones are used
in order to isolate the received sound and avoid echo issues. Echo appears when the received sound by the
teleconference is captured and then retransmitted back to the teleconference room along with your voice by your
microphone. Alternatively, although not suggested, you may check the “Echo Cancelation” box, which is found in the
“Devices” tab; nevertheless, keep in mind that low sound quality is produced (half-duplex – when talking you cannot
hear others).
In the sequel, the functionality of VidyoDesktop during the teleconference is described.
USING THE SERVICE DURING THE TELECONFERENCE
After joining the teleconference room you have multiple options that you can take advantage of, as shown below.
Layout
Up to 8 remote parties can be shown at the same time. You may choose the number of remote parties shown on your
monitor by clicking on the corresponding drop down menu. Choose a number within the 0-8 range as shown below.
Clicking on the Layout icon changes the screen to “Preferred mode”, where the person who last spoke has the largest
screen real estate.
Full Screen
Clicking on the “Full Screen” button toggles the screen between sizing the window to utilize the entire screen real
estate and restoring the window to the previous size. When in Full Screen mode, the toolbar is hidden unless you
mouse over the screen.
11
e:Presence – User Manual
Share Screen
Participants can share applications on their computers by clicking the Share button. Clicking the button itself toggles
between sharing and stopping the share. Click the drop-down arrow to select from the open applications on your local
machine to share with other meeting participants. You can also choose to share your entire desktop by selecting your
display from the share list (Windows only). You may undock the shared screen (i.e., view it as a separate window) and
re-dock the shared screen (i.e., snap it back into the main VidyoDesktop window) by double-clicking the contents of the
application window.
Docked
Undocked
12
e:Presence – User Manual
Toggle
Many participants may share what’s on their computer screens (like a PowerPoint slide or a spreadsheet) but you can
view only one shared screen at a time. You may toggle between multiple applications using the Toggle button. Click the
button to cycle through the available shares. Click the drop-down arrow to select a specific share from all available
shared applications, including yours. The first option in the drop-down is always “None”. Selecting None means that you
will not see any shared applications in the VidyoDesktop window.
Self-View
13
e:Presence – User Manual
You can view your own video feed in “Picture-in-Picture” mode by clicking the Self-View button. Your feed appears as a
thumbnail image in the lower right corner of the screen. Click the Self-View button a second time to see your image the
same size as others on the screen layout. For example, if you are in a direct call the screen will split in half and you will
see the person you are talking to on the left hand side and yourself on the right. Click the Self-View button a third time
to remove yourself from the layout and view only the other meeting participants.
Volume
Click on the Volume button to mute/unmute the sound you are hearing. The button turns red when mute is on. Or use
the drop-down arrow to change the volume level. You will see a slider and a green line whose vertical movement
reflects the energy (volume) level your speakers or headphones are outputting.
Microphone
Click on the Microphone button to mute/unmute the sound you are broadcasting. Or use the drop-down arrow to
change the volume level. You will see a slider and a green line whose vertical movement reflects the energy (volume)
level your microphone is outputting.
Privacy
Click on the Privacy button to stop the video you are sending (i.e., privacy mode). You stay on the call but other
participants will not be able to see you. If you are showing a document, it will continue to be visible.
Configuration
Click on the Configuration button to configure your VidyoDesktop, including Status, Attendees, Network, Devices, Video,
Options and About. The following settings are accessible when your status is “Not in Conference” as well.
Configuration and Status
Status
14
e:Presence – User Manual
This tab indicates whether you are connected in a conference or not, with whom, the name of the server you
are connected with, and your current bandwidth consumed for your participation. By clicking on the “Show
Conference Status” icon you may see the statistics of the current teleconference.
Attendees
This tab shows a list of the participants in the teleconference. The names shown here are the virtual names
(Grnet user *) that are given by the system instead of the real names of the participants in the teleconference.
Network
15
e:Presence – User Manual
In the Network tab various technical details dealing with accessing the teleconference service via your local
network or the Internet are depicted and can/should be changed.
It should be noted that you should contact service helpdesk or the moderator if you are not sure of what to
change (or if a change is actually required) in case of a connection problem.
The VidyoProxy section is used to configure the service to operate behind firewalls, NATs and Web proxies that
limit traffic to specific ports and protocols – commonly port 80 for HTTP, port 443 for HTTPS or port 22 for SSH.
This tab shows the home server and port used.
Selecting “Always use VidyoProxy” option forces the VidyoDesktop client to use the VidyoProxy. Under this
setting, and in case VidyoDesktop finds a VidyoProxy address, it immediately tries to use it without first trying
to connect directly. The VidyoProxy can be used as a fallback mechanism in case direct access to the server is
not available. By default, the VidyoProxy is used if a direct connection cannot be established. Do not change
this setting unless advised by helpdesk.
The Web Proxy tab refers to the case where your local network accesses Internet through a WebProxy.
In the sequel all ports that are related to the service’s operation along with their usage are depicted.
Connectivity Requirements – Port numbers used by the application
TCP port 80
UDP ports 50000 –
65535
HTTP: Data traffic towards
teleconference server
HTTPS: Data traffic towards
teleconference server
EMCP: Data traffic towards
teleconference server
SCIP: Data traffic towards teleconference
server
RTP / sRTP / RTCP: Data traffic
towards/from teleconference server
UDP timeout
General observation
TCP port 443
TCP port 17992
TCP port 17990
User ID check and GUI operation
Optional use of SSL security protocol
Access to the teleconference server
Access to the teleconference server
Voice and video streams from the
participants in the teleconference (6
ports per participant)
Change the default value (0:02:00 – 2
minutes) to a larger one (3:00:00 – 3
hours) to avoid end of calls
16
e:Presence – User Manual
Connectivity Requirements – Port numbers to connect via VidyoProxy
TCP port 80
HTTP: Data traffic towards
teleconference server
TCP port 443
HTTPS: Data traffic towards
teleconference server
TCP port 22
HTTPS: Data traffic towards
teleconference server
User ID check and GUI operation, voice
and video streams of the
teleconference participants
User ID check and GUI operation, voice
and video streams of the
teleconference participants
User ID check and GUI operation, voice
and video streams of the
teleconference participants
Devices
This tab shows the available playback, record and camera devices associated with your personal computer. If a
new audio or video device is detected, this window automatically appears to enable you to select a new
device.
Echo Cancellation – If you use a non-echo canceling audio device you are still able to achieve a good audio
experience with the VidyoDesktop by using the echo cancellation feature. Echo cancellation is turned off when
you use a service-recommended audio device because recommended devices have echo cancellation built in.
When you use an audio device that is not recommended, echo cancellation is automatically enabled. You can
disable it if you wish.
•
To enable this option, select the Echo Cancellation checkbox, as shown below.
•
To disable it, deselect the checkbox.
17
e:Presence – User Manual
Video
This tab applies to the camera configuration and determines how encoding is performed.
•
Best Quality: Recommended for best user experience.
•
Best Frame-Rate: Allows encoding at 30fps for resolutions higher than VGA.
•
Best Resolution: Allows for higher-resolution encoding.
•
Limited Bandwidth: It can be used in bandwidth-limited environments where the full video quality
cannot be met. When selecting this mode, encoding resolution is limited to CIF – conserving uplink
bandwidth and the number of participants that can be viewed is initially limited. If enough downlink
bandwidth is detected, the number of received participants will increase with time.
•
Advanced (Windows only): This mode applies for controlled environments usage only. Advanced
mode has three configuration options: 450p30, 720p15, 720p30. Each one forces camera capture,
encoding resolution and frame-rate based solely on what is available from the camera, irrespective of
CPU capacity.
Options
In this tab you can change the teleconference software language. English, German, Spanish, Italian, French,
Portuguese, Finnish, Polish, Japanese, Chinese and Korean are supported.
18
e:Presence – User Manual
Using the other available checkboxes you may force the application to:
•
Start when Windows start
•
Auto-answer incoming calls
•
Play a tone when a participant joins or leave a room
•
Start conferences in full-screen mode
•
Display the toolbar in full-screen mode
•
Display the participants’ names. Notice that these names are “Grnet user *”-like virtual names since
the allocation of the connection accounts is made automatically, in order to avoid complexity.
About
19
e:Presence – User Manual
The About tab displays the details about the version of the teleconference service software.
Disconnect
Clicking on the Disconnect button, you can leave the conference room.
20
e:Presence – User Manual
PARTCIPATING IN THE TELECONFERENCE USING Η.323 TERMINALS
The invitation to participate in a teleconference is sent through an e-mail, where all the necessary information
regarding the teleconference is included (subject, starting and ending date and time, moderator name, participation
and confirmation hyperlinks).
When you are defined as a H.323 participant in the teleconference, the invitation email that you receive includes more
information than that for a desktop user. The format of the invitation mail is the following:
[Text in English follows later on]
[Η πρόσκληση που ακολουθεί είναι προσωπική. Η προώθηση της σε άλλο άτομο θα κάνει αδύνατη την συμμετοχή σας στην
τηλεδιάσκεψη.]
Παρακαλούμε να συμμετέχετε στην τηλεδιάσκεψη με θέμα "xxxx ".
Αναλυτικές πληροφορίες για την τηλεδιάσκεψη:
Ημ/νία και ώρα έναρξης: 2012-01-24 10:00:00
Ημ/νία και ώρα λήξης: 2012-01-24 10:45:00
Πρόσκληση από: xxxxxx
Επειδή πρόκειται να δεχθείτε μία κλήση H323/SIP, παρακαλούμε πριν ακολουθήσετε το σύνδεσμο για συμμετοχή στην τηλεδιάσκεψη να
γνωρίζετε τις ακόλουθες πληροφορίες: IP διεύθυνση του H323/SIP τερματικού.
Δεν υποστηρίζεται κλήση σε τερματικό με ιδιωτική/εσωτερική IP διεύθυνση που δίνεται μέσω υπηρεσίας Network Address
Translation (NAT).
Αν το τερματικό σας υποστηρίζει κρυπτογράφηση (πρωτόκολλο H.235) παρακαλώ ενεργοποιήστε την.
Για να λάβετε μέρος στην τηλεδιάσκεψη ακολουθήστε τον παρακάτω σύνδεσμο μέσα στο χρονικό πλαίσιο που αναφέρεται
παραπάνω.https://epresence.grnet.gr/conference/portal.php?string_id=xxxxx
Θα σας παρακαλούσαμε να επιβεβαιώσετε την παρουσία σας στην τηλεδιάσκεψη ακολουθώντας τον παρακάτω σύνδεσμο:
https://epresence.grnet.gr/admin/confirm.php?string_id=xxxxxx
Υποστηρικτικό υλικό μπορείτε να αναζητήσετε στην ιστοσελίδα: /http://epresence.grnet.gr/support.php
-----[The following invitation is strictly personal. Forwarding this invitation to another person will make your participation to the conference
impossible.]
You are invited to join a teleconference meeting with subject "xxxxx".
Information regarding the teleconference:
Start date: 2012-01-24 10:00:00 (Local Greek time)
End date: 2012-01-24 10:45:00 (Local Greek time)
Invitation sender: xxxxxx
You are about to receive an H323/SIP call. Please have available your H323/SIP device IP address before following the link that connects
you to the meeting room.
A call to a terminal with a private/internal address which is provided from a Network Address Translation (NAT) service is not
supported.
If your terminal supports encryption (protocol H.235) please activate it.
Please click on the following link within the aforementioned dates in order to join this meeting.
https://epresence.grnet.gr/conference/portal.php?string_id=xxxxx
21
e:Presence – User Manual
Please click on the following link in order to confirm your participation to this meeting:
https://epresence.grnet.gr/admin/confirm.php?string_id=xxxxxx
Support material may be found in the following webpage: http://epresence.grnet.gr/support.php
Here, the part of the text that needs your extra consideration is made red (there is no such convention in the real
email).
In order to participate in the teleconference you will have to click on the first hyperlink (participation link) within the
date and time specified by the invitation email. To confirm your participation in the teleconference you should click on
the second one (confirmation link) anytime before it begins; in this way, the teleconference moderator will be notified
that you are available for the scheduled event.
The notification emails regarding the cancellation and the ending of the teleconference (as well as the notification
sound when less than 2 minutes are remaining for its end) are the same as described for the case of the PC user.
JOINING THE TELECONFERENCE ROOM USING Η.323 TERMINAL
In case you are defined as a user of a Η.323 terminal, installing the conference service software is not required. After
clicking on the participation hyperlink (quoted in the invitation email), you will be redirected to the following web page
where you are prompted to enter your terminal’s IP address. Moreover, you may choose to use SIP protocol or not, to
activate encryption during your call or not, and to use device compatibility mode or not. The SIP choice should be
selected only if your terminal supports calls using the SIP protocol. The Encryption box should be checked when H.235
protocol is used for data transmission through your device. The Compatibility Setting should be activated only if your
terminal is an old device which requires that e:Presence use H.263 video codec and G711 audio codec; selecting the
Compatibility Setting will deactivate the data channel of your terminal (Η.239 protocol).
22
e:Presence – User Manual
PARTICIPATING IN THE TELECONFERENCE USING VIDYOROOM TERMINAL
The invitation to participate in a teleconference is sent through an e-mail, where all the necessary information
regarding the teleconference is included (subject, starting and ending date and time, moderator name, participation
and confirmation hyperlinks).
When you are defined as a VidyoRoom terminal user, the invitation email that you receive includes more information
than that for a desktop user. The format of the invitation mail is the following:
[Text in English follows later on]
[Η πρόσκληση που ακολουθεί είναι προσωπική. Η προώθηση της σε άλλο άτομο θα κάνει αδύνατη την συμμετοχή σας στην
τηλεδιάσκεψη.]
Παρακαλούμε να συμμετέχετε στην τηλεδιάσκεψη με θέμα "xxxx ".
Αναλυτικές πληροφορίες για την τηλεδιάσκεψη:
Ημ/νία και ώρα έναρξης: 2012-01-24 10:00:00
Ημ/νία και ώρα λήξης: 2012-01-24 10:45:00
Πρόσκληση από: xxxxxx
Επειδή πρόκειται να δεχθείτε μία κλήση στο VidyoRoom τερματικό σας, παρακαλούμε πριν ακολουθήσετε το σύνδεσμο για συμμετοχή
στην τηλεδιάσκεψη να γνωρίζετε τις ακόλουθες πληροφορίες: Όνομα χρήστη που έχει αποδοθεί στο VidyoRoom τερματικό σας.
Για να λάβετε μέρος στην τηλεδιάσκεψη ακολουθήστε τον παρακάτω σύνδεσμο μέσα στο χρονικό πλαίσιο που αναφέρεται
παραπάνω.https://epresence.grnet.gr/conference/portal.php?string_id=xxxxx
23
e:Presence – User Manual
Θα σας παρακαλούσαμε να επιβεβαιώσετε την παρουσία σας στην τηλεδιάσκεψη ακολουθώντας τον παρακάτω σύνδεσμο:
https://epresence.grnet.gr/admin/confirm.php?string_id=xxxxxx
Υποστηρικτικό υλικό μπορείτε να αναζητήσετε στην ιστοσελίδα: /http://epresence.grnet.gr/support.php
-----[The following invitation is strictly personal. Forwarding this invitation to another person will make your participation to the conference
impossible.]
You are invited to join a teleconference meeting with subject "xxxxx".
Information regarding the teleconference:
Start date: 2012-01-24 10:00:00 (Local Greek time)
End date: 2012-01-24 10:45:00 (Local Greek time)
Invitation sender: xxxxxx
You are about to receive a call to your VidyoRoom terminal. Please have available the username assigned to your VidyoRoom terminal
before following the link that connects you to the meeting room.
Please click on the following link within the aforementioned dates in order to join this meeting.
https://epresence.grnet.gr/conference/portal.php?string_id=xxxxx
Please click on the following link in order to confirm your participation to this meeting:
https://epresence.grnet.gr/admin/confirm.php?string_id=xxxxxx
Support material may be found in the following webpage: http://epresence.grnet.gr/support.php
In order to participate in the teleconference you will have to click on the first hyperlink (participation link) within the
date and time specified by the invitation email. To confirm your participation in the teleconference you should click on
the second one (confirmation link) anytime before it begins; in this way, the teleconference moderator will be notified
that you are available for the scheduled event.
The notification emails regarding the cancellation and the ending of the teleconference (as well as the notification
sound when less than 2 minutes are remaining for its end) are the same as described for the case of the PC user.
JOINING THE TELECONFERENCE ROOM USING VIDYOROOM TERMINAL
In case you are defined as a user of a VidyoRoom terminal, installing the conference service software is not required.
After clicking on the participation hyperlink (quoted in the invitation email), you will be redirected to the following web
page where you are prompted to enter the name assigned to your terminal. An account for your VidyoRoom is assigned
once after communication with ePresence service helpdesk.
24
e:Presence – User Manual
25
e:Presence – User Manual
TELECONFERENCE PARTICIPATION HISTORY
To view your history of participating in teleconferences managed by e:Presence, you should use the “User Login” option
found in http://www.epresence.gr/. When you fill in your email address (the one used for receiving the invitation
emails) you will receive an email quoting the details of all the teleconferences you have participated in.
26
e:Presence – User Manual
TROUBLESHOOTING
The most common incidents when using the service along with instructions to deal with them are depicted here.
DESKTOP USERS
1.
The VidyoDesktop application cannot connect to the conference. The connection progress bar does not appear
although the application seems to load.
After clicking on the participation link you should normally be redirected to the following webpage where a bar informs
you of the connection progress.
In case the bar does not appear while the application seems to load and no connection to conference room is
established, Java is probably not installed or activated in your PC or browser.
27
e:Presence – User Manual
Check that Java is installed and updated in your Operating System (http://www.java.com/en/download/testjava.jsp).
In addition, check that Java is activated in your browser or check for security notifications while the application is
loading.
28
e:Presence – User Manual
2.
No connection is established while the connection progress bar appears. Either this bar never reaches 100% or I
am connecting for just a while and being almost automatically rejected.
Either the local or the router’s firewall blocks the communication ports needed by the application (see above for
networking issues).
If you have no access or you are not such an experienced user in order to check whether the required ports for
communication are open, then, for windows users, right-click on the VidyoDesktop icon on the lower right side of your
desktop so that a menu appears, and select “Configuration”. Correspondingly, in Apple MAC OS keep the trackpad
button pressed when pointing on the VidyoDesktop icon, and choose “Configuration”. In the case of Linux, right-click
on the VidyoDesktop icon shown in the up-right corner of your desktop and choose the “Configuration” option within
the menu that pops up.
This way you are directed to the application’s Configuration and Status window. In Network tab, check “Always use
VidyoProxy” that seems inactive in the following figure and then click on “Apply”.
This selection allows the communication with the server using the TCP ports 80, 443 and 22 which are usually open in
most of the cases since they are used for http, https and ssh respectively.
3.
Interrupted sound, bad quality in communication.
Apparently, your network connection is not adequate. Try to connect your personal computer to the Internet using an
Ethernet cable instead of a wireless network. If there is no improvement in the conference quality, or no wired
connection can be established, then go the Configuration and Status window (by pressing the “gear” icon of the
VidyoDesktop application or following the instructions in the previous section), choose Video tab and check the
“Limited Bandwidth” option.
29
e:Presence – User Manual
4.
The other participants complain that they hear themselves.
If speakers are used, the sound that you receive from other participants will be captured again by your microphone and
forwarded again back to the others causing the disturbing effect of echo (people hearing their voice within a delay),
while you will not experience any problem. If any other participant is also using speakers then the echo effect is
increased making the communication unbearable.
In case you do not use any of the recommended devices with echo cancelation feature built-in, it is suggested that you
use headphones so that you do not transmit the received sounds again back to the conference room. All the
participants in the conference should follow the same rule.
In any other case, go to the Configuration and Status window, select the Devices tab and check the “Echo cancelation”
option. Now, the echo effects may be suppressed but the quality of the transmitted sound will be low (half duplex –
when you are talking you cannot hear any other person in the conference); for this reason, it is the last-resort option.
5.
Connection problems for any other reason.
If any of the above suggestions cannot make you participate in the teleconference, then probably you need technical
support.
30
e:Presence – User Manual
For such cases log files are kept that may be easily found and then sent to helpdesk.
Finding log files in Microsoft Windows
The location of the log files depend on the version you use. In any case you should act according to the following steps.
In Start Menu choose Run. If Run option is not apparent in your Windows version select All Programs, then
Accessories and afterwards Run.
Within the box that appears type %TMP% or %TEMP% as shown below.
Press ENTER.
Search for VidyoApplet.log in the window that appeared.
Finding log files in Apple MAC OS and Linux
Log files for e:Presence are located in /tmp/ and their name is VidyoApplet.log.
Η.323 TERMINAL USERS
1.
I am answering the call to my terminal but it is immediately disconnected.
Probably, you have checked the “Encryption” option while your terminal neither supports H.235 protocol nor has it
been set up to support encrypted calls.
2.
The H.323 terminal gets connected but only sound is received (no video – black screen).
It is likely that you have checked the “Encryption” option whereas your terminal does not support the H.235 protocol.
3.
The H.323 terminal gets connected but only sound is received (no video at all).
Most probably, your terminal is old and it does not support the Η.264 protocol. Try to connect again after selecting the
“Compatibility setting” option. If no connectivity is established, then it is likely that your terminal does not even support
the Η.263 protocol.
4.
No calls can be made.
Check your network settings and examine whether the required ports that the service uses are blocked by a firewall.
Alternatively, check whether Η.323 calls are supported. If they are, try to call again after selecting the “SIP” option.
Finally, restart your terminal.
31