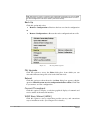
1
IKARUS OS & IKARUS NMS
User Manual
8 March 2006
1
/ 167
Ikarus OS and Ikarus NMS User
Manual
© 2006 AntCor Ltd No part of this publication may be reproduced or
transmitted in any form or by any means, electronic or mechanical,
including photography, recording, or any information storage and retrieval
system without written consent. Information in this manual is subject to
change without notice, and does not represent a commitment on the part of
AntCor.
AntCor shall not be liable for incidental or consequential damages
resulting from the furnishing, performance, or use of this manual.
All brand names used in this manual are the registered trademarks of their
respective owners. The use of trademarks or other designations in this
publication is for reference purposes only and does not constitute an
endorsement by the trademark holder.
2
/ 167
Ikarus OS and Ikarus NMS User
Manual
Table of Contents
1. Product Overview ............................................................................7
1.1
1.2
1.3
1.4
Compatibility and Requirements ....................................................... 7
Ikarus NMS Features ...................................................................... 7
IKARUS Features ........................................................................... 7
Ikarus NMS Installation Guide .......................................................... 8
2. Ikarus NMS ......................................................................................9
2.1 Overview of INMS Interface ............................................................. 9
2.1.1 Ikarus NMS Main Menu ............................................................................... 11
2.1.2 Network Topology Tab Information Panes ...................................................... 12
2.1.3 Node Shortcut Menu................................................................................... 13
2.2 Getting Started with INMS ............................................................. 14
2.2.1
2.2.2
2.2.3
2.2.4
2.2.5
2.2.6
Auto-Discovering Nodes .............................................................................. 14
Configuring a New Node.............................................................................. 16
Moving and Resizing Icons........................................................................... 18
Adding Background Map Images................................................................... 18
Saving and Loading Profiles ......................................................................... 21
Using the Node Shortcut Menu ..................................................................... 21
3. IP Networking ................................................................................ 28
3.1 Using the Network Interfaces Tree .................................................. 29
3.2 Configuring Basic IP Settings ........................................................ 29
3.2.1
3.2.2
3.2.3
3.2.4
3.2.5
3.2.6
3.2.7
IP Address .............................................................................................. 29
Subnet
...................................................................................... 29
Enable/Disable Selected Interface................................................................. 29
PTP IP Address .......................................................................................... 29
MAC Address ............................................................................................ 30
MAC Spoofing............................................................................................ 30
STP Enable ............................................................................................... 30
3.3 Configuring Global Settings............................................................ 30
3.3.1 Default Gateway ........................................................................................ 30
3.3.2 IP Forwarding............................................................................................ 30
3.3.3 DNS1 and DNS2 ........................................................................................ 31
3.4 Using Special Interface Commands ................................................. 31
3.4.1 Network Bridge Commands ......................................................................... 31
3.4.2 Virtual Interface Commands ........................................................................ 32
3.5 Using Table view.......................................................................... 33
3.6 Configuring VLANs ....................................................................... 34
3.6.1
3.6.2
3.6.3
3.6.4
Adding VLAN Interfaces .............................................................................. 35
Removing VLAN Interfaces .......................................................................... 36
Modifying VLAN Interfaces........................................................................... 36
Uploading VLAN Interfaces .......................................................................... 36
4. Static IP Routing............................................................................. 37
4.1 Configuring Routing Tables and Entries............................................ 38
4.1.1
4.1.2
4.1.3
4.1.4
4.1.5
4.1.6
3
/ 167
Adding a New Routing Table ........................................................................ 38
Remove an Existing Routing Table ................................................................ 39
Adding Static Routing Entries ....................................................................... 39
Removing Static Routing Entries................................................................... 40
Modifying Static Routing Entries ................................................................... 40
Repositioning Static Routing Entries .............................................................. 40
Ikarus OS and Ikarus NMS User
Manual
4.2 Configuring Static Rules ................................................................. 40
4.2.1
4.2.2
4.2.3
4.2.4
Adding Rule Entries .................................................................................... 41
Removing Rule Entries ................................................................................ 42
Modifying Rule Entries ................................................................................ 42
Repositioning Rule Entries ........................................................................... 42
5. Wireless ....................................................................................... 43
5.1 Setting Operational Modes............................................................. 44
5.1.1
5.1.2
5.1.3
5.1.4
5.1.5
5.1.6
Selected Operational Mode .......................................................................... 45
Configuring an Access Point ......................................................................... 45
Configuring WDS Mode ............................................................................... 48
Configuring Repeater Mode.......................................................................... 49
Configuring AP Client and Station Modes ........................................................ 51
Using Site Survey Operation ........................................................................ 52
5.2 Configuring Radio Settings............................................................. 54
5.2.1
5.2.2
5.2.3
5.2.4
5.2.5
5.2.6
5.2.7
5.2.8
5.2.9
Selecting Physical Layer Options................................................................... 55
Setting Channels and Frequencies ................................................................ 55
Setting Transmission Rates.......................................................................... 55
Setting the MAC Address............................................................................. 55
Setting Frag.............................................................................................. 56
Setting RTS .............................................................................................. 56
Selecting Diversity Options .......................................................................... 56
Selecting Antenna Options........................................................................... 56
Setting Transmitted Power .......................................................................... 56
5.3 Configuring Security Settings ......................................................... 57
5.3.1 Setting Wired Equivalent Privacy (WEP) ......................................................... 57
5.3.2 Setting Wi-Fi Protected Access (WPA) ........................................................... 57
5.3.3 Configuring Access Control Lists (ACL)........................................................... 59
5.4 Configuring Atheros Advanced Capabilities ....................................... 60
5.5 Wireless Topology Scenarios ........................................................... 63
5.5.1 Point-to-Point Links .................................................................................... 64
5.5.2 BSSID Extended Repetition ......................................................................... 68
6. Firewall and NAT............................................................................. 70
6.1 Firewall and NAT Chains................................................................. 70
6.1.1 Firewall Chains .......................................................................................... 70
6.1.2 NAT Chains ............................................................................................... 70
6.2 Configuring Firewall Rules .............................................................. 71
6.2.1 Configuring Firewall Matching Fields .............................................................. 72
6.3 Configuring NAT Rules ................................................................... 76
6.3.1 Configuring NAT Matching fields ................................................................... 77
6.3.2 Examples ................................................................................................. 80
7. DHCP ............................................................................................ 84
7.1 Configuring a DHCP SERVER .......................................................... 84
7.1.1 Setting DHCP Server Fields.......................................................................... 85
7.1.2 Lease Time Strategies ................................................................................ 88
7.2 Configuring a DHCP CLIENT ........................................................... 88
7.3 Configuring a DHCP Relay.............................................................. 89
8. WAN ........................................................................................... 91
8.1 Configuring a PPPoE CLIENT .......................................................... 91
8.1.1 Setting PPPoE Client Fields .......................................................................... 92
8.2 Configuring a PPTP Client .............................................................. 93
8.2.1 Setting PPTP Client Fields ............................................................................ 94
4
/ 167
Ikarus OS and Ikarus NMS User
Manual
9. Quality of Service .......................................................................... 96
9.1 The QoS window tab..................................................................... 96
9.1.1 Traffic Classes ........................................................................................... 97
9.1.2 Traffic Policies ......................................................................................... 100
9.1.3 Network Interfaces................................................................................... 100
9.2 Differentiating network traffic .......................................................101
9.3 Guarantees and Limitations ..........................................................102
9.3.1
9.3.2
9.3.3
9.3.4
9.3.5
Committed Information Rate (CIR) ............................................................. 103
Peak Information Rate (PIR) ...................................................................... 103
Excess Burst Size (EBS) ............................................................................ 103
Committed Burst Size (CBS) ...................................................................... 104
Priority................................................................................................... 104
9.4 Example: Bandwidth reservation for FTP Servers..............................105
9.4.1 Single Class per Policy .............................................................................. 106
9.4.2 Parallel Classes........................................................................................ 108
9.4.3 Class Hierarchy ....................................................................................... 110
9.5 Example: Elimination of P2P Traffic ................................................112
9.5.1 Shared Policies ........................................................................................ 114
9.6 Example: Access Point Bandwidth Sharing.......................................114
9.6.1 New QoS Entry ........................................................................................ 114
9.6.2 QoS Statistics ......................................................................................... 116
9.7 Design Guidelines and Limitations..................................................117
9.7.1
9.7.2
9.7.3
9.7.4
9.7.5
Destination/Source MAC match type ........................................................... 117
Application match type ............................................................................. 117
Child to Parent class relation...................................................................... 118
PIR on parallel classes .............................................................................. 118
Efficiency considerations ........................................................................... 118
9.8 Frequently Asked Questions..........................................................118
9.8.1 Submit, Apply Changes: I'm confused! ........................................................ 118
10. HotSpot Wizard........................................................................... 119
10.1 HotSpot Main Tab.......................................................................119
10.2 Using the HotSpot Wizard ............................................................121
10.2.1 WAN .................................................................................................... 121
10.2.2 LAN ..................................................................................................... 123
10.2.3 DHCP ................................................................................................... 124
10.2.4 NAT & Protection.................................................................................... 125
10.2.5 Wireless ............................................................................................... 129
10.2.6 Radius.................................................................................................. 130
10.2.7 Authentication Type................................................................................ 130
10.2.8 Walled Garden ....................................................................................... 132
10.2.9 Advertisement ...................................................................................... 132
10.2.10 Web Customization ............................................................................... 133
10.2.11 Summary ............................................................................................ 134
10.2.12 Enabling the HotSpot ............................................................................ 135
10.3 Backend Radius Configuration Example..........................................136
10.3.1 MAC Authentication ................................................................................ 136
10.3.2 UAM Authentication ................................................................................ 137
10.4 HotSpot Configuration Example ....................................................137
10.5 Troubleshooting .........................................................................148
10.5.1
10.5.2
10.5.3
10.5.4
10.5.5
10.5.6
5
/ 167
Cannot set wireless interface configuration ................................................. 148
DNS Error ............................................................................................. 148
Cannot obtain an IP address .................................................................... 148
Obtained an IP address but cannot Ping HotSpot ......................................... 149
HotSpot running, but no activeDHCP Server ............................................... 149
A user not authenticated, but can access the Internet .................................. 149
Ikarus OS and Ikarus NMS User
Manual
10.5.7 Ikarus NMS lost connectivity with Hotspot .................................................. 149
11. System Services ........................................................................ 150
11.1
11.2
11.3
11.4
11.5
Configuring SNMP Settings..........................................................150
Configuring HTTP Settings ..........................................................152
Configuring SSH Settings............................................................153
Configuring NTP Settings ............................................................154
Setting the Administrator Password .............................................155
12. Monitoring and Statistics.............................................................. 157
12.1
12.2
12.3
12.4
12.5
12.6
Using the Status Info Dialog Box...................................................157
Using the Current Throughput Graph .............................................157
Viewing Packet Statistics .............................................................158
Viewing the ARP table .................................................................159
Viewing the Open Connections List ................................................160
Using Monitor Utilities .................................................................160
12.6.1 Pinging (ICMP Utility).............................................................................. 160
12.6.2 Using Traceroute.................................................................................... 162
12.7 Viewing System Properties...........................................................163
13. MRTG Support ........................................................................... 164
13.1 Using MRTG..............................................................................164
14. WISP Easy Wizard ....................................................................... 165
15. Index ........................................................................................ 167
6
/ 167
Ikarus OS and Ikarus NMS User
Manual
1. Product Overview
The Ikarus Network Management System (INMS) is used to configure
and manage wireless networks of IKARUS nodes. Ikarus NMS has been
designed to provide network administrators with a comprehensive and
simple way to control and configure their network nodes.
1.1
Compatibility and Requirements
The Ikarus NMS software operates on any PC or Mac supported by Java.
That is any version of Microsoft Windows (98/ME/2000/NT/XP) or
GNU/Linux.
1.2
1.3
7
/ 167
Ikarus NMS Features
•
Optimized communication protocol between IKARUS's software and
Ikarus NMS featuring high levels of interactivity. Additionally an
advanced encryption scheme can guarantee secure configuration and
monitoring of IKARUS nodes.
•
Easy wizard-based configuration of IKARUS Hot-Spot.
•
Easy WISP Configuration Wizard
•
New graph-based statistics providing real time bandwidth utilization
per network interface.
•
New robust network topology display.
•
Built-in Multi Router Traffic Grapher (MRTG) support
IKARUS Features
•
Advanced fault tolerant mechanisms guaranteeing node stability.
•
Advanced Hotspot functionality
Web Redirect (Universal Access Method)
MAC Authentication
Bandwidth Management
User Information and Radius Statistics
Walled Garden
Advertisement URLs
Configurable redirection page
Multiple bridged high speed interfaces
Ikarus OS and Ikarus NMS User
Manual
1.4
Administration MAC
Radius Attributes Support
•
WAN Interface configuration (PPPoE, PPTP)
•
DHCP leases information added.
•
Wireless Functionality
Advanced Wireless Security (WPA, 802.1x)
Best Channel Selection Algorithm
Country Code Selection (+ out of band modes)
Wireless to wireless traffic filtering
Mac Address Spoofing
Advanced Firewall functionality
NTP (Network Time Protocol) service
Ikarus NMS Installation Guide
For a Windows installation, double-click the IKARUS_vX_setup.exe
installer and follow the prompts. The installer comes bundled with jre 1.4,
so you do not have to pre-install it.
For a Linux or Macintosh installation, unzip the INMSvX_jars.zip file and
launch the application as java –jar INMSvX.jar from the current directory.
JRE (v1.4) must be preinstalled.
8
/ 167
Ikarus OS and Ikarus NMS User
Manual
2. Ikarus NMS
If your goal is to deploy several wireless access points in one system,
central management is recommended. Even if you plan to begin with a
smaller network, but expect to expand in the future, a centrally managed
system should be considered. The Ikarus Network Management System
(INMS) provides an effective, turnkey management solution that covers
the needs of most users.
Using INMS you can:
2.1
•
Manage access points and devices on the wireless network
•
Configure network nodes, polling settings, and other parameters
•
Load and save network configurations
•
Configure and view network topology
•
Auto-discover available nodes
•
Analyze network traffic using the Multi Router Traffic Grapher
(MRTG)
Overview of INMS Interface
The user interface utilizes typical drop down menus, short cut menus
(right click) and tabbed/sub-tabbed panes inside the main window.
INMS Main Window
The Ikarus NMS window is a graphical user interface that facilitates
viewing, configuring and monitoring your wireless network. The interface
includes a typical main menu, tabbed panes containing graphical and
textual information and shortcut menus that allow you to navigate to other
windows, tabs and dialog boxes.
Figure 1.
9
/ 167
INMS Main Window
Ikarus OS and Ikarus NMS User
Manual
Main Menu
The Ikarus NMS window features a menu system with four main menu
headings: File, Tools, Utilities and Help.
Figure 2.
INMS Main Menu System
Tabbed Panes
The main body of the INMS window displays information in tabbed
panes. When INMS starts the Network Topology tab is available. This tab
contains three information panes: the Topology Map, the Registered
Node List and the Node Status pane.
Figure 3.
INMS Tabbed Panes
Node Shortcut Menu
Many other functions are accessible via the Node Shortcut Menu, which
includes the following items: GUI-Node Connectivity Settings, Open
Status Window, Advanced Node Configuration, Save Configuration,
Unlock, Back Up, FW Upgrade, Reboots, Current Throughput, Wisp
Easy Wizard (WEW) and Remove. From the Node Shortcut Menu you
can access additional tabbed windows used in configuring and monitoring
the network.
10
/ 167
Ikarus OS and Ikarus NMS User
Manual
Figure 4.
2.1.1
Node Shortcut Menu
Ikarus NMS Main Menu
Using INMS menus you can manage system profiles, implement tools to
discover, add and view nodes, launch utilities and access help information.
RW menus include:
File
•
Save Profile – Save the current INMS profile
•
Load Profile – Load a previously saved INMS profile
•
Load Background Image – Load a background image (typically a
map) to be displayed in the Topology Map
•
INMS Settings – Set polling interval and polling port values
•
Exit – Exit INMS
Tools
•
View Topology – Display the Topology Map tab
•
Add New Node – Open the Insert New Node dialog box
•
License Manager – Display the License Manager tab
•
Discovery Manager – Open the Auto Discovery dialog box
Utilities
•
MRTG – Open the MRTG window
Help
2.1.2
11
/ 167
•
Home Page – Access the AntCor website
•
About – Display the IKARUS introductory window
Network Topology Tab Information Panes
Ikarus OS and Ikarus NMS User
Manual
Figure 5.
The Ikarus NMS Window
Topology Map
Located in the center pane, the Topology Map displays icons
representing network nodes and connection information describing the
layout of the network. It also can display a map graphic in the background.
Registered Node List
Located in the left pane, the Registered Node List displays all registered
nodes on the network
Node Status
Located in the bottom pane, the Node Status area displays the following
information on the currently selected node
•
Firmware Version – The number representing the firmware version
residing in the node
•
Up Time – The length of time the node has been operating
•
Key Level
•
INMS Connectivity – The
responses
ratio of successfully received probe
All panes are resizable and can be adjusted according to user preferences.
12
/ 167
Ikarus OS and Ikarus NMS User
Manual
2.1.3
Node Shortcut Menu
Figure 6.
Node Shortcut Menu
GUI-Node Connectivity Settings
The GUI-Node Connectivity Settings menu option allows you to access
the Node Connectivity Settings dialog box (for the currently selected
node).
Open Status Window
The Open Status Window menu option allows you to access the Status
dialog box, which contains the FW Version, Key Level, Up Time and
Host Name fields. (The FW Version, Key Level and Up Time fields also
are displayed in the Node Status pane of the Topology Map tab.)
Advanced Node Configuration
The Advanced Node Configuration menu option allows you to retrieve
information from the selected node. A new pane is displayed containing a
main tab (Advanced Configuration of node: [node name]. Under this
tab three sub-tabs are displayed: Configuration, Statistics and System
Properties. Each of these tabs contains several additional sub-tabs used in
the configuration process.
Save Configuration
The Save Configuration menu option allows you to permanently save the
configuration for the current node.
Note: After the base station is configured, the configuration parameters are stored in RAM
(volatile memory). If the base station is powered down the configuration will be lost unless
you Save Configuration to the base station’s permanent memory.
13
/ 167
Ikarus OS and Ikarus NMS User
Manual
Back Up
The Back Up menu option allows you to back up and restore the
configuration settings for the selected node.
FW Upgrade
The FW Upgrade menu option allows you to access the Select dialog
box, from which you can select the firmware image file to be loaded into
the node.
Reboot
The Reboot menu option allows you to reboot the node.
Current Throughput
The Current Throughput menu option allows you to display a real-time
graphical display of transmit and receive traffic of the network interface.
WISP Easy Wizard (WEW)
The WISP Easy Wizard (WEW) menu option allows you to start a
wizard that provides an easy and convenient way to install and configure
wireless nodes. (See Chapter 14 for details)
Remove
The Remove menu option allows you to remove the currently selected
node from the Topology Map and Registered Node List.
2.2
Getting Started with INMS
Starting from the menus and windows mentioned above, you can autodiscover and insert new nodes, display maps and graphics of your wireless
network, save and load profiles and access multi-tabbed windows used for
advanced configuration of nodes.
2.2.1
Auto-Discovering Nodes
Discovery Manager allows you to discover nodes and insert them into the
Topology Map. A custom polling protocol is used to detect IKARUS
nodes in the specified subnet. Discovered nodes are displayed in a tabular
format.
To use Discovery Manager:
•
14
/ 167
In the Tools menu, select Discovery Manager. The Auto Discovery
dialog box appears.
Ikarus OS and Ikarus NMS User
Manual
Figure 7.
Auto Discovery Dialog Box
Network Subnet
In the Network Subnet field, type the subnet address. (INMS will detect
nodes in which the first three segments, or 24 bits, of their IP address
match the first three segments of the subnet address.)
Enable Broadcast Discovery
Select the Enable Broadcast Discovery checkbox. (INMS uses a UDP
broadcast message to detect any nodes on the network.)
Timeout
In the Timeout field, type a timeout value in seconds (default: 10 seconds)
Discovery Results
Click Start to initiate a discovery poll. The Discovery Results bar graph
displays the progress of the poll. When complete, the table displays the IP
Address, Host Name and Password (if used) of discovered node. The
checkbox under Include to Topology is automatically selected.
Include to Topology
To display a node in the Topology Map, leave the Include to Topology
checkbox selected.
Submit
Click the Submit button to insert the nodes into the Topology Map.
15
/ 167
Ikarus OS and Ikarus NMS User
Manual
Cancel
Click the Cancel button to exit the Auto Discovery dialog box.
Icons for each node should be visible in the Topology Map, labeled with
the hostname. If two nodes have the same default hostname, INMS will
label one with the hostname and the other with its IP address. (The label
can be changed to an Alias using the GUI-Node Connectivity Settings
dialog box, accessible from the Node Shortcut Menu.)
2.2.2
Configuring a New Node
Network nodes can be configured manually using the Insert New Node
dialog box.
1. Use any one of the following three methods to configure a new node:
•
Right click anywhere in the topology pane, then click the Insert new
node button that appears
or
•
Click the
icon
or
•
On the Tools menu, click Add New Node. The Insert New Node
dialog box appears.
Figure 8.
Insert New Node Dialog Box
2. Type the IP address, Alias (optional) and SSH Settings Password.
(Typically a new node is given the default password admin)
3. Select a Displayed Icon (optional) to represent the node.
16
/ 167
Ikarus OS and Ikarus NMS User
Manual
Access Point
Router
Dual Access
Point
Firewall
Router
Firewall
Voice
Gateway
IP Telephony
Router
Wireless
Bridge
Mobile Access
Router
NAT
Wireless Router
(default icon)
Figure 9.
List of Available Icons
Note: Though optional, adding Alias and/or Displayed Icon provides an enhanced visual
representation of the nodes. This becomes especially useful when working with middle to
large scale networks.
4. Click the Add button. The icon will appear in the topology pane. All
topology panes are updated with the new insertion information.
Figure 10.
17
/ 167
Node Insertion
Ikarus OS and Ikarus NMS User
Manual
If the newly inserted node has successfully responded to a network probe,
a green outline appears around the icon. A red outline
the node is not responding.
2.2.3
2.2.4
indicates
Moving and Resizing Icons
•
To move a node icon, drag it to the desired location in the pane.
•
To resize a node icon, select the icon, then drag one of its handles.
Adding Background Map Images
Topology Map can be further enhanced by loading a background image to
indicate the geographical location of the nodes. To add a background
image:
1. On the File menu, click Load Background Image. The Load
Background Image dialog appears.
2. Browse to the image file you wish to load, select it and click the Load
Background Image button.
Note: .gif or .jpg formats may be used for background images
18
/ 167
Ikarus OS and Ikarus NMS User
Manual
Figure 11.
Customized Topology Map
3. Adjust the magnification level of the background image using the
following zoom buttons located above the Registered Node List:
•
Zoom In
•
Zoom Out
•
Restore to default.
4. Create arrows indicating a connection between nodes by clicking in the
center of the source node (a hand cursor will appear), and dragging to
the center of the destination node. A line with arrowhead will appear
between the nodes.
19
/ 167
Ikarus OS and Ikarus NMS User
Manual
Figure 12.
2.2.5
Network Nodes Showing Connection
Saving and Loading Profiles
1. To save a Topology Profile, on the File menu, click Save Profile.
2. To load a Topology Profile, on the File menu, click Load Profile.
2.2.6
Using the Node Shortcut Menu
You can manage and configure a variety of operating parameters of
network nodes from the Node Shortcut Menu, which can be accessed
using either of the following methods:
•
Double click any node name shown in the Node List
or
•
Right click any node in the Topology Map
Figure 13.
20
/ 167
Node Shortcut Menu
Ikarus OS and Ikarus NMS User
Manual
GUI-Node Connectivity Settings
Click this option to display the Node Connectivity Settings dialog box.
This box contains the IP Address and Alias assigned to the selected icon.
If an Alias has not been assigned, the Alias field will contain the
Hostname of the node.
Figure 14.
GUI-Node Connectivity Settings Dialog Box
IP Address
When Ikarus NMS scans the network it looks for the IP Address listed in
this dialog. If it makes a connection, the border around the icon turns
green. If not, the border is red.
Alias
To change the Alias, type the new name into the Alias text box.
Password
Type the password (default: admin) into the Password field. (This step is
required to allow access to Advanced Node Configuration described
later in this section.)
Node Icon
To change the node icon, select a icon from the drop down menu.
Submit Changes
Click the Submit Changes button to add the node to the Topology Map
and keep the dialog box open
OK
Click OK to add the node and exit the dialog box.
21
/ 167
Ikarus OS and Ikarus NMS User
Manual
NOTE: Changing the IP Address, Alias or Password, specifies the parameters assigned to
the currently selected node icon. The IP address and password will be used when INMS
scans the network. Changing the IP address of the icon does not change the IP address of
the node. If the IP address of the icon is changed to an address not present on the
network, the border of the associated icon will turn red indicating no connection has been
made.
Open Status Window
Click this option to access the Status dialog box, which contains the FW
(Firmware) Version, Key Level, Up Time and Host Name fields. (The
FW Version, Key Level and Up Time fields also are displayed in the Node
Status pane of the Topology Map tab.)
•
The FW Version field contains the version number of the firmware
residing in the currently selected node.
•
The Key Level field should display Level 2.
•
Up Time – The length of time the node has been operating
•
Host Name – The name of the currently selected node
Figure 15.
Current Status Dialog Box
Advanced Node Configuration
Click this option to retrieve information from the selected node and open
the Advanced Configuration of Node tab.
NOTE: To access the Advanced Node Configuration you must first access the GUI-Node
Connectivity Settings via the Node Shortcut Menu and enter the password, then click OK
or Submit.
The Advanced Configuration of Node tab contains three sub-tabs:
Configuration, Statistics and System Properties.
22
/ 167
Ikarus OS and Ikarus NMS User
Manual
Figure 16.
Advanced Node Configuration Tab with Sub-Tabs
Each tab contains several additional tabs. The mind map below shows the
hierarchy of advanced configuration tabs and sub-tabs used. The table
indicates the chapter where descriptions and configuration procedures for
each tab are located.
Tab
Chapter
Network
3, 4
VLAN
3
Wireless
5
Firewall
6
NAT
6
DHCP
7
WAN
8
Bandwidth Manager
9
HotSpot
10
Services
11
Statistics
12
Figure 17.
Tab/Chapter List
The table above indicates the chapters where descriptions and
configuration procedures for each tab are located.
Advanced Configuration Tab Hierarchy
23
/ 167
Ikarus OS and Ikarus NMS User
Manual
Figure 18.
Mind Map of Advanced Configuration Tabs and Sub-tabs
Save Configuration
Click this option to permanently save the configuration for the current
node.
24
/ 167
Ikarus OS and Ikarus NMS User
Manual
Note: After the base station is configured, the configuration parameters are stored in RAM
(volatile memory). If the base station is powered down the configuration will be lost unless
you Save Configuration to the base station’s permanent memory.
Back Up
Click this option and select:
•
Retrieve Configuration to Retrieve the last saved node configuration
or
•
Restore Configuration to Restore the node configuration from a file
Figure 19.
Back Up Menu Options
FW Upgrade
Click this option to access the Select dialog box, from which you can
select the firmware image file to be loaded into the node.
Reboot
Click this option to reboot the node. An Alert dialog box appears with the
question: Should system save its configuration before reboot. Click Yes
if you want to save the configuration.
Current Throughput
Click this option to display a real-time graphical display of transmit and
receive traffic of the network interface.
WISP Easy Wizard (WEW)
Click this option to start a wizard that provides an easy and convenient
way to install new nodes. (See Chapter 14 for details)
25
/ 167
Ikarus OS and Ikarus NMS User
Manual
Remove
Click this option to remove the currently selected node from the Topology
Map and Registered Node List.
26
/ 167
Ikarus OS and Ikarus NMS User
Manual
3. IP Networking
This section describes IP Networking settings and configuration
procedures for your IKARUS node.
To configure IP Networking, select the Interface Configuration tab,
located under the Advanced Configuration of Node, Configuration,
Network tabs.
See Page 24 for a diagram showing Advanced Configuration tabs and sub-tabs.
The Interface Configuration tab features four panes:
•
Network Interfaces Tree (left pane)
•
Basic IP Configuration (top pane)
•
Global Settings (center pane)
•
Special Action Interface Commands (bottom pane)
Two buttons are located at the top of the IP Configuration tab:
•
Refresh – Click Refresh to retrieve setting from the selected node.
•
Submit – Click Submit to upload the configuration to the node.
Figure 20.
27
/ 167
Network Configuration Tab
Ikarus OS and Ikarus NMS User
Manual
3.1
Using the Network Interfaces Tree
The left pane of the IP Configuration tab contains the Network
Interfaces Tree, a representation of all available network interfaces of the
selected node. The tree view can be expanded or collapsed by left clicking
on any master interface. When an interface is selected, data fields in the
other panes display the parameters associated with the selected interface
and changes can be made.
3.2
Configuring Basic IP Settings
The top pane of the IP Configuration tab contains all Basic IP
Configuration fields for the interface selected in the Network Interfaces
Tree.
Figure 21.
IP Interface Settings
The following section describes the fields used to configure IP settings.
3.2.1
IP Address
The IP Address field contains the IP address of the selected interface. To
change the IP address of the interface, type the new address into this field
and click the Submit button.
3.2.2
Subnet
The Subnet field contains the subnet mask address of the selected
interface. To change the subnet address, type the new address into this
field and click the Submit button.
3.2.3
Enable/Disable Selected Interface
%he Enable/Disable Selected Interface box indicates whether the
interface is enabled. If this box is not checked the interface will maintain
the desired configuration but it will remain disabled. If the selected
interface is a virtual interface, this box has no effect. Virtual interfaces can
only be in the enabled state.
3.2.4
PTP IP Address
If there is a PPP connection (from a PPPoE client or a PPTP client), the
remote peer IP address is displayed in the PTP IP Address field.
Otherwise this field is blank. This is a read-only field.
28
/ 167
Ikarus OS and Ikarus NMS User
Manual
3.2.5
MAC Address
The MAC Address field displays the interface’s Media Access Control
(MAC) address in hex format. This field is readable for any kind of
interface and writeable only for physical interfaces. To change the MAC
address of a physical interface the MAC Spoofing check box must be
selected.
3.2.6
MAC Spoofing
When the MAC Spoofing check box is selected an alternate MAC address
(for physical interfaces only) can be typed into the MAC Address field.
3.2.7
STP Enable
The STP Enable check box enables the use of Spanning Tree Protocol,
Note: Spanning Tree Protocol (STP) eliminates Layer 2 loops in networks, by selectively
blocking some ports and allowing other ports to forward traffic, based on global (bridge)
and local (port) parameters you can configure
3.3
Configuring Global Settings
The center pane of the IP Configuration tab contains Global Settings.
These fields apply to all network interfaces.
Figure 22.
3.3.1
IP Global Settings
Default Gateway
Every IP packet with an unknown destination will be forwarded through
the default gateway IP address. Set this address statically by typing it into
the Default GW field. It also can be set dynamically from another
application such as a DHCP client, a PPPoE client, or a PPTP client.
3.3.2
IP Forwarding
IP Forwarding all traffic to flow between interfaces even if they are set
on different subnets. Select the IP Forwarding check box to allow the
system to forward packets from one subnet to another.
29
/ 167
Ikarus OS and Ikarus NMS User
Manual
3.3.3
DNS1 and DNS2
You can set DNS1 and DNS2 addresses statically by typing them in or
they can be set dynamically from another application such as a DHCP
client, a PPPoE client, or a PPTP client.
3.4
Using Special Interface Commands
The bottom pane of the IP Configuration tab contains Special Action
Interface Commands used to create and manage network bridges and
virtual interface commands.
Figure 23.
3.4.1
Special Interface Commands
Network Bridge Commands
A bridge is a LAN interconnection device that operates at the data link
layer (layer 2) of the OSI reference model. It may be used to join two
LAN segments (A, B), constructing a larger LAN. A bridge is able to filter
traffic passing between the two LANs and may enforce a security policy
separating different work groups located on each of the LANs. Bridges
were first specified in IEEE 802.1D (1990) and later by ISO (in 1993).
Add New Bridge
To create a new network bridge interface
1. Click the Add new bridge button. The Insert New Bridge dialog box
appears.
2. Type the bridge name in the box, then click the Submit button. The
bridge name appears in the Network Interfaces Tree.
Note: The bridge name must begin with the string “br”. There is no limitation to the rest of
the name.
Delete Bridge
To delete a bridge
1. Select the bridge in the Network Interfaces Tree
30
/ 167
Ikarus OS and Ikarus NMS User
Manual
2. Click the Delete Bridge button in the Network Bridge Commands
pane
Insert Interface
To insert an interface as a ‘slave’ under a bridge
1. In the Network Interfaces Tree, select an interface to become the
slave.
2. Click the Insert Interface button. The Insert Iface to Bridge dialog
bx appears.
3. In the Select Bridge list box, select the desired bridge.
4. Click Submit. The tree is rearranged to show the interface as a slave to
the bridge.
Figure 24.
Inserting an Interface Under a Bridge
Remove Interface
1. Select the interface in the Network Interfaces Tree.
2. Click the Remove Interface button.
3.4.2
Virtual Interface Commands
From the Special Interface Commands pane you also can create virtual
network interfaces—ones that are not associated with hardware. Virtual
interfaces allow you to associate more than one IP address with a system.
A typical use of this technique would be to support multiple Web sites.
For example, if http://www.examplesite.com were assigned the address
222.33.44.55, virtual interfaces 222.33.44.56 and 222.33.44.57 might be
assigned to www.examplesite.net and www.examplesite.org. All three
sites could exist on the same system without conflict.
Virtual interfaces also allow a system to communicate on more than one
network address space. For example, virtual interfaces allow you to
temporarily renumber a network from a masqueraded network address
space to a private (10.0.0.0) subnet. During the transition, all servers can
31
/ 167
Ikarus OS and Ikarus NMS User
Manual
be assigned a virtual address enabling them to communicate with clients
on both the old and new network address spaces. Externally, virtual
interfaces appear as if they are actual interfaces.
Add New Interface
To insert a new virtual interface in association with a physical interface
1. dlect the physical interface in the Network Interfaces Tree.
2. Click the Add new Iface button. The virtual interface appears in the
tree and is automatically named with a prefix that matches the physical
interface name and a suffix which is includes the virtual interface
index inside brackets.
Figure 25.
Insertion of Virtual Interfaces
Delete Interface
To permanently remove a virtual interface
1. Select the virtual interface in the Network Interfaces Tree
2. Click the Delete Iface button
3.5
Using Table View
The Table View option is a feature that further enhances the
controllability of interface IP settings. This feature allows you to browse
and edit the basic settings of all available interfaces. To access this option,
click the Table View button located below Network Interface Tree pane.
The Interface Configuration dialog appears.
32
/ 167
Ikarus OS and Ikarus NMS User
Manual
Figure 26.
3.6
Interface Table View
Configuring VLANs
A Virtual LAN (VLAN) is a group of devices on one or more LANs that
are configured so that they can communicate as if they were attached to
the same network, when in fact they are located on a number of different
LAN segments. Because VLANs are based on logical instead of physical
connections, they are very flexible for user/host management, bandwidth
allocation and resource optimization. The IEEE 802.1Q specification
establishes a standard method for tagging Ethernet frames with VLAN
membership information.
The IEEE 802.1Q standard defines the operation of VLAN bridges that
permit the definition, operation and administration of Virtual LAN
topologies within a Bridged LAN infrastructure. The 802.1Q standard is
intended to address the problem of how to break large networks into
smaller parts so broadcast and multicast traffic does not require more
bandwidth than necessary. The standard also helps provide a higher level
of security between segments of internal networks.
To make a router an 802.1Q compliant device, one or more VLAN
interfaces must be created with the proper tags. This can be accomplished
33
/ 167
Ikarus OS and Ikarus NMS User
Manual
in the VLAN tab of the Ikarus NMS window. VLAN interfaces can be
added, removed and managed from this tab.
Figure 27.
3.6.1
VLAN Tab
Adding VLAN Interfaces
1. In the VLAN tab, click the
button. The Create a new VLAN
dialog appears. This dialog contains the main fields for configuring a
VLAN interface. The VLAN TagID field automatically generates a
unique VLAN identifier according to 802.1Q.
2. Click the arrow on the Interface dropdown list and select any enabled
physical interface or bridge.
3. Type IP/subnet address in the IP Address/Subnet Mask fields. These
are required to properly route tagged packets. If there is a need to drop
un-tagged panes (not 802.1Q compliant), configure the specific
physical interface and any virtual interface with zero IP address.
4. Click Submit to complete the process. The virtual interface Tag
number, Interface name and IP/subnet address will appear in the
Virtual LAN list.
34
/ 167
Ikarus OS and Ikarus NMS User
Manual
Figure 28.
3.6.2
Create a New VLAN Dialog Box
Removing VLAN Interfaces
To remove a VLAN Interface, in the VLAN list, select the interface to be
deleted. Click the
button. The VLAN information will disappear
from the list.
3.6.3
Modifying VLAN Interfaces
To modify the settings for a VLAN interface, select the interface and click
the
button. The Create a new VLAN dialog box appears. The
settings for the interface are shown in the fields.
Change these settings as required, then click the Submit button. The new
settings appear in the VLAN Interface list.
3.6.4
Uploading VLAN Interfaces
To send the configuration settings to the node, click the
35
/ 167
button.
Ikarus OS and Ikarus NMS User
Manual
4. Static IP Routing
Static routing is the manual method used to set up routing. An
administrator enters routes into the router using configuration commands.
This method has the advantage of being predictable and simple to set up. It
is useful in managing small networks but becomes somewhat unwieldy on
larger networks. Ikarus NMS provides management tools for manipulating
any of the routing tables and configuring rules.
To configure Static IP Routing, select the Static Routing tab, located
under the Advanced Configuration of Node, Configuration, Network
tabs. In the Static Routing tab you can select the Routes tab or the Rules
tab.
See Page 24 for a diagram showing Advanced Configuration tabs and sub-tabs.
In the Routes tab you can:
•
Add, delete and select routing tables
•
Add, delete, modify and prioritize routes
In the Rules tab you can:
•
Add, delete and select rules
Figure 29.
Routing Table Handling
The bar across the top of the Static Routing tab contains the following
options:
36
/ 167
Ikarus OS and Ikarus NMS User
Manual
•
Entries Commands buttons
Button
Command
Insert New Route
Delete Route
Modify Route
Move Up
Move Down
Figure 30.
•
Route Entries Commands
Table Commands buttons
Button
Command
Insert New Route
Delete Route
Figure 31.
•
Tables drop down list
Figure 32.
4.1
Route Table Commands
Routing Tables Drop Down List
Configuring Routing Tables and Entries
IKARUS provides a multiple routing table system with a flexible
infrastructure and the ability to implement policy routing. In addition to
the local and main routing tables, IKARUS supports up to 252 additional
routing tables.
4.1.1
Adding a New Routing Table
To create a new routing table that will be integrated in the multiple routing
table system
37
/ 167
Ikarus OS and Ikarus NMS User
Manual
1. Click the Table Commands
Table dialog appears.
button. The Insert New Routing
2. Type the name into the Routing Table box, then click Submit. The
table name is stored in the drop down list for future use.
4.1.2
Remove an Existing Routing Table
To delete an existing routing table
1. Select the table name from the Main drop down list.
2. Click the Table Commands
button.
CAUTION: The user has to be careful not to delete the main routing table, as this action
can lead to connectivity problems.
4.1.3
Adding Static Routing Entries
To add a new static route
1. Select the Routes tab
2. Click the Entries Commands
dialog box appears.
Figure 33.
button. The Insert New Route
Insert New Route
In the above example all the traffic with destination addresses that belong to subnet
192.168.2.0/24 will be forwarded via interface ath0.
5.
38
/ 167
Ikarus OS and Ikarus NMS User
Manual
3. In the Destination boxes, type the destination network or destination
host address.
4. In the Subnet boxes, type the netmask for the destination net.
(255.255.255.255 for a host destination and 0.0.0.0 for the default
route)
5. In the Default Gateway boxes, type the gateway address (if required).
6. In the Preferred Source boxes, type the preferred source address for
communicating to that destination.
7. In the Distance box, type the distance to the target, usually counted in
hops. (This field is not used by recent kernels, but may be needed by
routing daemons.)
8. In the Interface drop down list, select the interface to which packets
for this route will be sent.
9. To accept your settings, click the Insert New Route dialog Submit
button, then click the IP Configuration pane Submit button to
complete the process.
4.1.4
Removing Static Routing Entries
To remove a specific routing entry, select the table row of that entry, then
click the Entries Commands
4.1.5
button.
Modifying Static Routing Entries
To edit a specific routing entry, select the table row of that entry, then
click the Entries Commands
4.1.6
button.
Repositioning Static Routing Entries
Routing entries allocated in each routing table are parsed by the OS kernel
in a serial manner. To modify the series (priority) of allocated entries,
select the table row of the entry to be moved, then click the Entries
Commands
button to move the entry upward or the
to move it downward in the list.
4.2
button
Configuring Static Rules
A rule is a method for implementing Access Control Lists (ACL) for
routes. Rules allow you to specify the filters that match packets to select a
route structure when the filter does match.
39
/ 167
Ikarus OS and Ikarus NMS User
Manual
Using a rule you can perform the most common Policy Routing function:
route by source address. The rule can specify the selection of a packet if
the source address of the packet falls within a designated address range,
and which route structure to use or other destination to choose if there is
no match. However, on a system with only one routing table, a rule set is
usable only under limited conditions.
Figure 34.
4.2.1
New Routing Rule Insertion
Adding Rule Entries
To add a new rule entry
1. Select the Rules tab
2. Click the Entries Commands
dialog appears.
button. The Insert New Rule
3. In the Source Address boxes, type the address of the source network
or source host.
4. In the Source Address Subnet boxes, type the netmask for the source
net. Type 255.255.255.255 for a host source.
5. In the Destination Address boxes, type the destination network or
destination host.
6. In the Destination Address Subnet boxes, type the netmask for the
destination net. Type 255.255.255.255 for a host destination.
7. In the Interface drop down list, select the interface that packets are
received from. The interface can be one of the available physical
interfaces or can be set to All.
40
/ 167
Ikarus OS and Ikarus NMS User
Manual
8. In the Action drop down list, select one of the following:
a) LookUp to cause the routing subsystem to look up the routing
table selected in the Table drop down list. (Default: Main
table)
b) Unreachable to drop the received packet and send an ICMP
packet to the source indicating the destination was unreachable.
c) Drop to silently drop packets with matching frames.
9. In the Table drop down list, select the routing table you wish to use
with the LookUp option described above.
In the example screenshot above the rule specifies that the system will silently drop
packets originated from network space 10.10.10.0/24 arriving in any interface.
4.2.2
Removing Rule Entries
To remove a specific rule entry, select the table row of that entry, then
click the Entries Commands
4.2.3
button.
Modifying Rule Entries
To edit a specific rule entry, select the table row of that entry, then click
the Entries Commands
button. The Insert New Rule dialog
appears with the fields for the selected rule filled in. Modify as required,
then click Submit.
4.2.4
Repositioning Rule Entries
Rules entries allocated in each routing table are parsed by the OS kernel in
a serial manner. To modify the series (priority) of allocated entries, select
the table row of the entry to be moved, then click the Entries Commands
button to move the entry upward or the
downward in the list.
41
/ 167
button to move it
Ikarus OS and Ikarus NMS User
Manual
5. Wireless
Ikarus NMS allows you to configure all wireless settings for nodes on
your wireless network, including:
•
Link Distance
•
Transmitter Power
•
Operational Modes
•
Radio Settings
•
Security Settings
•
Outdoor Settings
•
Country Code Settings
•
Site Survey Operation
To configure Wireless settings, select the Wireless tab, located under the
Advanced Configuration of Node, Configuration tabs. In the Wireless
tab you can select the OpMode, Radio, Security or Outdoor sub-tabs.
See 24 for a diagram showing Advanced Configuration tabs and sub-tabs.
Figure 35.
42
/ 167
Wireless Configuration Panel
Ikarus OS and Ikarus NMS User
Manual
Three buttons and two drop down lists are located at the top of the
Wireless tab:
5.1
•
Refresh – Click Refresh to retrieve setting from the selected node.
•
Submit – Click Submit to upload the configuration to the node.
•
Set CC – Click Set CC to accept the country code specified in the
CC drop down list
•
CC List – Select the required country code from the list, then click
Set CC. The software will perform all the appropriate checks of the
available radio chipsets in the system in the background. If any of
them does not support the specified country code a possible violation
could occur. If that occurs, Ikarus NMS warns you with a popup alert.
This protects you from choosing an unsupported country code which
might cause a loss of connection with the wireless interface after
setting the specific country code.
•
Selected Wireless Interface list – Select the wireless interface to be
configured. If there are multiple wireless interfaces available, this
drop down a list is populated. If the selected interface is not active a
red warning message is shown next to the interface.
Setting Operational Modes
An IKARUS node has the ability to operate in the following modes:
•
Access Point
•
WDS (Wireless Distribution System)
•
Repeater
•
AP Client
•
Station
Site Survey
The Site Survey button is accessible in all OpMode tabs. Site Survey
scans all available frequencies associated with the IEEE 802.11a, b and g
physical layer. When the scan is complete the Site Survey dialog box
appears, indicating any possible sources of interference by other nearby
access points. For more information on Site Survey settings, see
Section 5.1.6.
5.1.1
Selected Operational Mode
The Selected Operational Mode drop down list is populated with all
available operational modes an IKARUS node can adopt. Selecting an
operational mode from the drop down list makes the corresponding pane
available in the OpMode tab.
43
/ 167
Ikarus OS and Ikarus NMS User
Manual
5.1.2
Configuring an Access Point
To configure the node as an access point (AP), select Access Point in the
Selected Operation Mode drop down list. The AP tab becomes available.
Several parameters must be configured as follows:
Figure 36.
Wireless Operational Mode Settings
SSID (Service Set Identifier)
This field contains the string which is published as ESSID by the access
point. To create a name for the service set identifier (SSID), type the name
in the SSID box.
Inactivity Limit
If a station associated with the IKARUS access point is idle for a period of
time defined by the Inactivity Limit field, the IKARUS access point
sends a disassociation frame to the station to inform it that it had been
disassociated due to inactivity timeout. To configure the Inactivity Limit,
type the inactivity threshold, in minutes, in this box.
Beacon Period
This field represents the desirable time interval between two consecutive
beacons. To configure the Beacon Period, type the number of seconds in
this box. (Default: 100)
Association List
To access a list of information for all nodes associated with the AP, click
the Association List button. The Associated stations for wireless
interface dialog box appears.
44
/ 167
Ikarus OS and Ikarus NMS User
Manual
Figure 37.
Association List
A description for each field in the Association List follows:
Alias
An Alias is a special name you can create to identify a client on the AP.
When the configuration is saved, all aliases are saved on the device.
MAC Address
The MAC Address field contains the MAC address of each client
associated with the AP.
IP Address
The IP Address field contains the IP address of each client that exchanges
network traffic with the AP
Note: A client can be seen with multiple IP addresses if transparent bridging is being used.
To see a list of the IP addresses, click Expand with the desired client selected.
Signal Level
The Signal Level field displays the signal level for each associated client
based on Received Signal Strength Indication (RSSI).
Fade Margin
The Fade Margin field displays the actual difference between Signal
Level and Noise Level.
Noise Level
The Noise Level field displays the noise level of the chip according to
transmit rate and physical layer standard
Rate
The Rate field displays the transmission rate the AP uses to exchange data
with each client.
45
/ 167
Ikarus OS and Ikarus NMS User
Manual
Idle Time
The Idle Time field displays the time that has passed since a formerly
associated client was disassociated.
Type
The Type field indicates the type of the node listed. It can contain the
following values:
•
Adapter (Station Mode)
•
AP_Client (AP Client Mode)
•
WDS_Type
•
Client
NOTE: Every client that has ever been associated to the AP is included to this list, which is
automatically saved when you click Save Configuration.
Action
• The Action field is a drop down list that allows you to perform
several different actions on the selected node. You can:
•
Select Set Alias to set an Alias for a specific node.
•
Select Remove to remove an idle node from the list.
•
Select Disassociate to disassociate a client which is associated with
the AP.
•
Select Permanent Disassociation to disassociate a client which is
associated to the AP and simultaneously add its MAC to an Access
Control List to deny access.
Best Channel
Best Channel selection is an extra feature of access point mode. To
enable best channel selection (BCS) click the Best Channel button. The
system calculates the best available frequency based on the BCS algorithm
and configures the AP to transmit on the appropriate channel to achieve
better performance.
Stealth Mode
Stealth Mode is another enhancement of Access Point mode. When
Stealth Mode is enabled the AP does not transmit beacons and hides its
SSID in transmitted probe responses, which makes the AP essentially
invisible. No other node can discover it unless that node already has the
AP’s settings. In addition, a custom polling protocol is implemented,
which is compatible with links between IKARUS APs and IKARUS
clients. When using this protocol IKARUS clients are able to detect
IKARUS Stealth APs.
46
/ 167
Ikarus OS and Ikarus NMS User
Manual
To implement this feature, select the Stealth Mode checkbox.
Hide ESSID
Hiding the AP’s ESSID prevents outside users from joining the network
because they cannot detect the network identifier. To stop the AP from
publishing its ESSID in it beacon transmissions, select the Hide ESSID
check box.
Stop Wireless To Wireless Traffic
To prevent traffic between two wireless stations that are both associated
with an IKARUS AP, select the Stop Wireless to Wireless Traffic check
box.
NOTE: IKARUS has the ability to support Address 4 traffic. However it is necessary to put
the wireless interface (the one that operates as an access point) under a Network Bridge
(check IP Network configuration) if you intend to enable Address 4 support.
5.1.3
Configuring WDS Mode
An IKARUS node can operate as an access point WDS node. This gives
you the opportunity to configure a Wireless Distribution System Network
by setting up a number of IKARUS WDS nodes, each one taking part in
the network. All the features and settings described in the access point
section are supported for WDS mode. In addition, WDS Mode features a
WDS List which contains the MAC addresses of all WDS nodes included
in the network.
To configure the currently selected node for Wireless Distribution System
(WDS) mode, select WDS in the Selected Operation Mode drop down
list. The WDS tab becomes available. SSID, Inactivity Limit, Beacon
Period, Site Survey, Stealth Mode, Hide ESSID and Stop Wireless to
Wireless Traffic fields are configured the same as for Access Point Mode.
The WDS tab also features an Association List button and a list of
Registered WDS Nodes.
Figure 38.
47
/ 167
Wireless WDS Mode Settings
Ikarus OS and Ikarus NMS User
Manual
In the Registered WDS nodes list, type the MAC addresses of the nodes
to be configured. Select the check box next to the MAC address field to
enable it as part of the WDS network topology. (The enable feature can be
helpful when WDS nodes change behavior. You can maintain the nodes’
MAC addresses in the list and enable or disable as necessary.
5.1.4
Configuring Repeater Mode
Repeater Mode is an advanced IKARUS mode. When an IKARUS node
is configured to perform as a repeater it operates as a client. It associates
with an AP that matches the desired BSSID (Basic Service Set Identifier)
and adopts the settings of the BSS (Basic Service Set). After the
association is complete, IKARUS repeats the BSS creating a brand new
BSS range. Repeaters implement a combination of both Client mode and
Access Point mode functionality and features such as Stealth Mode and
Wireless to Wireless Traffic control.
Figure 39.
Repeater Topology
As the diagram above illustrates, the IKARUS Repeater is associated with
the IKARUS Base Node. After being associated, the IKARUS Repeater
extends the IKARUS Base Node’s BSS. The result is that the Initial BSS
range is expanded to the footprint shown by the Final Merged BSS range
with the Repeater acting as an access point with the Base Node settings.
The three stations in the example topology can have access to both Host-
48
/ 167
Ikarus OS and Ikarus NMS User
Manual
PC-1 and Host-PC-2 (or can exchange data between them) regardless of
whether they are associated with the Base Node or the Repeater.
Preferred SSID/Preferred BSSID
To configure an IKARUS node as a Repeater, type the Preferred SSID
name or the Preferred BSSID MAC address into the appropriate fields.
Click the Submit button and wait for the Repeater to associate itself with
the specified Base node. The Repeater is then ready to accept associations
with wireless stations.
State and Link Quality/Signal Level
The State field and Link Quality/Signal Level fields mirror Client
Node’s state as far as it has to do with the potential link with an access
point. A continuous polling protocol operates between the Ikarus NMS
and all nodes which have been added in the Network Topology pane. For
Client configured nodes, Ikarus NMS is continuously informed of the
State (Idle, Authenticated or Associated) of the node, the quality of the
link (if associated) and the dynamic signal strength.
Figure 40.
5.1.5
Repeater Mode Settings
Configuring AP Client and Station Modes
The functionality of AP Client and Station modes is similar. Both modes
configure the node as a client. The main difference is that AP Client
supports address 4 traffic. Station has an embedded proxy-ARP
functionality to support only address 3 traffic for all possible entities
which maybe adjacent to its Ethernet interface. You can select either mode
based on your network needs.
49
/ 167
Ikarus OS and Ikarus NMS User
Manual
Figure 41.
Figure 42.
AP Client Mode Settings
Station Mode Settings
Preferred SSID
This field contains the string which is published as ESSID by the AP
Client/Station node. To create a name for the service set identifier (SSID),
type the name in the Preferred SSID box.
50
/ 167
Ikarus OS and Ikarus NMS User
Manual
Preferred BSSID
This field contains the MAC address which is published as BSSID by the
AP Client/Station node. To create a name for the basic service set
identifier (BSSID), type the MAC address in the Preferred BSSID box.
State and Link Quality/Signal Level
The State field and Link Quality/Signal Level fields mirror Client
Node’s state as far as it has to do with the potential link with an access
point. A continuous polling protocol operates between the Ikarus NMS
and all nodes which have been added in the Network Topology pane. For
Client configured nodes, Ikarus NMS is continuously informed of the
State (Idle, Authenticated or Associated) of the node, the quality of the
link (if associated) and the dynamic signal strength.
5.1.6
Using Site Survey Operation
The Site Survey button is available on all OpMode tabs. If an IKARUS
node operates as AP Client, Repeater or Station, Site Survey will scan all
available channels to find an appropriate BSSID to join (based on user
credentials SSID, BSSID, Security etc). When an IKARUS node acts as an
access point or WDS, Site Survey can be used to scan and monitor
adjacent frequencies to detect interference from other access points.
When you click the Site Survey button, the Site Survey dialog box
appears. Rows in the dialog box display all the available information for
every node scanned.
After the scan is complete and the dialog box list is populated, the status
bar at the bottom of Ikarus NMS window displays the message Site
survey list retrieved successfully.
Figure 43.
Site Survey Operation
At the bottom of the Site Survey dialog box four buttons are available:
51
/ 167
Ikarus OS and Ikarus NMS User
Manual
Connect:
Select a node in the list and click Connect to connect to that node.
Refresh
Click the Refresh button to re-scan and update the Site Survey list.
Continuous Scan
Click Continuous Scan to enable consecutive scanning. The button
remains depressed until clicked a second time. While in Continuous Scan
mode, the Site Survey list is updated dynamically, merging all the possible
unique entries.
Align
The Align option allows you to achieve the best possible alignment for a
distant point-to-point link. Click the Align button. The Site Survey Align
dialog box appears. This dialog box displays BSSID, SSID, Channel
Number, Link Quality and Signal Level fields. Using this dialog you can
monitor signal strength and quality value statistics through consecutive
polling. Polling occurs at a high frequency to provide an up-to-date
representation of the link. While monitoring these statistics you can adjust
your antenna to achieve maximum performance. When optimal antenna
position and polarity are achieved, click the Quit button to return to the
Site Survey panel.
Figure 44.
5.2
Site Survey Align
Configuring Radio Settings
To configure the radio settings of the selected wireless interface, select the
Radio tab on the left side of the Wireless pane. From the Radio tab you
can:
•
52
/ 167
select the Physical layer options (IEEE 802.11a,b and g)
Ikarus OS and Ikarus NMS User
Manual
•
select the Channel number
•
select whether the Channel is expressed as a number or Frequency
•
select the TxRate (data transmission rate)
•
set and enable the Frag value
•
set and enable the RTS parameter
•
enable Spoofing
•
configure the MAC Address
•
enable Diversity operation
•
select the Antenna connector
Figure 45.
5.2.1
Wireless Radio Settings
Selecting Physical Layer Options
The Physical drop down list contains all physical layer options that are
available for the specific hardware you are using. If your hardware
supports IEEE 802.11 a, b and g standards the Physical drop down list
will contain AUTO, 802.11A, 802.11B, 802.11B-G, Turbo A and Turbo
G options. (If the hardware does not support a physical layer standard
Ikarus NMS returns a warning dialog indicating the NIC cannot be
configured in the selected physical layer standard.)
5.2.2
Setting Channels and Frequencies
The Channel drop down list displays the currently selected radio channel
using the standard IEEE channel numbering convention. To convert the
Channel field to display the actual frequency, click the Frequency button.
5.2.3
Setting Transmission Rates
The TxRate drop down list allows you to select a standard transmission
rate based on the available rates associated with the selected physical layer
53
/ 167
Ikarus OS and Ikarus NMS User
Manual
standard. You also can select Auto mode. In Auto mode IKARUS will be
auto-configured to support the optimal TxRate for each related node. This
can be very useful in environments sensitive to retries. In Auto mode an
auto-rate fallback algorithm, which runs on the background, tries to
maximize the data transfer rate.
Note: Management and Control frames are always transmitted at the lowest available rate
of the selected physical layer standard.
5.2.4
Setting the MAC Address
The MAC Address field contains the MAC address of the configured
radio card/hardware that has been selected in the Selected Wireless
Interface field. However, you can enable spoofing functionality by
selecting the Enable Spoofing checkbox and typing a new MAC address
into the MAC Address field.
5.2.5
Setting Frag
The Frag field allows you to implement fragmentation of packets, a
technique that improves network performance in the presence of RF
interference. You can set the fragment size by typing in the frame size
threshold (in bytes). If a frame exceeds this value it will be fragmented.
The fragmentation range is 256 to 2048 bytes. Setting the fragmentation
threshold to 2048 effectively disables fragmentation.
To implement fragmentation, type the threshold value into the Frag box
and select the Enable check box.
5.2.6
Setting RTS
The RTS field allows you to implement RTS/CTS handshaking between
an IKARUS node and another station on the wireless network. RTS/CTS
handshaking helps minimize collisions among hidden stations on a
wireless network. An RTS/CTS handshake involves the originating node
sending a Ready To Send frame to its destination, then waiting for the
destination to return a Clear To Send frame. The originating node will
then send its data. RTS/CTS operation adds to overhead but can help
avoid collisions. When implementing RTS on an IKARUS access point
RTS operation is initiated if a packet exceeds the threshold configured in
the RTS field. The valid range is 0 to 2347 bytes. (If RTS is enabled a
starting value of 500 is recommended.)
To implement RTS, type the threshold value into the RTS box and select
the Enable check box.
5.2.7
Selecting Diversity Options
The Diversity field allows you to enable the use of two antennae for
diversity operation, if two are used for the same radio.
54
/ 167
Ikarus OS and Ikarus NMS User
Manual
5.2.8
Selecting Antenna Options
The Antenna drop down list allows you to select the Right or Left
antenna, if two are used.
5.2.9
Setting Transmitted Power
The transmitted power of the node can be set by selecting preset values
between 5 and 30. This is a custom scale (with no defined units) which
simply represents minimum and maximum Transmitted Power of the
currently selected wireless interface. To set transmitted power, select a
value in the Tx Power drop down list.
5.3
Configuring Security Settings
From the Security tab you can configure the security settings of the
Selected Wireless Interface. From this tab you can set up
5.3.1
•
None (no security)
•
WEP (Wired Equivalent Privacy)
•
WPA (Wi-Fi Protected Access)
•
ACL (Access Control List)
Setting Wired Equivalent Privacy (WEP)
Through the WEP tab you can configure an IKARUS node to
encrypt/decrypt data with keys based on the WEP protocol. To implement
WEP, select WEP in the Selected Encryption Mode drop down list.
To implement 64-bit encryption, select WEP-64 in the WEP Type drop
down list.
To implement 128-bit encryption, select WEP-128 in the WEP Type drop
down list.
Four text boxes (WEP Key #1, #2, #3 and #4) with adjacent option
buttons allow you to maintain four different encryption keys, while using
one of them. Type one or more encryption key into the text boxes, then
select the option button of the one to be used.
55
/ 167
Ikarus OS and Ikarus NMS User
Manual
Figure 46.
5.3.2
Wireless WEP Settings
Setting Wi-Fi Protected Access (WPA)
In the WPA tab you can configure an IKARUS node to encrypt/decrypt
data with keys based on WPA protocol. To implement WPA, select WPA
in the Selected Encryption Mode drop down list.
Setting WPA Mode
To set the WPA Mode, select either the WPA or RSN(WPA 2) option
button.
Figure 47.
Wireless WPA Settings
Setting Key Management Mode
To configure the Key Management field, select PSK (Pre-Shared Key) or
EAP (Extensible Authentication Protocol) in the Key Management Mode
drop down list. This selection determines the type of fields that appear in
the area in the right side of the pane.
EAP
When EAP is selected, several text boxes appear on the right side of the
panel. These fields are required in order to force an IKARUS access point
to authenticate clients on a Back-End Authentication Server. They include
•
56
/ 167
the Server IP address
Ikarus OS and Ikarus NMS User
Manual
•
the Server Port number, used for EAP-TLS packet transactions
(usually 1812)
•
a Server Secret phrase which is used for the IKARUS node
authenticator to be accepted by the Back-End Authentication Server.
EAP-TLS is by default the supported protocol for EAP. The IKARUS node uses 802-1X
authentication to authenticate its clients. If the IKARUS node is configured as a client, in
the case of EAP-TLS usage, you should upload the appropriate certificates on IKARUS
station. This can be done by clicking the Upload Server and Client Certificate buttons on
the right pane.
Figure 48.
EAP Settings
PSK
When PSK is selected in the Key Management Mode, drop down list, the
Pass Phrase text box appears on the right side of the pane. This is the
initial value on which negotiated WPA keys are created. To configure the
Pass Phrase field, type the pass phrase.
Figure 49.
PSK Settings
Pairwise Cipher
The Pairwise Cipher field provides three options for the encryption
mechanism of an IKARUS node.
57
/ 167
•
TKIP (Temporal Key Integrity Protocol)
•
AES(CCMP) (Advanced Encryption Standard-Counter Mode CBCMAC Protocol)
•
BOTH (selected if an IKARUS node is configured as an access
point)
Ikarus OS and Ikarus NMS User
Manual
Group Cipher
(Group Cipher is not functional in Ikarus NMS version 1.1.3)
5.3.3
Configuring Access Control Lists (ACL)
When the Selected Operational Mode has been set to Access Point or
WDS, the ACL sub-tab in the Security tab is available for selection. You
have the option of setting an Access Control List to manage clients trying
to connect to the access point. To configure Access Control List functions,
click the ACL tab, then select the Enable checkbox.
Figure 50.
Access Control List Settings
Denying Access
To deny specified clients access to the node, select DENY in the Policy
drop down list. Clients with MAC addresses matching MAC addresses
registered in the ACL will be denied access. All other addresses will be
allowed
Allowing Access
To allow specified clients access to the node, select ALLOW in the
Policy drop down list. Clients with MAC addresses matching MAC
addresses registered in the ACL will be allowed access. All other
addresses will be denied.
Setting up Access Control Lists
There are two methods to set up an Access Control List.
58
/ 167
•
Type in the MAC addresses manually, using the Add button, and
remove selected MAC addresses using the Remove button.
•
Load a text file containing the MAC addresses using the Append
from File button.
Ikarus OS and Ikarus NMS User
Manual
Extracting Access Control Lists
To save an existing ACL, click Extract to File and name/save the file.
This can be a useful feature if you need to submit the same MAC list to
another access point.
5.4
Configuring Atheros Advanced Capabilities
The Atheros tab is useful in optimizing the operation of distant IKARUS
nodes.
Figure 51.
Atheros Settings
Link Distance
Setting the Link Distance can be effective in optimizing operation of a
node. When Link Distance is defined, the acknowledge timeout is
configured according to the distance. In lossy environments, where many
retries occur, acknowledge timeout should be configured accordingly to
the distance between the nodes. To set this parameter, type the distance (in
meters) into the Link Distance text box.
Fast Frames
Fast Frames is a feature of Atheros-based technologies that utilizes frame
aggregation and timing modifications to increase the data throughput rate
of the system. It increases throughput by transmitting more data per frame
and removing inter-frame pauses. To implement fast frames, select the
Fast Frames check box.
Packet Bursting
Packet Bursting is another technique used by Atheros-based technologies
to increase throughput by decreasing overhead and sending more dta
frames per given period of time. To implement packet bursting, select the
Packet Bursting check box.
59
/ 167
Ikarus OS and Ikarus NMS User
Manual
WMM (Layer 2 QoS) / Advanced WMM Settings
WMM (Wi-Fi Multimedia) is a priority-based Quality of Service method
used in implementing Voice over WLANs. To implement WMM, select
he WMM (Layer QoS) check box, then click the Advanced WMM
Settings checkbox to access the Advanced WMM Parameters dialog
Box.
Figure 52.
Advanced WMM Parameters
WMM QUEUES (TRAFFIC PRIORITIES)
There are the four queues that h/w uses to organize and prioritized the
packets
AC_BK= Background Access Category
(Lowest Priority for bulk data that require maximum throughput and there
is not any time sensitivity related such as FTP for example)
AC_BE= Best Effort Access Category
(medium priority , traditional IP data via this queue)
60
/ 167
Ikarus OS and Ikarus NMS User
Manual
AC_VI= Video Access Category
(High Priority lower than VOICE ,video data sent to this)
AC_VO= Voice Access Category
(High priority , VOIP data and streaming media)
NOTE1 :: On behalf of the AP these fields are advertised in the Beacon
and the CLIENT or STATION on the other side are informed via this in
order to be aware of the policy of the AP.On the other hand AP knows the
policy of each Client.
NOTE2 ::AP EDCA parameters affect traffic flowing from AP to the client
or station(On the other hand STA EDCA control the upstream form client
or Station to AP)
CONFIGURABLE FIELDS (per queue)
.
a.CWmin = Minimum Value of Contention Window
b.CWmax = Maximum Value of Contention Window
b.AIFsn = Arbritary Interframe Space
d.TXOP = Length of TXOP
CWmin
Input to the algorithm that specifies the initial random backoff wait time
(window as known) for retry transmission.This valuw is the upper limit in
msecs of a range from which initial random backoff wait time is
determined.
CWmax
This value is the upper limit in msecs for the doubling random backoff
value.This doubling continues until either the data frames is sent or the
Max Contention Window is reached
AIFs
The Arbitration Inter-Frame Spacing specifies a wait time for data frames
61
/ 167
Ikarus OS and Ikarus NMS User
Manual
TXOP
This is an interval of time when an WMM station or client has the right to
initiate transmisions onto the wireless medium.
5.5
Wireless Topology Scenarios
In this section two possible specific wireless topologies are described,
based on IKARUS's operational modes. In the first section two ways of
setting a point-to-point link are described. In the second section a specific
topology concerning IKARUS Repeater functionality is described.
5.5.1
Point-to-Point Links
There are two basic topology scenarios. You can create a point to point
link using either scenario.
WDS to WDS Scenario
A point-to-point link can be created by configuring two IKARUS nodes as
WDS access points.
Figure 53.
WDS Topology
WDS Node-1 configuration should include the following :
62
/ 167
•
WDS-Node-2’s MAC address should be set in Node-1’s WDS list.
•
Both nodes should transmit on the same frequency.
Ikarus OS and Ikarus NMS User
Manual
•
IKARUS Stealth Mode should be used (if you want to avoid beacon
transmitting) or Hide ESSID (if you want beacons to be transmitted
but not to publish the IKARUS node’s ESSID.)
•
Additionally, you can enable an ACL with Policy set up to Deny and
no node’s MAC address in the list to prevent stations from
connecting to the node.
The same configuration should be set in WDS Node-2, with corresponding
values.
AP to AP-Client Scenario
You can set up a point-to-point link using AP and AP Client Modes.
Figure 54.
Point-to-point Topology
The access point should be configured as follows:
1. Set up the ESSID of the AP.
2. Enable Stealth Mode in the AP.
3. Enable ACL with Policy set up to ALLOW and put the AP-Client’s
MAC address in the MAC list.
The AP-Client should be configured as follows:
1. Type the AP’s MAC address into the SSID field.
63
/ 167
Ikarus OS and Ikarus NMS User
Manual
2. Type the MAC address of the AP into the Preferred BSSID field.
3. Perform a Site Survey.
4. Select the AP from list and perform an Align.
5. Make all the adjustments to achieve optimal alignment results
5.5.2
BSSID Extended Repetition
Repeater is a custom mode of IKARUS. Repeater functionality is
described in the Operational Modes section of this document.
Figure 55.
Extended Repetition Topology Example
In this scenario the IKARUS Base Node’s BSS is repeated through a
Repeater chain. Each IKARUS Repeater node repeats the BSS of the
previous node. Each station is connected to a different Repeater Node, but
they all belong to the same BSS as if they were on the same access point.
This topology can be useful in creating a long distance extension of a Base
Node AP’s BSS, or even to reduce the load of an AP in a large area with
many clients. Also, by configuring an IKARUS Repeater in an optimal
position within the target area, you can achieve load-balancing. In
addition, Repeater offers bridging of all wireless Clients with all Ethernet
Host PCs adjacent to its Ethernet interface.
64
/ 167
Ikarus OS and Ikarus NMS User
Manual
6. Firewall and NAT
A firewall protects networked computers from intentional hostile intrusion
that could compromise confidentiality or result in data corruption or denial
of service. A network system in order to support firewall functionality
must have at least two network interfaces, one for the network it is
intended to protect, and one for the network it is exposed to. A firewall sits
at the junction point or gateway between the two networks, usually a
private network and a public network such as the Internet.
To configure Firewall settings, select the Firewall tab, located under the
Advanced Configuration of Node, Configuration tabs.
To configure NAT settings, select the NAT tab, located under the
Advanced Configuration of Node, Configuration tabs.
See Page 24 for a diagram showing Advanced Configuration tabs and sub-tabs.
6.1
Firewall and NAT Chains
Ikarus OS supports advanced firewall and NAT (Network Address
Translation) functionality and features an easy management and
monitoring interface, providing a turnkey solution for advanced and
novice network administrators. However, a firewall mis-configuration
may result in denial of service even for the administrator, outlining a high
risk configuration.
Ikarus OS Firewall and NAT subsystems consist of four firewall and two
NAT queue chains.
6.1.1
6.1.2
Firewall Chains
•
Input firewall - All incoming traffic is tested against the input
firewall rules prior to being accepted.
•
Output firewall - All outgoing traffic is tested against the output
firewall rules prior to being sent.
•
Forwarding firewall - All traffic that is being forwarded through the
operating system is tested against the forwarding firewall rules prior
to being forwarded.
•
Flowmark - All incoming traffic that matches the corresponding
criterions is marked.
NAT Chains
•
65
/ 167
DNAT - Used to alter destination attributes of a packet (to redirect
them).
Ikarus OS and Ikarus NMS User
Manual
•
SNAT - Used to alter source attributes of a packet (to hide sender’s
address and properties).
The following image displays the way data packets flow through Firewall
and NAT chains:
Figure 56.
6.2
Packet flow diagram
Configuring Firewall Rules
Rules are entries in a chain consisting of several fields (criteria) that can
be used to match a data packet. If all criteria are met, the rule is matched
and the packet leaves the chain, launching the action of the matching rule.
From the Firewall tab you can
•
Select Chains
•
Set up Policy
•
Add, delete and manage Firewall Rules and Flowmarks
•
Write rules to the active list
•
Refresh the displayed information
Figure 57.
66
/ 167
Firewall Chains
Ikarus OS and Ikarus NMS User
Manual
Before configuring a rule, you must Select Chain and set the Policy.
Select Chain
In the Select Chain drop down list, select Input, Output or Forward.
Policy
In the Policy drop down list, select Accept or Drop.
ACCEPT - The packet will flow to the next chain, leaving the current
chain at this rule (no further rules in this chain are further examined),
DROP - The packet stops flowing, is discarded, without notifying the
sender.
6.2.1
Configuring Firewall Matching Fields
Click the
button. The Firewall Rule Configuration for [chain
type] Chain dialog box appears. This dialog box contains two tabs: Basic
and Advanced.
Not Check Boxes
In both tabs, several fields have a Not check box beside them. The Not
field inverts the matching operation, causing a match to occur if the
opposite of the rule is matched. For example, Source IP: is configured
with the specific IP address. When the adjacent check box is selected the
rule will match all packets except the ones that have the specified Source
IP address.
Basic Rule Settings
Figure 58.
Firewall Rule Configuration Dialog Box, Basic Tab
Source IP
The Source IP field displays the Source IP address of the packet. The
address can be expressed as a single IP address (e.g. 192.168.1.1/32), or as
67
/ 167
Ikarus OS and Ikarus NMS User
Manual
a whole IP subnet (e.g. 192.168.1.0/24). A match occurs if the source IP of
the packet is exactly the same or belongs to the subnet configured.
Type the source IP address and number of subnet mask bits into the
Source IP field.
Destination IP
The Destination IP field displays the Destination IP address of the packet.
The address can be expressed as a single IP address (e.g. 192.168.1.1/32),
or as a whole IP subnet (e.g. 192.168.1.0/24). A match occurs if the
destination IP of the packet is exactly the same or belongs to the subnet
configured.
Type the destination IP address and number of subnet mask bits into the
Destination IP field.
Input Interface
The Input Interface field displays the interface from which the packet
was delivered. A match occurs if the interface that the packet arrived from
is the same as the configured interface (if the configured interface is a
bridge, this also matches with interfaces under the bridge).
In the Input Interface drop down list, select a specific input interface, or
select ANY.
Output Interface
The Output Interface field displays the interface from which the packet
is to be transmitted. A match occurs if the interface that the packet will be
transmitted from is the same with the configured interface (in case the
configured interface is a bridge, this also matches with interfaces under the
bridge).
In the Output Interface drop down list, select a specific input interface,
or select ANY.
Existing Flowmark
The Existing Flowmark drop down list contains Flowmarks that already
have been configured. Select a Flowmark from the list to configure a
Flowmark as a firewall matching rule. A match occurs if the packet was
marked by this mark when it flowed through the Flowmark chain.
New Flowmark
The New Flowmark field is available if Mark is selected in the Action
field. Type the name of the new flowmark in the New Flowmark box.
Action
When a rule is matched, its action is performed. Firewall actions can be:
ACCEPT - The packet will flow to the next chain, leaving the current
chain at this rule (no further rules in this chain are further examined),
68
/ 167
Ikarus OS and Ikarus NMS User
Manual
REJECT - The packet stops flowing, is discarded, and a return ICMP
packet (reason code UNREACHABLE) is sent back to the sender.
DROP - The packet stops flowing, is discarded, without notifying the
sender.
FORWARD - (currently not in use)
MARK - The packet will flow to the next chain, leaving the current chain
at this rule (no further rules in this chain are further examined). It will be
marked as New Flowmark.
Comment
The Comment field is used to enter a string consisting of at most 30
characters to describe the rule. This field is not used for matching.
Advanced Rule Settings
Figure 59.
Firewall Rule Configuration Dialog Box, Advanced Tab
Protocol
The Protocol drop down list contains a list of protocols that can be
selected for matching. The contents of the dialog box changes depending
on the protocol selected. The following selections may be configured in
this field:
•
ALL – A match always occurs.
•
TCP – A match occurs if
1. the packet’s protocol type is TCP
AND
2. the SYN flag of the packet matches based on which of the
following is selected in the SYN flag drop down list:
ALL - matches always.
SET - A match occurs if the packet starts a new
connection.
69
/ 167
Ikarus OS and Ikarus NMS User
Manual
NOT SET - A match occurs if the packet is a member of a
previously started connection.
AND
3. Source Port - Source port is entered as number (0-65535)
where 0 indicates that all ports are matched.
4. Destination Port - Destination port is entered as number (065535) where 0 indicates that all ports are matched.
Figure 60.
•
Advanced Firewall Rule, TCP
UDP – A match occurs if
5. the packet’s protocol type is UDP
AND
6. Source Port - Source port is entered as number (0-65535)
where 0 indicates that all ports are matched.
AND
7. Destination Port - Destination port is entered as number (065535) where 0 indicates that all ports are matched.
•
ICMP – A match occurs if
8. the packet’s protocol type is ICMP
AND
9. the ICMP Type matches based on which of the following is
selected in the ICMP Type drop down list:
ANY: A match occurs always
REQUEST: A match occurs if the packet is an ICMP
request.
RESPONSE: A match occurs if the packet is an ICMP
response.
•
GRE – A match occurs if the packet’s protocol type is GRE (Generic
Routing Encapsulation)
•
ESP - A match occurs if the packet’s protocol type is ESP
•
AH – A match occurs if the packet’s protocol type is AH
Connection State
Ikarus can perform firewall functions based on the connection state. The
following selections may be configured in this field:
70
/ 167
Ikarus OS and Ikarus NMS User
Manual
New - A match occurs if the packet starts a new connection (router has
seen packets in one direction).
Established - A match occurs if the packet is a member of an existing
connection (router has seen packets in both directions).
Related - A match occurs if the packet starts a new connection, but is also
a member of an existing connection (router has seen packets in both
directions).
Invalid - A match occurs if the packet is not a member of an existing
connection, but also it does not start a connection (ambiguous packet).
Source MAC
A match occurs if the packet’s Source MAC address (in the Ethernet
header) is the same as the address in this field. Type the Source MAC
address in the Source MAC field
Limit
The Limit fields contain settings related to the rate at which the packet is
arriving.
Limit Rate - A match occurs if the configured rate has not been reached
yet.
Limit Burst - A match occurs if the configured burst rate has not been
reached yet.
Important: To enable a Firewall rule (write it to the active list) you must click the
button.
6.3
Configuring NAT Rules
Rules are entries in a chain consisting of several fields (criteria) that can
be used to match a data packet. If all criteria are met, then the rule is
matched and the packet leaves the chain, launching the action of the
matching rule.
From the NAT tab you can
71
/ 167
•
Select the NAT Kind
•
Add, delete, edit and manage NAT rules
•
Write NAT rules to the active list
Ikarus OS and Ikarus NMS User
Manual
Figure 61.
NAT Chains
Before configuring rules you must select the NAT Kind drop down list.
NAT Kind
In the NAT Kind drop down list, select SNAT or DNAT.
6.3.1
Configuring NAT Matching fields
To add a rule, click the
button. The NAT Rule Configuration for
[NAT Kind] Chain dialog box appears.
Figure 62.
NAT Rule for Configuration for Source Chain Dialog Box
SNAT/DNAT Common Fields
The following fields are common to SNAT and DNAT configuration
dialog boxes.
Not Check Boxes
Several fields have a Not check box beside them. The NOT field inverts
the matching operation, causing a match to occur if the opposite of the rule
is matched. For example, Source MAC: is configured with the specific
MAC address. When the adjacent check box is selected the rule will match
all packets except the ones that have the specified Source MAC address.
72
/ 167
Ikarus OS and Ikarus NMS User
Manual
Source IP
The Source IP field displays the Source IP address of the packet. The
address can be expressed as a single IP address (e.g. 192.168.1.1/32), or as
a whole IP subnet (e.g. 192.168.1.0/24). A match occurs if the source IP of
the packet is exactly the same or belongs to the subnet configured.
Type the source IP address and number of subnet mask bits into the
Source IP field.
Destination IP
The Destination IP field displays the Destination IP address of the packet.
The address can be expressed as a single IP address (e.g. 192.168.1.1/32),
or as a whole IP subnet (e.g. 192.168.1.0/24). A match occurs if the
destination IP of the packet is exactly the same or belongs to the subnet
configured.
Type the destination IP address and number of subnet mask bits into the
Destination IP field.
Source Port(s)
The Source Port(s) field displays the port number of the source node. A
match occurs if the source port number is the same as the number in this
field.
Type the source port number into the Source Port field.
Destination Port(s)
The Destination Port(s) field displays the port number of the destination
node. A match occurs if the destination port number is the same as the
number in this field.
Type the destination port number into the Destination Port field.
Input Interface
The Input Interface field displays the interface from which the packet
was delivered. A match occurs if the interface that the packet arrived from
is the same as the configured interface (if the configured interface is a
bridge, this also matches with interfaces under the bridge).
In the Input Interface drop down list, select a specific input interface, or
select ANY.
Output Interface
The Output Interface field displays the interface from which the packet
is to be transmitted. A match occurs if the interface that the packet will be
transmitted from is the same with the configured interface (in case the
configured interface is a bridge, this also matches with interfaces under the
bridge).
In the Output Interface drop down list, select a specific input interface,
or select ANY.
73
/ 167
Ikarus OS and Ikarus NMS User
Manual
Existing Flowmark
The Existing Flowmark drop down list contains Flowmarks that already
have been configured. Select a Flowmark from the list to configure a
Flowmark as a firewall matching rule. A match occurs if the packet was
marked by this mark when it flowed through the Flowmark chain.
Protocol
The Protocol drop down list contains a list of protocols that can be
selected for matching. The following selections may be configured in this
field:
•
ALL – A match always occurs.
•
TCP – A match occurs if
10. The Source port is entered as a number from 0 to 65535, where
0 indicates that all ports are matched.
11. The Destination port is entered as a number from 0 to 65535,
where 0 indicates that all ports are matched.
•
UDP - A match occurs if packet’s protocol type is UDP and,
12. The Source port is entered as a number from 0 to 65535, where
0 indicates that all ports are matched.
13. The Destination port is entered as a number from 0 to 65535,
where 0 indicates that all ports are matched.
•
ICMP - A match occurs if packet’s protocol type is ICMP
•
GRE - A match occurs if packet’s protocol type is GRE
•
AH - A match occurs if packet’s protocol type is AH
•
ESP - A match occurs if packet’s protocol type is ESP
Source MAC
Sender’s MAC address. A match occurs if the packet’s Source MAC
address (in the Ethernet header) is the same.
Comment
The Comment field is used to enter a string consisting of at most 30
characters to describe the rule. This field is not used for matching.
SNAT Chain Specific Fields
The following fields are available in the SNAT configuration dialog box.
Masquerade: The IP address to be assigned to outgoing packets is
dynamically retrieved by the current outgoing interface’s IP address (does
not need to explicitly configure the outgoing source IP address).
74
/ 167
Ikarus OS and Ikarus NMS User
Manual
Translate Source IP to: The IP address (or range of IP addresses) that the
source IP of the packet will change to. In case there is a range of IP
addresses, a round robin algorithm is used to assign addresses.
Translate Source Port to: The range of the router’s ports used to send
NATed packets and track for responses.
DNAT Chain Specific Fields
The following fields are available in the DNAT configuration dialog box.
Redirect – When a match occurs, the packet will be redirected to another
port of the router.
Translate Dest IP to – The IP address (or range of IP addresses) that the
destination IP of the packet will change to. In case there is a range of IP
addresses, a round robin algorithm is used to assign addresses. This is used
to forward the packet to another host.
Translate Dest Port to – The port that the packet will be sent to (in case
there is a range of ports, a round robin algorithm is used).
Figure 63.
NAT Rule for Configuration for Destination Chain Dialog Box
Important: To enable a NAT rule (write it to the active list) you must click the
button.
6.3.2
Examples
The following examples may be helpful in understanding how to configure
Firewall and NAT rules.
Deny incoming SSH connections to your router from
the internet.
SSH service by default runs on port 22. Assume that the router is
connected to the internet through interface eth0. To disallow incoming
SSH connections from the internet, you can insert a rule in the Input chain
of the Firewall system that will drop this kind of connection (because they
are TCP connections, SYN flag will be set).
75
/ 167
Ikarus OS and Ikarus NMS User
Manual
To accomplish this, configure the Firewall rules as follows:
In the Basic tab:
Source IP:
0.0.0.0/0 (any)
Destination IP:
0.0.0.0/0 (any)
Input interface:
eth0 (the connection to internet)
Comment:
no_SSH_connect
ACTION:
DROP
In the Advanced tab:
Protocol:
TCP
SYN Flag:
SET
Source Port:
0(any)
Destination Port:
22(SSH)
Figure 64.
Figure 65.
Basic Rule Example Configuration
Advanced Rule Example Configuration
Click Submit to add the rule to the list and apply it to the router.
76
/ 167
Ikarus OS and Ikarus NMS User
Manual
Figure 66.
Example Firewall Tab
NAT: Having a single public IP address, allow whole
local network to access the internet.
Assume that the router is connected to the internet through interface eth0
and IP address 173.55.1.2/24. Your local network is connected to router’s
eth1 interface with IP address 192.168.1.1/24. You should masquerade all
outgoing traffic to the internet (interface eth0) originated from your local
network (interface eth1).
Insert a rule to the SNAT chain as follows:
Details
Source IP:
192.168.1.0/24 (local network)
Output Interface:
eth0
Translate Source IP to:
address)
0.0.0.0-0
Comment:
NAT_on_WAN
Figure 67.
MASQUERADE
(eth0’s
IP
NAT Configuration - Masquerade Example
Click Submit to add the rule to the list and apply it to the router.
77
/ 167
Ikarus OS and Ikarus NMS User
Manual
Figure 68.
NAT Tab - Masquerade Example
HINT: make sure IP Forwarding is enabled on the router (Interface
settings Panel).
Important: To enable a NAT rule (write it to the active list) you must
click the
78
/ 167
button.
Ikarus OS and Ikarus NMS User
Manual
7. DHCP
The Dynamic Host Configuration Protocol (DHCP) provides
configuration parameters to Internet hosts in a client-server model. DHCP
server hosts allocate network addresses and deliver configuration
parameters to other (client) hosts.
DHCP consists of two components: a protocol for delivering host-specific
configuration parameters from a server to a host and a mechanism for
allocation of network addresses to hosts.
To configure DHCP settings, select the DHCP tab, located under the
Advanced Configuration of Node, Configuration tabs. The DHCP tab
contains two sub-tabs: Server and Client, selected by clicking the
corresponding option button.
See Page 24 for a diagram showing Advanced Configuration tabs and sub-tabs.
7.1
Configuring a DHCP SERVER
The IKARUS DHCP server provides an extended set of configuration
parameters while at the same time being effective and low resource
consuming.
79
/ 167
Ikarus OS and Ikarus NMS User
Manual
Figure 69.
DHCP Server Configuration Dialog Box
To configure a DHCP Server, select the interface from the interface tree.
Its background turns blue. Only clients in the same physical interface will
be able to acquire IP addresses from this DHCP server. If clients from
other physical interfaces must acquire their IP addresses from the same
server a bridge should be created, and those interfaces should be added
under that bridge. Then, select that bridge as the DHCP server interface.
NOTE: You cannot select an interface which is under a bridge as the DHCP server
interface. Additionally the DHCP server interface should have already been configured
with a valid IP address and subnet mask. Multiple DHCP servers on different interfaces are
allowed.
7.1.1
Setting DHCP Server Fields
To configure DHCP server settings, select the Server option button and
select the Active check box. The Server tab becomes available.
After completing the required fields, click the Submit button. This
uploads the configuration to the node without starting the server.
Start IP and End IP
Type the appropriate IP addresses into the Start IP and End IP fields.
These are the upper and lower limits for the DHCP server address pool.
80
/ 167
Ikarus OS and Ikarus NMS User
Manual
Broadcast
Type the appropriate IP address into the Broadcast field. This field
contains the IP address clients will use. Broadcast IP should be one of the
addresses the Subnet Mask permits.
Subnet Mask
Type the appropriate IP address into the Subnet Mask field. This is the
subnet mask clients will use.
Domain
Type the Domain name (if any) that will be allocated to clients into this
text box.
Time Parameters
For each of the following fields, type the appropriate value into the box.
Lease
The Lease field contains the number of seconds an allocated IP is valid.
After expiration the client has to renegotiate for getting a new IP (which is
usually the same). The expiration time that the client adopts depends on
the operating system running on the client and the DHCP client
configuration.
Decline
The Decline field contains the number of seconds that an IP will be
reserved (leased) for if a DHCP decline message is received.
Min Lease
The Min Lease field contains the minimum number of seconds. If a lease
to be given is below this value (sec), the full lease time is used instead.
Conflict
The Conflict field contains the amount of time (sec) that an IP address
will be reserved (leased) if an ARP conflict (two clients with the same IP
address) occurs.
Max Lease
The Max Lease field contains the maximum number of current leases
(allocated IP addresses). After this limit is reached the server stops
assigning IP addresses to new clients.
Offer
The Offer field contains the number of seconds an offered address is
reserved (leased). This field specifies the number of seconds the DHCP
server should cache the offers it has extended to discovering DHCP
clients. The default value is 60 seconds. On fast network media this value
can be decreased.
81
/ 167
Ikarus OS and Ikarus NMS User
Manual
DNS Servers
In the three DNS Servers fields (DNS 1, DNS 2 and DNS 3), type the IP
addresses of the DNS servers that DHCP clients will use for DNS
requests.
WINS Servers
If there are WINS servers that client should use, type the addresses in the
WINS Servers fields (WINS 1 and WINS 2).
Routers
In the Routers fields (Router 1 and Router 2), type the IP addresses of the
routers (default gateways) the client can use.
Leases Info
Click the Leases Info button to access the DHCP Leases dialog box that
displays all the allocated leases.
Figure 70.
DHCP Leases Dialog Box
In the current version DHCP server configuration does not support
dynamic changing of the DHCP leases file. After an IP allocation you are
able to see the new record in the DHCP Leases dialog after approximately
a 60 second delay.
82
/ 167
Ikarus OS and Ikarus NMS User
Manual
7.1.2
Lease Time Strategies
One of the most common DHCP administration questions is, "What
setting should I give my lease times?" As with many networking
questions, the answer is, "It depends." The primary decision criterion is
the desired frequency at which your clients update their configuration
data.
If you are using DHCP only for randomized address assignments, having
longer lease times will result in greater levels of stability. For example, if
you use lease duration times of one month or longer, a temporary server
outage is not likely to affect your normal operations much. However, if
you are using DHCP for a variety of system-configuration options (such as
default DNS servers and static routes), you will want to have shorter lease
times so that changes to the network are recognized quickly by the DHCP
clients. In this case, having lease times that are longer than a day or two
can be problematic because clients that obtain a new lease just before a
critical infrastructure change is made will not recognize this change until
the lease expires or gets renewed.
For dynamic environments, there are two common lease-duration
strategies. The first calls for leases to be renewed halfway through a
working day (such as having them expire every eight hours, which will
cause them to be renewed after four hours). Another strategy is to set the
lease duration to a multiple of two and a half times the working day (that
is, 20 hours for an eight-hour working day), causing the leases to
completely expire overnight and thus be renegotiated every morning. The
former strategy works well on networks that keep their machines running
all of the time, while the latter strategy works well on networks where
systems are powered down or otherwise removed from the network at
night.
Be forewarned, however, that both strategies expose the network to
problems if the DHCP server goes down or is on a remote network that is
subject to outages. If the DHCP clients are getting their lease data from a
remote DHCP server that is on the other side of a WAN link that is even
minimally prone to failure, chances are good that short lease times will
result in at least a few failed lease renewals.
7.2
Configuring a DHCP CLIENT
Configuration of the DHCP Client application is simple. The only
requirement is selection of the interface where the DHCP client will
search for DHCP servers.
Similar to DHCP server configuration, multiple instances of DHCP client
on different interfaces are allowed.
83
/ 167
Ikarus OS and Ikarus NMS User
Manual
Figure 71.
DHCP Client
To configure a DHCP Client, select the interface from the interface tree.
Its background turns blue.
To configure DHCP client settings, select the Client option button and
select the Active check box. The Client tab becomes available.
To prevent the changing of a client’s default system gateway and DNS
addresses when the client receives an IP address from the server, select the
Keep DNS and Gateway check box. This is useful when you already
have set a static default gateway and DNS and want them to remain
unchanged, or if they are to be configured from another application (e.g.
PPPoE client). In most other cases this field should be remain unselected.
To complete the configuration, click the Submit button.
7.3
Configuring a DHCP Relay
DHCP does not require a server on each subnet. To allow for scale and
economy, a relay agent can be installed listening to DHCP messages and
forwarding them on (and onto other network segments). This eliminates
the necessity of having a DHCP server on each physical network.
84
/ 167
Ikarus OS and Ikarus NMS User
Manual
Figure 72.
DHCP Relay
To configure a DHCP Relay, select the interface from the interface tree.
Its background turns blue.
To view the full DHCP Relay pane, select the Relay option button, then
select the Active check box. The Relay Configuration pane appears.
The Relay Configuration pane represents the subnet (LAN) where a relay
listens for client DHCP requests in order to forward them to DHCP servers
Server 1, Server 2, Server 3 or Server 4. Type the appropriate IP
addresses in these fields.
Interface where application relays on should has a valid ip and subnet
mask and like the other DHCP apis, DHCP relay can have multiple
instances on different interfaces.
To complete the configuration, click Submit.
85
/ 167
Ikarus OS and Ikarus NMS User
Manual
8. WAN
To configure WAN settings, select the WAN tab, located under the
Advanced Configuration of Node, Configuration tabs. The WAN tab
contains two sub-tabs: PPPoE and PPTP, selected by clicking the
corresponding option button.
See Page 24 for a diagram showing Advanced Configuration tabs and sub-tabs.
8.1
Configuring a PPPoE CLIENT
The PPPoE client application is used to create PPPoE connections with
PPPoE servers mainly used by Internet Service Providers.
Figure 73.
PPPoE Configuration
To configure a PPPoE Client, select the interface from the interface tree.
Its background turns blue. This interface usually shares the same medium
with an ADSL modem (in bridge mode). There is no need for a preconfigured valid IP address and subnet mask on this interface.
To view the full PPPoE tab, select the PPPoE option button and select the
Active check box. The PPPoE tab appears.
After completing the required fields, click Submit.
86
/ 167
Ikarus OS and Ikarus NMS User
Manual
8.1.1
Setting PPPoE Client Fields
User Name
Type the User Name for the client that will be used to authenticate with
the PPPoE server (usually supplied by the ISP).
Password
Type a Password (more than three characters) for the client. This is used
to authenticate with the PPPoE server and is usually supplied by the ISP.
Protocol
In the Protocol drop down list, select the Protocol to be used for
authentication with the PPPoE server. Protocol options are: None, PAP
and CHAP.
Figure 74.
PPPoE Protocol Selection
Concentrator
The Concentrator contains the name of a server and relates to the case
where there are multiple PPPoE servers available. If those servers have a
valuable name (called a Concentrator name) you can choose the proper
one by type the correct name into this field.
Keep DNS and Gateway
In most cases PPPoE authentication supplies the client with some valid
DNS addresses and makes the PPPoE interface the default system
gateway. To set a static DNS address and/or a default gateway, or leave
87
/ 167
Ikarus OS and Ikarus NMS User
Manual
another application to configure them, (e.g. DHCP client), select the Keep
DNS and Gateway check box.
MTU size
The normal Ethernet MTU is 1500 bytes in length, but the PPPoE
overhead, plus two bytes of overhead for the encapsulated PPP frame,
mean that the MTU of the PPP interface is at most 1492 bytes. This causes
all kinds of problems if you are using a Linux machine as a firewall and
interfaces behind the firewall have an MTU greater than 1492. For safety
MTU size must be an integer between 536 and 1412.
Enable on Demand
Enable on Demand is a feature which enables the functionality of
creating a PPPoE connection only when there is IP traffic on a PPPoE
interface. Some ISPs offer connection agreements where charging depends
on time. In these cases this feature could be valuable. When the Enable on
Demand check box is selected, the following fields appear: Remote
Domain, Remote IP and Demand Time
To configure this field identify the PPPoE server by its IP address and
type the address into the Remote IP field, OR determine its domain name
and type it into the Remote Domain field. Then type a time period
(seconds) into the Demand Time field. If a PPPoE connection remains
idle for this period, the connection closes until you try to use it again
(probably from a PC behind the router).
Figure 75.
PPPoE - Enable on Demand Settings
Current Status
When you click the Refresh button the Current Status field displays
information on the current connection (whether there is a connection or
the reason for an unsuccessful attempt to connect).
8.2
Configuring a PPTP Client
The PPTP client application is used to create PPTP connections with
PPTP servers mainly used by Internet Service Providers.
88
/ 167
Ikarus OS and Ikarus NMS User
Manual
Figure 76.
WAN - PPTP Settings
To configure a PPTP Client, select the interface from the interface tree.
Its background turns blue. This interface must be pre-configured with a
valid IP address and subnet mask from the PPTP server subnet or it should
be able to “see” PPTP server in some way (e.g. through default gateway).
To view the full PPTP tab, select the PPTP option button and select the
Active check box. The PPTP tab appears.
After completing the required fields, click Submit.
8.2.1
Setting PPTP Client Fields
User Name
Type the User Name for the client that will be used to authenticate with
the PPTP server (usually supplied by the ISP).
Password
Type a Password (more than three characters) for the client. This is used
to authenticate with the PPTP server and is usually supplied by the ISP.
Protocol
In the Protocol drop down list, select the Protocol to be used for
authentication with the PPTP server. Protocol options are: None, PAP and
CHAP.
Dial IP or ISP Name
To identify the PPTP server, type the IP address in the Dial IP field, OR
type the DNS name of the PPTP service in the ISP Name field.
89
/ 167
Ikarus OS and Ikarus NMS User
Manual
Keep DNS and Gateway
In most cases PPTP authentication supplies the client with some valid
DNS addresses and makes the PPPoE interface the default system
gateway. To set a static DNS address and/or a default gateway, or leave
another application to configure them, (e.g. DHCP client), select the Keep
DNS and Gateway check box.
Authenticator
Some PPTP servers require an Authenticator field called to establish a
PPTP connection. This name usually is provided by ISPs.
Enable on Demand
Enable on demand is a feature which enables the functionality of creating
a PPTP connection only when there is IP traffic on a PPTP interface.
Some ISPs offer connection agreements where charging depends on time.
In these cases this feature could be valuable.
Select the Enable on Demand check box, then type a time period
(seconds) into the Demand Time field. If a PPTP connection remains idle
for this period, the connection closes until you try to use it again (probably
from a PC behind the router).
Current Status
When you click the Refresh button the Current Status field displays
information on the current connection (whether there is a connection or
the reason for an unsuccessful attempt to connect).
90
/ 167
Ikarus OS and Ikarus NMS User
Manual
9. Quality of Service
Quality of service (also know as Traffic Shaping) refers to the general
concept of prioritizing network traffic, according to some of its
properties. By default, each packet is treated equally and in a first-come,
first-served basis. However, by utilizing QoS, certain traffic patterns, can
be given higher priority or can be guaranteed specific network resources.
From now on, we will refer to a traffic pattern as class.
Some of the policies that can be enforced with QoS are:
9.1
•
Restrict or eliminate the bandwidth consumed by P2P
applications.
•
Distribute the available bandwidth equally among a group of
HOTSPOT users.
•
Make sure that certain services (eg. the web portal of a
hotspot) will always be accessible, no matter how overloaded
the network is.
•
Reserve a portion of the available bandwidth for latencysensitive applications, like VoIP.
•
Mitigate DoS attacks by restricting the network usage
available for specific kinds of traffic (eg. ICMP traffic).
The QoS window tab
Let's have a look first, at the overall GUI interface (Picture 77).
91
/ 167
Ikarus OS and Ikarus NMS User
Manual
Figure 77.
The QoS window
There are three main columns:
9.1.1
Traffic Classes
Traffic classes are entities to which we associate specific traffic patterns,
and specific network resources. The traffic patterns constitute the
Matches associated to a Traffic Class, and the network resources
reserved, comprises the Target of the Traffic Class. These properties can
be configured via the rightmost panel of the QoS window.
To add a new Traffic Class, you have to right-click on the “Traffic
Classes” label in the respective Panel. You can define as many Traffic
Classes as you wish. A Traffic Class can also form a tree-like hierarchy
of Subclasses. The tree may have at most two layers of subclasses (Picture
78).
92
/ 167
Ikarus OS and Ikarus NMS User
Manual
Figure 78.
9.1.2
Three layer class hierarchy
Traffic Policies
A Traffic policy is an object to which we associate one or more classes
and one or more interfaces. The set of classes assigned to a Traffic Policy,
defines the policy for the associated interfaces. The way you assign
classes to policies is unlimited. Traffic policies can be shared by many
interfaces, in which case the interfaces are unified from the QoS
standpoint. Shared polices will be discussed in more depth later in this
chapter.
9.1.3
Network Interfaces
This panel lists all physical interfaces of the system. For each interface, we
distinguish two flows: An incoming one, which corresponds to traffic
coming to the interface, from the underlying physical layer, and an
outgoing one, which corresponds to traffic going out of the interface, to
the physical layer.
Note: Bridges and virtual interfaces will not be present here. If you want to set a policy to a
bridge, set the same traffic policy to every physical interface that makes up the bridge.
Virtual interfaces can only be distinguished, in the basis of their ip address.
Bear in mind, that you can't assign more than one policy per interface
flow; as well as, the same policy to both flows of the same interface.
The way that Classes, Policies and Interfaces are interrelated is depicted in
picture 79.
93
/ 167
Ikarus OS and Ikarus NMS User
Manual
Figure 79.
Classes, Policies and Interfaces
Associations are carried out by drag&dropping one to item on another.
9.2
Differentiating network traffic
The network traffic can be categorized by almost any combination of the
following properties
Inbound/Outbound Interface
eg. Eth0 in, ath0 out
Source/Destination IP/subnet
eg. 192.168.2.0/24, 172.16.1.1/32
Source/Destination IP port range
eg. 0-1024, 520
Source/Destination Mac
eg. 01:02:03:04:05:06
Protocol
eg. IP, TCP, UDP, ICMP, ...
Application
eg. P2P traffic, etc
Negations of most of the
aforementioned
eg. ! 192.168.1.1/32
These parameters constitute the MATCH part of a class. The GUI panel
responsible for these options is depicted at picture 80.
94
/ 167
Ikarus OS and Ikarus NMS User
Manual
Figure 80.
9.3
Network Traffic Matches
Guarantees and Limitations
On the other hand, the network resources that can be guaranteed or limited
are:
•
Committed Information Rate
•
Peak Information Rate
•
Committed Burst Size
•
Excess Burst Size
•
Priority
These parameters constitute the TARGET part of a class. The GUI
interface responsible for these options are depicted in Picture 81.
95
/ 167
Ikarus OS and Ikarus NMS User
Manual
Figure 81.
9.3.1
Policy parameters
Committed Information Rate (CIR)
This is the rate (expressed in kbits/s) which is guaranteed that will always
be available to the respective traffic class. Apparently, the CIF dedicated
for a specific class, can not exceed the network bandwidth available.
When multiple competing classes exist for the same interface and for the
same direction (output/input), the sum of all of them should also not
overrun the available bandwidth.
Note that, regardless of the CIR the traffic is always transmitted at the
maximum speed supported by the physical interface. Literally, the CIR
expresses the average rate in which the traffic is sent, in due time.
9.3.2
Peak Information Rate (PIR)
This is the maximum rate (in kbits/s) in which, the traffic of a class, can be
sent or received (in average). Even if no other traffic competes for the
bandwidth, this barrier can not be exceeded. This value can be as large as
the capacity of the link and as small as the CIR.
The bandwidth between CIR and PIR is not guaranteed for a class. The
possibility for a class to exploit this range, depends on its priority as we
will see later.
9.3.3
Excess Burst Size (EBS)
Some applications are characterized by short periods of intensive network
usage and long periods with no network usage at all. For instance, when
we browse the Internet, our web browser requests a web page and then
remains idle for a long period of time, until another page is requested.
96
/ 167
Ikarus OS and Ikarus NMS User
Manual
Such applications are not served well by the CIR/PIR mechanism alone.
The EBS mechanism remedies this problem by allowing an application to
send a number of bytes continuously, for some time, without being
interrupted. As soon as EBC bytes have been sent, the application is
forced back to normal behavior (average rate ranging between CIR and
PIR).
9.3.4
Committed Burst Size (CBS)
The CBS corresponds to the minimum number of bytes that have to be
available in order for a transmission to start. By the time that the
transmission starts, it is not possible to be interrupted, until there are no
other data to send. By default this value is the smallest possible (a single
packet size ideally) and scarcely will you have to set a different value.
In order to better understand the concept of rate and burst, consider the
analogy: Each class (or subclass as we will see later) is like a bucket with
size EBS. The bucket is filled up at a rate which ranges between CIR and
PIR. In accordance with this analogy, transmission starts when we throw
water out of the bucket. The minimum quantity of water (traffic) that we
can be thrown out is CBS. Therefore, when a class is idle for a while, it's
possible for an application later on, to send a large burst of data, until the
“bucket” is empty. Similarly, for a class that sends traffic at a steady rate,
lower than CIR, its “bucket” will always be filled up.
9.3.5
Priority
The Priority value dictates which class, among those at the same layer,
will get the unused bandwidth. This bandwidth comes from those classes
that are not fully utilizing their CIR. This extra bandwidth is delivered first
to the class with the highest priority and as soon as the PIR (or EBS) of
this class is reached, the distribution continues to the next class in order of
priority. Priority value can vary between 0 (higher priority) and 7 (lower
priority).
Consider the scenario: We have a standard 11mbps wireless link, and we
want to guarantee half of it, to outgoing TCP traffic. Then we further
divide it to TCP traffic destined for host x, and that destined to host y.
This scenario is depicted in the following table.
Classes in the table denoted as “auto”, are classes that are automatically
(and transparently) created by the system to handle unclassified traffic.
These automatically generated classes, get the rest of the bandwidth (as its
CIR), which is not reserved for any of the user-defined ones. System
generated classes are always of priority 7.
97
/ 167
Ikarus OS and Ikarus NMS User
Manual
11 mbps Link Bandwidth
USER CLASS
AUTO CLASS
CIR 5,5 mbps: Outgoing TCP
CIR 5,5 mbps: Anything but TCP
Priority 0
Priority 7
USER
SUBCLASS 1
USER
SUBCLASS 2
AUTO
SUBCLASS
1,8 mbps
1,8 mbps
Rest traffic
host x
host y
(1,8 mbps)
Priority 0
Priority 1
Priority 7
No subclasses available
Back in our scenario:
Let's assume now that 7 mbps traffic (out of the 11 mbps) qualifies for the
USER CLASS. This means that we have 7 mbps TCP traffic, which has to
be distributed among the three subclasses. Let's also assume that 1/3 of
this traffic is destined for host x and another 1/3 for host y. Although, it
might be tempting to say that, its of the subclasses will get 1/3 of the 7
mbps, in actual, SUBCLASS 2 and AUTO SUBCLASS will get exactly
1,8 mbps (the CIR) and SUBCLASS 1 will get 3,4 mbps. This is because
SUBCLASS 1 has a higher priority. If there is no traffic at all for
SUBCLASS 1, then SUBCLASS 2 will get 5,2 out of the 7 mbps
available. By now, the role of priority should be clear.
9.4
Example: Bandwidth reservation for FTP
Servers
Let's have a look now at one example, in order to better comprehend the
QoS mechanism. Let's say that we have an IkarusOS powered Hotspot,
equipped with an standard 11mbps wireless interface. The real available
bandwidth on such an interface is approximately 5.5mbps or 5500kbps.
On the ethernet side, there are two ftp servers and a bunch of other
insignificant hosts. The ftp servers are meant to serve the hotspot clients.
Hence, we would like to guarantee some bandwidth for them. The network
layout is illustrated in picture 82.
98
/ 167
Ikarus OS and Ikarus NMS User
Manual
Figure 82.
9.4.1
Hotspot with two back-end FTP servers
Single Class per Policy
We will start by defining a QoS policy to guarantee 3 mbps for FTP
traffic. Since we want to guarantee both uploads and downloads from the
ftp servers, we will create two different classes, one for each flow
direction. On each of them, we will set a PIR limit (3.5 mbps), in order to
prevent the FTP server from monopolizing the bandwidth.
Steps to follow:
1. We click on “Traffic Classes” and right-click on it.
2. We add a new class, named let's say “ftp_traffic_out”, to handle
outgoing traffic from interface ath0.
3. We click on “ftp_traffic_out” class and configure the MATCHES
and TARGET as depicted on picture 83.
99
/ 167
Ikarus OS and Ikarus NMS User
Manual
Figure 83.
Figure 84.
'ftp_traffic_out' configuration
4. Similarly, we set up an 'ftp_traffic_in' class for the incoming flow
direction. (Picture 84).
Figure 85.
Figure 86.
'ftp_traffic_in' configuration
5. Now we will create two policies, one for each flow direction,
named 'ftp_in' and 'ftp_out'. We accomplish this by right-clicking
on 'Traffic Policies' label.
100
/ 167
Ikarus OS and Ikarus NMS User
Manual
6. Then we associate each class to each respective policy (Picture
85). This is done by dragging-dropping classes to policies and
policies to interface flows.
Figure 87.
9.4.2
Single class per policy
Parallel Classes
Up to now, we guarantee 3mbps for FTP traffic coming from any of the
directly connected subnets, and destined to the other one. However, we
make no provisions for users (of either subnet), who might set up an FTP
server on their own initiative. Such ftp servers can consume part of the
3mbps quota, which is reserved for the two original FTP server. If we
want to prevent this, we will have to be more specific when defining our
classes. In particular:
1. We rename 'ftp_traffic_out' to 'ftp_traffic_out_ftp1' to handle
traffic destined for FTP server 192.168.1.220. We change the
destination address to 192.168.1.220/32. We leave the ftp
application type to FTP.
2. Similarly, we rename 'ftp_traffic_in' to 'ftp_traffic_in_ftp1' to
handle traffic originating for FTP server 192.168.1.220. Therefore,
we change the source address to 192.168.1.220/32. The ftp
application type of TARGET remains as it is.
3. In a similar manner, we create two new classes, named
'ftp_traffic_out_ftp2' and 'ftp_traffic_in_ftp2' to handle traffic
originated from/destined to 192.168.1.190/32 (Picture 86). We also
set the TARGET application type to FTP.
101
/ 167
Ikarus OS and Ikarus NMS User
Manual
4. Since we dived the total CIR/PIR of the initial classes (one for
each direction) in two classes, we have also to redefine the
CIR/PIR on each subclass to 1500/1750. This way, for each
direction the policy guarantees an aggregated CIR of 3000 and an
aggregated PIR of 3500.
Figure 88.
Parallel classes
Classes 'ftp_traffic_in_ftp1' and 'ftp_traffic_in_ftp2' are considered
Parallel Classes, as far as the incoming interface flow of ath0 is
concerned. This is because they don't form a hierarchy and hence, for
every arriving packet, both of them are evaluated against against it.
Classes 'ftp_traffic_out_ftp1' and 'ftp_traffic_out_ftp2' are also parallel
classes, as far as the outgoing interface flow of ath0 is concerned.
Parallel classes, although very convenient feature, should be used with
caution. By all means, you should avoid setting parallel classes that
overlap each other. In other words, it should be clear which class will be
activated for every arriving packet. For instance, the two classes depicted
at picture 87 are overlapping, cause is ambiguous which one will handle
traffic originating within subnet 172.8.1.0/24 and destined to host
192.168.1.1/32 with destination port number 200.
102
/ 167
Ikarus OS and Ikarus NMS User
Manual
Figure 89.
Figure 90.
9.4.3
Overlapping parallel classes
Class Hierarchy
Although the aggregated ftp traffic falls within limits (3000/3500), the
maximum allowed bandwidth for each FTP server is restricted to 1750
kbps. An intuitive workaround would be to set the PIR of each class to
3500. However, in that case, if there is a lot of ftp traffic for both FTP
servers, then the aggregated ftp traffic might exceed the desired
restriction: 3500 (since 3500+3500=7000). In order to alleviate this
problem, we will have to create a class hierarchy.
1. We set the CIR/PIR of every class created up to now to 1499/3500
and we remove the application type of FTP.
2. We create two new classes, named 'ftp_traffic_in' and
'ftp_traffic_out'. We set the CIR/PIR on each of them to
3000/3500. Source IP/Sub of 'ftp_traffic_in' should be set to
192.168.1.0/24 and destination IP/Sub of 'ftp_traffic_out' to
192.168.1.0/24. This is to allow for other ftp sessions to take place.
Next, on the MATCHES part, we set the port range to 20 – 21 (ftpdata, ftp-control), and the protocol type to FTP.
103
/ 167
Ikarus OS and Ikarus NMS User
Manual
104
/ 167
ftp_traffic_in_ftp1
ftp_traffic_out_ftp1
ftp_traffic_in_ftp2
ftp_traffic_out_ftp2
ftp_traffic_in
ftp_traffic_out
Ikarus OS and Ikarus NMS User
Manual
3. We drag&drop the previous classes to these new ones to create a
class hierarchy as depicted at picture 88. We also alter the structure
of our policies, so that only the newly created classes are assigned
to them.
Figure 91.
Class hierarchy
This way we limit the PIR at parent classes (3000/3500) and then we
further distribute the bandwidth among the child classes (1499/3500 each).
So, we enforce an upper limit on the amount of bandwidth used for FTP
traffic, and at the same time, we enable both FTP Server to use the full
potential of the reserved bandwidth.
Note: We couldn't have set a CIR of 1500 on each subclass, because when we subdivide
a class to subclasses, there should always be some bandwidth available to accommodate
for the rest of the traffic (traffic not covered by any of the subclasses).
9.5
Example: Elimination of P2P Traffic
Currently, IkarusOS does not support filtering of ip traffic based on its
Layer 7 properties. For example, you can't set up a firewall rule to block
incoming/outgoing P2P traffic. Nonetheless, you can virtual eliminate it,
by restricting the bandwidth available to it.
In this example we will set up two Traffic Policies, one for each direction,
and two Traffic Classes, that will reduce the bandwidth available to P2P
traffic to as low as Kbits/sec. P2P users will soon get frustrated and drop
105
/ 167
Ikarus OS and Ikarus NMS User
Manual
their P2P applications altogether. The following pictures demonstrate the
QoS configuration needed.
Figure 92.
Class hierarchy for restricting P2P traffic on both interfaces
p2p_in, p2p_out MATCHES
Figure 93.
106
/ 167
p2p_in, p2p_out TARGET
Overlapping parallel classes
Ikarus OS and Ikarus NMS User
Manual
9.5.1
Shared Policies
In our example, traffic policies p2p_in and p2p_out are shared between
interfaces eth0 and ath0. That makes them (both interfaces) to be regarded
as a single interface, from the standpoint of QoS. In practice, this means
that 1 Kbits/sec can be occupied by P2P traffic coming from either eth0 or
ath0, and an other 1 Kbits/sec for P2P traffic leaving from either eth0 or
ath0 (not 1 Kbits/sec each).
9.6
9.6.1
Example: Access Point Bandwidth Sharing
New QoS Entry
IkarusOS INMS has a convenient way to set bandwidth policies for
individual clients of an Access Point. This feature works only for clients
that have a statically assgned IP and not via DHCP. If you want to set
bandwidth policies for individual AP Clients which get their IP via DHCP,
you'll have to set up your classes manually based on client's MAC address.
You define a bandwidth policy for an AP client by clicking on the “New
Client” button (picture 91).
Figure 94.
The 'New QoS Entry' window
We will now create two bandwidth policies for two AP clients (John and
Maria).
107
/ 167
Ikarus OS and Ikarus NMS User
Manual
John's settings
Figure 95.
Marias's settings
John's and Maria's settings
Note: If it's about a single IP, use a subnet mask of /32. However, if you want the policy to
cover multiple IPs, then use the appropriate subnet mask.
After submitting both windows the resulting class hierarchy will be:
Figure 96.
108
/ 167
Resultant QoS layout for Maria and John
Ikarus OS and Ikarus NMS User
Manual
9.6.2
QoS Statistics
By right-clicking on the traffic policy below the associated interface flow,
you can get statistics regarding packets handled by this policy.
Figure 97.
Current rate and packet analogy
The bar chart on the top illustrates the current average rate for each class.
The pie chart corresponds to the number of packets services by the class
up to now. By choosing the table view you get some more detailed
statistics, including dropped packets due to rate/burst limitations.
109
/ 167
Ikarus OS and Ikarus NMS User
Manual
Figure 98.
9.7
9.7.1
More detailed statistics
Design Guidelines and Limitations
Destination/Source MAC match type
To use the destination MAC match type, you have to create a bridge
interface and assign to it the desired physical interface (a single interface
is ok). Then, you can use the destination MAC match type of the interface
assigned to the bridge.
Also bear in mind that, on a regular ip network, all receiving packets on
the gateway, have as destination mac the gateway's mac address.
Similarly, all packets forwarded by the gateway, have as source mac the
gateway's mac address. Hence, it's pointless to use these fields on an
IkarusOS powered AP, which acts as a gateway.
110
/ 167
Ikarus OS and Ikarus NMS User
Manual
Figure 99.
A Packet sent by A for B has C.Eth0's mac address as destination mac,
and when it is resent by C, it has a source mac of C.Eth1.
When A sends a packet for B, the packet initially has destination mac:
C.Eth0. Thereafter, when gateway C forwards it to its destination (host B)
it has source mac: C.eth1.
9.7.2
Application match type
You may set the application match type only on leaf subclasses, on a class
hierarchy. The reason behind this is that application type is very specific
and should only exist on subclasses that reside on the last level (leaf) of a
class hierarchy.
Moreover, when application type is used on a leaf class, it's not possible to
set the protocol match type on any of its parent classes. This is because,
when you set an application type match, you implicitly define the protocol
type which corresponds to the that application type.
9.7.3
Child to Parent class relation
In a class hierarchy, a child's MATCH and TARGET part should be subset
of that of each parent class. Therefore, you can't have a parent class to
match a destination port range of 1-1024, when one of its child classes
matches destination port range 500-2000. Port range 1025-2000 is not a
subset of the parent class.
9.7.4
PIR on parallel classes
Currently, the QoS subsystem requires that all parallel classes (or
subclasses) will either have a PIR defined or not. Therefore, it's not
possible to set the PIR on a subclass and not set it on one of its sibling
classes. All of them should either have or not have a PIR defined.
111
/ 167
Ikarus OS and Ikarus NMS User
Manual
9.7.5
Efficiency considerations
Whenever possible, prefer the port or protocol match type instead of the
application one. Application match type is slower and more CPU
intensive.
9.8
9.8.1
Frequently Asked Questions
Submit, Apply Changes: I'm confused!
'Apply Changes' button is to save changes made to the rightmost panel of
the QoS interface. This is the panel responsible for setting MATCHES and
TARGET properties of a class. On the other hand 'Submit' is used to save
the overall QoS configuration. Finally, don't forget to save configuration
on the device via the 'Save Configuration' option on the 'View Topology'
window.
112
/ 167
Ikarus OS and Ikarus NMS User
Manual
10.
HotSpot Wizard
The Ikarus OS HotSpot Access Gateway enables telcos, operators,
wireless ISPs, enterprises, government institutions, or school campuses to
deploy WLANs with secured user authentication support. Based on both
RADIUS (Remote Authentication User Dial-In Service) and Web
Redirection technology, when an unauthenticated wireless user is trying to
access a Web page, a logon page is shown instead of the requested page,
so that the user can type his/her user name and password for
authentication. Then, the user credential information is sent to a back-end
RADIUS server to see if the user is allowed to access the Internet. This
web-redirection also supports Web page customization, allowing operators
or HotSpots to easily designate a Web page / Advertisement URL before /
after user login, not to mention Web-redirection bypass for paid users
and/or those frequently using HotSpot services, where authentication can
be performed using their MAC address.
To configure the HotSpot Wizard settings, select the HotSpot tab,
located under the Advanced Configuration of Node, Configuration tabs.
See Page 24 for a diagram showing Advanced Configuration tabs and sub-tabs.
10.1 HotSpot Main Tab
When the HotSpot tab is selected a simple user interface is displayed as a
starting point for the HotSpot configuration process. From the HotSpot
Main tab you can:
113
/ 167
•
enable the HotSpot
•
view the status of the Hotspot
•
view the administrator’s MAC address
•
start the HotSpot Wizard
•
open a window to view a file containing configuration information
•
open a window to view user information
•
open a window to view Radius statistics
Ikarus OS and Ikarus NMS User
Manual
Figure 100.
Main HotSpot Tab
Enable HotSpot
Click the Enable HotSpot button to stop or start Hotspot functionality.
Status
Status displays current HotSpot status (Stopped, Running or
Initializing). In case there is a problem with HotSpot initialization
procedure, an error message is displayed.
Example: DNS error
The HotSpot needs to connect to a DNS server, but cannot find one. This may be a
possible incorrect configuration of the HotSpot's WAN interface settings, or a possible
temporary unreachable state of the DNS server (WAN is not initialized yet, PPP
connection is not established yet). The HotSpot will keep retrying to initialize at certain
intervals.
Admin MAC
Admin MAC is the administrators MAC Address. This MAC address (if
not zeros), is always considered authenticated and assigned the first
HotSpot Dynamic IP address (x.x.x.2). Setting it is recommended, to
avoid losing connectivity with the HotSpot, if connected to one of its
HotSpot interfaces.
Users Info
Users Info is a list of users that have obtained an IP address, their
authentication status (TRUE or FALSE), and users’ statistics. To access
this list, click the Users Info button. The HotSpot Users dialog box
appears.
The Users Info button is available when the HotSpot configuration is
complete and the HotSpot is running.
114
/ 167
Ikarus OS and Ikarus NMS User
Manual
Figure 101.
Users Info Window
Radius Statistics
The Radius Statistics window allows you to view information about the
operation of the Radius server. To access the Radius Statistics window,
click the Radius Statistics button.
The Radius Statistics button is available when the HotSpot configuration
is complete and the HotSpot is running.
Figure 102.
Radius Statistics Window
10.2 Using the HotSpot Wizard
To begin the wizard configuration, click the Start Wizard button in the
configuration panel. A multi-tabbed pane opens with the WAN tab on top.
To navigate between tabs, click the Next or Previous buttons at the
bottom of the pane.
The following sections describe the configuration settings for each tab.
10.2.1 WAN
WAN is the interface that the HotSpot should use to connect to the
Internet.
115
/ 167
Ikarus OS and Ikarus NMS User
Manual
Figure 103.
HotSpot Wizard WAN Tab
Configure the WAN tab as follows:
Select WAN Interface
Select the interface to be used as the WAN Interface from the Select
WAN Interface drop down list.
WAN Type
Select one of the following WAN Types by clicking the option button.
Different configuration fields will become available in the lower section of
the tab depending on the select made in this field.
•
Static IP
•
DHCP Client
•
PPTP Client
•
PPPoE Client
Static IP
The WAN interface will be assigned with a static IP address, Subnet
mask, DNS IP and Gateway IP.
DHCP Client
The WAN interface will retrieve dynamically the corresponding IP
Settings via DHCP protocol.
PPTP Client
The WAN interface will try to connect via the PPTP protocol based on its
configuration parameters.
116
/ 167
Ikarus OS and Ikarus NMS User
Manual
Figure 104.
HotSpot WAN PPTP Client Settings
•
Type the user name in the User Name field
•
Type the password in the Password field.
•
Select None, PAP or CHAP in the Protocol field.
•
Type the ISP name in the ISP Name field.
•
Type the dial IP address in the Dial IP field.
PPPoE Client
The WAN interface will try to connect via the PPPoE protocol based on
its configuration parameters.
Figure 105.
HotSpot WAN PPTPoE Client Settings
•
Type the user name in the User Name field
•
Type the password in the Password field.
•
Select None, PAP or CHAP in the Protocol field.
•
Type the ISP name in the ISP Name field.
10.2.2 LAN
Select the physical interfaces to be used as HotSpot interfaces, then click
the
to transfer it to the HotSpot Interfaces box. You have the
flexibility to select multiple interfaces, either Ethernet or wireless. When
the HotSpot is initialized, these interfaces will be bridged under a network
bridge called br_HotSpot.
117
/ 167
Ikarus OS and Ikarus NMS User
Manual
Figure 106.
HotSpot Wizard LAN Tab
10.2.3 DHCP
Hotspot will assign HotSpot users with an IP address in the range of the
configured dynamic IP addresses. Configure the HotSpot DHCP tab as
follows:
Figure 107.
HotSpot Wizard DHCP Tab
Warning: Hotspot uses its build-in DHCP server, which is not displayed in the DHCP panel
of the router.
Dynamic IPs
Type the base IP address and subnet into the Dynamic IPs field.
Example: If the dynamic IP addresses are 192.168.1.0/24, the Hotspot
will assign IP addresses in the range of 192.168.1.2 to 192.168.1.254. IP
address 192.168.1.0 is the Network IP, which cannot be assigned. IP
address 192.168.1.1 will be assigned to the HotSpot itself (br_HotSpot
interface). IP address 192.168.1.255 is the Broadcast IP, which cannot be
assigned.
DNS 1 and DNS 2
If DNS values are set to 0.0.0.0, the Hotspot will assign the router's DNS
IP addresses.
118
/ 167
Ikarus OS and Ikarus NMS User
Manual
Domain
Domain is the domain name assigned to HotSpot users.
Lease
Is the number in seconds users’ DHCP client services will have to renew
their assigned IP.
Static IP
Static IP is an advanced option left to the administrator. Using it, Hotspot
will never assigned this range of IP addresses, unless MAC authentication
is used and the Radius server's response forces an IP address of this range
to be assigned (Framed-IP-Address).
Example: If dynamic IP addresses are configured as above and static IP
addresses are 192.168.1.0/30, the Hotspot will assign IP addresses in the
range 192.168.1.4 to 192.168.1.254, leaving IP addresses 192.168.1.2 to
192.168.1.3 to be assigned from the Radius server.
Warning: The Static IPs subnet should be a sub-subnet of the Dynamic IPs subnet.
10.2.4 NAT & Protection
NAT Enable
If the NAT Enable option is selected, HotSpot users' IP addresses will be
translated to the WAN's IP address (Network Address Translation,
Masquerade). This should be used if the dynamic IP addresses assigned
are not public IP addresses, but private ones. If NAT Enable is not
selected, HotSpot users' IP addresses will be forwarded to the Internet
unmodified.
Figure 108.
119
/ 167
HotSpot Wizard NAT & Protection Tab
Ikarus OS and Ikarus NMS User
Manual
Protection Level
Protection is performed through firewall rules. According to the protection
level used, appropriate firewall rules will be generated. (The comment
“Added_By_Hotspot” will be automatically generated.)
Warning: All preconfigured firewall rules will be dropped.
There are four levels of protection:
No Protection
There is no protection. All traffic is accepted both from WAN and
HotSpot interfaces.
Low Protection
Policy of the Input firewall chain will be set to Drop. The following
configuration will be applied to the firewall subsystem.
Traffic Coming from the WAN Interface
120
/ 167
Type
Action
Comments
Connections Related or
Established
Accepted
Traffic initiated from router or
HotSpot users
SSH connection
Accepted
New SSH connection
SNMP
Accepted
SNMP request
INMS connection
accepted
New INMS connection
ICMP traffic
Limited to 5/sec
All ICMP types
UDP port 500 and Protocols
AH, ESP (IPsec)
Accepted
IPsec traffic
Everything else
Dropped
Ikarus OS and Ikarus NMS User
Manual
Traffic Coming from Hotspot Interfaces
Type
Action
Comments
Connections To Internet
Accepted
Traffic from HotSpot users
SSH connection
Accepted
New SSH connection
SNMP
Accepted
SNMP request
INMS connection
accepted
New INMS connection
ICMP traffic
Limited to 5/sec
All ICMP types
Protocols AH, ESP (IPsec)
Accepted
IPsec traffic
Everything else
Dropped
Medium Protection
Policy of the Input firewall chain will be set to Drop. The following
configuration will be applied to firewall subsystem.
Traffic coming from WAN interface
121
/ 167
Type
Action
Comments
Connections Related or
Established
Accepted
Traffic initiated from router or
HotSpot users
INMS connection
accepted
New INMS connection
ICMP traffic
Limited to 5/sec
All ICMP types
UDP port 500 and Protocols
AH, ESP (IPsec)
Accepted
IPsec traffic
Everything else
Dropped
Ikarus OS and Ikarus NMS User
Manual
Traffic coming from Hotspot Interfaces
Type
Action
Comments
Connections To Internet
Accepted
Traffic from HotSpot users
INMS connection
accepted
New INMS connection
ICMP traffic
Limited to 5/sec
All ICMP types
Protocols AH, ESP (IPsec)
Accepted
IPsec traffic
Everything else
Dropped
High Protection
Policy of the Input firewall chain will be set to Drop. The following
configuration will be applied to firewall subsystem.
Warning: INMS Connectivity from WAN or Hotspot interfaces will be lost!
Traffic coming from WAN interface
Type
Action
Comments
Connections Related or
Established
Accepted
Traffic initiated from router or
HotSpot users
ICMP traffic
Limited to 5/sec
All ICMP types
UDP port 500 and Protocols
AH, ESP (IPsec)
Accepted
IPsec traffic
Everything else
Dropped
Traffic coming from Hotspot Interfaces
122
/ 167
Type
Action
Comments
Connections To Internet
Accepted
Traffic from HotSpot users
ICMP traffic
Limited to 5/sec
All ICMP types
Protocols AH, ESP (IPsec)
Accepted
IPsec traffic
Everything else
Dropped
Ikarus OS and Ikarus NMS User
Manual
10.2.5 Wireless
If there are wireless interfaces used as HotSpot interfaces, the Wireless
tab is used to configure the wireless settings of these interfaces.
By default, Wireless to Wireless traffic is dropped.
Figure 109.
HotSpot Wizard Wireless Tab
HotSpot Wireless Interface
Select the HotSpot Wireless Interface from the drop down list.
Physical
Select the Physical layer standard of your interface, or select Auto.
Wireless Channel
If any selection except Auto is selected in the Physical list, this list is
available. Select a Wireless Channel number.
ESSID
Type the ESSID name in this text box.
Encryption
In the Encryption drop down list, select None or WEP. If WEP is
selected, the additional fields appear.
WEP Type
Select WEP 64 or WEP 128 in the WEP Type drop down list
Key 1, Key 2, Key 3 and Key 4
Type up to four different Key codes in these fields and select the one to be
used by clicking the option button beside it.
123
/ 167
Ikarus OS and Ikarus NMS User
Manual
10.2.6 Radius
The radius server used to authenticate HotSpot users.
Figure 110.
HotSpot Wizard Radius Tab
IP Address 1 and 2 / Domain 1 and 2
Either the IP address or Domain name of at least one Radius Server must
be configured. The second Radius server is used as a backup server (if
present).
Authentication Method
Authorization to Radius server will be performed using the
Authentication Method (CHAP or PAP) selected in the Authentication
Method drop down list.
Secret Key
Type the Secret Key of the Radius Server in this field.
NAS ID
Type the HotSpot's NAS identifier in the NAS ID box.
Authentication Port
The Authentication Port is the port used to send Access Requests to
Radius Server (1812 by default).
Accounting Port
The Accounting Port is the port used to send Accounting Requests to the
Radius Server (1813 by default).
10.2.7 Authentication Type
Authentication Type is the method used to authenticate HotSpot users.
At least one must be enabled.
124
/ 167
Ikarus OS and Ikarus NMS User
Manual
Figure 111.
HotSpot Wizard Authentication Tab
UAM Authentication
UAM is the common Web-redirection authentication type. Hotspot users,
after they have obtained an IP address, and opened a Web browser, will be
redirected to the HotSpot's Web page to provide their Username and
Password.
Enable
Select the Enable check box to enable UAM Authentication.
Domain
Type the URL of the authentication webpage into the Domain text box.
Secrect
The Secret field is currently unused.
Port
Port is the local port the HotSpot will use for redirection (default 3990).
MAC Authentication
Hotspot users can be authenticated to the Radius Server using their MAC
address (the MAC address of their media used to obtain an IP address).
Hotspot will send an access request to the Radius Server, using as
Username the MAC address of the user (followed by the suffix string if
present). It also sends password configured in the Password field. If
authentication is successfully completed, the user obtains the Framed-IPAddress of the Radius Access Response (if present), or the next available
IP address in the range of Dynamic IP addresses. If authentication fails
and UAM Authentication is enabled, user obtains an IP address in the
125
/ 167
Ikarus OS and Ikarus NMS User
Manual
range of Dynamic IP addresses and UAM authentication is performed
(WEB-redirect page).
Enable
Select the Enable check box to enable MAC Authentication.
Password
Password is the password used to authenticate HotSpot users to Radius
Server.
Suffix
Suffix is the string attached to the HotSpot users' MAC address used as
Radius Username.
Warning: If MAC authentication is enabled, HotSpot users will obtain an IP address ONLY
if the Radius Server is reachable.
10.2.8 Walled Garden
Walled Garden is a set of at most five domains or IP addresses or subnets
that a user can access without having performed authentication (The user
must have previously obtained an IP address from the HotSpot).
Type the URLs for these domains or IP addresses into the Walled Garden
URLs text boxes.
Figure 112.
HotSpot Wizard Walled Garden Tab
10.2.9 Advertisement
Advertisement is a set of at most five URLs that a HotSpot user will be
redirected to, after having authenticated successfully using UAM
authentication.
126
/ 167
Ikarus OS and Ikarus NMS User
Manual
Figure 113.
HotSpot Wizard Advertisement Tab
10.2.10 Web Customization
From the Web Customization tab, the login Web page to which a
HotSpot user is redirected can be customized according to administrator's
needs.
Figure 114.
HotSpot Wizard Web Customization Tab
The following text fields that the administrator can fill with info
describing his needs.
Brand Name
Type the Brand name of the company providing the HotSpot. E.g.
Downtown Bistro's Hotspot
Extra Text
Type additional text for promotional purposes. E.g. Featured by Tony’s
HotSpot Operators.
Select Color
Click Select Color to access the Select Background Color dialog box.
Select the background color of the redirection Web page.
127
/ 167
Ikarus OS and Ikarus NMS User
Manual
Select Image
Click Select Image to access the Select dialog box and import a .jpg, .bmp
or .jpeg graphics file that is superimposed on the Web redirection page.
10.2.11 Summary
All configuration data is stored in the Summary field. When the
Summary tab is on top the configuration data is shown in this tab.
Figure 115.
HotSpot Wizard Summary Tab
Submit
To apply the configuration to the router, click the Submit button at the
bottom of the Summary tab.
Exit
Click Exit to return to the main HotSpot configuration tab
128
/ 167
Ikarus OS and Ikarus NMS User
Manual
Figure 116.
Hain HotSpot Tab
10.2.12 Enabling the HotSpot
In the main HotSpot tab, click Submit.
If Hotspot is already running, it will try to set the new configuration and
start again. If an error occurs, the previous configuration will be restored.
If Hotspot is not running, the configuration is applied but Hotspot will
remain stopped.
To start the router operating as a HotSpot, select the Enable HotSpot
check box in the main HotSpot tab and click the Submit button again.
Figure 117.
Start HotSpot
To poll the HotSpot’s status, click the Refresh button. If the Status box
displays Initializing, retry a few minutes later. The Status box will
display Running when initialization is complete.
When the HotSpot is running the Show Users Info and Radius Statistics
buttons will be available.
129
/ 167
Ikarus OS and Ikarus NMS User
Manual
Figure 118.
HotSpot Running
10.3 Backend Radius Configuration Example
The following is an example for the Linux freeradius package:
Assume
•
Dynamic IPs subnet is 192.168.1.0/24
•
Static IPs subnet is 192.168.1.0/30.
•
Radius password configured for MAC authentication is “password”.
10.3.1 MAC Authentication
To authenticate a user using MAC authentication with MAC
000102030405, configure the radius server as follows:
•
00-01-02-03-04-05* Auth-Type :=
"password"
Local, User-Password ==
•
Class = 0702345678,
•
Session-Timeout = 7200,
•
Idle-Timeout = 600,
•
Acct-Interim-Interval = 60,
•
Paned-IP-Address = 192.168.1.3,
•
WISPr-Bandwidth-Max-Up = 256000,
•
WISPr-Bandwidth-Max-Down = 512000
*NOTE: FORMAT HAS BEEN CHANGED FROM VERSION 1.1.0 (XX-XX-XX-XX-XX-XX
INSTEAD OF XXXXXXXXXXXX). CAPITAL LETTERS MUST BE USED (0A-0B-0C-0D0E-0F).
Upon successful authentication,
130
/ 167
Ikarus OS and Ikarus NMS User
Manual
•
User will be authenticated for 7200 seconds (2 hours), will obtain IP
address 192.168.1.3, upload bandwidth 256 kbps and download
bandwidth 512 kbps.
•
HotSpot will send Accounting requests to radius every 60 seconds.
10.3.2 UAM Authentication
To authenticate a user using UAM authentication with username “user1”
and password “his_password”, configure the radius server as follows:
•
user1 Auth-Type := Local, User-Password == "his_password"
•
Class = 0702345678,
•
Session-Timeout = 7200,
•
Idle-Timeout = 600,
•
Acct-Interim-Interval = 60,
•
WISPr-Bandwidth-Max-Up = 256000,
•
WISPr-Bandwidth-Max-Down = 512000
Upon successful authentication,
•
User will be authenticated for 7200 seconds (2 hours), , upload
bandwidth 256 kbps and download bandwidth 512 kbps.
•
HotSpot will send Accounting requests to radius every 60 seconds.
10.4 HotSpot Configuration Example
Assume that the user’s system is equipped with two Ethernet interfaces
and one wireless interface.
131
/ 167
Ikarus OS and Ikarus NMS User
Manual
Figure 119.
Network Topology – Example
The user is connected to the internet via a router with public IP w.x.y.z.
His/her private IP subnet is 192.168.1.0/24. The router masquerades
private IPs to its public IP.
The user must authorize users connected to both HotSpots’ Ethernet
interface eth1 and wireless interfaces ath0. This is accomplished by
configuring Ikarus to act as a HotSpot and authenticate users connected to
those interfaces (HotSpot LAN Interfaces).
The authentication is assumed to be handled by the user’s local Radius
Server (IP 192.168.1.00).
Ikarus HotSpot’s WAN Interface in that case is eth0, the one connected to
the router (and Internet).
Hotspot users will be assigned with IPs in the subnet 192.168.0.0/24
To sum up, Ikarus HotSpot should be configured with:
•
WAN interface: eth0, with static IP 192.168.1.3/24
•
LAN Interfaces: eth1 and ath0
•
Gateway: 192.168.1.1 (router’s private IP)
•
DNS: say 65.173.1.1 (obtained from your internet connection)
•
Radius Server: 192.168.1.100 ( let radius secret be “radius_secret”)
•
Dynamic IPs assigned to users: 192.168.0.0/24
Applying this example, network topology will change to:
132
/ 167
Ikarus OS and Ikarus NMS User
Manual
Figure 120.
Network Topology after Hotspot – Example
Red lines show the user’s LAN (WAN for HotSpot), where there is no
authentication performed.
Green lines show the user’s public LAN (LAN for HotSpot), where
authentication is required.
HotSpot Configuration Procedure
Select Advanced Node Configuration from the Node Shortcut Menu in
Ikarus NMS.
Click the HotSpot tab to begin the HotSpot configuration. The HotSpot
tab appears.
133
/ 167
Ikarus OS and Ikarus NMS User
Manual
Figure 121.
HotSpot Main Panel – Example
Click the Start Wizard button. The HotSpot Configuration pane appears
containing several tabs. The WAN tab is on top.
1. In the Select WAN Interface drop down list, select: eth0 as the
WAN interface
2. In the IP Address field, type: 192.168.1.3
3. In the Subnet field type: 255.255.255.0
4. In the DNS field type: 65.173.1.1
5. In the Gateway field type: 192.168.1.1
Click the Next button. The LAN tab will appear.
Figure 122.
WAN Configuration – Example
The LAN tab contains two lists: Physical Interfaces and HotSpot
Interfaces
In the Physical Interface list, Select eth1 and ath0 and copy them to the
HotSpot Interface list by clicking the
134
/ 167
button.
Ikarus OS and Ikarus NMS User
Manual
Click the Next button. The DHCP tab will appear.
Figure 123.
LAN Configuration – Example
Configure DHCP server settings (IP addresses to be assigned from
HotSpot to Users) as follows:
1. In the Dynamic IPs field, type: 192.168.0.0 / 24 (24 is the Subnet
Mask portion representing 255.255.255.0)
2. In the DNS 1 field, type: 0.0.0.0 (This will tell it to get Ikarus
WAN DNS IP)
3. In the Domain field type: domain_of_your_choice
4. In the Lease field, type 600, the lease time for DHCP (in seconds)
Click the Next button. The NAT & Protection tab will appear.
Figure 124.
HotSpot’s DHCP Server Configuration – Example
Configure NAT & Protection settings as follows:
1. Select the NAT Enable check box. Due to HotSpot’s Private
Dynamic IPs subnet, Hotspot should masquerade users’ IP
addresses to its WAN IP (eth0).
2. In the Protection Level box, select: Medium.
Click the Next button. The Wireless tab will appear.
135
/ 167
Ikarus OS and Ikarus NMS User
Manual
Figure 125.
NAT & Protection Level Configuration – Example
Configure Wireless settings as follows:
1. In the Physical drop down list, select: 802.11B
2. In the Wireless Channel drop down list, select: 1
3. In the ESSID field, type: My_HotSpot
4. In the Encryption drop down list, select: NONE
Click the Next button. The Radius tab will appear.
Figure 126.
Wireless Configuration – Example
Configure Wireless settings as follows:
1. In the IP Address 1 field, type: 192.168.1.100
2. In the IP Address 2 field, type: 0.0.0.0 (no backup radius server)
3. In the Authentication Method drop down list, select: CHAP
4. In the Secret Key field, type: radius_secret
5. In the Authentication Port field, type: 1812
6. In the Accounting Port field, type: 1813
7. In the Nas ID field, type : some_nas (if needed by radius server)
136
/ 167
Ikarus OS and Ikarus NMS User
Manual
Click the Next button. The Auth Type tab will appear.
Figure 127.
Radius Configuration – Example
Configure Authentication Type settings as follows:
In the UAM Authentication section, select the Enable check box to
authenticate users via Web redirection
Click the Next button. The Walled Garden tab will appear.
Figure 128.
Authentication Methods – Example
In the Walled Garden tab you can configure domains that a user can
access without being authenticated. Configure Walled Garden settings as
follows:
In the Walled Garden URLs box, type 192.168.1.20 into field 1. (For this
example, this address is assumed to operate a public web server. A user
connected to a HotSpot LAN Interface can then access that address
without authentication. )
Click the Next button. The Advertisement tab will appear.
137
/ 167
Ikarus OS and Ikarus NMS User
Manual
Figure 129.
Walled Garden Configuration – Example
In the Advertisement tab you can configure domains that a user will be
directed to after being authenticated. Configure Advertisement settings as
follows:
In the Advertisement URLs box, type the URL of any Web site.
Click the Next button. The Web Customization tab will appear.
Figure 130.
Redirection URLs Configuration – Example
In the Web Customization tab you can customize the redirection Web
page. Configure Web Customization settings as follows:
1. In the Select Background Color box, set the Red, Green and Blue
fields by dragging the controls or changing values in the
corresponding spin boxes.
2. In the Brand Name and Extra Text boxes, type a text message.
3. Click the Select Image button to browse for image files to insert
into the Web page.
Click the Next button. The Summary tab will appear.
138
/ 167
Ikarus OS and Ikarus NMS User
Manual
Figure 131.
Web Page Customization – Example
The Summary tab displays a summary of configuration options.
Click the Submit button in the Summary tab.
Figure 132.
Summarize Configuration – Example
Click the Exit button. The main HotSpot pane appears.
Although the configuration has been loaded, Hotspot is not running.
(Status field displays: Stopped). To complete the procedure:
1. In the Admin MAC box, type the administrator’s MAC address.
This is recommended to ensure connectivity is not lost with
HotSpot in the event of a Radius mis-configuration.
2. Click the Submit button to apply the configuration to HotSpot.
The original HotSpot tab appears.
3. To complete the process, select the Enable HotSpot check box.
Click the Submit button to start HotSpot.
139
/ 167
Ikarus OS and Ikarus NMS User
Manual
Note: HotSpot will assign to its HotSpot interfaces the IP address: 192.168.0.1
Administrator’s IP address will be 192.168.0.2
Figure 133.
Start HotSpot – Example
To poll HotSpot’s status, click the Refresh button. If the Status box
displays Initializing, retry a few minutes later. The Status box will
display Running when initialization is complete. With HotSpot running
all changes have been applied to the router.
Figure 134.
HotSpot is Running – Example
Return to the Network tab and note the Interface List contains a bridge
br_HotSpot with eth1 and ath0 under it.
140
/ 167
Ikarus OS and Ikarus NMS User
Manual
Figure 135.
Interface Panel after HotSpot’s Initiation – Example
Select the Firewall and NAT tabs and note that they also are initialized.
141
/ 167
Figure 136.
New Firewall Settings – Example
Figure 137.
NAT Settings – Example
Ikarus OS and Ikarus NMS User
Manual
If a user connects to the HotSpot, it will assign the next free Dynamic IP
address.
Figure 138.
HotSpot has Assigned an IP address – Example
If this user now tries to access the Internet, a Redirection Web-page is
displayed:
10.5 Troubleshooting
10.5.1 Cannot set wireless interface configuration
•
Check if you have selected channel and ESSID.
•
If you are running Ikarus OS with a CPE license, wireless interfaces
cannot be used as access points, and Hotspot cannot have wireless
HotSpot interfaces.
10.5.2 DNS Error
•
If you use static IP address for the WAN, make sure you have entered
the right settings.
•
If you use dynamic IP allocation (DHCP, PPPoE and PPTP clients),
wait for the WAN interface to establish a connection.
10.5.3 Cannot obtain an IP address
•
Check if the Dynamic IP addresses are all allocated by selecting
Show User Info. If more IP addresses are required, reconsider
configuring an extended IP pool for Dynamic IP addresses.
•
If MAC authentication is enabled, check if your RADIUS server is
operating and has connectivity with the HotSpot, or Radius Settings
are right (Secret Key, Ports) .
•
Check if Hotspot Status in the Main HotSpot tab is running.
10.5.4 Obtained an IP address but cannot Ping
HotSpot
Check if the user is authenticated.
142
/ 167
Ikarus OS and Ikarus NMS User
Manual
10.5.5 HotSpot running, but no activeDHCP Server
Hotspot uses its built in DHCP server; there is no mis-configuration.
10.5.6 A user not authenticated, but can access the
Internet
Check if the domain the user has accessed is in the Walled Garden
domains.
10.5.7 Ikarus NMS lost connectivity with Hotspot
143
/ 167
•
If you access Hotspot through the WAN interface, make sure WAN
interface has established its connectivity, or you have not selected
HIGH Protection Level in Hotspot configuration (in this situation the
INMS connection from WAN is dropped).
•
If you access Hotspot through the HotSpot LAN interfaces, and you
have selected HIGH Protection Level in HotSpot configuration,
INMS connection cannot be established.
•
If you access HotSpot through the HotSpot LAN interfaces, and you
have configured your MAC address as the administrator’s MAC, then
enable DHCP client on your computer. If you cannot obtain an IP
address, configure your computer with a static IP address, the first in
Dynamic IP addresses (x.x.x.2) and try again (Maybe Hotspot is
initializing).
•
If there is another interface, neither WAN nor LAN, try to connect
through it.
Ikarus OS and Ikarus NMS User
Manual
11.
System Services
IKARUS can be configured to run the following services:
•
SNMP (Simple Network Management Protocol) Service
•
HTTP (Hyper-Text Transfer Protocol) Service
•
SSH (Secure Shell Protocol) Service
•
NTP (Network Time Protocol) Service
To configure System Services settings, select the Services tab, located
under the Advanced Configuration of Node, Configuration tabs.
See Page 24 for a diagram showing Advanced Configuration tabs and sub-tabs.
Figure 139.
11.1
Services Tab
Configuring SNMP Settings
SNMP (Simple Network Management Protocol) is the most widely used
protocol for managing TCP/IP Internets. A network management station
(NMS) uses SNMP query (poll) SNMP processes (agents) on network
devices such as routers and end stations. These agents maintain a list of
144
/ 167
Ikarus OS and Ikarus NMS User
Manual
variables and their values that describe the state of the network device.
The variables can describe routing table entries, interface addresses, and
byte counts transmitted on various interfaces. The collection of variables
is described by a Management Information Base (MIB).
When SNMP is enabled, IKARUS will respond to SNMP requests (SNMP
get, getnext, getbulk, walk).
A community name can be configured, as a read-only community. SNMP
set requests are not supported.
To configure SNMP, select the SNMP tab under the Services tab.
Configure the SNMP tab fields as follows:
SNMP Enable
Select the SNMP Enable checkbox to enable SNMP
Port
The Port field contains the router port that the SNMP module listens to
for SNMP requests (default 161). Typically you will not have to change
this value.
Community
The Community field contains the read-only community name of SNMP
service (default: public). SNMP service will respond to requests if and
only if the community name is set appropriately.
Submit
Click Submit to apply the configuration.
Figure 140.
145
/ 167
SNMP Service Configuration
Ikarus OS and Ikarus NMS User
Manual
11.2
Configuring HTTP Settings
Web servers are the computers that run Web sites, accepting HTTP
(Hyper-Text Transfer Protocol) connections from web browsers and
delivering Web pages and other files to them, as well as processing form
submissions. When HTTP is enabled, IKARUS will respond to
HTTP/HTTPS requests.
To configure HTTP, select the HTTP tab under the Services tab.
Configure the HTTP tab fields as follows:
HTTP Enable
Select the HTTP Enable checkbox to enable HTTP
Port
The Port field contains the router port that the HTTP module listens to for
HTTP requests (default 80). Typically you will not have to change this
value.
Upload SSL Certificate
Click Upload SSL Certificate to open a Select dialog box and upload
your own SSL certificate for Secure HTTP requests (HTTPS). A default
certificate is included in every newly installed IKARUS.
Upload Key File
Click Upload Key File to open a Select dialog box and upload your own
keys file for Secure HTTP requests (HTTPS). A default file is included in
every newly installed IKARUS.
Submit
Click Submit to apply the configuration.
146
/ 167
Ikarus OS and Ikarus NMS User
Manual
Figure 141.
11.3
HTTP Service Configuration
Configuring SSH Settings
Developed by SSH Communications Security Ltd., Secure Shell is a
program to log into another computer over a network, to execute
commands in a remote machine, and to move files from one machine to
another. It provides strong authentication and secure communications over
insecure channels.
SSH protects a network from attacks such as IP spoofing, IP source
routing, and DNS spoofing. An attacker who has managed to take over a
network can only force SSH to disconnect. He or she cannot play back the
traffic or hijack the connection when encryption is enabled.
When using SSH's slogin (instead of rlogin) the entire login session,
including transmission of password, is encrypted; therefore it is almost
impossible for an outsider to collect passwords. When SSH is enabled,
IKARUS will respond to SSH connection requests.
To configure SSH, select the SSH tab the Services tab. Configure the SSH
tab fields as follows:
SSH Enable
Select the SSH Enable checkbox to enable SSH
Port
The Port field contains the router port that the SSH module listens to for
SSH connection requests (default 22). Typically you will not have to
change this value.
Submit
Click Submit to apply the configuration.
147
/ 167
Ikarus OS and Ikarus NMS User
Manual
Figure 142.
11.4
SSH Service Configuration
Configuring NTP Settings
The Network Time Protocol (NTP) is a time synchronization system for
computer clocks through the Internet. The main characteristics of NTP are
the following.
•
Fully automatic, continuous synchronization
•
Suitable for synchronizing one computer, or a whole computer
network
•
Fault tolerant and dynamically auto configuring
•
Based on UTC time, independent of time zones and day-light saving
time.
•
Synchronization accuracy can reach 1 millisecond.
When NTP is enabled, IKARUS will periodically send a request to a
configured NTP server (based Interval time) and adjust IKARUS’s local
system time.
To configure NTP, select the NTP tab under the Services tab. Configure
the NTP tab fields as follows:
NTP Enable
Select the NTP Enable checkbox to enable NTP
Port
The Port field contains the router port that the NTP module listens to for
NTP server responses (default 123). Typically you will not have to change
this value.
148
/ 167
Ikarus OS and Ikarus NMS User
Manual
Domain
The Domain field contains the domain name or IP address of the NTP
server.
Interval
The Interval field contains the interval, in minutes, between two
consecutive requests (default 60 minutes).
Submit
Click Submit to apply the configuration.
Figure 143.
11.5
NTP Service Configuration
Setting the Administrator Password
To configure the administrator password, select the Security tab under the
Services tab. Configure the Security tab fields as follows:
Old Password
Type the current password in the Old Password text box. The default
password is: admin
New Password
Type the new password in the New Password text box. The new password
must be at least 8 characters and no more than 63 characters
Re-type
Re-type the new password in the Retype text box
149
/ 167
Ikarus OS and Ikarus NMS User
Manual
Submit
Click Submit to apply the configuration.
Figure 144.
150
/ 167
Change Administrator’s Password
Ikarus OS and Ikarus NMS User
Manual
12.
Monitoring and Statistics
The advanced statistics engine of Ikarus OS, in combination with the
graphing facilities of Ikarus NMS, lets the administrator delve into the
results real-time, identifying high bandwidth nodes and possible
bottlenecks.
Some Monitoring and Statistics features are available from the Node
Shortcut Menu. Others are located under the Advanced Configuration
of Node, Configuration tabs.
See Page 24 for a diagram showing Advanced Configuration tabs and sub-tabs.
12.1 Using the Status Info Dialog Box
The Status Info dialog box provides all the information displayed in the
bottom pane of the Network Topology tab, with the addition of an extra
editable field which is used to set the Host Name of the node. The
displayed information is useful in cases where the administration unit is
“hidden” behind NAT and connectionless communication (such as Ikarus
Polling Protocol and SNMP) can not be initiated.
To view the Status Info dialog box, click Open Status Window in the
Node Shortcut Menu.
Figure 145.
Current Status of Node Dialog Box
12.2 Using the Current Throughput Graph
The Current Throughput graph provides a real-time graphical display of
transmit and receive traffic of each network interface. By monitoring
performance and analyzing performance data, you can begin to see
patterns in the data that will help you locate bottlenecks. After you have
located a bottleneck, you can make changes to the component to improve
performance. Bottlenecks can occur anywhere in your server environment
151
/ 167
Ikarus OS and Ikarus NMS User
Manual
at any time, so it is important to capture baseline performance information
about your system and monitor performance regularly. Ikarus NMS
provides the option of real time traffic monitoring.
To view the Current Throughput Graph, click Current Throughput in
the Node Shortcut Menu.
Figure 146.
Current Throughput Window
12.3 Viewing Packet Statistics
The Packet Stats tab contains information concerning the total packet
statistics per interface.
To view packet statistics, select the Packet Stats tab under the Advanced
Configuration, Statistics, Network tabs.
Interface
Select the interface for which you want to view statistics in the drop down
list.
Refresh
Click Refresh to update the graph.
Reset
Click Reset to…
152
/ 167
Ikarus OS and Ikarus NMS User
Manual
Figure 147.
Interface Packet Statistics
12.4 Viewing the ARP Table
The ARP Entries tab contains the ARP (Address Resolution Protocol)
table of the currently selected Ikarus node.
On a single physical network, individual hosts are known on the network
by their physical hardware address. Higher-level protocols address
destination hosts in the form of a symbolic address (IP address in this
case). When such a protocol wants to send a datagram to destination IP
address w.x.y.z, the device driver does not understand this address.
Therefore, a module (ARP) is provided that will translate the IP address to
the physical address of the destination host. It uses a lookup table
(sometimes referred to as the ARP cache) to perform this translation.
When the address is not found in the ARP cache, a broadcast is sent out on
the network, with a special format called the ARP request. If one of the
machines on the network recognizes its own IP address in the request, it
will send an ARP reply back to the requesting host. The reply will contain
the physical hardware address of the host and source route information (if
the packet has crossed bridges on its path). Both this address and the
source route information are stored in the ARP cache of the requesting
host. All subsequent datagrams to this destination IP address can now be
translated to a physical address, which is used by the device driver to send
out the datagram on the network.
To view the ARP table, select the ARP Entries tab under the Network
tab.
153
/ 167
Ikarus OS and Ikarus NMS User
Manual
Figure 148.
ARP Entries Table
12.5 Viewing the Open Connections List
The Open Connections tab displays all your computer's inbound and
outbound connections and lists all open ports, helping the administrator to
detect host's activity. Open connections can be sorted in ascending or
descending order per column by clicking on the corresponding table
header.
To the Open Connections list, select the Open Connections tab under the
Advanced Configuration, Statistics, Network tabs.
Figure 149.
Open Connections Tab
Refresh
Click Refresh to update the open connections information.
12.6 Using Monitor Utilities
The Monitor Utilities tab provides a user interface for implementing two
useful network utilities: Ping (ICMP) and Traceroute. To access these
utilities, select the Monitor Utilities tab under the Advanced
Configuration, Statistics tabs. The Monitor Utils tab has two sub-tabs:
the ICMP Util tab and Trace Route tab.
12.6.1 Pinging (ICMP Utility)
The ICMP Util tab provides a convenient tool for initiating Ping
commands. Ping sends ICMP requests to the address you specify and lists
the responses received and their round trip time. When the utility is
terminated it summarizes the results in a graphic display, giving the
average round trip time and the percent packet loss. This utility can be
154
/ 167
Ikarus OS and Ikarus NMS User
Manual
used to determine whether there is a problem with the network connection
between two hosts.
Figure 150.
ICMP Utility Tab
To configure and use the ICMP Utility, select the ICMP Util tab,
configure the Destination and Packet Size fields, then use Start, Stop
and Clear buttons as follows:
Destination
Type the IP address of the node you wish to ping in the Destination text
box.
Packet Size
Type the number of bytes to be sent in each packet in the Packet Size box.
Start
Click Start to initiate the Ping command. The software will repeatedly
ping the destination address. The window will display the number of
bytes, source address, time to live (ttl), the round trip time, % packet loss,
and average time.
Stop
Click the Stop button to terminate the pinging process. The pinging
session will end and a window will appear displaying the Packet
Statistics (Transmitted Packets, Received Packets and Loss %) and Time
Statistics (Min, Max and Average) in bar graph format.
155
/ 167
Ikarus OS and Ikarus NMS User
Manual
Clear
Click Clear to clear the data from the window. Data can be cleared while
a pinging session is underway.
12.6.2 Using Traceroute
The Traceroute tab provides a convenient tool for initiating Trace Route
commands.
Traceroute is a utility that records the route (the specific gateway
computers at each hop) through the Internet between your Ikarus node and
a specified destination. It also calculates and displays the amount of time
each hop took. Traceroute is a handy tool for understanding where
problems are in the Internet network.
Figure 151.
Traceroute Tab
To configure and use the ICMP Utility, select the ICMP Util tab,
configure the required fields, then use the buttons as follows:
Destination
Type the IP address of the node to which you wish to Traceroute in the
Destination text box.
Start Port
Type the port number in Start Port box.
Max TTL
Type the maximum time to live value in the Max TTL box.
Resolve Network Domain Names
Select Resolve Network Names to cause the utility to include the domain
names of each IP address listed.
156
/ 167
Ikarus OS and Ikarus NMS User
Manual
Start
Click Start to initiate the TraceRoute command. The software will trace
the route to the destination address. The window will display the number
of hops max, size of the packets and elapsed time.
Stop
Click the Stop button to terminate the TraceRoute process. The Traceroute
session will end and a dialog box will appear displaying the Traceroute
utility terminated.
Clear
Click Clear to clear the data from the window.
12.7 Viewing System Properties
The System Properties tab provides information about the currently
selected nodes CPU and Memory. To access the System Properties,
select the System Properties tab under the Advanced Configuration tab,
Figure 152.
System Properties Dialog
To refresh the data in the System Properties fields, click the Refresh
button.
157
/ 167
Ikarus OS and Ikarus NMS User
Manual
13.
MRTG Support
Multi Router Traffic Grapher, or MRTG, is a tool to monitor the traffic
load on network links. MRTG generates HTML pages containing GIF
images which provide a live visual representation of this traffic.
MRTG client support of Ikarus NMS uses the package provided by JRobin
(http://www.jrobin.org/utilities/MRTGdemo.html).
To use the MRTG, select MRTG under the Utilities menu.
13.1
Using MRTG
To implement MRTG, extract the required files in a network server with
java support and initialize it by executing the following command: “java –
jar MRTG-server-1.4.0.jar”.
Using MRTG
•
After the successful MRTG server initialization, in the Utilities menu
select MRTG. The built in MRTG client will be invoked and a
prompt appears requesting the MRTG server IP address.
•
Type the MRTG server IP address. Upon successful connection nodes
can be inserted in the monitoring list.
•
On each node insertion the user will be presented with a list of all
available interfaces. The user may select one or more interfaces to
monitor.
Figure 153.
MRTG Display Statistics
NOTE: The JRobin MRTG server uses SNMP polls to retrieve information which means
that the SNMP agent has to enable in the monitored node.
158
/ 167
Ikarus OS and Ikarus NMS User
Manual
14.
WISP Easy Wizard
The WISP Easy Wizard is an extension to Ikarus NMS providing a
convenient and easy way to install IKARUS nodes.
To start the WISP Easy Wizard, in the Node Shortcut Menu, select
WISP Easy Wizard (WEW). The WISP Easy Wizard (WEW) dialog
box appears which displays some typical WISP installations.
Select from the available operational modes. An Info Tip is displayed in
the upper-left corner of the window when the cursor is hovered over an
image.
Figure 154.
WISP Easy Wizard
Available configuration scenarios:
•
Backhaul AP
•
Repeater AP
•
Point-to-point link
•
CPE installation
Selecting the mode that is closest to your target configuration allows you
to access a step by step simplified configuration procedure, which guides
you through the whole configuration process.
After completion of the wizard, you can tweak the applied configuration
manually as described in the previous chapters.
159
/ 167
Ikarus OS and Ikarus NMS User
Manual
NOTE: After the successful application of the configuration via WEW the current IP is
maintained to avoid losing connectivity with the device. If the user does not require that IP
address any more, it is recommended to remove it by deleting the corresponding Virtual
Interface.
160
/ 167
Ikarus OS and Ikarus NMS User
Manual
15.
Index
Access Point .................................................................................................................................................45
ACL .................................................................................................................................................................
Allowing Access .............................................................................................................................................................. 60
Denying Access ............................................................................................................................................................... 60
Extracting lists ................................................................................................................................................................. 60
Setting up lists.................................................................................................................................................................. 60
Action............................................................................................................................................................47
Add...................................................................................................................................................................
Background Image........................................................................................................................................................... 18
New Bridge...................................................................................................................................................................... 31
New Interface................................................................................................................................................................... 33
Rule Entries ..................................................................................................................................................................... 41
Rules ....................................................................................................................................................................................
Firewall ...................................................................................................................................................................... 72
Static Route...................................................................................................................................................................... 39
AES(CCMP) .................................................................................................................................................59
Alias ..............................................................................................................................................................46
Antenna Options...........................................................................................................................................56
AP Client.......................................................................................................................................................51
ARP Table ..................................................................................................................................................159
Association List.............................................................................................................................................46
Authentication .................................................................................................................................................
MAC .............................................................................................................................................................................. 136
UAM .............................................................................................................................................................................. 137
Backend Radius...............................................................................................................................................
Configuration ................................................................................................................................................................ 136
Backup ....................................................................................................................................................14, 26
Bandwidth Manager.....................................................................................................................................96
Beacon Period...............................................................................................................................................45
Best Channel.................................................................................................................................................47
BSSID ..............................................................................................................................................................
Preferred .......................................................................................................................................................................... 52
161
/ 167
Ikarus OS and Ikarus NMS User
Manual
Current Throughput ...................................................................................................................... 14, 26, 157
Default Gateway ...........................................................................................................................................30
DHCP...............................................................................................................................................................
Client ............................................................................................................................................................................... 88
Configuration................................................................................................................................................................... 84
Conflict ............................................................................................................................................................................ 86
Fields ............................................................................................................................................................................... 85
HotSpot DHCP Server ................................................................................................................................................... 124
Lease Time Strategies ...................................................................................................................................................... 88
Leases .............................................................................................................................................................................. 87
Max Lease........................................................................................................................................................................ 86
Offer................................................................................................................................................................................. 86
Relay................................................................................................................................................................................ 89
Time Parameters .............................................................................................................................................................. 86
Decline............................................................................................................................................................................ 86
Lease ............................................................................................................................................................................... 86
Min Lease ....................................................................................................................................................................... 86
Discovery Manager..........................................................................................................................................
Auto Discovery................................................................................................................................................................ 14
Diversity Options..........................................................................................................................................56
DNAT............................................................................................................................................................80
DNS..................................................................................................................................................................
Error....................................................................................................................................................................... 120, 148
Keep DNS and Gateway ............................................................................................................................................ 92, 95
PPTP service name .......................................................................................................................................................... 94
Spoofing......................................................................................................................................................................... 153
Keep DNS and Gateway ................................................................................................................................................. 89
DNS Address....................................................................................................................................................
DHCP Servers.................................................................................................................................................................. 87
Global Settings................................................................................................................................................................. 31
Fade Margin .................................................................................................................................................46
6.Firewall ......................................................................................................................................................70
Chains .............................................................................................................................................................................. 70
Examples.......................................................................................................................................................................... 80
Matching Fields ............................................................................................................................................................... 72
Global Settings..............................................................................................................................................30
Hide ESSID...................................................................................................................................................48
162
/ 167
Ikarus OS and Ikarus NMS User
Manual
HotSpot ............................................................................................................................................................
Advertisement................................................................................................................................................................ 132
Configuration......................................................................................................................................................... 119, 139
LAN Settings ................................................................................................................................................................. 123
NAT Enable ................................................................................................................................................................... 125
Protection Level............................................................................................................................................................. 126
Radius Server................................................................................................................................................................. 130
Troubleshooting............................................................................................................................................................. 148
WAN Settings ........................................................................... 97, 100, 103, 104, 106, 108, 110, 114, 116, 117, 118, 121
Web Customization........................................................................................................................................................ 133
Wizard Configuration .................................................................................................................................................... 121
Authentication Type ..................................................................................................................................................... 130
DHCP Example............................................................................................................................................................. 124
HTTP ..........................................................................................................................................................152
ICMP ..........................................................................................................................................................160
Idle Time.......................................................................................................................................................47
Inactivity Limit.............................................................................................................................................45
Interface...........................................................................................................................................................
Select/Disable .................................................................................................................................................................. 29
IP Address ..............................................................................................................................................29, 46
IP Address .......................................................................................................................................................
Remote Peer..................................................................................................................................................................... 29
IP Forwarding ..............................................................................................................................................30
IP Networking .................................................................................................................................................
Configuration................................................................................................................................................................... 28
IP settings .....................................................................................................................................................29
MAC ...........................................................................................................................................................131
MAC ................................................................................................................................................................
Address ...................................................................................................................................................................... 30, 46
Spoofing........................................................................................................................................................................... 30
MRTG.........................................................................................................................................................164
NAT .................................................................................................................................................................
Chains .............................................................................................................................................................................. 70
Matching Fields ............................................................................................................................................................... 77
Rules ................................................................................................................................................................................ 76
Network Bridge ............................................................................................................................................31
Network Interfaces Tree .................................................................................................................................
163
/ 167
Ikarus OS and Ikarus NMS User
Manual
Using................................................................................................................................................................................ 29
Node .................................................................................................................................................................
Advanced ................................................................................................................................................................... 13, 23
Connectivity Settings................................................................................................................................................. 13, 22
Moving/Resizing Icons .................................................................................................................................................... 18
Save ........................................................................................................................................................................... 13, 26
Shortcut Menu ........................................................................................................................................................... 13, 21
Add ................................................................................................................................................................................. 16
Status Window.......................................................................................................................................................... 13, 23
Noise Level....................................................................................................................................................46
NTP ............................................................................................................................................................154
Open Connections List ...............................................................................................................................160
Outdoor Settings..............................................................................................................................................
Configuration................................................................................................................................................................... 60
Link Distance................................................................................................................................................................... 61
Packet Statistics..........................................................................................................................................158
Pairwise Cipher ............................................................................................................................................59
Password ....................................................................................................................................................155
Pinging ........................................................................................................................................................160
PPTP Client ..................................................................................................................................................93
Profiles .............................................................................................................................................................
Saving and Loading ......................................................................................................................................................... 21
PSK ...............................................................................................................................................................59
Radio................................................................................................................................................................
Channels and Frequencies................................................................................................................................................ 55
Configuration................................................................................................................................................................... 54
MAC Address .................................................................................................................................................................. 55
Phycial Layer ................................................................................................................................................................... 55
Transmission Rates .......................................................................................................................................................... 55
Reboot.....................................................................................................................................................14, 26
Repeater Mode ................................................................................................................................................
Configuration................................................................................................................................................................... 49
Routers..........................................................................................................................................................87
Routing ............................................................................................................................................................
Modifying ........................................................................................................................................................................ 42
Removing......................................................................................................................................................................... 42
Repositioning................................................................................................................................................................... 42
164
/ 167
Ikarus OS and Ikarus NMS User
Manual
Static ................................................................................................................................................................................ 40
Tables............................................................................................................................................................................... 38
Security............................................................................................................................................................
Access Control Lists ........................................................................................................................................................ 59
Configuration................................................................................................................................................................... 57
WEP................................................................................................................................................................................. 57
WPA ................................................................................................................................................................................ 57
Signal Level ..................................................................................................................................................46
Site Survey ....................................................................................................................................................44
Align ................................................................................................................................................................................ 53
Continuous Scan .............................................................................................................................................................. 53
Operation ......................................................................................................................................................................... 52
SNAT ............................................................................................................................................................79
SNMP .........................................................................................................................................................150
SSH ............................................................................................................................................................153
SSID ..............................................................................................................................................................45
Preferred .................................................................................................................................................................... 50, 52
State and Link Quality ...........................................................................................................................50, 52
Status ...............................................................................................................................................................
Info Dialog Box ............................................................................................................................................................. 157
Stealth Mode.................................................................................................................................................47
Stop Traffic...................................................................................................................................................48
3.2.2Subnet ...................................................................................................................................................29
Backend Radius Fields................................................................................................................................................... 136
DHCP Server Fields......................................................................................................................................................... 86
Discovery Manager Fields ............................................................................................................................................... 14
Firewall Matching Fields ................................................................................................................................................. 73
HotSpot Fields ............................................................................................................................................................... 140
NAT Matching Fields ...................................................................................................................................................... 78
PPTP Fields ..................................................................................................................................................................... 94
Walled Garden Fields .................................................................................................................................................... 132
System Properties .......................................................................................................................................163
System Services................................................................................................................................................
Configuration ................................................................................................................................................................ 150
Table View ....................................................................................................................................................33
Throughput.................................................................................................................................................157
TKIP .............................................................................................................................................................59
165
/ 167
Ikarus OS and Ikarus NMS User
Manual
Trace Route ................................................................................................................................................162
Transmission Rate........................................................................................................................................47
Transmitted Power.......................................................................................................................................56
Type .................................................................................................................................................................
Node................................................................................................................................................................................. 47
UAM ...........................................................................................................................................................131
Upgrade ...........................................................................................................................................................
Firewall ...................................................................................................................................................................... 14, 26
Utilities........................................................................................................................................................160
Virtual Interface...........................................................................................................................................32
3.6VLAN .......................................................................................................................................................34
Interfaces.......................................................................................................................................................................... 35
Walled Garden ...........................................................................................................................................132
8.WAN ..........................................................................................................................................................91
PPPoE Client ................................................................................................................................................................... 91
WDS..............................................................................................................................................................48
WEP............................................................................................................................................................129
WINS ...............................................................................................................................................................
Servers ............................................................................................................................................................................. 87
5.Wireless......................................................................................................................................................43
Extended Repetition......................................................................................................................................................... 68
Point to Point Links ......................................................................................................................................................... 64
Scenarios.......................................................................................................................................................................... 63
Setting Modes .................................................................................................................................................................. 44
WISP Easy Wizard.................................................................................................................................14, 27
166
/ 167
Ikarus OS and Ikarus NMS User
Manual
167
/ 167
Ikarus OS and Ikarus NMS User
Manual