1
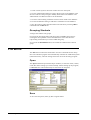
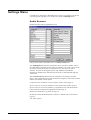
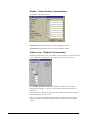
Setup User Manual 31.08.1996 Copyright 1995-1996 Teleste Educational Oy. All rights reserved. Microsoft is a registered trademark. Microsoft Access, ODBC, Microsoft Windows 3.1 and Microsoft Windows 95 are trademarks of Microsoft Corporation. Reachout is a trademark of the Ocean Isle Software Corporation. Proxy is a trademark of the Funk Software Corporation. PC-Duo is a trademark of the PCI & Vector Networks Ltd. Nescape is a trademark of the Netscape Communications Corporation. Software used: Programs: Help and User Guide: Installation: Database: Reports: Microsoft Visual C++ (trademark of the Microsoft Corporation). Doc-To-Help (trademark of WexTech Systems, Inc.). InstallShield (trademark of Stirling Technologies, Inc.). SOLID (trademark of Solid Information Technology, Ltd.). Crystal Reports (trademark of Seagate Technology Inc.). This equipment complies with the requirements in Part 15 of FCC Rules for a Class A computing device. Operation of this equipment in a residential area may cause unacceptable interference to radio and TV reception requiring the operator to take whatever step are necessary to correct the interference. Contents Install 3 Overview....................................................................................................................... 3 Minimum Computer Requirements................................................................... 3 Upgrade/New Program..................................................................................... 3 Optional Software: Remote Control and Dictionary .......................................... 3 Begin Installation........................................................................................................... 4 Installation of Program Files.......................................................................................... 6 Copied Files................................................................................................................... 6 Install Disk 1.................................................................................................... 7 Install Disk 2.................................................................................................... 7 Install Disk 3.................................................................................................... 8 Install Disk 4.................................................................................................... 8 Install Disk 5.................................................................................................... 9 Install Disk 6.................................................................................................. 10 Setup 11 Overview..................................................................................................................... 11 Student Workstation Setup............................................................................. 11 Programme Source Setup (audio)................................................................... 11 Video Network Installation............................................................................. 11 Other Settings................................................................................................ 11 Database Setup............................................................................................... 11 Grouping Students.......................................................................................... 12 File Menu.................................................................................................................... 12 Open.............................................................................................................. 12 Save............................................................................................................... 12 Save As.......................................................................................................... 13 Preferences..................................................................................................... 13 Advanced Preferences.................................................................................... 14 Exit................................................................................................................ 14 Layout Menu................................................................................................................ 15 Available Layouts........................................................................................... 15 New Student................................................................................................... 15 Delete Student................................................................................................ 15 Raster 0 - Raster 8.......................................................................................... 15 Grid 8 - Grid 32, Grid Off.............................................................................. 15 Button Size (45 x 45, 55 x 45, 65 x 45, 75 x 45) ............................................. 15 Settings Menu.............................................................................................................. 16 Audio Sources................................................................................................ 16 Default Sources.............................................................................................. 17 Video Sources................................................................................................ 17 Audio - Video Source Connections................................................................. 18 Video Line - Student Connections.................................................................. 18 Database Administrator.................................................................................. 19 Update Locations............................................................................................ 19 Update Workstations...................................................................................... 20 Setup Contents • i Video Overlay................................................................................................ 21 System Settings.............................................................................................. 22 Data Files....................................................................................................... 22 Pedagogical Network Setup (e.g. Classnet)..................................................... 22 Specifications for Master Video Window..................................................................... 23 Altering the Position of the Window.............................................................. 23 Altering the Size of the Window.................................................................... 23 Optional Software........................................................................................................ 23 Remote Control Program................................................................................ 24 Dictionary Program........................................................................................ 24 Linking Other Applications............................................................................ 24 Setup Files................................................................................................................... 26 LABMAIN.INI File........................................................................................ 26 LABMAIN.SET File...................................................................................... 27 ODBC Setup Files....................................................................................................... 28 ODBC.INI...................................................................................................... 28 ODBCINST.INI............................................................................................. 28 Glossary of Terms ii • Contents 29 Setup Install Overview Minimum Computer Requirements Pentium 90 MHz 16 MB RAM (32 MB recommended for Database) 20 MB free hard disk space (100 MB recommended for Database) SVGA Colour Display: resolution 800x600 or greater, 256 colours Windows 95 Serial Port Parallel Port Mouse Port Mouse The computer installed in the master desk should be as follows: The computer should be in the horizontal position (not a tower model). The power switch must be on the front panel of the computer. The keyboard connection must be on the back panel of the computer. The mouse connector must be on the back panel of the computer. Upgrade/New Program Use the same installation disks for both an upgrade from the old program and for the new version. If there is an old version in the same directory where the new version is to be installed, the old version will be moved to the \OLDMAIN directory. Only .SET and .INI files remain in the old directory. Those files may be used again (or may be changed with the Setup program). Optional Software: Remote Control and Dictionary You can set up optional software for the program to enable teachers to use remote control functions and the dictionary directly from the main program. Remote control enables the teacher to contact and control student PCs. Setup Install • 3 Remote control and dictionary software are installed using their own installation programs. They should be installed before Setup. Define paths to the optional software in the Setup program. For the remote control program you should designate computers as follows: name for workstation 1 is WKS1, name for workstation 2 is WKS2 and so on. Begin Installation 1. Insert Disk 1 in the floppy disk drive (A or B). 2. From the Start Menu, select the Control Panel program. 3. In the Control Panel, double-click on the Add/Remove Programs icon. 4 • Install Setup 4. Click on Install in the Add/Remove Programs window to start the Add Program function. 5. Click on Next, when the program searches for Disk 1 in the floppy disk drive. Setup Install • 5 6. Click Finish to begin the INSTALL.EXE program. 7. Follow the Install program instructions. Installation of Program Files The program first checks your computer's system resources (monitor colours, memory capacity and CPU). If there are less than 256 colours, less than 8 MB of memory, or if the CPU is a 286 or 386, the program notifies the user. It is possible to exit the installation program if system resources are insufficient. If the program finds an old version, it will be moved to the \OLDMAIN directory. Only INI and SET files remain in the old directory. The installation procedure is as follows: 1. Click OK, when the program asks where the main program is to be installed. The default directory is C:\LABMAIN. You can, of course, change the directory. 2. Click OK when the program asks where the Database is to be installed. The default directory is C:\SOLID. 3. If there is insufficient disk space, the program notifies the user and asks for a change of directory. 4. All the necessary files will be copied to the hard disk. The installation program notifies the user when Disks 2, 3, 4, 5 and 6 should be inserted. 5. The program checks for the existence of the ODBC.INI, ODBCINST.INI and CONTROL.INI files, and modifies them if necessary. 6. Installation is completed. Copied Files Details are given below of all files copied during installation. Installation Disks 1 and 2 contain all the files needed by the program itself and some ODBC support files. The remaining ODBC support files and Database files are on Installation Disks 3, 4, 5 and 6. 6 • Install Setup Install Disk 1 egdata.dll is copied to LABMAIN directory engine.exe is copied to LABMAIN directory labmain.bmp is copied to LABMAIN directory labmain.exe is copied to LABMAIN directory labmain.ini is copied to LABMAIN directory setup.exe is copied to LABMAIN directory video.dll is copied to LABMAIN directory video.mm is copied to LABMAIN directory video.nul is copied to LABMAIN directory video.vb is copied to LABMAIN directory video.vd is copied to LABMAIN directory video.wtv is copied to LABMAIN directory Install Disk 2 Setup admineng.cnt is copied to LABMAIN directory admineng.hlp is copied to LABMAIN directory adminfin.cnt is copied to LABMAIN directory adminfin.hlp is copied to LABMAIN directory english.cnt is copied to LABMAIN directory english.dll is copied to LABMAIN directory english.hlp is copied to LABMAIN directory finnish.cnt is copied to LABMAIN directory finnish.dll is copied to LABMAIN directory finnish.hlp is copied to LABMAIN directory french.cnt is copied to LABMAIN directory french.dll is copied to LABMAIN directory french.hlp is copied to LABMAIN directory german.dll is copied to LABMAIN directory labdb.exe is copied to LABMAIN directory labdb.ini is copied to LABMAIN directory remote.exe is copied to LABMAIN directory russian.dll is copied to LABMAIN directory setupeng.cnt is copied to LABMAIN directory setupeng.hlp is copied to LABMAIN directory setupfin.cnt is copied to LABMAIN directory setupfin.hlp is copied to LABMAIN directory smip.dll is copied to Windows directory video.bmp is copied to LABMAIN directory Install • 7 vmc_api.dll is copied to Windows directory vsm.dll is copied to Windows directory vtc.dll is copied to Windows directory vwb.dll is copied to Windows directory vwb_clip.dll is copied to Windows directory vwb_hard.dll is copied to Windows directory winmem32.dll is copied to Windows directory Install Disk 3 crpe32.dll is copied to Windows System directory solid.db is copied to Database directory solid.lic is copied to Database directory student.bmp is copied to LABMAIN directory Install Disk 4 8 • Install co2c40en.dll is copied to Windows System directory ctl3d32.dll is copied to Windows System directory d2hlnk32.dll is copied to Windows Help directory d2hnav32.exe is copied to Windows Help directory d2htls32.dll is copied to Windows Help directory extstudentinfo.crf is copied to Report directory extstudentinfo.rpt is copied to Report directory gradescale.crf is copied to Report directory gradescale.rpt is copied to Report directory implode.dll is copied to Windows System directory mfc30.dll is copied to Windows System directory p2sodbc.dll is copied to Windows System directory pincode.rpt is copied to Report directory pointsbystudent.crf is copied to Report directory pointsbystudent.rpt is copied to Report directory pointsbytest.rpt is copied to Report directory pointsbytest.crf is copied to Report directory pg32.dll is copied to Windows System directory studentinfo.crf is copied to Report directory studentinfo.rpt is copied to Report directory u2ddisk is copied to Crystal Reports directory u2dmapi.dll is copied to Crystal Reports directory u2fcr.dll is copied to Crystal Reports directory u2fdif.dll is copied to Crystal Reports directory Setup u2free.dll is copied to Crystal Reports directory u2frtf.dll is copied to Crystal Reports directory u2fsepv.dll is copied to Crystal Reports directory u2ftext.dll is copied to Crystal Reports directory u2fwks.dll is copied to Crystal Reports directory u2fwordw.dll is copied to Crystal Reports directory u2fxls.dll is copied to Crystal Reports directory u2lbar.dll is copied to Crystal Reports directory u2ldts.dll is copied to Crystal Reports directory u2lsamp1.dll is copied to Crystal Reports directory Install Disk 5 Setup bwcc.dll is copied to Windows System directory cpn16ut.dll is copied to Windows System directory ctl3dv2.dll is copied to Windows System directory ds16gt.dll is copied to Windows System directory ds32gt.dll is copied to Windows System directory glcv31mw.dll is copied to Windows System directory gldg31mw.dll is copied to Windows System directory glfs31mw.dll is copied to Windows System directory msvcrt10.dll is copied to Windows System directory odbc16gt.dll is copied to Windows System directory odbc16ut.dll is copied to Windows System directory odbc32.dll is copied to Windows System directory odbc32gt.dll is copied to Windows System directory odbcad32.exe is copied to Windows System directory odbccp32.cpl is copied to Windows System directory odbccp32.dll is copied to Windows System directory odbccr32.dll is copied to Windows System directory odbcint.dll is copied to Windows System directory olepro32.dll is copied to Windows System directory pstuirw.dll is copied to Windows System directory scliw16.dll is copied to Windows System directory scliw32.dll is copied to Windows System directory sdecw16.dll is copied to Windows System directory snmpw16.dll is copied to Windows System directory snmpw32.dll is copied to Windows System directory sntbw16.dll is copied to Windows System directory sntbw32.dll is copied to Windows System directory Install • 9 solset32.dll is copied to Windows System directory solsetup.dll is copied to Windows System directory sshmw16.dll is copied to Windows System directory sshmw32.dll is copied to Windows System directory sspxw16.dll is copied to Windows System directory swsaw16.dll is copied to Windows System directory swsaw32.dll is copied to Windows System directory Install Disk 6 10 • Install ctl3d.dll is copied to Windows System directory msvcrt20.dll is copied to Windows System directory msvcrt40.dll is copied to Windows System directory odbc.dll is copied to Windows System directory odbc.ini is copied to Windows directory odbcadm.exe is copied to Windows System directory odbccurs.dll is copied to Windows System directory odbcinst.dll is copied to Windows System directory odbcinst.ini is copied to Windows directory rcon.exe is copied to Database directory solid.exe is copied to Database directory solid.ini is copied to Database directory ssql.exe is copied to Database directory ssqlw.exe is copied to Database directory Setup Setup Overview Before the Media Resource Centre can be used, an installation-specific system setup must be defined for the software. Student Workstation Setup The student seating order defines the location and number of student workstations on the master screen. Student grouping defines the student groups at start-up. The default setting places all students in Group A. Programme Source Setup (audio) Parameters are defined for each programme source, by which the system distinguishes one programme source from another. Each programme source is given a name by which the system recognises it. The CER-3000 programme source connector number 'ties' a programme source to the hardware configuration. The programme source type defines the features of the audio device to be used. The programme sources are divided into categories on the basis of their features and remote control options. Video Network Installation In configuring the video network, the number of VD2 units in use - to which student video monitors and/or local video equipment are connected - must be defined. Four student workstations may be connected to one VD2 unit. In addition, the number of student monitors and/or local monitors connected to a VD2 unit must be defined. VD2 unit input and output numbers, student workstations corresponding to these, and video network video output numbers are also defined at this point. Other Settings The environment settings define issues relating to the equipment at the master workstation, which must be checked and adjusted as appropriate. Database Setup Here are the steps to follow to set up the database: Setup Setup • 11 1. Create a class layout in the Class window and save the layout. 2. Use the Administrator dialog to register the first user in the database. This first user will have the privilege to modify all the data in the database. The Administrator can add new teachers to the database. 3. Use the Location dialog to add the current location name to the database. 4. Use the Workstation dialog to add all the workstations to the database 5. Save the location and workstation data to the INI file by selecting the Save command from theFile Menu. Grouping Students Arranges the students into groups. First click the Grouping button and then select studentsfor each group by clicking the Group button in the Functionwindow. Then click the icon representing each student you wish to addto that group. If you click theAll Students button, all students are added to the selected group. File Menu The File Menu contains the maintenance and save commands for the Setup files. The Labmain program will automatically initialize the CER-3000 system (Restart function), when the settings have been saved in the Setup program Open The Open command opens theFile Open window, to select the name (*.SET) of the file whose settings you wish to modify. When starting up the program, LABMAIN.SET will automatically be selected as the setup file. Save To save the setup files (.SET) by their original names. 12 • Setup Setup Save As To save the setup files (.SET) using a newly selected name. Preferences To define the initial setup state of the program. It is possible to tailor the program startup configuration to suit your own needs and tastes. Select Preferences in the File Menu to open thePreferences window in the centre of your screen. Select Language offers the teacher the opportunity to select the user language. Select Layout offers the opportunity to use different seating plans in the classroom. Tooltips are to help users who cannot immediately remember the meaning of the icons in the toolbar. When a user wants information about a particular icon, he just moves the cursor over the icon and waits for a moment. A Help comment appears on the screen in a few seconds.Tooltips are turned on by clicking Used (default). Not Used is for users who no longer need Tooltip help. Database may be turned on or off by clicking Used (default) or Not Used. If Database is Not Used, theDatabase Menu shows no accessible items. Limited Access is either Used (default) or Not Used. If Used, students have Limited Access to their cassette recorders (in manual programme transfer). Setup Setup • 13 Student Microphones Mutedis either On or Off (default) when transferring a programme. If Student Microphones Mutedis On, programme transfer is as normal except that the student track is erased. Automonitor Scanallows you to select whether Automonitor scans students by student number or by group division. Clicking the Advanced button opensthe Advanced Preferences window. Advanced Preferences Advanced Preferences offer advanced user options. Autolesson Delayis the user-definable period following the last sentence in a programme before which tape rewind begins. Group Call Modeoffers a choice of how student recorders are controlled, if Group Call is used during programme transfer: 1. Standard: Group Call does not interfere with programme transfer; the teacher's speech is heard alongside the programme. 2. Transfer Pause: Programme transfer is stopped during Group Call. 3. Programme Mute: Programme transfer continues as per normal, but the programme is muted in the students' headsets. Automonitor Intervalallows the time spent on the automatic monitoring of each student to be varied. Speaker Mute selects situations in which the classroom loudspeakers are muted to avoid acoustic feedback. The user can select muting separately for Intercom and Group Call. Intercom Mode allows teachers to change the functionality of student recorders during Intercom. The default isStop + Teacher Control. Exit To exit the Setup program. 14 • Setup Setup Layout Menu Available Layouts You can save new student icon layouts by clicking the Save As button, e.g. "butterfly tables open" or "butterfly tables closed". If you want to delete a previously saved layout, select the layout name in the list box and click on Delete. Modifications are saved by clicking theOK button. New Student Creates a new student icon. The student icons are numbered automatically from one upwards. The Insert button also adds a new icon to the Class window. If you do not want automatic numbering, hold down the SHIFT key and press the Insert key. Delete Student This function deletes the next student icon clicked on. The remaining student icons are automatically renumbered. The Delete button also adds a new icon to the Class window. If you do not want automatic numbering, hold down the SHIFT key and press the Delete key. Raster 0 - Raster 8 To set the sharpness of the raster used in placing the icons. Grid 8 - Grid 32, Grid Off Grid commands set the density of the grid used in placing icons. The Grid Off command removes the grid. Button Size (45 x 45, 55 x 45, 65 x 45, 75 x 45) Button Size determines the size of the student button. The fewer the students in the Media Resource Centre, the larger the button size that may be used. Setup Setup • 15 Settings Menu Commands for defining the Media Resource Centre's programme sources and connecting them logically to one another are found in theSettings menu. Audio Sources Defines the lab's audio programme sources. Assign a user name to the audio source in theSource Title field. The CER Input field states the programme source connector number. This is the CER-3000 programme source connector number (1-8). Only sources in the first four ports can be used as recording devices in the source-to-source function. The port for all digital sources (CD, Media File and Media Warehouse) should be the same because the audio is channelled through the sound card. The Control Type field defines the set of features to be used for an audio device. The programme sources are divided into categories on the basis of their features and remote control options: No Remote Control: defines a source without remote control (type 0). Remote Control (1xTransfer):defines a source with remote control (type 1). Remote Control (4xTransfer):defines a programme source with both remote control and 4x normal speed programme transfer (type 2). Media File: Media File e.g. WAV file (type 3). Media Warehouse: Media Warehouse, which is a textual link to a WAV file (type 4). CD Audio: (type 5) 16 • Setup Setup Default Sources Defines the default programme source for each student group. Select the source from the group's pull-down menu. Video Sources This defines the programme source devices for the video network and "ties" them to the Video Distributor 1(VD1) programme source inputs. Video Source Title Field The name of the video programme source is defined in theTitle field. On the first line, where 'No Video' is specified, select the programme source default (for when no other programme source is connected). VD1 Input Defines the Video Source connector number for the VD1 unit. Setup Setup • 17 Audio - Video Source Connections Links audio and video sources. Audio Sourceassigns names for the audio programme sources. Video Source assigns names for the video programme sources. Video Line - Student Connections Defines the principal user for each student video connection. The principal user is the student who controls the video connection with his or her device. The Number of VD2 field defines the number of VD2 units in the video network. By clicking+ or - the user can increase or decrease the number of VD2 units. Select the active VD2 unit by clicking in the VD2 list box. The user can then select students for the active unit. When VD is used in the Dual Teacher System, you should set one "student number" to 200. This allows one extra teacher monitor line for the second teacher. 18 • Setup Setup Database Administrator The user must give the name, initials, user name and password for the first database Administrator. The program must be reset in order to change the first administrator's data. When a database Administrator is added, the password should be carefully remembered for future use. Update Locations In the Update Locationsdialog, a user can add a new location, update and delete existing ones. The term "location" means physical space in the building. It means nearly the same as "room", so you can define one location for each physical room. When there is only one lab in the specific environment, this dialog is used in the following way: 1. Give a location name to theName field and 2. Click the Save button. The new location is then added to the database. If there is more than one lab in this environment, you should add all the locations from this dialog by clicking theNew button, inserting appropriate data and clicking the Save button. Adding a New Location 1. Click the New button. 2. Insert location name and description. 3. Click the Save button. Updating a Location 1. Select the one of the existing locations by clicking in list box on the top. 2. Change the appropriate data. 3. Click the Save button. Setup Setup • 19 Update Workstations In the Update Workstationsdialog, the user can save the student workstations and teacher's workstation to the database. The term "workstation" means here PC position, AAC position and AA position. This dialog also links the teacher workstation and all student workstations to the specific location. The first field is the workstation number, the second field is a workstation type (Student/Teacher) and the third field is a workstation status (Active/Removed). All the student workstations which are visible in the Class window (in the current layout) are located in this list box. If you want to insert more workstations, click theNew button and give a workstation number to theNumber field. To delete a workstation, select it from the list box and click theDelete button. If a workstation is currently removed and you want to activate it, you should change its status by clicking the Edit button and change the status from the property page. How to Use Update Workstation Dialog Note: First make the class layout and save it. It is then easier for you to use this dialog. 1. Select a location from theCurrent Location list box. The location you have added from the Update Locationsdialog is selected as the default location. 2. The Current Workstationsetting refers to the teacher's workstation number. The default for this setting is 100. If you are installing more teacher computers (e.g. for Dual Teacher System), you should change this setting to 101 for the second teacher's PC. 3. Check that all the student workstations are in the list box. Add any missing workstations. 4. When all the data are correct, click theOK button. You can also cancel all the changes by clicking theCancel button. Adding a New Workstation 1. Click the New button. 2. Insert a workstation number in theNumber field on the properties page and then select the status (the default isActive). 3. Click the Save button. 20 • Setup Setup Updating a Workstation 1. Select one of the existing workstations by selecting an item from the workstation list box. 2. Change the appropriate data. 3. Click the Save button. Deleting a Workstation 1. Select an existing workstation from the workstation list box 2. Click the Delete button. 3. The Workstation status will change toRemoved. Video Overlay Note: Before Setup, you must first install the appropriate card in Windows. The active overlay card can be changed inthe Video Overlay window by selecting the card and clickingOK. All the available overlay cards are displayed in the list box at the top of the window. The active overlay card is displayed beneath the list box. The Settings button allows you to change the standard (PAL, NTSC, SECAM) and the input connector (Source 1, Source 2), if those settings are possible. Setup Setup • 21 System Settings Defines issues relating to the equipment and features of the program. Lab Mode Sets the operational mode of the program. Demo sets the program to demo mode. In demo mode it may be run on the master PC, independently of the language lab's electronics. Lab makes the program function normally. Rewind at Power Up To rewind student recorders at start-up, set to On or Off. CER-3000 Serial Port Selects the serial port connected to the CER-3000. Data Files Assigns names to the definition files. The definition files are saved with the Save command. Pedagogical Network Setup (e.g. Classnet) You can begin the Pedagogical network setup by selecting the appropriate Menu item from the Settings Menu. The Pedagogical network system is setup by clicking the Select button and selecting the PC positions one by one. After you 22 • Setup Setup have selected the correct PC position, the PC icon and position number will appear to the student icon. If you have clicked the icons in the wrong order, you can cancel the last PC position by clicking theCancel button in the Function window. TheCancel All button is for starting the Pedagogical network setup from the beginning. By clicking the Fixed button, all the student positions will also have the PC, which is connected to the Pedagogical network. All the changes are accepted by clicking the OK button. Respectively all the changes will be cancelled by clicking the Cancel button (at the bottom of the window). Specifications for Master Video Window If the video network and video card have been installed, the master Video Window parameters must be set. Clicking the Video Window button makes a video window appear in the student field. The position and size of this window may be altered. Altering the Position of the Window First move the pointer over the caption bar of the video window. Hold down the left-hand button of the mouse to move the window to its new position. Altering the Size of the Window First move the pointer to the bottom right-hand corner of the window, where it changes into a double-headed arrow. Hold down the left-hand button of the mouse to change the size of the window (its shape remains constant). Optional Software Clicking on the Remote Control or Dictionary icons brings up a window showing the program path and parameters of each. Use the Browse button to search through your hard disk(s) in the File Open window. You should always install the dictionary/remote control program itself in Windows before using the Setup program. Setup Setup • 23 Remote Control Program The program may identify student workstations as follows: the name for workstation 1 is WKS1, for workstation 2, WKS2 and so on. Once you have defined a path for the remote control program, you should also define the parameters i.e. you must define the actual command line for using remote control. Below are three examples of how to setup remote control programs: 1. The REACHOUT program, the parameters should be:PHONE=WKS%d. The program replaces the %d parameter with the student number; for example, workstation 1 will be called using the parameters PHONE=WKS1. The command line will be C:\REACHOUT\VIEWER.EXEPHONE=WKS%d. 2. The PROXY program, the parameters should be WKS%d. The command line will be C:\PROXY\PROXY.EXE WKS%d. 3. The PC-DUO program, the parameters should be* /UIP /Cwks%d. Dictionary Program Any dictionary program can be installed on the teacher's computer. The teacher may select the installed dictionary by clickingon the dictionary icon in the toolbar. The path to the dictionary program must be defined in the same way as that to the remote control program. Linking Other Applications You can directly launch different kinds of applications from the main application's Other Menu. If some applications are linked with this dialog , you can see those as items in theOther Menu. When an item is selected from the Menu, one of the following dialogs appears: None, Connect, Options or E-mail. When no dialog is needed,None is set. 24 • Setup Setup Connect dialog: Options dialog: E-mail dialog: You can make new links by clicking theNew button and filling all the necessary fields. If you want to change the existing links, select the appropriate application from the Title list, change the fields and confirm the changes by clicking the OK button. How to Link Other Applications If you want to link some other applications to the main application's Other Menu, you should follow these steps: 1. Select the Link Other Applications command from theSettings Menu. 2. Give the Network Application a name in theTitle field (e.g. Netscape). If there are already some applications in the list, you must click theNew button and then enter a name in the Title field. 3. Select the application by clicking theBrowse button and searching for the file. 4. If you want to give some options, enter them in theOptions field. 5. The INI file can be browsed by clicking theBrowse button. 6. Select the dialog type (None, Connect, Options or E-mail). Setup Setup • 25 Setup Files LABMAIN.INI File The LABMAIN.INI file is utilised by the program. The user can modify its settings in the Setup program. When the user saves settings in the Setup program, both a SET file and the INI file are saved. All the hardware settings are contained in the LABMAIN.INI file. There is only one INI file per the environment, but many SET files. NAME The application name as shown in the title bar (e.g. NAME=application). LOGO The title text, e.g. the name of your institution. DATAFILES The user Setup file name, test results file name and link file name are saved in SET, RSP and LNK constants. For example, SET="LABMAIN.SET", RSP="LABMAIN.RSP" and LNK="LABMAIN.LK". MODE Possible values for MODE are LAB and DEMO. LAB shows that the language lab is functioning normally, and DEMO indicates that the teacher's computer is not connected to the lab's electronics. SERIALPORT The CER is connected to a serial port. Possible values for this port are COM1, COM2, COM3 and COM4. VDWIN Video window position variables (x, y) and size variables (cx, cy) are delimited by commas, e.g. 299,124,250,200. MASTERS The parameters given for the programme sources are: the source number (index), CER-3000 hardware port, source type and source name. For example: 0,1,2,Cassette 1,3,1,VCR VIDEOS VD1 numbers and names for video sources. For example: 0,None 1,Camera 26 • Setup Setup 2,VCR LAYOUT Student positions on screen (student number, x, y, cx, cy, group). For example: 1,32,368,45,45 AUDIOVIDEO Audio-video pairs (CER-3000 port and VD 1 source number). For example: 1,1 or 2,1 STUDENTVIDEO Video sources for students (student number and VD 2 output). For example: 5,1 REWINDSTUDENTS Automatic rewind of student recorders at the program Startup (ON or OFF). MAXSTUDENTS Maximum number of students in language lab: 0 for normal lab and 1 for interpreter lab. EJECTCONTROL Student recorders' Eject control. Possible values are STOP, FREE and ENABLE. REMOTEPROGRAM Remote program, which is executed when the remote program icon is clicked in the toolbar. For example: PROGRAM=C:\PROXY\PROXY.EXE and OPTIONS=WKS%d. COMMON The database name is saved in the DATASOURCE constant. For example: DATASOURCE=ShMem SOLID. The following items are for differentiating locations and workstations from each other: LOCATIONID, WORKSTATIONID, LABLOCATION1 and LABLOCATION2. These are updated, when you have used Update Locations or Update Workstations dialogs. If the program is used in a network (connected to another computer used to drive CER-3000), SERVER-setup parameters are needed. IPADDRESS is a server IP address and PORT is a server port. LABMAIN.SET File All the user configurations are saved in the LABMAIN.SET file: 1. Preferences information (from theFile menu). 2. The grouping of students. 3. Programme sources for groups. Setup Setup • 27 ODBC Setup Files ODBC.INI The ODBC.INI file contains the database name and the ODBC driver. For database functions, the ODBC.INI file should consist of at least the following rows: [ODBC Data Sources] ShMem SOLID=SOLID Server 2.1 [ShMem SOLID] Driver=C:\WINDOWS\SYSTEM\scliw16.dll Description=SOLID Server 2.1 16bit Driver32=C:\WINDOWS\SYSTEM\scliw32.dll [ODBC 32 bit Data Sources] ShMem SOLID=SOLID Server 2.1 (32 bit) ODBCINST.INI ODBCINST.INI consists of all installed ODBC drivers. At least the following rows should be included in the ODBCINST.INI file: [SOLID Server 2.1] Driver=C:\WINDOWS\SYSTEM\scliw16.dll Setup=C:\WINDOWS\SYSTEM\solsetup.dll [ODBC Drivers] SOLID Server 2.1=Installed [SOLID Server 2.1 (32 bit)] Driver=C:\WINDOWS\SYSTEM\scliw32.dll Setup=C:\WINDOWS\SYSTEM\solset32.dll 32Bit=1 [ODBC 32 bit Drivers] SOLID Server 2.1 (32 bit)=Installed 28 • Setup Setup Glossary of Terms Administrator Administrators have the highest priority access to the database. They may add to, delete from and update teacher and student data, as well as other Administrators' data. All Call When All Call is selected, the teacher's voice is heard by all the students. Student recorders in free work are stopped and come under teacher control. Audio-Active Comparative Student Station A student workstation with a recorder. The student can record programme source material on one track and his/her own speech on the other track. Audio-Active Student Station There is no student recorder at this station. The student can listen to a programme sent from either the master recorder or an external programme source. Autolesson Automatic programme transfer to students. The student tapes are first rewound, after which programme transfer begins. Transfer ends when there is a pause of a specified length (Autolesson delay). The student tapes are then rewound and the students freed to do independent work. Automonitor Monitors all students, moving automatically from one student to another after a certain period of time. The automonitor symbol appears on the student icon of the monitored student. Students may be monitored either by group or by student number - the choice is made in theFile-Preferences window. Button A raised, differently-coloured area. Pressing it starts or stops a function. Setup Glossary of Terms • 29 Call For the student to call the teacher. The word Help appears on the student icon of the calling student. When the teacher clicks on the icon, a line of communication is opened and the call is accepted. Camera With the Camera button, the teacher sends the programme from the video programme source to all student monitors and the teacher's monitor. The source in question is that connected to the first video programme source connector in the video network. This would usually be the document camera. Class Speaker The teacher may use the classroom loudspeaker to listen to the programme. It is muted during Group Call and Intercom to avoid acoustic feedback. Muting can be switched off in Preferences. Class Window Each student is represented by his/her numbered icon in the Class window. The icon layout is "as you see it" in the classroom. Clicking Using the mouse to position the pointer at the appropriate place on the screen, and then pressing the mouse button. Free Work No programme transfer to the students - independent work only. Function Window This window contains all the parameter controls for a particular function (e.g. Pair Discussion). Group Button Clicking buttons A, B, C, D or L activates the source control for the group indicated. Group Call Click Group Call when you want to speak to the whole group. Student recorders in independent work stop and come under teacher control. Group Conference Members of a specific group can talk to each other once the group has been created by the teacher. One or more Group Conferences may take place at the same time. The teacher can participate interactively by clickingMix or use Intercom to talk to one member of the group at a time. Student recorders are under teacher control during a Group Conference. Group Control Group controls are for controlling all the student recorders in an active group. 30 • Glossary of Terms Setup Group Window The Group Window contains group programme source controls, programme transfer controls and group controls. Grouping Students may be divided into groups to work with different tasks. The program has four teaching groups (A, B, C and D) to which a programme can be transferred, and one Library Group (L) for independent study. Infrared Device Controller Infrared-controlled devices, such as a video recorder, may be remote-controlled using the Infrared Device Controller. Intercom Through Intercom, the teacher and student can hear and speak to each other. A student recorder in free work is stopped and comes under teacher control. The teacher can also control the student recorder through the Student Monitor window. Library Group The Library Group works independently, selecting its own programme sources. The teacher may monitor and talk with any student in the Library Group. Mark Students can place an electronic bookmark on the student track of a recording. There are ten bookmarks (1,2,...9,0). The teacher can also set bookmarks (6, 7, 8, 9, 0) for the student during Monitor. The Search button is used to wind to the bookmark and for playback. Master Audio Panel The Master Audio Panel (MAP) is located on the left-hand side of the master desk. There are controls for teacher headset volume, and classroom loudspeaker bass, treble and volume. Media File A media file is a digitised sound and/or picture file (e.g. WAV). Media Warehouse The Media Warehouse forms the link between the file name (e.g. dingdong.wav) and the explanatory text (sound of a church bell at noon). Teachers do not have to remember file names and paths - they may use the explanatory texts instead. Menu The Menu is at the top of the Main window. The Menu items areFile, Layout, Settings and Help. Setup Glossary of Terms • 31 Mix An editing function which mixes programme source sound and the teacher's voice. Model Student A Model Student is a student who is used as the programme source. The Model Student is indicated by the letter M on his or her student icon. The Model Student can be changed. Monitor The teacher's screen shows an image of the student recorder panel through which student recorder operation can be monitored. The teacher can set bookmarks during Monitor, and can hear the student's programme and speech. If the video network is in use, the teacher can see the student's video picture on the video monitor. The student will not be aware of being monitored. Mouse Used to control the Media Resource Centre. Pair Discussion This function allows students to be linked in a Pair Discussion. Both the number of students in a pair and number of the pairs may be varied, and pairs may be created across group boundaries. Students can hear the other member(s) of the pair. Student icons show the student numbers of those in Pair Discussion. Phone Conversation Students can take full advantage of this function to make telephone calls and take part in totally life-like conversations. Preferences The program has certain initial settings which the teacher may change to suit his/her taste. Programme Source Each device in the master desk that the teacher uses to transfer sounds or pictures to the students is referred to as a Programme Source. Programme Track The Student Recorder runs two tracks - the Programme Track and the Student Track. The Programme Track records the audio part of the Programme Source. Programme Transfer The Programme Transfer controls areTransfer, Fast Transfer, Autolesson, Fast Autolessonand Manual. Programme Transfer is controlled through the Group window. 32 • Glossary of Terms Setup Response Analyser The Response Analyseris an automatic system for putting multiple choice student responses to test questions up on screen and/or to paper. Restart Select this option to reboot the system from scratch. Statusbar The Statusbar is a status row at the bottom of the main window. It is divided into four parts. Each part shows a group status and the group Programme Source. Student Audio Panel Control keys and an information display for the student. Student Icon The Student icon shows the student number and provides the teacher with information about the status of the student recorder. Student Track The student recorder runs two tracks - the Programme track and the Student track. The Student track records the student's speech. Test The Test menu contains the Response Analyserand Response Recording functions. Toolbar The Toolbar us on the top of the main window and contains control buttons. Tooltip Tooltip is for users who cannot always remember the meanings behind icons in the toolbar. To get help, move the cursor onto the icon in question and wait for a moment. Help comes on screen after a few seconds. Video Network This network allows for individual video distribution to each student. Setup Glossary of Terms • 33 Setup Glossary of Terms • 35