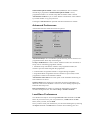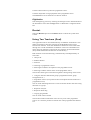
1
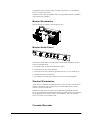
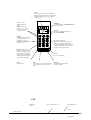
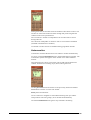
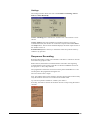
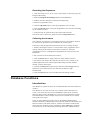
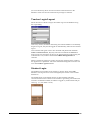
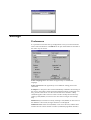
User Manual 31.08.1996 Copyright 1995-1996 Teleste Educational Oy. All rights reserved. Microsoft is a registered trademark. Microsoft Access, ODBC, Microsoft Windows 3.1 and Microsoft Windows 95 are trademarks of Microsoft Corporation. Reachout is a trademark of Ocean Isle Software Corporation. Proxy is a trademark of Funk Software Corporation. Used Software: Labmain and Setup: Help and User Guide: Installation: Database: Microsoft Visual C++ (trademark of Microsoft). Doc-To-Help (trademark of WexTech Systems, Inc). InstallShield (trademark of Stirling Technologies, Inc.). Solid (trademark of Solid Information Technologies, Ltd.). This equipment complies with the requirements in Part 15 of FCC Rules for a Class A computing device. Operation of this equipment in a residential area may cause unacceptable interference to radio and TV reception requiring the operator to take whatever step are necessary to correct the interference. Contents User Guide 1 Overview....................................................................................................................... 1 Introduction..................................................................................................... 1 User Interface................................................................................................... 1 Programme Source........................................................................................... 3 Master Workstation.......................................................................................... 3 Master Audio Panel.......................................................................................... 3 Student Workstation......................................................................................... 3 Cassette Recorder............................................................................................. 4 How To Use................................................................................................................... 8 Switching ON the Media Centre....................................................................... 8 Programme Transfer to Students...................................................................... 8 Talking to the Whole Class.............................................................................. 9 Monitoring Student Work................................................................................. 9 Teacher-Student Discussion............................................................................. 9 Group Conference.......................................................................................... 10 Pair Discussion............................................................................................... 11 Phone Conversation........................................................................................ 11 Programme Copying....................................................................................... 12 Grouping Students to Different Groups........................................................... 12 Displaying Video Window.............................................................................. 13 Using Help..................................................................................................... 13 User Reference 14 Overview..................................................................................................................... 14 Introduction................................................................................................... 14 Toolbar Functions........................................................................................................ 14 Toolbar .......................................................................................................... 14 All Call.......................................................................................................... 14 Class Speaker................................................................................................. 14 Video............................................................................................................. 15 Camera .......................................................................................................... 15 Remote PC..................................................................................................... 15 Dictionary...................................................................................................... 15 Phone Conversation........................................................................................ 15 Pair Discussion............................................................................................... 15 Group Conference.......................................................................................... 15 Grouping........................................................................................................ 16 Group............................................................................................................. 16 Monitoring and Guiding Students................................................................................ 16 Monitor.......................................................................................................... 16 Intercom......................................................................................................... 16 Automonitor................................................................................................... 17 Student Notes................................................................................................. 18 Group Functions.......................................................................................................... 19 Group Call..................................................................................................... 19 TLC-3000 User Manual Contents • i Group Camera................................................................................................ 19 Grouping........................................................................................................ 19 Programme Source......................................................................................... 19 Programme Transfer...................................................................................... 21 Group Control................................................................................................ 22 Communication Exercises............................................................................................ 24 Group Conference.......................................................................................... 24 Pair Discussion.............................................................................................. 24 Phone Conversation....................................................................................... 25 Testing Student............................................................................................................ 25 Response Analyser......................................................................................... 25 Response Recording....................................................................................... 27 Database Functions...................................................................................................... 28 Introduction................................................................................................... 28 Teacher Login/Logout.................................................................................... 29 Student Login................................................................................................ 29 Student Attendance........................................................................................ 30 Teacher Attendance....................................................................................... 30 Settings........................................................................................................................ 31 Preferences..................................................................................................... 31 Advanced Preferences.................................................................................... 32 Load/Save Preferences.................................................................................... 32 Special Functions......................................................................................................... 33 Stereo............................................................................................................. 33 Copying......................................................................................................... 33 Restart ........................................................................................................... 34 Using Two Teachers (Dual)............................................................................ 34 Technical Features....................................................................................................... 35 Hardware Features......................................................................................... 35 Software Features........................................................................................... 37 Glossary of Terms ii • Contents 39 TLC-3000 User Manual User Guide Overview Introduction The User Guide is a fast guide for users who wish to get a general overview of this application. User Reference is for users who need to know something about a specific issue. User Interface Main Window Menu Toolbar Function Window Class Window Statusbar Menu The Menu consists of the following main items:File, Communication, Test, Groups, Database, Other and Help. TLC-3000 User Manual User Guide • 1 Toolbar All Call Camera Class Speaker Remote PC Video Dictionary Phone Group Conference Pair Discussion Groups Grouping Statusbar The Statusbar is divided into four sections (A, B, C and D). Each section shows group status and the group programme source (e.g. Transfer Cassette). Function Window From the Function window, the user can access the specific commands of a particular function (e.g. Group functions). Class Window The student icons are in the Class window.By clicking on one of those student icons, the user can interact with that student. Programme Source The programme sources of the Media Resource Centre are located in the master desk. Different audio and video devices may be used for programme sources e.g. tape recorders, video recorders, CD players, sound card s, openreel recorders etc. Most programme sources can be remote-controlled directly through the master screen. These include e.g. a recorder and infrared controlled 2 • User Guide TLC-3000 User Manual programme sources such as video recorders, CD players etc. (use Infrared Device Controller accessory). Students see the video programme source via programme transfer if the video network has been installed. Master Workstation The teacher has an ordinary microcomputer (PC). Master Audio Panel The Master Audio Panel is located at the left-hand side of themaster desk. It consists of the following: 1. The main switch for the Media Resource Centre. 2. Connections for two master headsets. 3. Connections for two external programme sources (2 x lines IN & OUT). 4. Volume control for the headsets. 5. The volume, bass and treble controls for the classroom loudspeaker. Student Workstation Audio-Active Comparative Student Stations consist of a tape recorder and a Student Audio Panel. The recorder may be located either in the recorder cabinet or on the student desk. Student recorders have two tracks: the programme track and the student track. The programme transferred from the programme source is recorded on the programme track, and the student cannot delete it. Only the student's voice is recorded on the student track. Cassette Recorder TLC-3000 User Manual User Guide • 3 CALL Press to call the teacher. An exclamation mark appears on your display. It disappears when the teacher answers. Press again to cancel the call. Volume control VOL1 programme track,. VOL2 student track Press (+) or (-), or both at the same time to set volume at normal. SEARCH To find bookmarks, pressSEARCH and the bookmark number. PAUSE This pauses theprogramme during PLAY or RECORD. MARK You can mark certain points in the programme with a bookmark. To set a bookmark pressMARK and a number (1-5). FF (Fast Forward/Cue) To fast forward the tape, press once (starts in 2 seconds). Keep pressed down to fast forward slowly. When the recorder is onPLAY, you can monitor the tape while fast-forwarding. REW (Rewind, Review) For fast rewind, press once (starts in 2 seconds). Keep pressed down to rewind slowly. When the recorder is on PLAY, you can monitor the tape while rewinding. STOP Stops the tape. PLAY Plays theprogramme. REC To record your own speech and listen to the programme track at the same time. RECAP To find the beginning of the previous sentence. LCD Bookmark number Tape counter (mins., secs.) Master Recorder CALL Library cassette 4 • User Guide TLC-3000 User Manual Setup Mode How To Use... Switching ON the Media Centre 1. Switch ON the Media Resource Centre by the main switch on the left-hand side of the master desk. This switches on all the lab equipment. Once the lab has been switched on, all student tapes are automatically rewound to the beginning. 2. Wait a moment while the computer restarts and themain program initialises. TLC-3000 User Manual User Guide • 5 Programme Transfer to Students 1. Place your programme materials in their appropriate places. 2. Click the source list to select the programme source. 3. Click the Transfer or Fast Transfer button to start programme transfer. 4. To stop programme transfer, clickTransfer or Fast Transfer again as appropriate. Talking to the Whole Class 1. Click the All Call button in the Toolbar to talk to all students. 2. Click All Call again to stop talking to the students. Monitoring Student Work 6 • User Guide TLC-3000 User Manual 1. Click the student icon of the student you wish to monitor. 2. Click the Group A button to return to the Main window. Teacher-Student Discussion 1. Click the student icon of the student you want to talk with. 2. Click the Intercom button. 3. You can talk with a student and control the student's recorder. Group Conference TLC-3000 User Manual User Guide • 7 1. Click the Group Conference icon in the Toolbar. 2. Click the Group button(s) for where you want to begin group conference. 3. Click the same Group button(s)again to stop the group conference. Pair Discussion 1. Click the Pair Discussion icon in the Toolbar. 2. Click the Select button in the Function window. 3. Click student icons one by one. 4. Click the Cancel All button to stop pair discussion. Phone Conversation 8 • User Guide TLC-3000 User Manual 1. Click the Phone Conversation icon in the Toolbar. 2. Click the Group button(s) where you want to begin the Phone Conversation. 3. Click the same Group button(s)again to stop the Phone Conversation Programme Copying 3. Click where you want to copy FROM. 1. Click the Group icon (A, B, C or D). 4. Click where you want to copy TO. 5. Click the Copy/Fast Copy button to begin copying. 2. Select the Source-toSource command in the Other Menu. 6. Click the same button again to stop copying. 7. Click the Close button to close the Source-to-Source window. TLC-3000 User Manual User Guide • 9 Grouping Students to Different Groups 1. Click the Grouping icon in the Toolbar. 2. Click the Group button in the Function Window to change the active group. 3. Click those student icons you wish to move to the active group. Displaying Video Window 1. Click the Video window button in the Toolbar. 2. Click the Video Window button again to close Video window Using Help 1. Select the Contents command in the Help Menu. 2. Click the topic you need Help on when the Contents window appears. 10 • TLC-3000 User Manual User Reference Overview Introduction User Reference is for users who need to knowin detail about a specific issue. For a fast overview ofthe application, select the User Guide (see previous chapter). Toolbar Functions Toolbar All Call Camera Class Speaker Remote PC Video Dictionary Phone Group Conference Pair Discussion Groups Grouping All Call By clicking All Call the teacher can talk to all students simultaneously. Class Speaker ON/OFF button for the classroom loudspeaker. The same sound is sent through the classroom loudspeakers as through the master headset. Video ON/OFF button for the Video window. TLC-3000 User Manual User Reference • 11 Camera ON/OFF button for the Camera. The Camerafunction also opens the Video window, if it is not already open. Remote PC ON/OFF button for the teacher to control student computers. The Remote control window appears on the teacher's screen when: 1. The Remote PC button in the Toolbar is clicked ON. 2. The relevant Student icon is clicked (the student must have a PC and remote control software). Dictionary Button for running dictionary programs. Click theDictionary button to show the list box of dictionaries setup for this application. Choose a dictionary from the list box by double-clicking the dictionary name or by selecting the dictionary and clickingOK. Phone Conversation ON/OFF button that displays the Phone Conversation window. Pair Discussion ON/OFF button that displays the Pair Discussion window. Group Conference ON/OFF button that displays the Group Conference window. Grouping ON/OFF button that displays the Grouping window. 12 • User Reference TLC-3000 User Manual Group ON/OFF button that displays the Group window (A, B, C, D or L). Monitoring and Guiding Students Monitor Click the student's icon to monitor a student. This allows the teacher to listen to that particular student's work. Click the Intercom button to open the student-teacher intercom connection. Student Audio Panel controls become available in the Student Monitor window. Click the Automonitorbutton to start the Automonitor function where the teacher can monitor students while they work. Automonitor controls become available in the StudentMonitor window. The user can set bookmarks 6,7,8,9 and 0 on the monitored student's tape by clicking the bookmark button. Intercom Intercom connection with a student may be established as follows: 1. By clicking Intercom in the Student Monitor window. 2. By clicking the icon of a student who is calling the teacher (ahelp balloon appears on the student icon when the student is using Call). TLC-3000 User Manual User Reference • 13 During Intercom, the window shows the Student Audio Panel controls. The teacher can control the student recorder through this panel and guide the student toward correct performance. The recorder of a student in independent work is under teacher control during Intercom. The classroom loudspeaker is muted in order to avoid acoustic feedback (disabled in the Preferences window). All student recorder controls are disabled during programme transfer. Automonitor Automonitor switches Monitor from one student to another automatically. To select, click theAutomonitorbutton in the Student Monitor window. The Automonitor symbol will appear on the student icons under automatic monitor. Through Intercom, a direct conversation can be held with the monitored student. Automonitor switching stops (Pause) during Intercom. Clicking Previous returns the teacher to the previously monitored student. Next takes the teacher on to the next student. Pause pauses Automonitor. Click +/- buttons to lengthen or shortenthe monitoring time per student. Group buttons select the group(s) to be monitored automatically. Click the Automonitorbutton again to stop automatic monitoring. 14 • User Reference TLC-3000 User Manual Student Notes This feature is only functional, if a student is logged into the database (of course the teacher must also be logged in). If you want to make notes about a particular student, click the Notes button. After that you can either select an old note from the list box at the top of the dialog or you can write a new one to the field at the bottom. In the first list box, there are all the notes concerning the specified student in chronological order. Second list is the current/selected note. When you have selected a note from the upper list box, you can read it from the list box on the bottom. You can print all the notes by clicking thePrint button. The current note can be copied to another application by selecting the text and clicking the Copy button. Adding a Note 1. If there is already a note visible, click theNew button and then write a note. 2. Click the Save button. Updating a Note 1. Select an existing note from the Note list box. 2. Update the note. 3. Click the Save button. Deleting a Note 1. Select an existing note from the Note list box. 2. Click the Delete button. TLC-3000 User Manual User Reference • 15 Group Functions Group Call By clicking the Group Call button, the teacher can talk to theactive group alone. All Call and Group Call donot interfere with programme transfer to students. Student recorders in free work are stopped, and control reverts to the teacher. Group Camera ON/OFF button for the GroupCamera. If the Video window is not already open, the Camera function also opens it. Grouping Arranges the students into groups. First click the Grouping button and thencreate a group by clicking the Group button in the Functionwindow. Then click the icon of each student you wish to add that group. If you click theAll Students button, all the students are added to the selected group. Programme Source Click the Source list to open the selection box. Click the required source name to select the programme source of your choice. The Source list then closes. The name of the selected programme source then appears on the status bar. When the user changes source, the controls change as appropriate. For example, the CD-ROM controls are quite different to the cassette controls. Cassette, Open-reel, VCR (Video) During programme transfer the Mix and Edit buttons are enabled. They are otherwise disabled. 16 • User Reference TLC-3000 User Manual The teacher's own voice may be mixed alongside the programme source by clicking the Mix button. Clicking the Edit button pauses the group's programme source (Pause) and the teacher's microphone becomes that source. ClickEdit again to restart and return to the selected programme source. Click the Stop button to stop the programme source. Click the Pause button to pause the programme source. Click the Play button to start programme source playback. Rewind and Fast forward wind the programme source backwards and forwards. CD-ROM Click the Stop button to stop the CD. If you click Play again, playback starts from the beginning of the current (active) track. Play starts playback from track 1 on the CD. Pause stops the CD. If you click Play again, playback restarts from the current position. Eject opens the CD drive carriage. Previous Track moves the CD to the start of the track immediately before the current track. Next Track moves the CD to the start of the track immediately following the current track. Skip Backwards moves the CD quickly backwards from the current position. Skip Forwards moves the CD quickly forwards from the current position. Tracks are marked as follows: e.g. 01/04. The first two digits show the active track and next two digits show the total number of tracks on the CD. Position (on the left) and duration (on the right) information is shown under the buttons. Position and duration are shown asfollows: 02:00 (minutes : seconds). Media File (e.g. WAV-file) TLC-3000 User Manual User Reference • 17 Media files are digitised audio programmes on the computer's hard disk. Analogue material can be digitised usingthe Source-to-Source function. Media files can also be saved to a server hard disk, if available. Controls for playing Media files are almost the same as those for the CD. Select a Media file using the File Open button. The file name is shown above the button. There is of course no (CD) track information available for the Media file and the eject button is not relevant. Media Warehouse The Media Warehouse is for teachers who donot want to have to remember Media file names and/or paths to files. The Warehouse is a link between each Media file and its textual explanation. Links are saved to afile in the Sourceto-Source window. The Warehouse works as follows: a user digitises analogue material and then stores it on the hard disk of the teacher PC. The file must be given a name (such as "C:\WINDOWS\WAV\ENCRS1.WAV"). While technically necessary, this is not an easy sort of name to remember!You must therefore also enter an explanatory text(for example, "English Course for Group One"). Teacher The teacher can choose to become the source for all students in the current group. Student The teacher can select one of the students as amodel student. This student then becomes a new source and everybody in the current group will hear him or her. Click the Select Student button to choose the student; the chosen student shows in the field above the button. Programme Transfer The Programme Transfer control buttons are located in the Group (A, B, C or D) window. Transfer Click the Transfer button to start programme transfer. The group's programme source starts on playback and student recorders begin recording. The programme will be recorded on the programme track, while the student's speech is recorded on the student track. The students hear the recorded program. 18 • User Reference TLC-3000 User Manual Clicking the Transfer button again stops programme transfer. Students are then switched to independent work. Autolesson Click Autolessonto start automatic programme transfer. The student tapes are rewound, after which programme transfer starts as above. Once the programme is finished, the student tapes rewind automatically, and the students are switched to independent work. (The length of the pause after the last sentence before rewind begins is defined in the Preferences window). Clicking the Autolessonbutton again stops programme transfer. Students are then switched to independent work. Fast Transfer Click the Fast Transfer button to start programme transfer at four times normal speed. The group's programme source starts at four-times normal playback and student recorders at fourtimes the normal recording speed. The programme is recorded on the programme track of the student recorder. The student track is erased. The students cannot hear the programme. Clicking the Fast Transfer button again stops programme transfer. Students are then switched to independent work. Fast Transfer is only possible when the group's programme source is a cassette recorder or an open-reel recorder. Fast Autolesson Clicking Fast Autolessonstarts Autolesson transfer at fourtimes the normal speed. Clicking the Fast Autolessonbutton again stops programme transfer. Students are then switched to independent work. Manual Clicking the Manual button initiates manual mode. The programme source starts to play back and the student recorders are stopped. The student microphones are active duringmanual mode. Group Control Play Stop Recorder Control Rewind Pause Fast Forward Record Bookmarks Student Record Cassette Lid Release Search Bookmark Fast Speed Record The Group Control window displays the operating buttons for the group members' recorders. TLC-3000 User Manual User Reference • 19 There are also buttons for setting and searching bookmarks, selecting student recorder control and for cassette lid release control. Recorder Control The Recorder Control button is used to put the student recorders under system control or free them to students’ individual control. The recorders are set to system control by clicking the Recorder Control button. During programme transfer, student recorders are automatically put under system control and the Recorder Control button is disabled. Recorder Function Buttons The Stop button stops all student recorders. The Play button starts playback for all student recorders in the current group. The Pause button pauses all student recorders in the current group. The Rewind button rewinds student tapes fast. Fast Forward button winds student tapes forward fast. The Record button allows recording on both tracks of the student recorders at normal speed. While the teacher is using the Record function, the student recorders are locked. The Fast Speed Record button records on the programme track and erases the student track. The Student Recorder button plays the programme track back and records the student’s speech on the student track. Cassette Lid Release Control Click the Cassette Lid Release button to allow all the students in a group to open their cassette lids. Click the button again to lock the Cassette Lids. Setting Bookmarks The Bookmark Index number buttons (6, 7, 8, 9 and 0) are used to set bookmarks for the current group. Searching Bookmarks Search for bookmarks by clicking the Bookmark Search button and then a Bookmark Index button (6,7,8,9 or 0). Recorders are set to play as they find the indicated bookmark. Student Recorders under Individual Control When students are working individually, the Recorder Function buttons do not display the recorder state. The teacher cannot control the student recorders, or set or search for bookmarks. Student Recorders under System Control The Recorder Function buttons display the recorder state. The teacher can then control the student recorders and set or search for bookmarks. 20 • User Reference TLC-3000 User Manual Manual Programme Transfer The Recorder Function buttons show what the student recorders are doing. The teacher can both set and search for Bookmarks. Programme Transfer and Autolesson The Recorder Function and Recorder Controlbuttons are inactive during Programme Transfer. Teacher and student can both set but not search for bookmarks during programme transfer. Communication Exercises Group Conference Group conference allows studentsto hear and talk to other members of their group. 1. Click the Group Conference icon to open the Group Conference window. 2. Click the Group button (in the Function window) of the group you wish to hold the conference. During group conference three circles are shownon the student icon. The student recorders are under teacher control duringgroup conference. The teacher may participate in thegroup conference by contacting one of the group members via Intercom. Click the Group button again in the Functionwindow to stop thegroup conference for that group. Pair Discussion Pair discussion allows members of a pair to talk to and hear each other. Pairs can be formed across group boundaries. 1. Click the Pair Discussion icon to open thePair Discussion window. 2. Click Select to create the pairs yourself. Then click the student icons of those students you wish to pair. Fixed forms pairs in numerical order (1-2, 3-4, 5-6 etc.). If there is an odd number of students, the last three will form a pair. Random creates pairs at random. If there is an odd number of students, the last three will form a pair. A pair can be undone usingCancel and then clicking the icon of one member of the pair. Cancel All cancels all pairs. TLC-3000 User Manual User Reference • 21 The student icons show the student numbers of those inpair discussion. You can change the groupin which you wish to startpair discussion. You can also change how many students belong to a "Pair". Phone Conversation The phone conversation is a pair discussion initiated by a student. A student phones his/her selected partner, and is connected as if by telephone. 1. Click the Phone Conversation icon to open thePhone Conversation window. 2. Click the Group button (in the Functionwindow) of the group you wish to start the phone conversation. During phone conversation, the telephone receiver symbol is shown on the student icon. The teacher may participate in thephone conversation by contacting one of the group members via Intercom. Click the Group button again in the Functionwindow to stop thephone conversation for that group. Testing Student Response Analyser The Response Analyser is used for multiple-choice tests e.g. multiplelistening tests (e.g. select an answer from 1, 2, 3, 4), word tests, true/false tests (e.g. 1 = TRUE and 2 = FALSE), word order selections, and so on. The teacher may use the camera to display questions for the students. Why use the Response Analyser? First, the teacher saves time in checking test results. Secondly, you can save all the students' results to the database. These results may also be printed. 1. Click the Group icon (A, B, C or D) to select a group for Response Analyser testing. The Response Analyser cannot be used for more than one group at a time. 2. Select the Response Analysercommand in the Test Menu. 3. Click the Start button to start asking the question. 22 • User Reference TLC-3000 User Manual 4. Click a number to set the correct answer. 5. The user can monitor the progress of the test by watching the responses on the student icons. 6. Click the Stop button to finish a question. 7. Start the next question by clicking theStart button again (2). 8. Click the Close button to end the test. The Source can be controlled from theMix, Edit, Rewind, Stop, Play, Pause and Fast Forward buttons. The Source is the same asthat selected in the Group window for the active group, and can be changed in the list box. The number displayed betweenthe Start and Stop buttons shows how many questions have already been asked. The Reports button launches the Administrator Tool, where you can print out Test Reports. If you have not used database facilities, you can print results to the default printer by clicking thePrint button directly. Click Settings to open the Response Analyser Settings window . The preferences for the Response Analyser function are sethere. The results of the test are saved to the database with the Save command, which opens the Test Data dialog. Test Data dialog The Test Data dialog contains the following fields:Test Name, Weight, Grade Scale, Test Date and Info field. The Test Name identifies the test. The Weight is some kind of weight value for this test (default value for Weight is 100). The Grade Scale list box is for selecting a scale for this actual test. The Test Date field is inactive but check the date is correct before you save the results to the database. Work with this dialog in the following way: 1. Enter the test name (e.g. "English Test"). 2. Enter a weight for the test (the default is 100). You can give more weight for this test give e.g. 200 to theWeight field. 3. Select a grade scale for the test from the Grade Scale list. 4. Check the test date in theTest Date field. 5. You can enter extra information concerning this particular test in the Informationfield. 6. Click the OK button. You can also cancel this database update by clicking the Cancel button. TLC-3000 User Manual User Reference • 23 Settings The settings window allows the user to defineAnswer Checking, Answer Time and Print Results By. Answer Checkingselects whether the student's first or last answer is to be chosen. Answer Timesets the time available for a student response. Using the Unlimited selection, the teacher can control the response time with theStart and Stop buttons. The Seconds command displays the fixed response time in the window next to it. Print Results Byselects the way in which the results are printed: either by student or by question. Response Recording Response Recording is used to test students' oral skills. It cannot be used for more than one group at a time. Before the test, the student recorders should be rewound to the beginning. Control buttons for the group's recorders are shown on themaster screen for this purpose i.e. Rew, Stop and Rec. The programme used for the test must not have pauses embedded in it - the teacher pauses the programme during the test. The test consists of two stages: First, the students listen to the teacher's questions and respond to them orally. Only the students' answers are recorded on the student track. Tip: The first question should be: "What's your name ?". Secondly, the teacher collects the students' answers on tape using the master recorder. 24 • User Reference TLC-3000 User Manual Recording the Responses 1. Click the Group icon (A, B, C or D) in the Toolbar to select the group for Response Recording. 2. Select the Response Recordingcommand in the Test Menu. 3. Student recorders should be rewound to the beginning. 4. Select the programme source. 5. Click the Question button to start the programme source on play. 6. Click the Answer button to stop the programme source and start recording on the student recorders. 7. Continue until all questions have been asked and answered. The answer time is shown in a small box beside theQuestion button. Collecting the Answers The collection of responses is an automatic function. The students' answers are collected on the master tape at fourtimes the normal speed. If the tape is full, the application will instruct the user to change the tape. 1. Before collecting the answers, set the recorder as the programme source (exactly stating the destination of the answer collection). Select the programme source by clickingin the Programme Source list and select the destination. 2. Put a cassette in the recorder and rewind it. 3. Click the Start button to begin collection of the students' answers. 4. The teacher can monitor the collection of answers via a window in the bottom right-hand corner of the Response Recording window (Student number, Counter and Target). 5. Clicking the Start button again stops collection (ON/OFFtoggle button). Otherwise, once all the answers are collected, the function stop s automatically. 6. Click the Close button to close the Response Recording window. Database Functions Introduction The database is optional and may be switched ON/OFF from the Preferences window. The database is for users who wish to see student initials and names on screen. Test results are also saved to thedatabase. When all the necessary data have been saved to the database, a user can get many different reports from the database. Some examples of reports are a student list, test results and a grade scale report. There are three different privilege levels in the database : Administrator, teacher and student. Administrators are allowed to update all information and add new teachers and delete old ones. Teachers can add new students and delete old ones. Students are not permitted to update thedatabase. The threelevel hierarchy can be redefined by assigning all teachers asAdministrators TLC-3000 User Manual User Reference • 25 (two level hierarchy).There are also secretaries and technicians in the database. These two have the same kind of privileges as teachers. Teacher Login/Logout When the lesson is about to begin, the teacher logs into the database using the Login dialog. After every lesson, the teacher should log out from the database. If somebody forgets to log out, they will be logged out automatically when the next teacher logs in. Once a teacher has typed in his or her username and passwordto the User Name and Passwordfields, they may select the coursefrom the Course list. If the course does not appear in the list, the teacher must first add it using the Administrator Tool, which is launched fromData ManagementMenu selection. When a teacher has logged in, his/her role and user name becomes visible to the application’s caption bar. The same information disappears when the user uses the Teacher Logoutcommand. Student Login The Student Login window is for teachers to log the whole class into the database. The Login Process can be managed by the teacher or the students themselves. The default group in the student list box is those students which are connected to the course selected in the Teacher Login dialog. The student list includes: workstation number (if student is logged in), student name and pin code (e.g. "(1) Joe Smith 1234"). 26 • User Reference TLC-3000 User Manual If you want to log some other students in, you should click the More students button and select those students to whom you want to give the option of logging in to the database. By clicking a student nameand the student icon in the Class window student will be logged in. If the teacher wants to make the login process available for students, he/she should click theLogin Modebutton. Then all the student positions are activated for Login, so that students can enter their pin codes (four digits). The teacher can check the student login by looking at the student icons and student list box. Every student logged in ispreceded by the workstation number. Students not logged in yet have no workstation number assigned to them. There are also student initials visible in the student icon when the student is logged in. If you want to get more information a particular student click theMore Info button. Click the OK button to accept the Logins. If you still want to cancel the student logins, click theCancel button. Student Attendance In the Student Attendance window, the user can check who has used any Media Resource Centre workstation, by selecting a particular workstation. By changing the workstation selection, the user can obtain information on students who have usedother workstations. The most recent login date is displayed first. Teacher Attendance In the Teacher Attendance window, the Administrator can check which teachers have used the Media Resource Centre. The most recent login date is displayed first. TLC-3000 User Manual User Reference • 27 Settings Preferences It is possible to tailor the start-up configuration to suit your own needs and tastes. Select Preferences in theFile Menu to open the Preferences window in the centre of your screen. Select Languageoffers the teacher the opportunity to selectthe user language. Select Layoutoffers the opportunity to use different seating plans in the classroom. Tooltips are to help users who cannot immediately remember the meaning of the icons in the toolbar. When users want information about a particular icon, they just move the cursor over the icon and wait for a moment. A Help comment appears onthe screen in a few seconds. Tooltips are turned on by clicking Used (default). Not Used is for users who no longer need Tooltip help. Database may be turned on or off by clicking Used (default) or Not Used. If the database is Not Used, the login window is not displayed. Limited Accessis either Used (default) or Not Used. If Used, students have Limited Access to their cassette recorders (in Manual programme transfer). 28 • User Reference TLC-3000 User Manual Student Microphones Muted is either Used (default)or Not Used when transferring a programme. If Student Microphones Muted is Used, programme transfer is as normal except that the student track is erased. Automonitor Scanallows you to select whether Automonitor scans students by student number or by group division. Clicking the Advanced button opensthe Advanced Preferences window. Advanced Preferences Advanced Preferences offer advanced user options. Autolesson Delayis the user-definable period following the last sentence in a programme before which tape rewind begins. Group Call Modeoffers a choice of how student recorders are controlled, if Group Call is used during programme transfer: 1. Standard: Group Call doesn't interfere with programme transfer; the teacher's speech is heard alongside the programme. 2. Transfer Pause: Programme transfer is stopped during GroupCall. 3. Programme Mute: Programme transfer continues as per normal, but the programme is muted in the students' headsets. Automonitor Intervalallows the time spent on the automatic monitoring of each student to be varied. Speaker Mute selects situations in which the classroom loudspeakers are muted to avoid acoustic feedback. The user can select muting separately for Intercom and Group Call. Intercom Modeallows teachers to change the functionality of student recorders during Intercom. The default isStop + Teacher Control. Load/Save Preferences New Preferences may be saved using theSave/Save Ascommands in the File Menu. If you wish to save your own preferences, select Save As in the File Menu, name your file, and clickOK. Once you have saved your Preferences you can utilise them again by selecting the Open command in the File Menu. Click the file containing your own TLC-3000 User Manual User Reference • 29 preferences and clickOK, and LABMAIN.EXE will now start up with your preferences. Special Functions Stereo ON/OFF Menu selection for stereo audio connection. Copying This application allows for the copying of programmes from one programme source to another. The Source-to-Source window is also used for the digitisation of analogue material. 1. Select a group by clicking the Group icon in the Toolbar. 2. Start copying by selectingSource-to-Sourcein the Other Menu. A Source-to-Source Function window opens through which the user controls copying. Click the Manual button to open an audio route between devices. The devices are controlled by the teacher. For the tape recorder, keep Rec pressed down and then click VOL1+ on the Student Audio Panel. For theopen-reel recorder, click REC and select L (in Rec mode). Through the Line Out connector, record as applicable to the equipment being used. Click the Copy button to start copying at normal speed. Click theFast Copy button to start copying at fourtimes the normal speed. Clicking the same button again stops copying. The Mix button connects the teacher's microphonealongside the programme source being played. The Edit button pauses the programme source and selects the teacher's microphone as the new programme source. Clicking this button again restarts the original programme source for the group. Click the Stop button to stop the programme source. 30 • User Reference TLC-3000 User Manual Click the Pause button to pause the programme source. Click the Play button to begin playback of the programme source. The Close button closes the Source-to-Source window. Digitisation Start the digitising process by selecting the analogue source and Media file as the destination. Then click theCopy button. A Media file is a digitised audio file. Restart Select the Restart option from the Other Menu to reboot the system from scratch. Using Two Teachers (Dual) This application can be used simultaneously at twomaster workstations. This makes it possible to share the resources of the Media Resource Centre between two teachers. A lab with twomaster workstations can be used either through one or both of themaster workstations. There are some differences when using two teachers as opposed to one, and these are described below. (Only master workstation One has the All Call facility.) Both teachers can do the following, simultaneously and independently of each other: 1. Group Call 2. Student Monitor 3. Intercom 4. Listening to programme sources 5. Selecting the teacher's microphone as the programme source 6. Selecting a student of their choice as the programme source The teachers must agree on the following before the beginning of the lesson: 1. Using the functions linked with groups (programme transfer, group arrangements etc.). 2. Programme sources (except the teacher's microphone and the student as a programme source). The use of the following functions is reserved for the teacher who starts using them first in a group: 1. Response Analyser 2. Response Recording 3. Copying programmes The use of the video network The teacher at master workstation Two can only view video programme sources. It is not then possible to monitor the video programme the students see. TLC-3000 User Manual User Reference • 31 Technical Features Hardware Features Master Workstation (Type WS) Minimum requirements: 90 MHz Pentium 16 MB RAM (32 MB recommended) 20 MB Free Hard Disk space SVGA Colour Display: resolution 800x600 or greater and 256 colours Windows 95 Serial Port Parallel Port Mouse Port Mouse System Electronics Line input 1,2 0.1-3 V/ 22 kohm (RCA) Line output 1,2 0.3 V / 1 kohm (RCA) Loudspeaker output 2x15 W / 4 ohm frequency response 20...20000 Hz + /-3 dB Teacher Mic input (condenser) 30 mV / 2.2 kohm (+6V) Headset output impedance 200 ohm nominal level -10 dBV (0.3 V) maximum level + 5 dBV Student positions up to 48 students up to 96 students with additional CER Master workstations 2 Groups 4 teaching groups 1 library group Audio programme sources 8 external equipment teacher mic 1, 2 model student 1, 2 Group Conference for 4 teaching groups Pair Discussion for 48 + 48 students Phone Discussion for 48 + 48 students Operating Voltage 115 / 230 V +/- 10 % 50 / 60 Hz Power consumption (approx) 16 students 0,3 kW 32 students 0,5 kW 32 • User Reference TLC-3000 User Manual 48 students 0,8 kW Operating temperature 10..40 °C Cassette Recorder SAT-S Track systems 4 tracks, 2 channels 2 tracks, 2 channels Tape C-cassette, IEC Type I Tape speed 4.75 and 19 cm/s Tape speed variation +/- 1 % Tape speed adjustment range 4.75 cm/s +/- 10 % (playback) Frequency response 63...12500 Hz +/- 3 dB 250...40000 Hz +/- 3 dB (19 cm/s) Wow and flutter < 0.2 % (DIN) Distortion (THD) < 3 % / 0Vu Rewind time (C-60) < 60 s Signal-to-noise ratio > 56 dB (A) Erase efficiency > 70 dB (A) Microphone input impedance 200 ohm, 0.9 mV Headset sockets 4 modular sockets Headset output impedance 200 ohm nominal level -10 dBV (0.3 V) maximum level +5 dBV Volume adjustment Separate for both channels 15 steps Power consumption max. 10 W Headset VST 200 Plug Modular (RJ-11) Headphone impedance 200 ohm Frequency range headphone 20-18000 Hz microphone 25-12000 Hz Microphone impedance 200 ohm Microphone sensitivity 1.2 mV / Pa (1 kHz / 1m) Level of acoustic pressure 96 dB (DIN 45580) Weight 290 g Cable length 1.7 m Video Network (Type VD) Video source inputs 4 Master monitor outputs 2, 1 in VD 1 and 1 in VD 2 Student monitor outputs in VD 2 4 TLC-3000 User Manual User Reference • 33 Local video source inputs in VD 24 Video signal Video socket type 75 ohm / 1 Vpp F-Socket Infrared Device Controller (Type URC) The Infrared Device Controller (URC) is used to interface external devices such as VCR, CD-player etc. for either the master or the student unit. The controller is programmable, it can be "taught" the commands of infrared controlled video or audio devices by using the remote controller of the devices. This enables the remote control of infrared controlled devices as well as the system's own recorders. Software Features MCI Interface You can control the CD-ROM, Wav-files or the Virtual Tape Recorder as audio sources. Database This application is connected to a Solid database via the ODBC-driver. If the user wants to use some other database, he or she can change the ODBCdriver and begin to use the new database. Remote PC This application functions with Remote control network software. All students must be configured with that software. This application recognises the remote control program, when it's defined in the LABMAIN.INI file. 34 • TLC-3000 User Manual Glossary of Terms Administrator Administrators have the highest priority access to the database. They may add to, delete from and update teacher and student data, as well as other Administrators' data. All Call When All Call is selected, the teacher's voice is heard by all the students. Student recorders in free work are stopped and come under teacher control. Audio-Active Comparative Student Station A student workstation with a recorder. The student can record programme source material on one track and his/her own speech on the other track. Audio-Active Student Station There is no student recorder at this station. The student can listen to a programme sent from either the master recorder or an external programme source. Autolesson Automatic programme transfer to students. The student tapes are first rewound, after which programme transfer begins. Transfer ends when there is a PAUSE of a specified length (Autolesson delay). The student tapes are then rewound and the students freed to do independent work. Automonitor Monitors all students, moving automatically from one student to another after a certain period of time. The automonitor symbol appears on the student icon of the monitored student. Students may be monitored either by group or by student number - the choice is made in theFile-Preferences window. Button A raised, differently-coloured area. Pressing it starts or stops a function. TLC-3000 User Manual Glossary of Terms • 35 Call For the student to call the teacher. The word HELP appears on the student icon of the calling student. When the teacher clicks on the icon, a line of communication is opened and the call is accepted. Camera With the Camera button, the teacher sends the programme from the video programme source to all student monitors and the teacher's monitor. The source in question is that connected to the first video programme source connector in the video network. This would usually be the document camera. Class Speaker The teacher may use the classroom loudspeaker to listen to the programme. It is muted during Group Call and Intercom to avoid acoustic feedback. Muting can be switched off in Preferences. Class Window Each student is represented by his/her numbered icon in the Class window. The icon layout is "as you see it" in the classroom. Clicking Using the mouse to position the pointer at the appropriate place on the screen, and then pressing the mouse button. Free Work No programme transfer to the students - independent work only. Function Window This window contains all the parameter controls for a particular function (e.g. Pair Discussion). Group Button Clicking buttons A, B, C, D or L activates the source control for the group indicated. Group Call Click Group Call when you want to speak to the whole group. Student recorders in independent work stop and come under teacher control. Group Conference Members of a specific group can talk to each other, once the group has been created by the teacher. One or more group conferences may take place at the same time. The teacher can participate interactively by clickingMix or use Intercom to talk to one member of the group at a time. Student recorders are under teacher control during a group conference. Group Control Group controls are for controlling all the student recorders in an active group. 36 • Glossary of Terms TLC-3000 User Manual Group Window The Group window contains group programme source controls, programme transfer controls and group controls. Grouping Students may be divided into Groups to work with different tasks. The program has four teaching Groups (A, B, C and D) to which a programme can be transferred, and one Library Group (L) for independent study. Infrared Device Controller Infrared-controlled devices, such as a video recorder, may be remote-controlled using the Infrared Device Controller. Intercom Through Intercom, the teacher and student can hear and speak to each other. A student recorder in free work is stopped, and comes under teacher control. The teacher can also control the student recorder through the Student Monitor window. Library Group The Library Group works independently, selecting its own programme sources. The teacher may monitor and talk with any student in the Library Group. Mark Students can place an electronic bookmark on the student track of a recording. There are ten bookmarks (1,2,...9,0). The teacher can also set bookmarks (6, 7, 8, 9, 0) for the student during Monitor. The Search button is used to wind to the bookmark and for playback. Master Audio Panel The Master Audio Panel (MAP) is located on the left-hand side of the master desk. There are controls for teacher headset volume, and classroom loudspeaker bass, treble and volume. Media File A Media file is a digitised sound and/or picture file (e.g. WAV) saved on a hard disk. Media Warehouse The Media Warehouse forms the link between the file name (e.g. dingdong.wav) and the explanatory text (sound of a church bell at noon). Teachers do not have to remember file names and paths - they may use the explanatory texts instead. Menu The Menu is at the top of the Main window. The Menu items areFile, Communication, Test, Database, Otherand Help TLC-3000 User Manual Glossary of Terms • 37 Mix An editing function which mixes programme source sound and the teacher's voice. Model Student A Model Student is a student who is used as the programme source. The Model student is indicated by the letter M on his or her student icon. The model student can be changed. Monitor The teacher's screen shows an image of the student recorder panel, through which student recorder operation can be monitored. The teacher can set bookmarks during Monitor, and can hear the student's programme and speech. If the video network is in use, the teacher can see the student's video picture on the video monitor. The student will not be aware of being monitored. Mouse Used to control the Media Resource Centre. Pair Discussion This function allows students to be linked in a pair discussion. Both the number of students in a "pair" and number of the pairs may be varied, and pairs may be created across group boundaries. Students can hear the other member(s) of the pair. Student icons show the student numbers of those in pair discussion. Phone Conversation Students can take full advantage of this function to make telephone calls and take part in totally life-like conversations. Preferences The program has certain initial settings which the teacher may change to suit his/her taste. Programme Source Each device in the master desk that the teacher uses to transfer sounds or pictures to the students is referred to as a Programme Source. Programme Track The student recorder runs two tracks - the Programme track and the Student track. The Programme track records the audio part of the Programme Source. Programme Transfer Programme Transfer controls areTransfer, Fast Transfer, Autolesson, Fast Autolessonand Manual. The Programme Transfer is controlled through the Group window. 38 • Glossary of Terms TLC-3000 User Manual Response Analyser The Response Analyseris an automatic system for putting multiple choice student responses to test questions up on screen and/or to paper. Restart Select this option to reboot the system from scratch. Statusbar The Statusbar is a status row at the bottom of the main window. It is divided into four parts. Each part shows a group status and the Group Programme Source. Student Audio Panel Control keys and an information display for the student. Student Icon The Student icon shows the student number and provides the teacher with information about the status of the student recorder. Student Track The student recorder runs two tracks - the Programme track and the Student track. The Student track records the student's speech. Test The Test menu contains the Response Analyserand Response Recording functions. Toolbar The Toolbar is on the top of the Main window and contains control buttons. Tooltip Tooltip is for users who cannot always remember the meanings behind icons in the toolbar. To get help, move the cursor onto the icon in question and wait for a moment. Help comes on screen after a few seconds. Video Network This network allows for individual video distribution to each student. TLC-3000 User Manual Glossary of Terms • 39 TLC-3000 User Manual Glossary of Terms • 41