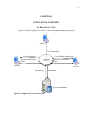
1
A WEB BASED CONTENT MANAGEMENT SYSTEM _______________ A Thesis Presented to the Faculty of San Diego State University _______________ In Partial Fulfillment of the Requirements for the Degree Master of Science in Computer Science _______________ by Satya Rameshbhai Joshi Spring 2011 iii Copyright © 2011 by Satya Rameshbhai Joshi All Rights Reserved iv DEDICATION This thesis is dedicated to my parents and to my sister for their unconditional love and support and to my maternal aunts for their support and encouragement throughout my graduate study. v ABSTRACT OF THE THESIS A Web Based Content Management System by Satya Rameshbhai Joshi Master of Science in Computer Science San Diego State University, 2011 The information for a department of a university on a website tends to be general in nature and often unchanging. If the department or the faculty wish to change, add to, or personalize this information, they need to request the website administrators to make this change on their behalf. This process besides being time consuming is inefficient and may not address the needs of the department accurately. This thesis addresses this issue by the development of a web based content management system. This system provides a simple user friendly interface where the faculty can enter/maintain their personal information, manage information on their classes, upload images, send emails to students registered in a class and interact with students on a discussion board for each class. This web system is designed to be used by the department of Africana Studies at San Diego State University, but with minor changes, it can be used by any department of any university. vi TABLE OF CONTENTS PAGE ABSTRACT ...............................................................................................................................v LIST OF TABLES ................................................................................................................. viii LIST OF FIGURES ................................................................................................................. ix ACKNOWLEDGEMENTS .......................................................................................................x CHAPTER 1 INTRODUCTION .........................................................................................................1 1.1 Motivation ..........................................................................................................1 1.2 Some background on Web Based Content Management System ......................2 2 TECHNOLOGIES .........................................................................................................4 2.1 PHP ....................................................................................................................4 2.2 MySQL ..............................................................................................................5 3 DESIGN .........................................................................................................................6 3.1 Images ................................................................................................................6 3.2 Style Sheets ........................................................................................................6 3.3 Database .............................................................................................................7 4 APPLICATION OVERVIEW .....................................................................................11 4.1 High Level View ..............................................................................................11 4.2 Implementation ................................................................................................12 4.2.1 Create Account....................................................................................... 12 4.2.2 Personal Page ......................................................................................... 12 4.2.3 Add a Class ............................................................................................ 13 4.2.4 Images .................................................................................................... 14 4.2.5 Discussion Board ................................................................................... 15 4.2.6 Send Email ............................................................................................. 17 4.2.7 Features .................................................................................................. 20 4.2.7.1 Ease of Use ................................................................................... 20 vii 4.2.7.2 Web Accessibility ......................................................................... 21 4.2.7.3 Browser Compatibility .................................................................. 21 5 CONCLUSION AND FUTURE EXTENSIONS ........................................................22 BIBLIOGRAPHY ....................................................................................................................24 APPENDIX THE DEPARTMENT OF AFRICANA STUDIES WEBSITE – USER MANUAL ........25 viii LIST OF TABLES PAGE Table 3.1. Professors Table – Stores Faculty .............................................................................8 Table 3.2. Homepagetext Table – Stores Information on Home Pages for Faculty ..................8 Table 3.3. Classinfo Table – Stores Information on Classes .....................................................9 Table 3.4. Images Table – Stores Information on Images .........................................................9 Table 3.5. Mainpage Table – Stores Information on the Front Page of the Website...............10 Table 3.6. Studentinfo Table – Stores Information on Students ..............................................10 Table 3.7. Studentreginfo Table – Stores Student Registration Information ...........................10 ix LIST OF FIGURES PAGE Figure 4.1. High level view of the system. ..............................................................................11 Figure 4.2. Manage personal information. ...............................................................................13 Figure 4.3. Faculty home page. ................................................................................................14 Figure 4.4. A class added to the website as seen by a visitor/student......................................15 Figure 4.5. Interface to upload images.....................................................................................16 Figure 4.6. View of the images uploaded. ...............................................................................17 Figure 4.7. Image displayed in original dimensions. ...............................................................18 Figure 4.8. Interface to discussion board for students. ............................................................18 Figure 4.9. Interface to discussion board for faculty. ..............................................................19 Figure 4.10. Student registration page. ....................................................................................19 Figure 4.11. Interface to faculty for sending emails. ...............................................................20 x ACKNOWLEDGEMENTS I would like to express my sincere gratitude to all the people who contributed for the success of this work. I would like to thank my thesis advisor and committee members Dr. Carl Eckberg, Dr. Shirley Weber and Dr. Joseph Lewis. I am especially grateful to Dr. Shirley Weber for her valuable time and support from the beginning to the completion of the project and to Dr. Carl Eckberg for his valuable suggestions. I would also like to thank LaShae Collins at the Department of Africana Studies and Nadine Misiaszek at the College of Arts and Letters for their useful inputs and help in the completion of this project. 1 CHAPTER 1 INTRODUCTION 1.1 MOTIVATION Every university website typically has a section for each of its departments. This section contains information on that department such as its research work, faculty information, courses, etc. This information is usually general in nature and does not change often. In this scenario, the department provides the desired information to the website administrators and they build the website section for the department as per the instructions. Any subsequent changes or additions to the website will require making a request for the same to the website administrators. This severely restricts the flexibility and usability of the website for the department and its faculty. A computer science department can easily create its own website, but a small arts department might find this bothersome. The same applies to individual faculty. It would be highly desirable if there was a system that could enable faculty members to update the desired information on a departmental website on their own and whenever they want. This way, they can use the internet to communicate with the students much more effectively. They can maintain up to date their information on the departmental website such as change in curriculum, upcoming events for a class, project deadlines, exam schedules, etc. This system could also support other features such as sending emails to students by class, a discussion board to interact with class, etc. These desirable features were the motivation for this web based content management system. This system was designed for the department of Africana Studies at San Diego State University, which does not maintain a website on its own, primarily for the benefit of individual faculty to maintain current postings. Previously too, a thesis has been done at the Computer Science Department that aids the Department of Africana Studies in education. This thesis provided a graphical interactive interface to information on slavery in America [1]. 2 1.2 SOME BACKGROUND ON WEB BASED CONTENT MANAGEMENT SYSTEM A web content management system (WCMS) is a software system which provides website authoring, collaboration and administration tools designed to allow users with little knowledge of web programming languages or markup languages to create and manage the site’s content with relative ease. Most systems use a database to store content, metadata, or artifacts that might be needed by the system. A presentation layer displays the content to Web-site visitors based on a set of templates. Most systems use server side caching to improve performance. This works best when the WCMS is not changed often but visits happen on a regular basis. Administration is typically done through browser-based interfaces. Unlike Web-site builders, a WCMS allows non-technical users to make changes to a website with little training. A WCMS typically requires an experienced coder to set up and add features, but is primarily a Web-site maintenance tool for non-technical administrators [2]. A WCMS is a software system used to control a dynamic collection of Web material (HTML documents, images and other forms of media). A WCMS typically has: Automated templates: Create standard output templates (usually HTML and XML) that can be automatically applied to new and existing content, allowing the appearance of all content to be changed from one central place. Scalable expansion: Available in most modern WCMSs is the ability to expand a single implementation (one installation on one server) across multiple domains, depending on the server’s settings. WCMS sites maybe able to create microsites/web portals within a main site as well. Easily editable content: Once content is separated from the visual presentation of a site, it usually becomes much easier and quicker to edit and manipulate. Most WCMS software includes editing tools allowing non-technical individuals to create and edit content. Scalable feature sets: Most WCMS software includes plug-ins or modules that can be easily installed to extend an existing site’s functionality. Web standards upgrades: Active WCMS software usually receives regular updates that include new feature sets and keep the system up to current web standards. Workflow management: Workflow is the process of creating cycles of sequential and parallel tasks that must be accomplished in the CMS. For example, one or many content creators can submit a story, but it is not published until the copy editor cleans it up and the editor-in-chief approves it. 3 Collaboration: CMS software may act as a Collaboration platform allowing content to be retrieved and worked on by one or many authorized users. Changes can be tracked and authorized for publication or ignored reverting to old versions. Other advanced forms of collaboration allow multiple users to modify (or comment) a page at the same time in a collaboration session. Delegation: Some CMS software allows for various user groups to have limited privileges over specific content on the website, spreading out the responsibility of content management. Document management: CMS software may provide a means of collaboratively managing the life cycle of a document from initial creation time, through revisions, publication, archive, and document destruction. Content virtualization: CMS software may provide a means of allowing each user to work within a virtual copy of the entire Web site, document set, and/or code base. This enables changes to multiple interdependent resources to be viewed and/or executed in-context prior to submission. Content syndication: CMS software often assists in content distribution by generating RSS and Atom data feeds to other systems. They may also e-mail users when updates are available as part of the workflow process. Multilingual: Ability to display content in multiple languages. Versioning: Like Document Management Systems CMS software may allow the process of versioning by which pages are checked in or out of the WCMS, allowing authorized editors to retrieve previous versions and to continue work from a selected point. Versioning is useful for content that changes over time and requires updating, but it may be necessary to go back to or reference a previous copy [2]. Some notable WCMS based on PHP and MySQL are Avactis, amilia CMS, Accrisoft Freedom, Jadu etc. 4 CHAPTER 2 TECHNOLOGIES This chapter furnishes some introductory information on the main technologies used in the design and implementation of this project. 2.1 PHP PHP originally stood for personal home page. Later on it came to be known as “Hypertext Preprocessor.” PHP was originally created by Rasmus Lerdorf in 1995 and has been in continuous development ever since. The main implementation of PHP is now produced by the PHP Group and serves as the de facto standard for PHP as there is no formal specification. PHP is a free software released under the PHP License. PHP is a general-purpose scripting language that was originally designed for web development to produce dynamic web pages. For this purpose, PHP code is embedded into the HTML source document and interpreted by a web server with a PHP processor module, which generates the web page document. The PHP interpreter passes the dynamically generated web page back to the web server. The web server then sends this page containing HTML to the browser which formats and displays it [3]. As a general-purpose programming language, PHP code is processed by an interpreter application in command-line mode performing desired operating system operations and producing program output on its standard output channel. It may also function as a graphical application. PHP is available as a processor for most modern web servers and as a standalone interpreter on most operating systems and computing platforms. PHP primarily acts as a filter, taking input from a file or stream containing text and/or PHP instructions and outputs another stream of data; most commonly the output will be HTML. Originally designed to create dynamic web pages, PHP now focuses mainly on server-side scripting, and it is similar to other server-side scripting languages that provide dynamic content from a web server to a client, such as Microsoft’s Asp.net, Sun Microsystems’ Java Server Pages, and mod_perl [4]. 5 2.2 MYSQL There are several advantages of using a Relational Database Management System (RDBMS) to store data, such as – easier to manage, retrieve and update data, better organization of data, greater flexibility in accessing and managing data, better security, integrity of data, etc. This web content management system uses MySQL Relational Database Management System (RDBMS) as a backend to store data. MySQL is a widely used open source RDBMS. It is fast, reliable, popular and cost saving way of building databases for web applications. MySQL was originally founded and developed in Sweden by two Swedes and a Finn: David Axmark, Allan Larsson AND Michael “Monty” Widenius, who had worked together since the 1980s [5]. MySQL is a popular choice of database for use in web applications, and is a central component of the widely used LAMP web application software stack—LAMP is an acronym for “Linux, Apache, MySQL, PHP”. Its popularity is closely tied to the popularity of PHP. MySQL is used in some of the most frequently visited web sites on the Internet, including Flickr, Nokia.com, YouTube, Wikipedia, Google and Facebook [6]. The MySQL database has become the world’s most popular open source database because of its high performance, high reliability and ease of use. MySQL runs on more than 20 platforms including Linux, Windows, Mac OS, Solaris, HP-UX and IBM AIX. MySQL also offers a comprehensive range of database tools, support, training and consulting services [7]. 6 CHAPTER 3 DESIGN This chapter discusses the different design tasks involved in this project. 3.1 IMAGES The different images in this website were developed using Adobe Photoshop CS5 tool. Adobe Photoshop is a very powerful tool for image creation, manipulation, conversion, etc. The background image of the website, the menu bar image, images for buttons, etc are all developed using photoshop. The background image of the website is specially designed to suit the theme of the Department of Africana Studies. It is designed using several images by creating layers in photoshop. These images were obtained from the internet are free from copyright. Due to the design of the background image and the header image, the appearance of this website is specific to the Department of Africana Studies; but, by using different images or by using some background color instead, this limitation is easily overcome and the website can be used by any department. 3.2 STYLE SHEETS A style sheet is used to control the appearance and layout of a web page. By attaching style sheets to structured documents on the Web (ex. HTML), authors and readers can influence the presentation of documents without sacrificing device-independence or adding new HTML tags [8]. Cascading Style Sheets (CSS) is a style sheet mechanism that has been specifically developed to meet the needs of Web designers and users [6]. Several Cascading Style Sheets (CSS) have been created for this website to design its simple and user friendly interface. Some web pages with similar layout needs share the same style sheet. The CSS were created using the Adobe Dreamweaver tool. It is a very powerful tool for development in PHP, CSS, JSP, HTML, etc. 7 3.3 DATABASE In a RDBMS, a good database design is essential to avoid data redundancy and to ensure data consistency and high performance. In relational database design, the design process of organizing data to minimize redundancy is called normalization. The goal of database normalization is to decompose relations with anomalies in order to produce smaller, well-structured relations. Normalization usually involves dividing large, badly-formed tables into smaller, well-formed tables and defining relationships between them [9]. The normalization process involves getting our data to conform to various normal forms, and a higher level of normalization cannot be achieved unless the previous levels have been satisfied. The most significant normal form levels from a practical point of view are briefly discussed below: To begin, a ‘primary key’ is a minimal set of columns identifying each row of a table. A ‘prime column’ is any column in the primary key. 1. First Normal Form (1NF): The first normal form (or 1NF) requires that the values in each column of a table are atomic. By atomic we mean that there are no sets of values within a column [10]. 2. Second Normal Form (2NF): A table is said to be in a Second Normal Form (2NF) if it is in a First Normal Form (1NF), and each non-prime attribute (column) in the table does not depend on any proper subset of the entire primary key. 3. Third Normal Form (3NF): A table is said to be in a Third Normal Form (3NF) if it is in a Second Normal Form (2NF) and all non-prime attributes (columns) depend only on the primary key, i.e., there are no transitive dependencies, i.e. any non-prime attribute does not depend on other non-prime attributes. The database for this website is in the Second Normal Form (2NF). A table ‘classinfo’ in the database violates the Third Normal Form, as it has transitive dependencies. Some attributes in this table depend on the ‘class name’ rather than the primary key ‘class id’. This was intentionally allowed to support for the unlikely yet probable scenario of having two or more classes with the same name in the future. This content management system is not expected to be data intensive. The amount of data will be modest in size and though it is supported to be changed conveniently, it will be changing infrequently. So, the database design will not impact the performance substantially, even though the tables are not fully normalized. Structure of each table in the database and the information it stores is briefly discussed below. 8 Table 3.1 stores information on the faculty members – their name and log in information and an identifier (Id) to uniquely identify each record. Table 3.1. Professors Table – Stores Faculty Professors Id Name Password Email Table 3.2 stores information on the home page for each faculty member. The attribute ‘Id’ is a foreign key that references the ‘Id’ attribute in the ‘Professors’ table above. The ‘Header’ attribute stores the heading on the home page, the ‘Text’ attribute stores the text content, and the ‘Profimg’ attribute is the name of the image that is the faculty member’s picture. Table 3.2. Homepagetext Table – Stores Information on Home Pages for Faculty Homepagetext Id Header Text Profimg Table 3.3 stores information on each of the classes added on the website. Attribute ‘Cid’ uniquely identifies a class or a record in this table. ‘Profid’ is a foreign key referencing the ‘Id’ attribute in the ‘Professors’ table. Attribute ‘Cname’ is the name of the class and attribute ‘Ctext’ is the information on the class entered by the faculty that will appear on the web page for this class. Attribute ‘Questions’ will contain the contents of the ‘discussion board’ for this class, where students and faculty members can interact by sharing information and posting questions/answers. 9 Table 3.3. Classinfo Table – Stores Information on Classes Classinfo Cid Profid Cname Ctext Questions Table 3.4 stores information on the images uploaded for each class. ‘Imgid’ attribute uniquely identifies each image, i.e., each record in this table. Attribute ‘Cid’ is a foreign key that references attribute ‘Cid’ in the table ‘Classinfo’; it identifies which class this image belongs to. ‘Imgname’ and ‘Imgcaption’ attributes store the name and descriptive caption of the image respectively. Table 3.4. Images Table – Stores Information on Images Images Imgid Cid Imgname Imgcaption Table 3.5 will store information on the home page of the website. ‘Header’ will store the heading data and ‘Text’ will store the contents. Since there is only one web page in the website which will store the information on the department in general, this table will have only one row. Table 3.6 stores email addresses of the students who have registered with this website. 10 Table 3.5. Mainpage Table – Stores Information on the Front Page of the Website Mainpage Header Text Table 3.6. Studentinfo Table – Stores Information on Students Studentinfo Studentid Email Table 3.7 keeps track of what classes each student has registered for. Attributes ‘Classid’ and ‘Studentid’ are both foreign keys, referencing the attribute ‘Cid’ in table ‘Classinfo’ and the attribute ‘Studentid’ in table ‘Studentinfo’ respectively. Table 3.7. Studentreginfo Table – Stores Student Registration Information Studentreginfo Classid Studentid 11 CHAPTER 4 APPLICATION OVERVIEW 4.1 HIGH LEVEL VIEW Figure 4.1 gives a high level overview of this web content management system. Visitors View Information View Information Interact on discussion board View/Manage Information Interact on discussion board Students Faculty Information Information Server and database Figure 4.1. High level view of the system. 12 4.2 IMPLEMENTATION This chapter describes about the implementation of this web content management system. The thesis aims to meet the following requirements and the implementation of these is discussed in this chapter: 1. Allow faculty members to create their accounts with the system and use this account to access and update their information whenever they want. 2. Support for faculty to maintain their personal information on their respective home pages. 3. Support for faculty to add classes to the website and manage related information. 4. Faculty should be able to upload images for each class. 5. Allow students to register for desired classes to receive emails from the respective faculty. Faculty should be able to send emails to registered students per class using the website interface. 6. Have a discussion board for each class. Both faculty and students should be able to access and update the contents of this section. Also, the concerned faculty should be notified via email when the content gets updated. 7. The website should be fully web accessibility compliant. 8. Implementation of these requirements is explained next. 4.2.1 Create Account The first step in using this website to manage information is to create an account. This feature is password protected, as only the faculty members should be allowed to create an account and not any students or visitors. On the log in page, there is a link as “New User” using which an account can be created, after proper authentication. To create an account, the user needs to enter a valid email address, name and password. The email address and password will be required for subsequent log in. In case the user forgets his password, there is an option “Forgot Password” on the log-in page; using which he can have the password emailed to him at this email address. The user can delete his account when no longer needed; it will permanently delete all information associated with it. 4.2.2 Personal Page After successful account creation or log in, the next web page (shown in Figure 4.2) allows the user to manage his personal information on this website. Here he can enter his 13 Enter Header Upload Image Enter Contents Figure 4.2. Manage personal information. research interests, profile information, etc and upload his image. This information and image will be visible on the corresponding home page for that faculty member on the website. Figure 4.3 shows how this information will appear to the visitors of the website on the home page of the faculty. 4.2.3 Add a Class The faculty members can add classes to this website, once they have an account. The interface to add a class is exactly the same as that for entering personal information, as shown in Figure 4.4. Each faculty member can add and delete classes as needed. When a class is deleted, all related information such as a description of the class, uploaded images, contents on the discussion board and information on registered students are permanently deleted. When a class is added, several features for that class become available such as 14 Figure 4.3. Faculty home page. sending emails, uploading images and interacting on a discussion board. These features are discussed next. 4.2.4 Images After a class has been added, faculty users can upload images for that class. The interface to upload images is very simple (Figure 4.5). The user can also write some caption for an image which will appear below the image. If no caption is entered, the image name will appear as a caption. The uploaded images can be seen in the image gallery as shown in Figure 4.6. Clicking on any image will open up the image in a new page in its original dimensions as can be seen in Figure 4.7. 15 Figure 4.4. A class added to the website as seen by a visitor/student. The view of the image to visitors of the website will be exactly the same as Figure 4.7, except that they will not have the options to update the caption or delete the image. Faculty members have the option to delete a single image as shown above or delete all the images uploaded for a class. 4.2.5 Discussion Board This option appears as ‘Ask a Question’ on the visitor/student interface of the website. This feature applies to every class added to the website. Access to this feature is password protected, as only students should be allowed to post in this section and not any random visitor. A single password is supplied to the department which they can pass on to their students to be able to use this feature. If this is found to be inadequate security, more elaborate authentication can be added later. After this authentication, students can post any 16 Figure 4.5. Interface to upload images. question or information on the discussion board and it will be visible to all who have access to it. Also, whenever an update is made on this board, an email is sent as a notification to the concerned faculty member, so that he can log into his account and reply on the board if needed. This feature can be very useful for interactions or discussions between students. Students can ask questions on current project or homework and other students or faculty can reply to them. Also, if a student is shy and not comfortable to ask questions in class, this feature will be very useful to him. Here any information on the board is anonymous so students can freely ask questions without any hesitations. Figure 4.8 shows the interface of discussion board to students. As shown in Figure 4.9, faculty can sign-in in to their accounts and reply back or share some other information on the discussion board. 17 Figure 4.6. View of the images uploaded. 4.2.6 Send Email Students have the option to register for classes to receive emails from their faculty. To register, they need to authenticate themselves with the same password that is needed to access the discussion board, supply a valid email address and select the classes. Figure 4.10 shows the registration page. Faculty can send emails to registered students using the interface shown in Figure 4.11. If no students have registered for a class yet, a message informing the faculty member will be displayed when the faculty tries to send an email and this feature will be ‘locked’ (unusable) for that class until at least one student registers for it. 18 Figure 4.7. Image displayed in original dimensions. Figure 4.8. Interface to discussion board for students. 19 Figure 4.9. Interface to discussion board for faculty. Figure 4.10. Student registration page. 20 Figure 4.11. Interface to faculty for sending emails. 4.2.7 Features This section discusses some key features of this system. 4.2.7.1 EASE OF USE The website is carefully designed to be user friendly. Its design is very intuitive and informative so that even people with little experience in computers can easily use this system. A user friendly feature of this website is ‘title’ information for each item in each web page. Moving the mouse pointer over any item such as buttons, text boxes, images, etc will display this title information below the mouse pointer indicating its function or intent. This greatly simplifies interaction with the website as the use of each item on each page becomes known. Also, the design of the interface through which the faculty will manage their information, is exactly the same as of the interface to the visitors of the website. So while entering information, the faculty will get a close idea of how it will actually look on the website. In addition, a user manual (as seen in the Appendix) with step by step instructions on using this system has also been provided to the department. 21 4.2.7.2 WEB ACCESSIBILITY Web accessibility refers to the inclusive practice of making websites usable by people of all abilities and disabilities. When sites are correctly designed, developed and edited, all users can have equal access to information and functionality. For example, when a site is coded with semantically meaningful HTML, with textual equivalents provided for images and with links named meaningfully, this helps blind users using text-to-speech software and/or text-to-Braille hardware. When click-able links and areas are large, this helps users who cannot control a mouse with precision. When pages are coded so that users can navigate by means of the keyboard alone, or a single switch access device alone, this helps users who cannot use a mouse or even a standard keyboard. When videos are closed captioned or a sign language version is available, deaf and hard of hearing users can understand the video. When flashing effects are avoided or made optional, users prone to seizures caused by these effects are not put at risk. When sites are correctly built and maintained, all of these users can be accommodated while not impacting on the usability of the site for non-disabled users [11]. This website is carefully designed and implemented so that it meets the web accessibility requirements. All the web pages in the website are verified to meet these requirements by the Web Accessibility Evaluation Tool (WAVE) at www.wave.webaim.org. 4.2.7.3 BROWSER COMPATIBILITY The website is carefully designed and implemented so that it is compatible with different browsers. The website is tested and verified to be working fine on Firefox 3.5 and onwards, Internet Explorer 7 and onwards, Safari 5.0.3 and Google chrome 8.0.552.237. 22 CHAPTER 5 CONCLUSION AND FUTURE EXTENSIONS This web content management system is a very useful and convenient tool for a university department to manage its online information. Flexibility and convenience in managing information, user friendly interface and ease of use are the key features that make it a desirable online tool for a department. In addition, with a few minor changes in design, this website can be used by any department at any university. Some valuable extensions which could be done to this website are discussed next. This Web Content Management System is designed for the faculty at the department of Africana Studies at San Diego State University and so it is required to follow all guidelines for a university website. This website and any information uploaded on it, in any format, must be compliant with web accessibility requirements at all times. So some features like support for uploading documents, pdf files, video files, audio files, etc. would require regular monitoring and maintenance of the website by the concerned web engineers at San Diego State University to ensure compliance with web accessibility requirements at all times. To avoid this extra burden on these engineers, many features have not been supported by this website. One initially desired feature of this system was support for uploading video and audio files and documents by the faculty members. To support this feature, all video files must have synchronized captions in English and all audio files must have equivalent text transcripts so that they are web accessible. The documents - Microsoft word files, PDFs, etc must be formatted following certain rules to be web accessible. At this point in time, it was not possible to ensure that the uploaded items are compliant with web accessibility requirements at all times and so currently these features are not supported. As a future enhancement, an uploading interface can be developed that can ensure that documents are in a web accessible format and convert them to such a format if not; before uploading them on the server. Adding support for this feature would be a highly 23 valuable extension to this website. Also, support for features like assignment submission, grade report, etc. would require major revisions, but could be included in this framework. 24 BIBLIOGRAPHY [1] Ankit Taneja. Location based computerized multimedia presentation on slavery in America. Master’s thesis, San Diego State University, San Diego, CA, 2010. [2] Wikipedia.org. Web Content Management System, 2011. http://en.wikipedia.org/wiki/Web_content_management_system, accessed Feb. 2011. [3] Joel Murach and Ray Harris. Murach’s PHP and MySQL. Fresno, CA: Mike Murach & Associates, 2010. [4] Wikipedia.org. PHP, 2011. http://en.wikipedia.org/wiki/PHP, accessed Feb. 2011. [5] Oracle Corporation. About, 2011. http://www.mysql.com/about/, accessed Feb. 2011. [6] Wikipedia.org. MySQL, 2011. http://en.wikipedia.org/wiki/Mysql, accessed Feb. 2011. [7] Oracle Corporation. Why MySQL?, 2011. http://www.mysql.com/why-mysql/, accessed Feb. 2011. [8] W3C. Web Style Sheets, 2011. http://www.w3.org/Style/, accessed Feb. 2011. [9] Wikipedia.org. Database Normalization, 2011. http://en.wikipedia.org/wiki/Database_normalization, accessed Feb. 2011. [10] Oracle Corporation. An Introduction to Database Normalization, 2011. http://dev.mysql.com/tech-resources/articles/intro-to-normalization.html, accessed Feb. 2011. [11] Wikipedia.org. Web Accessibility, 2011. http://en.wikipedia.org/wiki/Web_accessibility, accessed Feb. 2011. 25 APPENDIX THE DEPARTMENT OF AFRICANA STUDIES WEBSITE – USER MANUAL 26 THE DEPARTMENT OF AFRICANA STUDIES WEBSITE – USER MANUAL This manual is intended for the faculty at the department. It lists the different features of the website and instructions on how to use them. The website front page is at – http://www-rohan.sdsu.edu/~afrosai/afras/index.php. The website has two sections1. The front section, which will be visible to all viewers, mostly students; and 2. The administrative section, which will be used only by the faculty members to enter and maintain desired information that will be visible on the front section of the website. These two sections will be referred to by the above names in the remaining manual. Below are step by step instructions on using the website. (1) Create an Account To use this website, the first step is to create an account. When you visit the website at the link above, there is a menu bar below the department name. The rightmost button on this menu bar is “faculty login.” Clicking on this button will take you to the login page. On a successful log in, you enter the ‘administrative section’ of the website. But since this is the first time, click on the “New User” link on the page. On the next page you will be required to enter a password which you can get from the department. A single password has been provided to the department to share with all the faculty members. This authentication is necessary so that only the faculty members are allowed to create an account. Once this verification is complete, fill out the form on the next page. You will need to enter a valid email address, your name and a password. Keep a note of the email address you enter here; as it will be required for logging in each time. Also, in case you forget your password, clicking on the “Forgot Password” link on the login page will send an email containing your password to this email address. The name you enter here will appear as such in the list of faculty members and your individual home page on the ‘front section’ of the website. (2) Create Your Home Page Once you complete the form, you enter the ‘administrative section’ of the website and the next page is your home page. (This page will be referred to as your ‘home page’ henceforth in this manual). You can return to this page from anywhere in the website by clicking on the ‘home’ button on the left hand side menu. The information you enter on this page will be seen on your personal page on the website. You can enter information here on your research work, interests, profile, etc. On this page, below the welcome message, you can see two boxes. In the smaller box, enter a ‘header’ of your choice like “About Me”, “My profile”, “My Interests”, etc. In the bigger box, you can enter personal information of your choice. Below these boxes, is a button to upload your picture. This picture will be seen on your home page along with the information you enter above. Using this page you can always change your information and replace your picture any time you want; just sign in to your account and make the changes. 27 On the left side of this page is a list of buttons 1. Home: This is a link to this current page. Clicking on this button from any page in the ‘administrative section’ of the website will direct you to this page. 2. My classes: Once you have added classes on this website, moving your mouse on this button will open up a list of your classes. Clicking on any class will direct you to the page related to that class. 3. Add a class: Clicking on this button will open up a page where you can add a new class to this website. 4. Delete my account: Clicking on this button will permanently delete your account and any information associated with it such as images, classes added by you, etc. 5. Sign out: Clicking on this button will end your current session and direct you to the login page. (3) Add a class On your home page, on the left side is a button “Add a class.” Clicking on this button will lead you to a page where you can add a new class to this website. On this page, just like your home page, are two boxes. In the first, small box, enter the name of your class. The name you enter here will be visible as such in the list of classes on the front section of the website. In the second box, enter information on the class. You can edit this information whenever you want. You can enter class specific information here such as the curriculum, project deadlines; exam schedules etc. and change it whenever you want. After you click on the “Add” button below to add this class, on the next page, you can now see this class in the “My classes” list. You can also see options such as “Question Answers”, “Send Email”, “Images” and “Delete this class.” These options will apply to an each individual class. They are explained in detail below. (4) Question Answers Every class registered on the website will have a ‘Question Answers’ section. This option is on the front section of the website as well as on the administrative section. It can be considered to be a ‘scratchpad’. Anyone (with proper authentication) can view and update information on this scratchpad – students as well as faculty members. It can be used as a discussion forum, to ask a question, to share some information, etc. Students will be able to view/update this ‘scratchpad’ on the front section of the website after authenticating with a password. This password will be common to all the students and is provided to the department to share with them This authentication is necessary so that any random visitor to the website may not be able to update the scratchpad. You can view the scratchpad for each of your classes by signing into your account, browsing to the respective class page using the ‘My classes’ list on the left side menu and then clicking on the ‘Question Answers’ button. Here you can view the scratchpad – any question or information posted on it and contribute to it as needed. Every time some one updates this section for your class, an email will be sent as a notification to you at the email address you have registered with this website. So students should be advised not to make trivial updates. 28 (5) Send Email You can send an email to all students who have registered for a particular class. When you sign in to this website, on the left side menu is a button ‘My Classes’, moving your mouse over this button will open a list of classes you have added on this website. When you click on a particular class, it will lead you to the specific page for that class. Here, on the left side is a ‘Send Email’ button. Clicking on this will direct you to a page where you can send emails to all those students who have registered with this class. In the front section of this website is a ‘register’ option using which students can register with specific classes, to receive emails from their faculty members. If no students are registered with the class yet, you will get a message notifying it when you try to send an email. (6) Images Using this option you can upload images for each of your classes. By navigating to the desired class page as described above, click on the images button on the left side menu. The next page is ‘Image Gallery’. Since you have not uploaded any images yet, it will be empty. On the left side menu, is an option ‘upload images’. Clicking on this button will lead you to a page where you can upload an image and enter specific caption for it. On this page on the left side menu, there is a button ‘Image gallery’. Click on this button to go back to the ‘Image Gallery’ page. Here now you can see the image you have uploaded. Clicking on an image will open up the image in a new page in its original dimensions with the caption below it. Edit the caption if needed and click on the ‘update’ button below to save the change. Also there is a button ‘delete’ on this page which will delete this image and a ‘back’ button which will lead you back to the ‘Image Gallery’ page. Below the ‘upload image’ option on the left side menu is the ‘delete all images’ option. Clicking on it will delete all images specific to this class. (7) Delete this Class When you navigate to a specific class page as described above, on the left side menu is an option ‘Delete this class’. Use this option to delete class at the end of semester or whenever needed. It will permanently delete all the images for that class, and any other information on the class page or the ‘Question Answers’ section. The above instructions on using this website have covered all the available functionalities. Using the website will be easy as it is user friendly; whenever you will move your mouse over an item (menu button, text box, etc.) in the page, a title will appear below the mouse pointer indicating the function or intent of that item. Also, everything you enter on the website - information or image can be edited/deleted/replaced, so you can always undo your actions if needed. After you create your account and add classes and other information using the ‘administrative section’ of the website as described above, you can view it on the ‘front section’ of the website at http://www-rohan.sdsu.edu/~afrosai/afras/index.php and verify it. 29 The appearance of the website is modest and its features are limited, as I was obliged to comply with the disability accessible requirements of a university website and so could not use many web technologies. The website is tested on browsers – Firefox 3.5 and onwards, Internet Explorer 7 and onwards, Safari 5.0.3 and Google chrome 8.0.552.237 and it works fine. Should you face any problem while using this website or have any questions, please contact me at [email protected]