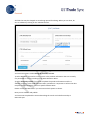
1
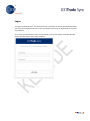
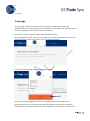
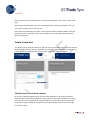
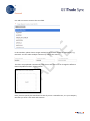
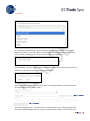
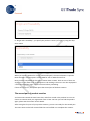
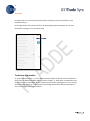
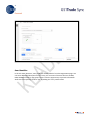
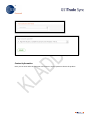
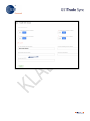
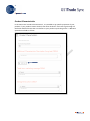
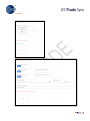
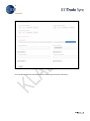
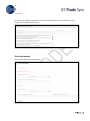
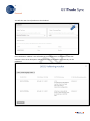
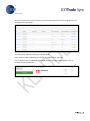
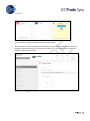
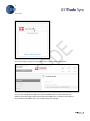
Preliminary version of
User Guide
GS1Trade Sync
v 0.1 – maj 2014
www.gs1.dk/gs1tradesync
Contents
Logon ........................................................................................................................................ 4
Front page ................................................................................................................................ 5
Create a base unit..................................................................................................................... 6
The first part of trade item creation..................................................................................... 6
The second part of product creation.................................................................................. 16
Trade Item information ...................................................................................................... 17
Item identities .................................................................................................................... 18
Contact Information ........................................................................................................... 20
Trade item status................................................................................................................ 21
Product Characteristics....................................................................................................... 23
Price information ................................................................................................................ 26
Package ............................................................................................................................... 27
Dimensions ......................................................................................................................... 28
Storage and handling .......................................................................................................... 29
Dangerous goods ................................................................................................................ 31
Dangerous substances ........................................................................................................ 33
Origin information .............................................................................................................. 34
Marks .................................................................................................................................. 35
Taxes and Subsidies ............................................................................................................ 36
Package Hierarchy Information .......................................................................................... 37
Trade item sustainability .................................................................................................... 37
Public/Non-public ............................................................................................................... 38
Pallet without GTIN ............................................................................................................ 40
Food, beverages and tobacco............................................................................................. 41
Generic information ....................................................................................................... 41
Marketing information ................................................................................................... 42
Nutrition Information ..................................................................................................... 43
Chemical and pharmaceutical information ........................................................................ 45
Safety Data Sheet ........................................................................................................... 45
Pharmaceutical information ........................................................................................... 46
Creating a packaging unit (case)............................................................................................. 46
Hierarchy ............................................................................................................................ 50
Side 2 af 69
Validation............................................................................................................................ 51
Publish ................................................................................................................................ 53
Search and Edit ....................................................................................................................... 55
Creating an assortment (mix packages) ................................................................................. 58
Deleting products (Not yet implemented) ............................................................................. 62
Export/download data in PDF, HTML or CIN .......................................................................... 63
Subscriptions .......................................................................................................................... 64
Other features ........................................................................................................................ 65
Help texts (Not implemented yet)...................................................................................... 65
More target markets .......................................................................................................... 65
Trading partners with specific data .................................................................................... 68
Side 3 af 69
Logon
To log on to GS1Trade Sync, use the link that you received in an email. We recommend that
you use Internet Explorer version 9, 10 or 11. Please consult your IT department if you have
any problems.
First, enter the received user name and password to access the system. Click the LOG ON
button and wait for the front page to appear.
Side 4 af 69
Front page
The front page consists of a blue menu bar with your (company) name, Item and
Administration. The content of the menu bar depends on which user roles you have. If your
only role is publisher, you will only see Item in the menu.
In the menu, you can choose between Item and Administration.
By clicking Administration, you can view and edit your company information. You can also
get a list of users, which you can edit, or you can create new users.
If you click on the GS1 logo, the following details appear:
Here you can change language, and you can log off by clicking the orange button.
By clicking on Item, you can search and create new products and get a list of the data
recipients who receive information about your products. To edit a product, you must first
Side 5 af 69
find your product in the 'Search item'. This feature is described in the section "Search and
Edit".
By clicking on Administration, you can view and edit your company information. You can
also create and edit users in the user list.
Item creation is divided into two parts. The first part includes mandatory fields, which are
mandatory to fill in regardless of the type of product. The second part contains product
specific information.
Create a base unit
You always start creating the base unit. The base unit is the smallest unit, the lowest level in
the packaging hierarchy such as a consumer unit. The base unit is the basis for being able to
create additional packaging levels. Click on 'New Trade Item' - the grey square.
The first part of trade item creation
On the first page that appears when you click "New Trade Item", all required fields are
displayed and must be filled in order to create a product. The page is divided into sections.
Each section has an orange title. All orange headlines you can find on the left side of the
screen when you go further in your data creation. We will take a look at the entire page,
one field at a time.
Side 6 af 69
'Trade item header' is the first section that you need to go through and fill out.
In the first field, enter GTIN of the base unit. GTIN stands for Global Trade Item Number and
is the product number. A GTIN may consist of 8, 12, 13 or 14 digits. Always enter 14 digits.
Fill in with leading zeros. If, for example, it is a GTIN-13, you must place one 0 in front. If the
GTIN does not contain a correct check digit, a red box appears telling you that the format is
invalid.
Side 7 af 69
Use Tab or mouse to move to the next field.
In this attribute, please choose target market(s) that the data should be available for, e.g.
Denmark. You can select multiple countries by clicking the country.
The dates are populated automatically with the current date. You can change the Effective
Date and publication date, if you need to.
Here you must specify the manufacturer GLN. If you are a manufacturer, it is your company
GLN that you enter. Click Save and continue.
Side 8 af 69
In the section 'Item identities' it must be specified which Trade Item Unit is involved, the
product brand name and the product description.
Side 9 af 69
In "Trade Item Unit Descriptor”, select the type of descriptor, for example the base unit.
Always remember to start with a base unit and build the packaging hierarchy from it. On
how to create a packaging unit, see the section "Creating packaging unit."
In 'Brand Name', type the product brand or trademark. Remember to write it the same way
each time, as the data receiver uses this as search criteria.
Always select ‘True’ to the base unit when you start a package hierarchy. At all other levels
of the package hierarchy, select ‘False’.
The fields ‘Language Code’, ‘Functional name’ and ‘Description short’ belong together. First,
select the desired language. Then you type text into ‘Functional name’, such as coffee, and
Side 10 af 69
a description short, for example Espresso beans. If you want texts in multiple languages,
click on “+ Add new item description”. This gives you three new fields in which you again
choose a language and insert text. You can delete, click the x to the right of the field
“Description Short” (see above).
In ‘Product Classification’ specify the product GPC code. GPC is a GDSN attribute and
classifies a product type. If you do not know the GPC code, click on the magnifying glass.
This will display a list of GPC codes. Find the appropriate number by either typing a search
text in English or click through the categories:
Side 11 af 69
In ‘Additional Trade Item Identification, you must enter your internal item number of the
item.
Side 12 af 69
'Import Classification' allows you to specify three types of import classifications. You must
enter eight digits as code for the import classification. Click the “+ New import
classification” (hidden behind the drop down menu “Choose Option”, see above), if you
need more than one number.
In ‘Trade Item Status’, select the status of your product. You must select True or False for all
possibilities. Finally, you enter the date when the item is available.
In 'Marks', enter Barcode Type, and True or False to ‘Is price on pack’.
Side 13 af 69
In 'Barcode Type', select the type of barcode on the product, such as EAN, UCC 13 symbol.
In 'Package', you must select True or False to ‘Is Packaging Marked Returnable’, and in
'Packaging Type', select which type of packaging the product is packed in, such as a bottle or
a carton.
Side 14 af 69
In the section 'Dimensions', the product’s physical dimensions are to be specified. Rules for
how a product is to be measured and weighed are found in the GDSN Package
Measurement Rules.
In ’Is trade Item a variable unit’, you must specify whether or not your product’s weight can
vary.
'Net content' allows you to specify the number of units or milliliters, grams, kilos, etc.
In the other fields, you specify the product's dimensions and weight. GS1 recommends that
all measurements are given in millimeters and weights are given in grams. Please do not use
commas or periods in the weight attributes or height, width and depth attributes.
Please make sure that the dimensions entered are correct and the same as in your own IT
system.
If your product contains dangerous substances, please choose the tab “True” in the
'Dangerous Substance Information'.
Side 15 af 69
In “Origin and Traceability”, you specify the product’s country of origin by using the drop
down menu.
When you create a product for 'Target market Denmark', the VAT Indication is required.
Note that there are two options: either HIGH for 25% or ZERO for VAT free.
Now you have completed the first part of master data creation. Click on save. If there are
any errors in your data so far, it will appear in red markings. The errors are also displayed in
a list at the top of the page. Correct all errors before proceeding.
If there are no errors, the system opens the second part of the data creation.
The second part of product creation
You have now entered the most basic data, and all are stored in the product list. You can
choose to continue with your registration now or later. On how you can find the product
again, please see the section 'Search & Edit'.
After saving the first part of your product creation, you are now ready for the second part.
The menu items on the left contain fields that can be filled in to complete the creation.
Side 16 af 69
A red dot next to an item means that the field is mandatory and must be filled in. (Not
implemented yet.)
Go through all the menu items and fill in the appropriate fields. Remember to save your
data before moving on to a new menu item.
Trade Item information
In ‘Trade Item information', you can add more details about the brand owner and whether
the product is labeled with RFID and has a batch number. 'Is Trade Item a combination item'
means the product is bundled, such as a bottle of beer with a drinking glass. You can specify
minimum order, warranty on the product and through which trade channel the product is
sold, such as retail stores or pharmacies.
Side 17 af 69
Item identities
In the tab ‘Item identities', many fields are already filled in from the Registration page. You
can enter additional descriptions of the item, you can enter if the item also has an ISBN,
ISSN, UNSPSC number or age group. There is also the opportunity to provide information
about the item replacing another item by adding the "old" product GTIN.
Side 18 af 69
Side 19 af 69
Contact Information
Here you can enter who the consumer can contact in case of questions about the product.
Side 20 af 69
Trade item status
In the tab 'Trade item status', you can specify the product life cycle. Information about the
product status was completed earlier. This is where you enter the date, if the product is
going to be deleted!
Side 21 af 69
Side 22 af 69
Product Characteristics
In the menu item 'Product Characteristics', it is possible to set specific properties of your
product. If your product contain alcohol, then enter alcohol%. You have to go through all
the fields and fill all those that are relevant to your product. By Clicking on the '+ Add New'
opened more fields to fill out.
Side 23 af 69
Side 24 af 69
You can upload external information such as operating instructions: see below.
Side 25 af 69
In “Trade item external information”, one can add a link (URL) for more information or an
image. You can add more than one.
Price information
Here you can enter price information.
Side 26 af 69
Package
If you are in the process of establishing a pallet or a display, you can use the facility
'Package' to fill in pallet information. “Packaging Material” is not mandatory information for
target market Denmark, but we recommend that the information is filled in at this stage, as
it is mandatory for e.g. Sweden. Click Save and continue.
Side 27 af 69
If you choose ‘Add’ under ‘Packaging material’, the screen below opens:
Dimensions
In 'Dimensions', some fields are already filled in with information about the product's
height, width and depth. Note that if you selected ‘Yes’ for 'Is Base Price Declaration
Relevant (D8019)', the 'Relevant content for price comparison' can also be completed. You
can also add drained weight. Trade item nesting is not relevant to the base unit.
Side 28 af 69
Storage and handling
In 'Storage and handling', it is possible for you to specify data storage, shelf life and
transportation. For a base unit it is mandatory to enter temperature and shelf life
information for food and beverages. Please note that temperature attributes and trade
item life span attributes can be dependent on chosen GPC codes. Please see the screen in
section ‘Product Classification’. Pallet information, handling instructions and transport
details can be filled in for packages and pallet level.
Side 29 af 69
Side 30 af 69
Dangerous goods
In 'Dangerous goods', you can enter information about products with the classification of
dangerous goods. If you select ‘+ Add regulation’ (not shown below), you can specify
different regulation codes, for example flashpoint.
Remember to save before you proceed to the next item.
Under 'Add hazardous information detail’ you get a new page, where you can add more
information:
Side 31 af 69
Side 32 af 69
Dangerous substances
Enter the information if the product contains hazardous substances.
Side 33 af 69
Origin information
In 'Origin', you can enter where the meat or fish product was manufactured, was
raised/grown/caught, slaughtered and where it was last processed.
Side 34 af 69
Marks
In 'Marks', you can indicate the marks and symbols, which may be printed on the packaging
of the product.
Side 35 af 69
Taxes and Subsidies
In ‘Taxes and Subsidies’ you can specify e.g. excise coffee tax and the VAT rate (HIGH = 25%
or ZERO = 0%).
Side 36 af 69
Package Hierarchy Information
This section is not relevant to the Base Unit. Please see 'Create a package item' and 'Create
an assortment'.
Trade item sustainability
Here you specify information about how you should dispose of the product, e.g. if the item
is a battery or the item itself contains batteries, chemicals or drugs.
Side 37 af 69
Public/Non-public
This is used to indicate if an item is public and is meant to be seen and searched for by all
retailers or if the data are only for specific data recipient(s).
Press the blue button if the product must be public for all.
Confirm with the green button.
If the product data are only for specific data recipient(s) (non-public), then select ’Create
new access’. Select a recipient and press the green button. You can add more by recipients
by repeating this process.
Side 38 af 69
Side 39 af 69
Pallet without GTIN
If your product is packed directly onto a pallet that does not have a GTIN, you must specify
the pallet information here. Remember, if there is only a base unit in the hierarchy, you
must make sure that the “Trade Item Status” (see section ‘Trade Item Status’) is set to
‘True’ on ordering, invoice unit and despatch unit.
Side 40 af 69
Food, beverages and tobacco
Generic information
In 'Generic information', you can provide information on preservatives and other
information.
Side 41 af 69
Marketing information
Under 'Marketing Information', you can add additional information that is not already
provided.
Side 42 af 69
Nutrition Information
In 'Nutrition information' you have the option to specify allergens, ingredients, nutritional
information, E-numbers, etc.
The numbers to the right in the gray boxes indicate how much information is already set.
(Not shown in picture.)
Nutrition information must be entered here, and please select whether the information
applies to a prepared or unprepared product.
Side 43 af 69
If you choose prepared, you get the options shown below:
If you choose unprepared, you get a similar screen without the option to indicate tobacco
relevant information.
Side 44 af 69
In the section ‘Calorific Values’, kcal and Kjo can be indicated.
Other Regulation 1169 attributes are to be found in the other tabs. A food guideline will be
published soon by GS1 Denmark.
Chemical and pharmaceutical information
In the menu item 'Chemical and pharmaceutical information', you can specify additional
safety information about your product.
Safety Data Sheet
Here you can specify additional safety information about your product. For example, you
can specify GHS information and Hazard statement. Remember to click ‘SAVE’.
Side 45 af 69
Pharmaceutical information
Here you can enter pharmaceutical information.
You have now created a base unit. Creation of a packaging item is explained in the
following.
At the top of the page, click “+ New upper level”. A new screen appears.
Creating a packaging unit (case)
Side 46 af 69
All relevant data has to be entered the same way as you did when you created the base
unit. GTIN, Target market and manufacturer GLN must be entered.
In ‘Quantity of next lower trade item’, please indicate the number of base units contained in
the package.
Side 47 af 69
Under 'Item identities' please make sure that you select a different code than
BASE_UNIT_OR_EACH in the field ‘Trade Item Unit Descriptor’, for example CASE.
In 'Product Classification', you can enter the Supplier’s internal item number.
In 'Trade Item Status', select True or False to all.
In 'Marks', the information about Barcode Type and ‘Is price on pack’ is to be given.
In 'Package', select True or False for ‘Is package marked returnable’ and the type of
packaging.
In 'Dimensions', please specify dimensions and weight of the packaging unit as you did on
the base unit.
Please remember to save your data.
After saving the data, the second part opens. You must go through the menu items on the
left.
Side 48 af 69
In 'Storage and handling', please remember to enter the number of layers, number of units
per pallet and stacking factor.
Side 49 af 69
In the screen ‘Packaging and hierarchy’, you can see the number of base units in the case,
and also the GTIN of the base unit packed in the case.
Hierarchy
Once you have filled in the information in the relevant screens and fields, you can check
your hierarchy by selecting the Hierarchy button. The screen image below shows a base unit
and a case containing 10 base units.
Side 50 af 69
You can choose different levels of the hierarchy, just by clicking on one of the red boxes.
This will show you the information about the chosen unit.
Validation
You can now press Validate
Side 51 af 69
You will then see a list of products to be validated.
Press the button ‘Validate’. You will either get an acceptance or a validation result that
contains a short error description. Please correct the errors before the hierarchy can be
published.
Side 52 af 69
If the validation goes through without errors, you can publish the hierarchy.
Publish
Now the packaging hierarchy is ready to be published. Click the ‘Publish’ button.
Choose publish:
Side 53 af 69
Now the hierarchy is published.
You can see that the grey 'Pending' turns to first blue “Waiting registration response” and
then into green 'Published' at the top of the page
There will also be two new icons, Print and Edit. You can only Print at the highest level in
the packaging hierarchy (package or pallet).
Side 54 af 69
Search and Edit
When you need to find a product, select ‘Item’ in the blue bar and then 'search item'.
You can search for a product by entering a GTIN (remember to enter 14 digits) or brand
name and click on the magnifying glass. Select detailed search by clicking on the three dots.
Side 55 af 69
You can use the various search criteria, or click the Search button (on the image above) and
all the products are shown:
You select the product by clicking on the blue GTIN.
If the product is NOT published you can edit and add the data you want.
If it is a product that is published click the Edit button. The Edit button appears only on
products that are published.
Side 56 af 69
All fields that may be changed are now being opened for editing. When you are done, be
sure to validate by clicking on the 'Validate' button.
You have two options: either change by refresh or correct.
1) Select correct if you need to correct errors in the product information that are normally
not permitted to correct according to the GTIN Allocation Rules.
2) Select change by refresh if you need to update the product information and if it is
allowed according to the GTIN Allocation Rules, and when it is important to inform the data
recipient that the change is valid on a specific Effective Date.
Please contact GS1 Denmark if you are unsure which option to choose.
Now you can validate and publish.
You have now completed the section describing the search and edit functionality in
GS1Trade Sync.
Side 57 af 69
Creating an assortment (mix packages)
Now you can start to create an assortment.
It is important that all base units contained in the assortment are already created.
Please keep in mind that when you create an assortment, the Effective Date must be the
same or later than the Effective Date of the base units.
To create an assortment you select ’DIS PLAY_SHIPPER’ in the ‘Trade Item Unit Descriptor’.
You create an assortment in the same way that you created a base unit.
Fill out the fields in Trade Item Identification.
In 'Product Classification', select a GPC code in the same way that you selected in the
creation of the base unit. Remember that an assortment can only contain one GPC code, so
if the assortment contains different kinds of GPC codes, choose the GPC of the majority of
the units contained in the assortment.
In 'Trade Item Status', set status to Despatch unit and Invoice unit. Remember also that an
assortment cannot be a consumer unit.
In 'Marks', please select Barcode Type, and select ‘True’ or ‘False’ in the attribute ‘Is price
on pack’, if the assortment is actually marked physically with a price.
In addition, please select Packaging Type.
In 'Dimensions', please fill in the required height, width and weight. Please make sure that
the gross weight is indicated correctly. Gross weight is equal to the gross weight of the total
number of base units contained plus the weight of the outer packaging of the assortment.
Side 58 af 69
Please remember that the height and width of the assortment must always be greater than
the height and width of the base unit.
Please remember to save your data.
After you have saved the first page, please go through the menu options on the left hand
side, where there are red marks (Not yet implemented).
It is important to have control over the product's packaging hierarchy. In the screen
’Packaging and hierarchy’ (see below) you must enter the number of different base units
and the total number of base units in the assortment.
Next step is to specify the number and GTIN of each base unit. If there are two different
base units contained in the assortment, the value given in the field ‘Quantity of children’
must be 2. If there are 12 pieces of each of the two base units, then the value in the
Side 59 af 69
attribute ‘Total quantity of next lower level trade item’ must be 24.
Here you can add a number of different base units and the total number per base unit
contained.
In the attribute ‘Quantity of Next Lower Level Trade Item’ (D8270), which can be repeated
as many times as needed, the number (count) of each base unit is indicated. In the attribute
’Trade Item Identification of Next Lower Level Trade Item (D8249), the GTIN of each base
unit contained is indicated.
Please remember to save the data.
Side 60 af 69
Check that the hierarchy is created correctly by clicking on the icon “Hierarchy”:
Once you have entered all data, please click the button Validate. You can publish the data
when there are no errors.
Side 61 af 69
Deleting products (Not yet implemented)
Items NOT published, you can delete yourself.
If you have multiple items to delete, open the item list, select and press delete
If the item is published/released, it can only be deleted by inserting the date for the
deletion of the item. Then the deletion will be announced to the data recipients when the
delete version is published. The product will be physically deleted from the datapool after
48 months. Otherwise, the procedure is to send an email to [email protected] who
will help you with the deletion.
Side 62 af 69
Export/download data in PDF, HTML or CIN
To export the data entered into one of the above formats, you must first open the 'Product
List':
To the right of the product lines, you can see an icon that looks like a cloud at the highest
level of the hierarchy.
When you point to the cloud with the mouse, you get the three options shown below:
Select the desired format, and the document is downloaded and can be opened on the
screen.
Side 63 af 69
Subscriptions
In 'Item', you also have the opportunity to see which companies have set up subscriptions
to your products. Click the grey arrow:
This will give you a list of data recipients:
If you select a data recipient, you get a list of the products they are able to retrieve:
Side 64 af 69
Other features
Help texts (Not implemented yet)
For most fields you can view a help text by moving the mouse over the field name. There
will be a blue circle with an 'i', which you press to make the help text appear.
Click on the circle and help text appears:
More target markets
If your product is for multiple markets, select all countries either on the first page of
creation in ‘Target markets’, or wait until the second part of the creation process.
Side 65 af 69
On page 2, do the following:
Press the down arrow to the right of the Danish flag. This opens a drop down with Denmark
and beside a field Add new market. Click ’Add new market’.
Select the additional country from the drop down menu and press the blue button.
Side 66 af 69
You can specify multiple countries with the same procedure.
Choose Sweden to enter product data. All the data from the Danish profile which match the
Swedish profile requirements, are transferred. And then you just need to fill in the special,
additional Swedish information.
Side 67 af 69
Trading partners with specific data
If you have trading partners who want have different data, you can create a special trading
partner profile in every target market.
Click ’Add new trade partner’.
Enter GLN or company name of the partner and press the button named “Add Target
Market Company”.
Side 68 af 69
Press the company name, here Coop Denmark, to open product information.
You can now change for example the “Start Availability Date” or other data that are
different from the original data and the data that COOP wants to receive. Remember to
save, validate and publish when you are done with your changes.
Side 69 af 69