1
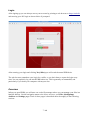
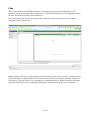
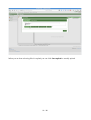
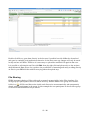
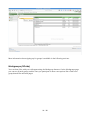
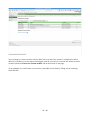
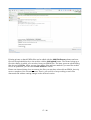
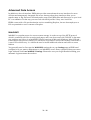
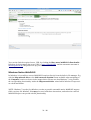
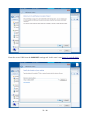
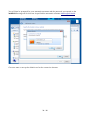
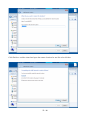
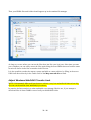
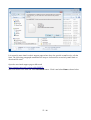
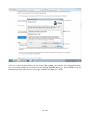
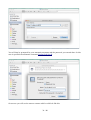
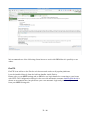
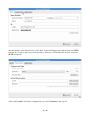
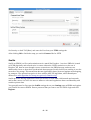
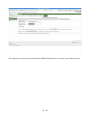
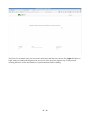
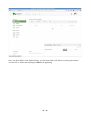
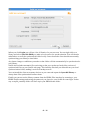
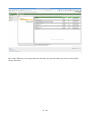
User Guide
17. September 2015
1 / 48
Table of Contents
Introduction..........................................................................................................................................3
Prerequisites.........................................................................................................................................3
How to Access UCPH ERDA...............................................................................................................3
Sign-up.............................................................................................................................................3
Login................................................................................................................................................7
Overview..........................................................................................................................................7
Files..................................................................................................................................................8
File Sharing...............................................................................................................................13
Workgroups (VGrids)....................................................................................................................14
Archives.........................................................................................................................................15
Settings...........................................................................................................................................18
Advanced Data Access.......................................................................................................................20
WebDAVS......................................................................................................................................20
Windows Native WebDAVS.....................................................................................................21
Adjust Windows WebDAVS Transfer Limit.............................................................................26
Mac OSX Finder.......................................................................................................................30
Linux with Nautilus / Konqueror / Thunar / ............................................................................32
SFTP..............................................................................................................................................34
FireFTP.....................................................................................................................................35
FileZilla.....................................................................................................................................37
PuTTY.......................................................................................................................................37
SSHFS.......................................................................................................................................38
FTPS..............................................................................................................................................38
FireFTP.....................................................................................................................................39
Seafile............................................................................................................................................40
Support, Questions and Comments....................................................................................................48
2 / 48
Introduction
University of Copenhagen – Electronic Research Data Archive (UCPH ERDA or just ERDA) is the
storage and archiving facility provided by University of Copenhagen to employees and students. It
delivers centralized storage space for personal and shared files in addition to archiving of e.g. PhD
theses and research data for publishing.
The latest version of this guide is always available from http://www.erda.dk/ in different languages.
Prerequisites
You only need a web browser to use the fundamental features of the ERDA system. In case you
want to use the advanced features, you may have to install additional client software.
How to Access UCPH ERDA
Everyone associated with UCPH has a username consisting of six characters, like abc123. The
username is popularly known as the Swedish number-plate. The login is generally used for web
mail and to access intranet facilities like KU Net.
You can use that same login to sign up for and access your account on ERDA1.
Sign-up
Signing up is as easy as opening the sign-up web page
https://sid.erda.dk/cgi-sid/signup.py,
1
We also provide a 'digital signature'-like login method for users who e.g. prefer that extra level of security, but that
is not covered in this guide.
3 / 48
clicking the Sign Up with KU OpenID button and entering your KU login when prompted.
As an example we show it for the user with KU username brs278 below, but please use your own
KU login.
4 / 48
When you click Yes (Allow) your account on ERDA is created and you will see a link to your
personal entry page like this:
5 / 48
Just click the your personal page link to go start using your account.
6 / 48
Login
After signing up you can always access your account by pointing a web browser to https://erda.dk
and entering your KU login as shown below if prompted
After entering your login and clicking Yes (Allow) you will reach the actual ERDA site.
The web browser remembers your login for a while, so you don't have to repeat the login every
time. You can explicitly log out inside ERDA after use. This is generally recommended, and
particularly if you share your computer with anyone else.
Overview
When you open ERDA you will start out on the file manager where you can manage your files in a
familiar fashion. Use the navigation menu to the left to access to your Files, Workgroups,
Archives and Settings pages. Each of those pages is described more thoroughly in the following
sections.
7 / 48
Files
This is your main area on ERDA and where you manage your personal and shared files. The
directory tree in the left pane takes you quickly to a specific sub-directory and the right pane shows
the files and directories in the current directory.
The location bar right above the two panes shows the path to the current directory with quick
navigation links to parent dirs.
Right-clicking a directory or file brings up a context menu in which you can select common actions
on the item that you right-clicked. For files the actions include e.g. download, edit and rename. For
directories you get the choice of e.g. uploading or creating files inline. Right-clicking in the empty
space below the entries in the right pane brings up the context menu for the current directory.
8 / 48
You can add new text files inline with the Create File entry from the right-click menu or upload
with the Upload File entry there.
The latter opens the upload dialog where you can drag and drop local files from your desktop or
click Add files... and point files out for upload.
9 / 48
When you are done selecting files for upload you can click Start upload to actually upload.
10 / 48
wait for them to complete or click Cancel if you change your mind.
11 / 48
Finally click Close when finished and your uploaded files show up among your other files.
12 / 48
Double click files to open them directly in the browser if possible but with fallback to download
and open in a suitable local application otherwise. In the latter case any changes will only be saved
locally and not in ERDA. Therefore it is necessary to upload the modified file again in that case.
It is possible to edit simple text files with Edit from the right click and please refer to the sections
about Advanced Data Access for a guide to the possibilities of mounting and easily working directly
on files in your ERDA folder without worrying about the upload step.
File Sharing
ERDA integrates sharing of files with work or research groups tightly in the Files interface. For
each group you participate in there's a shared directory with the name of the group and a sharedfolder icon . All files and directories inside such directories are automatically and transparently
shared with all participants in the group. In this example the user participates in the eScience group
so the associated shared directory is shown.
13 / 48
More information about signing up for groups is available in the following sections.
Workgroups (VGrids)
You can share files with your colleagues using the Workgroup features. On the Workgroups page
you can see all such groups, and the ones you participate in have extra options like a link to the
group shared files and web pages.
14 / 48
If you think you are entitled to participate in a group, that you are not already in, you can use the
green request-membership icon
to ask the group administrator to give you access. The requestownership icon
can similarly be used to request co-administrator rights for a group. When you
click to request member or ownership a small window will open with a text field where you can
write a message/reason which the owners will receive along with your access request.
Privileged users can also add new groups using the Create Workgroup button at the bottom of
their Workgroups page as shown in the example here.
Archives
The Archives page provides PhD students and researchers with a method to archive or freeze a
snapshot of one or more files. This is required in relation to handing in PhD theses and in certain
cases when submitting a paper to a conference or journal. Initially the archive list is empty but after
adding a couple of archives it could look like the example below.
15 / 48
You can inspect a frozen archive with the blue info icon and if the system is configured to allow
deletion of archives you can remove them again with the red remove icon and new archives can be
created with the Create a new frozen archive link at the bottom of the page.
As an example we could create a new archive called My article data by filling out the resulting
form like this:
16 / 48
Existing private or shared ERDA files can be added with the Add file/directory button and new
files can be uploaded directly to the archive with the Add upload button. The former brings up a
file select dialog in which you can select from your ERDA files. The latter opens an upload dialog
like the one from Files. When you are done adding files and have marked if you want the archive
files to be published, you can click Create Archive to finish.
Please note that archiving does not remove the files you may have selected from ERDA, but only
saves a snapshot of the current contents. That is, you are free to keep working on such files
afterwards and without causing changes to the archived version.
17 / 48
Afterwards you can see all the details registered about it on the view archive page and use the links
to access the associated files.
Settings
On the Settings page(s) you can tweak your personal ERDA settings to your liking. This includes
configuring the look-and-feel of the web interface and setting up advanced access methods like e.g.
access with a SFTP/WebDAVS/FTPS/Seafile client or mapping of your user home as a network
drive on your local PC or workstation.
ERDA also includes a file synchronization service like Dropbox, but one which KU employees are
permitted to use – unlike Dropbox.
Further description of the SFTP/WebDAVS/FTPS/Seafile tabs and their use is available in the
Advanced Access sections.
You don't need to edit the settings to just use the fundamental functionalities. So you can safely
leave them alone if in doubt.
18 / 48
19 / 48
Advanced Data Access
In addition to the web interface ERDA also provides some advanced access interfaces for more
efficient and transparently integrated file access. Among others these interfaces allow you to
transfer many or big files more efficiently and to map your ERDA files and directories on your local
PC or workstation. In that way you can work with them just like if they were local files.
ERDA comes with a file synchronization service resembling Dropbox, but one that employees at
KU are permitted to use in contrast to Dropbox.
WebDAVS
WebDAV is a popular protocol to access remote storage. It works on top of the HTTP protocol
which is commonly used for accessing web pages, and it can be secured with TLS/SSL in the same
way, and then we refer to it as WebDAVS. Recent versions of Microsoft Windows, Mac OSX and
Linux support this protocol natively, so with those it's possible to access such remote content like if
it was in a local directory. I.e. without the need to install additional software and still in a secure
fashion.
You generally need to first open the WebDAVS settings tab on your Settings page at ERDA and
configure how you want to authenticate to our WebDAVS server. Enter a password that you want to
login with and click Save WebDAVS Settings. Please also note your Login Details including your
automatic login username shown there.
20 / 48
You can also find the required server URL by clicking the Show more WebDAVS client details...
link there. In this example the server URL is https://erda.dk:8020 and the automatic username is
[email protected], but please look up your own.
Windows Native WebDAVS
In Windows it is possible to access WebDAVS locations directly from the built-in file manager. E.g.
with the Map network drive or the Add a network location button available when navigating to
the Computer location as shown in the images below. Please note that Windows 7 only provides
the corresponding functionality inside the Map network drive wizard while Windows 8 exposes it
as a dedicated button.
NOTE: Windows 7 was the first Windows version to provide reasonable native WebDAVS support.
Older versions like Windows Vista may also work with these instructions, and otherwise external
WebDAVS helpers can provide similar functionality.
21 / 48
Click the Connect link to proceed adding the network location.
22 / 48
Enter the server URL from the WebDAVS settings tab. In this case it was https://io.erda.dk:8020
23 / 48
You will then be prompted for your automatic username and the password you entered on the
WebDAVS settings tab. In this case it specified the automatic username [email protected].
Choose a name or accept the default one for the connection shortcut.
24 / 48
Click Finish to end the wizard and open the remote location for use like a local folder.
25 / 48
Then your ERDA files and folders should appear up in the standard file manager.
As long as you are online you can use the files there just like your local ones. Next time you start
your computer you can easily access the files again using the saved ERDA shortcut from the same
location as shown in the first screenshot in this section.
It is also possible to make the remote content available as a network drive by filling in the server
URL from above directly in the Folder field of the Map network drive wizard.
Adjust Windows WebDAVS Transfer Limit
NOTE: Unfortunately Microsoft has chosen to enforce a very low and artificial limit on how big
files one can download from WebDAV(S) locations.
In practice the limit results in a rather unhelpful error message like this one, if you attempt to
download files of about 50MB or more from your WebDAVS folder.
26 / 48
It is treated in more detail on their support pages where they also provide a small tool to edit the
limit. The following paragraphs summarize the steps to increase this excessively small limit on
download file sizes.
Open the associated support page at Microsoft
https://support.microsoft.com/en-us/kb/2668751
and scroll down to the blue and white Download button. Click it and select Run as shown below
27 / 48
to proceed with installing the Fix it application from Microsoft. First step is to tick the I Agree box
and click Next
28 / 48
After one or more dialogs where you just answer Yes or Next you reach the following dialog where
you can actually change the size limit from the default 50000000 Bytes (i.e. about 50MB) to e.g. the
maximum possible value shown to the right, 4294967295 Bytes (i.e. 4GB).
29 / 48
Then click Next and wait for Fix it to create a restore point and so on before finally selecting Close
to finish the wizard and Yes to reboot when requested. Then it becomes possible to transfer much
bigger files.
Mac OSX Finder
On Mac OSX you can access remote WebDAV(S) content with the native Finder application. In the
menu under Go you select Connect to Server.
Enter the server URL from the WebDAVS settings tab and click Connect.
30 / 48
You will then be prompted for your automatic username and the password you entered there. In this
case it specified the automatic username [email protected].
On success you will see the remote contents which could look like this
31 / 48
Linux with Nautilus / Konqueror / Thunar / ...
On most modern Linux distributions you can access remote WebDAV(S) content with the native file
manager. In the file manager menu typically under Go you select Open Location.
Enter the server URL from the WebDAVS settings tab (possibly replacing https with davs in the
URL if it complains) and click Connect. You find the server URL
In XFCE with the Thunar file manager as shown here you need to use the davs rather than the https
prefix in the URL.
32 / 48
You will then be prompted for your automatic username and the password you entered on the
WebDAVS settings tab. In this case it specified the automatic username [email protected].
On success you will see the remote contents which could look like this
33 / 48
NOTE: The Nautilus/Thunar file managers rely on the GNOME gvfs library, which had a known
bug at least until recent versions. Thus upload of files bigger than 1GB would simply hung. You can
try to upgrade to a working version of gvfs (e.g. 1.22.2) or use another client if you experience this
problem.
SFTP
SFTP is a secure end efficient file transfer protocol similar to the old FTP protocol but with proper
security built in. It relies on the security mechanisms of the OpenSSH suite of applications and it is
supported by a number of clients on all popular platforms. Some platforms even integrate it natively
in the general file manager so that no extra software is required.
You generally need to first open the SFTP settings tab on your Settings page at ERDA and
configure how you want to authenticate to our SFTP server. Either by inserting one or more SSH
public keys2 or entering a password that you want to login with and click Save SFTP Settings.
Please also note the Login Details including the automatic username shown there.
2
How they are used is outside the scope of this guide but a good starting point could be
https://support.cs.ncl.ac.uk/Advice/Secure_Shell/PublicKey/
34 / 48
We recommend one of the following clients known to work with ERDA but it is possibly to use
others.
FireFTP
FireFTP is an add-on to the Firefox web browser and works on all popular platforms.
It can be installed directly from the Add-ons handler inside Firefox.
Please refer to your SFTP settings tab on ERDA to see login details for connecting to your home
with SFTP. The Configuration dialogs for the user with automatic username [email protected] is
shown as an example here, but please use your own automatic login and your chosen password
from your SFTP settings tab
35 / 48
Account Name can be chosen freely while Host, Login and Password are taken from your SFTP
settings tab. Switch to the Connection tab and set Security to SFTP and enter the Port from your
SFTP settings tab.
After clicking OK to finish the configuration you can hit Connect in the top left
36 / 48
and you should see your remote content in the right half-pane
FileZilla
FileZilla is popular stand-alone FTP/FTPS/SFTP client available on all popular platforms. The
ERDA configuration is not that different from the FireFTP one, but please refer to the project page
for more information:
https://filezilla-project.org
PuTTY
PuTTY is a popular stand-alone SFTP client originally developed for Windows but now also
available on other platforms. The ERDA configuration is not that different from the FireFTP one,
but please refer to the project page for more information:
37 / 48
www.chiark.greenend.org.uk/~sgtatham/putty/
SSHFS
On Mac OSX and Linux it's possible to map remote storage with SSHFS so that the contents look
just like if they were in a local directory. Your SFTP settings tab contains very brief instructions for
doing so if you click the Show more SFTP client details... link.
There's also some information on
https://sourceforge.net/p/migrid/wiki/MiGFSIntro/
FTPS
FTPS is another secure and efficient file transfer protocol built on top of the old FTP protocol, but
with proper security added. It relies on the security mechanisms of TLS/SSL and it is supported by a
number of clients on all popular platforms. As far as we know none of the major platforms integrate
it natively in the general file manager, so you probably need to install a dedicated client to use it.
You generally need to first open the FTPS settings tab on your Settings page at ERDA and
configure how you want to authenticate to our FTPS server. Enter a password that you want to login
with and click Save FTPS Settings. Please also note the login details including the automatic
username shown there.
38 / 48
Our SFTP server is more thoroughly tested and allows the stronger public key authentication but
our FTPS server may deliver higher throughput, so feel free to use either in accordance with your
needs.
You can use the clients that we mentioned in the SFTP section but other FTPS clients may also
work.
FireFTP
The configuration is much like for SFTP just using the automatic username and the password you
entered on the FTPS settings tab:
Account Name can be chosen freely while Host, Login and Password are taken from your FTPS
settings tab.
39 / 48
Set Security to Auth TLS (Best) and enter the Port from your FTPS settings tab.
After clicking OK to finish the setup you can hit Connect like for SFTP.
Seafile
Seafile on ERDA is a file synchronization service much like Dropbox – but since ERDA is located
at UCPH physically and network-wise it comes without the UCPH restrictions on the use of
Dropbox. All data are sent through a secure connection to the ERDA storage, and users can
additionally choose to have their synchronized data encrypted locally before ever sending it over the
network to the storage. This means that data are significantly better protected against eavesdropping
by strangers. The optional encryption is done with the AES 256 algorithm, which Datatilsynet
defines as a valid algorithm for strong encryption (in Danish only).
Seafile provides sharing capabilities which can be used to share data with internals and externals,
and in that context it is left to the users to adhere to rules and regulations about confidentiality and
sensitive private data.
You generally need to first open the Seafile settings tab on your Settings page at ERDA and register
your Seafile account on ERDA. Enter a password that you want to use for Seafile login and click
Register.
40 / 48
The registration will proceed and inform the ERDA administrators to activate your Seafile account.
41 / 48
You'll receive an email once your account is activated, and then you can use the Login link there to
login with your email and the password you chose in the previous register step. Then proceed
creating libraries of files and folders for synchronization and/or sharing.
42 / 48
As an example you create a library called autosync by clicking the New library button shown
above and filling the pop-up with just that name before clicking Submit.
Then you can click on the newly created autosync library and upload files using the Upload button
and selecting one or more local files as shown with the instructions.pdf file below.
43 / 48
Once you have data in your Seafile library you can share them with others by moving the mouse
over the file or folder and clicking the share icon appearing.
44 / 48
This will open a short sharing wizard pop-up where you first Generate a sharing link and then enter
email addresses of people to share it with. You can password protect the share and include a small
message with the link email if you like.
To actually synchronize one or more libraries to your PC(s) or workstation(s), you need to install
the client. When you login to your Seafile page there's a link to the downloads page at the bottom.
The client is available for all common platforms, including Windows, Mac OSX and Linux in
addition to clients in the app stores for mobile devices.
Download and install the one for your platform to proceed. Then add your account as shown here
but with your email and password from the Seafile registration.
45 / 48
When you click Login you will get a list of libraries for your account. You can right click on a
library and select Sync this library to make a local version for synchronization. You will then be
asked where to store the synchronized folder locally. Once chosen the client should start actually
synchronizing your library to that folder.
Any future changes or additions you make to that folder will also automatically be synchronized to
your library.
Seafile also includes automatic file versioning so that you can always fetch older versions of
synchronized files on your Seafile web page. This includes files that you deleted from your local
synchronization folder, making it work as a backup as well.
You can install the client on as many devices as you want and repeat the Sync this library to
always have files synchronized between them.
Finally you can access the library contents from the ERDA Files interface by returning to your
ERDA Seafile settings and saving the password you chose for your Seafile account login. In that
way a seafile_readonly folder will show up in your ERDA home folder.
46 / 48
Due to the difference in storing format we currently only provide read-only access to the Seafile
library files there.
47 / 48
Support, Questions and Comments
We welcome all comments on how we can improve the user experience as well as any questions
you may have about the use of ERDA. This includes support in case something doesn't work the
way it is intended and described here.
It is very helpful for us if you include information about your operating system and browser with
any support requests. If you aren't sure you can open up
https://www.whatismybrowser.com/ or http://detectmybrowser.com/
and send us at least the line below “Your web browser is:” in the blue block at the top or the line
starting with “You're using” respectively.
Screenshots of any problems are also very useful.
Feel free to contact us by sending an email to the ERDA Support <[email protected]>.
Kind Regards, the UCPH ERDA team.
48 / 48