1
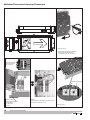
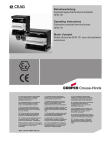
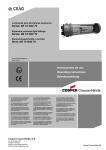
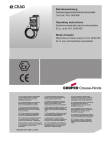
Explosionsgeschützte LED-Rettungszeichenleuchte Serie: EXIT, EXIT 24 V und EXIT CG-S Explosion protected LED-exit luminaire Series: EXIT, EXIT 24 V and EXIT CG-S Panneau de signalisation de sortie de secours lumineux antidéflagrant à diodes électroluminescentes Série: EXIT, EXIT 24 V et EXIT CG-S 3 2191 000 061 (E) Betriebsanleitung Operating instructions Mode d’emploi &=7HQWRQiYRGNSRXåLWtVLPåHWHY\åiGDW YHVYpPPDWHĜVNpPMD]\FHXSĜtVOXãQpKR ]DVWRXSHQtVSROHþQRVWL&RRSHU&URXVH +LQGV&($*YHYDãt]HPL +$NH]HOpVL~WPXWDWyWD]DGRWWRUV]iJ Q\HOYpQD&RRSHU&URXVH+LQGV&($*FpJ KHO\LNpSYLVHOHWpQLJpQ\HOKHWLPHJ '.0RQWDJHYHMOHGQLQJHQNDQRYHUV WWHVWLO DQGUH(8VSURJRJUHNYLUHUHVKRV'HUHV &RRSHU&URXVH+LQGV&($*OHYHUDQG¡U ,6HGHVLGHUDWHODWUDGX]LRQHGHOPDQXDOH RSHUDWLYRLQXQDOWUDOLQJXDGHOOD&RPXQLWj (XURSHDSRWHWHULFKLHGHUODDOYRVWUR UDSSUHVHQWDQWH&RRSHU&URXVH+LQGV&($* ((QFDVRQHFHVDULRSRGUiVROLFLWDUGHVX UHSUHVHQWDQWH&RRSHU&URXVH+LQGV&($* HVWDVLQVWUXFFLRQHVGHVHUYLFLRHQRWURLGLRPD GHOD8QLRQ(XURSHD /7âLRVQDXGRMLPRLQVWUXNFLMRVLãYHUVWRVƳ-njVǐ JLPWąMąNDOEąJDOLWHSDUHLNDODXWLDWVDNLQJRMH &RRSHU&URXVH+LQGV&($*DWVWRY\EHMHVDYR ãDO\MH (676HGDNDVXWXVMXKHQGLWRPDULLJLNHHOHV Y}LWHNVLGDRPDULLJLVDVXYDVWDVMDRPDVHVW &RRSHU&URXVH+LQGVL&($*HVLQGXVHVW /9âRHNVSOXDWƗFLMDVLQVWUXNFLMXYDOVWVYDORGƗ YDUDWSLHSUDVƯWMXVXYDOVWVDWELOGƯJDMƗ&RRSHU &URXVH+LQGV&($*SƗUVWƗYQLHFƯEƗ ),17DUYLWWDHVVDWlPlQNl\WW|RKMHHQNllQQ|V RQVDDWDYLVVDWRLVHOOD(8QNLHOHOOl7HLGlQ &RRSHU&URXVH+LQGV&($*HGXVWDMDOWDQQH 0-LVWJƫXMLWROEXGDQLOPDQZDOILOOLQJZD QD]]MRQDOLWDJƫKRPPLQJƫDQGLUUDSSUHĪHQWDQW WD &RRSHU&URXVH+LQGV&($*I SDMMLĪKRP *5ǼĮȞȤȡİȚĮıșİȚİIJĮȡĮıȘIJȦȞȠįȘȖȚȦȞȤȡȘıİ ȦȢıİĮȜȜȘȖȜȦııĮIJȘȢǼǼʌȠȡİȚȞĮȗȘIJȘșİȚĮʌȠ IJȠȞǹȞIJȚʌȡȠıȦʌȠIJȘȢ&RRSHU&URXVH +LQGV&($*³ 1/,QGLHQQRRG]DNHOLMNNDQGHYHUWDOLQJYDQ GH]HJHEUXLNVLQVWUXFWLHLQHHQDQGHUH(8WDDO ZRUGHQRSJHYUDDJGELM8Z&RRSHU&URXVH +LQGV&($*YHUWHJHQZRRUGLJLQJ COOPER Crouse-Hinds GmbH Neuer Weg - Nord 49 D 69412 Eberbach / Germany Fone +49 (0) 6271/806 - 500 Fax +49 (0) 6271/806 - 476 Internet: http://www.CEAG.de E-Mail: Info-ex @ ceag.de 36HIRUQHFHVViULDDWUDGXomRGHVWDV LQVWUXo}HVGHRSHUDomRSDUDRXWURLGLRPDGD 8QLmR(XURSHLDSRGHVROLFLWDODMXQWRGRVHX UHSUHVHQWDQWH&RRSHU&URXVH+LQGV&($* 3/1LQLHMV]ąLQVWUXNFMrREVáXJLZRGSRZLHGQLHM ZHUVMLMĊ]\NRZHMPRĪQD]DPyZLüZ SU]HGVWDZLFLHOVWZLHILUP\&RRSHU&URXVH +LQGV&($*QDGDQ\NUDM 6(Q|YHUVlWWQLQJDYGHQQDPRQWDJHRFK VN|WVHOLQVWUXNWLRQWLOODQQDW(8VSUnNNDQYLG EHKRYEHVWlOODVIUnQ(U&RRSHU&URXVH +LQGV&($*UHSUHVHQWDQW 6.7HQWRQiYRGQDREVOXKX9iPYR9DãRP URGQRPMD]\NXSRVN\WQH]DVW~SHQLHVSRORþQRVWL &RRSHU&URXVH+LQGV&($*YR9DãHMNUDMLQH 6/21DYRGLOD]DXSRUDERY9DãHPMH]LNX ODKNR]DKWHYDWHSULSULVWRMQHP]DVWRSQLãWYX SRGMHWMD&RRSHU&URXVH+LQGV&($*Y9DãL GUåDYL Maßbilder/Dimensional drawings/Dimensions Bild 1/fig. 1/Fig.1 Befestigungsschraube LED-Leiterkarte/ Fixing screw LED printed circuit/ vis de fixation LED carte de circuits Netzanschluss/Mains connection/schéma des connexions L N PE L N PE Bild 2/fig. 2/Fig. 2 Befestigungsschrauben/ Fixing screws/ vis de fixation ˆØ 5 mm 2 Cooper Crouse-Hinds GmbH + Pfeil/Arrowhead/Flèche - 1 Bild 2a/ Netzanschluss 24 V DC/Mains connection 24 V DC/ schéma des connexions 24 V CC Bild 3/fig. 3/Fig. 3 2 2. Normenkonformität 1. Sicherheitshinweise: Zielgruppe: Elektrofachkräfte und unterwiesene Personen. Die Leuchte darf nicht in der Zone 0 oder 20 eingesetzt werden! Die auf der Leuchte angegebenen technischen Daten sind zu beachten! Die Anforderungen der EN 61241-0 und -1 u.a. in Bezug auf übermäßige Staubablagerungen und Temperatur, sind vom Anwender zu beachten Umbauten oder Veränderungen an der Leuchte sind nicht zulässig! Die Leuchte ist bestimmungsgemäß in unbeschädigtem und einwandfreiem Zustand zu betreiben! Als Ersatz dürfen nur Originalteile von CEAG/ Cooper Crouse-Hinds GmbH (CCH) verwendet werden! Reparaturen, die den Explosionsschutz betreffen, dürfen nur von CEAG/CCH oder einer qualifizierten „Elektrofachkraft“ durchgeführt werden! Diese Betriebsanleitung während des Betriebes nicht in der Leuchte lassen! Die nationalen Unfallverhütungs- und Sicherheitsvorschriften und die nachfolgenden Sicherheitshinweise, die in dieser Betriebsan) gekennzeichnet sind, leitung mit einem ( beachten! Adressschalter 1 0 0 0 ... 1 1 ... ... 2 2 ... 9 Adressschalter 2 Leuchtenadresse 0 Überwachung aus 1 1 2 2 ... ... 0 10 1 11 ... ... ... ... 0 1 ... 9 Bild 4 Adresssierung EXIT CG-S 20 nicht zulässig ... nicht zulässig Diese Leuchte ist zum Einsatz in explosionsgefährdeten Bereichen der Zone 1,2 und 21, 22 gemäß IEC 60079-10 und EN 60079-14 geeignet. Sie wurde entsprechend dem Stand der Technik und gemäß DIN EN ISO 9001:2000 entwickelt, gefertigt und geprüft. 3. Technische Daten EG-Baumusterprüfbescheinigung: BVS 09 ATEX E... Konformität gemäß Richtlinie 94/9/EG und Norm: II 2 G Ex e ib m IIC T6 ta max + 40 °C: ta max + 50 °C: II 2 G Ex e ib m IIC T5 II 2 D Ex tD A21 IP66 T80°C Anerkennung der Qualitätssicherung Produktion: PTB 96 ATEX Q001-5 Bemessungsspannung AC: EXIT 24 V nicht zulässig EXIT 110 V - 277 V* EXIT CG-S 220 V - 254 V* Bemessungsspannung DC: EXIT 12 - 24 V DC ± 20% EXIT 110 V - 250 V* EXIT CG-S 195 V - 250 V* Bemessungsfrequenz: 50 - 60 Hz Bemessungsstrom 110 V AC/DC: 0,05 A 220 V AC/DC: 0,025 A Schutzklasse nach EN 60 598: I Klemmvermögen Anschlussklemme 2x je Klemme: 3 x 2,5 mm² Ex e-Kabel- und Leitungseinführung Standardausführung: M20x1,5 für Leitungen Ø 5,5 bis 13 mm Metall: M20x1,5 Gewinde Drehmoment für Ex e Kabel- und Leitungseinführung M20x1,5: 3,75 Nm Drehmoment für Druckschraube: 2,5 Nm (für Abdichtung Leitung oder Verschluss-Stopfen) * zulässige Toleranzen gemäß EN 60079-0 4. Installation EXIT Die für das Errichten und Betreiben von explosionsgeschützten elektrischen Betriebsmitteln geltenden Sicherheitsvorschriften gemäß des Gerätesicherheitsgesetzes sowie die allgemein anerkannten Regeln der Technik sind einzuhalten! Transport und Lagerung der Leuchte ist nur in Originalverpackung und der angegebenen Lage gestattet! Öffnen und Schließen der Leuchte: Lösen sie die vier Deckelschrauben (Kreuzschlitz) Entfernen Sie die Haube. Beim Ablegen der Haube auf glatte und saubere Unterlage achten, damit der Siebdruck auf der Haube nicht verkratzt wird! Montage der Leuchte Die Leuchte ist an den vier Befestigungslaschen mit geeigneten Befestigungsschrauben (Schraube ´Ø max. 5 mm, Bild 1) sicher auf tragfähigem Untergrund anzuschrauben. Netzanschluss: Nach Öffnen der Haube ist die Befestigungsschrauben (SW 4mm) der LED-Leiterkarte zu lösen (Bild 1). Die Leiterkarte kann dann herausgeschwenkt werden. Führen Sie die Netzzuleitung durch die bescheinigte Leitungseinführung M20x1,5 ein. Verwenden Sie für Leitungen von 5,5 bis 8 mm beide Dichtungseinsätze, von 8 bis 13 mm nur den äußeren Dichtungseinsatz. Achten Sie auf korrekten Sitz des verbleibenden Dichtungseinsatzes in der Verschraubung. Bei nicht benutzten Kabel-und Leitungseinführungen ist die Schutzscheibe zu entfernen und durch einen bescheinigten Verschlussstopfen (Drehmoment 3,5 Nm) zu verschließen. Beim Verschließen mit einem bescheinigten Verschlussstopfen stets beide Dichtungseinsätze verwenden! Bei Metall-Kabeleinführungen sind die Schutzkappen der nicht benutzten Einführungen zu entfernen und durch bescheinigte Ex-Verschlussstopfen (min. IP65) zu verschließen! Achtung! Nur festverlegte Leitungen zulässig! Bei Verwendung anderer Leitungseinführungen sind die Angaben des Herstellers hinsichtlich Klemmvermögen und Zugentlastung zu beachten! Klemmen Sie die Leitungen L, N und PE am Klemmstein sicher an (Bild 2). Montieren Sie die LED-Leiterkarte. Achten Sie auf sichere Lage der Leitungen. Quetschen Sie keine Leitungen! Montieren Sie die Haube mit den vier Schrauben. Ziehen Sie die Schrauben nur handfest an. Überwachung (EXIT CG-S) Das CG-S Modul überwacht und meldet an das angeschlossene CEAG Notlichtversorgungssystem die Funktion der Versorgungselektronik sowie den Betrieb von min. 50 % der LEDs. Mit dem CG-S-Überwachungsmodul mit Codierschalter für max. 20 Adressen kann die EXIT CG-S Leuchte als einzelüberwachte Notleuchte an CEAG Notlichtversorgungssystemen betrieben werden. Hierbei kann der Betreiber die Schaltungsart frei programmieren. So können an einem Endstromkreis bis zu 20 Leuchten in unterschiedlichen Schaltungsarten betrieben werden. Adressierung Vor Montage der Leuchtenhaube muß die individuelle Leuchtenadressierung eingestellt werden. Hierzu ist mit einem geeigneten Schraubendreher die gewünschte Adresse (Bild 4, 1 - 20) am Adressschalter einzustellen (Pfeil auf Zahl, Bild 3). Soll die Leuchte nicht überwacht werden, ist immer die Stellung 0/0 einzustellen. Die Standardleuchte EXIT ist nicht mit einer Überwachungselektronik ausgerüstet und ist nicht adressierbar. 6. Inbetriebnahme Vor der Inbetriebnahme die korrekte Funktion und Installation der Leuchte in Übereinstimmung mit dieser Betriebsanleitung und anderen zutreffenden Bestimmungen überprüfen! Isolationsmessungen nur zwischen PE und Außenleiter L1 (L, L2, L3) sowie zwischen PE und N durchführen! – Messspannung: max. 1kV AC/DC – Messstrom: max. 10 mA Achtung: Eine Isolationsmessung zwischen L und N darf nicht durchgeführt werden, da sonst die Elektronik oder die Netzeingangssicherung im Gerät) zerstört wird. 7. Instandhaltung Die für die Instandhaltung, Wartung und Prüfung von explosionsgeschützten Betriebsmitteln geltenden Bestimmungen (z.B. EN 60079-17) sind einzuhalten! Wartung Im Rahmen der Wartung sind vor allem die Teile, von denen die Zündschutzart abhängt, zu prüfen z. B.: Gehäuse und Schutzwannen auf Risse und Beschädigungen. Dichtungen auf Beschädigungen. Klemmen und Verschluss-Stopfen auf festen Sitz. Wegen der Gefahr elektrostatischer Aufladung darf die Leuchte nur mit einem feuchten, nicht fasernden Tuch oder Schwamm gereinigt werden! Dazu nur übliche Haushaltsspülmittel in vorgeschriebener Verdünnung mit Wasser benutzen! Die Wassertemperatur darf maximal 50°C betragen. Anschließend mit klarem Wasser nachspülen, da sonst Spannungsrisse in der Schutzwanne entstehen können! Instandsetzung Vor dem Austausch oder der Demontage von Einzelteilen ist folgendes zu beachten: Das Betriebsmittel vor dem Öffnen oder vor Instandhaltungsarbeiten erst spannungsfrei schalten! Nur zugelassene CEAG/CCH Originalersatzteile verwenden (siehe CEAG/CCH Ersatzteilliste). Programmänderungen und -ergänzungen sind vorbehalten. Bei der Entsorgung nationale Abfallbeseitigungsvorschriften beachten! Cooper Crouse-Hinds GmbH 3 1. Safety instructions 2. Conformity with standards For skilled electricians and instructed personnel in accordance with national legislation, including the relevant standards and, where applicable, in acc. with IEC 60079-17 on electrical apparatus for explosive atmospheres. The light fitting must not be operated in zone 0 or 20 hazardous areas! The technical data indicated on the light fitting are to be observed! The requirements of the EN 61241-0 and -1 regarding excessive dust deposits and temperature to be considered from the user. Changes of the design and modifications to the light fitting are not permitted! The light fitting shall be operated as intended and only in undamaged and perfect condition! Only genuine CEAG/Cooper Crouse-Hinds GmbH (CCH) spare parts may be used for replacement! Repairs that affect the explosion protection (see national standard), may only be carried out by CEAG/CCH or a qualified “electrician”! Do not keep these operating instructions inside the light fitting during operation! The national safety rules and regulations for prevention of accidents and the following safety instructions which are marked with an ( ) in these operating instruction, will have to be observed! Address switch 1 0 0 0 ... 1 1 ... ... 2 2 ... 9 Address switch 2 0 1 2 ... 0 1 ... ... 0 1 ... 9 Luminaire address Monitoring off 1 2 ... 10 11 ... ... 20 not permissable not permissable Fig. 4 Addressing The light fitting is suitable for use in zone 1, 2 and 21, 22hazardous areas acc. to IEC 60079-14 and IEC 60079-10. It has been designed, manufactured and tested according to the state of the art and according to EN ISO 9001:2000. 3. Technical data EC type examination certificate: BVS 09 ATEX E... Category of application aacd 94/9/EC. and directive: II 2 G Ex e ib m IIC T6 ta max + 40 °C: II 2 G Ex e ib m IIC T5 ta max + 50 °C: II 2 D Ex tD A21 IP66 T80°C Approval of the production quality assurance: PTB 96 ATEX Q001-5 Rated voltage AC: EXIT 24 V non-permissible EXIT 110 V - 277 V* EXIT CG-S 220 V - 254 V* Rated voltage DC: EXIT 12 - 24 V DC ± 20% EXIT 110 V - 250 V * EXIT CG-S 195 V - 250 V * Rated frequency 50 - 60 Hz Rated current 110 V AC/DC: 0.05 A 230 V AC/DC: 0.025 A Insulation class to EN 60 598: I Supply terminal clamping capacity 2 x per terminal: 3 x 2.5 mm² Ex-e cable entry standard version: M20x1,5 for cable Ø 5,5 to 13 mm metal thread: M20x1.5 Test torque for M 20 x 1.5 Ex-e cable entry: 3.75 Nm Test torque for pressure screw: 2.5 Nm (for sealing off the cable or the blanking plug) max. permissable tolerances accd. EN 60079-0 Cooper Crouse-Hinds GmbH 5. Monitoring (only EXIT CG-S) The CG-S module monitors and indicates to the connected CEAG emergency supply system the operation of the supply unit circuit and the function of min. 50 % of the installed LEDs. The CG-S module allows single monitoring of these luminaires in CEAG emergency lighting systems. The switching mode (maintained/non-maintained and switched emergency luminaires) is freely programmable and mixed operation up to 20 addresses in a single circuit is possible. Addressing Before fitting the cover, the addressing of the individual luminaires is to be carried out. The desired address (fig.4, 1 - 20) is set on the address switch by means of a suitable screw driver (Arrowhead to No., fig. 3). If the luminaire should not be monitored the code 0/0 has to be selected. The standing luminaire EXIT and is not equipped with monitoring circuit and can not be addressed. 6. Taking into operation Prior to operation, check the light fitting for its proper functioning and installation in compliance with these operating instructions and other applicable regulations! Only carry out insulation measurements between PE and the external conductor L1 as well as between PE and N. – measuring voltage: max. 1 kV AC/DC – measuring current: max. 10 mA Mind: There must no insulation measurement be carried out between L and N, since that would destroy the electronics (mains input fuse in the unit). 4. Installation EXIT 7. Maintenance The respective national regulations as well as the general rules of engineering which apply to the installation and operation of explosion protected apparatus will have to be observed! Transport and storage of the luminaire is permitted in original packing and specified position only! Observe the national regulations applicable to the maintenance, servicing and test of apparatus for explosive atmospheres e.g EN 60079-17 as well as the general rules of engineering! Opening and closing the light fitting Unscrew the four recessed head screws of the cover Remove the protective cover. If putting down take care to prevent scratches on the silk screen cover Installation of the fitting The luminaire shall be fitted by using the four mounting clips with suitable fixing screws (Ø: 5 mm, fig. 1) onto a suitable surface. Mains connection After opening the cover unscrew the screw (allen screw 4 mm) of the LED-printed board (fig.1). The printed board can be swiveled out. Pass the cable (5.5 to 13 mm) through the certified Ex cable entry M 20 x 1,5. Use both sealing inserts for cables from 5.5 to 8 mm, and the outer sealing insert only for cables from 8 to 13 mm. Pay attention to the proper fit of the remaining sealing insert in the certified cable gland. In case of unused cable entries, remove their protective cover and close the entries with a blanking plug (torque of 2.5 Nm). When closing the gland with a blanking plug, always use both sealing inserts! When metal cable entries are used, the protective caps of the unused entries are to be removed and the entries to be closed with certified Ex blanking plugs! Attention! Only fix laid cable may be used for connection! If cable glands from other manufacturer are used the instructions regarding strain relief and clamping capacity must be observed! Connect the conductors to the terminals L, N 4 and PE in accordance with the terminal marking (see fig. 2). Remont the LED-printed board into the housing. Take care not to pinch any conductors. Install the protective cover with the four screws. Tighten the screws only hand-tight! Servicing When servicing, in particular those components that affect the explosion protection, will have to be checked, e. g.: Housing and protective bowl for any cracks or damages. Gaskets for their perfect condition. Terminals and blanking plugs for their firm fit. Because of the risk of an electrostatic charge, the light fitting shall only be cleaned with a damp, non-fibrous cloth or sponge! Only use customary household washing-up liquid diluted in water as specified! The water temperature may be max. 50°C. After that, rinse with clear water to prevent the risk of tension cracks in the protective bowl! Repair Prior to replacing or removing any components, observe the following: Cut the apparatus off the voltage before opening it or carrying out repairs! Only use certified genuine CEAG/CCH spare parts! (See CEAG/CCH spare parts list). Subject to alteration or supplement of this product series. Regarding waste disposal, observe the relevant national regulations! The plastic materials are marked with material identifications. 2. Conformité avec les normes 1. Consignes de sécurité Pour le personnel électricien qualifié et le personnel instruit suivant la règlementation légale, y compris les normes respectives ainsi que, le cas échéant, CEI 60079-17 pour apppareils électriques utilisables en atmosphère explosive. Il n’est pas permis d’utiliser le luminaire dans la zone 0 et 20. Les caractéristiques techniques indiquées sur le luminaire doivent être respectées! Les exigences des EN 61241-0 et -1 en ce qui concerne des dépôts de poussière démesurés et une température doivent être considérées par I’utilisateur. Il n’est pas permis de transformer ou de modifier le luminaire! Le luminaire ne doit être exploité que pour la fonction qui lui est dévolue et qu’en état intact et parfait! Seules des pièces de rechange d’origine CEAG/Cooper Crouse-Hinds GmbH (CCH) doivent être employées pour le remplacement! Des réparations qui portent sur la protection contre l’explosion, ne doivent être exécutées que par CEAG(CCH) ou par un «électricien» qualifié! Ce mode d’emploi ne doit pas être laissé dans le luminaire pendant son exploitation! Veuillez respecter les prescriptions nationales de sécurité et de prévoyance contre les accidents ainsi que les consignes de sécurité qui sont marquées d’un ( ) dans ce mode d’emploi! Position de l’interrupteur 1 0 0 0 ... 1 1 ... ... 2 2 ... 9 Fig. 4 Adressage Position de l’interrupteur 2 0 1 2 ... 0 1 ... ... 0 1 ... 9 Adresse de luminaire aucune surveillance 1 2 ... 10 11 ... ... 20 pas possible pas possible Ce luminaire convient à l’utilisation dans les zones 1 et 2 d’une atmosphère explosive selon EN 60079-14 et CEI 60079-10. Il a été conçu, construit et testé selon l’état actuel de la technique et selon EN ISO 9001: 2000. 3. Caractéristiques techniques Certificat d’essai CE du modèle type: BVS 09 ATEX E... Domaine d’application 94/9/CE et directive: ta max + 40 °C: II 2 G Ex e ib m IIC T6 II 2 G Ex e ib m IIC T5 ta max + 50 °C: II 2 D Ex tD A21 IP66 T80°C Homologation de l’assurance de la qualité en production: PTB 96 ATEX Q001-5 Gamme des tensions CA: EXIT 24 V EXIT 110 V - 277 V* EXIT CG-S 220 V - 254 V* Gamme des tensions CC: EXIT 24 V 12 - 24 V ± 20 % EXIT 110 V - 250 V* EXIT CG-S 195 V - 250 V* Gamme des fréquences 50 - 60 Hz Courant nom. 110 V CA/CC 0,05 A 230 V CA/CC 0,025 A Classe d’isolation selon EN 60 598: I Capacité de serrage des bornes, 2 x par borne: 3 x 2,5 mm² Entrée de câble Ex-e: modèle standard M20x1,5 pour câbles d’un modèle standard d’un Ø de 5,5 à 13 mm Couple d' essai pour l’entrée de câble Ex-e M20x1,5: 3,75 Nm Couple d' essai pour la vis de pression: 2,5 Nm(pour étancher le câble ou le bouchon de fermeture) * Tolerances admissible selon EN 60079-0 4. Installation EXIT Lors de l'installation et de l'exploitation des appareils électriques pour atmosphère explosive, les règlements nationaux ainsi que les règles de la technique généralement reconnues doivent être respectés! Le transport et le stockage ne sont permis que dans l'emballage original et dans la position spécifiée! Ouverture et fermeture du panneau: U Desserrez les quatre vis du couvercle (empreinte cruciforme) U Enlevez le couvercle. Posez le couvercle sur une surface propre et lisse afin de ne pas rayer la sérigraphie du couvercle! Montage du panneau Le panneau doit être correctement fixé à l’aide des quatre pattes de fixation avec des vis appropriées (vis Ø maximum 5 mm, fig. 1) sur un support solide. Raccordement au secteur: Après ouverture du couvercle, desserrez les une vis de fixation de la carte à LED (fig.1). La carte à LED comporte une sécurité antichute. Faites passer le câble d’alimentation secteur dans le passe-câble marqué M 20x1,5. Utilisez pour les câbles de 5,5 à 8 mm les deux inserts d’étanchéité, pour les câbles de 8 à 13 mm seulement l’insert d’étanchéité extérieur. Veillez à l’assise correcte des inserts d’étanchéité restants dans l’assemblage vissé. En cas de non utilisation de câbles ou de passe-câbles, la rondelle de protection doit être retirée et remplacée par un bouchon de fermeture homologué. (couple de serrage 3,5 Nm). Utilisez toujours les deux inserts d’étanchéité lors de la fermeture avec le bouchon homologué ! En cas de passe-câble en métal, les capuchons de protection des passe-câbles non utilisés doivent être enlevés et remplacés par des bouchons de fermeture antidéflagrants homologués (minimum IP65) ! Attention ! Seul un câblage fixe est autorisé ! Dans le cas d’utilisation d’autres passe-câbles, respectez les instructions du fabricant en ce qui concerne le serrage des câbles et l’absence de tension mécanique sur ceux-ci ! Raccordez sûrement les câbles L, N et PE au bornier (fig. 2). Montez la carte à LED. Veillez à une pose correcte et sûre des câbles. Evitez tout pincement des câbles ! Monter le couvercle avec les quatre vis. Les vis ne doivent être serrées qu’à la main. 5. Surveillance (EXIT CG-S) Le module CG-S surveille et signale au système d’alimentation de l’éclairage de secours CEAG raccordé le fonctionnement de l’électronique d’alimentation ainsi que le fonctionnement d’au moins 50 % des LED. Avec le module de surveillance CG-S équipé d’un commutateur de codage pour un maximum de 20 adresses, l’afficheur EXIT CG-S peut être exploité comme afficheur de secours unique contrôlé, relié aux systèmes d’alimentation d’éclairage de secours CEAG. L’exploitant peut dans ce cas programmer librement le mode de commutation. Jusqu’à 20 afficheurs peuvent être exploités avec différents modes de commutation dans un circuit électrique terminal. Adressage L’adressage individuel des afficheurs doit être effectué avant le montage du couvercle du panneau de l’afficheur. Pour cela, procédez au réglage des adresses souhaitées (fig. 4, 1 - 20) au commutateur d’adresses à l’aide d’un tournevis approprié. (flèche face aux nombres, fig. 3). Si l’afficheur ne doit pas être surveillé, régler toujours la position sur 0/0. Le panneau d’affichage standard EXIT n’est pas équipé d’une électronique de surveillance et n’est pas adressable. 6. Mise en service Vérifiez que l’installation et le fonctionnement corrects de l’afficheur soient conformes aux instructions de cette notice d’utilisation et à toutes les autres prescriptions en vigueur ! Les mesures d’isolation ne doivent être effectuées qu’exclusivement entre PE et les câbles extérieurs L1 (L, L2, L3) ainsi qu’entre PE et N ! - Tension de mesure : maximum 1kV AC/DC - Courant de mesure : maximum 10 mA Attention: ne pas effectuer de mesure d’isolation entre L et N, sinon il y a destruction de l’électronique ou du fusible de protection d’alimentation secteur de l’appareil. 7. Entretien Respectez la réglementation en vigueur en ce qui concerne l’entretien, la maintenance et le contrôle des moyens d’exploitation antidéflagrants (par ex. EN 60079-17) ! Maintenance Il faut avant tout vérifier les pièces desquelles dépend le type de protection antidéflagrante, par ex. : U Fissures et dommages au boîtier et au carter de protection. U Dommages aux joints. U Positionnement correct des borniers et des bouchons de fermeture. U En raison du risque de charge électrostatique, le panneau ne doit être nettoyé qu’à l’aide d’un chiffon non pelucheux ou d’une éponge humides ! N’utilisez pour cela que des produits de rinçage ménagers dilués dans de l’eau à la concentration prescrite ! La température de l’eau ne doit pas dépasser 50° C. Rincez ensuite à l’eau claire, sinon il y a risque de fissures de tension dans le carter de protection ! Réparation Respectez les instructions suivantes avant le remplacement ou le démontage de pièces détachées: Mettre d’abord le panneau hors tension avant toute ouverture ou travaux de réparation ! N’utilisez que des pièces détachées agréées d’origine CEAG/CCH (voir liste des pièces détachées CEAG/CCH). Des modifications ou extensions de programmes font l’objet de réserves. Respectez les prescriptions légales de traitement des déchets en cas d’élimination ! Cooper Crouse-Hinds GmbH 5 Cooper Crouse-Hinds GmbH Neuer Weg-Nord 49 D-69412 Eberbach Phone +49 (0) 6271/806-500 Fax +49 (0) 6271/806-476 Internet: www.CEAG.de E-Mail: [email protected] 3 2191 000 061 (E) /XX/06.09/Str Technische Änderungen vorbehalten! Betriebsanleitung gültig ab 02.2009 EG-Konformitätserklärung EC-Declaration of conformity CE-Déclaration de conformité