1
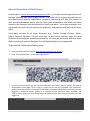
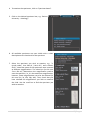
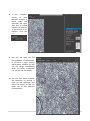
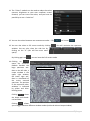
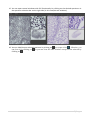
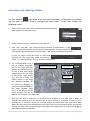
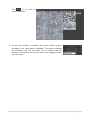
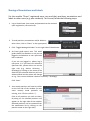
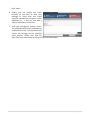
HistoViewer’s User Manual
Table of Contents
General Operation of HistoViewer....................................................................................................... 2
Registration .......................................................................................................................................... 7
Annotation and Labeling of Slides........................................................................................................ 8
Sharing of Annotations and Labels .................................................................................................... 10
Website Disclaimer, Limitation of Liability and Copyright ................................................................. 12
1|Page
General Operation of HistoViewer
HistoViewer ( http://anat-microscopy.ana.au.dk/ ) is a virtual microscopy tool for cell
biology, histology and embryology courses. The slides of the e-learning platform can
be viewed from without registration. However, registering will give you access to
your personal database where you can store your annotations and labels and have
access to the features you discovered at a later time point - from any computer. As a
registered user you can also share your positions, annotations and labels with other
users.
Up-to-date versions of all major browsers (e.g. Firefox, Google Chrome, Safari,
Opera, Internet Explorer >=9) will work fine. In the recent months, some of these
browsers achieved great speed improvements, so it can pay off to test different ones.
Older versions of Internet Explorer (from 8 downwards) are not supported.
To get started, follow the following steps:
1. Go to the HistoViewer’s website (http://anat-microscopy.ana.au.dk/ ).
2. Click “Start HistoViewer” in the upper right corner:
3. A new site opens where you can see five tabulators are visible: “Home” guides you back to
HistoViewer’s start page, “Click to log in” guides you to the log-in window, “My specimens”
guides you to the positions, annotations and labels you have created (only active when you are
logged in), “Specimen boxes” guides to a selection of the specimen boxes available, and
“Share” which guides you to creating email messages to other users (only active when you are
logged in).
2|Page
4. To examine the specimens, click on “Specimen boxes”.
5. Click on the desired specimen box, e.g. “Aarhus
University – Histology”:
6. All available specimens are now visible with a short
description and a thumbnail of the specimen:
7. Select the specimen you wish to examine, e.g. “1.
Lymph node | lens: 60x oil | NA=1.35 | stain: Gomori
silver”. Note that some of the specimens were scanned
at different magnifications. The value lens (in this case
“lens: 60x oil”) determines the magnification used to
scan the specimen, i.e. it is the maximum magnification;
however, lower magnifications can also be selected (in
this case (1x, 2x, 10x, 20x, 40x). Thus, check that you
have selected the magnification you wish to examine
the slide. Use the scroll bar to find the specimen you
wish to examine.
3|Page
8. If your computer
screen
or
web
browser window is
rather small, the
specimen will open
with only a limited
number of buttons.
To get access to all
buttons, click the
“+”:
9. You will see now the full
functionalities of HistoViewer.
If you have a larger screen/
web browser window, you will
see this design immediately
when you select a specimen
(i.e. you will not see step 8).
10. You can now either examine
the specimen by moving it
(click on the specimen and
move the cursor), or you can
make use of the different
functionalities.
4|Page
11. The “Colors” module can be used to adapt the colors,
contrast, brightness to your own computer screen.
Likewise, you can invert the colors, and you have the
possibility to see a “scale bar”.
12. You can also select between two movement modes – “fly”
13. You can also select a full screen mode by clicking
window. You can also close the side bar by
clicking on the “X” (this will free even more
space).
By clicking again on
14. Clicking on
opens the 3-viewers
module. Besides the
large specimen window on the left side, a
Loupe window is the
upper right window,
the lower right window is a thumbnail of
the entire scanned
specimen. The position
in the respective other
windows is indicated
by yellow and blueblinking boxes.
and “move”
.
. This will maximize the specimen
, you can leave the full screen mode.
Large specimen window
Loupe window
Thumbnail window
Clicking
closes
the loupe and thumbnail windows.
Clicking
allows
you to toggle between different window modes (with and without loupe window).
5|Page
15. You can open several windows with full functionality by clicking on the desired specimens in
the specimen selection bar on the right side (in this example two windows).
16. You can hide/show a selected specimen by clicking on
(to reopen click
). Likewise, you
can close it by clicking on , or you can close all other windows except for the selected by
clicking on .
6|Page
Registration
Registered users of HistoViewer have access to additional features such as a personal
database where you can store your annotations and labels, review the stored
position, annotations and labels from any internet-connected computer anywhere
and anytime, and share these with other users specified by you. To register, follow
the following steps:
1. To register, click on ”Register” on
the homepage:
2. A registration form will open. Please fill out this form and read the disclaimer at the bottom
carefully. By clicking on “Agree and Submit” you agree to these conditions. Note that the
password will be sent to the email address specified by you. Please make sure that the spam
filter of this email address allows receiving emails from the HistoViewer web-server.
7|Page
Annotation and Labeling of Slides
Via the module
, registered users can store positions, annotations and labels
e.g. for later repetition and/or sharing with other users. To this end, follow the
following steps:
1.
Log in HistoViewer (user name and password can be received
upon registration, see section B):
2. Select a specimen from a slide box on the right side.
3. Click “Vwr” and “DB”. “Vwr” open the loupe function of HistoViewer, i.e. the
region of the specimen that can be labeled and annotated. The Loupe window
is the upper right window above the thumbnail. “DB” opens the data base function.
(If you no longer need the loupe or data base
function, you can simply close them by clicking on
“Hide…” or “Hide database”. This frees space on the screen.
4. It is recommended to use a
low to medium magnificaLarge specimen window
tion for the large specimen
window on the left side (e.g.
2x, 10x or 20x) and a larger
magnification for the loupe
in the upper right corner
(e.g. 20x, 40x or 60x). The
yellow square in the large
left specimen window can
be moved by dragging to
position the desired detail in
the loupe window. Note
that it is the position of the
loupe window that can be
labeled and is stored in the data base.
Loupe window
Thumbnail
5. Now you can write a short text in the small white window on the right side in order to
annotate the position. You can also put one or more arrows on structures to label or set a
rectangle on a structure. Arrows of constant length are drawn from the arrow-head side.
When you press on the left mouse button and move away from the position where you started
clicking, the color of the arrows changes. Rectangles are simply drawn by clicking and dragging
until the desired size is reached.
8|Page
Click
, if you wish to
remove the labels.
6. To store the position, annotation text and/or labels (arrows,
rectangles), click “Store detail in database”. The position including
the annotation text and any labels can be recalled from any
computer connected to the internet once you are logged in under
your user name.
9|Page
Sharing of Annotations and Labels
Via the module “Share”, registered users can send their positions, annotations and
labels to other users (e.g. peer students). To this end, follow the following steps:
1. Log in HistoViewer (user name and password can be received
upon registration, see section B):
2. To send positions, annotations and/or labels to
other users, click on “Share” in the upper panel:
3. Click “Toggle Message Window” on the right side of HistoViewer:
4. An Email guide opens now. This email
guide checks first whether or not you are
logged in and whether or not a specimen
box is selected.
If you are not logged in, please log in
(see point 1). If you have not selected a
specimen box, please select one on the
right side (e.g. Aarhus University –
Histology) by clicking on the name of the
slide box (the selected slide box will turn
wheat-colored and the status will change
to e.g. “Your current slidebox is Aarhus University – Histology”.
Click “Next”.
5. Your stored positions will now be visible
on the left side of the window (in case
some recently made positions are
missing, click “Click to refresh…”).
Click on all positions you wish to share.
By doing so, the selected positions will
appear on the right side of the window.
Selected positions can be removed from
the attachment list by clicking on the
position name on the right side).
10 | P a g e
Click “Next”.
6. Finally, you can specify the email
recipient (if you wish to send your
message to more than one email
recipient, separate the recipients’ email
addresses by ; ). You can also add a
subject and write an email text.
7. Send your message by clicking “Send”.
The selected positions will automatically
be attached as links. The repicient(s) will
receive the message on the specified
email account. Please note that the
spam filter used must allow receiving emails from HistoViewer.
11 | P a g e
Website Disclaimer, Limitation of Liability and Copyright
There is no warranty for this website, to the extent permitted by applicable law. We
provide this service "as is" without warranty of any kind, either expressed or implied,
including, but not limited to, the implied warranties of merchantability and fitness
for a particular purpose. The entire risk as to the quality and performance of the
program is with you. In no event unless required by applicable law or agreed to in
writing will any copyright holder, or any other party who modifies and/or conveys
the program as permitted above, be liable to you for damages, including any general,
special, incidental or consequential damages arising out of the use or inability to use
this website or connected services or programs (including but not limited to loss of
data or data being rendered inaccurate or losses sustained by you or third parties or
a failure of the website to operate with any other websites, web services or
programs), even if such holder or other party has been advised of the possibility of
such damages. We cannot guarantee permanent access to our website neither at
present time nor in future.
This website is not designed to, and does not, provide medical advice. All content,
including text, graphics, images, and information, available on or through this
website may be erroneous and is not intended to be a substitute for professional
medical advice, diagnosis or treatment. On using HistoViewer you confirm that you
have read, understood and will respect these conditions.
Any links to third party websites are provided solely for the purpose of your
convenience. Links made to other sites are made at your own risk and we accept no
liability for any linked sites. A link to a third party website does not mean that we
endorse or accept any responsibility for the content or the use of such website. We
have not tested any content, software feature or links found on any linked third party
website and do not accept responsibility and liability for the quality, safety,
suitability or reliability of any of the third party websites or any of the material
contained in these third party websites. Take your own precautions to ensure that
the website content is free of items of a destructive nature (e.g. viruses, worms,
Trojan horses). We bear no responsibility for the accuracy, legality or content of the
external site or for that of subsequent links.
All content of HistoViewer including its design, scripts and scanned slides is
protected by copyright laws.
12 | P a g e