1
Sytten 2 RapidWeaver Theme
User Manual
Contents
1 Introduction
3
1.1
Welcome to Sytten 2 . . . . . . . . . . . . . . . . . . . . . . . . .
3
1.2
The Opening Act . . . . . . . . . . . . . . . . . . . . . . . . . . .
3
1.3
Getting Help . . . . . . . . . . . . . . . . . . . . . . . . . . . . .
4
2 The Basics
4
2.1
Installation . . . . . . . . . . . . . . . . . . . . . . . . . . . . . .
4
2.2
Options . . . . . . . . . . . . . . . . . . . . . . . . . . . . . . . .
5
2.2.1
Device Simulator . . . . . . . . . . . . . . . . . . . . . . .
5
2.2.2
Maximum Width . . . . . . . . . . . . . . . . . . . . . . .
5
2.2.3
Top Options . . . . . . . . . . . . . . . . . . . . . . . . .
6
2.2.4
Top Effect . . . . . . . . . . . . . . . . . . . . . . . . . . .
6
2.2.5
Title Shadow . . . . . . . . . . . . . . . . . . . . . . . . .
7
2.2.6
Top Menu Text Shadow . . . . . . . . . . . . . . . . . . .
7
2.2.7
Logo Options . . . . . . . . . . . . . . . . . . . . . . . . .
7
2.2.8
Navigation Options . . . . . . . . . . . . . . . . . . . . . .
7
2.2.9
Main Content Options . . . . . . . . . . . . . . . . . . . .
8
2.2.10 Sidebar Options . . . . . . . . . . . . . . . . . . . . . . .
8
2.2.11 ExtraContent 1 Options . . . . . . . . . . . . . . . . . . .
9
2.2.12 ExtraContent 1 Height . . . . . . . . . . . . . . . . . . . .
9
2.2.13 ExtraContent 2 Options . . . . . . . . . . . . . . . . . . .
10
2.2.14 ExtraContent 3 Options . . . . . . . . . . . . . . . . . . .
10
2.2.15 ExtraContent 4 Options . . . . . . . . . . . . . . . . . . .
10
1
2.3
2.2.16 ExtraContent 5 Options . . . . . . . . . . . . . . . . . . .
10
2.2.17 Slideshow Type . . . . . . . . . . . . . . . . . . . . . . . .
10
2.2.18 Slideshow Timeout . . . . . . . . . . . . . . . . . . . . . .
11
2.2.19 Slideshow Effect . . . . . . . . . . . . . . . . . . . . . . .
11
2.2.20 Slideshow Speed . . . . . . . . . . . . . . . . . . . . . . .
11
2.2.21 Slideshow Settings . . . . . . . . . . . . . . . . . . . . . .
12
2.2.22 Font Family . . . . . . . . . . . . . . . . . . . . . . . . . .
12
2.2.23 Font Size . . . . . . . . . . . . . . . . . . . . . . . . . . .
13
2.2.24 Font Family (Title) . . . . . . . . . . . . . . . . . . . . . .
13
2.2.25 Font Size (Title) . . . . . . . . . . . . . . . . . . . . . . .
14
2.2.26 Font Family (Slogan) . . . . . . . . . . . . . . . . . . . . .
14
2.2.27 Font Size (Slogan) . . . . . . . . . . . . . . . . . . . . . .
14
2.2.28 Font Family (Navigation) . . . . . . . . . . . . . . . . . .
15
2.2.29 Font Family (Headings) . . . . . . . . . . . . . . . . . . .
15
2.2.30 Line Height . . . . . . . . . . . . . . . . . . . . . . . . . .
16
2.2.31 Responsive Behavior . . . . . . . . . . . . . . . . . . . . .
16
Theme Styles . . . . . . . . . . . . . . . . . . . . . . . . . . . . .
16
2.3.1
Using Theme Styles . . . . . . . . . . . . . . . . . . . . .
16
2.3.2
Making Your Own Theme Styles . . . . . . . . . . . . . .
19
2.3.3
Installing Theme Styles . . . . . . . . . . . . . . . . . . .
19
3 Advanced Features
3.1
3.2
19
ExtraContent . . . . . . . . . . . . . . . . . . . . . . . . . . . . .
19
3.1.1
ExtraContent 1 — The Place for Headers, Banners and
Sliders, Oh My! . . . . . . . . . . . . . . . . . . . . . . . .
20
3.1.2
ExtraContent Stack . . . . . . . . . . . . . . . . . . . . .
20
3.1.3
ExtraContent Snippet . . . . . . . . . . . . . . . . . . . .
21
SS3 . . . . . . . . . . . . . . . . . . . . . . . . . . . . . . . . . . .
22
3.2.1
Basic Features of SS3 . . . . . . . . . . . . . . . . . . . .
23
3.2.2
SlideBox Stack . . . . . . . . . . . . . . . . . . . . . . . .
23
3.2.3
SlideBox Snippet . . . . . . . . . . . . . . . . . . . . . . .
23
3.2.4
SlideLinks . . . . . . . . . . . . . . . . . . . . . . . . . . .
25
2
3.2.5
SlideNum . . . . . . . . . . . . . . . . . . . . . . . . . . .
26
3.2.6
SlideWH
. . . . . . . . . . . . . . . . . . . . . . . . . . .
27
3.3
SocialLinks . . . . . . . . . . . . . . . . . . . . . . . . . . . . . .
28
3.4
FontAwesome . . . . . . . . . . . . . . . . . . . . . . . . . . . . .
29
3.5
jQuery . . . . . . . . . . . . . . . . . . . . . . . . . . . . . . . . .
29
3.6
Bootstrap . . . . . . . . . . . . . . . . . . . . . . . . . . . . . . .
30
4 Customize Your Theme
30
4.1
General . . . . . . . . . . . . . . . . . . . . . . . . . . . . . . . .
30
4.2
Images . . . . . . . . . . . . . . . . . . . . . . . . . . . . . . . . .
31
4.3
CSS . . . . . . . . . . . . . . . . . . . . . . . . . . . . . . . . . .
31
4.4
JavaScript . . . . . . . . . . . . . . . . . . . . . . . . . . . . . . .
32
5 Updating Your Theme
32
5.1
Backing up . . . . . . . . . . . . . . . . . . . . . . . . . . . . . .
32
5.2
Updating . . . . . . . . . . . . . . . . . . . . . . . . . . . . . . .
32
1
1.1
Introduction
Welcome to Sytten 2
Thank you for purchasing the seydesign Sytten 2.rwtheme. Sytten is an
open feeling theme that leverages full widths and big vertical spaces to allow
your ideas and creativity to flow freely. With practically no limitations set for
logo size, a bold title and a vast space for beautiful vistas, Sytten presents your
visitors with an above-the-fold experience like no other.
This breathtaking RapidWeaver® theme is chock-full of great features like vast
vistas that fill the top of your site and fantastic designer fonts for those finishing
touches. Built on our tried and true framework, Sytten is fully responsive,
includes Device Simulator, SS3, SmartNav, Font Awesome and so much more.
1.2
The Opening Act
In the next few pages you will learn how to install, use and customize your
theme. While much of what you will learn here is common to most RapidWeaver
themes, keep in mind that features found in some themes may not be found in
this theme and vice versa.
3
Also be aware that RapidWeaver itself is a vast program with many features.
I will only cover the features that pertain specifically to this theme and I will
assume that you have a certain level of basic understanding when it comes to
the RapidWeaver application. As such, it is highly recommended that you take
the time to become familiar with the basic operation of RapidWeaver before
delving any deeper into this, or any other theme.
Some areas of the RapidWaver application worth reading up on are:
•
•
•
•
•
•
The Page Inspector
Nested navigation
Adding a logo
Setting a Title and Slogan
Enabling breadcrumbs
Color selection
For more on these topics, visit the RapidWeaver manual pages.
1.3
Getting Help
If you run into any trouble, community support is just a click away at http:
//seydesign.com/group.
2
The Basics
2.1
Installation
To install a RapidWeaver Theme you must first have the RapidWeaver application
installed on your Mac operating system. RapidWeaver is available on the Mac
App Store. Once RapidWeaver is installed, simply double-click on the “seydesign
Sytten 2.rwtheme” file and RapidWeaver will install the theme for you.
Now that you have installed your theme, you are ready to put it to good use.
Whether you are just getting started with your latest RapidWeaver project or
are looking for a new design for an existing project, selecting a new theme is
easy:
1. Simply open the RapidWeaver Theme Drawer (View > Show Themes),
2. start typing the theme name in the search box,
3. and select the theme icon when it appears.
4
2.2
Options
Sytten 2 has a lot of features built-in, so take the time to look around the Styles
menu (View > Show Page Inspector > Styles) to familiarize yourself with them.
Try selecting various options and see what effect it has in preview mode. Some
options may not appear to do anything at all at first as they may rely on certain
special features, such as Social Links or ExtraContent. Or it might also be a
case where the current view already meets the minimum requirements set by
options such as Minimum Width.
2.2.1
Device Simulator
Enables device simulation, such as iPhone and iPad, to give you an idea of how
your site might look on these devices. This is for development purposes only,
as the feature does not work well outside of RapidWeaver. The views are only
approximations and should not be taken as fully accurate.
In the Style settings, you can choose which device is shown be default while
working on your layout. Each time RapidWeaver loads the preview, this will be
the device that is shown first. However, after the preview has loaded you can
use the drop menu on the page to switch to other views faster.
•
•
•
•
•
•
2.2.2
Off - [Default]
iPhone 5
iPhone 4
Android
iPad
Kindle
Maximum Width
Sets the maximum width that your layout will scale to when the viewport
(window) size increases. Since the theme is fully responsive, this only limits its
maximum width, not its minimum width.
•
•
•
•
•
768px
960px
1024px - [Default]
1280px
Full Width - Scales according to the viewport size and always occupies the
full width.
5
2.2.3
Top Options
A collection of color and background tile options that pertain to the top area
that lies behind the Site Title.
•
•
•
•
•
•
•
•
•
•
•
•
•
•
•
•
•
•
•
2.2.4
Background - [Color]
Site Title - [Color]
Site Slogan - [Color]
Social Links - [Color]
None - [Background] [Default]
Blueprint tile - [Tile]
Diagonal tile - [Tile]
Dotted tile - [Tile]
Horizontal tile - [Tile]
Linen tile - [Tile]
Metal grid tile - [Tile]
Noise tile - [Tile]
Square tile - [Tile]
Vertical tile - [Tile]
Vista 1 - [Background]
Vista 2 - [Background]
Vista 3 - [Background]
Vista 4 - [Background]
Vista 5 - [Background]
Top Effect
A collection of transparent overlay effects that give a filtered effect to the top
area of your site. The effect can be layered.
•
•
•
•
•
•
•
•
•
•
•
•
Spotlight Quarter [1] - [Transparent Filter]
Spotlight Half [1] - [Transparent Filter]
Spotlight Full [1] - [Transparent Filter]
Halftone Dark [2] - [Transparent Filter]
Halftone Light [2] - [Transparent Filter]
Mask Dark [3] - [Transparent Filter]
Mask Mid [3] - [Transparent Filter]
Mask Light [3] - [Transparent Filter]
Bottom Fade Dark [4] - [Transparent Filter]
Bottom Fade Mid [4] - [Transparent Filter]
Bottom Fade Light [4] - [Transparent Filter]
Bottom Grad Dark [4] - [Transparent Filter]
6
• Bottom Grad Mid [4] - [Transparent Filter]
• Bottom Grad Light [4] - [Transparent Filter]
2.2.5
Title Shadow
Options to control the text shadow effect of the title and slogan.
• Off - [Default]
• Embed
• Emboss
2.2.6
Top Menu Text Shadow
Option to control the text shadow effect of the top menu.
• Off - [Default]
• Embed
• Emboss
2.2.7
Logo Options
Option to turn the Site Logo on or off.
• Off - [Default]
• On
2.2.8
Navigation Options
A collection of colors and type options that pertain to each of the three navigation
areas of the theme. With regard to navigation types, you can choose a system that
is broken up into as many as three hierarchical parts for maximum architectural
control.
•
•
•
•
•
•
•
•
Hover Background (Top Menu) - [Color]
Text (Top Menu) - [Color]
Hover Text (Top Menu) - [Color]
Current Text (Top Menu) - [Color]
Border (Top Drop Menu) - [Color]
Text (Top Drop Menu) - [Color]
Bar Background (Sub Menu) - [Color]
Hover Background (Sub Menu) - [Color]
7
•
•
•
•
•
•
•
•
•
•
•
•
•
Text (Sub Menu) - [Color]
Hover Text (Sub Menu) - [Color]
Current Text (Sub Menu) - [Color]
Border (Sub Drop Menu) - [Color]
Text (Sub Drop Menu) - [Color]
Background (Vertical/Responsive) - [Color]
Border (Vertical/Responsive) - [Color]
Text (Vertical/Responsive) - [Color]
3 tier - [Type] [Default]
2 tier (a) - [Type]
2 tier (b) - [Type]
Vertical - [Type]
Hide - [Type]
2.2.9
Main Content Options
A collection of colors pertaining to the main content area.
• Background - [Color]
• Text - [Color]
• Link - [Color]
2.2.10
Sidebar Options
A collection of color, width and position options pertaining to the sidebar area.
•
•
•
•
•
•
•
•
•
•
•
•
•
Background - [Color]
Text - [Color]
Link - [Color]
Social Links - [Color]
Narrow (right) - [Width/Position]
Narrow (left) - [Width/Position]
Normal (right) - [Width/Position] [Default]
Normal (left) - [Width/Position]
Medium (right) - [Width/Position]
Medium (left) - [Width/Position]
Wide (right) - [Width/Position]
Wide (left) - [Width/Position]
Hide - [Width/Position]
8
2.2.11
ExtraContent 1 Options
A collection of color and background image options as they pertain to the header
or ExtraContent1 area.
•
•
•
•
•
•
•
•
•
•
•
•
•
•
•
•
•
•
•
•
•
•
•
•
•
Banner - [Color]
Header - [Color]
Border - [Color]
Text - [Color]
Link - [Color]
Slide navigation - [Color]
Image 3 - [Background]
Image 4 - [Background]
Image 5 - [Background]
Image 6 - [Background]
Image 7 - [Background]
Image 8 - [Background]
Image 9 - [Background]
Image 10 - [Background]
Image 11 - [Background]
Image 12 - [Background]
Image 13 - [Background]
Image 14 - [Background]
Image 15 - [Background]
Image 16 - [Background]
Image 17 - [Background]
Image 18 - [Background]
Image 19 - [Background]
Image 20 - [Background]
Blank - [Background] [Default]
2.2.12
ExtraContent 1 Height
Sets the height of the header. The header is located within the top portion of
the site, under the title and slogan. Since there is padding and the possibility of
content overrun, these heights are only an approximation.
•
•
•
•
•
Hidden - [Default]
120px
240px
360px
Variable
9
2.2.13
ExtraContent 2 Options
A collection of color settings for the ExtraContent 2 area.
• Background - [Color]
• Text - [Color]
• Link - [Color]
2.2.14
ExtraContent 3 Options
A collection of color settings for the ExtraContent 2 area.
• Background - [Color]
• Text - [Color]
• Link - [Color]
2.2.15
ExtraContent 4 Options
A collection of color settings for the ExtraContent 4 area.
• Background - [Color]
• Text - [Color]
• Link - [Color]
2.2.16
ExtraContent 5 Options
A collection of color settings for the ExtraContent 5 area.
• Background - [Color]
• Text - [Color]
• Link - [Color]
2.2.17
Slideshow Type
The slide show type allows you to choose from Off, Content or a selection of
preset internal sequences.
• Off / Manual (snippet) - [Default] turns off the slide show unless the
SlideNum or SlideWH snippets are detected.
• Content (SlideBox stack/snippet) - enables the use of content slides created
either with the SlideBox snippet or SlideBox stack.
10
•
•
•
•
•
•
•
Slides
Slides
Slides
Slides
Slides
Slides
Slides
2.2.18
1 to 5 - enables the internal slide sequence using slides X to Y.
6 to 10
11 to 15
16 to 20
1 to 10
11 to 20
1 to 20
Slideshow Timeout
Slide show timeout allows you to select the duration that any given slide in the
sequence will be shown for, from a minimum of 4 seconds to a maximum to 20
seconds.
•
•
•
•
•
•
4 seconds - [Default]
6 seconds
8 seconds
12 seconds
16 seconds
20 seconds
2.2.19
Slideshow Effect
Slide show effect allows you to choose from an assortment of transition animations
that determine the how one slide will switch to the next.
•
•
•
•
•
•
•
•
•
•
•
•
Blind X
Blind Y
Fade - [Default]
Grow X
Grow Y
Scroll down
Scroll left
Scroll right
Scroll up
Shuffle
Toss
Random
2.2.20
Slideshow Speed
Slide show speed controls the amount of time a transition takes. The shorter
the time, the faster the animation is that switches one slide to the next.
11
•
•
•
•
•
•
•
1/4 second
1/2 second
3/4 second
1 second - [Default]
1 1/2 second
2 seconds
2 1/2 seconds
2.2.21
Slideshow Settings
Slide show settings are a collection of additional features that you can enable
individually or en masse.
• Auto stop - automatically stops the slide show once the last slide has been
reached.
• Navigation - displays left and right navigation arrows at either side of each
slide.
• Pager - displays pager buttons at the bottom of each slide.
• Pause on hover - causes the slide show to pause the slide show when hovered
over.
• Random order - displays the slides in random order.
2.2.22
Font Family
Sets the default font family for the whole theme.
•
•
•
•
•
•
•
•
•
•
•
•
•
•
•
•
Cookie (cursive)
Lobster (cursive)
Andale Mono (monospace)
Courier New (monospace)
Monaco (monospace)
Arial (sans-serif)
Cabin (sans-serif)
Geneva (sans-serif)
Helvetica (sans-serif) - [Default]
Lucida Grande (sans-serif)
Montserrat (sans-serif)
Trebuchet MS (sans-serif)
Ubuntu (sans-serif)
Verdana (sans-serif)
Bree (serif)
Droid (serif)
12
•
•
•
•
•
Georgia (serif)
Lora (serif)
Playfair Display (serif)
Times (serif)
Vollkorn (serif)
2.2.23
Font Size
Sets the relative font size for the whole theme
•
•
•
•
•
Extra small
Small
Medium - [Default]
Large
Extra large
2.2.24
Font Family (Title)
Sets the font family for the site title only.
•
•
•
•
•
•
•
•
•
•
•
•
•
•
•
•
•
•
•
•
•
•
Theme Default (Title) - [Default]
Cookie (cursive)
Lobster (cursive)
Andale Mono (monospace)
Courier New (monospace)
Monaco (monospace)
Arial (sans-serif)
Cabin (sans-serif)
Geneva (sans-serif)
Helvetica (sans-serif)
Lucida Grande (sans-serif)
Montserrat (sans-serif)
Trebuchet MS (sans-serif)
Ubuntu (sans-serif)
Verdana (sans-serif)
Bree (serif)
Droid (serif)
Georgia (serif)
Lora (serif)
Playfair Display (serif)
Times (serif)
Vollkorn (serif)
13
2.2.25
•
•
•
•
•
Font Size (Title)
Theme Default (Title) - [Default]
Extra small
Small
Large
Extra large
2.2.26
Font Family (Slogan)
Sets the font family for the site slogan only.
•
•
•
•
•
•
•
•
•
•
•
•
•
•
•
•
•
•
•
•
•
•
Theme Default (Title) - [Default]
Cookie (cursive)
Lobster (cursive)
Andale Mono (monospace)
Courier New (monospace)
Monaco (monospace)
Arial (sans-serif)
Cabin (sans-serif)
Geneva (sans-serif)
Helvetica (sans-serif)
Lucida Grande (sans-serif)
Montserrat (sans-serif)
Trebuchet MS (sans-serif)
Ubuntu (sans-serif)
Verdana (sans-serif)
Bree (serif)
Droid (serif)
Georgia (serif)
Lora (serif)
Playfair Display (serif)
Times (serif)
Vollkorn (serif)
2.2.27
•
•
•
•
•
Font Size (Slogan)
Theme Default (Slogan) - [Default]
Extra small
Small
Large
Extra large
14
2.2.28
Font Family (Navigation)
Sets the font family for the navigation only.
•
•
•
•
•
•
•
•
•
•
•
•
•
•
•
•
•
•
•
•
•
•
Theme Default (Title) - [Default]
Cookie (cursive)
Lobster (cursive)
Andale Mono (monospace)
Courier New (monospace)
Monaco (monospace)
Arial (sans-serif)
Cabin (sans-serif)
Geneva (sans-serif)
Helvetica (sans-serif)
Lucida Grande (sans-serif)
Montserrat (sans-serif)
Trebuchet MS (sans-serif)
Ubuntu (sans-serif)
Verdana (sans-serif)
Bree (serif)
Droid (serif)
Georgia (serif)
Lora (serif)
Playfair Display (serif)
Times (serif)
Vollkorn (serif)
2.2.29
Font Family (Headings)
Sets the font family for the headings only.
•
•
•
•
•
•
•
•
•
•
•
Theme Default (Title) - [Default]
Cookie (cursive)
Lobster (cursive)
Andale Mono (monospace)
Courier New (monospace)
Monaco (monospace)
Arial (sans-serif)
Cabin (sans-serif)
Geneva (sans-serif)
Helvetica (sans-serif)
Lucida Grande (sans-serif)
15
•
•
•
•
•
•
•
•
•
•
•
Montserrat (sans-serif)
Trebuchet MS (sans-serif)
Ubuntu (sans-serif)
Verdana (sans-serif)
Bree (serif)
Droid (serif)
Georgia (serif)
Lora (serif)
Playfair Display (serif)
Times (serif)
Vollkorn (serif)
2.2.30
Line Height
Sets the overall line height.
• Small
• Medium - [Default]
• Large
2.2.31
Responsive Behavior
Turns the built-in responsive features either on or off. Normal would represent
normal desktop web development while responsive would apply to sites that you
want to render effectively across all screens, from desktop to smart phone.
• Normal - [Default]
• Responsive
2.3
2.3.1
Theme Styles
Using Theme Styles
Theme Styles are ways of grouping selected Theme Variations. Themes can ship
with Theme Styles built in, they can be made available separately as “.rwstyle”
files, and the user can create their own within RapidWeaver. If you’ve never
used Theme Styles before they might be a little tough to find at first.
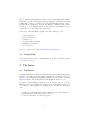
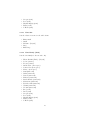
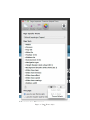
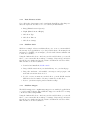
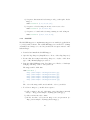
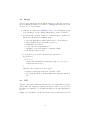
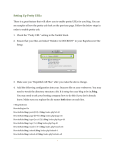
1. Open the Page Inspector (View > Show Page Inspector),
2. Click the “Styles” tab,
3. Click the folder icon found at the bottom of the panel,
16
Figure 1: Using Theme Styles
17
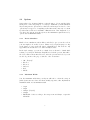
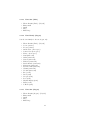
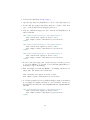
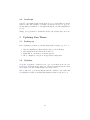
Figure 2: Saving Theme Styles
18
4. Select the theme style you like.
See Figure 1.
2.3.2
Making Your Own Theme Styles
Making your own theme styles is a great way to apply a group of your favorite
theme variations and colors to other pages on your site.
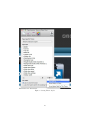
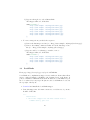
1.
2.
3.
4.
5.
6.
Open the Page Inspector (View > Show Page Inspector),
Click the “Styles” tab,
Set all the variations and colors to your liking,
Click the cog icon found at the bottom of the panel,
Select “Save Style As. . . ”,
Enter an appropriate name.
See Figure 2.
2.3.3
Installing Theme Styles
Theme Styles might also come independent of the theme itself, downloaded
from another source. RapidWeaver Theme styles are identified by their “.rwstyle” extension. To install these Theme Styles simply double-click them and
RapidWeaver will install them for you automatically.
3
Advanced Features
3.1
ExtraContent
Home page: http://foss.seydoggy.com/?p=ExtraContent
ExtraContent is a nearly ubiquitous technology found in most modern RapidWeaver themes today. Since it was first introduced in 2008, ExtraContent has
been one of the most sought after, most requested features of all time. ExtraContent allows users to take their RapidWever site beyond the usual sidebar/content
layout and add content in places otherwise out of reach for RapidWever.
In Sytten 2, the 7 ExtraContent areas are located from top to bottom as follows:
• ExtraContent1 and ExtraContent2 are located in the top area (header) of
the layout, just under the title and slogan.
19
• ExtraContent3 is located between the top section and main area (content
and sidebar) of the layout.
• ExtraContent4 and ExtraContent5 are attached to the top and bottom of
the main area (content and sidebar).
• ExtraContent6 is located under the main area of the layout.
• ExtraContent7 is located between the main area of the layout and the
footer.
3.1.1
ExtraContent 1 — The Place for Headers, Banners and Sliders, Oh My!
A fairly standard feature on any site is the top space, above the fold if you will,
where the biggest imagery, the most important ideas or most recent news goes.
This is called the site header and can be filled with all kinds of content.
In Sytten 2, adding your own simple header image is easy (see ‘Customize Your
Theme > Images’ in this manual), but what if you want your header to say more
then that? We use ExtraContent 1 or SS3 for that.
Let’s look at the theme options aimed specifically at the site header and ExtraContent 1:
• ExtraContent 1 Options: you can choose a header image as your site
header or use a color, as a backdrop to your content.
• ExtraContent 1 Height: You can specify a height if need be or use the
variable height setting to allow the header height adjust to your content.
We know that you don’t want to be locked into just one way of doing things,
that’s why the header is so flexible and responsive to your input. By using
ExtraContent in your site header, you are free to craft any type of content that
you feel fits the area. If you are using Stacks, then nearly anything is possible.
Maybe an left-floated image with right-floated text, or a slider like the built-in
SS3, Bootstrap Carousel or Super Flex from Nick Cates Design.
Or if you prefer a more manual approach, remember that Twitter Bootstrap
is built-in to Sytten 2, meaning that you have access to all sorts of advanced
content features like grids, thumbnails and sliders, just to name a few.
3.1.2
ExtraContent Stack
(Requires Stacks)
1. Download and install the ExtraContent add-ons.
2. Open the Stack element panel.
20
3. Search for “ExtraContent” in the panel’s search field.
4. Drag the ExtraContent stack on your page.
5. Change the ExtraContent value in the settings.
6. Add more stacks inside the ExtraContent stack and preview.
7. Depending on your theme, your ExtraContent may now automatically
appear, or there might be an option to turn the ExtraContent on or off.
8. To add more content to more areas, simply repeat steps 1 through 6.
NOTE: Do not use Stacks Background, Border and Layout options on the
ExtraContent stack itself. These features are general stack settings that are
common to all stacks but do not apply in all cases. Only apply said options to
your content within the ExtraContent stack.
3.1.3
ExtraContent Snippet
1. Download and install the ExtraContent add-ons.
2. Open the RapidWeaver Snippet browser (“View > Show Snippets”).
3. Search for “ExtraContent” in the browser’s search field.
4. Drag an appropriate snippet somewhere on your page, either in the main
content or the sidebar.
5. Between the opening <div id="myExtraContent1"> and closing </div>,
replace everything with content of your own. For example:
<div id="myExtraContent1">Hello world!</div>
6. To change which area your content is displayed in, simple change the
number at the end of the id to one that corresponds with the desired area
in your theme. For example:
<div id="myExtraContent2">Hello world!</div>
7. Depending on your theme, your ExtraContent may now automatically
appear, or there might be an option to turn the ExtraContent on or off.
8. To add more content to more areas, simply repeat the process, using
numbers that correspond to those in your theme. For example:
21
<div id="myExtraContent1">Hello world!</div>
<div id="myExtraContent2">
Question: What did foo say when he walked
into a bar?
</div>
<div id="myExtraContent3">Answer: "Ouch!"</div>
9. You can add ExtraContent tags around just about anything. Say for
instance you wanted to embed a video above your main content with this
embed code:
<iframe
src="http://player.vimeo.com/video/46506843"
width="500" height="313" frameborder="0"
webkitAllowFullScreen mozallowfullscreen
allowFullScreen>
</iframe>
10. Then all you need to do is add <div id="myExtraContent1"> in front
and </div> at the end, like this:
<div id="myExtraContent2">
<iframe
src="http://player.vimeo.com/video/46506843"
width="500" height="313" frameborder="0"
webkitAllowFullScreen mozallowfullscreen
allowFullScreen>
</iframe>
</div>
11. If using ExtraContent with HTML code in a styled-text type area, be sure
to use the option Format > Ignore Formatting if your code breaks out
over several lines. Otherwise your formatting might have excessive spacing
or have awkward steps.
3.2
SS3
Home page: http://foss.seydoggy.com/?p=SS3
In 2011 we launched the third iteration of an integrated slide show that we’d
been putting in seyDesign RapidWeaver® themes since 2010. This third version,
dubbed SS3, was also the first time we’d opened up the source for all developers
to use in their own themes.
SS3 allows users to turn just about anything into a slide show. From built-in
images, remote images, content, stacks and more!
For full instructions and tutorial videos on how to use SS3, please visit http:
//foss.seydoggy.com/?p=SS3.
22
3.2.1
Basic Features of SS3
Note: All of these basic features can be found in the RapidWeaver Page Inspector
under the Styles tab and have been covered already in this manual.
1. Image (ExtraContent 1 Options)
2. Height (ExtraContent 1 Height)
3. Slide Show Type
4. Slide Show Timeout
5. Slide Show Settings
3.2.2
SlideBox Stack
SlideBox is a simple, effective stack that allows you to create a content-rich slide
show in any SeydoggySlideshow 3 (or SS3) enabled theme. From simple text
and images or anything you can imagine, your SS3 enabled theme will turn each
box into it’s own slide.
Using the built-in slide show controls in your SS3 enabled theme, you can add
flare to your content slide show with speed settings, delays and special effects.
Or take it a step further and use the advanced tricks in the SS3 User API to
link each slide to another destination.
1. Download and install the SlideBox stack.
2. Drag a SlideBox stack from your Stacks Library onto your Stacks page.
3. Drag other stacks into each available content space and propagate each
item with text and media as needed.
4. To add or remove items from your slide show, open the SlideBox stacks
HUD and select the number of items you want in your slide show.
5. Refer to your themes Styles panel for further settings.
3.2.3
SlideBox Snippet
The SlideBox snippet is a complimentary snippet for use with SeydoggySlideshow
3 (or SS3) enabled themes. The sdSlideBox snippet is a method for creating
content based slides using HTML.
Using the built-in slide show controls in your SS3 enabled theme, you can add
flare to your content slide show with speed settings, delays and special effects.
Or take it a step further and use the advanced tricks in the SS3 User API to
link each slide to another destination.
23
1. Download and install the SlideBox snippet.
2. Open the Page Inspector (RapidWeaver > View > Show Page Inspector).
3. Be sure that the setting found in Page Inspector > Styles > Slide show
type > Content (SlideBox stack/snippet) is selected.
4. Paste the sdSlideBox snippet into any content area in RapidWeaver. It
will look like this:
<div class="sdSlideBoxSnippet" id="mySdSlideBox1">
This content will appear as slide 1.<br/>
Some sample content. Add whatever you like here.
</div>
<div class="sdSlideBoxSnippet" id="mySdSlideBox2">
This content will appear as slide 2.<br/>
Some sample content. Add whatever you like here.
</div>
<div class="sdSlideBoxSnippet" id="mySdSlideBox3">
This content will appear as slide 3.<br/>
Some sample content. Add whatever you like here.
</div>
5. If you’ve pasted the snippet into a styled-text type area then you need
to select the HTML code and ignore the formatting (RapidWeaver >
Formatting > Ignore Formatting).
6. Edit each sample text with any HTML of your liking. Each area is a
unique slide. The sample text looks like this:
This codentent will appear as slide 1.<br/>
Some sample content. Add whatever you like here.
7. To add slides, simply add a new sdSlideBoxSnippet wrapper and number
it accordingly. For example, if I wanted to add a forth slide, I would copy
the third slide and change the id from mySdSlideBox3 to mySdSlideBox4.
Like this:
<div class="sdSlideBoxSnippet" id="mySdSlideBox4">
This content will appear as slide 4.<br/>
Some sample content. Add whatever you like here.
</div>
24
3.2.4
SlideLinks
The SlideLinks Snippet is a complimentary snippet for use with SeydoggySlideshow 3 (or SS3) enabled themes. The sdSlideLinks snippet is a method for
defining unique URL’s for each slide in an SS3 slide show, whether they are the
default internal image slides, externally hosted image slides or content based
SlideBox slides.
1. Download and install the SlideLinks snippet.
2. Open the Page Inspector (RapidWeaver > View > Show Page Inspector).
3. Once you’ve set up the slide show with the desired settings, paste this
snippet into Page Inspector > Header > JavaScript changing each URL to
suit your needs.
4. The snippet will look like this:
sdSS.slideLinks = [
"http://www.google.com",
"http://www.tumblr.com",
"http://www.twitter.com",
"http://www.flickr.com",
"http://www.facebook.com"
];
5. The order of the links will coincide with the order of your slides.
6. Be sure that the number of links used matches the number of slides in your
slide show. To add links to the end of your sequence:
a) Add a comma to the end of the URL line that is currently last (i.e.
“http://www.facebook.com”,).
b) Add a new line after the comma.
c) On the new line, add your new URL in quotations (i.e.
“http://seydesign.com”).
d) Repeat a through c for each additional link.
The snippet will now look like this:
sdSS.slideLinks = [
"http://www.google.com",
"http://www.tumblr.com",
"http://www.twitter.com",
"http://www.flickr.com",
"http://www.facebook.com",
"http://seydesign.com"
];
25
7. To remove links from the end of your sequence:
a) Remove the last URL line (i.e. “http://www.facebook.com”).
b) Remove the trailing comma from what is now the last URL line (i.e.
“http://www.flickr.com”)
c) Repeat a and b for each link you wish to remove.
The snippet will now look like this:
sdSS.slideLinks = [
"http://www.google.com",
"http://www.tumblr.com",
"http://www.twitter.com",
"http://www.flickr.com"
];
3.2.5
SlideNum
The SlideNum snippet is a complimentary snippet for use with SeydoggySlideshow
3 (or SS3) enabled themes. The sdSlideNum snippet is a method for defining
how many slides to show and in which order, should you find the built-in slide
sequences do not suit your needs.
1. Download and install the SlideNum snippet.
2. Open the Page Inspector (RapidWeaver > View > Show Page Inspector).
3. Be sure that the setting found in Page Inspector > Styles > Slide show
type > Off / Manual (snippet) is selected.
4. Paste this snippet into Page Inspector > Header > JavaScript changing
each number to suit your needs.
The snippet will look like this:
sdSS.slideNum = [3,5,1,9,15];
Each number corresponds to a header image (i.e. “3” is “Background
image 3” from the Page Inspector > Styles > Background (header/slide
show)[EC 1] menu). The order of the numbers will coincide with the order
of your slides.
5. sdSlideNum is actually a simple comma separated list. Adding or removing
slides in the sequence is just a matter of adding or removing numbers
from the list. Just make sure that each number is separated from the next
number by a comma, making sure that the last number in the list is NOT
followed by a comma.
Here are just a few examples:
26
a) A sequence that starts at header image 1 and goes through to header
image 8:
sdSS.slideNum = [1,2,3,4,5,6,7,8];
b) A sequence of header images from 20 to 16 in reverse order:
sdSS.slideNum = [20,19,18,17,16];
c) A sequence of 7 random header image starting at 9 and ending 10:
sdSS.slideNum = [9,6,11,2,20,17,10];
3.2.6
SlideWH
The SlideWH snippet is a complimentary snippet for use with SeydoggySlideshow
3 (or SS3) enabled themes. The sdSlideWH snippet is a method for defining
externally hosted images to be used in your slide show sequence instead of the
built-in images.
1. Download and install the SlideWH snippet.
2. Open the Page Inspector (RapidWeaver > View > Show Page Inspector).
3. Be sure that the setting found in Page Inspector > Styles > Slide show
type > Off / Manual (snippet) is selected.
4. Paste the sdSlideWH snippet into Page Inspector > Header > JavaScript
changing each image source to suit your needs.
The snippet will look like this:
sdSS.slideWH = [
"http://www.example.com/images/header3.jpg",
"http://www.example.com/images/header5.jpg",
"http://www.example.com/images/header1.jpg",
"http://www.example.com/images/header9.jpg",
"http://www.example.com/images/header15.jpg"
];
The order of the images will coincide with the order of your slides.
5. To add more images to your slide show sequence:
a) Add a comma to the end of the image source line that is currently
last (i.e. “http://www.example.com/images/header15.jpg”,).
b) Add a new line after the comma.
c) On the new line, add your new image source in quotations (i.e.
“http://www.example.com/images/header20.jpg”).
27
d) Repeat a through c for each additional link.
The snippet will now look like this:
sdSS.slideWH = [
"http://www.example.com/images/header3.jpg",
"http://www.example.com/images/header5.jpg",
"http://www.example.com/images/header1.jpg",
"http://www.example.com/images/header9.jpg",
"http://www.example.com/images/header15.jpg",
"http://www.example.com/images/header20.jpg"
];
6. To remove images from your slide show sequence:
a) Remove the last image source line (i.e. “http://www.example.com/images/header15.jpg”).
b) Remove the trailing comma from what is now the last image source
line (i.e. “http://www.example.com/images/header9.jpg”)
c) Repeat a and b for each image you wish to remove.
The snippet will now look like this:
sdSS.slideWH = [
"http://www.example.com/images/header3.jpg",
"http://www.example.com/images/header5.jpg",
"http://www.example.com/images/header1.jpg",
"http://www.example.com/images/header9.jpg"
];
3.3
SocialLinks
Home page: http://foss.seydoggy.com/?p=Social%20Links
Social Links is a complimentary snippet for use with some themes that allows
users to easily add simple social links to the designated area of the theme. A
perfect combination of ExtraContent and Font Awesome, Social Links lets your
site be social in a few easy steps. In Sytten 2, the Social Links are located at
the top right of the layout.
1. Download and install the Social Links snippet.
2. Paste this snippet into the main content area or sidebar area of your site.
It will look like this
<!-Instructions:
1. Paste this snippet into the main content area or
sidebar area of your site.
28
2. If pasted into a styled text area, be sure to
select the snippet then use Format > Ignore
Formatting.
3. Replace # with the full URI you wish to link to.
4. Add or remove lines as needed.
5. For a list of other supported icons, visit:
http://fortawesome.github.com/Font-Awesome/
-->
<div id="myExtraContent12">
<ul class="social_links">
<li><a href="#" class="icon-home"></a></li>
<li><a href="#" class="icon-twitter-sign"></a></li>
<li><a href="#" class="icon-facebook-sign"></a></li>
<li><a href="#" class="icon-github-sign"></a></li>
<li><a href="#" class="icon-plus-sign"></a></li>
<li><a href="#" class="icon-camera"></a></li>
<li><a href="#" class="icon-shopping-cart"></a></li>
</ul>
</div>
3. If pasted into a styled text area, be sure to select the snippet then use
Format > Ignore Formatting.
4. Replace # with the full URI you wish to link to.
5. Add or remove lines as needed.
6. For a list of other supported icons, visit Font Awesome.
3.4
FontAwesome
Since Sytten 2 use FontAwesome for Social Links, it’s also available theme-wide
for anything else you might need nifty little icons for. Learn more about Font
Awesome.
3.5
jQuery
Sytten 2 comes with the same version of jQuery that is used in the Stacks
RapidWeaver plugin. In fact, if the Stacks version is detected then Sytten 2’s
version is ignored. jQuery is a multi-browser JavaScript library designed to
simplify the client-side scripting of HTML. Used by over 65% of the 10,000 most
visited websites, jQuery is the most popular JavaScript library in use today.
29
jQuery’s syntax is designed to make it easier to navigate a document, select
DOM elements, create animations, handle events, and develop Ajax applications.
jQuery also provides capabilities for developers to create plug-ins on top of the
JavaScript library. This enables developers to create abstractions for low-level
interaction and animation, advanced effects and high-level, theme-able widgets.
The modular approach to the jQuery library allows the creation of powerful
dynamic web pages and web applications.
Learn more about jQuery.
3.6
Bootstrap
“Sleek, intuitive, and powerful front-end framework for
faster and easier web development.” – http://twitter.github.
io/bootstrap
Twitter Bootstrap is baked right into Sytten 2. A free collection of tools for
creating websites and web applications, Twitter Bootstrap contains HTML and
CSS-based interface components and JavaScript extensions. It is an incredibly
powerful and tool to add some extra flare to your RapidWeaver projects. If
you’re not afraid of a little HTML, CSS and maybe a little JavaScript, then
you’ll have a great time with Bootstrap. Learn more about Twitter Bootstrap.
4
Customize Your Theme
4.1
General
There are two main ways to modify a themes behavior beyond the options
available in the styles panel:
1. Use the Header, CSS, JavaScript and Prefix fields found in View > Show
Page Inspector > Header.
2. Modify the themes contents by opening the theme contents in RapidWeaver:
1. From the RapidWeaver menu, select View > Show Themes.
2. Use the search field to find your theme.
3. Right-click (ˆ+click, control + click) on your theme and select “Reveal
Contents in Finder. . . ”
30
4.2
Images
Sytten 2 comes with header images built-in, but these are just place holders for
the wonderful imagery that you’re capable of. Changing these images is as easy
as can be in one of several ways.
1. Using the free application, RWmultitool Lite, you can simply drag and
drop new images onto the existing built-in images. Visit to learn more.
2. You can modify your theme’s images by opening the theme contents in the
Finder and edit them from within the theme.
1.
2.
3.
4.
5.
6.
Open the RapidWeaver Theme Drawer (View > Show Themes),
Start typing the theme name in the search box,
Right-click on your theme,
Select, “Reveal Contents in Finder. . . ”,
Navigation to the folder images > editable_images,
Modify those images to suit.
3. You can also keep your theme intact and use custom CSS.
For the header:
.pageHeader{
background:url(link/to/your/header.jpg) 50% 50% repeat;
background-size:cover;
}
This CSS can be applied in one of two places:
1. In View > Show Page Inspector > Header > CSS
2. By opening the theme’s contents in Finder and editing the custom.css
file.
4.3
CSS
Sytten 2 comes with a blank custom.css file for you to apply whatever custom
styles you like. The advantage to placing your custom code here as opposed to the
Page Inspector is that the code is applied throughout your entire RapidWeaver
project.
Simply open your theme’s contents and edit the custom.css file suit your needs.
31
4.4
JavaScript
Sytten 2 comes with a blank custom.js file for you to apply whatever custom
scripts you like. The advantage to placing your custom code here as opposed to
the Page Inspector is that the code is applied throughout your entire RapidWeaver
project.
Simply open your theme’s contents and edit the custom.js file suit your needs.
5
Updating Your Theme
5.1
Backing up
Before updating your theme you should always make a backup copy. To do so:
1.
2.
3.
4.
5.2
Open the RapidWeaver Theme Drawer (View > Show Themes),
Start typing the theme name in the search box,
Right-click on your theme icon when it appears,
Choose “Duplicate” and give it an appropriate backup name.
Updating
To update your theme, download a new copy of your theme from our order
lookup page. Follow the steps to find your order and download the latest version.
The version you download will always be the latest version.
Once downloaded, open the zip/dmg file, find the “.rwtheme” and double-click
it. RapidWeaver will now automatically install the updated version for you.
32