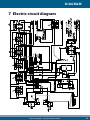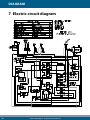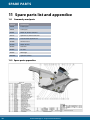
1
USER MANUAL
HG FEEDER 65 M
Hedensted Gruppen – for professional fur farmers
CONTENTS
HG FEEDER 65 M
2
Subject
1
Safety regulations .. . . . . . . . . . . . . . . . . . . . . . . . . . . . . . . . . . . . . . . . . . . . . . . . . 3
2
Description of function .. . . . . . . . . . . . . . . . . . . . . . . . . . . . . . . . . . . . . . . . . 6
3
4
Precautions before starting .. . . . . . . . . . . . . . . . . . . . . . . . . . . . . . . . . . . 14
Driving / feeding .. . . . . . . . . . . . . . . . . . . . . . . . . . . . . . . . . . . . . . . . . . . . . . . . 16
5
Maintenance . . . . . . . . . . . . . . . . . . . . . . . . . . . . . . . . . . . . . . . . . . . . . . . . . . . . . . 17
6
Troubleshooting . . . . . . . . . . . . . . . . . . . . . . . . . . . . . . . . . . . . . . . . . . . . . . . . . . 21
7
8
Hydraulic and electrical diagrams .. . . . . . . . . . . . . . . . . . . . . . . . . . . 22
Technical data . . . . . . . . . . . . . . . . . . . . . . . . . . . . . . . . . . . . . . . . . . . . . . . . . . . . . 25
9
Warranty terms and certificate .. . . . . . . . . . . . . . . . . . . . . . . . . . . . . . . . 26
10
Service documentation . . . . . . . . . . . . . . . . . . . . . . . . . . . . . . . . . . . . . . . . 28
11
Parts lists and appendices .. . . . . . . . . . . . . . . . . . . . . . . . . . . . . . . . . . . . . 30
12
Declaration of conformity . . . . . . . . . . . . . . . . . . . . . . . . . . . . . . . . . . . . . 47
Hedensted Gruppen – for professional fur farmers
Page
safety
1 Safety regulations
Read the manual
Read the instruction manual carefully, and make sure that anyone else who may be required to operate the machine reads it
as well. Dangerous situations may arise if an operator is unfamiliar with certain aspects of the machine and its use.
WARNING! Hot parts
WARNING! Noise
Never touch the engine or the exhaust
pipe while the machine is running, or when
We recommend the use of ear
the engine has just been switched off.
protectors. Long-term exposure to
noise will damage your hearing.
Hot parts can cause severe burns.
WARNING! Moving parts
WARNING! Danger
Make sure to keep your hands, feet, hair
When parking and performing service on the machine,
and clothes away from all moving parts.
make sure to switch off the engine, remove the ignition
Never use the machine without the
key and apply the handbrake.
protective screens, etc. supplied.
Moving parts can cause serious injuries.
The word WARNING! next to a text in the
manual indicates that failure to follow the instructions
may result in personal injury.
Hedensted Gruppen – for professional fur farmers
3
safety
1.1 Training
u If you spill fuel, do not attempt to start the engine. Move the machine away from the place where you spilled the u Read these instructions carefully. You need to familiarise fuel so as to avoid igniting the spillage. If you spill fuel on yourself with all operation levers, switches, etc. and with the exhaust pipe or over the engine, wait until it has how to use the equipment correctly.
evaporated before starting the engine; otherwise there is a major risk of fire.
u Do not allow children or anyone who has not studied the instructions to use the feeder. National legislation may lay
u If you spill diesel or motor oil on your skin, wash the area down a minimum age for persons permitted to use the feeder.
u Remember that the operator is responsible for any and all accidents or potentially dangerous situations that may arise involving other people and/or their property.
u Operators must be instructed thoroughly in the use of the thoroughly with soap and water.
u It is hazardous to breathe in fuel or oil fumes.
u It is potentially fatal to ingest fuel or oil.
1.3 Noise and vibration levels
feeder. The instructions should emphasise:
According to test report DANAK 100/1721 of
1) The need to be careful, thorough and focused when 26 July 2013, the machine’s noise level is 85
dB(A). Even though this is below the legally
working with automotive machines.
2) That the operator must maintain a good overview of what stipulated level, HG still recommends the use
is happening in front of and behind the vehicle – particu-
of ear protectors.
larly during feeding, when there may be other people in the immediate area.
The most common causes of accidents are:
1) Driving too fast, particularly with a full feed container
Hand/arm vibration level:
1.67 m/s2
Body vibration level:
0.34 m/s2
1.4 Operation
2) Taking turns too quickly, particularly when there is feed in u The operator must wear a seatbelt while driving.
the container
3) Lack of overview
4) The operator lacking sufficient familiarity with the vehicle
u If you use the machine indoors, you must make sure that 5) Excessive incline of the terrain
the ventilation system is sufficient according to the regula-
tions and recommendations that apply to the location.
1.2 Preparation
u Do not let the engine run in small, enclosed rooms where u When operating the machine, make sure not to wear loose-
4
there is a risk of hazardous carbon monoxide building up.
fitting clothing that could become caught on nesting boxes, doorways, etc. In addition, make sure to wear non-slip foot
u WARNING: Breathing in carbon monoxide can cause wear so that you can operate the pedals safely.
poisoning and death.
u Store fuel in containers approved for the purpose. Make u Never use the machine in locations where there is com-
sure to keep the containers out of the reach of children bustible dust or explosive gases, or where the exhaust and unauthorised persons.
pipe may come into contact with flammable material.
u Always refuel the machine outdoors. It is forbidden to u Never place or store fuel or other flammable liquids close smoke while refuelling.
to the engine.
u Always refuel before starting the engine. Never remove u As far as possible, only operate the feeder in daylight hours the cap from the fuel tank or attempt to refuel while the engine is hot or running.
or use good artificial lighting.
Hedensted Gruppen – for professional fur farmers
SafETy
u Do not rest your feet on the pedals when starting the
engine is running.
engine – place them on the running board instead.
u The machine is intended exclusively for feeding mink.
u Do not drive longitudinally along slopes, and never drive
1.5 Maintenance
on slopes that exceed 15 degrees.
Machine incline: Max. 15˚
Wash the machine once a week. Make sure not to spray water
directly onto electrical components or into the engine compartment.
Every time you refuel the machine, perform a visual check to
ensure:
u That there are no leaks in the hydraulic system (hoses,
tank, etc.).
u That there are no leaks in the fuel system (hoses, filters,
tank, etc.).
u That all bolts, nuts, etc. are securely tightened.
u If the machine should tip over, hold on tightly to the steer-
u That the silencer is tight.
ing wheel with both hands.
u That the radiator grille at the back and by the rotating
u Remember that the driving properties of the machine are
flywheel is free from wool, etc.
very different with an empty and a full feed container. This
is because the centre of gravity of the machine is much
u That no motor oil has been spilled around the motor oil
filling aperture.
higher when the container is full.
u Never attempt to take sharp turns at high speed when
u That the accelerator pedal is not activated, and that the
machine remains completely still when the pedal is
there is feed in the container.
released.
u For the best driving experience, operate the accelerator
pedal with smooth movements of the foot. Remember that
Check the air pressure in the tyres once a week and check the
the speed of the machine increases proportionally with
motor oil once a day.
the movement of the accelerator pedal. This applies both
when driving forwards and when reversing.
1.6 Dismantling / Disposal
u When leaving the machine unattended, remember to
When, many years from now, the machine is worn out and has
apply the handbrake and remove the ignition key.
to be disposed of, HG will carry out the dismantling work by
arrangement, as this work must be done in an environmentally
u Always stop the engine before carrying out any kind of
friendly manner. During the dismantling process, the parts are
sorted according to type of material. This means that steel parts
service or repair work.
are classed as steel, rubber seals as rubber, and so on. The variu Stop the engine and allow it to cool down before refuelling.
ous materials are then disposed of according to the regulations
in effect at that time.
u Never touch the engine or the exhaust pipe while the
Hedensted Gruppen – for professional fur farmers
5
function
2 Description of function
Operator’s panel
2
3
4
5
18
6
13
14
1
9
7
8
15
12
16
11
17
10
1
2
3
4
5
6
7
8
9
6
Hand-held terminal for individual feeding
(optional extra)
Work light
Mixer speed
Mixer rotation (forward / reverse)
Water dosage
Feed pump control (manual / automatic)
Feed pump rotation (forward / reverse)
Light switch
Feed computer (optional extra)
10
11
12
13
14
15
16
17
18
Ignition switch
Throttle lever
Hour counter
Indicator light – preheater
Indicator light – oil pressure
Indicator light – water temperature
Indicator light – battery charging
Hand brake
Adjustment of water dosage
Hedensted Gruppen – for professional fur farmers
function
The machine’s functional units
28
29
26
27
19
21
22
23
20
25
31
36
24
32
33
35
30
34
19
20
21
22
23
24
25
26
27
Feed pedal
Operating pedal
Setting the operator’s seat
Filling – diesel
Filling – hydraulic oil
Filling – water
Draining – water
Adjustment of feed pump speed
Main switch
28
29
30
31
32
33
34
35
36
Seat belt
Emergency stop
Battery
Fuse box
Filling – cooling water
Filling – motor oil
Oil filter
Air filter
Combi-cooler filter
Hedensted Gruppen – for professional fur farmers
7
function
2.1 Hand-held terminal for individual
feeding (optional extra)
2.5 Water dosage
See the section about extra equipment on page 16.
Use this switch to turn the water dosage on or off.
2.2 Work light
2.6 – 2.7 Feed pump control
Make sure that you always have plenty of light to work by.
Use the upper switch on the right to set feed pump control to
manual (MAN) or automatic (AUTO). Use the lower switch on the
left to choose whether the feed pump is to run forward (FWD)
2.3 – 2.4 Mixer control
or reverse (REV).
2.8 Light switch
Use the switch on the left to select the rotation speed (high
or low) for the mixer. Use the switch on the right to choose
whether the mixer direction is to be forward (FWD) or reverse
(REV). Turn the switches to their centre position to deactivate
The light switch is positioned to the left of the hour counter.
the mixer.
8
Hedensted Gruppen – for professional fur farmers
function
2.9 Feed computer (optional extra)
2.12 Hour counter
You can use a feed computer to ensure a uniform volume of feed.
The hour counter indicates how many hours the machine has
See the section about extra equipment on page 16.
run. Please note that it will continue to count as long as the
machine is switched on. Therefore, remember to switch off the
ignition and remove the key when you leave the machine.
2.10 Ignition switch
If the hour counter breaks, make sure to have it repaired immediately. Otherwise, it will be impossible to keep track of when to
change the oil, etc.
2.13 - 2.16 Indicator lights
The ignition switch features four positions:
0. Stop
1. Ignition
2. Preheat
3. Start
To the far right on the operator’s panel, there are four indicator
2.11 Throttle level
lights with the following functions:
1) Preheater light – must switch off before you start the engine.
2) Oil indicator light – must switch off approx. 2 seconds
after you start the engine. If it does not, turn the engine
off immediately.
3) Temperature warning light – lights up if the engine over
heats. If this indicator light illuminates, turn the engine off immediately.
The throttle lever is positioned on the left-hand side of the op-
4) Charging indicator – lights up during operation if the
erator’s panel.
battery is not charging.
Hedensted Gruppen – for professional fur farmers
9
function
2.17 Hand brake
2.20 Operating pedal
Always apply the handbrake before leaving the machine.
The operating pedal is located on the left-hand side of the
machine. NB Activate this pedal carefully, as the speed of the
2.18 Adjustment of water dosage
machine increases proportionally to the degree the pedal is depressed. This means that the further you press the pedal down,
the faster the machine will move. For the best driving experience, operate the pedal with smooth movements.
2.21 Setting the operator’s seat
3
4
You can adjust the volume of water that is mixed with the feed
when the feed pump is activated. Turn the tap to regulate the
water volume. Clockwise: less water; anti-clockwise: more wa-
1
ter.
2
1) Indication of correct setting
2.19 Feed pedal
When the yellow mark is in the green area, the seat has
been adjusted correctly in relation to the operator’s
weight.
2) Hardness setting
3) Seat cushion setting
4) Backrest setting
The feed pedal is located on the right-hand side of the machine.
Activate the pedal every time you want to pump feed out.
10
Hedensted Gruppen – for professional fur farmers
function
2.22 Filling – diesel
2.26 Adjustment of feed pump speed
The fuel cap is positioned to the left of the operating pedal. Al-
You can regulate the circulation speed of the feed pump so that
ways check the tank to make sure there is sufficient diesel in it.
more or less feed is supplied during a given period. The regulator is positioned in front of the hand brake.
2.23 Filling – hydraulic oil
2.27 Main switch
The hydraulic oil tank is positioned to the right of the feed pedal. Use the dipstick to check the oil level.
The main switch is located below the hand brake.
2.24–25
Filling / Draining water
2.29 Emergency stop
To fill water into the machine, pour it into the top of the water
An emergency stop button is fitted to the left-hand side of the
tank in front of the feed container. The drain valve is located in
operating panel. To reset the system, pull the red button out.
front of the front wheels. Please note that the container volume
Then check that the bottom indicator is green and that the top
indication is approximate.
line is between the arrows.
Hedensted Gruppen – for professional fur farmers
11
function
2.30 Battery
2.33 Filling – motor oil
The battery is located behind the footboard. Always keep the
Check the motor oil level daily. To do this, use the dipstick lo-
top of the battery clean, otherwise there is a risk that it will dis-
cated on the left side of the engine.
charge.
2.31 Fuse box
2.34 Air filter
The fuse box is located under the operating panel. Never use fuses
The air filter is located under the operator’s seat. To replace the
larger than those originally fitted in the machine. When replacing
filter, remove the end cap and pull the insert out.
fuses, see the electrical diagrams on pages 23–24.
2.32 Filling – cooling water
2.35 Combi-cooler filter
The radiator is located under the operator’s seat.
The particle filter for the combi-cooler is located on the back of
Please note that the engine must be cold before you remove
the machine. Tip the seat and remove the filter when it is time
the radiator cap to refill with coolant. If the engine is hot, there
to blow it clean.
is a risk of scalding.
12
Hedensted Gruppen – for professional fur farmers
Before starting
3 Precautions
3.1 Oil level, engine
3.3 Fuel, filling
Dipstick
Filling, diesel
Every time you use the machine, check the oil level in the en-
Use standard diesel oil for Feeder 65 M. Look in the tank to check
gine before starting it. Make sure the machine is standing on a
the volume of fuel it contains. Diesel oil is normally frost proof to
level surface when you check the oil level. Pull the dipstick out
temperatures as low as –21˚C. In sharp frosts, however, paraffin
and wipe it clean with a cloth. Replace it, remove it again and
may form in diesel oil. To prevent this happening, you can add
read the level. If the oil level is below or just over the minimum
petroleum according to the following table:
line, refill with oil up to the maximum line.
In temperatures below
3.2 Oil level, hydraulic
Add
÷10˚C
10% petroleum
÷20˚C
25% petroleum
÷30˚C
40% petroleum
÷40˚C
55% petroleum
!
To be absolutely sure of the antifreeze level, we recommend
that you ask your supplier for specifications for precisely the
type of diesel you use.
WARNING
Use the dipstick to check the level of hydraulic oil.
l Fuel is highly flammable.
Be very careful, and always refuel outdoors.
l Newer smoke while refuelling.
l Newer refuel a hot engine. Wait at least 10
minutes for the engine to cool down.
l Do not overfill the tank as fuel can expand and
spill over. Make sure that the cap is securely
tightened after refuelling.
l Store fuel in a cool place, using containers
designed for the purpose.
l Regularly check the fuel tank and hoses for
leaks.
Hedensted Gruppen – for professional fur farmers
13
Before starting
3.4 Air filter
3.6 Tyre pressure
Make sure to keep the air filter clean. A dirty or clogged air filter
Check that the tyre pressure is correct. Incorrect tyre pressure
will reduce the output of the engine, increase fuel consumption
can make the machine unstable and have an unpredictable ef-
and cause more wear and tear to the engine.
fect on its manoeuvrability.
3.5 Radiator grille/combi-cooler
Lawn tyres (standard) no. 474746
Max.
65 PSI
Pressure
4.48 bar
NB! You must keep the radiator clean because it functions as
the air intake for cooling the engine. A fully or partially clogged
grille will cause the engine temperature to rise, increasing the
risk of engine problems/breakdown.
Tractor tyres are available as an optional extra.
Tractor tyres no. 474760
Max.
67 PSI
Pressure
4.6 bar
You can remove the particle filter in the radiator grille. Tip the
operator’s seat and remove the filter when it is time to blow it
clean.
14
Hedensted Gruppen – for professional fur farmers
OPERATION
4 Driving/feeding
4.1 Starting
Make sure not to take corners quickly, especially with a full feed
container. If you do so, the machine can easily tip over as its centre of gravity is very high when the feed container is full.
We also recommend that you avoid driving the machine on terrain approaching an incline of 15˚. Here, too, the machine will
tip over very easily.
4.3 Feeding
Start by setting the feed pump speed and the water dosage
(see pages 10-11). You will normally only need to do this more
than once if the consistency/water content of the feed varies.
Press the feed pedal on the far right once for each portion of
Move the throttle lever to its top position. Turn the ignition key
feed you are to distribute.
until the control lights illuminate. Check that they all light up.
Now turn the key to the next position and hold it there until the
When distributing feed, make sure to concentrate on the task
preheater indicator light goes out. Then turn the key all the way
at hand and maintain a good overview. Take care not to come
to the final position and the engine will start.
too close to the fittings and furnishings. A lapse of concentra-
WARNING
!
tion can easily result in the machine damaging cages, nesting
boxes, etc.
l
The preheating should take no more than
10 seconds. If it takes longer than this, the
preheater and the adjoining components
may be damaged.
l Do not repeat preheating if the engine does
not start first time.
4.4 Stop
Throttle back to neutral and let the machine run for a few minutes to allow the engine temperature to fall to normal operating
temperature before you stop it. This will help extend the service
life of the engine.
4.5 Parking
4.2 Driving
Place both hands on the wheel and position your feet as far to the
sides as possible. Open the throttle until you reach the desired
number of revolutions. Then carefully press the accelerator pedal
on the far left. The smoother the movements of your foot, the
!
smoother the drive. We recommend that you do not drive the
machine on soft land or on terrain approaching an incline of 15˚.
WARNING
l
Make sure that your feet and legs do not stick out so far from the machine that you risk
bumping them against – or getting them
caught on – cages, doorways, etc.
l
You must only activate the pedals with your
feet when sitting in the operator’s seat – never activate them with your hands or while
standing up.
Always park on level ground and remember to activate the
handbrake and remove the ignition key.
Hedensted Gruppen – for professional fur farmers
15
OPERATION
4.6
Feed computer for individual feeding (optional extra)
If you fit a feed computer you can, for example, set the machine
to distribute 200 g of feed in each portion. The computer can do
much more besides.
For instance, it can take the strain off your ankle as you only need
to keep the feed pedal depressed rather than having to activate
it for each portion of feed.
If you have a hand-held terminal for individual feeding, you can
use it to read a barcode placed on each cage to define how
much feed each animal is to receive.
This helps ensure that the animals receive the maximum amount
of feed every day so you can make full use of their growth potential. It will also help you save around 2 hours a day during the
growth period if you have a stock of 3,000 females.
16
Hedensted Gruppen – for professional fur farmers
Maintenance
5 Maintenance
Maintenance schedule
For every xx hours of operation
Activity
Check
5.1
5
25
100
200
500
2500
5000
Hydraulic oil level and leaks
Motor oil level
Water pump
Oil indicator light
Acid level in accumulator
Fan belt tightness
Engine rack
Coolant
Exhaust
Pre-filter in air filter box (sponge)
Air filter
Air intake and radiator grille
Adjust
Neutral position
Brake cable
Throttle cable
Lubricate
Feed pump
Mixer screw
Brake axles
Cables
Steering gear
Tighten
Various bolts
Wheel hubs
Engine rack
Clean
Air filter
Fuel tank
Radiator fins and air intake
Filter on front of radiator
Replace
Motor oil *)
First
Hydraulic oil *)
First
Air filter
Hydraulic oil filter
First
Fuel filter
Motor oil filter
Engine overhaul
First
Belts
Partial
Complete
First
*)
= Replace when the machine hour counter has reached 25 hours.
= Replace at least once a year
Check components according to the supplier’s recommendations. Hedensted Gruppen stipulates that an authorised service technician must perform
a major service on the machine after every 500 hours of operation or at least once a year. All maintenance must be performed by a trained mechanic,
farmer or similar.
Hedensted Gruppen – for professional fur farmers
17
Maintenance
5.2 Changing the motor oil
and oil filter
5.3 Changing the hydraulic oil and
the hydraulic oil filter
We recommend that HG performs this task.
We recommend that HG performs this task.
Motor oil
Hydraulic oil
Drain plug
Motorolie
Drain plug
Place a suitable container under the engine with sufficient ca-
Place a suitable container under the hydraulic oil tank and re-
pacity to hold the 4.5 litres or so of oil you drain from the engine.
move the drain plug. Please note that a large volume of oil will
Remove the drain plug. Once the oil has drained, replace the
be released. Replace the drain plug once all the oil has drained
drain plug and refill with clean oil.
out. Refill with clean hydraulic oil (volume: see the specifications
on page 25).
u Every time you unscrew the drain plug, you will need
!
to replace the drain plug seal.
!
WARNING
WARNING
l The motor oil can be very hot, so take care!
Oil filter
l The hydraulic oil can be very hot, so take care!
Hydraulic oil filter
Filling oil
Hydraulic oil filter
Motor oil filter
Remove the old oil filter and replace it with a new one. Make sure
For replacement of the hydraulic oil filter, see the parts list page
that the area around the oil cap is clean before you remove it.
30. Make sure that the nut and the surrounding area are clean
before you remove it.
18
Hedensted Gruppen – for professional fur farmers
Maintenance
5.4 Replacing/cleaning the air filter
Feed pump
Lubricating nipple
When it is time to clean or replace the air filter, open the filter
housing and then pull the filter out. Tap it gently on the floor to
remove the loose dirt.
Mixer
Lubricating nipple
5.5 Lubrication
Mixer chain
You can use standard high pressure grease for lubrication. Lubricating nipples are located:
u On the joints at each side of the steering cylinder
Lubricating nipple
u In the feed pump
u At both ends of the mixer
u On the brake axle behind the rear wheels
Steering cylinder
Use chain oil or grease to lubricate the chain that powers the
mixer. Here, too, you will find a lubricating nipple.
Lubricating nipple
Lubricating nipple
Hedensted Gruppen – for professional fur farmers
19
Maintenance
5.6 Cleaning the combi-cooler
Brake axle
The radiator grille on the back of the machine must be kept
clean of wool and dirt. Lift the filter up and clean it. Remove any
Lubricating nipple
dirt from the water and oil cooler.
DO NOT clean with a water hose or compressed air as this may
!
damage the engine.
WARNING
l Turn off the engine and remove the ignition
key before starting the cleaning work.
5.7 Protectors
It is only permitted to remove any of the protectors on the machine in connection with repairs or service procedures.
20
Hedensted Gruppen – for professional fur farmers
Troubleshooting
6FAQ
Problem
Possible cause
The engine does not start
l Incorrect fuel
l Air in the fuel pump
l Empty fuel tank
l Excessive piston clearance
l Blocked ventilation in filler cap
The engine starts but then stops
l Blocked air filter
l Air in the fuel pump
l Blocked fuel filter
l Defective or blocked fuel supply
l Blocked valve in fuel tank
l Burned out exhaust valve
No power from the engine
l Blocked air filter
l Blocked fuel filter
l Worn cylinder
l Worn piston rings
l Defective or blocked fuel supply
l Burned out exhaust valve
Low oil pressure in the engine
l Blocked lubrication circuit
l Worn oil pump
l Defective oil pressure valve
l Defective main bearing
Engine blocked
l Main bearing burned out
or defective
l Pistons burned out
l Hydraulic pump blocked
Engine produces blue exhaust (diesel)
l Worn valve guide
l Worn cylinder
l Too much oil in crankcase
l Worn piston rings
Engine produces white exhaust (diesel)
l Excessive piston clearance
l Incorrect injection timing
Engine produces black exhaust (diesel)
l Overload
l Injection error
Engine knock in the crankcase
l Small or big end bearings burned out or defective
Engine knock in the tappet
l Incorrect fuel
l Insufficient piston clearance
l Incorrect injection timing
l Worn piston rings
Engine consumes a lot of oil
l Worn valves
l Worn cylinder
l Leaky oil seals
l Too much oil in crankcase
l Worn piston rings
Motor oil level rises
l Excessive piston clearance
l Defective injection system
Engine losing oil
l Blocked breather pipe
l Defective injection system
Engine overheats
l Insufficient piston clearance
l Blocked radiator fins
l Incorrect injection timing
l Defective injection system
l Overloaded engine
Engine misfires
l Incorrect fuel
l Cold engine
l Blocked radiator fins
l False air via the injection pump
l Defective injection system
Poor acceleration
l Incorrect fuel
l False air via the injection pump
Hedensted Gruppen – for professional fur farmers
21
Diagram
7 Hydraulic diagram
D2
a(p1)
D1
b(p1)
S
p1
M2
M1
22
Hedensted Gruppen – for professional fur farmers
DIAGRAM
7 Electric circuit diagram
Hedensted Gruppen – for professional fur farmers
23
diagram
7 Electric circuit diagram
24
Hedensted Gruppen – for professional fur farmers
DATA
8 Technical data
8.1 HG Feeder 65 M
Dimensions and weight
Width
90 cm
Length
237 cm
Height
151 cm
Net weight
850 kg
Engine
Kubota V1305
25 hp (18,5 kW)
Capacity
898 cm3
Bore x stroke
72 x 73.6 mm
Misc. fluids
Motor oil
Q8 7520 15W-40 (or better)
Hydraulic oil
Q8 Handel 46
Fuel
Diesel
Tanks and containers
Feed tank
650 litres
Water tank
55 litres
Diesel tank
35 litres
Hydraulic tank
40 litres
Wheel dim./tyre pressure
Wheel dimensions
Tyre pressure
23 x 8.50-12
65 PSI
Steering gear
Steering
Turn diameter
(circumscribed circle)
Servo
4.2 meter
Hedensted Gruppen – for professional fur farmers
25
Warranty
9 Warranty conditions
Warranty period
Approval of claims for compensation
Hedensted Gruppen provides a 12-month warranty (max. 1,000
Approval from the manufacturer of claims for compensation is
operating hours) as from the date of delivery.
conditional upon the defective part(s) being presented to the
manufacturer or the manufacturer’s representative within two
The warranty covers
(2) weeks of the damage being identified. The right of ownership to the damaged part(s) shall be transferred to the supplier
u Components that have to be repaired or replaced on
of the new part(s).
account of material defect or manufacturing error.
such as:
Only components can be replaced under
the warranty, which therefore does not
cover
u Feed pumps, tyres, light bulbs, filters, oil and so on.
u Freight costs.
The warranty does not cover wearing parts and consumables
u Costs in connection with waiting time, the machine The manufacturer’s warranty shall be
terminated in the event that
u The machine is used incorrectly.
Other information
owner’s working hours and travel expenses.
u Loss of earnings and other consequential expenses.
u The machine is used without the operator complying
with the information in the instruction manual and safety Before repairs under warranty, the manufacturer must be con-
regulations.
tacted to agree on the procedure. If the repair work has been
u The timings in the service schedule are not observed, or
initiated or completed, the cost of same cannot be claimed
against the warranty.
if obsolete parts such as filters are used.
u The machine is used after a fault or defect has been
identified, and the resulting repair is more expensive than The present warranty conditions can only be amended
the cost of repairing the original fault.
through a separate agreement.
The owner’s own insurance should cover:
u Fire, break-in, theft and vandalism
u Water and frost damage
u Corrosion damage caused by battery acid
u Damage caused by the weather
These are not covered by the manufacturer’s warranty.
26
Hedensted Gruppen – for professional fur farmers
Warranty
WARRANTY CERTIFICATE
Version
Type/Chassis no.
Model/year
Delivery date
Seller/fitter
Company
Address
Signature
First owner
Address
Telephone no.
Second owner
Address
Telephone no.
Special conditions
The warranty certificate is to be filled in by an HG fitter no later than in connection with the first service (50 hours).
Hedensted Gruppen – for professional fur farmers
27
service
10 Service documentation
Service no. 1
Service no. 4
Service completed
Service completed
Number of hours _____________________
Number of hours _____________________
Date
_____________________
Date
_____________________
Work order no.
_____________________
Work order no.
_____________________
SIGNATURE
SIGNATURE
Service no. 2
Service no. 5
Service completed
Service completed
Number of hours _____________________
Number of hours _____________________
Date
_____________________
Date
_____________________
Work order no.
_____________________
Work order no.
_____________________
SIGNATURE
Service no. 3
Service no. 6
Service completed
Service completed
Number of hours _____________________
Number of hours _____________________
Date
_____________________
Date
_____________________
Work order no.
_____________________
Work order no.
_____________________
SIGNATURE
28
SIGNATURE
SIGNATURE
Hedensted Gruppen – for professional fur farmers
service
10 Service dokumentation
Service no. 7
Service no. 10
Service completed
Service completed
Number of hours _____________________
Number of hours _____________________
Date
_____________________
Date
_____________________
Work order no.
_____________________
Work order no.
_____________________
SIGNATURE
SIGNATURE
Service no. 8
Service no. 11
Service completed
Service completed
Number of hours _____________________
Number of hours _____________________
Date
_____________________
Date
_____________________
Work order no.
_____________________
Work order no.
_____________________
SIGNATURE
SIGNATURE
Service no. 9
Service no. 12
Service completed
Service completed
Number of hours _____________________
Number of hours _____________________
Date
_____________________
Date
_____________________
Work order no.
_____________________
Work order no.
_____________________
SIGNATURE
SIGNATURE
Hedensted Gruppen – for professional fur farmers
29
Spare parts
11 Spare parts list and appendice
11.1 Commonly used parts
Item no.
Feeder 65 M
474760
Tractor tyres
474746
Lawn tyres
476710
Motor oil, 20 litre container
476722
Hydraulic oil, 20 litre container
424533
Filter insert for hydraulic oil
467040
Air filter insert
467010
Motor oil filter
467015
Fuel filter
467025
Fan belt
475507
Work light
M100202
Hydraulic oil filter
11.2 Spare parts appendice
30
Hedensted Gruppen – for professional fur farmers
Spare parts
Hedensted Gruppen – for professional fur farmers
31
Spare parts
32
Hedensted Gruppen – for professional fur farmers
Spare parts
Hedensted Gruppen – for professional fur farmers
33
Spare parts
34
Hedensted Gruppen – for professional fur farmers
Spare parts
Hedensted Gruppen – for professional fur farmers
35
Spare parts
36
Hedensted Gruppen – for professional fur farmers
Spare parts
Hedensted Gruppen – for professional fur farmers
37
Spare parts
38
Hedensted Gruppen – for professional fur farmers
Spare parts
Hedensted Gruppen – for professional fur farmers
39
Spare parts
40
Hedensted Gruppen – for professional fur farmers
Spare parts
Hedensted Gruppen – for professional fur farmers
41
Spare parts
42
Hedensted Gruppen – for professional fur farmers
Spare parts
Hedensted Gruppen – for professional fur farmers
43
Spare parts
44
Hedensted Gruppen – for professional fur farmers
Spare parts
Hedensted Gruppen – for professional fur farmers
45
Spare parts
46
Hedensted Gruppen – for professional fur farmers
declaration
12 EU Declaration of conformity
Hedensted Gruppen A/S
Vejlevej 15
DK-8722 Hedensted
Tel. (+45) 75 89 12 44
Fax (+45) 75 89 11 80
www.hedensted-gruppen.dk
hereby declares that:
HG Feeder 65 M
HG item no. 250012
conforms with:
The Machine Safety Directive 2006/42/EC
under application of the following
harmonising standards:
DS/EN 12100-1:2005
DS/EN 13857:2008
Hedensted, den 31. maj 2012
Jens Jørgen Madsen
CEO
Hedensted Gruppen – for professional fur farmers
47
Vejlevej 15, DK-8722 Hedensted
Phone (+45) 75 89 12 44
Fax (+45) 75 89 11 80
www.hedensted-gruppen.dk
Hedensted Gruppen – for professional fur farmers