1
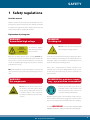
User Manual
HG 8 Hot Spray Scraper
HG – for professional fur farmers
contents
HG 8 Hot Spray Scraper
Topic
2
Page
1
Safety regulations .. . . . . . . . . . . . . . . . . . . . . . . . . . . . . . . . . . . . . . . . . . . . . . . . . 3
2
Transport and manoeuvring .. . . . . . . . . . . . . . . . . . . . . . . . . . . . . . . . . . . 5
3
The machine’s functional units .. . . . . . . . . . . . . . . . . . . . . . . . . . . . . . . . 6
4
Operation of the touch display .. . . . . . . . . . . . . . . . . . . . . . . . . . . . . . . 13
5
Replacement/adjustment of scraping rollers .. . . . . . . . . . . . . 18
6
Alarms . . . . . . . . . . . . . . . . . . . . . . . . . . . . . . . . . . . . . . . . . . . . . . . . . . . . . . . . . . . . . . . 19
7
8
Set-up and connection . . . . . . . . . . . . . . . . . . . . . . . . . . . . . . . . . . . . . . . . . . 22
9
Maintenance and storage . . . . . . . . . . . . . . . . . . . . . . . . . . . . . . . . . . . . . 24
10
11
Troubleshooting . . . . . . . . . . . . . . . . . . . . . . . . . . . . . . . . . . . . . . . . . . . . . . . . . . 26
12
Warranty .. . . . . . . . . . . . . . . . . . . . . . . . . . . . . . . . . . . . . . . . . . . . . . . . . . . . . . . . . . . . 28
13
Service documentation .. . . . . . . . . . . . . . . . . . . . . . . . . . . . . . . . . . . . . . . . 30
14
Scraping rollers and spare parts . . . . . . . . . . . . . . . . . . . . . . . . . . . . . . 32
15
Declaration of conformity . . . . . . . . . . . . . . . . . . . . . . . . . . . . . . . . . . . . . 33
Operating the machine .. . . . . . . . . . . . . . . . . . . . . . . . . . . . . . . . . . . . . . . . 23
Technical data .. . . . . . . . . . . . . . . . . . . . . . . . . . . . . . . . . . . . . . . . . . . . . . . . . . . 27
HG – for professional fur farmers
safety
1Safety regulations
Read the manual
Machine operators must read the manual carefully and receive
training in the machine’s functions before starting to work with
it. If operators are ignorant of certain details, they may be at risk
of physical injury when operating the machine.
Explanation of pictograms
Warning!
Accumulated high voltage
Warning!
Crushing risk
The machine is supplied
Do not hold the tip of the fleshing beam
with electrical power from
when starting a scraping sequence.
two connections.
Before the electricity cabinets can be opened, you must dis-
The beam moves towards the hole for the scraping rollers, where
connect both connections and wait for at least 10 minutes. The
there is a risk that your hand may become trapped. Release the
reason for this is that the machine’s frequency converter may
start button if there is any indication of risk. This will return the
contain accumulated high voltage that can produce extremely
beam automatically to its starting position.
powerful electric shocks.
There is also a crushing risk if you activate a function in the
NB: Interfering with the set-up of the frequency converter may
<Manual> menu on the touch display while the doors are open.
cause a risk of serious personal injury and/or damage to the ma-
For this reason, the machine may only ever be operated by one
chine.
person at a time.
Warning!
Hot components
Warning! Ear protectors compulsory – eye protection recommended
Do not touch any of the components in
Both the operator and any people in the
the machine’s hot water system, which
immediate vicinity of the machine must
carries water at a temperature of 60 ˚C. As
wear ear protectors as the noise level ex-
a result, the surfaces of the components
ceeds the normally permitted level.
are always hot and may cause discomfort
or burns.
Operators and any people in the immediate vicinity of the machine should also wear protective goggles, because the machine
may eject hair, sawdust and other detritus when it is operating.
The word
Warning! next to a text in the manual indicates
that failure to follow the instructions may result in personal injury.
HG – for professional fur farmers
3
safety
u The area around the machine must be kept neat and tidy
1.1 Use
to prevent accidents involving tripping and falling.
u The machine is intended exclusively for the industrial
scraping of mink skins so as to remove fat from the skins
u Cables and hoses used to supply the machine must be laid
before they are dried.
out so that they do not constitute a risk – above head
height or in appropriate cable trays on the floor, for example.
u The machine must only ever be operated by one person
at a time.
1.4 Preparation
u Operators must be over 18 years of age, in good health
u When operating the machine, make sure not to wear loose
with normal mobility and physical attributes.
clothing that may catch on the tip of the fleshing beam or
in the scraping rollers. In addition, make sure to wear foot-
1.2Training
wear with firmly gripping sole to prevent the risk of slipping.
u Before starting to work with the machine, operators must
u Always keep grease, oil and other such materials for main-
read the instructions in this manual carefully and famil-
taining the machine in holders approved for the purpose.
iarise themselves with the correct operating procedure –
Store these materials out of reach of children and non-
in consultation with an experienced instructor, if appropriate.
authorised persons.
u These instructions should emphasise:
1.5Noise level
u The operator and any other people in the immediate vicinity
1) The need to be careful, thorough and focused when
working with the machine.
2) The need to ensure that the operator maintains a good
overview of the area around the machine.
u The operator is responsible for any and all accidents and/
or dangerous situations that may arise in respect to other
people.
of the machine must wear ear protectors while the machine
is operating, as the noise it generates exceeds the normally
permissible level. The noise level at the operator’s station has
been measured at 95 dB(A) / 98 dB(C).
1.6 Maintenance
The machine should be cleaned every day when it has been
particularly affected by grease, sawdust, fur and dirt. A com-
The most common causes of accidents are:
pressed air pistol and a hot water pistol are supplied with the
1) Lack of concentration
machine. Do not spray water directly on electrical components,
2) Operators who are insufficiently familiar with the machine.
including the small sensors used to inform the operator of any
faults/errors during the work process.
1.3 Positioning, spatial requirements, etc.
Visually inspect the machine to check the following:
u The machine must be positioned indoors on a flat, solid
u That there are no leaks in the air system (hoses, etc.)
surface.
u That all bolts, nuts, etc. are securely tightened
u There must be at least 70 cm of free space around all oper
ating areas, as well as a ceiling height of at least 250 cm.
The manual describes how the machine should otherwise be
maintained.
u Operation is performed within normal reach from the
operating position in front of the fleshing beam.
1.7 Dismantling / Disposal
u The lighting level must be at least 300 lx in all places
When the time comes to dispose of the machine, contact your
local dealer to ensure that the machine is dismantled and dis-
where work is being done on or with the machine.
posed of in the most environmentally appropriate manner.
4
HG – for professional fur farmers
transport
2Transport and manoeuvring
A crane must be used to transport the machine, which weighs
When the machine has been delivered and lifted down onto the
1,500 kg. It features three lifting points identified by hook labels
ground, use the specially developed transport wheels to ma-
on the machine itself.
noeuvre it into position in the pelting station.
Use a jack to lift the machine’s legs one by one. Fit the wheels
into the purpose-built holes in the legs. Secure the wheel axle
using a washer and bolt, and then lower the jack so that the leg
rests on the wheel. Once the machine has been manoeuvred
into position, reverse the process to remove the wheels one at
a time.
WARNING! Do not attempt to move the machine using
equipment other than the three transport wheels developed
specifically for the purpose, which you can order from HG.
WARNING! The machine weighs 1,500 kg and must only
be lifted using a crane fitted with approved equipment and operated by persons who have received the appropriate training.
HG – for professional fur farmers
5
function
3The machine’s functional units
9
5
10
6
3
1
4
1
2
7
8
15
16
23
17
14
30
32
30
18
20
29
1
2
3
4
5
6
7
8
9
10
11
12
13
14
15
16
6
31
28
26
11
Filling oil for the lubrication system
Water filter
Air supply connection
Drain – condensation water
Plugs for connecting electricity supply
Water heater
Thermostat, water heater
Overheating protection, water heater
Filling cap for coolant for the beam heater
Thermostat, beam heater
Water supply connection
Drain – water
Overpressure valve
Main switch
Electrical cabinet 1
Electrical cabinet 2
17
18
19
20
21
22
23
24
25
26
27
28
29
30
31
32
22
24
19
27
13
12
21
Compressed air cabinet
Fleshing beam
Support roller
Temperature gauge
Beam washer
Access to scraping rollers
Sawdust dispenser
Skin remover
Connection of throughput drum
Fat pump
Fat discharge
Compressed air pistol
Hot water pistol
Emergency stop (2 locations)
Start panel
Operating panel with touch display
HG – for professional fur farmers
25
function
3.1 Filling oil for the lubrication system
3.4 Draining – condensation water
The two glass containers for filling lubrication oil are mounted
Open the tap to drain the condensation water. Use a suitable
behind the machine. Gently press the glass container upwards
container to collect the liquid so that it does not spill onto the
and unscrew it. Use mist lubrication oil.
floor.
3.2 Water filter
3.5 Plugs for connecting electricity supply
Check the water filter and clean as required. Unscrew the cover
The machine uses two plugs: a 32 A CEE plug and a 16 A CEE
to access the filter.
plug for connecting a 3 x 400 Volt power supply with neutral (N)
and earth (PE) conductors. The ground fault circuit breaker (HPFI)
for the 32 A plug must be approved for frequency converters.
3.3 Air supply connection
3.6-7 Water heater
Thermostat
The machine requires compressor pressure of at least 7 bar and
The thermostat for setting the water temperature in the spray sys-
an air flow of at least XX litres per minute. Use a type Cejn 320
tem is mounted on the water heater. Set the thermostat at 60 ˚C
coupling to connect the air supply.
(approx. “7 o’clock” on the dial) and wait until the water reaches
the right temperature. When the water heater is switched on, the
red light below the thermostat will be illuminated.
HG – for professional fur farmers
7
function
3.8 Overheating protection for the water heater
3.11–13 Water supply connection
Drain
Overpressure valve
Connection
If the container’s overpressure fuse cuts out, you will need to
Connect the water heater to a supply of ordinary, cold tap water.
remove the cover from the base of the water heater and press
To open the water supply, turn the red tap so that the “wings”
the red <Reset> button.
are vertical. The water heater is fitted with an overpressure valve,
which is activated if the water boils. Use the drain valve for frost
protection.
3.9 Filling coolant
3.14 Main switch
Filling cap
Thermostat
When the main switch is set to <OFF>, there is no power connected to the machine. Turn the switch to <ON> when you
want to operate the machine. You must make sure to lock the
main switch in the <OFF> position when performing repairs or
maintenance on the machine.
Fill coolant for the beam heating system so that, when cold,
there is a gap of 4–5 cm from the surface of the fluid to the top
of the boss. Check regularly to make sure that the volume of
fluid remains at approximately the same level.
3.10 Thermostat for setting beam heat
Use the thermostat in the box next to the coolant to adjust the
beam temperature. Set the temperature to between 32 ˚C and
38 ˚C. WARNING! If the beam is too hot, you risk damaging
the hair side of the skin.
8
HG – for professional fur farmers
function
3.15 Electrical cabinet 1
2
3.17 Compressed air cabinet
3
1
4
5
In the first electrical cabinet from the left, you will find:
This cabinet contains the compressed air gauges for the beam
1
frequency converters
washer, fat scrapers and skin remover. The panel states what is
2
automatic fuses for the frequency converters
measured where.
3
fuses for the beam heater/spray system
fuses for the power plug for the throughput drum
4
fuses for the control current
5
motor protection switch for the fat pump
3.18-20 Fleshing beam
WARNING! Before the electricity cabinets can be opened, you
must disconnect both connections and wait for at least 10 minutes.
The machine’s frequency converters contain accumulated high voltage which can produce extremely powerful electric shocks.
NB: Interfering with the set-up of the frequency converter may
cause a risk of serious physical injury and/or damage to the machine.
The fleshing beam is heated to a temperature of between 32 ˚C
3.16 Electrical cabinet 2
and 38 ˚C. The support roller ensures that the beam remains stable
while the top rollers are scraping the neck. From the operator’s
station, you can check the beam temperature at the temperature
gauge positioned at an angle behind the fleshing beam.
3.21 Beam washer
The middle cabinet contains the motor protection switches for
the eight scraping rollers. From left to right, these switches protect the following motors:
1
Right-hand side 1
5
Top 2
2
Left-hand side 1
6
Bottom 2
The beam washer consists of two sets of rubber wipers which,
3
Top 1
7
Right-hand side 2
together with the hot water spray, are used to keep the beam
4
Bottom 1
8
Left-hand side 2
clean.
HG – for professional fur farmers
9
function
3.22 Access to the scraping rollers
Side view
From the rear
2
1
3
From the front
2
You can access the eight scraping rollers from three sides of the
machine. For safety reasons, you cannot use the machine for
scraping until all the access routes to the scraping rollers have
been closed correctly. Therefore, it is essential that you know
where and how to open and close the doors.
WARNING!
It is possible to activate several functions
manually while the doors are open. Because this constitutes a
4
risk of crushing, the machine must only ever be operated by one
person at a time.
From the front
1
5
2
1
There are handles on all the exterior doors. In addition, there are
closing and locking mechanisms in the places indicated here.
These principles also apply to the rear access routes.
Plexiglas panel
Plexiglas panel
6
6
NB: Make sure to close the plexiglas panels against the assembly fitting when you open the panel from the side (No. 5 on the
photo to the right).
10
HG – for professional fur farmers
1
function
3.23 Sawdust dispenser
3.26-27 Fat pump
After the scraping sequence, the skin is automatically coated
The fat falls into the fat pump, which can transport it over a
with sawdust before it is removed. Extra high sides for the auto-
distance of up to 40 metres. Fit a fire hose between the fat
matic dispenser are available from HG.
discharge and the fat container.
3.24 Skin remover
3.28 Compressed air pistol
Once the skin has been fully processed, it is automatically re-
The compressed air pistol is used for cleaning those parts of the
moved from the fleshing beam and allowed to drop – directly
machine where it is inappropriate to use water. Wear protective
into a throughput drum, if appropriate.
equipment in accordance with the regulations that apply to the
use of compressed air.
3.25 Connection of throughput drum
3.29 Hot water pistol
When a throughput drum is used in direct extension to the ma-
The hot water pistol is used for cleaning funnels and the fat
chine, the drum funnel must be positioned so as to prevent the
pump. NB: Always wear gloves when using the pistol. The wa-
risk of body parts being crushed between the funnel and the
ter temperature is approx. 60 ˚C, which is hot enough to cause
casing containing the skin remover. The shield must be adjusted
burns to exposed skin.
to match the equipment on site, and additional shields must be
added if there are any openings wider than 8 mm.
HG – for professional fur farmers
11
function
3.30 Emergency stop
There is an emergency stop button on the start panel and
above the fleshing beam on the first electrical cabinet. If an
emergency stop button has been activated, turn it clockwise
to release it and press <Reset> on the operating panel below
the touch display.
3.31 Start panel
3.32 Operating panel with touch display
5
1
2
3
4
6
12
7
8
9
10
11
1
Start scraping sequence with scraping pressure/speed set
5
Touch display (see next section)
to NORMAL
6
Reset emergency stop and safety locks on doors
2
Start scraping sequence with scraping pressure/speed set
7
Start the machine
to HARD
8
Stop the machine
3
Start scraping sequence with scraping pressure/speed set
9
Manual: beam backwards
to SOFT
10 Manual: beam forwards
4
Emergency stop
11 Automatic sequence – The button lights up when you
have kept the start button depressed long enough and
the automatic sequence has taken over. Then, release the
start button.
HG – for professional fur farmers
touch display
4Operation of the touch display
4.1 Main menu
You can use the touch display to adjust the machine settings
to match the properties of the skins – and your own particular
preferences.
1
2
3
4
5
6
The programme also contains a range of useful statistical information.
Simply touch the icon for the menu you wish to access. Then
7
touch the individual values in the program to change them. This
will call up a numerical keypad that you can use to enter the
relevant value. Press <ENTER> to save the new value or press
<ESC> to exit the menu without saving the change.
1
2
3
4
Operation
Choise of programme
Options
Technical information
5 Counters
6 Manual functions
7 Choose language
When you are working in the
operation menu, a warning will
be displayed if you deactivate
a function under “Functions”.
4.2.1 Operation menu – pressure
4.2.2 Operation menu – speed
4
3
2
1
2
1
5
3
6
7
8
6
4
5
9
10
11
1
Set scraping pressure (bar)
1-4 Set scraping lengths (mm)
2
Set zone lengths (mm) *
5
Set scraping speed (Hz of max.)
3
Machine status: Auto/manual
6
Machine status: Auto/manual
4
Skin counter
7
Skin counter
5
Current programme
8
Current programme
6
Go to previous page
9
Go to previous page
7
Return to main menu
10 Return to main menu
8
Switch to speed menu
11 Switch to pressure menu
7
8
* For autumn animals, zones 1 and 2 are treated as a single zone, with
the same value from the snout to a point just past the front legs. For
spring animals, zone 1 refers to the area from the snout to a point just
before the front legs, while zone 2 covers the area around the front
legs and zone 3 refers to the rest of the animal.
HG – for professional fur farmers
13
touch display
4.3 Programme menu
1
2
3
4
5
6
7
4.4 Settings menu
1
Access a programme you have saved previously
The machine settings menu contains five screens, which you
2
Save the current settings as a programme
can use to enter new values for:
3
Import a programme from a memory
(internal/external)
1
Adjusting scraping rollers
4
Export a programme to a memory
2
Hard/Soft values
(internal/external)
3
Activate/deactivate functions
5
Delete a programme
4
Running the sawdust dispenser and fat pump
6
Go to previous page
5
Where the rollers are to cut out
7
Return to main menu
4.3.1 Programme menu: Import/Export
1
2
4.4.1 Adjusting scraping rollers
3
When you call up the “Import/Export” menus, you will see this
This menu provides assistance with adjusting the scraping rollers.
screen. You can then choose which type of memory you wish
to use:
Start by pressing <STOP> on the operating panel. Then press
the left-hand side of the button for the relevant roller to adjust
1
External USB pen
2
External SD card
3
Internal memory
the value. Then press the whole field, which will turn green.
Then press <START> on the operating panel. Keep the button
depressed until the beam reaches the length entered and the
rollers cut in.
You can now physically adjust the rollers – see Section 5.
14
HG – for professional fur farmers
touch display
4.4.2 Hard / Soft
4.4.4 Sawdust and fat pump
Use this menu to define how the machine is to operate when
Use this menu to decide how much sawdust to apply, and to
you use the <SOFT> and <HARD> buttons on the start panel.
choose how often the fat pump is to run. NB! Make sure that
You can increase or decrease the pressure, speed and length
the pump does not “run dry”, as tendons will otherwise have a
settings and thus adapt the scraping process to match the in-
tendency to stick.
dividual skin types.
4.4.3 Activate/deactivate functions
4.4.5 Where the rollers cut out
You can use this menu to switch the various automatic func-
Use this menu to adjust how far the individual scraping rollers
tions in the scraping process <ON> and <OFF>. You can also
are to scrape the skin before they cut out. The length refers to
use this menu to check the processes individually.
the distance (in mm) from the point where the beam is fully
inserted to the point where the rollers are to cut out.
HG – for professional fur farmers
15
touch display
4.5 Technical menu: Status input
4.6 Counter menu
1
2
3
4
5
6
1
2
Use this screen to monitor the machine’s computer and see
This menu provides an overview of both the day’s production
the inputs and outputs running to and from the machine.
and total production for the machine. The menu also shows
Press (1) to switch to Output.
how many skins have been processed per set of scraping rollers,
cycle time and beam counter.
Under <Std data> (2), you can enter the machine’s standard
data, i.e. the standard settings with which it was delivered.
1
Displays the day’s production which, as necessary, can
Press the button and keep it depressed for 5 seconds to enter
be adjusted using the <+1> and <-1> buttons on the
the original data.
right-hand side, or reset using the <Reset> button.
NB! This will change everything back to the original factory
2
Displays total production for the machine’s service life.
3
Displays the number of skins processed – press <Reset>
to reset the counter.
4
You can set the alarms for changing the scraping rollers
to display a reminder on the screen when the number
entered has been reached. The reminder will appear no
matter which menu you are viewing on the display.
Remember to reset the counters after replacing rollers.
5
The cycle time shows how many seconds it took to
process the most recent skin.
6
The beam counter shows how far from the starting
position the fleshing beam is located (measured in mm).
settings!
16
HG – for professional fur farmers
Touch display
4.7 Manual menu
1
2
3
4
When the machine is in <Stop> status, you can run a number
of automatic functions manually.
To start with, press <Stop> on the operating panel and then
access the menu.
1
By switching the machine’s water nozzles on and off
manually, you can check whether they are spraying the
water correctly.
2
Here, you can activate the sawdust dispenser motor
manually (forward/reverse).
3
Here, you can activate the fat pump motor manually
(forward/reverse).
4
You can open and close the beam washer manually –
when it is time to replace the rubber wipers, for example.
If “Open Beam Washer” is activated, the machine cannot
operate for safety reasons.
HG – for professional fur farmers
17
skraberuller
5 Replacement and adjustment of scraping rollers
5.1 Replacement
HG recommends that you replace the scraping rollers for every
6,000 skins processed. Unscrew the nut on the end of the roller
and remove the washer. Release the scraping roller and replace
it with a new one. Replace the washer and nut, and securely
tighten the nut. Replace the nut as required.
NB: Make sure not to over-tighten the roller. Screw the nut in
until the washer is lying flush against the roller. Then give the
nut one more turn.
5.2 Adjustment
1
1
1
1
Adjust perpendicular position
1
1
2
2
Adjust the distance from the beam
The adjustment process is the same for all eight scraping rollers.
1
Perpendicular position
You can adjust two aspects:
Loosen bolt no. 1. Use the bolt indicated by the arrow to
adjust the perpendicular position. Retighten bolt no. 1.
1
Perpendicular position in relation to the beam
2
Distance
2
Distance from the beam, which determines when the
Loosen bolt no. 2. Use the bolt indicated by the arrow to
roller actually makes contact and catches hold of the skin.
adjust the distance from the beam. Retighten bolt no. 2.
NB: Only one person at a time may work on the machine during adjustment.
18
HG – for professional fur farmers
Alarms
6Alarms
The machine is fitted with 12 sensors that can stop operation if
6.3 Thermo-error, motors
they do not receive a “clear” signal.
One of the machine motors has been overloaded. This may be
If you have attempted to activate a function for more than three
one of the eight motors that operate the scraping rollers or the
seconds without anything happening, an alarm will appear in
motor for the fat pump. Check whether there is any fat, fur or dirt
the touch display.
around the motor or in its cooling channels. Remove if necessary.
If you rectify the error and the sensor still fails to provide a “clear”
WARNING! Make sure to disconnect both power con-
signal, you may need to adjust or even replace the sensor.
nections and wait for at least 10 minutes before opening the
electrical cabinets.
6.1 Emergency stop cut out
1.3.1 For the scraping rollers
One of the emergency stops has cut out. Reactivate the emer-
The motor protection switches for the scraping roller motors
gency stop and press <Reset>.
are located in the middle electrical cabinet. If a red button is
“in”, then the motor has cut out. Press the black button in if the
motor protection switch has cut out.
6.2 Door open
6.3.2 For the fat pump
One or more doors has not been closed and locked correctly.
The motor protection switch for the fat pump is located in the
Close and lock the door(s) and press <Reset>.
electrical cabinet to the left. Press the black button in if the motor protection switch has cut out.
Contact the HG service department if you are unable to rectify a fault after repeated efforts to do so.
Tel. +45 75 89 12 44 · 24-hour hotline: + 45 20 21 30 44
HG – for professional fur farmers
19
Alarms
6.4 Error – frequency converter
6.7 Error – support roller
Flow valve
One of the frequency converters has cut out. Check whether
there is a fault in the sawdust dispenser motor or the beam
driver. Press <Emergency stop> and wait 30 seconds before resetting the error.
WARNING! Make sure to disconnect both power connections and
wait for at least 10 minutes before opening the electrical cabinets.
6.5 Cannot start
Sensor
The “Support roller not down” alarm appears if the support roller is not down when it should be. Check the sensor, which you
may need to adjust or replace.
The “Support roll not down quickly enough” appears if the support roller does not come down quickly enough when it should.
Use the <Stick rev.> button to return the beam to its starting
position and adjust the flow valve so that the roller comes down
more quickly.
6.8 Skin remover not open
The machine cannot start because the beam is not in its starting position. Use the <Stick rev.> button to return the beam to its
starting position.
6.6 Manual operation not possible
This alarm appears if the skin remover is not open. Press <Stop>
and check that the jaw panels are open and that the sensor is
active (illuminated yellow).
Press <Stop> to interrupt the auto-sequence function.
Contact the HG service department if you are unable to rectify a fault after repeated efforts to do so.
Tel. +45 75 89 12 44 · 24-hour hotline: + 45 20 21 30 44
20
HG – for professional fur farmers
Alarms
6.9 Error – beam washer
6.11 Error – fat scraper
1
2
2
The “Beam washer, vertical not up” and “Beam washer, horizon-
The “Fat scraper, vertical cleaner not out” and “Fat scraper, hori-
tal not out” appear if the beam washer sides are not open when
zontal cleaner not out” appear if the relevant sensors do not
they should be. Press <Stop>, remove the front panel from
have a “Clear” signal. 1) indicates the position of the sensor for
the beam washer and check the sensors. (The arrows indicate
the vertical scraper, and 2) shows the position of the horizontal
where the sensors are positioned behind the panel).
ones. Press <Stop>, check that there is nothing caught near the
sensors and that they are active (illuminated yellow).
6.10 Beam washer opened manually
6.12 Low air pressure
Alarmen kommer, hvis funktionen ”Åben stokvasker” er
slået til. Gå ind i Manuel menuen, og slå funktionen fra.
This alarm appears if there is too little air pressure in the machine. Check the air supply.
the “Cannot start – beam washer opened manually” alarm appears, access the “Manual” menu and deactivate the “Open
beam washer” function.
Contact the HG service department if you are unable to rectify a fault after repeated efforts to do so.
Tel. +45 75 89 12 44 · 24-hour hotline: + 45 20 21 30 44
HG – for professional fur farmers
21
Before starting
7Set-up and connection
7.1Set-up
Electricity
Position the machine indoors on a level, solid floor, with at least
70 cm of free space in the area where work is done on the machine. The ceiling height is to be at least 250 cm.
The machine is fitted with two plugs: a 32 A CEE plug and a
16 A CEE plug for connecting a 3 x 400 Volt power supply with
neutral (N) and earth (PE) conductors. The ground fault circuit
breaker (HPFI) for the 32 A plug must be approved for frequency
Remove the transport wheels (see Section 2) and adjust the leg
height so that the machine is stable and level (both vertically
and horizontally).
converters.
Air
The operator operates the machine from a standing position
next to the fleshing beam. In accordance with the EN 124641:2002 standard, the work area must be illuminated with at least
300 lx.
7.2Connection
Water
The machine requires compressor pressure of at least 7 bar and
an air flow of at least xxx litres per minute. Use a type Cejn 320
coupling to connect the air supply. To avoid interruptions to the
scraping process, make sure that the air supplied to the machine
is free from water, dirt and rust from old pipes.
WARNING! It is important to connect the water supply and
air the water heater with the hose pistol before connecting the
power supply. Otherwise there is a risk of damaging the heating
element.
Connect the machine’s hot water container to a standard cold
22
water tap with water pressure of 3 bar. If the pressure is below 3
WARNING! Do not leave air and water hoses and electricity
bar, a pump can be inserted to ensure that the machine water
cables lying unsecured on the floor, as this constitutes a risk of
nozzles provide optimal water spray.
physical injury.
HG – for professional fur farmers
Before starting
8Operating the machine
1
Install and set up the machine as described on the
previous page.
2
Fill the hot water container with water
8.2The scraping sequence
3
Fill air line lubricant
4
Connect the power supply and turn the main switch to <ON>
5
Check that the emergency stop buttons have been
deactivated and that all doors are securely closed.
6
Press <Reset>. If the emergency stop circuits are OK, the
<Reset> button will light up green. The control current
and the compressed air system will now be activated.
7
Wait until the beam and the water in the hot water
container reach the correct temperature.
8
Press <Stick rev.> to ensure that the beam is in its starting
The skin is processed using two sets of four scraping rollers.
position.
All eight rollers are sprayed with hot water during the scraping
9
Place the skin on the beam and press <Start-up>.
process. This ensures optimal processing and leads the fat away
WARNING! Never attempt to reach in behind the machine
from the skin.
shields while the machine is operating. This constitutes a serious risk of crushing.
8.1 Positioning skins on the beam
The design of the scraping rollers ensures that the skin is twisted
slightly so that the fat is also scraped off that part of the skin
positioned on the edges of the fleshing beam.
After each set of scraping rollers, a fat scraper is used to remove
Pull the skin onto the beam with the leather side out and the
the liquid fat from the skin.
head at the pointed end of the beam. Stick the two spikes on
the front of the beam through the eye holes, and lay the tail on
The beam will continue to move forward up to the scraping dis-
the top side.
tance you defined in the programme, and the skin remover will
then remove the skin.
Then pull the front of the skin – i.e. the part around the head
and front legs – firmly onto the beam so that the scraping rollers
The beam washer and water nozzles are activated while the
make appropriate contact.
beam is returning to its starting position.
Choose the mode – NORMAL, SOFT or HARD – depending on
The machine is now ready for the next skin.
the skin properties. Keep the button depressed until the beam
has entered approx. 20 cm and the Auto light shines green.
If you release the button before the Auto light is illuminated, the
beam will return to its starting position for safety reasons.
HG – for professional fur farmers
23
Maintenance
9 Maintenance and storage
9.1 Daily maintenance
WARNING! You must disconnect and lock the main
Daily maintenance comprises:
switch in its <OFF> position before starting any maintenance
1
Normal cleaning of the machine
2
Cleaning the cooling ducts
3
Checking/cleaning the water nozzles
4
Checking the air line lubricant level
5
Checking/lubricating the nipples
work.
Normal cleaning
Cleaning the water nozzles
Use the compressed air pistol to remove fur and dirt from
Check the water nozzles at regular intervals. There are six noz-
around the electrical parts of the machine. Use water/petro-
zles by the beam washer and one by each scraping roller. Ac-
leum to clean off fat and grease. NB Always wear gloves when
tivate the water nozzles manually as described in the “Manual
using the hot water pistol for cleaning. The temperature of the
menu” section on page 17.
water in the pistol is 60 ˚C.
Cleaning the cooling ducts
Checking the air line lubricant level
Each of the eight scraping rollers has a separate motor. Every
The air line lubricant keeps the machine’s bearings lubricated.
day, use the compressed air pistol to blow any dirt out of the
Press the glass component on the oil container up and turn it
cooling ducts on each motor. Otherwise, there is a risk of the
anticlockwise. This will release the glass, which you can then top
motor overheating.
up with oil. Replace the glass component by pressing it up and
turning it clockwise.
24
HG – for professional fur farmers
Maintenance
Lubricating nipples
9.2Lubricants
Most of the machine’s bearings are lubricated automatically via
the compressed air system. However, there are 12 bearings that
you need to lubricate manually as required. Check whether the
grease disappears into the nipple or simply flows over it. NB:
Take care not to over-lubricate, as this can damage the bearings.
Lubrication nipples by the fleshing beam
Lubricate the guide rails with guide oil as required.
HG item no. 476590
As air line oil (“mist lubricator”) we recommend VG 5 Q8
Dynobear. HG item no. 476560
As grease/rust protection for lubricating nipples, we
recommend Q8 Rembrandt EP 2. HG item no. 476570
The four lubrication nipples by the fleshing beam are located
behind the beam suspension fitting.
9.3 Protection devices
It is only permitted to remove any of the protection devices on
the machine in connection with repairs or service procedures.
Lubrication nipples by the fat scrapers
9.4Storage
When you have finished work for the season, it is important to
clean the machine thoroughly and make sure that it is properly
lubricated.
Clean the machine with water/petroleum and blow it dry with
compressed air. Then lubricate all the guide rails with guide oil.
Grease the lubrication nipples.
The bearings for the four side scrapers have to be lubricated
manually. The arrows indicate the positions of the two lubrica-
WARNING! If the machine is not to be stored in a frost-free
tion nipples on each side scraper. The lubrication nipples for the
location, check the coolant in the beam and drain all the water
other fat scraper are in corresponding positions.
out of the hot water container.
HG – for professional fur farmers
25
Problems
10Troubleshooting
Problem
Possible cause
Solution
Cannot reset an emergency stop
The doors are not closed
Close and lock the doors
The emergency stop is activated
Deactivate the emergency stop
Not enough water in the machine
Check whether any of the nozzles are blocked
The water is not hot enough
Check the water temperature
The bottom roller is catching on the lip
Adjust the bottom roller to move it slightly
The skins are fatty
Tears in the skin around the head
away from the skin
Tears in the skin along the side
The side rollers are catching on the ears
Adjust the side rollers to move them slightly
away from the skin
Loose hair on the skins
Fat pump stops
The scraping process is too hard for the
Reduce the scraping pressure
type of skin
If appropriate, switch to softer rollers
The pump is sucking liquid out of the
Upwardly adjust the number of cycles for acti-
tendons, which then get stuck
vating the pump so that it does not run dry.
Alternatively, reduce the running time.
The hot water container does not heat up
The fuse has tripped
Activate the fuse in the bottom of the hot
water container.
26
There are streaks of fat along the skin, match-
The scraping pressure is too high, which
ing the edges of the beam
means that the skin cannot be turned.
HG – for professional fur farmers
Reduce the scraping pressure.
data
11Technical data
HG 8 Hot Spray Scraper
Dimensions and weight
Width
163 cm
Length
516 cm
Height
215 cm
Net weight
1,500 kg
Electricity
Voltage
3 x 400V + N + PE
Connection
32A + 16A CEE
PLC control
220V + 24V DC
Ampère consumption
31,1A + 14,2A
Compressed air
Air pressure
Air consumption
Connection
7 bar
XXX l/min
Cejn 320 quick release coupling
Capacity
Skins per hour
230
HG – for professional fur farmers
27
Warranty
12 Warranty conditions
Warranty period
HG provides a 12-month warranty, as from the date of delivery.
Only components can be replaced under
the warranty, which therefore does not
cover:
The warranty covers
u Freight costs.
u Costs in connection with waiting time, the machine
u Components that have to be repaired or replaced on
u Loss of earnings and other consequential expenses.
account of material defect or manufacturing error.
The warranty does not cover wearing parts and consumables
owner’s working hours and travel expenses.
Other information
such as:
Before repairs under warranty are carried out, the manufacturer
u Scraping rollers and rubber parts.
must be contacted to agree on the procedure. If the repair work
has been initiated or completed, the cost of same cannot be
The manufacturer’s warranty shall be
terminated in the event that:
claimed against the warranty.
The present warranty conditions can only be amended through
u The machine is used incorrectly.
a separate agreement.
u The machine is used without the operator complying with
the information in the instruction manual and safety regu-
lations.
u The machine is not maintained according to the instruc
tions supplied, or obsolete parts are used.
u The machine is used after a fault or defect has been identi
fied, and the resulting repair is more expensive than the
cost of repairing the original fault.
The owner’s own insurance should cover:
u Fire, break-in, theft and vandalism
u Water and frost damage
u Damage caused by the weather
These are not covered by the manufacturer’s warranty.
Approval of claims for compensation
Approval from the manufacturer of claims for compensation is
conditional upon the defective part(s) being presented to the
manufacturer or the manufacturer’s representative within two
weeks of the damage being identified. The right of ownership
to the damaged part(s) shall be transferred to the supplier of
the new part(s).
28
HG – for professional fur farmers
Warranty
WARRANTY CERTIFICATE
Version
Type/Chassis no.
Model/year
Delivery date
Seller/fitter
Company
Address
Signature
First owner
Address
Tel.
Second owner
Address
Tel.c
SPECIAL CONDITIONS
Warranty certificate to be completed by an HG fitter/sales consultant.
HG – for professional fur farmers
29
service
13Service documentation
HG recommends that, as a minimum, you have an annual season service performed on the machine.
Service no. 1
Service no. 4
Service completed
Service completed
Number of skins _____________________
Number of skins _____________________
Date
_____________________
Date
_____________________
Work order no.
_____________________
Work order no.
_____________________
SIGNATURE
SIGNATURE
Service no. 2
Service no. 5
Service completed
Service completed
Number of skins _____________________
Number of skins _____________________
Date
_____________________
Date
_____________________
Work order no.
_____________________
Work order no.
_____________________
SIGNATURE
SIGNATURE
Service no. 3
Service no. 6
Service completed
Service completed
Number of skins _____________________
Number of skins _____________________
Date
_____________________
Date
_____________________
Work order no.
_____________________
Work order no.
_____________________
SIGNATURE
30
SIGNATURE
HG – for professional fur farmers
service
HG recommends that, as a minimum, you have an annual season service performed on the machine.
Service no. 7
Service no. 10
Service completed
Service completed
Number of skins _____________________
Number of skins _____________________
Date
_____________________
Date
_____________________
Work order no.
_____________________
Work order no.
_____________________
SIGNATURE
SIGNATURE
Service no. 8
Service no. 11
Service completed
Service completed
Number of skins _____________________
Number of skins _____________________
Date
_____________________
Date
_____________________
Work order no.
_____________________
Work order no.
_____________________
SIGNATURE
SIGNATURE
Service no. 9
Service no. 12
Service completed
Service completed
Number of skins _____________________
Number of skins _____________________
Date
_____________________
Date
_____________________
Work order no.
_____________________
Work order no.
_____________________
SIGNATURE
SIGNATURE
HG – for professional fur farmers
31
Spare parts
14Scraping rollers and spare parts
14.1 Scraping rollers
0˚ wave
Per machine
10˚ wave CW
10-tooth scissors
2 pcs.
4 pcs.
1 pcs.
1 pcs.
Orange, Shore 84
195349
195342
195346
195338
Yellow, Shore 86
195350
195344
195348
195339
Grey, Shore 88
195340
14.2 Commonly used spare parts
32
20˚ straight CW
Varenr.
HG 8 Hot Spray Skraber
M200297
Knobbled panel for skin remover
M200780
Rubber for vertical cleaner
M200825
Rubber scraper, 180 mm
M200835
Rubber for horizontal cleaner
M201085
Rubber for scraping screen
M201625
Angled rubber for beam washer
M21592
Rubber for sawdust channel
14.3Circuit diagrams and spare parts
appendix
Contact HG to order a supplementary manual containing air
and electricity circuit diagrams and a spare parts appendix. You
can also access this online at
www.hedensted-gruppen.dk.
HG – for professional fur farmers
Declaration
15EU Declaration of conformity
Hedensted Gruppen A/S
Vejlevej 15
DK-8722 Hedensted
Tel. (+45) 75 89 12 44
Fax (+45) 75 89 11 80
www.hedensted-gruppen.dk
Hereby declares that:
HG 8 Hot Spray Scraper
HG item no. 194005
conforms with:
· The Machinery Directive 2006/42/EC
· The Low Voltage Directive 73/23/EEC
· The ROHS Directive 2011/65/EU
under application of the following
harmonising standards:
· DS/EN 12100-1:2005
· DS/EN 13857:2008
· DS/EN 60439-3
Hedensted, 1 August 2013
Jens Jørgen Madsen
CEO
HG – for professional fur farmers
33
Vejlevej 15, DK-8722 Hedensted
Tel. (+45) 75 89 12 44
Fax (+45) 75 89 11 80
www.hedensted-gruppen.dk
HG – for professional fur farmers