1
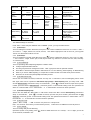
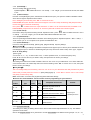
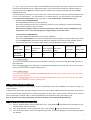
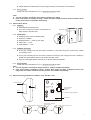
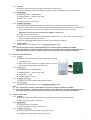
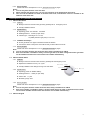
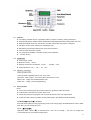
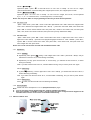
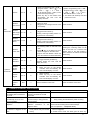
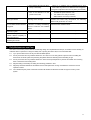
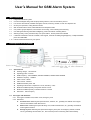
User’s Manual for GSM Alarm System
1. Main Features
1.1
Integrated GSM alarm system
1.2
Concise and elegant design with simple operating interface, CID communication protocol
1.3
LCD screen with calender, available in English, Chinese, Germany, Russian, French and Japanese etc.
1.4
One-key arm operation, coding wireless sensors
1.5
With 30 wireless alarm zones, GSM SMS alert and Telephone alarm
1.6
Can preset 5 groups telephone, with functions of recording, voice indicating and monitoring
1.7
Can distinguish alarming information intelligently, prevent mis-alarms & missing-alarms
1.8
Alarming Priority, history records backup once power failure , AC/DC power both available
1.9
5 methods Arm/Disarm: Remote Controller, Host Keypad , Remote Controlling Keypad(options) , Telephone/Mobile
phone and GSM SMS
1.10
2.
Internal & external antenna for your options
Descriptions of Host panel
2.1
2.2
Specifications
Working voltage:100~240VAC
Operating power: 9-15VDC
GSM Frequency:900/1800MHZ, 900/1800/1900MHZ, 850/900/1800/1900MHZ
Wireless Frequency:433MHZ
Static current: ≤ 80mA
Alarm current: ≤ 500mA
GSM transmission power: 2W
Operating environment: Temperature: -10-50°; Humid ity:<80%
Maximum available quantity of keychain remotes: 4 PCS
Maximum available quantity of wireless sensors: 116 PCS
Dimension:180*120*5(mm)
Zone types and definitions
2.2.1 Zone types: Perimeter zone, Motion zone, Emergency zone
2.2.2 Definitions:
Perimeter zone: Detecting the space like doors, windows, etc., generally use wireless door magnet
sensors and wireless curtain PIR sensors
Motion zone: Detecting the space like living room, aisles and bedrooms, etc., generally use wireless
wide-angle PIR sensors
Emergency zone: Detecting the space like Emergency area (such as emergency distress, medical
rescue, gas leakage and fire alarm, etc., this zone keep 24-hour monitoring status automatically.
1
Generally use panic button, wireless gas sensors and wireless smoke sensors.
2.3
Modes of arming:
2.3.1 “Away Arm” mode:Once any detectors in perimeter zones or motion zones get triggered, the host will alarm
immediately and meantime dial “#” automatically.
2.3.2 “Home Arm” mode:Once any detectors in perimeter zones get triggered, the host will alarm immediately and
meantime dial “#” automatically. It will not alarm after any detectors in the motion zone are triggered.
3.
How to program and setup for the Alarm Host?
3.1
How to program?
3.1.1 Prepare
Use “Pin” or similar tools to press the “SIM CARD SLOT”, it can let you to install SIM card
Please install a valid SIM card, replace the SIM card slot into the Alarm Host
Switch to “on’ from the host panel side to power on the system after you plug into outlet
Adjust GSM antenna and check the GSM signal if it is ok
3.1.2 GSM Signal Indicator:
Solid on: Host panel didn’t get any wireless net or SIM card didn’t be inserted well
Sparkle slow: signal is ok, host panel is in working mode
3.1.3 4.3. GSM signal level:
If you press the “▲” or “▼” when host is in standby mode, it will show as below:
GSM Signal level:
XX YY
“XX” is signal level, 2 digits
“YY” is signal status, it would say “ok” or “no”
“OK” means signal is ok, the host can work properly
“NO” means low signal, need to adjust the installation placeof the host panel
3.2
Press“ESC” to exit, or it will exit automatically if without any operations within 30 seconds.
How to Setup?
Notes:
The host will exit programming mode if without any operation within 30 seconds
It will exit to the previous menu if press “ESC”
If enter codes by mistake for 3 times, the host panel will resume to the standby mode
you can press “▲▼” to adjust programming info. Or to find alarming info.
The detailed menus in the SET are as below:
Main menu
Sub-Menu1
Sub-Menu2
Sub-Menu3
Sub-Menu4
Remark
Set Time
Set time
Hour/minute/second
Set Date
Set date
Year/Month/Day/Week
Auto-dialer#’s
Call center
Personal Nbr#
Set Protocol
CID protocol
No need to setup if
separate use
Entry Delay
Entry delay
Time delay
for entering
Exit Delay
Exit delay
Time delay for exiting
Siren On/Off
Siren off
Siren on
SMS phone no.
SMS reportng
Emergency siren
Alarming tele. number
Perimeter
siren
Motion
siren
Duration time
of alarming
2
User Code
Enter
Usercode
No need to setup
if separate use
Upload
Satus?
Upload status?
Yes no
No need to setup
if separate use
Zone
Attribute
Zone
X
number
Program
Sensor
Zone number
Alarm History
XX: Button
Call Failed
Status
History
DISARM
00:
01.01 03:39
X Zone type
Bypass
Zone?
Yes no
Group no.
Activate
Sensor
Delete
Sensor
Attribute
Set?
Yes no
Activate
Sensor
Learning
Deleting
Sensor
Success
For activating
wireless sensors
For Adding or
deleting wireless sensor
For viewing
alarming history records.
“XX”means
records No.
XX: 01.01
00:08:52
For checking
working records
The detailed settings are as below:
Press “SET” + Enter code( the defaulted code is “888888” )+ ENT, you may see below menus:
3.2.1 【Set time】:
This is for setting the host time. Press ENT, then press “
” button to delete the old record + X X X X X X + ENT →
“X X X X X X”: 6 digits, means “hour, minute, second”,
each takes 2 digits space. Such as 14:21:20, you may press
142120, now the host time will be 14:21:20.
3.2.2 【Set date】:
This is for setting the host date. Press ENT, then press “
” button to delete the old record + X X X X X X X + ENT
→ “X X X X X X X”:7 digits,means “year, month, day and week”. eg:2007/01/17 4, means Jan 17th, 2007, Thursday.
“0” means Sunday.
3.2.3 【Auto Dialer#’s】:
This is for presetting SMS & Reporting telephone numbers. Notes:
Totally 5 telephone/mobile numbers
The first group is fixed for management center,other 4 groups are fixed for personal numbers
Press“▲▼” to select the report method: ”SMS Phone No.” for voice alarming, ”SMS reporting” for SMS alarming
Notes: if you choose “SMS Reporting”, it will just sent to mobile numbers not include home phone numbers.
Press ENT to confirm each phone(telephone/mobile) number
3.2.4 【Set SMS Phone #s】:
Get into the “Auto Dialer r#’s” Menu, Press ENT. You may see ”1: Call Centre”, this is for Manageing Centre. Press
ENT again, here has two operations: SMS Phone #’s(4 groups) & SMS Reporting need you setup. Press “▲▼”
choose SMS Phone #’s, press ENT to setup “2: Personal Nbr”,
press “
” to delete old record, input the new phone
number, press ENT back to SMS Phone #’s , press ENT get into “3: Personal Nbr” setting mode. The operations are
same as “2: Personal Nbr”. The “4: Personal Nbr”
&
“5: Personal Nbr” are same as above operations.
3.2.5 【Set SMS Reporting #s】:
Get into the “Auto Dialer r#’s” Menu+ENT+”1: Call Centre”+ ENT, Press “▲▼” choose SMS Reporting, press ENT to
setup “2: Personal Nbr”,
press “
” to delete old record, input the new phone number, press ENT back to SMS
Phone #’s , press ENT get into “3: Personal Nbr” setting mode. The operations are same as “2: Personal Nbr”. The “4:
Personal Nbr”
&
“5: Personal Nbr” are same as above operations.
3.2.6 【Set protocol】:
【ENT + “▲▼” + ENT】 → “▲▼” to choose “XYJ protocol” or “CID protocol”.
Note: ” XYJ Protocol” is the factory’s communication protocol,
“CID Protocol” is ADEMCO Contact ID protocol.
3.2.7 【Entry delay】:
This is for setting delay time of disarming.
Operations: 【ENT + Entry Delay+ press “
” button to delete old record + X X + ENT】 → “X X”: 2 digits, you can set
00~59 seconds, the default is “00”.
3
3.2.8 【Exit delay】:
This is for setting delay time of arming
Operations:【ENT + “
” delete old record + X X + ENT】 → “X X”: 2 digits,you can set 00~59 seconds, the default
is “00”.
3.2.9 【Alarm On/Off】:
Here has 3 zones(Emergency Zone, Perimeter Zone & Motion Zone) for your options to enable or disable the alarm
when sensors trigered. Operations are as below:
ENT + Emergency Zone On/Off, press “▲▼” to choose ON or OFF.
If choose ON, the system will alarm when sensors trigered. You need to setup the alarming delay time(seconds) in
the next sub-menus. Please do as following:
ENT +press “
” to delete old record + input new time X X + ENT. You can set 00~60 minutes, the default is “03”
If choose OFF, just press ENT to confirm is ok. Then the system will not alarm when sensors trigered.
3.2.10 【User code】:
Here need to setup only based on linking network. Operations: ENT + press “
” button to delete old record + X X X
X + ENT】 → “X X X X”: 4 digits, you can set 0000~9999. Without defaulted User Code.
3.2.11 【Upload status】:
This is for uploading Arm/Disarm/Alarm information to the Managing Centre. Operations:【ENT + “▲▼” + ENT】 →
“▲▼” choose “yes” or “no” for upload or not upload. The defaulted is “No”.
3.2.12 【Zone Attribute】:
Here is for setting【Zone number】,【Zone type】,【Bypass Zone】 &【Entry Delay】.
【Zone number】:
】:
Here has 31 zonesfor your settings. 29 wireless zones(Each zone supports up to 4 sensors) and 2 dedicated zones for
remotes(Supports up to 4 remotes or wireless keypads per zone). Each zone needs to setup “Zone Type”, “Bypass
Zone” & “Entry Delay”.
【Zone type】:
You can see “2”, “1”, “0”.( “2” mean motion zone, “1” means perimeter zone, “0” means emergency zone)
Press “▲▼” to choose the one you desire to setup, then press ENT to confirm your settings.
【Bypass Zone】:
】:
This setting is for make zones enable or disable. Here has “Yes” & “No” for your alternatives. “Yes” means make this
zone’s sensors silent, “No” means keep this zone’s sensors working. Press “▲▼” to choose “Yes” or “No”, then press
ENT to confirm your settings.
【Entry Delay】:
】:
This is for settings delay time of alarming. Here has “Yes” & “No” for your alternatives.The delay duration time please
refer to what you have prest in the menu 3.2.7【Entry delay】(page 3).
Press “▲▼” to choose “Yes” or ‘No” to setup
entry delay or without entry delay.
Note:
:Press “ESC” to exit from the programming status after finish settings.
Below are the “Zones Attribute” lists for wireless sensors programming for your reference:
Zone
Zone
Bypass
Entry
Number
Type
Zone
Delay
00 ~ 01
02 ~ 10
11 ~ 20
21 ~ 30
——
Emergency
zone
Perimeter
zone
Motion
zone
No
No
No
No
No
No
No
No
Compatible Accessories
Remark
Wireless Keychain remote &
Wireless Keypad
Wireless Smoke Alarm,
Wireless Gas Alarm& Panic button.
Support up to
Wireless Door Magnet &
4 sensors per zone
Wireless Curtain PIR
Wireless Wide-Angle PIR
Motion Sensor
3.2.13 【Program Sensor】
This setting is for adding or deleting Sensors in the above mentioned Zones(Includes Zone 00, 01). The detailed
operations are as below:
Get into the Program Sensor menu, press ENT to choose Zone Number from different Zone Types(00 ~ 01, 02 ~ 10,
4
11 ~ 20, 21 ~ 30). E.g. if you want to learn a smoke alarm(belong to Emergency Zone) to the alarm host, you have to
choose the Zone Number from 02~10(Emergency Zone), can not choose Zone Number from other Zone Types. If
have old records, press
button to delete, input new number from the keypad, press ENT gets into the Group
Number setting mode.
This Group Number is for Sensors’ numbers, each zone can be connected up to 4 sensors, the Group Number is from
00 to 03. “00” means Sensor 1, “01” means Sensor 2, “02” means Sensor 3, “03” means Sensor 4. Press ENT gets
into Activate Sensor/ Delete Sensor mode, press “▲▼” to make Activate Sensor or Delete Sensor settings.
3.2.13.1 If choose Activate Sensor
This means adding Sensors to this host. Operations:
Get a sensor learning to the host, the word “learning” will show on the LCD Screen, if have been learned, the
word “success” will show on the LCD Screen.
Note: If a word “update?” shows on the screen, which means this sensor has been added before, you
may choose “Yes” or “No” to decide going on programming or not for this sensor.
3.2.13.2 If choose Delete Sensor,
This means deleting the added sensors from the host. Operations:
Get into the Program Sensor menu, choose Zone Number and Group Number you desire to delete, press “▲▼”
to choose Delete Sensor, press ENT, the host will give a long beep sound. Then the words “Deleting Sensors
Success” will show on the LCD Screen, which means you have deleted the sensors successfully.
Wireless
Keychain
Sensor Types
Remote
The default
Zone Number
00
Wireless
Wireless
WirelessCurtain
Door/Window
Wide-AnglePIR
PIR Sensor
Sensor
Motion Sensor
(N/A)
11
21
12
Wireless Gas
Wireless
Alarm (N/A)
Smoke Alarm
02
03
3.2.14 【Alarm History】
This menu is for checking the alarm history records, able to memory up to 100 records with Alarm Status and time &
date. Operations:
Get into the Alarm History menu, press ENT to check the first (00) alarm history record, press “▼” to view next other
history records. Press ESC to exit the checking mode.
3.2.15 【Status History】
This menu is for checking the ARMED or DISARMED detailed time of the system. Able to memory up to 100 records
with time & date. Operations:
Get into the Status History menu, press ENT to check the first(00) status history, press “▼” to view next other status
history records. Press ESC to exit the checking mode.
4.
How to Revise Master code?
This setting is for changing the “Enter Code” of the host. The defaulted “Enter Code” is “888888”. If you desire to change, you
may do as below:
In standby mode, press “SET”, the screen will show ”Enter Code”, you can input “999999”(Fixed code), press ENT, the screen will
show “Enter New Code”, please input 6 new digits from keypad, then press “ENT”. Screen will show “Re-enter Code”, pls input
this new digits again, and press “ENT” to confirm. Meanwhile the host panel will be back to the standby mode.
Note: If input the codes 3 times by mistake, the host will be back to the standby mode automatically.
5.
How to operate the Alarm Host?
5.1
Record:Slide the switch on the host panel side to “ON”,keep pressing“
” and speak close to the speaker of host,
and then release, the voice recorded.
” and you will hear the previous record.
5.2
Play:Slide the switch on the host panel side to“DC,keep pressing“
5.3
Arm:BY wireless remote:press the corresponding arm button and the host will beep once to successfully complete
the operation
5
By Host panel(Keypad):【0 + master code + ENT + “▲▼” + ENT】→ “▲▼”to choose “armed home” or “armed away”
5.4
Disarm: By wireless remote: press the corresponding disarm button and the host will beep twice to successfully
complete the operation
By Host panel(Keypad): 【ESC + master code + ENT 】 →the host will beep twice to successfully complete the
operation
5.5
Emergency: By wireless remote: Press Emergency key and the host will alarm immediately;
By host panel(Keypad): press
5.6
,and the host will alarm immediately.
Telephone alarm: After receiving the call, you will hear the recorded voice message immediately, it can be played for
30 seconds repeatedly, then follow the below instruction:
5.6.1 Input “8” to enter into the listening status for 20 seconds automatically, you can hear the alarming event sounds
from phone.
5.6.2 Input”#” to play the recorded voice message for one time automatically
5.6.3 Input “*”, the host will end the call and stop dialing any auto dialer#.
5.6.4 Directly hang off the telephone, the host will end the call and automatically dial the next auto dialer#.
5.7
SMS reporting: Mobile will get SMS like “ System Alarming XX, YYYY”, “XX” means zone number, “YYYY” means the
detailed sensor.
5.8
Arm remotely by phone: 30 seconds after successfully dial the telephone number of host, enter the password of host
after the beep---enter 1 after beep—the host will automatically hang up after beep to successfully complete the
operation.
5.9
Notes: You can set “Armed Away” remotely by phone, but keep notes that you can’t set “Armed Home” by this way.
5.10 Disarm remotely by phone: 30 seconds after successfully dial the telephone number of host,
enter the password of
host after the beep---enter 0 after beep—the host will automatically hang up after beep to successfully complete the
operation.
5.11 Arm by SMS:
You can edit SMS “ XXXXXXBF” to host panel, the host panel would arm automatically when getting
this SMS, and also will message back to mobile “Arm successfully”.
5.12 Notes: Arm by SMS is only for “Armed away”!
5.13 Disarm by SMS:
You can edit SMS “ XXXXXXCF” to host panel, the host panel would disarm automatically when
getting this SMS, and also will message back to mobile “Disarm successfully”.
5.14 Look up alarm history: press “▲▼” to find the “Alarm history”, and then press “ENT” to look up the previous alarm
history, at most 100 pieces of history are available can be saved.
5.15 Look up status history: press “▲▼” to find the “status history, and then press “ENT” to look up the previous alarm
history, at most 100 pieces of history are available can be saved.
5.16 Alarming dialing mode: After the host goes off, it starts to repeatedly dial the auto dialer#’s for three times ne by one
from the first one. The answered number will not be dialed again.
5.17 Power disconnection: If power got disconnected, the host panel will sound “di” each 8 seconds.
6.
Descriptions of basic accessories
6.1
Wireless Remote
6.1.1 Features:
To control the alarm host to arm and disarm.
Away
Disarm
Home
Emergency
With the emergency key for urgent help.
6.1.2 Specifications:
Operating power: 27A 12V alkaline battery
Emitting distance: ≥100m (in open area)
Service life: ≤2 years
6.1.3 Installation and Usage:
For users to take along.
Generally, press the “Away” key to arm before leaving home; and press the “Disarm” key to disarm; “Home”
is setting “Armed home”, please take notes that “Arm Home” is only effective for sensors in Perimeter Zone
(door sensor\curtain PIR sensor) and sensors in Emergency Zone (Like Gas sensor\Smoke sensor\Glass
sensor\Emergency button), it is not effective all sensors in Motion zone(Like wide-angle PIR).
6
Please replace the batteries after one year usage and when you feel shorter control distance.
6.1.4 How to program
Please refer to the descriptions of 3.2.13 【Program Sensor】in page4.
Note:
You can only add 1 remote each time, totally 8 available to be added.
Each serial number is available to study 1 remote, the latter configured remote will be workable and the
former one becomes not workable automatically.
6.2
Wireless Door Sensor
6.2.1 Features:
Generally set as Perimeter zone.
If any door or window is opened, it will transmit the
Working Light
alarm signals to the alarm host.
6.2.2 Specifications:
Operating power: 23A 12V alkaline battery
Frequency: 433MHZ
Door
Emitting distance: ≥100m (in open area)
Service life: ≤1 year
Alarm Distance: <4cm
6.2.3 Installation and Usage
Fix the part of magnet onto the door frame in a position of 1.6m above the ground to prevent any children
from bumping onto it
Fix the part of emitting onto the door frame, make sure to keep the part of magnet and part of emitting in
parallel, the space between the two parts shall be less than 10mm
Upon the working light flashes frequently in red, please replace the batteries
6.2.4 How to program
Please refer to the descriptions of 3.2.13 【Program Sensor】in page4.
Note:
You can only add 1 wireless door magnet each time, totally 4 available to be added.
Each serial number is available to study 1 wireless door magnet, the latter configured wireless door
magnet will be workable and the former one becomes not workable automatically.
6.3
Wireless wide-angle PIR Sensor(
(Address code: D0~
~D3:
:1101)
)
021
Working Light
D0
On / Off
D3
Low-Votage
Light
Power Switch
Down/Off
Up/On
Lens
Learning Emitting Switch
Jump Line
Fix the PIR by pushing
it downwards
Install the bracket
Wa ll
Wa ll
Keep the switch "on"
Wa ll
7
6.3.1 Features:
Mainly monitor and control indoor space, generally set as Motion zone.
When human body enters into etecting area, the sensor will transmit alarm signals to the alarm host.
6.3.2 Specifications:
Operating power: 9V alkaline battery
Emitting distance: ≥100m (in open area)
Service life: ≤1 year
Detecting distance: 110° 10×10m
6.3.3 Installation and Usage
Fix the bracket on suitable wall surface or in wall corner at a distance of 2~2.4m above the ground;
Open the sensor shell to connect the batteries well and adjust jumper line (short circuit “5S”: The sensor will
detect once every 5 seconds; short circuit “5MIN”: The sensor will detect once every 5 minutes;
Suggestion: short circuit “5S” for testing and “5MIN” for normal use;
Fix the sensor onto the bracket;
Adjust the sensor to a proper angle and then slide the power switch on the side to “ON”, and it will enter into
the normal working state after 30 seconds;
Upon the working light flashes frequently in green, please replace the batteries.
6.3.4 How to program
Please refer to the descriptions of 3.2.13 【Program Sensor】in page4.
Note:
You can only add 1 wireless wide-angle PIR sensor each time, totally 4 available to be added.
Each serial number is available to study 1 wireless wide-angle PIR sensor, the latter configured wireless
wide-angle PIR sensor will be workable and the former one becomes not workable automatically.
6.4
Wireless Curtain PIR Sensor
6.4.1 Features:
Mainly monitor and control indoor stereoscopic space, generally
set as Motion zone.
When human body enters into the detecting area, the sensor
will transmit the alarm signals to the alarm host.
6.4.2 Specifications:
Operating power: 9V alkaline battery
Emitting distance: ≥100m (in open area)
Service life: ≤1 year
Detecting distance: 100° 8m
6.4.3 Installation and Usage
(As same as the way for Wireless wide-angle PIR sensor)
6.4.4 How to program
Please refer to the descriptions of 3.2.13 【Program Sensor】in page4.
Note:
You can only add 1 wireless curtain PIR sensor each time, totally 4 available to be added.
Each serial number is available to study 1 wireless curtain PIR sensor, the latter configured wireless
wide-angle PIR sensor will be workable and the former one becomes not workable automatically.
6.5
Wireless Indoor Siren
6.5.1 Features:
Work with alarm host, wireless receiving alarm signals, spot alarming with sound and flash
With power plug, usually for indoor use.
6.5.2 Specifications:
Operating Power: 100~240VAC
Receiving Distance:≥100 M(In open area)
6.5.3 Installation and Usage:
Plug the wireless siren into suitable indoor power socket
Suggestion: Generally around 1.8M from the ground
8
6.5.4 How to program
Please refer to the descriptions of 3.2.13 【Program Sensor】in page4.
Notes:
You can only add 1 wireless siren each time.
When configure the wireless siren, you can only operation on the keypad of the alarm host.
One siren can be studied to at most 10 wireless alarm hosts, multi wireless sirens are available to be
added for each alarm host.
7.
Descriptions of Optional accessories
7.1
Wireless Gas Alarm
7.1.1 Features:
Mainly monitor and control indoor gas leak, generally set as Emergency Zone.
Usually installed in kitchen
7.1.2 Specifications::
Operating power: 110~240VAC,50~60HZ
Emitting distance::≥100m (in open area)
Inductive gas: Natural gas: 0.1%-0.5%
Liquefied petroleum gas (LPG): 0.1%-0.3%
7.1.3 Installation and Usage:
Fix the gas alarm onto proper wall surface inside the kitchen.
Connect the alarm to the power and it will be ready to detect after two minute
7.1.4 How to program
Please refer to the descriptions of 3.2.13 【Program Sensor】in page4.
Note:
You can only add 1 wireless gas alarm each time, totally 4 available to be added.
Each serial number is available to study 1 wireless gas alarm, the latter configured wireless gas alarm
will be workable and the former one becomes not workable automatically.
7.2
Wireless Smoke Alarm
7.2.1 Features:
Mainly monitor and control indoor fire risks, generally set as Emergency Zone.
Replace the batteries for every 1 or 2 year.
Usually installed on the ceilings of living room and aisles.
Wor king Ligh t
Air Hole
7.2.2 Specifications:
Tes t But ton
Operating power: 9V alkaline battery
Emitting distance: ≥100m (in open area)
Service life: ≤1 year
Monitoring range: 20m
7.2.3 How to program
Please refer to the descriptions of 3.2.13 【Program Sensor】in page4.
Note:
You can only add 1 wireless smoke alarm each time, totally 4 available to be added.
Each serial number is available to study 1 wireless smoke alarm, the latter configured wireless smoke
sensor will be workable and the former one becomes not workable automatically.
7.3
Wireless Keypad
9
7.3.1 Features:
LCD display, calendar function, upgraded and Micro-computer controlling, steady performance
Supported languages: Simple Chinese\Traditional Chinese\English\German\French\Russian and more
Work with wireless alarm host, with function of armed home\armed away, disarm, emergency
Including 3 codes: master code\user's code\distress code
Remembers programming settings when power is disconnected
Code recorded and resume function
Two power ports available, convenient using and easy installation
“One key” arming
7.3.2 Specification:
Power supply: 12VDC
Maximum current: ≤50mA
Working environment: temperature: -10~50℃
humidity: ≤97%
Product dimension: 125 × 125 × 25 (mm)
7.3.3 Operation and settings
Code type and function:
Code type: fixed code(9999),master code, user's code
Fixed code:9999, 4 digits,can revise master code and user's code
Master code:4 digits, set time\date\wireless code
User's code:4 digits, control arming\disarming
7.3.4 How to program
Notes:
LCD screen will exit programming mode if without any operations within 30 seconds
It will be back to the last menu if press “ESC” menu
If three time putting wrong program code, the host will resume to the very original status
If input the codes 3 times by mistake, the host will be back to the standby mode automatically
The detailed【
【Programs】
】is as below:
Press SET button getting into the programming mode, Enter Code (4 digits), the defaulted enter code is “8888”,
press ENT, you may see below menus:
7.3.4.1 【Set Time】:
Operations:【ENT + press“
”to clear old record + X X X X X X + ENT】→ “X X X X X X”: 6 digits, and
“hour\minute\second”, each takes two digits space
10
7.3.4.2 【Set Date】:
”to clear old record + X X X X X X X + ENT】→”X X X X X X X” 7 digits,
Operations:【ENT + press“
“year\month\date\week”, first three setting take 2 digits space for each, and 1 digits space for week
7.3.4.3 【Wireless Code】:
Operations:【ENT + X X X X X X X X + ENT】→”X X X X X X XX”: 8 digits, from “A0-A7”, can be replaced
by ”2”, ”1”, “0”. “2”means low level, “1” means high level, “0” means empty
Notes: You can press “ESC” to exit programming mode when you finish above operations.
7.3.5 Set master code
【SET + 9999 + ENT + press “▲▼” + ENT + Enter old 4 digits master code + ENT + Enter new 4 digits master
code + ENT + Reenter new 4 digits master code + ENT】 → press “SET” then enter “9999”, enter “ENT” then
press “▲▼” to choose “Revise master code” then press “Ent”, reenter 4 new master code, and then press
“ENT”, then, enter 4 new master code twice, then press “Ent” (Factory default set is 8888)
7.3.6 Set user's code
【SET + 9999 + ENT + press “▲▼” + ENT + Enter master code + ENT + 4 digits user’s code + ENT + same 4
digits user’s code + ENT】 →press“SET” and programming lights would be on,enter“999999”
,press “ENT”,
repress “▲▼” to choose “revise user’s code”, then press “ENT”, enter master code, then press “ENT” and
enter 4 digits user code, press “ENT”
Notes: user's code can't be same as fixed code of 9999 and master code.
7.3.7 Operations
7.3.7.1 Arming:
Operated by code:【press“
0
”arming + enter 4 digits user’s code + ENT + press“▲▼” + ENT】
,and you
will hear the host sound “bi”, it means arming successfully
Operated by one key: press “armed home” or “armed away”, you will hear the host sound “bi”, it means
arming successfully
Note: If you didn’t hear the host sound “b”, it means failed in arming, and you need to press “arm” again.
7.3.7.2 Disarming:
【press“
”disarming + enter 4 digits user’s code + ENT + ENT】, you will hear the host sound “bi bi”, it
means disarming successfully
Note: if you didn’t hear the host sound “bi bi”, it means failed in disarming, and you need to press “disarm”
again.
7.3.7.3 Emergency:
Press “
” button, and the host will sound out alarming immediately
7.3.8 How to program
Please refer to the descriptions of 3.2.13 【Program Sensor】in page4.
Note:
You can only add 1 remote keypad each time, totally 8 available to be added.
Each serial number is available to study 1 remote keypad, the latter configured remote keypad will be
workable and the former one becomes not workable automatically.
7.4
Wireless outdoor siren
11
7.4.1 Features
Nice, exquisite and waterproof
Mico-computer controlling, steady performance and high-class quality
Study to at most 10 pcs of wireless alarm host
With inbuilt charging circuit and back up accumulators, automatic AC power and DC power transformation
Low standby power consumption, self-inspection of lower battery voltage, automatic charging
Wall hanging installtion
7.4.2 Specifications:
Operating power:110~240VAC, 50Hz
Static power consumption:≤40 mA
Working power consumption:≤450 mA
The maximum alarm sound with flash:3 Minutes
Receiving distance:≥100M(In open area)
Alarming volume:≥105db
7.4.3 Installation and usage
Press down the green power switch on the back after connecting to the AC power
Study the siren to the alarm host according to the instruction below
Unplug from the AC power, fix it in the proper outdoor place with handing hook, and then plug to the AC
power
The max time for alarming sound with flash is 3 minutes, it will stop automatically after the alarm host is
disarmed
When the back-up battery has a lower voltage than 10VDC, the charging indicator turns on, the back-up
accumulators will be charged automatically, the approximate charging time is 20 hours,
when the charging
indicator off, it means it has finished charging
7.4.4 How to program
7.4.4.1 Activate
(Siren) connect the siren to power by plugging in to the socket------ press red studying switch on the back,
siren lights on
(Alarm host) Press
(
on the alarm host to let the alarm host goes off------ Let it stop alarming
-----Input programming password---ENT)---you will hear “DIDI” from the alarm host after 5 seconds
One siren can be studied to at most 10 wireless alarm hosts, multi wireless sirens are available to be added
for each alarm host.
7.4.4.2 Deactivate
Keep pressing the red button for 10 seconds and a successful deactivation will be followed by a flash of the
alarming light
Note:
:all the alarm hosts will become invalid to this siren after this operation
Preview of how to activate and deactivate “Basic accessories” and “Optional accessories”
Type
Zone
No.
Max. no. to
be
programmed
How to activate
How to deactivate
12
Basic
accessories
Remote
00、01
8
1) 【SET +Programming code + “▲▼”
“Program sensor” + ENT + “ ” + Y Y
+ ENT + “
” + X + ENT +
“▲▼””Activate sensor” + ENT 】
(The
screen would say learning)
2) Press any key on the remote twice
successively, the host LCD will
display ”Success”;
Wireless
door sensor
11~20
4
1) Same as above
2) Trigger the door magnet sensor twice
successively
Same as above
4
1) Same as above
2) Trigger the PIR sensor by
pressing ”Learning Emitting Switch” on
the panel twice successively
Same as above
4
1) Same as above
2) Trigger the PIR sensor by
pressing ”Learning Emitting Switch” on
the panel twice successively
Same as above
——
1) After connecting to the power, press
the “learning switch on the side of the
siren
2) Press“ ” key on the alarm host, then
disarm b keypad on the alarm host
3) Light on the siren flashes 5 times and
then off indicates successful activating
After connecting to the power, keep
pressing the “Learning” switch on the
side of the siren for 5 seconds and
release, light on the siren flashes 2
times and then off indicate successful
deavtivating
4
1) Same as above
2) Trigger wireless gas alarm by
releasing smoke, the host LCD will
display “Success”
Same as above
Wireless
Wide-Angle
PIR sensor
Wireless
Curtain PIR
sensor
Wireless
Indoor siren
Wireless
Gas alarm
Optional
Accessories
8.
Wireless
Smoke
Sensor
21~30
11~20
N/A
02~10
02~10
4
Remote
Keypad
00、01
8
Wireless
Outdoor
Siren
N/A
——
1) 【SET +Programming code + “▲▼”
“Program sensor” + ENT + “ ” + Y Y
+ ENT + “
” + X + ENT +
“▲▼”Delete sensor” + ENT 】
2) The alarm host will beep once and
press ESC to exit.
1)
2)
Same as above
Press any key on the remote
controller twice successively, the
host LCD will display ”success”
Same as above
1)
2)
Same as above
Press any key on the remote
controller twice successively, the
host LCD will display ”success”
Same as above
Same as wireless indoor siren
Same as wireless indoor siren
Common Problems and Solutions
Symptoms of Faults
The alarm host goes off
immediately after connected to
the power
The alarm host can’t
automatically record or can’t
record completely
Repeatedly receiving the alarm
telephone
The host does not alarm after
the detector is triggered in arm
state
Possible Cause
The telephone incoming line has
not been connected or not well
connected.
The record switch is not on;
The Record key is being pressed
while recording
Fail to operate according to the
operation
instruction
of
the
telephone alarm
1. Caused by the functions of arm
mode (Armed Away and Armed
Home);
Solution
Connect the telephone incoming line well.
1.
2.
Slide the record switch to “ON”;
Keep pressing the RECORD key while recording.
Follow the below instructions after answering the alarm
phone calls and hearing the recorded message:
(See 2.5 Operation --- Telephone alarm)
1.“Armed Away” mode: the alarm goes off when any
sensor is triggered;
2. “Armed Home” mode: the alarm goes off when any
13
2. Have already setup time for Entry
Delay or Exit Delay
The PIR sensor doesn’t work
1. Not connected to the power
2. Port of the detector is in the
power-down mode.
The detecting distance of PIR
sensor gets shorter
The ambient temperature in the
detecting area is too high.
The host does not alarm after
the new added wireless detector
is triggered.
Failed to follow the operation
instruction of “Adding and deleting
sensors” to add the new wireless
sensor
Batteries are running out.
The
PIR
sensor
flashes
frequently in green.
The door magnetic sensor
indicator flashes frequently in
green after alarming.
The distance of the remote
controller gets shorter.
9.
st
sensor in 1 Defense Line is triggered and it won’t
st
alarm when any sensor in 2 Defense Line is triggered
3. Program to adjust the time for Entry Delay or Exit Delay
1. Open the sensor shells to install the batteries well
and slide the power switch to “On”;
2. “5S”: detect once every 5 seconds;
“5MIN”: detect once every 5 minutes;
When the ambient temperature in the detecting area
exceeds the human body temperature, the detecting
distance will get shorter, it’s normal.
Follow the operation instruction of “How to program” to
activate the new wireless sensor
Replace with new batteries of the same specification.
Batteries are running out.
Replace with new batteries in the same specification.
Batteries are running out.
Replace with new batteries in the same specification.
Daily Maintenance and Care
This alarm is the hi-tech product with the outstanding design and sophisticated technique, and shall be used carefully. To
make the alarm to operate for a long term stably and to prolong the service life, it is recommended that:
9.1
9.2
Try to put the alarm host in the dry and well-ventilated places.
Do not put the host and any wireless detectors in too cold, too hot or dusty places to prevent it from curtailing the
service lives of electric parts and preventing the plastic shell from distorting and accelerating to age.
9.3
Do not put the host and any wireless detectors in low and too exposed places to prevent the children from touching
them or the thieves from finding them.
9.4
Regular testing is necessary for finding and resolving problems in time.
9.5
Regularly check the batteries in all wireless sensors and replace the running out batteries to ensure the normal
operation of them.
9.6
You’d better keep the power of the alarm host and all wireless accessories off while a long-time vacancy of the
system.
14