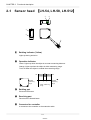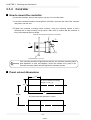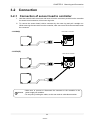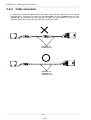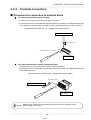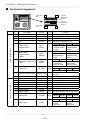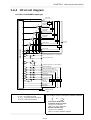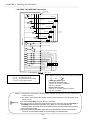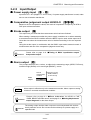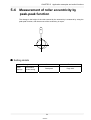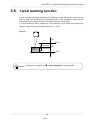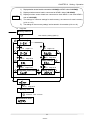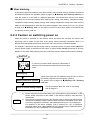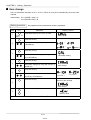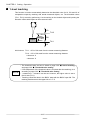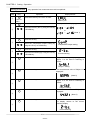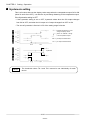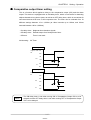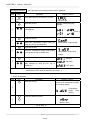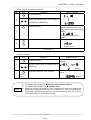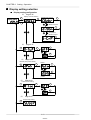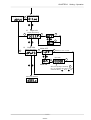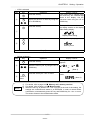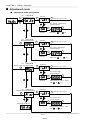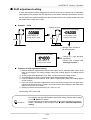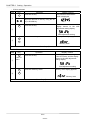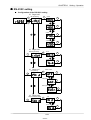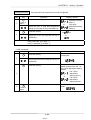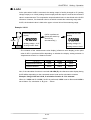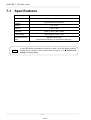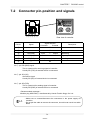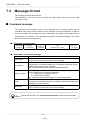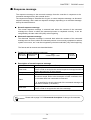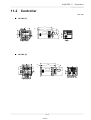
1
LED Type Optical Displacement Sensor ޓޓޓޓޓޓޓޓޓޓޓޓޓޓޓޓޓޓޓޓޓޓ Sensor head LH-50 series High-functionality controller 1-head type 2-head type LH-CS6 (P) LH-CD6 (P) User’s Manual First Edition 03/2003 Contents Contents 1. 2. CHAPTER 1 ޓ1-1 ޓޓޓ1-2 ޓޓޓ1-3 INTRODUCTION.........................................................1 CHECKING PACKED ITEMS........................................3 CAUTIONS IN HANDLING Working environment......................................................1-1 Wiring and noise countermeasures.................................1-3 Warming-up....................................................................1-3 CHAPTER 2 FUNCTIONAL DESCRIPTION ޓޓޓ2-1 Sensor head 㨇LH-54, LH-58, LH-512㨉 㨉.......................................2-1 2-2 ޓController 㨇LH-CS6(P)/CD6(P)㨉 㨉.............................................2-3 ޓޓ CHAPTER 3 MOUNTING AND CONNECTION ޓ ޓ3-1 M ou nt in g. .. .. .. .. .. . .. .. .. .. .. .. .. .. .. .. .. .. .. . .. .. .. .. .. .. .. .. .. .. .. .3 - 1 3-1-1 Sensor head..................................................................3-1 3-1-2 Controller...................................................................3-3 Connection........................................................3-4 ޓޓޓ3 - 2 3-2-1 Connection of sensor head to controller....................3-4 3-2-2 Cable extension............................................................3-5 3-2-3 Terminal connection..............................................3-6 3-2-4 I/O circuit diagram...................................................3-8 3-2-5 Input/Output..........................................................3-10 3-2-6 Serial I/O...........................................................3-19 CHAPTER 4 ޓޓޓ4-1 4-2 FOR OPTIMUM MEASURMENT Setting flow for optimum measurement..........................4-1 Optimum setting method................................................4-3 03/2003 Contents CHAPTER 5 ޓ ޓޓ5-1 ޓޓޓ5-2 ޓޓޓ5-3 APPLICATION EXAMPLES AND USEFUL FUNCTIONS Level difference measurement of objects by A-B...................5-1 Object thi c k n es s m ea s u re m e n t b y L - ( A+B) . . .. . . .. . . . .. . 5 - 2 Extreme point measurement by ޓޓޓ 5-5 peak hold / bottom hold function...........................................5-3 Measurement of roller eccentricity by peak-peak function......................................................5-4 BUSY input + Strobe output.......................................5-5 ޓޓޓ ޓޓޓ 5-6 5-7 5-8 5-9 5-10 Auto-response speed...................................................5-6 Height measureme nt by 0-ADJ function. .......... ........5-7 1-level teaching function.............................................5-8 2-level teaching function.......................................... 5-9 Analog output hold function..................................... 5-10 ޓޓޓޓ5-4 ޓޓޓޓ ޓޓޓ ޓޓޓ CHAPTER 6 SETTING OPERATION ޓޓޓ ޓޓޓ 6-1 Configuration.............................................................6-1 6-2 Prior to operation......................................................6-3 6-2-1 Setting flow..................................................................6-3 6-2-2 Default memory and user memory..............................6-4 6-2-3 Caution on switching power ON.................................6-6 ޓ ޓޓ6-3 Functions and setting procedure....................................6-7 ޓޓ ޓ ޓޓ6-4 List of initial settings..................................................6-118 CHAPTER 7 ޓ ޓޓ7-1 ޓ ޓޓ7-2 ޓ ޓޓ7-3 ޓޓޓ7-4 ޓޓޓ ޓ ޓޓ7-5 CHAPTER 8 RS-232C CONTROL Specification........................................................................7-1 Connector pin-position and signals...................................7-2 Message format..............................................................7-3 Cautions.........................................................................7-6 Commands description .................................................. 7-8 DESCRIPTION OF TERMS CHAPTER 9 ERROR INDICATION AND TROUBLESHOOTING Error indication...........................................................9-1 ޓޓޓ9-1 9-1-1 System errors.............................................................9-1 9-1-2 RS-232C communication errors..................................9-2 9-1-3 Measurement errors................................................9-3 9-1-4 Other errors.............................................................9-4 Troubleshooting..........................................................9-5 ޓޓޓ9-2 ޓޓޓ 03/2003 Contents CHAPTER 10 ޓޓޓ10-1 ޓޓޓ10-2 SPECIFICATIONS Sensor head.................................................................10-1 Controller.....................................................................10-2 CHAPTER 11 ޓޓޓ11-1 ޓޓޓ11-2 DIMENSIONS Sensor head.............................................................11-1 Controller....................................................................11-2 03/2003 Contents 㧙 MEMO 㧙 03/2003 Introduction 1. INTRODUCTION Thank you very much for buying our LED Type Optical Displacement Sensor, ‘sensor head LH-50 series / high functionality controller LH-CS6 (P) and LH-CD6(P). Please read this User’s Manual carefully and thoroughly to make the most of this product’s excellent performance capabilities and to use it safely and correctly. This system has been strictly checked and tested prior to its delivery. However, before use, make sure that there is no abnormality caused by transportation and also perform an operation check. If the system is damaged in transit or does not perform as per the specifications, please contact our office. ޓعNotes 㧝㧚 There may be cases that the illustrations of the product shown in this manual differ slightly from the actual product. 㧞㧚 The contents of this manual may be subject to change without anyޓprior notice. Further, any reproduction or modification of all or a part of this manual without permission is prohibited. 㧟㧚 Full care has been taken to prepare the contents of this manual. However, should there be any unclear point, error, etc., which you become aware of, please feel free to contact us. 㧠㧚 We shall not be responsible for any adverse consequences of operation, regardless of item 3 mentioned above. Warranty 1) Warranty period SUNX warrants this product for a period of one year from the date of purchase or delivery to the purchaser’s appointed warehouse. 2) Scope of warranty During the above mentioned period, if a failure of the product occurs under normal use and operation, and if it is found by SUNX that it is responsible for the failure, it shall remedy the defect or tender substitution for exchange at its cost and expense. However, in no event shall SUNX be liable for the failure, damage or loss stipulated below: Ԙ Failure caused by instructions, standards, or handling specified by the customer ԙ Failure caused by modifications done in the structure, capabilities, specifications, etc., without consulting SUNX, after the purchase or the delivery of the product Ԛ Failure caused by a development which could not be foreseen based upon the technology in practice at the time of purchase or contract ԛ Failure caused by use which deviates from the conditions/environment given in the product catalog or specifications Ԝ In case this product is used by being incorporated in the customer’s machine, failure which could be avoided if the customer’s machine had functions and structure commonly accepted in the industry ԝ Failure due to happening of Force Majeure Further, the warranty given here is limited only to this product which has been purchased or delivered. SUNX shall not be responsible for any consequential damage or loss arising out of the failure of this product. 1 03/2003 Introduction Explanation on Used Symbols This manual uses a variety of symbols to ensure safe operation. Before reading this manual, fully understand the meaning of these symbols. ޓ ⼊ޓ๔ WARNING This symbol indicates a warning against things, places or states which may pose a risk or danger to the human body. ᵈޓᗧ CAUTION ޓ ޓޓThis symbol indicates caution against possibilities which may lead to product damage. NOTE ᵈ ᗧ This symbol indicates a possibility of wrong operation. ޓ ෳޓ⠨ REFERENCE This symbol indicates matters which are convenient if remembered, or it provides reference for detailed descriptions of the concerned item. 2 03/2003 ޓޓޓޓޓޓޓޓޓޓޓޓޓޓޓޓޓޓޓޓޓޓޓޓޓޓޓޓޓޓޓޓޓޓޓ 2. Introduction CHECKING PACKED ITEMS ޓBefore use, check to see that the following items are present in the package. ޓ LH-54, LH-58, LH-512 LH-54, LH-58, LH-512 Sensor headޓ Instruction manualޓޓޓޓޓ ޓ 1 No. ޓޓޓޓޓޓޓޓޓޓޓޓޓޓ1 No. LH-CS6 (P), LH-CD6 (P) LH-CS6 (P), LH-CD6(P) Controller 1 No. Instruction manualޓ 1 No. ޓޓޓޓޓޓ ޓޓޓޓޓޓޓ Controller mounting frame (ATA4811) 3 03/2003 1 No. Introduction ̆ MEMO㧙 㧙 4 03/2003 CHAPTER 1 CAUTIONS IN HANDLING 1-1 Working environment.................................1-1 1-2 Wiringޓ ޓ andޓ ޓ noiseޓ ޓ countermeasures.........1-3 1-3 Warming-up................................................1-3 03/2003 CHAPTER 1 Cautions in handling - Working environment ޓޓޓޓޓޓޓޓޓޓޓޓޓޓ 1. WARNING ⼊ޓ๔ Although this sensor uses a red LED as the beam source, do not directly see the beam emitted from the sensor head, since it has been focused and has high optical intensity. 2. Never disassemble the products. 3. Make sure to carry out the wiring in the power supply OFF condition. ᵈޓᗧ CAUTION 4. Operate the products within an ambient temperature of 0 to +45͠ ( se n so r h e a d) , 0 to +5 0 ͠ ( c on tro l le r ). S to r ag e c a n b e a t a n a m bi e n t temperature of -20 to +60͠. 5. Operate the products within 35 to 85% RH humidity. Further, do not use the product under conditions where condensation may occur due to drastic temperature variation. 1-1 03/2003 CHAPTER 1 Cautions in handling CAUTION ᵈޓᗧ 6. Ambient illuminance with incandescent light should be 3,000lx or less for LH-54, LH-58 and 2,500lx or less for LH-512. 7. Do not allow any water, oil, fingerprints etc., which may refract light, or dust dirt, etc., which may block light, to stick to the emitting/receiving surfaces of the sensor head. In case they are present, wipe them with a clean, soft cloth or lens paper. 8. Take care that extraneous light, such as sunlight or light having the same wavelength, does not fall on the receiving part of the sensor head. Especially for accurate measurements, install a shield, etc., to block extraneous light. 9. Take care that in case the measured object has a highly reflective surface or is transparent, accurate measurement may not be possible. 10. Although the sensor has IP67 protection, measurement in water or rain is not possible. Further, the connector part is not water-proof. 11. Avoid dust, dirt, and steam. Besides, avoid use at places subject to intense vibrations or shock. 12. Take care that the sensor head does not come in direct contact with water, oil, grease, or organic solvents, such as thinner, etc. 13. Verify that the power supply voltage variation is within the rating. 14. If power is supplied from a commercial switching regulator, ensure that the frame ground (F.G.) terminal of the power supply is connected to an actual ground. 15. If the controller is used for a long time, although it becomes hot, this does not indicate any abnormality. However, if the controller is used by being enclosed in a control box, make sure to provide proper ventilation. 1-2 03/2003 CHAPTER 1 Cautions in handling 1-2 Wiring and noise countermeasures ᵈޓᗧ CAUTION 1. ޓޓޓޓ In case noise generating equipment (switching regulator, inverter motor, etc. ) is used in the vicinity of this product, connect the frame ground (F.G.) terminal of the equipment to an actual ground. 2. The analog output and alarm output are not incorporated with a short-circuit protection circuit. Do not connect them directly to a power supply or a capacitive load. 3. Do not run the wires together with high-voltage lines or power lines or put them in the same raceway. This can cause malfunction due to induction. 1-3 Warming-up ᵈ ᗧ NOTE 1. Take care that after switching on the power supply, there is a muting time of 5 sec. 2. Use this product 30 min. after the power is supplied. Immediately on supply of power, the electrical circuit is yet to stabilize, which may cause variation in measurements. 1-3 03/2003 CHAPTER 2 FUNCTIONAL DESCRIPTION 2-1 Sensor head 㨇LH-54, LH-58, LH-512㨉 㨉........2-1 2-2 Controller㨇LH-CS6(P), LH-CD6(P)㨉 㨉...........2-3 03/2003 CHAPTER 2ޓFunctional description Sensor head 㨇LH-54, LH-58, LH-512㨉 㨉 Ԙ ԙ Ԛ ԛ Ԝ Ԙ Emitting indicator (Yellow) Lights up during emission. ԙ Operation indicator Green: Lights up when the object is at center measuring distance. Orange: Lights up when the object is within measuring range. Turns off when the object is outside the measuring range. Off Lights up in orange Outside measuring range Ԛ Lights up in green 2-1 Lights up in orange Center Within measuring range Off Outside ᷹ቯ▸࿐ᄖ measuring range Emitting part Emits the LED beam. ԛ Receiving part Receives the reflected beam. Ԝ Connector for controller It connects to the controller or the extension cable. 2-1 03/2003 CHAPTER 2ޓFunctional description Spot diameter Ǿ 2.4mm or less Ǿ 1.6mm or less Ǿ 2.8mm ޓ2.0mm Ǿ 2.0mm .6mm Ǿ 1.6mm 2.8mm orએਅ less or less orએਅ less ޓએਅ Ǿ 1.0mm or less LH-58 LH-58 LH-54 LH-54 Center measuring distance (80mm) Center measuring distance (40mm) 0 -10 Ǿ 3.4mm less ororless +10 Distance Distance (mm) -20 0 +20 (mm) Ǿ 3.0mm Ǿ 2.1mm or less or less or less or less LH-52 LH-512 Center measuring distance (120mm) -30 ᵈޓᗧ CAUTION 0 +30 Distance (mm ) The spot diameter is based on the definition of 1/e ² (13.5%) of the beam axis light intensity. Take care that some amount of light spreads out of the specified spot diameter and, depending on the conditions around the measured object, may affect the measurement accuracy. 2-2 03/2003 CHAPTER 2ޓFunctional description 2-2-㧞Controller 㨇LH-CS6(P), LH-CD6(P)㨉 㨉 㧞 Ԧ ԥ Front panel side ԧ Rear panel side ԙ Ԛ Ԙ ԛ ԝ Ԝ Ԡ Ԟ ԟ ԡޓޓԢޓޓԣޓޓԤ Ԩ Ԧ ԧ Description Display hold indicator (Orange) Display scale indicator (Orange) Selected channel indicators (Orange) Emission indicators (Yellow) BUSY indicators (Green) Comparative output indicators (Hi and LO: Orange, Go: Green) 0-ADJ indicator (Green) Analog output hold mode indicator (Orange) Panel lock indicator (Orange) MODE key UP key DOWN key SET key 5 digit LED indicator (Red) RS-232C modular connector Terminal block Ԩ Connectors for sensor head connection Ԙ ԙ Ԛ ԛ Ԝ ԝ Ԟ ԟ Ԡ ԡ Ԣ ԣ Ԥ ԥ Function Lights up during display hold operation. Lights up during display offset operation. Light up on display channel selection. Light up during emission. Light up on BUSY input application. Light up when the comparative output is ON. Lights up on 0-ADJ operation. Lights up when analog output hold mode is set. Lights up when panel lock is set. Used to call memory and store settings. Used to change contents of setting items or setting conditions. Used to change and confirm setting conditions. Displays measurement value, setting items and settings. Connected when RS-232C is used. ̆̆̆̆ Connectors for connection to sensor heads [In LH-CS6(P), there is one connector for sensor head connection.] 2-3 03/2003 CHAPTER 3 MOUNTING AND CONNECTION 3-1 Mounting......................................................3-1 3-1-1 Sensor head..................................3-1 3-1-2 Controller........................................3-3 3-2 Connection..................................................3-4 3-2-1 Connection of sensor head to controller....................................3-4 3-2-2 Cable extension.............................. 3-5 3-2-3 Terminal connection.......................3-6 3-2-4 I/O circuit diagram...........................3-8 3-2-5 Input/Output................................3-10 3-2-6 Serial I/O.........................................3-19 03/2003 CHAPTER 3 Mounting and Connection 3-1 Mounting 3-1-1 Sensor head Setting method Adjust the distance between the sensor head and the measured object to be within the measuring range, by checking the operation indicator. Further, adjusting the reference position (center of displacement) of the measured object near the center measuring distance (LH-54: 40mm, LH-58: 80mm, LH-512: 120mm) results in stable measurement. Off Outside measuring range Lights up in orange Lights up in green 1. Lights up in orange Center Within measuring range Off Outside measuring range 2. Install the sensor head, such that the surface of the measured object is parallel to the sensing face of the sensor head. Use the two mounting holes and fix the sensor head firmly. However, note that the tightening torque should be 0.5Nm or less. 3. Since the emitting/receiving surfaces of the sensor head use glass, take care that they are not subject to direct shock. Further, do not allow any water, oil, fingerprints, etc., which may refract light, or dust, dirt, etc., which may block light, to stick to the emitting/receiving surfaces of the sensor head. In case they are present, wipe them with a clean, soft cloth or lens paper. 4. If the light reflected from the measured object is reflected once again from the surrounding objects and is received by the sensor head, the measurement is affected. Install the sensor head away from such objects or color them with non-glossy black paint so that reflected light is not received from the surroundings. Direction of mounting In case the measured object is moving as shown below, take care of the mounting direction of the sensor head, as an error may be generated depending on the mounting direction. ٟ Eccentricity measurement ٟ ٟ Level difference measurement ٟᲑᏅᬌߩ႐ว 3-1 03/2003 ٟ In case of extreme change in color or material at a boundary ٟ⦡߇⾰᧚ޔᭂ┵ߦ㆑߁Ⴚ⇇✢߇ࠆ႐ว CHAPTER 3 Mounting and Connection Mounting of several sensor heads In case several sensor heads are arranged in a row, mount them by keeping the minimum distance given below. 㧭 㧯 㧮 㧰 z When interference prevention function is used A B C D LH-54 0mm 0mm 10mm 17mm LH-58 0mm 0mm 10mm 17mm LH-512 0mm 0mm 30mm 17mm z When interference prevention function is not used A B C LH-54 20mm 40mm 90mm D 20mm LH-58 40mm 100mm 100mm 20mm LH-512 70mm 150mm 210mm 20mm Regarding the interference prevention function, please refer to page 3-12 ‘عInterference prevention function’. CAUTION If light from the opposite side sensor is not received, even D=0 is OK. NOTE 3-2 03/2003 CHAPTER 3 Mounting and Connection 3-1-2 Controller How to mount the controller Ԙ Insert the controller, from its rear position, into the cut-out of the panel. ԙ Insert the enclosed controller mounting frame (ATA4811) from the rear side of the controller and push it until the end. Ԛ Tighten the controller mounting frame uniformly, using the mounting screws (2 Nos.) enclosed with it. After mounting on the panel, make sure to confirm that the controller is firmly mounted and does not shake. Controller mounting frameޓ (ATA4811)㧔Accessory㧕 ԙ Ԙ Ԛ Panel thickness: 1 to 5 mm ᵈޓᗧ CAUTION If the mounting screws are tightened excessively, the controller mounting frame gets displaced. In case this happens, loosen the screws once, push in the controller mounting frame and then tighten the mounting screws. Panel cut-out dimensions 45 㧗0.6 0 In case of adjacent mounting 㧗0.6 45 㧗0.6 A=(48n-2.5) ޓ0 0 A Min.90 The panel thickness should be 1 to 5mm. 3-3 03/2003 CHAPTER 3 Mounting and Connection 3-2 Connection 3-2-1 Connection of sensor head to controller 㧝㧚 Hold the sensor head’s connector and insert it into the connector provided on the controller for sensor head connection, till its outer ring locks. 㧞㧚 To remove the sensor head, hold its connector by the outer ring and pull it straight out. While removing the connector from the controller, take care not to touch the terminals inside the connector. LH-CS6(P) Rear side of controller LH-CD6(P) Rear side of controller ᵈޓᗧ CAUTION Make sure to connect or disconnect the connector to the controller in the power supply off condition. Do not pull by holding the cable, as this can result in cable disconnection. 3-4 03/2003 CHAPTER 3 Mounting and Connection 3-2-2 Cable extension To extend the connection cable between the sensor head and the controller, use the optional exclusive cable. Three types of cable, 2m type (LH-CCJ2), 5m type (LH-CCJ5) and 10m type (LH-CCJ10), are available. Note that although the cable can be extended up to 10m, do not connect together two or more 2m type cables or two 5m type cables. LH-CCJ2 (2m) LH-CCJ5 (5m) LH-CCJ2 (2m) LH-CCJ5 (5m) LH-CCJ10 (10m) 3-5 03/2003 CHAPTER 3 Mounting and Connection 3-2-3 Terminal connection Procedure for connection to terminal block z For upper terminal block (press-fit type) Ԙ Loosen the screw of the terminal block by a screwdriver. ԙ Insert the wire to be connected into the terminal block as shown in the diagram below and then tighten the screws using a screwdriver with a tightening torque of 0.12 to 0.15N㨯m. Suitable wire size: AWG 20㨪26ޓStripped wire length: 4.5mm Suitable wire size: AWG 20㨪26 4.5mm (Strip wiring) Tightening torque 0.12 to 0.15Nm Upper terminal block (Press-fit type) z For lower terminal block (spring connection type) ޓޓޓޓޓԘ Keep the lever of the terminal block pressed with a screwdriver. ԙ Insert the wire to be connected into the terminal block as shown in the diagram below and then release the lever. Suitable wire size: AWG 20 to 28ޓStripped wire length: 8.0mm 8mm (Strip wiring) Suitable wire size: AWG 20 to 28 Push Lower terminal block (Spring type) ᵈޓᗧ CAUTION Make sure to connect or disconnect the connector from the controller in the power supply off condition. 3-6 03/2003 CHAPTER 3 Mounting and Connection Terminal arrangement Terminal No. 19 11 Terminal No. Description Symbol I/O Ԙ ԙ Ԛ Analog voltage output GND for analog output Analog current output 㧙5 to㧗5V O ANALOG㨋GND COM 4 to 20mA O Analog voltage output r5V F.S. Analog ground Analog current output 4 to 20mA ԛ Interference prevention I/O IF.P I/O I/O Interference prevention I/O Function Upper terminal block LH-CS6 Lower terminal block Upper terminal block Lower terminal block Terminal No. Terminal 10 1 Ԝ BUSY input Sensor head 1 BUSY HEAD1 ԝ BUSY input Sensor head 2 (Note) BUSY HEAD2 I I Low (0 to 1V) Measurement stops Calculation hold reset input HOLD RESET I ԟ Input COM IN. COM COM Ԡ Remote interlock input ԡ Ԣ ԣ Ԥ ԥ Ԧ ԧ Ԩ Input COM 㧗V 0V Comparative output HI Comparative output GO Comparative output LO Strobe output Alarm output ԩ Input COM 0-ADJ input LH-CD6P High (+V) Measurement stops LH-CD6 LH-CD6P High (㧗V) Measurement stops LH-CD6 LH-CS6P LH-CD6P High (㧗V) Low (0 to1V) Calculation Calculation result is reset result is reset COM for input LH-CS6 LH-CD6 LH-CS6P LH-CD6P 0V 㧗V Emission when short-circuited with I INTERLOCK IL.COM COM COM for remote interlock IL. COM 㧗V ̆ Power supply 㧗24V Power supply 0 V 0V ̆ ON when effective HI O ON when effective GO O ON when effective LO O ON when effective STRB O ON when normal, OFF during alarm ALARM O COM for input COM LH-CS6 IN.COM LH-CD6 LH-CS6P LH-CD6P 0V 㧗V LH-CS6 Ԫ LH-CS6P Low (0 to 1V) Measurement stops LH-CS6 Ԟ LH-CD6 0-ADJ Note: In case of LH-CS6(P), terminal No.ԝ is not used. 3-7 03/2003 I LH-CD6 Low (0 to 1V) 0-ADJ operation LH-CS6P LH-CD6P High (+V) 0-ADJ operation CHAPTER 3 Mounting and Connection 3-2-4 I/O circuit diagram LH-CS6, LH-CD6/NPN output type ޓ D1 Color code +V ZD1 Tr1 ZD2 Load Comparative output HI 30mA max. Load Comparative output GO 30mA max. Tr2 ZD3 30mA max. Tr3 ZD4 Load 24V DC r10㧑 Strobe output 30mA max. Tr4 ZD5 Main circuit Load Comparative output LO Load Alarm output 30mA max. Tr5 0V 100 ǡ Analog voltage output −5 to + 5V (Note 1) ZD6 GND for Analog output +12V ZD7 Analog current output 4 to 20mA (Note 2) D2 4.7k ǡ BUSY input HEAD 1 D3 4.7k ǡ BUSY input HEAD 2 (Note 3) D4 4.7k ǡ Calculation hold reset input D5 4.7k ǡ 0-ADJ input D6 4.7k ǡ Remote interlock input ̪1 ̪1 ̪1 Interference prevention I/O (Note 4) D7 4.7k ǡ ̪1 ̪1 Input COM Input COM Input COM Internal circuit Users’ circuit ̪㧝 Symbols.... D1㧦Reverse supply polarity protection diode ޓޓޓ D2 to D7㧦Input protection diode ZD1 to ZD5㧦Surge absorption zener diode ޓޓޓ Tr1 to Tr5㧦NPN output transistor Non-voltage contact or NPN open-collector transistor or 0-ADJ input, BUSY input Calculation hold reset input ޓLow (0 to 1V ): Effective ޓHigh (+V or open): Ineffective Remote interlock input Low (0 to 1V ): Emission ޓHigh (+V or open): Emission stopped 3-8 03/2003 CHAPTER 3 Mounting and Connection LH-CS6P, LH-CD6P/PNP output type Terminal No. +V ZD1 30mA max. Tr1 Comparative output HI Load ZD2 30mA max. Comparative output GO Tr2 ZD3 30mA max. Comparative output LO Tr3 ZD4 30mA max. Load 24V DC r10㧑 Strobe output Tr4 ZD5 Main circuit Load Tr5 Load 30mA max. Alarm output Load D1 0V 100 ǡ Analog voltage output -5 to +5V (Note 1) ZD6 GND for analog output +12V ZD7 Analog current output 4 to 20mA (Note 2) D2 4.7k ǡ BUSY input D3 4.7k ǡ BUSY inputޓHEAD2 (Note 3) D4 4.7k ǡ HEAD1 Calculation hold reset input D5 4.7k ǡ 0-ADJ input D6 4.7k ǡ Remote interlock input D7 4.7k ǡ Interference prevention ޓ I/O (Note 4) ̪1 ̪1 ̪1 ̪1 ̪1 Input COM Input COM Input COM Users’ circuit Internal circuit Symbols...D1㧦Reverse supply polarity protection diode ޓޓޓ D2 to D7㧦Input protection diode ZD1 to ZD7㧦Surge absorption zener diode ޓޓޓ Tr1 to Tr5㧦PNP output transistor ̪㧝 Non-voltage contact or PNP open-collector transistor or 0-ADJ input, BUSY input Calculation hold reset input ޓLow (0 to 1V, or open): Ineffective ޓHigh (+V ): Effective Remote interlock input ޓLow(0 to 1V, or open): Emission stopped ޓHigh (+V ): Emission Notes: 1) The device connected to analog output voltage should have an input impedance of 1M ǡ or more. 2) The device connected to the analog current output should have a load resistance of 300 ǡ or more. 3) In case of LH-CS6(P), terminal No.ԝ is not used. CAUTION ᵈޓᗧ 4) Do not connect an interference prevention I/O wire other than that of LH-CS6(P) or LH-CD6(P) to the interference prevention I/O. Further, do not connect together two controllers which have both been set as masters during interference prevention setting, as this will cause a fault. 5) The analog output and the alarm output are not incorporated with a short-circuit protection circuit. Do not connect them directly to a power supply or a capacitive load. 3-9 03/2003 CHAPTER 3 Mounting and Connection 3-2-5 Input/Output Power supply inputޓ [ޓԢ Ԣ - ԣ] Input 24V DCr10% (Ripple P-P 10% or less). If a power supply transformer is used, make sure to use an isolation transformer. Comparative judgement output HI/GO/LOޓ [ޓԤ Ԥ/ԥ ԥ/Ԧ Ԧ] Based on the set comparative values, the result of comparison is output by an NPN or PNP open-collector transistor. Strobe outputޓ [ޓԧ ԧ] This output lets you know that the measurement value has been finalized. When starting a measurement after the power supply is switched on or when restarting a measurement from BUSY condition when the BUSY input is used, strobe output turns ON at the time when the measurement value is finalized according to the set response time. Using the strobe output in combination with the BUSY input makes external control of measurement and use of the comparative judgment result easy. Please refer to page 3-14 ‘عTiming of BUSY input/Strobe output/ Comparative output’. ෳޓ⠨ REFERENCE Alarm outputޓ [ޓԨ Ԩ] This is output when an error, such as, no object in the measuring range, (NEAR, FAR error), insufficient light (DARK) or too much light (BRIGHT), occurs. Normal measurement condition Alarm output NOTE ෳޓ⠨ ON OFF Alarm output is effective only in the measurement mode. Alarm output on setting remains in a normal measurement condition. REFERENCE ᵈޓᗧ CAUTION When error occurs 㧔DARK, BRIGHT, or other errors) Please refer to page 9-1 ‘عError indication’ for NEAR or FAR, DARK, BRIGHT and other errors, and to page 3-11 ‘عAnalog displacement output diagrams’ for the alarm output. The analog output and the alarm output are not incorporated with a shortcircuit protection circuit. Do not connect them directly to a power supply or a capacitive load. 3-10 03/2003 CHAPTER 3 Mounting and Connection ع Analog voltage output [Ԙ Ԙ - ԙ] Within the measurement range, an analog voltage corresponding to the displacement is output. Please refer to analog displacement output diagrams below. The device connected to the analog voltage output should have an input impedance of 1M ǡor more. ᵈޓᗧ CAUTION The analog output and the alarm output are not incorporated with a short-circuit protection circuit. Do not connect them directly to a power supply or a capacitive load. Analog current output [ԙ ԙ - Ԛ] Within the measurement range, an analog current corresponding to the displacement is output. Please refer to analog displacement output diagrams below. ᵈޓᗧ CAUTION The device connected to the analog current output (white) should have a load resistance of 300 ǡ or more. 㨯 The analog output and the alarm output are not incorporated with a short-circuit protection circuit. Do not connect them directly to a power supply or a capacitive load. Analog displacement output diagram LH-58 LH-54 Center measuring distance (80mm) Center measuring distance (40mm) (21.6mA) (20mA) Distance (mm) ON +5.5 (20mA) +20 0 (12mA) -20 +10 0 (12mA) Distance (mm) -30 -5 (4mA) -5 (4mA) OFF +5 Measuring range (21.6mA) Displacement voltage(V) +5 +5.5 Displacement voltage(V) Displacement voltage(V) +5.5 Alarm output Center measuring distance (120mm) Measuring range Measuring range -10 LH-512 OFF Alarm output OFF ON 3-11 03/2003 +5 (21.6mA) (20mA) +30 0 (12mA) Distance (mm) -5 (4mA) OFF Alarm output OFF ON OFF CHAPTER 3 Mounting and Connection Interference prevention function [ԛ] When 2 sensor heads or more are installed close to each other, a malfunction may occur due to interference of LED lights. In this case, use the interference prevention function. In case 2 sensor heads are connected to one controller, when the calculation mode is set, the sensor is put into the interference prevention mode automatically. Further, 2 sensor heads can be connected to 2 controllers each, and a total of 4 sensor heads can be installed close to each other. In this case, for the 2 controllers, connecting the respective I/O terminal ԛ together, and setting one controller to ‘Master’ and the other controller to ‘Slave’ puts the sensor in the interference prevention function mode. Since the emission beam frequency of 4 sensors is mutually different, reliable measurements, without any mutual interference of the emitted beams, are possible. In case a number of sensor heads are used closely, take care of the interference range given in the table below, during installation. Controller set as Controller set as ‘Master’ ‘Slave’ ԛ A ԛ C B D ෳޓ⠨ REFERENCE A B C D LH-54 0mm 0mm 10mm 17mm LH-58 0mm 0mm 10mm 17mm LH-512 0mm 0mm 30mm 17mm Please refer to page 6-99 ‘ عInterference prevention setting’ for details of setting. When this function is used, the linearity, resolution, and response time may deteriorate. Do not connect an interference prevention I/O wire other than that of LH-CS6(P) / LH-CD6(P) to the interference prevention I/O terminal No. ԛ. Further, do not connect ᵈޓᗧ CAUTION together two controllers which have both been set as masters during interference prevention setting, as this will cause a fault. If light from the opposite side sensor is not received, even D=0 is OK. 3-12 03/2003 CHAPTER 3 Mounting and Connection BUSY inputޓ ޓHEAD1/HEAD2ޓ [ޓԜ - ԟ, ԡ, ԩ/ԝ - ԟ, ԡ, ԩ] Short-circuiting BUSY input (Ԝ㧘ԝ) to Input COM (ԟ㧘ԡ㧘ԩ) makes the BUSY input effective and puts the sensor in the BUSY condition. In the BUSY condition, the measurement is temporarily stopped and the measurement value, the comparative judgement output and the analog output are put on hold. BUSY input enables you to control the start /stop of measurement externally. Start measurement Start measurement CH 1 single measurement Hold during BUSY ON BUSY 1 OFF 1ms (min) ON BUSY 2 OFF z Features of BUSY input The measurement is put on hold when the BUSY input is ON. The measurement starts when BUSY input condition turns OFF from ON. Value just after the measurement starts: Measured value + F.S. Comparative output OFF Analog output +5.5V (21.6mA) 㨯 For LH-CD6(P) in CH1 single measurement mode, BUSY 1 is effective and BUSY 2 is ignored. Similarly, BUSY 2 is effective in CH2 single measurement mode and BUSY 1 is ignored. For LH-CD6 (P) in the calculation mode, setting BUSY 1 and BUSY 2 to ON or OFF simultaneously makes the BUSY input effective or ineffective. (See the diagram below.) BUSY input becomes effective by short-circuiting with input COM. BUSY input is effective when it is ON for 1ms or more. ON BUSY 1 input BUSY 2 input OFF ON OFF BUSY during ON calculation mode OFF NOTE ෳޓ⠨ REFERENCE In case of LH-CS6(P), the terminal No.ԝ is not used. Please refer to page 3-14 ‘ عTiming of BUSY input/Strobe output/ Comparative output’. 3-13 03/2003 CHAPTER 3 Mounting and Connection Timing of BUSY input/Strobe output/Comparative output ON BUSY input OFF Start measurement ON Comparative output OFF HI, GO, LO OFF Judgement Previous judgement OFF till measured value value is finalized Threshold judgement value is held ON Strobe output OFF Measurement value is finalized z Features When the BUSY input is ON, the sensor is in BUSY condition and the comparative output is held. The measurement starts when BUSY input turns OFF from ON and the comparative output turns OFF until the measurement has been finalized according to the set response time. When the measurement is finalized, the comparative output gives judgement and the strobe output is turned ON. 3-14 03/2003 CHAPTER 3 Mounting and Connection Even if a measurement error occurs during BUSY input is in the ON state, the Even if a measurement error occurs when BUSY input is ON state, the measurement output state ෳޓ⠨ REFERENCE measurement output state held by BUSY is maintained. held by BUSY is held. Measurement ᷹ቯ⁁ᘒ state 㧮㨁㧿㨅ജ BUSY input Measurement ᷹ቯ㧭 A Measurement ᷹ቯࠛ error Measurement ᷹ቯ㧮 B ᷹ቯ㧯 C Measurement ON ON OFF OFF ജ⁁state ᘒ Output Measure᷹ ቯ㧭 ment A ᷹ቯ㧭ࡎ࡞ ࠼ Measurement A Hold Measurement error ᷹ቯࠛ Initial state ೋ ᦼ⁁ ᘒ Measurement C ᷹ቯ㧯 㨾㩡㨺߆ࠄᓳᏫߒߚߎߣߦࠃࠆౣ᷹ቯᦼ㑆 Period for re-measurement after recovery from error state ON Alarm 㨻㩡㨺㩛output ജ ON OFF OFF Strobe output 㩇㩎㩥㨺㩖㩨 ജ 㨻㩡㨺㩛ജ Alarm output hold 㩘㨺㩣㩎㩨 ON ON OFF ࡠࡉ㧻㧲㧲 BUSY StrobeONਛࠬ࠻ OFF during BUSY ON OFF ᷹ቯࠛਛ Strobe OFF 㩇㩎㩥㨺㩖㩨OFF during measurement error ౣ᷹ቯᦼ㑆ਛ Strobe OFF during re㩇㩎㩥㨺㩖㩨OFF measurement Note 1: In case BUSY is turned ON when measurement error ᵈ㧝㧚᷹ቯࠛਛߦ㧮㨁㧿㨅ࠍ㧻㧺ߒߚ႐ว If BUSY input is ON during measurement error state, error is output on during ᷹ቯࠛਛ ߦ㧮㨁㧿 㨅ࠍ㧻㧺 ߔࠆߣޔ ᦼ㑆ߪࠛ ࠍജߒ ߹ߔޕ measurement error. If the sensor is ᷹ቯࠛ recovered from the measurement error state in the BUSY ߹߹㧮㨁 㧺ߒߚ⁁ ᘒߢ᷹ቯ ࠛ ߆ࠄ࿁ᓳ ߔࠆߣೋ ᦼ⁁ᘒࠍ ജ output state from the Initial ON state,ߘߩ the initial㧿㨅ࠍ㧻 state is output. In order to get back to the normal state, turn OFF the⁁ᘒ߆ࠄ BUSYㅢᏱജ input once. ߒ߹ ߔޕೋᦼ ⁁ᘒߦᓳᏫߔࠆߦߪ㧮㨁㧿㨅ജࠍ৻ᐲOFFߒ ߡਅߐޕ Measurement ᷹ቯ⁁ᘒ state Measurement ᷹ቯࠛ error Measurement ᷹ ቯ 㧭A Initial state: ೋᦼ⁁ᘒ Comparative output OFF 㧦Ყセജ OFF Strobe OFF 㩇㩎㩥㨺㩖㩨 OFF Alarm OFF ࠕࡓ 㧻㧺 Analog output +5.5 ON ON BUSY input OFF OFF 㧮㨁㧿㨅 Output ജ⁁state ᘒ Measurement error ᷹ቯࠛ 㨻㩏㩥㩂㩨ജ 㧗5.5 ೋᦼ⁁ ᘒ Initial state ೋᦼ⁁ ᘒ Initial state 㨻㩡㨺㩛output ജ Alarm Strobe output 㩇㩎㩥㨺㩖㩨 ജ Re-measurement 㨾㩡㨺߆ࠄᓳᏫߒߚߎߣ period after recovery ߦࠃࠆౣ᷹ቯᦼ㑆 from error state 3-15 03/2003 ᷹ቯ㧭 A Measurement CHAPTER 3 Mounting and Connection Note 2: In case BUSY is canceled, or BUSY input is turned ON during the re-measurement period after recovery from the measurement error state The re-measurement is carried out when BUSY is canceled, or after the sensor returns from the measurement error state. However, if BUSY is input when the re-measurement period (the period till the strobe input is turned ON), the initial state will be held. Measurement ᷹ቯ⁁ᘒޓޓޓޓޓ᷹ቯ㧭ޓޓޓޓޓ᷹ቯ㧮ޓޓޓޓޓޓޓޓޓޓޓޓ᷹ޓቯޓ㧯 Measurement B Measurement A Measurement C state ON ON OFF BUSY input OFF 㧮㨁㧿㨅 MeasureMeasurement A hold ജ⁁ᘒޓޓޓ᷹ቯ㧭ޓޓޓޓޓ᷹ቯ㧭ࡎ࡞࠼ޓޓޓޓޓ ೋᦼ⁁ᘒޓೋᦼ⁁ᘒޓೋᦼ⁁ᘒޓޓޓޓޓޓ᷹ቯ㧯 Initial state Initial state Initial state Measurement C ޓޓޓޓ Output state ment A Re-measurement ౣ᷹ቯᦼ㑆 Period for reperiod measurement Strobe output 㩇㩎㩥㨺㩖㩨ജ Held ౣ ᷹ at ቯinitial ᦼ 㑆 ਛ ౣ᷹ቯᦼ㑆 Re-measurement state since BUSY ߦ BUSY ࠍ period input was turned ࠇߚߚೋᦼ ON during the re⁁ᘒߢ㩘㨺㩣㩎㩨 measurement period ౣ᷹ቯਛߦis ࠍ ONoutput ߒߚߚ since BUSY Strobe not 㩇㩎㩥㨺㩖㩨߇ജߐࠇߥ BUSY input was turned ON during re-measurement ޓޓޓޓޓޓޓ ޓޓޓޓ ޓޓޓ ޓޓ ޓޓ ޓޓ ޓޓޓޓޓޓޓޓޓޓޓޓޓޓޓ ޓޓޓޓޓޓޓޓޓޓޓޓޓޓޓޓޓޓޓޓޓޓޓޓޓޓޓޓޓޓޓޓޓޓޓޓޓޓޓޓޓޓޓޓޓ ޓޓޓޓޓޓޓޓޓޓޓޓޓޓޓޓޓޓޓޓޓޓޓޓޓޓޓޓޓޓޓޓޓޓޓޓޓޓޓޓޓޓ ޓޓ ޓޓޓޓޓޓޓޓޓޓޓޓޓޓޓޓޓޓ ޓޓޓޓޓޓޓޓޓޓޓޓޓޓޓޓޓޓޓޓޓޓޓޓޓޓ 3-16 03/2003 CHAPTER 3 Mounting and Connection Calculation hold reset input [Ԟ Ԟ - ԟ, ԡ, ԩ] In the calculation mode, when peak-peak, bottom hold or peak hold is selected, the held value can be reset by inputting the calculation hold reset. ޛExampleޜ ޜIn case of bottom hold Measurement value Threshold value (TH-1) Threshold value (TH-2) Calculation hold reset input Hold Hold Calculation hold reset period Hold Hold Hold HI output GO output LO output z Features of calculation hold reset input The hold value is reset by the calculation hold reset input. During the calculation hold, normal measurement is carried out. In case of simple average, the calculation hold reset input is invalid. Calculation reset hold input becomes effective by short-circuiting with input COM. Calculation hold reset input becomes effective when it is ON for 1 ms or more. ෳޓ⠨ REFERENCE Please refer to page 6-63 ’عCalculation mode setting’ for calculation mode. Remote interlock input [Ԡ [Ԡ - ԟ , ԡ , ԩ ] ON/OFF of LED emission can be externally controlled by short-circuiting the remote interlock input to the input COM terminal Nos.ԟ㧘ԡ㧘ԩ or keeping it open. NOTE A short-circuit bar has been inserted between terminal Nos.Ԡ and ԟ when shipped from factory. 3-17 03/2003 CHAPTER 3 Mounting and Connection 0-ADJ inputޓ [ޓԪ - ԟ, ԡ, ԩ ] Short-circuiting the 0-ADJ input to input COM terminal (ԟ㧘ԡ㧘ԩ) adjusts the measurement value and the analog output to ‘0’ and the value at this time is taken as the standard ‘0’ for measurements. Standard surface Measurement value 0mm The measured value at this point is ‘0’ standard 0-ADJ 1ms (min) z Features of 0-ADJ input 0-ADJ input makes the measurement value standard ‘0’ at the instant it is turned ON. 0-ADJ becomes effective by short-circuiting with input COM. 0-ADJ input becomes effective when it is ON for 1 ms or more. z 0-ADJ during BUSY input and calculation hold reset input BUSY input ON OFF ON Calculation hold reset input OFF ON 0-ADJ input OFF 0-ADJ the value which has been held with BUSY input ෳޓ⠨ REFERENCE 0-ADJ the measurement value which is measured in the normal condition. Please refer to page 6-112 ‘ع0-ADJ’ for the details of setting and functions. 3-18 03/2003 CHAPTER 3 Mounting and Connection 3-2-6 Serial I/O RS-232C modular connector pin position Ԙԙ Ԛ ԛ Ԝ ԝ Pin No. Signal Description I/O NC Ԙ 㧙 㧙 NC ԙ 㧙 㧙 RD (RXD) Data input from external device Input Ԛ SG (SG) Signal ground ԛ 㧙 Command output to external device SD (TXD) Output Ԝ ԝ 㧙 㧺㧯 㧙 㧨Recommended connector㧪 Modular plug MOD-P66 manufactured by Honda Tsushin Kogyo Co., Ltd. ෳޓ⠨ REFERENCE Please refer to Chapter 7 ‘RS-232C CONTROL’ for RS-232C transmission. 3-19 03/2003 CHAPTER 4 FOR OPTIMUM MEASUREMENT 4-1 Setting flow for optimum measurement....4-1 4-2 Optimum setting method..........................4-3 03/2003 CHAPTER 㧠 4-1 For optimum measurement Setting flow for optimum measurement عSetting flow for the sensor head and the exclusive controller In this product, the sensor heads and the exclusive controllers can be used in any combination. Before commencing the measurement, follow the setting flow shown below in order to make the most of this product’s excellent performance capability. z In case of using single measurement mode (with one sensor head ) (Note) Mount the sensor head ̪Please refer to page 3-1 ‘3-1-1 Sensor head’ for details of sensor head Power ON mounting. Start measurement Memory write Memory read out ̪Please refer to page 6-10 ̪Please refer to page 6-9 ‘ عMe mo ry w ri te ’ fo r details. ‘ع عMemory call/memory read out’ Analog voltage (current) output offset adjustment Gain setting ̪Please refer to page 6-12 ‘ عCH 1/CH 2 gain setting’ for details. ̪Please refer to page 6-88‘ عAnalog voltage output offset setting’ and page 6-91‘ عAnalog current output offset setting’ for details. Calculation setting ̪Please refer to page 6-15 ع‘ޓCH 1/CH 2 calculation setting for details. Shift adjustment NOTE Span adjustment ̪Please refer to page 6-7 8 ̪Pl e a s e r ef e r t o pa g e 6 - 8 3 ‘عShift adjustment setting ’ for details. ‘ع عSpan adjustment setting’ for details. Please refer to page 6-7 ‘ عMeasurement mode’ for single measurement mode. 4-1 03/2003 CHAPTER 㧠 For optimum measurement z In case of using calculation mode (with two sensor heads) (Note) Mount the sensor head ̪Please refer to page 3-1 Power ON NOTE ‘3-1-1 Sensor head’ for details of sensor head mounting. Please refer to page 6-7 ‘ عMeasurement mode’ for calculation mode. Memory read out ̪Please refer to page 6-9 ‘ع عMemory call/memory read out’ for details. Gain setting for CH 1 side ̪Please refer to page 6-12 ‘عCH 1/CH 2 gain setting’ ޓfor details. Gain setting for CH 2 Start measurement ̪Please refer to page 6-12 ‘عCH 1/CH 2 gain setting’ for details. Memory write Memory write ̪Please refer to page 6-10 ̪Please refer to page 6-10 ‘ عMemory write’ for details. ‘ عMemory write’ for details. Shift adjustment for CH 1 side ̪P l e a s e r e f e r to p a g e 6 -1 0 2 ‘عCH 1/CH 2 shift adjustment setting’ for details. Shift adjustment for CH 2 side ̪P l e a s e r e fe r to p a g e 6 - 1 0 2 ‘عCH 1/CH 2 shift adjustment setting’ for details. Analog voltage (current) output offset adjustment ̪Please refer to page 6-88‘ عAnalog voltage output offset setting’ and page 6-91‘ ع Analog current output offset setting’ for details. Span adjustment Span adjustment for CH1 side ̪P l e a s e r e f e r t o p a g e 6 - 1 0 6 ‘عCH 1/CH 2 span adjustment setting ’ for details. Span adjustment for CH2 side ̪Pl e a s e r ef e r t o pa g e 6 - 8 3 ‘ع عSpan adjustment setting’ for details. Shift adjustment ̪P l e a s e r e f e r t o p a g e 6 - 1 0 6 ‘عCH 1/CH 2 span adjustment setting ’ for details. ̪P l e a s e r e f e r t o p a g e 6 - 7 8 ‘ عShift adjustment setting’ for details. Calculation setting Memory read out ̪Please refer to page 6-9 ‘ع عMemory call/memory read out’ for details. 4-2 03/2003 ̪Please refer to page 6-21 ‘ عCalculation equation selection’ for details. CHAPTER 㧠 4-2 For optimum measurement Optimum setting method In case of using single measurement mode (with one sensor head) Setting method Details Outside measuring range Green Off Orange Adjust the distance between the sensor head and the measured object Page 3-1 to be within the measuring range, by checking the operation indicator. 3-1-1 Sensor head Orange Step Mount the sensor head Oran ge Off Outside ᷹ቯ▸࿐ᄖ measuring Measuring range range Center Power ON Memory read out Page 6-9 عMemory call / memory read out In the initial condition. In case of LH-CS6(P), select ‘d-01’. Setting display In case of LH-CD6(P), ‘d-01’ (for connection to HEAD 1) , ‘d-02’ (for connection to HEAD 2) is displayed. Setting display Gain setting Setting display Set the object to be measured within the measuring range and at the closest position from the sensor head. 㧔㧕㧸㧴㧙㧡㧠ߦߡ Example: In case of measuring at 30 to 50mm with LH-54. When the measured object color does not change ޓޓޓ ޓޓޓޓޓ 30mm Measured object In SELECT setting, carry out the gain setting to display GOOD 3. • Depending on the reflection ratio or gloss of the measured object, it is possible that GOOD 3 state does not change even if the gain is changed. In that case, set the gain at one level lower than the highest gain for GOOD 3. • Because of the same reason mentioned above, it is possible that GOOD 3 does not light up. In that case, set the gain at the highest gain for GOOD 2. Optimum state GOOD 㧟 GOOD 㧞 BRIGHT state 㪙㪩㪅 㪙㪩㪅 㪙㪩 㪅 㪞㪦㪅 㪞㪦㪅 㪞㪦 㪅 㪛㪘㪅 㪛㪘㪅 㪛㪘㪅 4-3 03/2003 Page 6-12 عCH 1/CH 2 gain setting CHAPTER 㧠 Step Setting method When the measured object color changes frequently Gain setting Calculation setting For optimum measurement Details Set the object to be measured within the measuring range. Example: In case of measuring at 30 to 50mm with LH-54. عCH 1/CH 2 gain setting ޓޓޓޓޓ 30mm Measured object Set the gain setting to AUTO. Setting display Carry out calculation selection. Page 6-15 Example: In case normal measurement is selected. عCH 1/CH 2 calculation selection Setting display Shift adjustment Page 6-12 Set the object to be measured at the center of the measuring range. Example: In case of measuring at 30 to 50mm with LH-54. ޓޓޓޓޓ 㧔40mm㧕 Center of measuring range Measured object Carry out shift adjustment to display the desired measurement value. Measurement value display Measurement value display 4-4 03/2003 Page 6-78 عShift adjustment setting CHAPTER 㧠 For optimum measurement Step Span adjustment (NEAR side) Setting method Details 㧨In case the range to be measured is 50% or more of full-scale㧪 㧪 As shown in the figure below, set the object to be measured at position A, which is at the distance given below from the center of the range to be measured, towards the sensor head side (NEAR side). Example: In case of measuring at 30 to 50mm with LH-54. ޓޓ Distance of position A from center of range to be measured ޓޓޓޓޓ LH-54 : 5mm LH-58 : 10mm LH-512 : 15mm (35mm) A Center of the range to be measured 5mm Measured object 㧨In case the range to be measured is less than 50% of full-scale㧪 㧪 Set the object to be measured within the range to be measured at the position which is nearest (NEAR side) to the sensor head. Example: In case of measuring at 36 to 44mm with LH-54. ޓޓޓޓޓ (36mm) Position which is nearest to the sensor head within the range to be measured. Measured object Carry out span adjustment to display the desired measurement value. Example: In case the measurement value is to be 30 to 50mm with LH-54. Measurement value display Measurement value display 4-5 03/2003 Page 6-83 عSpan adjustment setting CHAPTER 㧠 Step Span adjustment (FAR side) For optimum measurement Setting method Details 㧨In case the range to be measured is 50% or more of full-scale㧪 㧪 As shown in the figure below, set the object to be measured at position B, which is at the distance given below from the center of the range to be measured, away from the sensor head side (FAR side). Example: In case of measuring at 30 to 50mm with LH-54. ޓޓޓޓޓ Distance of position B from center of range to be measured LH-54 : 5mm LH-58 : 10mm LH-512 : 15mm Center of the range to be measured (45mm) B 5mm Measured object 㧨In case the range to be measured is less than 50% of full-scale㧪 㧪 Set the object to be measured within the range to be measured at the position which is farthest (FAR side) from the sensor head. Example: In case of measuring at 36 to 44mm with LH-54. ޓޓޓޓޓ (44mm) Center of the range to be measured Measured object Position which is the farthest from the sensor head within the range to be measured. If the measurement value is different, adjust the span of FAR side and the NEAR side to balance them. Example: In case of measuring at 30 to 50mm with LH-54. FAR side span adjustment Measurement value display Adjust Measurement value display NEAR side span adjustment Measurement value display Adjust 4-6 03/2003 Measurement value display Page 6-83 عSpan adjustment setting CHAPTER 㧠 For optimum measurement Step Setting method Analog voltage (current) output offset adjustment Fine adjust the output value of digital panel meter, etc. In offset adjustment of analog voltage (current) output, only the analog output changes, the measurement value display does not change. If it is desired to offset only the measurement value display, refer to page 6-54 عDisplay offset setting. Memory write Store the setting in the memory to be written. Example: In case of storing in u-01 ޓSetting display Start measurement 4-7 03/2003 Details Page 6-88 عAnalog voltage output offset setting Page 6-91 عAnalog current output offset setting Page 6-10 عMemory write CHAPTER 㧠 For optimum measurement In case of using calculation mode (with two sensor heads) Setting method Outside measuring range Orange Green Off Power ON Memory read out Details Adjust the distance between the sensor head and the measured object Page 3-1 to be within the measuring range, by checking the operation indicator. 3-1-1 Sensor head Orange Step Mount the sensor head Oran ge Off Outside ᷹ቯ▸࿐ᄖ measuring Measuring range range Center In the initial condition, select the following. Page 6-9 عMemory call/ memory read out ‘d-04’ thickness measurement When L - (A + B) calculation is selected ‘d-03’ level difference measurement When A - B calculation is selected Setting display Setting display Set the object to be measured within the measuring range Page 6-12 عCH1/CH2 and at the closest position from the sensor head. gain setting Example: In case of measuring at 30 to 50mm with LH-54. When the measured object color does not change Gain setting for CH1 side ޓޓޓޓޓ 30mm Measured object In SELECT setting, carry out the gain setting to display GOOD 3. • Depending on the reflection ratio or gloss of the measured object, it is possible that GOOD 3 state does not change even if the gain is changed. In that case, set the gain at one level lower than the highest gain for GOOD 3. • Because of the same reason mentioned above, it is possible that GOOD 3 does not light up. In that case, set the gain at the highest gain for GOOD 2. Optimum state GOOD 㧟 GOOD 㧞 BRIGHT state 㪙㪩㪅 㪙㪩㪅 㪙㪩㪅 㪞㪦㪅 㪞㪦㪅 㪞㪦㪅 㪛㪘㪅 㪛㪘㪅 㪛㪘㪅 4-8 03/2003 CHAPTER 㧠 For optimum measurement Gain setting for CH 1 side Setting method When the measured object color changes frequently Step Set the object to be measured within the measuring range. Example: In case of measuring at 30 to 50mm with LH-54. Page 6-12 عCH 1/CH 2 gain setting ޓޓޓޓޓ (30mm) Measured object Set the gain setting to AUTO. Setting display Gain setting for Set the gain in a manner similar to that for CH 1. CH 2 side Memory write Details The setting conditions are stored in the memory number to be written in. Example: In case of storing in u-01 Page 6-12 عCH 1/CH 2 gain setting Page 6-10 عMemory write ޓSetting display Shift adjustment for CH 1 side Set the object to be measured on CH 1 side at the center of the Page 6-102 عCH 1/CH 2 measuring range. shift Example: In case of measuring at 30 to 50mm with LH-54. adjustment ޓޓޓޓޓ (40mm) Center of measuring range Measured object Carry out shift adjustment to display the desired measurement value. Measurement value display Measurement value display Set in a manner similar to that for CH 1. Shift adjustment for CH 2 side 4-9 03/2003 Page 6-102 عCH 1/CH 2 shift adjustment setting CHAPTER 㧠 Step Span adjustment for CH 1 side (NEAR side) For optimum measurement Setting method Details 㧨In case the range to be measured is 50% or more of full-scale㧪 㧪 Page 6-106 Set the object to be measured on CH 1 side at position A, which is عCH 1/CH 2 at the distance given below from the center of the range to be span adjustment measured, towards the sensor head side (NEAR side). Example: In case of measuring at 30 to 50mm with LH-54. ޓޓ Distance of position A from center of range to be measured ޓޓޓޓޓ Center of the range to be measured LH-54 : 5mm LH-58 : 10mm LH-512 : 15mm (35mm) A Center of the range to be measured 5mm Measured object 㧨In case the range to be measured is less than 50% of full-scale㧪 㧪 Set the object to be measured within the range to be measured at the position which is nearest (NEAR side) to the sensor head. Example: In case of measuring at 36 to 44mm with LH-54. ޓޓޓޓޓ (36mm) Position which is nearest to the sensor head within the range to be measured. Measured object Carry out span adjustment to display the desired measurement value. Example: In case the 30 to 50mm with LH-54. Measurement value display Measurement value display 4-10 03/2003 CHAPTER 㧠 For optimum measurement Step Setting method Span adjustment for CH 1 side (FAR side) 㧨In case the range to be measured is 50% or more of full-scale㧪 㧪 Set the object to be measured at position B, which is at the distance given below from the center of the range to be measured, away from the sensor head side (FAR side). Example: In case of measuring at 30 to 50mm with LH-54. ޓޓ ޓޓޓޓޓ Details Page 6-106 عCH 1/CH 2 span adjustment setting Distance of position B from center of range to be measured LH-54 : 5mm LH-58 : 10mm LH-512 : 15mm Center of the range to be measured (45mm) B 5mm Measured object 㧨In case the range to be measured is less than 50% of full-scale㧪 㧪 Set the object to be measured within the range to be measured at the position which is farthest (FAR side) from the sensor head. Example: In case of measuring at 36 to 44mm with LH-54. ޓޓޓޓޓ (44mm) Center of the range to be measured Measured object Position which is the farthest from the sensor head within the range to be measured. If the measurement value is different, adjust the span of FAR side and the NEAR side to balance them. Example: In case of measuring at 30 to 50mm with LH-54. FAR side span adjustment Measurement value display Adjust Measurement value display NEAR side span adjustment Measurement value display Span adjustment for CH 2 side (NEAR side) Adjust Measurement value display Set the span in a manner similar to that for CH 1. Page 6-106 عCH 1/CH 2 span adjustment setting 4-11 03/2003 CHAPTER 㧠 Step For optimum measurement Setting method Details Span adjustment for CH 2 side (FAR side) Set the span in a manner similar to that for CH 1. Memory read out Call the user memory which was previously written in after the gain setting. Example: In case u-01 was stored in Page 6-106 عCH 1/CH 2 span adjustment setting Page 6-9 عMemory call /memory read out Setting display ‘u-01’ should be selected. Calculation setting Carry out the calculation setting. Ԙ Switch the items of calculation equation. ޓ ޓInitial setting: CH 1= A, CH 2 = B ԙ Select the calculation equation. ޓޓޓޓޓޓޓޓޓޓޓޓ ޓޓޓEquation Page 6-21 عCalculation equation selection Display (1) A + B ( ޓ2)A − B ޓ (3)(A − B) / 2 (4)L − (A + B) ޓޓޓL: Constant (5)L − (A − B) ޓޓޓL: Constant Shift adjustment Set the object to be measured at the center of the measuring range. Example: In case of measuring at 30 to 50mm with LH-54. ޓޓޓޓޓ (40mm) Center of the range to be measured Measured object Carry out shift adjustment to display the desired measurement value. Measurement value display Measurement value display 4-12 03/2003 Page 6-78 عShift adjustment setting CHAPTER 㧠 For optimum measurement Step Span adjustment (NEAR side) Setting method Details 㧨In case the range to be measured is 50% or more of full-scale㧪 㧪 Page 6-83 Set the object to be measured at position A, which is at the عSpan distance given below from the center of the range to be measured, adjustment setting towards the sensor head side (NEAR side). Example: In case of measuring at 30 to 50mm with LH-54. ޓޓ Distance of position A from center of range to be measured ޓޓޓޓޓ LH-54 : 5mm LH-58 : 10mm LH-512 : 15mm (35mm) A Center of the range to be measured 5mm Measured object 㧨In case the range to be measured is less than 50% of full-scale㧪 㧪 Set the object to be measured within the range to be measured at the position which is nearest (NEAR side) to the sensor head. Example: In case of measuring at 36 to 44mm with LH-54. ޓޓޓޓޓ (36mm) Position which is nearest to the sensor head within the range to be measured. Measured object Carry out span adjustment to display the desired measurement value. Example: In case the measurement value is to be 30 to 50mm with LH-54. Measurement value display Measurement value display 4-13 03/2003 CHAPTER 㧠 Step Span adjustment (FAR side) For optimum measurement Setting method 㧨In case the range to be measured is 50% or more of full-scale㧪 㧪 Set the object to be measured at position B, which is at the distance given below from the center of the range to be measured, away from the sensor head side (FAR side). Example: In case of measuring at 30 to 50mm with LH-54. ޓޓޓޓޓ Distance of position B from center of range to be measured LH-54 : 5mm LH-58 : 10mm LH-512 : 15mm Center of the range to be measured (45mm) B 5mm Measured object 㧨In case the range to be measured is less than 50% of full-scale㧪 㧪 Set the object to be measured within the range to be measured at the position which is farthest (FAR side) from the sensor head. Example: In case of measuring at 36 to 44mm with LH-54. ޓޓޓޓޓ (44mm) Center of the range to be measured Measured object Position which is the farthest from the sensor head within the range to be measured. If the measurement value is different, adjust the span of FAR side and the NEAR side to balance them. Example: In case of measuring at 30 to 50mm with LH-54. FAR side span adjustment Measurement value display Adjust Measurement value display NEAR side span adjustment Measurement value display Adjust 4-14 03/2003 Measurement value display Details Page 6-83 عSpan adjustment setting CHAPTER 㧠 For optimum measurement Step Setting method Analog voltage (current) output offset adjustment Fine adjust the output value of digital panel meter, etc. In offset adjustment of analog voltage (current) output, only the analog output changes, the measurement value display does not change. If it is desired to offset only the measurement value display, refer to page 6-54 عDisplay offset setting. Memory write Store the setting in the memory to be written. Example: In case of storing in u-01 ޓSetting display Start measurement 4-15 03/2003 Details Page 6-88 عAnalog voltage output offset setting Page 6-91 عAnalog current output offset setting Page 6-10 عMemory write CHAPTER 5 APPLICATION EXAMPLES AND USEFUL FUNCTIONS ޓޓ5-1 ޓޓ Level difference measurement of objects by A - B..........................................5- 1 5-2 Object thickness measurement by L - ( A + B)..................................................5-2 5-3 Extreme point measurement by peak hold / bottom hold function.............5-3 5-4 Measurement of roller eccentricity by peak-peak function.....................................5-4 5-5 BUSY input + Strobe output......................5-5 5-6 Auto-response speed................................5-6 5-7 Height measurement by 0-ADJ function..5-7 5-8 1-level teaching function......................5-8 5-9 2-level teaching function......................5-9 5-10 Analog output hold function.................5-10 03/2003 CHAPTER 5 Application examples and useful functions Use of functions incorporated in this displacement sensor enables various measurements besides a simple displacement measurement. Some examples are given below. 5-1 Level difference measurement of objects by A - B In order to judge the height with respect to a reference plane, measure the level difference with two sensors. Example: Level difference is measured by using the calculation equation A − B. B A A㧙B The diagram above is the case when distance monitor is selected in the display setting. In case of displacement monitor, the reference position is the measuring center. Please refer to page 6-45 ‘عDisplay contents selection’ for details. NOTE Setting details Setting item Contents Details Memory read out d-03 Page 6-9 Item change A=CH 1 or A=CH 2 Page 6-19 Calculation equation selection A − B (Note) Page 6-21 Comparative output setting Threshold level setting Threshold value TH-1 or TH-2 is set Page 6-33 Display setting selection Display contents selection Displacement monitor or Distance monitor Page 6-45 Calculation setting NOTE If ‘default memory d-03’ is selected, the calculation equation is automatically set to A − B. 5-1 03/2003 CHAPTER 5 Application examples and useful functions 5-2 Object thickness measurement by L - (A + B) The thickness of the board is measured with two sensor heads and the thickness is judged with respect to the standard thickness. Example: The board thickness is measured by using the calculation equation L − (A + B) A Thickness Board L B The diagram above is the case when distance monitor is selected in the display setting. In case of displacement monitor, the reference position is the measuring center. Please refer to page 6-45 ‘عDisplay contents selection’ for details. NOTE Setting details Setting item Contents Memory read out d-04 Calculation setting Details Page 6-9 Item change A=CH 1 or A=CH 2 Page 6-19 Calculation equation selection L − (A 㧗 B) (Note) Page 6-21 Comparative output setting Threshold level setting Threshold value TH-1 or TH-2 is set Page 6-33 Display setting selection Display contents selection Displacement monitor or Distance monitor Page 6-45 NOTE If ‘default memory d-04’ is selected, the calculation equation is automatically set to L − (A + B). 5-2 03/2003 CHAPTER 5 Application examples and useful functions 5-3 Extreme point measurement by peak hold / bottom hold function The highest level or the lowest level of the object is measured by using with peak hold / bottom hold function. Further, the hold states can be reset with the calculation reset input. Bottom hold Measured object Peak hold Bottom hold Bottom hold Measurement value Calculation hold reset input ON OFF Peak hold Measurement value Peak hold ON Calculation hold reset input OFF Setting details Setting item Other settings Calculation mode setting Contents Details Peak hold or bottom hold Page 6-63 5-3 03/2003 CHAPTER 5 Application examples and useful functions 5-4 Measurement of roller eccentricity by peak-peak function The change in the height of the roller caused by the eccentricity is measured by using the peak-peak function, and the amount of the eccentricity is output. Setting details Setting item Other settings Calculation mode setting Contents Details Peak-peak Page 6-63 5-4 03/2003 CHAPTER 5 Application examples and useful functions 5-5 BUSY input + Strobe output By using a combination of BUSY input and Strobe output, the timing of comparative output can be controlled. Example: When comparative output is taken at the time when the strobe output turns ON, the measurement value at that time becomes the entered judgement value. Sync. sensor To BUSY input terminal BUSY input ON OFF Start measurement Complete measurement Measurement value Response time Comparative output ON Judgement Judgement OFF ON Strobe output OFF Enter measurement value Enter measurement value Please refer to page 3-8, 9 ‘3-2-4 I/O circuit diagram’ for the connection. ෳޓ⠨ REFERENCE 5-5 03/2003 CHAPTER 5 Application examples and useful functions 5-6 Auto-response speed If ‘AUTO’ is set in the response time setting, the response speed changes corresponding to the line speed and the analog output can be measured with an optimum resolution. Measure this surface TH-2 GO TH-1 Sync. Sensor To BUSY input terminal ON GO OFF Analog output Low Resolution High Auto-response speed start Fast Response speed Slow 0.5ms Analog output hold ON BUSY input OFF If analog output is taken at the point at which GO output turns ON, the measurement value with an optimum resolution can be obtained. ෳޓ⠨ REFERENCE Please refer to page 6-59 ‘عResponse time setting’ for setting details. 5-6 03/2003 CHAPTER 5 Application examples and useful functions 5-7 Height measurement by 0-ADJ function By using the 0-ADJ input, the height of a moving object can be measured with respect to a reference level to judge if it is OK or not. Reference level Standard level Height measurement from the standard reference level level Measured surface External BUSYSync. input sensor sensor 0-ADJ Sync. sensor To BUSY To0-ADJ 0-ADJinput input To External To BUSY Sync. input input Measured surface Measurement value Height from the standard level reference level 0-ADJ Sync. pulse The measurement value at this point is standard ‘0’. Standard surface ON External BUSY Sync. input OFF ON Comparative output Judgement OFF OK/NG Please refer to page 3-8, 9 ‘3-2-4 I/O circuit diagram’ for the connection and page 3-18 ‘ ع0-ADJ input’ for the operation chart. ෳޓ⠨ REFERENCE Also, please refer to page 6-112 ‘ ع0-ADJ’ for setting details. 5-7 03/2003 CHAPTER 5 Application examples and useful functions 5-8 1-level teaching function In case of measuring height (thickness) of an object to inspect and decide if the measured object is within the specifications, the threshold value of the comparative output can be automatically set by simple operation, by teaching with the actual object. In 1-level teaching function, performing 1-level teaching on the object and inputting the tolerance value can set the threshold values (TH-1, TH-2). Example: LO TH-2 -Tolerance GO Measured object +Tolerance TH-1 HI ෳޓ⠨ REFERENCE Please refer to page 6-27 ‘ ع1-level teaching’ for setting details. 5-8 03/2003 CHAPTER 5 Application examples and useful functions 5-9 2-level teaching function In case of measuring height (thickness) of an object to inspect and decide if the measured object is within the specifications, the threshold value of the comparative output can be automatically set by simple operation, by teaching with the actual objects. In 2-level teaching function, performing 2-level teaching on the objects can set the threshold values (TH-1, TH-2). Example: LO TH-2 GO Object-1 TH-1 Object- 2 ෳޓ⠨ REFERENCE HI Please refer to page 6-30 ‘ ع2-level teaching’ for setting details. 5-9 03/2003 CHAPTER 5 Application examples and useful functions 5-10 Analog output hold function Continuous analog output data can be obtained even if there are extreme changes (e.g. holes etc.), that can cause an error, on the measured surface of the object. Measurement of the height of these surfaces Measurement along this line Analog output hold OFF condition 5.5V 5.5V Analog output becomes 5.5V (measurement error) at the holes and continuous measurement cannot be done. Analog voltage output Analog output hold ON condition Analog voltage output The previous measurement value is held. Hold Analog output does not become 5.5V (measurement error) at the holes and continuous measurement can be done. ޓPlease refer to page 6-71 ‘عAnalog output hold setting’ for setting details. ෳޓ⠨ REFERENCE 5-10 03/2003 CHAPTER 5 Application examples and useful functions 㧙 MEMO 㧙 5-11 03/2003 CHAPTER 6 SETTING • OPERATION 6-1 Overall configuration...............6-1 عOther settings.................................. 6-57 6-2 Prior to operation................... 6-3 عResponse time setting.....................6-59 عCalculation mode setting.................6-63 ޓޓ6-2-1 Setting flow..................................... 6-3 ޓޓ6-2-2 Default memory and user memory. .6-4 عDefault memory................................6-4 عUser memory....................................6-6 ޓޓ6-2-3 Caution on switching power on........6-6 6-3 Functions and setting عChannel selection............................6-69 عAnalog output hold setting...............6-71 ع0-ADJ store setting.......................... 6-73 ع0-ADJ clear.......................................6-75 عAdjustment mode............................. 6-77 عShift adjustment setting................... 6-78 procedure................................6-7 عSpan adjustment setting.................. 6-83 عMeasurement mode.......................... 6-7 عAnalog voltage output offset عMeasurement value display...... ........6-8 setting............................................... 6-88 عAnalog current output offset عMemory call / memory read out........ 6-9 عMemory write...................................6-10 عCH 1 / CH 2 setting..........................6-11 setting............................................... 6-91 عRS-232C setting...............................6-94 عCH 1 / CH 2 gain setting................. 6-12 عBit rate setting.................................. 6-95 عCH 1 / CH 2 calculation setting.......6-15 عData length setting............................6-96 عCalculation setting...........................6-18 عParity setting.....................................6-97 عItem change.....................................6-19 عStop bit number setting.....................6-98 عCalculation equation selection...... ..6-21 عInterference prevention setting.........6-99 عComparative output setting............. 6-25 عCH1 / CH2 shift adjustment ع1-level teaching............................... 6-27 setting..............................................6-102 عCH1 / CH2 span adjustment ع2-level teaching............................... 6-30 عThreshold value setting.................. 6-33 عHysteresis setting............................6-35 setting..............................................6-106 عAll reset.......................................... 6-110 عComparative output timer setting....6-40 ع0-ADJ..............................................6-112 عDispaly setting selection..................6-43 عDisplay hold.....................................6-117 عDisplay contents selection.............. 6-45 عPanel lock setting............................6-117 عDisplay zero suppress.................... 6-47 6-4 List of initial settings.........6-118 عDecimal point position setting......... 6-49 عLowest bit zero setting.................... 6-50 عDisplay sleep setting....................... 6-52 عDisplay offset setting.......................6-54 03/2003 CHAPTER 6 Setting • Operation 6-1 Overall configuration Power ON ޓPage 6-7 Measurement mode MODE Press for 1 sec. or more SET Memory call Common settings for each memory (Note 4) MODE ޓPage 6-112 㧗 0-ADJ 㧗 MODE ޓPage 6-94 RS-232C setting ޓPage 6-117 SET Display hold MODE 㧗 Press for 1 sec. or more ޓPage 6-117 Press for 1 sec. or more ޓPage 6-99 Interference prevention setting Panel lock setting 㧕 Press for 1 sec. (RS-232C mode㧕 or more MODE Press for 1 sec. or more ޓPage 6-102 CH 1 shift adjustment setting (Note 1) MODE Press for 1 sec. or more ޓPage 6-106 CH 1 span adjustment setting (Note 1) MODE Press for 1 sec. or more ޓPage 6-102 CH 2 shift adjustment setting (Note 2) MODE Press for 1 sec. or more ޓPage 6-106 CH 2 span adjustment setting (Note 2) MODE Press for 1 sec. or more 6-1 03/2003 ޓPage 6-110 All reset CHAPTER 6 Setting • Operation 1) Displayed when sensor head is connected to LH-CS6(P) or HEAD 1 side of LH-CD6(P). 2) Displayed when sensor head is connected to HEAD 2 side of LH-CD6(P). 3) Displayed when sensor heads are connected to both HEAD 1 side and HEAD 2 NOTE side of LH-CD6(P). 4) The settings in ‘Common settings for each memory‘ are common for user’s memory (u-01 to u-16). 5) The settings in ‘User memory settings’ can be stored in 16 memories (u-01 to u-16). ޓPage 6-9 Memory read out SET User memory setting (Note 5) ޓPage 6-11 MODE CH 1 setting (Note 1) ޓPage 6-11 MODE CH 2 setting ޓPage 6-77 Adjustment mode MODE (Note 2) ޓPage 6-57 ޓPage 6-18 MODE Other settings Calculation setting MODE (Note 3) ޓPage 6-43 ޓPage 6-25 MODE Comparative output setting Display setting Memory store SET ޓPage 6-10 Memory write SET Press for 1 sec. or more Measurement mode 6-2 03/2003 MODE CHAPTER 6 Setting • Operation 6-2 Prior to operation 6-2-1 Setting flow Here, the flow of setting is explained in a simplified manner for proper understanding. Power ON When the power supply is switched ON, ‘Er-40’ may appear. Please refer to ‘6-2-3 Caution on switching power on’ on page 6-6. Sensor enters measurement mode immediately after Measurement mode switching on of power. ޓFor details, refer to ‘ عMeasurement mode’ on page 6-7. Press MODE key for 1 sec. or more Four default memories, d-01 to d-04, are present. If user memory has been set, user memory is also displayed. Select memory to suit measurement method. For details, refer to ‘6-2-2 Default memory and user memory’ on page 6-4. Call memory Set the parameters in the Change the setting of user memory setting (CH1 setting, CH2 setting, calculation setting, comparative output setting, user memory setting, as display setting, other settings, adjustment mode) required. The changes made above are written into user memory uWrite memory 01 to u-16. (For details, refer to ‘ عMemory write’ on page 6-10.) Set the parameters of items in common settings for each memory, as required. Change the common settings for each memory (RS-232C setting, interference prevention setting, CH 1 / CH 2 shift adjustment setting, CH 1 / CH 2 span adjustment setting, all reset) Press MODE key for 1 sec. or more to return to the measurement mode. Start 6-3 03/2003 CHAPTER 6 Setting • Operation 6-2-2 Default memory and user memory Default memory The settings for four different applications in which this sensor is likely to be frequently used have been registered in the default memories d-01 to d-04. z d-01 (CH1 independent measurement) This default memory is selected when only one sensor head is used and the used sensor head is connected to the HEAD 1 side of the controller. Connected to HEAD 1 NOTE • In case of LH-CS6(P), default memories other than d-01 cannot be selected. • d-01 can be selected even if two sensor heads are connected. In this case only the sensor head connected to HEAD 1 side operates. z d-02 (CH2 independent measurement) This default memory is selected when only one sensor head is used and the used sensor head is connected to the HEAD 2 side of the controller. Connected to HEAD 2 NOTE • d-02 can be selected even if two sensor heads are connected. In this case only the sensor head connected to HEAD 2 side operates. 6-4 03/2003 CHAPTER 6 Setting • Operation z d-03 (level difference measurement) This default memory is selected when two sensor heads are used to measure level difference. When d-03 is selected, calculation equation A − B is set in the calculation setting of user memory setting. (Refer to page 6-21.) 㧮 㧭 㧭㧙㧮 z d-04 (thickness measurement) This default memory is selected when two sensor heads are used to measure thickness. When d-04 is selected, calculation equation L − (A + B) is set in the calculation setting of user memory setting, and L input display appears. For the setting procedure after this, refer to ‘Setting procedure’ on page 6-22. 㧭 㧸 Thickෘߐ ness ᧼ Plate 㧮 6-5 03/2003 CHAPTER 6 Setting • Operation User memory In the factory shipment condition, even when memory call is carried out only the above mentioned four default memories are available. (Refer to page 6-9 عMemory call / memory read out.) In case the sensor is to be used in a different application, first choose from one the four default memories d-01 to d-04 and change each setting (CH1 setting, CH2 setting㧘calculation setting, comparative output setting, display setting, other settings, adjustment mode) of the user memory setting to suit the application. After that, store these settings in user memory (u-01 to u-16). (Refer to page 6-10 عMemory write.) A user memory which has once been written in and stored can be called by memory read out. 6-2-3 Caution on switching power on When the power is switched on, the memory which has been last set when the sensor was previously used is called. At this time, if the sensor head connection information (Note 1) is different from that stored the last time the sensor was used, an error indication appears. For example, if the sensor was previously used by connecting 2 Nos. of sensor heads LH-54 and now the power supply is switched on with 2 Nos. of sensor heads LH-512 connected, Er-40 error appears. In this case, after pressing some key, select the memory number and correct the settings. Power ON In case the present head connection information is different from that stored the last time the sensor was used. Press any key Memory call screen appears Return to normal setting routine 1) 2) NOTE Select from either the four default memories d-01 to d-04 or the already registered user memories. (Note 2) For details, refer to page 6-9 ‘ عMemory call / memory read out’. For the procedure after this, refer to the setting flow on page 6-3. Sensor head connection information is the information on the model Nos. of the sensor heads connected to the HEAD 1 side and the HEAD 2 side and their combination. Even though a registered memory No. already exists, if the present sensor head connection information and the sensor head connection information at the time of memory registration is different, the registered memory No. is not displayed. For instance, in the above example, even if memory No. u-01 is registered previously when using 2 Nos. LH-54, since the present sensor head connection information is 2 Nos. of LH-512, u-01 is not displayed. 6-6 03/2003 CHAPTER 6 Setting • Operation 6-3 Functions and setting procedure Measurement mode When the power is switched on, the sensor is in measurement mode. The measurement mode can be further classified as follows. Single measurement mode Power ON Measurement mode 1) NOTE 2) 3) In case the sensor is used with only one of the connected sensor heads effective (Note 1) Calculation mode In case two sensor heads are connected and different calculations are done (Note 2) RS-232C mode Mode for control through RS-232C (Note 3) This is the normal mode in case of LH-CS6(P). Further, in case of LH-CD6(P), it is not possible to use the two sensor heads independently. This mode is not available with LH-CS6(P). Refer to page 6-117 ‘ عPanel lock setting’ for changing to RS-232C mode. 6-7 03/2003 CHAPTER 6 Setting • Operation عMeasurement value display z With sensor head emission ON (Display example) The present measurement value is displayed. The measurement value can be displayed in terms of displacement monitor or distance monitor. ෳޓ⠨ REFERENCE Refer to page 6-43 ‘ عDisplay contents selection’ for setting of displacement monitor or distance monitor. z With sensor head emission OFF If the LED does not emit due to the setting of remote interlock, the display shown at the right appears. ෳޓ⠨ Refer to page 3-17 ‘ عRemote interlock input’ for emission ON/ OFF. REFERENCE z In case of outside measurement range, insufficient light or excess light Display Description HEAD 1 side HEAD 2 side The measured object is outside the measuring range (near side) The measured object is outside the measuring range (far side) Incident light intensity is insufficient Incident light intensity is excessive Please refer to page 9-1 ‘9-1 Error indication’ for other error indications. In case the measured object is outside the measuring range and is very close to the sensor head, the measurement value may be displayed, instead of NEAR or BRIGHT NOTE indication. Please ensure to set the object to be measured within the measuring range. Measurement value may be unstable near the boundaries of the measuring range. Please ensure to correctly set the object to be measured within the measuring range. 6-8 03/2003 CHAPTER 6 Setting • Operation عMemory call / memory read out In the factory shipment condition, memory call can be for d-01 to d-04. U-01 to u-16 are not displayed. (For details refer to page 6-4 ‘ عDefault memory and user memory’.) Measurement mode MODE Press for 1 sec. or more. Memory call SET (Note 1) ޓޓSelect the memory and press SET . Default memory (d-01 to d-04) is limited depending on the type of controller and the sensor head connection condition as given in the table below. Further, regarding u-01 to u-16, only the memory Nos. which have been once stored by memory write (page 6-10) are displayed. (Note 2) LH-CD6(P) Memory No. LH-CS6(P) Connection to HEAD 1 side Connection to HEAD 2 side Connection to both HEAD 1 and HEAD 2 sides d-01 Displayed Displayed Not displayed Displayed d-02 Not displayed Not displayed Displayed Displayed d-03 Not displayed Not displayed Not displayed Displayed d-04 Not displayed Not displayed Not displayed Displayed 1) 2) NOTE 3) When d-04 is selected, since the value of L is to be first input, L input display of calculation setting appears. For the setting procedure after this, refer to page 623 Step ԝ onwards. Further, the present sensor head connection information (Note 3) and the sensor head connection information at the time of registration can display only the same memory numbers. Sensor head connection information is the information on the model Nos. of the sensor heads connected to the HEAD 1 side and the HEAD 2 side and their combination. 6-9 03/2003 CHAPTER 6 Setting • Operation Memory write Select the memory number to be written into by using the UP and DOWN keys, and then press the SET key. Once a user memory has been stored into by using memory write, it can then be called by memory read out (refer to page 6-9). SET . Select memory and pressޓޓ NOTE If u-01 to u-16 is selected, the contents are written into an EEPROM and stored. However, if r is selected, the contents are not written into the EEPROM and are not stored. In this case, when the power supply is switched off, or when another user memory is read out, the contents which have been set are lost. 6-10 03/2003 CHAPTER 6 Setting • Operation CH 1 / CH 2 setting z CH 1 / CH 2 setting configuration CH 1 setting [Displayed when sensor head is connected to LH-CS6(P) or HEAD 1 side of LH-CD6(P)]. ޓPage 6-12 SET CH 1 gain setting SET SELECT setting Gain setting SET CH 1 setting MODE SET SET AUTO setting MODE Normal SET SET When the input digit is changed with MODE key, the selected digit blinks. Numerical value is set with key and key. CH 1 calculation setting ޓPage 6-15 SET SET SET L−A L value input CH 2 setting [Displayed when sensor head is connected to HEAD 2 side of LH-CD6(P).] ޓPage 6-2 SET CH 2 gain setting SET SELECT setting Gain setting SET CH 2 setting MODE SET SET AUTO setting MODE SET Normal SET When the input digit is changed with MODE key, the selected digit blinks. Numerical value is set with key and key. CH 2 calculation setting ޓPage 6-15 SET L−B 6-11 03/2003 SET L value input SET CHAPTER 6 Setting • Operation CH 1 / CH 2 gain setting Gain setting is the setting of the sensitivity of the sensor head connected to CH 1 or CH 2. This sensor calculates the measurement value based on the light reflected from the object. Hence, it is necessary to optimally set the sensitivity of the sensor head with respect to the change in the received light depending on the reflectivity of the object surface. The gain setting can be selected from AUTO setting and SELECT setting, separately for sensor heads of CH 1 and CH 2. • AUTO : The gain is automatically varied according to the change in the reflectivity (amount of light received) of the measured object. (Note 1) • SELECT: The sensitivity can be set with respect to the measured object in 11 steps. Further, since the setting can be done while seeing the ‘BRIGHT’, ‘GOOD’ and ‘DARK’ LEDs, the optimum gain can be verified (Refer to the figure below.). Set the gain so that GOOD 3 is displayed. (Note 2, 3 and 4) GOOD 㧝 DARK condition GOOD 㧟 GOOD 㧞 BRIGHT condition 㪙㪩㪅 㪙㪩㪅 㪙㪩㪅 㪙㪩㪅 㪙㪩㪅 㪞㪦㪅 㪞㪦㪅 㪞㪦㪅 㪞㪦㪅 㪞㪦㪅 㪛㪘㪅 㪛㪘㪅 㪛㪘㪅 㪛㪘㪅 㪛㪘㪅 Optimum condition Light intensity: Light intensity: Low High In SELECT setting, if the object is outside the measuring range, the following is displayed. In this case, return the object to within the measuring range. When the object is outside the near side of the measuring range (NEAR) 㪞㪦㪅 When the object is outside the far side of the measuring range (FAR) 㪞㪦㪅 㪙㪩㪅 㪛㪘㪅 㪙㪩㪅 㪛㪘㪅 Initial setting: SELECT settinğ̆̆04 NOTE 1) In the auto setting, the linearity and resolution may deteriorate. 2) Depending on the reflection ratio or gloss of the measured object, it is possible that GOOD 3 state does not change even if the gain is changed. In that case, set the gain at one level lower than the highest gain for GOOD 3. Because of the same reason mentioned above, it is possible that GOOD 3 does not light up. In that case, set the gain at the highest gain for GOOD 2. 3) Especially, in case of an object having a high reflectivity which should normally result in BRIGHT being displayed, if a high gain is set, the measured value may be displayed in the measurement mode, without the BRIGHT error being displayed. In this case, note that the measured value is highly inaccurate. 4) Do not move the object during gain setting. It will not be possible to set the optimum gain. 6-12 03/2003 CHAPTER 6 Setting • Operation Setting procedure Step Key MODE Ԙ Key operation from measurement mode is explained. Operation Display/Result Press the mode key for 1 sec. or more. 1 sec. or more SET Memory call Memory selection display appears. Press the set key. 㨪 or 㨪 Select the memory No. by using the UP key or DOWN key. ԙ SET Ԛ Press the set key. Select either CH 1 setting or CH 2 setting by using the UP key or the DOWN key. SET ԛ (Note 1) CH 1 setting CH 2 setting (Note 3) (Note 2) Press the set key. Select either CH 1 gain setting or CH 2 gain CH 1 gain setting CH 2 gain setting (Note 2) setting by using the UP key or the DOWN key. SET Ԝ (Note 3) Press the set key. AUTO setting Select either AUTO setting or SELECT setting SELECT setting by using the UP key or the DOWN key. In case AUTO setting is selected: Go to Step ԝ In case SELECT setting is selected: Go to Step ԟ • In case of AUTO setting Step Key SET Operation Display AUTO setting is set and the display returns to CH 1 gain setting or CH 2 gain setting. Press the set key. ԝ CH 1 gain setting MODE Ԟ Press the mode key twice. CH 2 gain setting Memory store display appears. MODE Memory store To Step Ԣ 6-13 03/2003 CHAPTER 6 Setting • Operation In case of SELECT setting Step Key SET ԟ Operation Display/Result Gain selection display appears. Press the set key. Gain appears on the left side and Bright, DARK, GOOD on the right Select the optimum gain using the UP key side. or DOWN key. 㪙㪩㪅 㪞㪦㪅 㪛㪘㪅 Ԡ ԡ SET Press the set key. The selected gain is set. MODE Press the mode key twice. Memory store display appears. MODE Memory store To step Ԣ Memory write Step Key SET Operation Memory selection display appears. Press the set key. Select the memory No. by using the UP key or DOWN key. Ԣ Display/Result 㨪 or (Note 4) SET ԣ 1 sec. or more 1) 2) NOTE Press the set key for 1 sec. or more. 3) 4) 5) Return to measurement mode (Note 5) For details, refer to page 6-9 ‘ عMemory call / memory read out’. Displayed when sensor head is connected to LH-CS6(P) or HEAD 1 side of LH-CD6(P). Displayed when sensor head is connected to HEAD 2 side of LH-CD6(P). For details, refer to page 6-10 ‘ عMemory write’. When the set key is pressed for 1 sec. or more at the end of the setting, the settings are confirmed and stored in an EEPROM. In order to cancel before confirmation, simultaneously press UP key and DOWN key for 1 sec. or more. The sensor returns to the measurement mode. 6-14 03/2003 CHAPTER 6 Setting • Operation CH 1 / CH 2 calculation setting In case of single measurement mode, the calculation equation for the sensor head connected to HEAD 1 or HEAD 2 is selected. Cal. equation Normal Description Display Normal measurement is done. It is selected when the measurement value A (CH 1) or B (CH 2) is to be deducted from a constant L. L can be set arbitrarily. (Input up tor5,000mm is possible.) It is convenient for object height measurement, etc. The reference position for L differs depending on whether displacement monitor or distance monitor is selected during display setting. Displacement monitor: L is distance from measurement center Distance monitor: L is distance from sensor head. Ex.: LH-54 Ex.: LH-54 Displacement monitor Distance monitor -10 L−A 30 (CH 1) Measurement 㧜 ᷹ቯਛᔃ center Measurement center 40 ᷹ቯਛᔃ〒㔌 distance ޓ 㧸 45 㧔㧭߹ߚߪ㧮㧕 (A or B) 50 Distance 〒 㔌 +5 L−B (CH 2) 㧸 㧔㧭߹ߚߪ㧮㧕 (A or B) 㧸㧙㧭 +10 Distance 〒 㔌 (mm) (mm) L㧸㧦㧝㧡㨙㨙 = 15mm If㧭㧦㧡㨙㨙ߣߒߚ႐ว A = 5mm L㧸㧙㧭㧩㧝㧡㧙㧡㧩㧝㧜 − A = 15 − 5 = 10 or 㧸㧙㧭 (mm) (mm) 㧸㧦㧡㧡㨙㨙 L = 55mm 㧭㧦㧠㧡㨙㨙ߣߒߚ႐ว If A = 45mm 㧸㧙㧭㧩㧡㧡㧙㧠㧡㧩㧝㧜 L − A = 55 − 45 = 10 For example, when L=0 is set, the analog displacement output graph Measurement center ᷹ቯਛᔃ〒㔌 distance is as given below. Ex.: LH-54 ( ޓ40mm) Measuring range ᷹ቯ▸࿐ 5.5 (21.6mA) 5 (20mA) ᄌ ജ (V) -10 㧜 (12mA) +10 〒 㔌 (mm) Distance (mm) -5 Alarm ࠕࡓ OFF output ജ (4mA) ON OFF Initial setting: Normal L = 0mm When ‘Normal’ is selected, the display offset returns to the initial value. L value is common for CH 1 and CH 2.Further, the L value set here is linked to the L NOTE value input at page 6-21 ‘ عCalculation equation selection’, and at page 6-54 ‘ عDisplay offset setting’. ෳޓ⠨ REFERENCE Refer to page 6-45 ‘ عDisplay contents selection’ for displacement monitor and distance monitor. 6-15 03/2003 CHAPTER 6 Setting • Operation Setting procedure Step Key MODE Ԙ Key operation from measurement mode is explained. Operation Press the mode key for 1 sec. or more. 1 sec. or more SET Display/Result Memory call Memory selection display appears Press the set key. 㨪 Select the memory No. by using the UP key or DOWN key. ԙ SET Ԛ (Note 1) 㨪 Press the set key. Select either CH 1 setting or CH 2 setting by using the UP key or DOWN key. SET or CH 1 setting CH 2 setting (Note 2) (Note 3) Press the set key. Select either CH 1 calculation setting or CH CH 1 calculation CH 2 calculation ԛ 2 calculation setting by using the UP key or setting DOWN key. SET setting (Note 3) (Note 2) Press the set key. or Ԝ Select normal, L-A (CH 1), or L-B (CH 2) by or using the UP key or DOWN key. CH 2 CH 1 In case normal is selected: Go to step ԝ In case L-A (CH 1) or L-B (CH 2) is selected: Go to ԟ In case of normal setting Step Key SET Operation Press the set key. Display/Result Normal is set and the display returns to CH 1 calculation setting or CH 2 calculation setting ԝ CH 1 calculation setting (Note 2) MODE Ԟ Press the mode key twice. CH 2 calculation setting (Note 3) Memory store display appears MODE Memory store To step ԣ 6-16 03/2003 CHAPTER 6 Setting • Operation In case of L − A or L − B Step Key SET ԟ Ԡ Operation Display/Result L value input display appears Press the set key. L value is input SET Press the set key MODE Input the L value by using the mode key, Up key and DOWN key. Press the set key. SET When the input digit is shifted by the mode key, the selected digit blinks. Input the numerical value by using the UP key or DOWN key. The input L value is set and the display returns to CH 1 calculation setting or CH 2 calculation setting ԡ CH 1 calculation setting (Note 2) MODE Ԣ Press the mode key twice. MODE CH 2 calculation setting (Note 3) Memory store display appears Memory store To step ԣ Memory write Step Key Memory selection display appears. Select the memory No. by using the UP key or DOWN key. ԣ Press the set key for 1 sec. or more. SET 3) 4) 5) 㨪 or (Note 4) Sensor returns to measurement mode. (Note 5) 1 sec. or more 1) 2) NOTE Display/Result Press the set key. SET Ԥ Operation For details, refer to page 6-9 ‘ عMemory call / memory read out’. Displayed when sensor head is connected to LH-CS6(P) or HEAD 1 side of LH-CD6(P). Displayed when sensor head is connected to HEAD 2 side of LH-CD6(P). For details, refer to page 6-10 ‘ عMemory write’. When the set key is pressed for 1 sec. or more at the end of the setting, the settings are confirmed and stored in an EEPROM. In order to cancel before confirmation, simultaneously press UP key and DOWN key for 1 sec. or more. The sensor returns to the measurement mode. 6-17 03/2003 CHAPTER 6 Setting • Operation Calculation setting Settings regarding each calculation of the calculation mode are done. z Configuration for calculation setting ޓPage 6-19 SET Item change Set A = CH 1 SET SET Calculation setting Note: When A is set, B is automatically set to the MODE other channel. SET Set A = CH 2 MODE SET A+B SET Calculation equation selection ޓPage 6-21 A−B SET When the input digit is changed with MODE key, the selected digit blinks. Numerical value is set with key and key. (A + B) / 2 SET L − (A + B) SET SET L value input L − (A − B) SET 6-18 03/2003 SET CHAPTER 6 Setting • Operation Item change Set A of calculation equation to CH 1 or CH 2. When A is set, B is automatically set to the other channel. Initial settingޓCH 1 (HEAD 1 side) = A ޓޓޓޓޓ CH 2 (HEAD 2 side) = B Setting procedure Step Key MODE Ԙ Key operation from measurement mode is explained. Operation Press the mode key for 1 sec. or more. 1 sec. or more SET Memory call Memory selection display appears. Press the set key. Select the memory No. by using the UP key or DOWN key. ԙ Display / Result 㨪 㨪 SET Ԛ (Note 1) Press the set key. Select calculation setting by using the UP Calculation setting key or DOWN key. SET ԛ Press the set key. Select item change by using the UP key or DOWN key. SET Ԝ Press the set key. Select either A=CH 1 or A=CH 2 by using the UP key or DOWN key. SET Item change A = CH 1 A = CH 2 CH for A is set and the display returns to item change. Press the set key. ԝ Item change MODE Press the mode key twice. Memory store display appears Ԟ MODE Memory store To step ԟ 6-19 03/2003 CHAPTER 6 Setting • Operation Memory write Step Key SET Operation Memory selection display appears. Press the set key. Select the memory No. by using the UP key or DOWN key. ԟ Display/Result 㨪 or (Note 2) Press the set key for 1 sec. or more. SET Ԡ NOTE 1 sec. or more 1) 2) 3) Sensor returns to measurement mode. (Note 3) For details, refer to page 6-9 ‘ عMemory call / memory read out’. For details, refer to page 6-10 ‘ عMemory write’. When the set key is pressed for 1 sec. or more at the end of the setting, the settings are confirmed and stored in an EEPROM. In order to cancel before confirmation, simultaneously press UP key and DOWN key for 1 sec. or more. The sensor returns to the measurement mode. 6-20 03/2003 Setting • Operation CHAPTER 6 Calculation equation selection This function performs calculation on the CH 1 and CH 2 measurement values. The following types of calculations are available. Equation Description Display A+B Measurement values A and B are added. A−B Measurement value B measurement value A. is subtracted from (A + B) / 2 Average of measurement values A and B is taken. L − (A + B) Sum of measurement values A and B is subtracted from constant L. L − (A − B) Difference of A and B is subtracted from constant L. ෳޓ⠨ REFERENCE NOTE Regarding interchange of CH 1 and CH 2 (CH 1 = B, CH 2 = A), refer to page 6-19 ‘ عItem change’. In memory read out, if d-03 is selected, A − B is automatically set. If d-04 is selected, L − (A + B) is automatically set. z Analog displacement output diagram in case of calculation In case two sensor heads are connected and an equation given above is selected, or when two different types of sensor heads are connected and calculation is performed, the relation between the analog output and the displacement is different from that when measurement is done with only one sensor head. The full scale distance becomes the sum of the full scale distances of the two sensor heads. Depending upon the combination, the full scale distance is as shown in the table below and the analog displacement output diagrams are as shown on the next page. HEAD 1 side HEAD 2 side ෳޓ⠨ REFERENCE LH-54 LH-58 LH-512 LH-54 LH-58 LH-512 40mm (±20mm) 60mm (±30mm) 80mm (±40mm) 60mm (±30mm) 80mm (±40mm) 100mm (±50mm) 80mm (±40mm) 100mm (±50mm) 120mm (±60mm) In case of measurement with one sensor head, refer to page 3-11 ‘Analog displacement output diagram’. 6-21 03/2003 Setting • Operation CHAPTER 6 Ex. 2: In case of calculation with LH-58 and LH-512 Ex. 1: In case of calculation with 2 Nos. of LH-54 Since the full scale distance of LH-58 is 40mm (±20mm), and that of LH-512 is 60mm (±30mm), when they are used in combination, the full scale distance becomes 100mm (±50mm), and the analog displacement output diagram is as shown in the figure below. Since the full scale distance of LH-54 is 20mm (±10mm), when calculation is done with two sensor heads, the full scale distance becomes 40mm (±20mm), and the analog displacement output diagram is as shown in the figure below. Measuring range ᷹ቯ▸࿐ Measuring range ᷹ቯ▸࿐ 5 Displacement output (V) ᄌ ജ (V) (20mA) +20 㧜 (12mA) Alarm ࠕࡓ OFF output ജ ᄌ ജ (V) 5 -50 -20 (20mA) 㧜 +50 (12mA) 〒 㔌 Distance (mm) 〒 㔌 Distance (mm) (mm) (mm) -5 (4mA) -5 (4mA) ON (21.6mA) 5.5 (21.6mA) Displacement output (V) 5.5 Alarm ࠕࡓ OFF output ജ OFF ON OFF z Analog output when L − (A + B) or L − (A − B) is selected In Example 1, with two LH-54 sensor heads connected, if A + B is selected and A + B = 20mm, the measurement value display is 20mm, and the analog output voltage is +5V. If in this condition, L − (A + B) is selected, and L = 0mm, the measurement value display becomes −20mm and the analog output voltage becomes −5V, i.e., + changes to −. Setting procedure Step Key MODE Ԙ Operation Memory call Memory selection display appears. Press the set key. Select the memory No. by using the UP key or DOWN key. ԙ SET Display/Result Press the mode key for 1 sec. or more. 1 sec. or more SET Ԛ Key operation from measurement mode is explained. 㨪 or 㨪 Press the set key. Select the calculation setting by using the UP key or DOWN key. 6-22 03/2003 Calculation setting (Note 1) CHAPTER 6 Setting • Operation SET ԛ Press the set key. Select the calculation equation selection by Calculation equation selection using the UP key or DOWN key. SET Press the set key. A +B A−B Select the calculation equation by using the Ԝ (A + B) / 2 UP key or DOWN key. L − (A + B) L − (A − B) To step ԝ in case L − (A + B) or L − (A − B) is selected To step ԡ in case other equations are selected In case L − (A + B) or L − (A − B) is selected. Step ԝ Ԟ Key SET Operation Display/Result L value input display appears. Press the set key. L value is input. SET Press the set key. MODE Input L value by using the mode key, UP key and DOWN key. SET Press the set key. When the input digit is shifted by the mode key, the selected digit blinks. Input the numerical value by using the UP key or DOWN key. Input L value is set, and the display returns to calculation equation setting ԟ Calculation equation setting MODE Ԡ Press the mode key twice. MODE Memory store display appears. Memory store To step ԣ 6-23 03/2003 CHAPTER 6 Setting • Operation In case other equations are selected Step Key Operation Press the set key. SET ԡ Display/Result Selected calculation equation is set and the display returns to calculation equation selection Calculation equation selection Press the mode key twice. MODE Memory store display appears Ԣ MODE Memory store To step Ԥ Memory write Step Key Operation Memory selection display appears. Press the set key. SET Select the memory No. by using the UP key or DOWN key. ԣ Display/Result 㨪 or (Note 2) Press the set key for 1 sec. or more. SET Ԥ 1 sec. or more NOTE 1) 2) 3) Sensor returns to measurement mode. (Note 3) For details, refer to page 6-9 ‘ عMemory call / memory read out’. For details, refer to page 6-10 ‘ عMemory write’. When the set key is pressed for 1 sec. or more at the end of the setting, the settings are confirmed and stored in an EEPROM. In order to cancel before confirmation, simultaneously press UP key and DOWN key for 1 sec. or more. The sensor returns to the measurement mode. 6-24 03/2003 CHAPTER 6 Setting • Operation Comparative output setting z Comparative output configuration ޓPage 6-27 SET 1-level teaching Target setting SET Measurement value + tolerance setting SET SET SET Comparative output setting + tolerance is input MODE Measurement value of target object blinks The present − tolerance is displayed − tolerance setting SET SET − tolerance is input Adjust with ޓ ޓkey or key. ޓPage 6-30 2-level teaching MODE Adjust with ޓ ޓkey or key. Measurement value Target 1 setting SET SET The present + tolerance is displayed SET SET Place Object 1 Measurement value of Object 1 blinks Measurement value Target 2 setting SET SET Place Object 2 Measurement value of Object 2 blinks ޓPage 6-33 Threshold value setting MODE SET Present threshold value is displayed TH-1 SET SET TH-2 ޓPage 6-35 Hysteresis setting MODE Hysteresis OFF SET SET Press for 1 sec. or more Present hysteresis value is displayed SET Hysteresis ON ޓPage 6-40 MODE Comparative output timer setting 6-25 03/2003 SET SET CHAPTER 6 Setting • Operation Comparative output setting MODE Hysteresis setting ޓPage 6-40 Comparative output timer setting Without timer SET MODE SET ON delay Timer interval setting SET SET OFF delay SET Set the timer interval between 10 to 999ms by key or key. 1-level teaching 6-26 03/2003 CHAPTER 6 Setting • Operation 1-level teaching This function is used to automatically determine the threshold value for HI, GO and LO of comparative output by teaching with actual measured objects, etc. The threshold values (TH-1, TH-2) are set by performing 1-level teaching on the desired object and inputting the tolerance values with respect to the measured value. LO − toler㧙Ꮕ ance Object + toler㧗Ꮕ ance TH-2 GO TH-1 HI Initial valuesޓTH-1: +15% of full scale from the center measuring distance ޓޓޓޓޓޓTH-2: −15% of full scale from the center measuring distance + tolerance: 0 − tolerance: 0 NOTE The threshold value set here is linked to page 6-30 ‘ ع2-level teaching’ and page 6-33 ‘ عThreshold value setting’. If fine adjustment of the threshold value is required after the teaching, do it according to page 6-33 ‘ عThreshold value setting’. + tolerance or − tolerance can be set. However, the higher value is set to the HI side (TH-1). Teaching cannot be done in the BUSY state with the BUSY input ON. The teaching data becomes the upper limit of + F.S. 6-27 03/2003 CHAPTER 6 Setting procedure Step Key operation from measurement mode is explained. Key MODE Ԙ Operation Memory call Memory selection display appears Press the set key. Select the memory No. by using the UP key or DOWN key. ԙ SET Ԛ Display/Result Press the mode key for 1 sec. or more. 1 sec. or more SET Setting • Operation 㨪 or 㨪 (Note 1) Press the set key. Select comparative output setting by using Comparative output setting the UP key or DOWN key. SET ԛ Press the set key. Select 1-level teaching by using the UP key or DOWN key. SET 1-level teaching Target setting display appears. Place the object for teaching. Press the set key. Ԝ Target setting SET Measurement value of object is displayed. Press the set key. ԝ (Note 2) Ԟ SET + tolerance setting SET ԟ Ԡ SET Adjust + tolerance. Press the set key. Adjust the + tolerance by using the UP key or DOWN key. Press the set key. − tolerance setting display appears. − tolerance setting SET ԡ + tolerance setting display appears. Press the set key. Adjust − tolerance. Press the set key. Adjust the − tolerance by using the UP key or DOWN key. 6-28 03/2003 Setting • Operation CHAPTER 6 SET Press the set key. Threshold level and tolerance is set and display returns to 1-level teaching Ԣ 1-level teaching MODE Press the mode key twice. Memory store display appears. ԣ MODE SET Memory store Memory selection display appears. Press the set key. Select the memory No. by using the UP key or DOWN key. Ԥ 㨪 or (Note 3) SET ԥ Press the set key for 1 sec. or more. 1 sec. or more (Note 5) 1) 2) NOTE Sensor returns to measurement mode. For details, refer to page 6-9 ‘ عMemory call / memory read out’. If the display is set to comparative decision monitor, HI, GO or LO is displayed. In case it is desired to display the present measurement value, change the setting to either displacement monitor or distance monitor. (For details of the setting, refer to page 6-45 ‘عDisplay contents selection’.) 3) For details, refer to page 6-10 ‘ عMemory write’. 4) When the set key is pressed for 1 sec. or more at the end of the setting, the settings are confirmed and stored in an EEPROM. In order to cancel before confirmation, simultaneously press UP key and DOWN key for 1 sec. or more. The sensor returns to the measurement mode. 6-29 03/2003 CHAPTER 6 Setting • Operation 2-level teaching This function is used to automatically determine the threshold value for HI, GO and LO of comparative output by teaching with actual measured objects, etc. The threshold values (TH-1, TH-2) are set by performing 2-level teaching on the desired object. LO 㧸㧻 TH-2 㨀㧴㧙㧞 㧳㧻 GO Object 1 Object 2 㨀㧴㧙㧝 TH-1 㧴㧵 HI Initial set valueޓTH-1: +15% of F. S. from center measuring distance ޓޓޓޓޓޓ NOTE TH-2: −15% of F. S. from center measuring distance The threshold value set here is linked to page 6-27 ‘ ع1-level teaching’ and page 6-33 ‘ عThreshold value setting’. If fine adjustment of the threshold value is required after the teaching, do it according to page 6-33 ‘ عThreshold value setting’. Threshold values TH-1 and TH-2 can be set as TH-1 > TH-2 or TH-1<TH-2. However, the higher value is set to the HI side. Teaching cannot be done in the BUSY state with the BUSY input ON. The teaching data becomes the upper limit of + F.S. 6-30 03/2003 CHAPTER 6 Setting • Operation Setting procedure Step Key MODE Ԙ Key operation from measurement mode is explained. Operation Press the mode key for 1 sec. or more. 1 sec. or more SET Memory call Memory selection display appears. Press the set key. Select the memory No. by using the UP key or DOWN key. ԙ SET Ԛ ԛ or 㨪 (Note 1) Comparative output setting. Press the set key. Select 2-level teaching by using the UP key or DOWN key. SET 㨪 Press the set key. Select the comparative output setting by using the UP key or DOWN key. SET Display/Result 2-level teaching Target 1 setting display appears. Object 1 to be used in teaching is placed. Press the set key. Ԝ Target 1 setting SET The measurement value of Object 1 is displayed. Press the set key. ԝ (Note 2) SET Target 2 setting display appears. Object 2 to be used in teaching is placed. Press the set key. Ԟ SET Target 2 setting The measurement value of Object 2 is displayed. Press the set key. ԟ (Note 2) SET Press the set key. The threshold value is displayed and the display returns to the 2-level teaching display. Ԡ 2-level teaching 6-31 03/2003 CHAPTER 6 Step Key Display / Result Press the mode key twice. MODE ԡ Operation Setting • Operation Memory store display appears. MODE Memory store Memory selection display appears. Press the set key. SET Select the memory No. by using the UP key or DOWN key. Ԣ 㨪 or (Note 3) Press the set key for 1 sec. or more. SET ԣ 1 sec. or more 1) 2) NOTE 3) 4) Sensor returns to measurement mode. (Note 4) For details, refer to page 6-9 ‘ عMemory call / memory read out’. If the display is set to comparative decision monitor, HI, GO or LO is displayed. In case it is desired to display the present measurement value, change the setting to either displacement monitor or distance monitor. (For details of the setting, refer to page 6-45 ‘ عDisplay contents selection’.) For details, refer to page 6-10 ‘ عMemory write’. When the set key is pressed for 1 sec. or more at the end of the setting, the settings are confirmed and stored in an EEPROM. In order to cancel before confirmation, simultaneously press UP key and DOWN key for 1 sec. or more. The sensor returns to measurement mode. 6-32 03/2003 CHAPTER 6 Setting • Operation Threshold value setting The comparative results are output based on the set threshold values. This device is equipped with three independent outputs (HI, GO, LO). The threshold value is set for two places, and depending on the measurement value, one of the outputs, either HI, GO or LO, turns ON. LO TH-2 GO TH-1 HI Initial setting TH-1: +15% of full scale from the measurement center TH-2: –15% of full scale from the measurement center Setting procedure Key MODE Ԙ GO TH-2 < Measurement value < TH-1 LO TH-2 ³ Measurement value Key operation from measurement mode is explained. Operation Display / Result Press the mode key for 1 sec. or more. 1 sec. or more SET ԙ TH-1 ≤ Measurement value Threshold values TH-1 and TH-2 can be set as TH-1 > TH-2 or TH-1<TH-2. However, the higher value is set to the HI side. The threshold value set here is linked to page 6-27 ‘ ع1-level teaching’ and page 6-30 ‘ ع2-level teaching’. NOTE Step HI Memory call Memory selection display appears. Press the set key. Select the memory No. by using the UP key or DOWN key. 㨪 or 㨪 6-33 03/2003 (Note 1) CHAPTER 6 Setting • Operation Press the set key. SET Ԛ Select the comparative output setting by Comparative output setting. using the UP key or DOWN key. Press the set key. SET ԛ Select the threshold value setting by using the UP key or DOWN key. Threshold value setting Press the set key. SET Ԝ Select the TH-1 or TH-2 threshold value setting by using the UP key or DOWN key. The current threshold value is displayed. Press the set key. SET ԝ Adjust the threshold value by using the UP key or DOWN key. (Note 2) The threshold value is set and the display returns to the threshold value setting display. Press the set key. SET or Ԟ Threshold value Press the mode key twice. Memory store display appears. MODE ԟ Memory store MODE Memory selection display appears. 㨪 Select the memory No. by using the UP key or DOWN key. or Press the set key. SET Ԡ (Note 3) SET ԡ Press the set key for 1 sec. or more. 1 sec. or more 1) 2) NOTE 3) 4) Sensor returns to measurement mode. (Note 4) For details, refer to page 6-9 ‘ عMemory call / memory read out’. If the display is set to comparative decision monitor, HI, GO or LO is displayed. In case it is desired to display the present measurement value, change the setting to either displacement monitor or distance monitor. (For details of the setting, refer to page 6-45 ‘ عDisplay contents selection’.) For details, refer to page 6-10 ‘ عMemory write’. When the set key is pressed for 1 sec. or more at the end of the setting, the settings are confirmed and stored in an EEPROM. In order to cancel before confirmation, simultaneously press UP key and DOWN key for 1 sec. or more. The sensor returns to the measurement mode. 6-34 03/2003 CHAPTER 6 Setting • Operation Hysteresis setting This is a function that sets the display value range when the comparative output GO is ON (when HI and LO are OFF). It is effective in preventing chattering of the comparative output. If the Hysteresis setting is OFF If the hysteresis setting is set on OFF, hysteresis exists when the GO output changes from ON to OFF, and when the HI output or LO output changes from OFF to ON. The size of hysteresis is fixed at 0.15% of the setting range full scale. Indicates the direction of the change in display values. Shows an ON/OFF change in the comparative output. TH-2 TH-1 HI Output threshold value TH-2 LO Output threshold value TH-1 Hysteresis TH-2 NOTE TH-1 The threshold values TH-1 and TH-2 cannot be set individually for each device. 6-35 03/2003 CHAPTER 6 Setting • Operation If the Hysteresis Setting is ON If the hysteresis setting is set to ON, the size of the hysteresis and its direction can be set. (Size of Hysteresis) Hysteresis can be set within a range of 0 to ±5% F.S. <Hysteresis Direction> If the hysteresis value is ‘+’ If the Hysteresis value is ‘–’ Hysteresis exists when the GO output changes from ON to OFF, and when the HI output and LO output change from OFF to ON. Hysteresis exists when the GO output changes from OFF to ON and when the HI output and LO output change from ON to OFF. Hysteresis TH-2 NOTE Hysteresis TH-1 TH-2 TH-1 The threshold values TH-1 and TH-2 cannot be set individually for each device. 6-36 03/2003 CHAPTER 6 Setting • Operation Setting procedure Step Key MODE Ԙ Key operation from measurement mode is explained. Operation Press the mode key for one sec. or more. 1 sec. or more SET Memory call. Memory selection display appears. Press the set key. Select the memory No. by using the UP key or DOWN key. ԙ SET Ԛ ԛ (Note 1) Comparative output setting. Press the set key. Select the hysteresis setting by using the UP key or DOWN key. SET 㨪 or 㨪 Press the set key. Select the comparative output setting by using the UP key or DOWN key. SET Display / Result Hysteresis setting Press the set key. or Ԝ Select the hysteresis setting ON or OFF by using the UP key or DOWN key. If ON is selected, go to step ԝ. If OFF is selected, go to step Ԡ. 6-37 03/2003 CHAPTER 6 Setting • Operation If ON is selected Step Key SET ԝ Operation Press the set key. Display / Result The current hysteresis value is displayed. Adjust the hysteresis value by using the UP key or DOWN key. SET The hysteresis value is set and the display returns to the hysteresis setting display. Press the set key. Ԟ Hysteresis setting Press the mode key twice. Memory store display appears. MODE ԟ MODE Memory store Go to Step Ԣ. If OFF is selected Step Key SET Ԡ Operation Press the set key. 1 sec. or more Display / Result The hysteresis setting is set to OFF and the display returns to hysteresis setting. Hysteresis setting MODE ԡ Press the mode key twice. Memory store display appears. MODE Memory store Go to Step Ԣ. 6-38 03/2003 CHAPTER 6 Setting • Operation Memory write Step Key Operation Display / Result Memory selection display appears. Press the set key. SET Select the memory No. by using the UP key or DOWN key. Ԣ 㨪 or (Note 2) Press the set key for 1 sec. or more. SET ԣ NOTE 1 sec. or more 1) 2) 3) Sensor returns to measurement mode. (Note 3) For details, refer to page 6-9 ‘ عMemory call / memory read out’. For details, refer to page 6-10 ‘ عMemory write’. When the set key is pressed for 1 sec. or more at the end of the setting, the settings are confirmed and stored in an EEPROM. In order to cancel before confirmation, simultaneously press UP key and DOWN key for 1 sec. or more. The sensor returns to the measurement mode. 6-39 03/2003 CHAPTER 6 Setting • Operation Comparative output timer setting This is a function which applies a delay to the comparative output (GO) and the alarm output. This device is equipped with an ON-delay timer, which is convenient for detecting objects that take a long time to pass, as well as an OFF-delay timer, which is convenient for connected devices that have a slow response time. The timer can be selected from 19 different settings between 10 to 1,000ms (at 10ms intervals up to 100ms, and 100ms intervals between 100 to 1,000ms). On-delay timer: Neglects short detection signals. Off-delay timer: Extends output for a fixed period of time. Off timer: Timer is not used. Initial setting: Off Timer ON-delay timer Judgment state ON GO OFF ON GO OFF T ON LO OFF OFF-delay timer Judgment state GO ON OFF ON GO OFF T ON LO OFF NOTE The ON-delay timer is set when turning ON of Comparative Output GO is to be delayed and the OFF-delay timer is set when turning OFF of Comparative Output GO is to be delayed. 6-40 03/2003 CHAPTER 6 Setting • Operation Setting procedure Step Key MODE Ԙ Key operation from measurement mode is explained. Operation Press the mode key for one sec. or more. 1 sec. or more SET Display / Result Memory call Memory selection display appears. Press the set key. Select the memory No. by using the UP key or DOWN key. ԙ 㨪 (Note 1) 㨪 SET Ԛ Press the set key. Select the comparative output setting by using the UP key or DOWN key. SET Press the set key. Select the comparative output timer setting by using the UP key or DOWN key. ԛ Comparative output setting. Comparative output timer setting SET Ԝ Press the set key. Off-timer Select the OFF-timer, ON-delay or OFFdelay settings by using the UP key or DOWN key. ON-delay OFF-delay If OFF-timer is selected, go to Step ԝ. If ON-delay or OFF-delay is selected, go to Step ԟ. If OFF is selected. Step Key SET Operation Display / Result OFF-timer is set, and the display returns to the comparative output timer setting display. Press the set key. ԝ Comparative Output Timer Setting MODE Ԟ Press the mode key twice. Memory store display appears. MODE Memory store Go to Step Ԣ. 6-41 03/2003 Setting • Operation CHAPTER 6 If ON-delay or OFF-delay is selected. Step Key Operation Display / Result Press the set key. SET ԟ Select the desired timer time setting by using the UP or DOWN key. The selected timer time is set and the display returns to the comparative output timer setting display. Press the set key. SET Ԡ Press the mode key twice. Comparative output timer setting Memory store display appears. MODE ԡ MODE Memory store Go to Step Ԣ. Writing to Memory Step Key Operation Press the set key. SET Select the memory No. by using the UP or DOWN key. Ԣ Display / Result Memory selection display appears. 㨪 or (Note 2) Press the set key for 1 sec. or more. SET ԣ NOTE 1 sec. or more 1) 2) 3) Sensor returns to measurement mode. (Note 3) For details, refer to page 6-9 ‘ عMemory call / memory read out’. For details, refer to page 6-10 ‘ عMemory write’. When the set key is pressed for 1 sec. or more at the end of the setting, the settings are confirmed and stored in an EEPROM. In order to cancel before confirmation, simultaneously press UP key and DOWN key for 1 sec. or more. The sensor returns to measurement mode. 6-42 03/2003 CHAPTER 6 Setting • Operation Display setting selection z Display setting configuration ޓPage 6-45 SET Display contents selection Displacement monitor SET SET Display setting MODE Distance monitor SET Comparative decision monitor SET ޓPage 6-47 Display zero suppress MODE SET SET SET ޓPage 6-49 Decimal point position setting AUTO SET MODE SET SET Select decimal point position ޓPage 6-50 Lowest bit zero setting SET MODE SET SET ޓPage 6-52 Display sleep setting MODE 6-43 03/2003 Setting • Operation CHAPTER 6 Lowest bit zero setting Display setting MODE ޓPage 6-52 Display sleep setting SET MODE SET SET ޓPage 6-54 Display offset setting MODE Offset OFF SET SET Press for 1 sec. or more. Input value SET SET Offset ON MODE When the input digit is shifted by key, the selected digit blinks. Set the numerical value by key or key. Display item selection 6-44 03/2003 CHAPTER 6 Setting • Operation Display contents selection This function switches the use of the measurement value display to displacement monitor, distance monitor or comparative decision monitor. Displacement Monitor: This displays the measurement center as ‘0.’ The NEAR side is the – side and the FAR side is the + side. Distance Monitor: This displays the distance from the sensor head to the measured object. Comparative Decision Monitor: This displays the current comparative decision output result, either HI, GO or LO. Initial setting: Displacement Monitor Measuring range NEAR side Measuring center FAR side Displacement monitor NEAR side Measuring center FAR side LH-54 ޓ−10.000 ޓޓ00.000 ޓޓ10.000 LH-58 ޓ−20.000 ޓޓ00.000 ޓޓ20.000 LH-512 ޓ−30.000 ޓޓ00.000 ޓޓ30.000 Distance monitor NEAR side Measuring center FAR side LH-54 ޓޓ30.000 ޓޓ40.000 ޓޓ50.000 LH-58 ޓޓ60.000 ޓޓ80.000 ޓޓ99.999 LH-512 ޓޓ90.000 ޓޓ120.00 ޓޓ150.00 Comparative decision monitor Comparative decision output Display HI GO LO NOTE If the comparative decision monitor is set, HI, GO, or LO are shown in the display instead of the measurement values in case of ‘ ع1-level teaching’, page 6-27, ‘ ع2-level teaching’, page 6-30 and ‘ عThreshold value setting’, page 6-33. If ‘ ع0-ADJ’, page 6-112, is executed, the measurement value becomes ‘0’ and the display is automatically set to displacement monitor. 6-45 03/2003 CHAPTER 6 Setting procedure Step Key Key operation from the measurement mode is explained. Operation Press the mode key for 1 sec. or more. MODE Ԙ Setting • Operation 1 sec. or more Display / Result Memory call Memory selection display appears. Select the memory No. by using the UP key 㨪 or DOWN key. or 㨪 (Note 1) Press the set key. SET ԙ Press the set key. SET Ԛ Select the display setting by using the UP key or DOWN key. Display setting Press the set key. SET Select the display contents selection by using the UP key or DOWN key. ԛ Display contents selection Press the set key. SET Displacement monitor Ԝ Select either displacement, distance or comparative decision monitor by using the UP key or DOWN key. Press the set key.. SET Distance monitor Comparative monitor decision The selected monitor is set, and the display returns to the display contents selection display ԝ Display contents selection Press the mode key twice. Memory store display appears. MODE Ԟ MODE Memory store Press the set key. SET Memory selection display appears. Select the memory No. by using the UP key or DOWN key. ԟ 㨪 or (Note 2) SET Ԡ NOTE 1 sec. or more 1) 2) 3) Press the set key for 1 sec. or more. Sensor returns to measurement mode. (Note 3) For details, refer to page 6-9 ‘ عMemory call / memory read out’. For details, refer to page 6-10 ‘ عMemory write’. When the set key is pressed for 1 sec. or more at the end of the setting, the settings are confirmed and stored in an EEPROM. In order to cancel before confirmation, simultaneously press UP key and DOWN key for 1 sec. or more. The sensor returns to measurement mode. 6-46 03/2003 CHAPTER 6 Setting • Operation Display zero suppress This function clears the ‘0’ in the higher order digit and displays numerical values without it. This function sets the zero suppress ON/OFF. <Example> ޓZero suppress OFF ޓޓޓZero suppress ON ޓޓޓޓ01.234ޓޓޓޓޓψ ޓޓޓ1.234 ޓޓޓޓ001.23ޓޓޓޓޓψޓޓޓޓ1.23 Initial setting: OFF Setting Procedure Step Key MODE Ԙ Key operation from the measurement mode is explained. Operation Press the mode key for 1 sec. or more. 1 sec. or more SET Memory call Memory selection display appears. Press the set key. Select the memory No. by using the UP key or DOWN key. ԙ SET Ԛ Display / Result 㨪 or 㨪 (Note 1) Press the set key. Select the display setting by using the UP Display setting key or DOWN key. SET ԛ Press the set key. Select display zero suppress by using the Display zero suppress UP key or DOWN key. SET Ԝ Press the set key. Select ON or OFF by using the UP key or or DOWN key. SET Press the set key. ON or OFF state is set, and the display returns to the display zero suppress display. ԝ Display zero suppress Press the mode key twice. Memory store display appears. MODE Ԟ MODE Memory store 6-47 03/2003 CHAPTER 6 Memory selection display appears. Press the set key. SET Select the memory No. by using the UP key or DOWN key. ԟ Setting • Operation 㨪 or (Note 2) SET Ԡ NOTE 1 sec. or more 1) 2) 3) Press the set key for 1 sec. or more. Sensor returns to measurement mode. (Note 3) For details, refer to page 6-9 ‘ عMemory call / memory read out’. For details, refer to page 6-10 ‘ عMemory write’. When the set key is pressed for 1 sec. or more at the end of the setting, the settings are confirmed and stored in an EEPROM. In order to cancel before confirmation, simultaneously press UP key and DOWN key for 1 sec. or more. The sensor returns to the measurement mode. 6-48 03/2003 CHAPTER 6 Setting • Operation Decimal point position setting This function enables the decimal point position of the measurement value to be set. In the AUTO setting, the decimal point is shifted automatically so that the value of the higher order digit is displayed. Initial setting: AUTO Setting procedure Step Key MODE Ԙ Key operation from measurement mode is explained. Operation Press the mode key for 1 sec. or more. 1 sec. or more SET Display / Result Memory call Memory selection display appears. Press the set key. Select the memory No. by using the UP key or DOWN key. ԙ SET Ԛ Display setting Press the set key. Select the decimal point position shift setting by using the UP key or DOWN key. ԛ (Note 1) Press the set key. Select the display setting by using the UP key or DOWN key. SET 㨪 or 㨪 Decimal point position shift setting SET Ԝ Press the set key. Select AUTO or the desired decimal point position by using the UP key or DOWN key. SET Press the set key. or etc. AUTO or the desired decimal point position is set, and the display returns to the decimal point position shift setting display. ԝ Decimal point position shift setting. Press the mode key twice. Memory store display appears. MODE Ԟ MODE Memory store 6-49 03/2003 Setting • Operation CHAPTER 6 Memory selection display appears. Press the set key. SET Select the memory No. by using the UP or DOWN key. ԟ 㨪 or (Note 2) SET Ԡ 1 sec. or more NOTE 1) 2) 3) Press the set key for 1 sec. or more. Sensor returns to measurement mode. (Note 3) For details, refer to page 6-9 ‘ عMemory call / memory read out’. For details, refer to page 6-10 ‘ عMemory write’. When the set key is pressed for 1 sec. or more at the end of the setting, the settings are confirmed and stored in an EEPROM. In order to cancel before confirmation, simultaneously press UP key and DOWN key for 1 sec. or more. The sensor returns to measurement mode. Lowest bit zero setting This is a function that fixes the display of the lowest bit to ‘0.’ <Example> ޓޓ12.345ޓޓޓψޓޓޓ12.340 ޓޓ123.45ޓޓޓψޓޓޓ123.40 Initial setting: OFF Setting procedure Step Key MODE Ԙ Key operation from measurement mode is explained. Operation Press the mode key for 1 sec. or more. 1 sec. or more SET Memory call Memory selection display appears. Press the set key. Select the memory No. by using the UP key or DOWN key. ԙ Display / Result 㨪 or 㨪 SET Ԛ Press the set key. Select the display setting by using the UP Display setting key or DOWN key. 6-50 03/2003 (Note 1) CHAPTER 6 Setting • Operation Press the set key. SET ԛ Select the lowest bit zero setting by using the UP key or DOWN key. Lowest bit zero setting Press the set key. SET Ԝ Select either ON or OFF by using the UP or key or DOWN key. Press the set key. SET ON or OFF state is set and the display returns to the lowest bit zero setting display. ԝ Press the mode key twice. Lowest bit zero setting Memory store display appears. MODE Ԟ MODE Memory store Press the set key. SET Memory selection display appears. Select the memory No. by using the UP key or DOWN key. ԟ 㨪 or (Note 2) SET Ԡ NOTE 1 sec. or more 1) 2) 3) Press the set key for 1 sec. or more. Sensor returns to measurement mode. (Note 3) For details, refer to page 6-9 ‘ عMemory call / memory read out’. For details, refer to page 6-10 ‘ عMemory write’. When the set key is pressed for 1 sec. or more at the end of the setting, the settings are confirmed and stored in an EEPROM. In order to cancel before confirmation, simultaneously press UP key and DOWN key for 1 sec. or more. The sensor returns to the measurement mode. 6-51 03/2003 Setting • Operation CHAPTER 6 Display sleep setting This function enables the display contents in the measurement value display to be turned off. When the display sleep ON setting is selected, press the set key for 1 sec. or more if you desire to see the measurement value. The measurement value is displayed temporarily. Initial setting: OFF NOTE The display sleep setting is preserved even when the power is turned OFF. The display sleep operation is enabled only in the measurement mode. Temporary cancellation of display sleep is enabled only in the measurement mode. Setting procedure Step Key MODE Ԙ Key operation from measurement mode is explained. Operation Press the mode key for 1 sec. or more. 1 sec. or more SET Memory call Memory selection display appears. Press the set key. Select the memory No. by using the UP key or DOWN key. ԙ SET Ԛ ԛ Ԝ Display setting Display sleep setting Press the set key. Select either ON or OFF by using the UP key or DOWN key. SET (Note 1) Press the set key. Select the display sleep setting by using the UP key or DOWN key. SET 㨪 or 㨪 Press the set key. Select the display setting by using the UP key or DOWN key. SET Display / Result Press the set key. or ON or OFF state is set and the display returns to the display sleep setting display. ԝ Display sleep setting 6-52 03/2003 CHAPTER 6 Setting • Operation Press the mode key twice. Memory store display appears. MODE Ԟ MODE Memory store Memory selection display appears. Press the set key. SET Select the memory No. by using the UP key or DOWN key. ԟ 㨪 or (Note 2) SET Ԡ NOTE 1 sec. or more 1) 2) 3) Press the set key for 1 sec. or more. Sensor returns to measurement mode, and the display is put off. (Note 3) For details, refer to page 6-9 ‘ عMemory call / memory read out’. For details, refer to page 6-10 ‘ عMemory write’. When the set key is pressed for 1 sec. or more at the end of the setting, the settings are confirmed and stored in an EEPROM. In order to cancel before confirmation, simultaneously press UP key and DOWN key for 1 sec. or more. The sensor returns to the measurement mode. 6-53 03/2003 CHAPTER 6 Setting • Operation Display offset setting This function changes the display value, for a given measurement value, to the desired value. Input the desired offset amount. L can be set as desired. (Any value up to ± 5,000 mm can be input.) LH-54 (In case of displacement monitor) Display value = Measurement value + Offset amount (L) <Example> Current measurement value: 5.000 If we input 15 as the Offset L value: -10 The display value becomes 20.000. Initial setting: OFF 㧜 Measuring center ޓޓޓޓޓL = 0 mm +5 (Current measurement value) L = 15 +10 Distance (mm) NOTE ෳޓ⠨ The offset amount input here is linked to the constant L value input in ‘ع CH1 / CH2 calculation setting’, page 6-15, and ‘ عCalculation equation selection’, page 6-21. If this function is set to the OFF state, the display offset returns to the initial setting value. REFERENCE Refer to page 6-45, ‘ عDisplay contents selection’, for details of the displacement monitor. 6-54 03/2003 CHAPTER 6 Setting • Operation Setting procedure Step Key MODE Ԙ Key operation from measurement mode is explained. Operation Press the mode key for 1 sec. or more. 1 sec. or more SET Memory call Memory selection 㨪 display appears. Press the set key. Select the memory No. by using the UP key or DOWN key. ԙ SET Ԛ ԛ Ԝ or 㨪 (Note 1) Display setting Press the set key. Select the display offset setting by using the UP key or DOWN key. SET 㨪 Press the set key. Select the display setting by using the UP key or DOWN key. SET Display / Result Display offset setting Press the set key. Select either ON or OFF by using the UP key or DOWN key. or If OFF is selected, go to Step ԝ. If ON is selected, go to Step ԟ. If OFF is selected. Step Key SET ԝ Display / Result ON or OFF state is set and the display returns to the display offset setting screen. Display offset setting Press the set key. 1 sec. or more. MODE Ԟ Operation Press the mode key twice. Memory store display appears. MODE Memory store Go to Step Ԣ. 6-55 03/2003 CHAPTER 6 Setting • Operation If ON is selected Step Key Operation Display / Result If the input digit is shifted using Press the set key. the mode key, the selected digit blinks in the display. Set the Select the amount of offset by using the numerical value using the UP or DOWN key. UP or DOWN key. SET ԟ MODE The input offset amount is set and the display returns to the display offset setting display. Press the set key. SET Ԡ Display offset setting Press the mode key twice. MODE ԡ Memory store display appears. MODE Memory store Step Ԣ. Writing to Memory Step Key Operation Press the set key. SET Select the memory No. by using the UP or DOWN key. Ԣ Display / Result Memory selection display appears. 㨪 or (Note 2) Press the set key for 1 sec. or more. SET ԣ NOTE 1 sec. or more 1) 2) 3) Sensor returns to measurement mode. (Note 3) For details, refer to page 6-9 ‘ عMemory call / memory read out’. For details, refer to page 6-10 ‘ عMemory write’. When the set key is pressed for 1 sec. or more at the end of the setting, the settings are confirmed and stored in an EEPROM. In order to cancel before confirmation, simultaneously press UP key and DOWN key for 1 sec. or more. The sensor returns to the measurement mode. 6-56 03/2003 CHAPTER 6 Setting • Operation Other settings z Configuration of other settings Page 6-59 Response time setting Response time setting SELECT setting SET SET SET SET Other settings MODE SET Set the response time to 0.5, 1, 10, 20, 30, 40, 100 or 300ms using or key. Auto setting Page 6-63 Calculation mode setting MODE Normal SET SET Peak to peak SET Peak hold SET MODE If the input digit is shifted with key, the selected digit blinks in the display. Set the numerical valu e using or key. Bottom hold SET Simple average SET SET n value input Page 6-69 Channel selection CH 1 SET SET MODE (Note 1) CH 2 SET (Note 2) Page 6-71 MODE Calculation SET ޓAnalog output hold setting (Note 3) 6-57 03/2003 SET Numerical value input CHAPTER 6 Setting • Operation Channel select Other settings MODE ޓPage 6-71 Hold OFF Analog output hold setting SET MODE SET SET Hold ON ޓPage 6-73 MODE 0-ADJ store setting 0-ADJ store OFF SET SET SET 0-ADJ store ON ޓPage 6-75 MODE 0-ADJ clear SET SET Press SET for 1 sec. or more. Response time setting 1) NOTE 2) 3) Displayed if the sensor head is connected to LH-CS6 (P) or the HEAD 1 side of LH-CD6 (P). Displayed if the sensor head is connected to the HEAD 2 side of LH-CD6 (P). Displayed if the sensor heads are connected to both the HEAD 1 side and HEAD 2 side of LH-CD6 (P). 6-58 03/2003 CHAPTER 6 Setting • Operation Response time setting This function selects the response time. In the SELECT setting, the response time can be selected from 8 different steps, 0.5, 1, 10, 20, 30, 40, 100 or 300ms. The resolution changes depending on the selected response time. Set the response time in consideration of the necessary response speed and resolution. Also, if the AUTO setting is selected, the response time is selected in accordance with the measured object. For measuring the displacement accurately: Set to slow response time. (High resolution) For fast response Set to fast response time. (Low resolution) Initial Setting: SELECT 300ms 6-59 03/2003 CHAPTER 6 Setting • Operation This surface is measured. TH-2 GO TH-1 ON GO OFF Measurement data Analog output Low Resolution High Auto response speed start Fast Response speed 0.5 ms Analog output hold Slow ON BUSY input OFF If the comparative output timer is set In case of ON-delay timer Comparative output (OFF-timer) If the analog output is fetched at the falling edge of the GO output, the measurement value with the optimum resolution can be obtained. ON OFF ON GO OFF T Analog output 0.5 ms Analog output hold Auto response speed start In case of OFF-delay timer Comparative output (OFF-timer) ON OFF ON GO T OFF 0.5 ms Analog output hold Analog output Auto response speed start NOTE 䊶 For LH-CD6 (P), this is the response time for CH 1 or CH 2 setting. The response time for calculation setting is twice the selected time. Also, take care that when the response time is set to AUTO, the linearity, resolution and the response time would vary. 䊶 If set on AUTO, only Normal can be selected in ‘ عCalculation mode setting’, page 6-63. Also, if a mode other than Normal is selected in the calculation mode setting, AUTO cannot be set. 6-60 03/2003 CHAPTER 6 Setting • Operation Setting procedure Step Key MODE Ԙ Key operation from measurement mode is explained. Operation Press the mode key for 1 sec. or more. 1 sec. or more SET ԙ Display / Result Memory call Memory selection display appears. 㨪 Select the memory No. by using the UP key or or DOWN key. Press the set key. 㨪 SET Ԛ Press the set key. Select ‘Other settings’ by using the UP key or DOWN key. SET ԛ Ԝ Other settings Press the set key. Select the response time setting by using the UP key or DOWN key. SET (Note 1) Response time setting Press the set key. Select either AUTO or SELECT setting by using the UP key or DOWN key. SELECT setting AUTO setting If AUTO is selected, go to Step ԝ. If SELECT is selected, go to Step ԟ. If AUTO is set Step Key SET Operation Display / Result AUTO setting is set and the display returns to the response time setting display. Press the set key. ԝ (Note 2) Response time setting MODE Ԟ Press the mode key twice. Memory store display appears. MODE Memory store Go to Step Ԣ. 6-61 03/2003 CHAPTER 6 Setting • Operation If SELECT is set Step Key Press the set key. SET Press the set key. SET The selected response time is set. Press the mode key twice. MODE ԡ Display / Result Response time selection display appears. Select the optimum response time by using the UP key or DOWN key. ԟ Ԡ Operation Memory store display appears. MODE Memory store Go to Step Ԣ. Memory write Step Key Operation Press the set key. SET Select the memory No. by using the UP key or DOWN key. Ԣ Display / Result Memory selection display appears. 㨪 or (Note 3) Press the set key for 1 sec. or more. SET ԣ 1 sec. or more 1) 2) NOTE 3) 4) Sensor returns to measurement mode. (Note 4) For details, refer to page 6-9 ‘ عMemory call / memory read out’. If this function is set to AUTO, it becomes impossible to select any calculation mode settings (p. 6-63) except Normal. Also, if a mode other than Normal is selected in the calculation mode setting, it cannot be set on AUTO. For details, refer to page 6-10 ‘ عMemory write’. When the set key is pressed for 1 sec. or more at the end of the setting, the settings are confirmed and stored in an EEPROM. In order to cancel before confirmation, simultaneously press UP key and DOWN key for 1 sec. or more. The sensor returns to the measurement mode. 6-62 03/2003 CHAPTER 6 Setting • Operation Calculation mode setting This device is equipped with 5 types of calculation modes. Various measurements are possible through a combination of the three input signals: strobe output, BUSY input and calculation hold reset input. Initial setting: Normal z Normal Measurement is performed continuously, and the display value and comparative output are updated at all times. Threshold value (TH-1) Measurement value Threshold value (TH-2) Calculation hold reset input HI output GO output LO output NOTE The calculation hold reset input is disabled. z Peak to Peak The difference between the maximum value and the minimum value in the data during the measuring period is updated. Peak change Measurement Peak change point point value Bottom change point Bottom change point Measurement value No measurement state Calculation hold reset input NOTE No measurement is done during the calculation hold reset input interval. 6-63 03/2003 CHAPTER 6 Setting • Operation z Peak Hold Holds the maximum value of the data during the measuring period. Hold Hold Hold Threshold value (TH-1) Hold Hold Threshold value (TH-2) Calculation hold reset input Measurement value Calculation hold reset input HI output GO output LO output NOTE During the calculation hold reset period, normal measurement is done. z Bottom Hold Holds the minimum value in the data during the measuring period. Measurement value Threshold value (TH-1) Hold Hold Threshold value (TH-2) Calculation hold reset input Calculation hold reset input Hold Hold HI output GO output LO output NOTE During the calculation hold reset period, normal measurement is done. 6-64 03/2003 Hold CHAPTER 6 Setting • Operation z Simple average This is the simple average over the number of times the data is set during the measuring period. The upper limit for the number of settings is 1,024 times. Threshold value (TH-1) Threshold value (TH-2) Measurement value HI output GO output LO output NOTE Do not input the calculation hold reset input. If this is input, the measurement value will be fixed on the + side’s full scale value, the comparative output will be HI and the analog output will be +5.5 V. NOTE 䊶 If AUTO is set at ‘ عResponse time setting’, page 6-59, only Normal can be selected. Also, if a mode other than Normal is selected, AUTO cannot be set in response time setting. 6-65 03/2003 CHAPTER 6 Setting procedure Step Key MODE Ԙ Operation SET Ԛ Memory call Memory selection display appears. Press the set key. ԛ or 㨪 (Note 1) Other settings Press the set key. Select the measurement mode by using the UP key or DOWN key. SET 㨪 Press the set key. Select ‘Other settings’ by using the UP key or DOWN key. SET Display / Result Press the mode key for 1 sec. or more. Select the memory No. by using the UP key or DOWN key. ԙ Ԝ Key operation from measurement mode is explained. 1 sec. or more SET Setting • Operation Calculation mode setting Press the set key. Normal Select the measurement mode by using the UP key or DOWN key. Peak to peak Peak hold Bottom Hold Simple average (Note 2) If a setting other than simple average is selected: Go to Step ԝ. If simple average is selected: Go to Step ԟ. 6-66 03/2003 CHAPTER 6 Setting • Operation If a setting other than simple average is selected. Step Key SET Operation Display / Result The selected calculation mode is set and the display returns to the calculation mode setting. Press the set key. ԝ Calculation mode setting MODE Ԟ Press the mode key twice. Memory store display appears. MODE Memory store Go to Step ԣ. If simple average is selected Step ԟ Key SET SET Ԡ MODE SET Operation Display / Result The display changes to the n (number of average times) input display. Press the set key. Input n. Press the set key. Press the mode key, then input the L If the input digit is shifted using the mode key, the digit that is value by using the UP key or DOWN key. selected will blink in the display. Fix the numerical value using the UP key or DOWN key. n is set, and the display returns to Press the set key. the calculation mode setting display. ԡ MODE Ԣ Press the mode key twice. Calculation mode setting Memory store display appears. MODE Memory store Go to Step ԣ. 6-67 03/2003 CHAPTER 6 Setting • Operation Memory write Step Key Operation Press the set key. SET Select the memory No. by using the UP or DOWN key. ԣ Display / Result Memory selection display appears. 㨪 or (Note 3) Press the set key for 1 sec. or more. SET Ԥ 1 sec. or more 1) 2) NOTE 3) 4) Sensor returns to measurement mode. (Note 4) For details, refer to page 6-9 ‘ عMemory call / memory read out’. If this function is set to AUTO, it becomes impossible to select any calculation mode settings (p. 6-63) except Normal. Also, if a mode other than Normal is selected in the calculation mode setting, it cannot be set on AUTO. For details, refer to page 6-10 ‘ عMemory write’. When the set key is pressed for 1 sec. or more at the end of the setting, the settings are confirmed and stored in an EEPROM. In order to cancel before confirmation, simultaneously press UP key and DOWN key for 1 sec. or more. The sensor returns to the measurement mode. 6-68 03/2003 CHAPTER 6 Setting • Operation Channel selection This selects the channels which are used for measurement value display and for analog output. 1 - CH : Select when using the single measurement mode on CH 1 side. 2 - CH : Select when using the single measurement mode on CH 2 side. CAL : Select when using the calculation mode. Setting procedure Step Key MODE Ԙ Key operation from the measurement mode is explained. Operation Press the mode key for 1 sec. or more. 1 sec. or more SET Memory call Memory selection display appears. Press the set key. Select the memory No. by using the UP key or DOWN key. ԙ SET Ԛ ԛ Ԝ SET or 㨪 Other settings Channel selection Press the set key. CH 1 Select 1-CH, 2-CH or CAL by using the UP key or DOWN key. (Note 3) CH 2 Calculation (Note 4) mode Press the set key. (Note 2) The selected channel is set, and the display returns to the channel selection display. ԝ Press the mode key twice. Channel selection Memory store display appears. MODE Ԟ (Note 1) Press the set key. Select channel selection by using the UP key or DOWN key. SET 㨪 Press the set key. Select ‘Other settings’ by using the UP key or DOWN key. SET Display / Result MODE Memory store 6-69 03/2003 CHAPTER 6 SET ԟ Press the set key. Setting • Operation Memory selection display appears. Select the memory No. by using the UP key or DOWN key. 㨪 or (Note 5) SET Ԡ 1 sec. or more 1) 2) 3) 4) NOTE 5) 6) Press the set key for 1 sec. or more. Sensor returns to measurement mode. (Note 6) For details, refer to page 6-9 ‘ عMemory call / memory read out’. Displayed if a sensor head is connected to the HEAD 1 side of LH-CS6 (P) or LH-CD6 (P). Displayed if a sensor head is connected to the HEAD 2 side of LH-CD6 (P). Displayed if sensor heads are connected to both the HEAD 1 side and HEAD 2 side of LH-CD6 (P). For details, refer to page 6-10 ‘ عMemory write’. When the set key is pressed for 1 sec. or more at the end of the setting, the settings are confirmed and stored in an EEPROM. In order to cancel before confirmation, simultaneously press UP key and DOWN key for 1 sec. or more. The sensor returns to the measurement mode. 6-70 03/2003 CHAPTER 6 Setting • Operation Analog output hold setting When this function is used, even if insufficient light (DARK) condition or excessive light (BRIGHT) condition occurs temporarily, the value just before this error occurs is held. Hence, this enables continuous measurements without any break of analog output. Only analog output is held. Measurement display, comparative output and alarm output are not held. NOTE Sensor head Measured object Temporary insufficient light (DARK) Analog displacement output waveform Hold Alarm output OFF ON Setting procedure Step Key MODE Ԙ Operation Memory call Memory selection display appears. Press the set key. Select the memory No. using the UP key or DOWN key. ԙ SET Ԛ 㨪 or 㨪 (Note 1) Press the set key. Select ‘Other settings’ by using the UP key or DOWN key. SET Display / Result Press the mode key for 1 sec. or more. 1 sec. or more SET ԛ Key operation from measurement mode is explained. Other settings Press the set key. Select the analog output hold setting by using the UP key or DOWN key. 6-71 03/2003 Analog output hold setting Setting • Operation CHAPTER 6 Press the set key. SET Ԝ Select ON or OFF by using the UP key or DOWN key. Press the set key. SET or ON or OFF is set and the display returns to the analog output hold setting display. ԝ Analog Output Hold Setting Press the mode key twice. Memory store display appears. MODE Ԟ MODE Memory Store Memory selection display appears. Press the set key. SET Select the memory No. by using the UP or DOWN key. ԟ 㨪 or (Note 2) SET Ԡ NOTE 1 sec. or more 1) 2) 3) Press the set key for 1 sec. or more. Sensor returns to measurement mode. (Note 3) For details, refer to page 6-9 ‘ عMemory call / memory read out’. For details, refer to page 6-10 ‘ عMemory write’. When the set key is pressed for 1 sec. or more at the end of the setting, the settings are confirmed and stored in an EEPROM. In order to cancel before confirmation, simultaneously press UP key and DOWN key for 1 sec. or more. The sensor returns to measurement mode. 6-72 03/2003 CHAPTER 6 Setting • Operation 0-ADJ store setting The 0-ADJ function forcibly sets the measurement value and the analog output to ‘0’ and makes the value at that time the reference value (‘0’) for measuring. If 0-ADJ store is set to the ON state, it is recorded in the sensor so that even if the power is turned OFF, the sensor operates with the recorded zero value when the power is turned ON again. If 0-ADJ is performed with 0-ADJ store in the OFF state, 0-ADJ will be disabled when the memory is called. First set 0-ADJ store to the ON state, then carry out 0-ADJ after performing memory write. If r is selected in ‘ عMemory write’, page 6-10, even if 0-ADJ store is turned ON, the value is not written into the EEPROM and is not recorded. When the power is turned OFF or a different address in memory is called, 0-ADJ is cleared. If 0-ADJ store is set to ON, the settings are stored in an EEPROM. However, the EEPROM has a lifetime and the settings cannot be done for more than 100,000 times. NOTE Refer to page 6-112 ‘ ع0-ADJ’ for details of the 0-ADJ function. ෳޓ⠨ REFERENCE Setting procedure Step Key MODE Ԙ Key operation from the measurement mode is explained. Operation Press the mode key for 1 sec. or more. 1 sec. or more SET Memory call Memory selection display appears. Press the set key. Select the memory No. by using the UP key or DOWN key. ԙ Display / Result 㨪 or 㨪 (Note 1) SET Ԛ Select ‘Other settings’ by using the UP key or DOWN key. SET ԛ Other settings Press the set key. Select 0-ADJ store setting by using the UP key or DOWN key. SET Ԝ Press the set key. 0-ADJ store setting Press the set key. Select ON or OFF by using the UP key or DOWN key. 6-73 03/2003 or CHAPTER 6 Press the set key. SET Setting • Operation ON or OFF is set, and the display returns to the 0-ADJ store setting display. ԝ 0-ADJ store setting Press the MODE key twice. Memory store display appears. MODE Ԟ MODE Memory store Press the set key. SET Memory selection display appears. Select the memory No. by using the UP key or DOWN key. ԟ 㨪 or (Note 2) SET Ԡ NOTE 1 sec. or more 1) 2) 3) Press the set key for 1 sec. or more. Sensor returns to measurement mode. (Note 3) For details, refer to page 6-9 ‘ عMemory call / memory read out’. For details, refer to page 6-10 ‘ عMemory write’. When the set key is pressed for 1 sec. or more at the end of the setting, the settings are confirmed and stored in an EEPROM. In order to cancel before confirmation, simultaneously press UP key and DOWN key for 1 sec. or more. The sensor returns to the measurement mode. 6-74 03/2003 CHAPTER 6 Setting • Operation 0-ADJ clear This function clears the 0-ADJ value once it has been set. This condition is the factory setting (0V, 12mA at the measuring center). Also, 0-ADJ cannot be cleared from an external terminal. Refer to page 6-112, ‘ ع0-ADJ’ for details of the 0-ADJ function. ෳޓ⠨ REFERENCE Setting procedure Step Key MODE Ԙ Key operation from measurement mode is explained. Operation Press the mode key for 1 sec. or more. 1 sec. or more SET Display / Result Memory call Memory selection display appears. Press the set key. Select the memory No. by using the UP key or DOWN key. ԙ 㨪 or 㨪 SET Ԛ Press the set key. Select ‘Other settings’ by using the UP key or DOWN key. SET ԛ Ԝ ԝ 0-ADJ clear Press the set key. Do not clear 0-ADJ. Select NO or YES by using the UP key or DOWN key. SET Other settings Press the set key. Select the 0-ADJ clear setting by using the UP key or DOWN key. SET (Note 1) or Clear 0-ADJ. Press the set key. The selected contents are set (In case of YES, press it for 1 sec. or more.) and the display returns to the 0ADJ clear setting display. 1 sec. or more 0-ADJ clear Press the MODE key twice. Memory store display appears. MODE Ԟ MODE Memory store 6-75 03/2003 CHAPTER 6 Setting • Operation Press the set key. SET Memory selection display appears. Select the memory No. by using the UP key or DOWN key. ԟ 㨪 or (Note 2) SET Ԡ NOTE 1 sec. or more 1) 2) 3) Press the set key for 1 sec. or more. Sensor returns to measurement mode. (Note 3) For details, refer to page 6-9 ‘ عMemory call / memory read out’. For details, refer to page 6-10 ‘ عMemory write’. When the set key is pressed for 1 sec. or more at the end of the setting, the settings are confirmed and stored in an EEPROM. In order to cancel before confirmation, simultaneously press UP key and DOWN key for 1 sec. or more. The sensor returns to measurement mode. 6-76 03/2003 CHAPTER 6 Setting • Operation Adjustment mode z Adjustment mode configuration ޓPage 6-78 SET Shift adjustment setting Shift OFF SET SET Press for 1 sec. or more. Adjustment mode MODE The present measurement value is displayed. SET SET Shift ON ޓPage 6-83 Span adjustment setting Adjust withޓ orޓ key. Span OFF SET SET Press for 1 sec. or more. MODE The present measurement value is displayed. SET SET Span ON Adjust with ޓPage 6-88 Analog voltage output offset setting orޓ key. Offset OFF SET SET Press for 1 sec. or more. MODE The present offset value is displayed. SET SET Offset ON ޓPage 6-91 Analog current output offset setting Adjust between –3000 to +3000 with or key. Offset OFF SET SET Press for 1 sec. or more MODE The present offset value is displayed. SET SET Shift adjustment setting Offset ON 6-77 03/2003 Adjust between –3000 to +3000 with or key. CHAPTER 6 Setting • Operation Shift adjustment setting In case the relation between displacement amount and output is desired to be calibrated, shift adjustment is possible. By shift adjustment, the relation between the distance from the sensor head to the measured object and the measured value or the analog output value can be shifted within ±30% of full scale. z Example LH-54 Change of 5mm Measurement value display Measurement value display Analog voltage: 0V Analog current: 12mA 35mm Analog voltage: -2.5V Analog current: 8mA 40mm If change from –05.000 to –04.000 is desired Measurement value display Analog Voltage: -2V Analog Current: 8.8mA Change by + 1mm with shift adjustment. (Please refer to page 6-80 ‘Setting procedure’.) z Features of shift adjustment setting Ԙ Relation between displacement amount and output can be adjusted within ±30% of full scale (±3.0V approx. for analog voltage output and ±4.8mA approx. for analog current output). ԙ Analog output shift adjustment is for, both, current output and voltage output. Ԛ This setting acts on, both, measurement value display and analog output. ԛ If sensor heads are connected to, both, HEAD 1 and HEAD 2 sides, the setting applies to both of them. Ԝ If the set values exceed the upper/lower limit of the analog output, they are held at the upper/lower limit of full scale. Further, the measurement value display is also held at the upper or lower limit of full scale. ԝ Setting is possible for each memory No. (u-01 to u-16). Initial setting: OFF (zero shift) ෳޓ⠨ REFERENCE This function can be used together with 0-ADJ setting. Please refer to page 6-112 ‘ ع0-ADJ’ for details. In case setting is to be done individually for the sensor heads connected to HEAD 1 and HEAD 2, refer to page 6-102 ‘ عCH1 / CH2 shift adjustment setting’. 6-78 03/2003 CHAPTER 6 Setting • Operation z Analog displacement output diagram LH-58 LH-54 Center measuring distance Center measuring distance (80mm) (20mA) 5 Displacement Output (V) Displacement output (V) (40mm) (16.8mA) +3.0 (16.8mA) +3.0 +20 Distance (mm) -20 +10 Distance (mm) -10 (20mA) 5 -3.0 (7.2mA) -3.0 (7.2mA) -5 (4mA) -5 (4mA) LH-512 Center measuring distance (120mm) (20mA) 5 (16.8mA) +3.0 +30 Distance (mm) -30 -3.0 (7.2mA) -5 (4mA) NOTE After shift adjustment, the set values that exceed the upper/lower limit of the measurement value or analog output, are held at the upper/lower limit of full scale. 6-79 03/2003 CHAPTER 6 Setting • Operation Setting procedure Step Key MODE Ԙ Operation Memory call Memory selection display appears. Press the set key. Select the memory No. by using the UP key or DOWN key. ԙ SET Ԛ ԛ (Note 1) Adjustment mode Press the set key. Select the shift adjustment setting by using the UP key or DOWN key. SET 㨪 or 㨪 Press the set key. Select the adjustment mode by using the UP key or DOWN key. SET Display / Result Press the mode key for 1 sec. or more. 1 sec. or more SET Ԝ Key operation from measurement mode is explained. Shift adjustment setting Press the set key. Select OFF or ON by using the UP key or DOWN key. If ON is selected, go to Step ԝ. If OFF is selected, go to Step Ԡ. 6-80 03/2003 or CHAPTER 6 Setting • Operation If ON is selected Step Key SET ԝ Operation Press the set key. Display / Result The present measurement value is displayed. Adjust the amount of shift by using the UP key or DOWN key. SET The shift amount is set, and the display returns to the shift adjustment setting display. Press the set key. Ԟ Shift adjustment setting Press the mode key twice. Memory store display appears. MODE ԟ MODE Memory store Go to Step Ԣ. If OFF is selected Step Key SET Operation Display / Result The shift adjustment setting is set to the OFF state, and the display returns to the shift adjustment setting display. Press the set key. 1 sec. or more. Ԡ Shift adjustment setting MODE ԡ Press the mode key twice. Memory store display appears. MODE Memory store Go to Step Ԣ. 6-81 03/2003 CHAPTER 6 Setting • Operation Memory write Step Key Operation Press the set key. SET Select the memory No. by using the UP key or DOWN key. Ԣ Display / Result Memory selection display appears. 㨪 or (Note 2) Press the set key for 1 sec. or more. SET ԣ NOTE 1 sec. or more 1) 2) 3) Sensor returns to measurement mode. (Note 3) For details, refer to page 6-9 ‘ عMemory call / memory read out’. For details, refer to page 6-10 ‘ عMemory write’. When the set key is pressed for 1 sec. or more at the end of the setting, the settings are confirmed and stored in an EEPROM. In order to cancel before confirmation, simultaneously press UP key and DOWN key for 1 sec. or more. The sensor returns to the measurement mode. 6-82 03/2003 CHAPTER 6 Setting • Operation Span adjustment setting In case the relation between displacement amount and output is desired to be calibrated, span adjustment is possible. By span adjustment, the output span (slope) of the measurement value, or analog output, versus the distance from the sensor head to the measured object can be adjusted within ±30% of full scale. z Example LH-54 Change of 5mm Measurement value display Measurement value display 35mm 40mm If change from –05.010 to –05.000 is desired. Measurement display value Change by +0.010mm with span adjustment. (Please refer to page 6-85 ‘Setting procedure’ for details.) z Features of span adjustment setting Ԙ The span (slope) of the output versus the displacement can be adjusted within ±30% of full scale (±3.0V approx. for analog voltage output and ±4.8mA approx. for analog current output). ԙ Analog output span adjustment is for, both, current output and voltage output. Ԛ This setting acts on, both, measurement value display and analog output. ԛ If sensor heads are connected to, both, HEAD 1 and HEAD 2 sides, the setting applies to both of them. Ԝ If the set values exceed the upper/lower limit of the analog output, they are held at the upper/lower limit of full scale. Further, the measurement value display is also held at the upper or lower limit of full scale. ԝ Setting is possible for each memory No. (u-01 to u-16). Initial setting: OFF (Span amount 1) ෳޓ⠨ REFERENCE This function can be used together with 0-ADJ setting. Please refer to page 6-112 ‘ ع0-ADJ’ for details. In case setting is to be done individually for the sensor heads connected to HEAD 1 and HEAD 2, refer to page 6-106 ‘ عCH1 / CH2 span adjustment setting’. 6-83 03/2003 CHAPTER 6 Setting • Operation z Analog displacement output diagram LH-54 LH-58 Center measuring distance Center measuring distance (80mm) (20mA) 5 r30% Displacement output (V) Displacement output (V) (40mm) +10 -10 Distance (mm) (20mA) 5 -20 -5 (4mA) r30% +20 Distance (mm) -5 (4mA) LH-512 Center measuring distance Displacement output (V) (120mm) (20mA) 5 r30% +30 Distance (mm) -30 -5 (4mA) NOTE After span adjustment, the set values that exceed the upper/lower limit of the measurement value or analog output, are held at the upper/lower limit of full scale. 6-84 03/2003 CHAPTER 6 Setting • Operation Setting procedure Step Key MODE Ԙ Key operation from measurement mode is explained. Operation Press the mode key for 1 sec. or more. 1 sec. or more SET Memory call Memory selection display appears. Press the set key. Select the memory No. by using the UP key or DOWN key. ԙ Display / Result 㨪 or 㨪 (Note 1) SET Ԛ Select the adjustment mode by using the UP key or DOWN key. SET ԛ Adjustment mode Press the set key. Select the span adjustment setting by using the UP key or DOWN key. SET Ԝ Press the set key. Span adjustment setting Press the set key. Select OFF or ON by using the UP key or DOWN key. If ON is selected, go to Step ԝ. If OFF is selected, go to Step Ԡ. 6-85 03/2003 or CHAPTER 6 Setting • Operation If ON is selected Step Key SET ԝ Operation Press the set key. Display / Result The present measurement value is displayed. Adjust the amount of span by using the UP key or DOWN key. SET The span amount is set, and the display returns to the span adjustment setting display. Press the set key. Ԟ Span adjustment setting Press the mode key twice. Memory store display appears. MODE ԟ MODE Memory store Go to Step Ԣ. If OFF is selected Step Key SET Operation Press the set key. 1 sec. or more Ԡ Display / Result The span adjustment setting is set to the OFF state, and the display returns to the span adjustment setting display. Span adjustment setting MODE ԡ Press the mode key twice. Memory store display appears. MODE Memory store Go to Step Ԣ. 6-86 03/2003 CHAPTER 6 Setting • Operation Memory write Step Key Select the memory No. by using the UP key or DOWN key. Ԣ Press the set key for 1 sec. or more. SET NOTE Display / Result Memory selection display appears. Press the set key. SET ԣ Operation 1 sec. or more 1) 2) 3) 㨪 or (Note 2) Sensor returns to measurement mode. (Note 3) For details, refer to page 6-9 ‘ عMemory call / memory read out’. For details, refer to page 6-10 ‘ عMemory write’. When the set key is pressed for 1 sec. or more at the end of the setting, the settings are confirmed and stored in an EEPROM. In order to cancel before confirmation, simultaneously press UP key and DOWN key for 1 sec. or more. The sensor returns to measurement mode. 6-87 03/2003 CHAPTER 6 Setting • Operation Analog voltage output offset setting This function adjusts the offset of analog voltage output within ±10% approx.(±1V approx.) of full scale. It adjusts only the analog voltage output value, not the measurement value display. To set the offset, select analog voltage output offset ON and set the amount of offset. Offset can be fine adjusted in ±3,000 steps. To cancel offset adjustment, set to analog current output offset OFF. Initial setting: OFF Setting procedure Step Key MODE Ԙ Key operation from measurement mode is explained. Operation Press the mode key for 1 sec. or more. 1 sec. or more SET Memory call Memory selection display appears. Press the set key. Select the memory No. by using the UP key or DOWN key. ԙ Display / Result 㨪 or 㨪 (Note 1) SET Ԛ Select the adjustment mode by using the UP key or DOWN key. SET ԛ Adjustment mode Press the set key. Select the analog voltage output offset setting by using the UP key or DOWN key. SET Ԝ Press the set key. Analog voltage offset setting Press the set key. Select OFF or ON by using the UP key or DOWN key. If ON is selected, go to Step ԝ. If OFF is selected, go to Step Ԡ. 6-88 03/2003 or output CHAPTER 6 Setting • Operation If ON is selected Step Key SET ԝ Operation Press the set key. Display / Result The present offset value is displayed. Adjust the offset value by using the UP key or DOWN key. (within ± 3000) SET The offset value is set, and the display returns to the analog voltage output offset setting display. Press the set key. Ԟ Analog voltage output offset setting MODE ԟ Press the mode key twice. Memory store display appears. MODE Memory store Go to Step Ԣ. If OFF is selected Step Key SET Operation Display / Result The analog voltage output offset setting is set to the OFF state, and the display returns to the analog voltage output offset setting display. Press the set key. 1 sec. or more Ԡ Analog voltage output offset setting MODE ԡ Press the mode key twice. Memory store display appears. MODE Memory store Go to Step Ԣ. 6-89 03/2003 CHAPTER 6 Setting • Operation Memory write Step Key Operation Press the set key. SET Select the memory No. by using the UP or DOWN key. Ԣ Press the set key for 1 sec. or more. SET ԣ Display / Result Memory selection display appears. 1 sec. or more NOTE 1) 2) 3) 㨪 or (Note 2) Sensor returns to measurement mode. (Note 3) For details, refer to page 6-9 ‘ عMemory call / memory read out’. For details, refer to page 6-10 ‘ عMemory write’. When the set key is pressed for 1 sec. or more at the end of the setting, the settings are confirmed and stored in an EEPROM. In order to cancel before confirmation, simultaneously press UP key and DOWN key for 1 sec. or more. The sensor returns to measurement mode. 6-90 03/2003 CHAPTER 6 Setting • Operation Analog current output offset setting This function adjusts the offset of analog current output within ±10% approx.(±1.6mA approx.) of full scale. It adjusts only the analog current output value, not the measurement value display. To set the offset, select analog current output offset ON and set the amount of offset. Offset can be fine adjusted in ±3,000 steps. To cancel offset adjustment, set to analog current output offset OFF. Initial setting: OFF Setting procedure Step Key MODE Ԙ Key operation from measurement mode is explained. Operation Press the mode key for 1 sec. or more. 1 sec. or more SET Memory call Memory selection display appears. Press the set key. Select the memory No. by using the UP key or DOWN key. ԙ Display / Result 㨪 or 㨪 (Note 1) SET Ԛ Select the Adjustment Mode by using the UP key or DOWN key. SET ԛ Adjustment mode Press the set key. Select the analog current output offset Analog current output setting by using the UP key or DOWN key. offset setting SET Ԝ Press the set key. Press the set key. Select OFF or ON by using the UP key or DOWN key. If ON is selected, go to Step ԝ. If OFF is selected, go to Step Ԡ. 6-91 03/2003 or CHAPTER 6 Setting • Operation If ON is selected Step Key SET ԝ Operation Display / Result The present offset value is displayed. Press the set key. Adjust the offset value by using the UP key or DOWN key. (within ±3,000) SET The offset value is set, and the display returns to the analog current output offset setting display. Press the set key. Ԟ Analog current offset setting Press the mode key twice. output Memory store display appears. MODE ԟ MODE Memory store Go to Step Ԣ. If OFF is selected Step Key SET Operation Display / Result The analog current output offset setting is set to the OFF state, and the display returns to the analog current output offset setting display. Press the set key. 1 sec. or more Ԡ Analog current output offset setting MODE ԡ Press the mode key twice. Memory store display appears. MODE Memory store Go to Step Ԣ. 6-92 03/2003 CHAPTER 6 Setting • Operation Memory write Step Key Select the memory No. by using the UP key or DOWN key. Ԣ Press the set key for 1 sec. or more. SET NOTE Memory appears. Press the set key. SET ԣ Operation 1 sec. or more 1) 2) 3) Display / Result selection display 㨪 or (Note 2) Sensor returns to measurement mode. (Note 3) For details, refer to page 6-9 ‘ عMemory call / memory read out’. For details, refer to page 6-10 ‘ عMemory write’. When the set key is pressed for 1 sec. or more at the end of the setting, the settings are confirmed and stored in an EEPROM. In order to cancel before confirmation, simultaneously press UP key and DOWN key for 1 sec. or more. The sensor returns to measurement mode. 6-93 03/2003 CHAPTER 6 RS-232C setting z Configuration of the RS-232C setting ޓPage 6-95 SET Bit rate setting SET 9,600 SET RS-232C setting MODE 4,800 SET 2,400 SET 1,200 SET ޓPage 6-96 Data length setting 8 bit SET SET MODE 7 bit SET ޓPage 6-97 Parity setting Parity check SET SET MODE Odd parity SET Even parity SET ޓPage 6-98 Stop bit number setting 1 bit SET SET MODE 2 bit SET 6-94 03/2003 Setting • Operation CHAPTER 6 Setting • Operation Bit rate setting Initial setting: 9,600 bps Setting procedure Step Key MODE Ԙ Key operation from measurement mode is explained. Operation Display / Result Press the mode key for 1 sec. or more. 1 sec. or more Select the RS-232C setting by using the UP key or DOWN key. RS-232C setting. Press the set key. SET ԙ Select bit rate setting by using the UP key or DOWN key. Bit rate setting Press the set key. SET Select 9,600, 4,800, 2,400 or 1,200 by Ԛ using the UP key or DOWN key. Press the set key. SET The selected bit rate is set, and the display returns to the bit rate ԛ setting display. Bit rate setting Press the mode key once. The display returns to the RS232C setting display. MODE Ԝ RS-232C setting MODE ԝ 1 sec. or more NOTE Press the mode key for 1 sec. or more. Sensor returns to measurement mode. (Note 1) When the mode key is pressed for 1 sec. or more at the end of the setting, the settings are confirmed and stored in an EEPROM. In order to cancel before confirmation, simultaneously press UP key and DOWN key for 1 sec. or more. The sensor returns to measurement mode. 6-95 03/2003 CHAPTER 6 Setting • Operation Data length setting Initial setting: 8 bits Setting procedure Step Key MODE Ԙ Key operation from measurement mode is explained. Operation Display / Result Press the mode key for 1 sec. or more. 1 sec. or more Select the RS-232C setting by using the RS-232C setting. UP key or DOWN key. SET ԙ Press the set key. Select data length setting by using the UP key or DOWN key. SET Ԛ Data length setting Press the set key. Select 8 bit or 7 bit by using the UP key or DOWN key. SET Press the set key. The selected data length is set, and the display returns to the data length setting display. ԛ Data length setting The display returns to the RS232C setting display. Press the mode key once. MODE Ԝ MODE ԝ 1 sec. or more NOTE Press the mode key for 1 sec. or more. RS-232C setting Sensor returns to measurement mode. (Note 1) When the mode key is pressed for 1 sec. or more at the end of the setting, the settings are confirmed and stored in an EEPROM. In order to cancel before confirmation, simultaneously press UP key and DOWN key for 1 sec. or more. The sensor returns to the measurement mode. 6-96 03/2003 CHAPTER 6 Setting • Operation Parity setting Initial setting: OFF Setting procedure Step Key MODE Ԙ Key operation from measurement mode is explained. Operation Display / Result Press the mode key for 1 sec. or more. 1 sec. or more Select RS-232C setting by using the UP key or DOWN key. SET ԙ Press the set key. Select parity setting by using the UP key or DOWN key. SET Ԛ SET RS-232C setting. Parity setting Press the set key. OFF Select OFF, even parity or odd parity using the UP key or DOWN key. Odd parity Press the set key. Even parity The selected parity is set, and the display returns to the parity setting display. ԛ Parity setting The display returns to the RS232C setting display. Press the mode key once. MODE Ԝ MODE ԝ 1 sec. or more NOTE Press the mode key for 1 sec. or more. RS-232C setting Sensor returns to measurement mode. (Note 1) When the mode key is pressed for 1 sec. or more at the end of the setting, the settings are confirmed and stored in an EEPROM. In order to cancel before confirmation, simultaneously press UP key and DOWN key for 1 sec. or more. The sensor returns to the measurement mode. 6-97 03/2003 CHAPTER 6 Setting • Operation Stop bit number setting Initial Setting: 1 bit Setting procedure Step Key MODE Ԙ Key operation from measurement mode is explained. Operation Display / Result Press the mode key for 1 sec. or more. 1 sec. or more Select the RS-232C setting by using the UP key or DOWN key. SET ԙ Press the set key. Select stop bit number setting by using the UP key or DOWN key. SET Ԛ Stop bit number setting Press the set key. Select 1 bit or 2 bit by using the UP key or DOWN key. SET RS-232C setting. Press the set key. or The selected stop bit number is set, and the display returns to the stop bit number setting display. ԛ Stop bit number setting Press the mode key once. MODE The display returns to the RS232C setting display. Ԝ MODE ԝ 1 sec. or more NOTE Press the mode key for 1 sec. or more. RS-232C setting Sensor returns to measurement mode. (Note 1) When the mode key is pressed for 1 sec. or more at the end of the setting, the settings are confirmed and stored in an EEPROM. In order to cancel before confirmation, simultaneously press UP key and DOWN key for 1 sec. or more. The sensor returns to the measurement mode. 6-98 03/2003 CHAPTER 6 Setting • Operation Interference prevention setting z Configuration of interference prevention setting Single Interference prevention setting SET SET Master SET Slave SET z Features of interference prevention setting When multiple sensor heads are used in close proximity to each other, the LED light from each sensor may interfere with the other sensors and cause malfunction. In such a situation, use the interference prevention function. If two sensor heads are connected to one controller unit, and the calculation mode is set, they enter the interference prevention mode automatically. Also, by using two controller units, each connected with two sensor heads, a maximum of four sensor heads can be used in close proximity to each other. In this case, the input/output terminal ԛ on one controller is connected to the input/output terminal ԛ on the other controller, and one controller is set as the master and the other is set as the slave to set the interference prevention mode. (Note 1) In this mode, light beam modulation is switched alternately between the four sensors, so that the sensors are not influenced by each other’s beams and reliable measurement is possible. If multiple sensor heads are used, install them taking care of the interference range shown in the table on the next page. If measurement is being done with 1 controller: Set the control on ‘Single.’ If measurement is being done with 2 controllers: Set one controller on ‘Master’ and the other controller on ‘Slave.’ (Note 1) Connect the interference prevention input/output terminal ԛ on each controller together. Controller set as Slave Controller set as Master ԛ ԛ Initial setting: Single NOTE Depending on the combination of the measurement modes set on the controllers, which are set as the master and the slave, you may not be able to use the interference prevention function. See page 6-100, ‘•• Combination of controllers when setting interference prevention’. 6-99 03/2003 CHAPTER 6 㧭 Setting • Operation 㧯 㧮 㧰 LH-54 LH-58 LH-512 A 0mm 0mm 0mm B 0mm 0mm 0mm C 10mm 10mm 30mm D 17mm 17mm 17mm NOTE If light from the sensor on the opposite side is not received, there would be no influence even if D = 0. NOTE Do not connect an interference prevention I/O other than that of LH-CS6(P) or LH-CD6(P) to the interference prevention I/O. Do not connect together two controllers which have been set as masters during interference prevention function setting, as this causes malfunction. z Combination of controllers when setting interference prevention Depending on the combination of the measurement modes set on the controllers, which are set as the master and the slave, you may not be able to use the interference prevention function. In case of Combination 3 in the table below, the interference prevention function will not work. Change to Combination 2. z Response time when interference prevention is being used If the interference prevention function is set, take care that the response time becomes longer compared to the case when this function is not used. The response time, as compared to the case when the interference prevention function is not used, is as shown in the following table. 㧝 㧞 㧟 㧠 Controller set as master Controller set as slave Calculation mode Calculation mode Single measurement mode Single measurement mode Calculation mode Single measurement mode Calculation mode Single measurement mode 6-100 03/2003 Interference prevention function OK OK NG OK Response time 20 times 20 times 10 times CHAPTER 6 Setting • Operation NOTE If a controller is set as Slave, it cannot function by itself. In this case, the measurement value display shows an error ‘SLAVE’ in the measurement mode. When not using the interference prevention function, set the controller on Single. If it is set on Master, it will slow the response time. Linearity and resolution may deteriorate when this function is used. If a controller is set as Master, the sensor head's spot intensity will reduce, but this is not a sign of failure. Setting procedure Step Key MODE Ԙ Key operation from measurement mode is explained. Operation Display / Result Press the mode key for 1 sec. or more. 1 sec. or more Select the interference prevention setting by using the UP key or DOWN key. SET ԙ Press the set key. Single Select single, master or slave by using the UP key or DOWN key. SET Interference prevention setting Press the set key. Master Slave Single, master or slave is set, and the display returns to the interference prevention setting display. Ԛ Interference prevention setting MODE ԛ 1 sec. or more Press the mode key for 1 sec. or more. 6-101 03/2003 Sensor returns to measurement mode. CHAPTER 6 Setting • Operation CH 1 / CH 2 shift adjustment setting It is possible to calibrate the relationship between the displacement and the output of sensor heads connected to CH 1 and CH 2 individually. By the CH 1 / CH 2 shift adjustment, the relation between the distance from the sensor head to the measured object and the measurement value or the analog output value can be shifted up or down within a range of ±5% of the full scale. z CH 1 / CH 2 shift adjustment setting configuration CH 1 shift adjustment setting Shift OFF SET SET Press for 1 sec. or more CH 2 shift adjustment setting The measurement value for the initial setting state is displayed. SET SET Shift ON Adjust with or key. z Features of CH 1 / CH 2 shift adjustment setting Ԙ Relation between displacement amount and output can be adjusted within ±5% of full scale (±0.5V approx. for analog voltage output and ±0.8mA approx. for analog current output). ԙ Analog output shift adjustment is for, both, current output and voltage output. Ԛ This setting acts on, both, measurement value display and analog output. ԛ Even if sensor heads are connected to both CH 1 and CH 2, they can be adjusted individually. Ԝ If the set values exceed the upper/lower limit of the analog output, they are held at the upper/lower limit of full scale. Further, the measurement value display is also held at the upper or lower limit of full scale. ԝ Unlike ‘ عShift adjustment setting’, page 6-78, registration cannot be done for each memory No. This is a common memory setting. Initial setting: OFF (Zero shift) NOTE When this setting is done, the settings other than the gain setting become initial setting values. (As for gain, operation is at the presently set gain.) For that reason, when this setting is done, the measurement value for the initial setting state is displayed. (For example, even if you have set 0-ADJ, etc., the display in the measurement value display is as in the case when 0-ADJ is OFF.) 6-102 03/2003 CHAPTER 6 Setting • Operation z Example of use If you are performing calculation measurement (A - B), in case the measurement value is not ‘0’ even when a flat object is being measured, this function is convenient. Variations in individual heads or between objects can be canceled using this function. It is possible to set this in combination with the 0-ADJ setting. For details, refer to page 6-112 ‘ ع0-ADJ’. If you desire to set this setting for each memory No., refer to page 6-78 ‘ عShift adjustment setting’. ෳޓ⠨ REFERENCE LH-54 LH-58 Center measuring distance Center measuring distance (80mm) (20mA) Displacement output (V) Displacement output (V) (40mm) 5 (12.8mA) (20mA) 5 (12.8mA) +0.5 +0.5 -10 -0.5 +10 Distance -20 -0.5 (mm) (11.2mA) (11.2mA) -5 -5 (4mA) (4mA) +20 Distance (mm) LH-512 Center measuring distance Displacement output (V) (120mm) (20mA) 5 (12.8mA) +0.5 -30 -0.5 (11.2mA) +30 Distance (mm) -5 (4mA) NOTE After shift adjustment, if the set values exceed the upper/lower limit for the measurement value and analog output, they are held at the upper/lower limit of full scale. 6-103 03/2003 CHAPTER 6 Setting procedure Step Ԙ Key operation from measurement mode is explained. Key MODE Operation Display / Result CH 1 shift adjustment setting (Note 1) CH 2 shift adjustment setting (Note 2) Press the mode key for 1 sec. or more. 1 sec. or more or Select the CH 1 or CH 2 shift adjustment setting by using the UP key or DOWN key. SET ԙ Setting • Operation Press the set key. or Select ON or OFF by using the UP key or DOWN key. If ON is selected, go to Step Ԛ. If OFF is selected, go to Step ԝ. If ON is selected. Step Key SET Ԛ Operation Press the set key. Display / Result The present measurement value is displayed. Select shift amount by using the UP key or DOWN key. SET The shift amount is set, and the display returns to the CH 1 or CH 2 shift adjustment setting display. CH 1 shift Press the set key. ԛ or MODE Ԝ Press the mode key for 1 sec. or more. 1 sec. or more. 6-104 03/2003 adjustment setting (Note 1) CH 2 shift adjustment setting (Note 2) Sensor returns to measurement mode. CHAPTER 6 Setting • Operation If OFF is selected Step Key Operation Press the set key for 1 sec. or more. SET 1 sec. or more. Display / Result The CH 1 or CH 2 shift adjustment setting is set to the OFF state, and the display returns to the CH 1 or CH 2 shift adjustment setting display. ԝ or CH 1 shift adjustment setting (Note 1) CH 2 shift adjustment setting (Note 2) Press the mode key for 1 sec. or more. MODE Ԟ 1 sec. or more. 1) NOTE 2) 3) Sensor returns to measurement mode. (Note 3) Displayed if a sensor head is connected to the HEAD 1 side of LH-CS6 (P) or LH-CD6 (P). Displayed if a sensor head is connected to the HEAD 2 side of the LH-CD6 (P) When the mode key is pressed for 1 sec. or more at the end of the setting, the settings are confirmed and stored in an EEPROM. In order to cancel before confirmation, simultaneously press UP key and DOWN key for 1 sec. or more. The sensor returns to measurement mode. 6-105 03/2003 CHAPTER 6 Setting • Operation CH 1 / CH 2 span adjustment setting It is possible to calibrate the relation between the displacement and the output of sensor heads connected to CH 1 and CH 2 individually. By the CH 1 / CH 2 span adjustment, the relation between the distance from the sensor head to the measured object and the output span (slope) of the measurement value or the analog output value can be adjusted within a range of ±5% of full scale. z CH1 / CH2 span adjustment setting configuration CH 1 span adjustment setting Span OFF SET SET Press for 1 sec. or more CH 2 span adjustment setting The measurement value for the initial setting state is displayed. SET Span ON SET Adjust with or key. z Features of CH1 / CH2 span adjustment setting Ԙ Relation between displacement amount and output can be adjusted within ±5% of full scale (±0.5V approx. for analog voltage output and ±0.8mA approx. for analog current output). ԙ Analog output shift adjustment is for, both, current output and voltage output. Ԛ This setting acts on, both, measurement value display and analog output. ԛ Even if sensor heads are connected to both CH 1 and CH 2, they can be adjusted individually. Ԝ If the set values exceed the upper/lower limit of the analog output, they are held at the upper/lower limit of full scale. Further, the measurement value display is also held at the upper or lower limit of full scale. ԝ Unlike ‘ عSpan adjustment setting’, page 6-83, registration cannot be done for each memory No. This is a common memory setting. Initial Setting: OFF (Span amount 1) NOTE When this setting is done, the settings other than the gain setting become initial setting values. (As for gain, operation is at the presently set gain.) For that reason, when this setting is done, the measurement value for the initial setting state is displayed. (For example, even if you have set 0-ADJ, etc., the display in the measurement value display is as in the case when 0-ADJ is OFF.) 6-106 03/2003 CHAPTER 6 Setting • Operation z Example of use If you are performing calculation measurement (A − B), in case the measurement value is not ‘0’ even when a flat object is being measured, this function is convenient. Variations in individual heads or between objects can be canceled using this function. ෳޓ⠨ REFERENCE It is possible to set this in combination with the 0-ADJ setting. For details, refer to page 6-112 ‘ ع0-ADJ’. If you desire to set this setting for each memory No., refer to page 6-83 ‘ عSpan adjustment setting’. LH-54 LH-58 Center measuring distance (40mm) (80mm) (20mA) Displacement output (V) Displacement output (V) Center measuring distance 5 r5㧑 +10 -10 (20mA) 5 r5㧑 +20 Distance -20 Distance (mm) (mm) -5 -5 (4mA) (4mA) LH-512 Center measuring distance Displacement output (V) (120mm) (20mA) 5 r5㧑 +30 Distance (mm) -30 -5 (4mA) NOTE After span adjustment, if the set values exceed the upper/lower limit for the measurement value and analog output, they are held at the upper/lower limit of full scale. 6-107 03/2003 CHAPTER 6 Setting procedure Step Ԙ Key operation from measurement mode is explained. Key MODE Operation Press the mode key for 1 sec. or more. 1 sec. or more or Select the CH1 or CH2 span adjustment setting by using the UP key or DOWN key. SET ԙ Setting • Operation Display / Result CH 1 span adjustment setting (Note 1) CH2 span adjustment setting (Note 2) Press the set key. Select ON or OFF by using the UP key or DOWN key. or If ON is selected, go to Step Ԛ. If OFF is selected, go to Step ԝ. If ON is selected. Step Key SET Ԛ Operation Press the set key. Select span amount by using the UP key or DOWN key. SET The span amount is set, and the display returns to the CH 1 or CH 2 span adjustment setting display. CH 1 span adjustment setting (Note 1) or CH 2 span adjustment setting (Note 2) Press the set key. ԛ MODE Ԝ Display / Result The current measurement value is displayed. Press the mode key for 1 sec. or more. 1 sec. or more. 6-108 03/2003 Sensor returns to measurement mode. CHAPTER 6 Setting • Operation If OFF is selected Step Key Operation SET Press the set key for 1 sec. or more. 1 sec. or more. ԝ Press the mode key for 1 sec. or more. MODE Ԟ 1 sec. or more. 1) NOTE 2) 3) Display / Result The CH 1 or CH 2 span adjustment setting is set to the OFF state, and the display returns to the CH 1 or CH 2 span adjustment setting display. CH1 span adjustment setting (Note 1) or CH2 span adjustment setting (Note 2) Sensor returns to measurement mode. (Note 3) Displayed if a sensor head is connected to the HEAD 1 side of LH-CS6 (P) or LH-CD6 (P). Displayed if a sensor head is connected to the HEAD 2 side of LH-CD6 (P). When the mode key is pressed for 1 sec. or more at the end of the setting, the settings are confirmed and stored in an EEPROM. In order to cancel before confirmation, simultaneously press UP key and DOWN key for 1 sec. or more. The sensor returns to measurement mode. 6-109 03/2003 CHAPTER 6 Setting • Operation All reset This function returns the settings of all the functions to their initial settings. z All reset configuration Press for 1 sec. or more ޓPage 6-9 SET Memory read out SET All reset When all reset is executed, it becomes impossible to press the UP key and DOWN key at the same time for 1 sec. or more and cancel the settings before going to Step ԟ on page 6-111, performing memory write and returning to measurement mode in Step Ԡ. For example, if you have proceeded to Step ԝ, then decided to perform some other setting without proceeding to Step Ԡ, the settings performed up to that point cannot be canceled in the middle of the setting procedure. NOTE Refer to page 6-118, ‘List of initial settings’. ෳޓ⠨ REFERENCE Setting procedure Step Key MODE Ԙ SET Key operation from measurement mode is explained. Operation Press the mode key for 1 sec. or more. 1 sec. or more Select all reset setting by using the UP key or DOWN key. SET ԙ Display / Result All reset setting Press the set key. Select No or Yes using the UP key or DOWN key. If No is selected, go to Step Ԛ. If Yes is selected, go to Step Ԝ. 6-110 03/2003 or CHAPTER 6 Setting • Operation If No is selected Step Key Operation Display / Result The display returns to the all reset setting display without executing all reset. Press the set key. SET Ԛ All reset setting Press the mode key for 1 sec. or more. MODE ԛ Sensor returns to measurement mode. 1 sec. or more If Yes is selected Step Key Operation Press the set key for 1 sec. or more. SET Ԝ 1 sec. or more Select the memory No. by using the UP key Display / Result Memory selection display appears. 㨪 or 㨪 (Note 1) or DOWN key. The display will change to the setting display for the selected memory No. Press the set key. SET ԝ Press the mode key twice. Memory store display appears. MODE Ԟ Memory store MODE Press the set key. Memory write. Memory selection display Select the memory No. by using the UP key appears. or DOWN key. 㨪 SET ԟ or (Note 2) SET Ԡ Press the set key for 1 sec. or more. 1 sec. or more NOTE 1) 2) 3) Sensor returns to measurement mode. (Note 3) For details, refer to page 6-9 ‘ عMemory call / memory read out’. For details, refer to page 6-10 ‘ عMemory write’. Until you return to the measurement mode, it is impossible to press the UP key and DOWN key simultaneously for 1 sec. or more and cancel the operation. 6-111 03/2003 CHAPTER 6 Setting • Operation 0-ADJ At the point when 0-ADJ is executed, the analog output is forcibly changed to 0V (analog voltage output) or to 12mA (analog current output) and this output is used as the reference value in measurements. The comparative output threshold value is also linked to the 0-ADJ reference. However, if a threshold value is set which exceeds the measuring range after 0-ADJ, the threshold value is held at the upper or lower limit of the measuring range. Example: LH-54 Measurement value display 35mm Measurement value 0-ADJ is performed. (Press the mode key and UP key simultaneously.) display Analog voltage: –2.5V Analog voltage: 0V Analog current: 8mA Analog current: 12mA The contents of the measurement value display (reference value display) at the point when 0-ADJ is performed differ depending on whether the display setting selection is ‘displacement monitor’ or ‘distance monitor’. LH-54 LH-58 LH-512 0mm 0mm 0mm 40mm 80mm 120mm Displacement Monitor Distance Monitor Also, if the calculation function is used with LH-CD6 (P), the reference value display during 0-ADJ differs depending on the connected sensor head and its calculation contents. Example: Using LH-54 and LH-58, if calculation function A - B is selected When A = LH-54 and B = LH-58, if 0-ADJ is performed, LH-54 is set to 40mm and LH-58 is set to 80mm. So, calculation A - B gives - 40mm. 6-112 03/2003 Setting • Operation CHAPTER 6 z Features of 0-ADJ function Within the measuring range, the analog output at any point can be adjusted to 0V (voltage output) or 12mA (current output). The set value that exceeds the upper or lower limit of analog output is held at the upper or lower limit of full scale. Further, the measurement value display is also held at the upper or lower limit of full scale. 0-ADJ is done together on the measurement value display and analog output. 0-ADJ is done together on the voltage output and the current output. 0-ADJ is possible for values including those set by Shift adjustment or Span adjustment. At the time of factory shipment, approx. 0V and 12mA have been set for measuring center. 0-ADJ can also be set from the terminal block (Ԫ). If 0-ADJ store is set to ON, the settings are stored in an EEPROM. However, the EEPROM has a lifetime and the settings cannot be done for more than 100,000 times. NOTE ෳޓ⠨ REFERENCE Setting procedure Step Key MODE 㧗 Regarding the relation between the displacement and the analog output when 0-ADJ has been done, or when 0-ADJ has been done in shift setting ON state, please refer to page 6-114 ‘• Examples of analog displacement output diagrams during 0-ADJ’. Concerning recording and cancellation of 0-ADJ, refer to page 6-73 ‘ع 0-ADJ store setting’ and page 6-75 ‘ ع0-ADJ clear’. Key operation from the measurement mode is explained. Operation Display / Result Press the mode key and UP key 0-ADJ is performed, the display simultaneously. value becomes ‘0’ and the Ԙ 0-ADJ indicator lights up. 6-113 03/2003 CHAPTER 6 Setting • Operation z Examples of analog displacement output diagrams during 0-ADJ Ԙ In case 0-ADJ setting has been done at the NEAR side or the FAR side, the analog displacement output diagrams are as shown below. LH-54: If the +10 mm position is made ‘0’. LH-54: If the -10 mm position is made ‘0’. Center measuring distance (40mm) (40mm) (20mA) (20mA) 5 Displacement output (V) Displacement output (V) Center measuring distance 0 -10 (12mA) +10 Distance (mm) 5 0 -10 (12mA) (4mA) LH-58: If the +20 mm position is made ‘0’. LH-58: If the -20 mm position is made ‘0’. Center measuring distance (80mm) (80mm) (20mA) (20mA) 5 Displacement output (V) Displacement output (V) Center measuring distance 0 (12mA) +20 Distance (mm) 5 0 -20 (12mA) -5 LH-512: If the +30 mm position is made ‘0’. Center measuring distance Center measuring distance (120mm) (120mm) (20mA) (20mA) 5 Displacement output (V) Displacement output (V) (mm) -5 LH-512: If the -30 mm position is made ‘0’. 0 (12mA) -30 +30 Distance (mm) 5 0 (12mA) +30 Distance (mm) -5 -5 (4mA) (4mA) NOTE +20 Distance (4mA) (4mA) -30 (mm) -5 -5 (4mA) -20 +10 Distance After the 0-ADJ and shift adjustments, if the set value exceeds the upper/lower limit of the measurement value or the analog output, it is held at the upper/lower limit of full scale. 6-114 03/2003 CHAPTER 6 Setting • Operation ԙ In case عShift adjustment, page 6-78, has been done after 0-ADJ has been set at the NEAR side or the FAR side, the analog displacement output diagrams are as shown below. LH-54: If the +10 mm position is made ‘0’. LH-54: If the -10 mm position is made ‘0’. Center measuring distance Center measuring distance (40mm) Displacement output (V) (40mm) Displacement output (V) 5 (20mA) 5 (20mA) +10 0 -10 (12mA) +10 -10 Distance (mm) (12mA) 0 Distance (mm) -5 (4mA) -5 (4mA) LH-58: If the +20 mm position is made ‘0’. LH-58: If the -20 mm position is made ‘0’. Center measuring distance Center measuring distance Displacement Output (V) (80mm) (80mm) Displacement Output (V) 5 (20mA) 5 (20mA) +20 0 -20 (12mA) +20 -20 Distance (12mA) 0 (mm) -5 (4mA) -5 (4mA) LH-512: If the +30 mm position is made ‘0’. LH-512: If the -30 mm position is made ‘0’. Center measuring distance Center measuring distance (120mm) (120mm) Displacement output (V) Displacement output (V) 5 (20mA) -30 0 (12mA) +30 -30 Distance (mm) (12mA) 5 (20mA) +30 0 Distance (mm) -5 (4mA) -5 (4mA) NOTE Distance (mm) If shift adjustment is carried out with respect to a 0-adjusted measurement value, a large shift adjustment, which when added to the data before 0-ADJ results in a value exceeding the measurement full scale, cannot be performed. After the 0-ADJ, if the set value exceeds the upper/lower limit of the measurement value or the analog output, it is held at the upper/lower limit of full scale. 6-115 03/2003 CHAPTER 6 Setting • Operation Ԛ In case عSpan adjustment setting, page 6-83, has been done after 0-ADJ has been set at the NEAR side or the FAR side, the analog displacement output diagrams are as shown below. LH-54: If the +10 mm position is made ‘0’. LH-54: If the -10 mm position is made ‘0’. Center measuring distance Center measuring distance (40mm) (40mm) Displacement output (V) Displacement output (V) 5 (20mA) -10 0 (12mA) +10 Distance 0 -10 (12mA) (mm) +10 Distance (mm) (4mA) -5 -5 (4mA) LH-58: If the -20 mm position is made ‘0’. LH-58: If the +20 mm position is made ‘0’. Center measuring distance Center measuring distance (80mm) (80mm) Displacement output (V) Displacement output (V) 5 (20mA) -20 0 (12mA) +20 Distance (mm) 5 (20mA) 0 -20 (12mA) +20 Distance (mm) (4mA) -5 -5 (4mA) LH-512: If the -30 mm position is made ‘0’. LH-512: If the +30 mm position is made ‘0’. Center measuring distance Center measuring distance (120mm) Displacement output (V) Displacement output (V) (120mm) 5 (20mA) -30 0 (12mA) +30 Distance (mm) 5 (20mA) 0 -30 (12mA) +30 Distance (mm) (4mA) -5 -5 (4mA) NOTE 5 (20mA) If span adjustment is carried out with respect to a 0-adjusted measurement value, a large span adjustment, which when added to the data before 0-ADJ results in a value exceeding the measurement full scale, cannot be performed. After the 0-ADJ, if the set value exceeds the upper/lower limit of the measurement value or the analog output, it is held at the upper/lower limit of full scale. 6-116 03/2003 CHAPTER 6 Setting • Operation Display hold The display hold function is a function that fixes the measurement value display by pressing the DOWN key and Set key simultaneously. Pressing any key cancels the function. NOTE The display hold setting is enabled only in the measurement mode. Setting Procedure Step Key operation from measurement mode is explained. Key 㧗 Operation Display / Result Press the DOWN key and set key The measurement value simultaneously. display is fixed and the display hold indicator lights up. SET Ԙ Panel lock setting When the panel lock setting is turned ON, it makes it impossible for a key operation to be received until the setting is canceled. Also, when the panel lock setting is turned ON, RS232C communication is enabled. Initial setting: OFF NOTE Even if the power is turned OFF, panel lock is maintained. Setting and canceling of panel lock are only enabled in the measurement mode. Setting procedure Key operation from measurement mode is explained. Setting/cancellation method Step Key 㧗 Ԙ Operation Press the UP key and DOWN key simultaneously for 1 sec. or more. 1 sec. or more 6-117 03/2003 Display / Result When the panel lock setting is ON, the panel lock indicator lights up. CHAPTER 6 㧢-㧠 㧠 Setting • Operation List of initial settings CH 1 / CH 2 gain setting SELECT:04 CH 1 / CH 2 calculation selection Normal Item change CH 1 = A, CH 2 = B Calculation equation selection Threshold level setting When d-03 is selected. When d-04 is selected A-B L-(A+B) TH-1 TH-2 +15% of F.S. from measurement center. Hysteresis setting the -15% of F.S. from the measurement center. OFF Comparative output timer setting OFF-timer Display contents selection Displacement Monitor Display zero suppress OFF Decimal point position setting AUTO Lowest bit zero setting OFF Display sleep setting OFF Display offset setting OFF Response time setting 300ms Calculation mode setting Normal Analog output hold setting OFF 0-ADJ store setting OFF Shift adjustment setting OFF Span adjustment setting OFF Analog voltage output offset setting OFF Analog current output offset setting OFF Bit rate setting 9600 Data length setting 8bit Parity setting OFF Stop bit number setting 1bit Interference prevention setting Single CH 1 / CH 2 shift adjustment setting OFF CH 1 / CH 2 span adjustment setting OFF Panel lock setting OFF 6-118 03/2003 CHAPTER 6 Setting • Operation ̆ MEMO 㧙 6-119 03/2003 CHAPTER 7 RS-232C CONTROL 7-1 Specifications..............................................7-1 7-2 Connector pin-position and signals..........7-2 7-3 Message format...........................................7-3 7-4 Cautions.......................................................7-6 7-5 Commands description..............................7-8 03/2003 CHAPTER 7ޓRS-232C control 7-1 Specifications Connector 6-pin modular jack Sync. method Start-stop sync. system Communication method Non-procedural half-duplex Stop bit 1 bit / 2 bits Data bit 7 bits / 8 bits Baud rate 1,200 / 2,400 / 4,800 / 9,600 Parity setting Without parity / Even / Odd Sending/receiving timer NOTE With time-out monitor (10 seconds for sending, 10 seconds for receiving㧕 I n case RS-232C transmission function is used, set to RS-232C mode by setting panel setting to ON. Please refer to page 6-117 ‘ عPanel lock setting’ for setting details. 7-1 03/2003 CHAPTER 7 RS-232C control 7-2 Connector pin-position and signals ԘԙԚԛ Ԝ ԝ Rear view of controller Signal direction Controller ޓޓExternal Pin No. Signal Ԙ 㧙 NC ԙ 㧙 NC Ԛ RD (RXD) ԛ SG (SG) Ԝ SD (TXD) ԝ 㧙 ޓInput φ Output 㧙 Output ψ Description Receiving Signal ground Input Sending NC No.Ԛ pin: RD (RXD) signal This is a terminal for receiving signal of controller. Usually SD (TXD) of external device is connected. No.ԛ pin: SG (SG) Ground for signal. Usually SG (SG) of external device is connected. No.Ԝ pin: SD (TXD) This is a terminal for sending signal of controller. Usually RD (RXD) of external device is connected. <Recommended connector> Modular plug MOD-P66 غmanufactured by Honda Tsushin Kogyo Co. Ltd. ᵈޓᗧ NOTE Make sure to connect/disconnect the connectors in the power supply off condition. Do not pull the cable to remove the connector, since this can result in a cable break. 7-2 03/2003 CHAPTER 7ޓRS-232C control 7-3 Message format The message format is shown below. The characters to be used for the message are JIS8 (some parts are common with JIS7/ASCII ) code. Command message The command is an instruction given to the controller from an external device. By the command, each setting of the controller can be changed or checked externally. In order to use the command, the message must be constructed in the defined format and must be transmitted to the controller. This message is called the command message. The format and its contents are described below. z Command messageformat Start code 1 character Command 4 characters Subcommand 1 character Data Variable length of data End code 1 character Head φޓޓޓޓޓޓޓޓޓޓޓޓޓޓޓޓޓޓޓޓޓޓޓޓޓޓޓޓޓޓψ End z Description of command message Name Description STX (02h) fixed. Start code This is a code to recognize the start of the message. This is the instruction portion. By specifying a command consisting of 4 characters, instruction for any Command operation can be given to the controller. Type of command that can be specified is described later. Sub command Data End code ෳޓ⠨ REFERENCE This is auxiliary instruction to be added for setting and reading. Either of following one character is specified. ‘ޓޓS’... Data write-in or operation (SET) ‘ޓޓR’... Data read-out (Read) Note: There are commands for which ‘R’ cannot be specified. This is the data to be specified for each command. The contents to specified vary from command to command. Refer to the description of each command. ETX (03h) fixed. This is a code to recognize the end of the message. Please refer to page 7-8 ‘7-5 Commands description’ for the type of commands. 7-3 03/2003 CHAPTER 7 RS-232C control Response message The response message is the returned message from the controller in response to the command message sent by the external device. The response message is classified into 3 types, a normal response message, an abnormal response message, and a read-out response message, depending on a command message sent by the external device. z Normal response message The normal response message is returned back when the contents of the command message are correct or when the instructed process is completed correctly. It can be recognized by the start code ACK (06h) at the beginning. z Abnormal response message The abnormal response message is returned back when the contents of the command message are not correct, when the instructed process is not correctly completed or when a system error occurs, etc. It can be recognized by the start code NAK (15h) at the beginning. The format and its contents are described below. z Format of normal response message Start code 1 character Response code 2 characters Data Variable length of data Head φޓޓޓޓޓޓޓޓޓޓޓޓޓޓޓޓޓޓޓޓޓޓޓޓޓ End code 1 character ψ End z Description of normal response message Name Description ACK (06h) fixed. Start code This is a code to recognize the normal response message besides to identify the beginning of the message. Response code 00 (3030h) fixed. When the sub-command of the command message is ‘R’, the read set value is stored. Refer to the description of each command, since the contents differ from command to command. Data If ‘S’ is specified for the sub-command of the command message, this item will be omitted. (O character) End code ෳޓ⠨ REFERENCE ETX (03h) fixed. This is a code to recognize the end of the message. Please refer to page 7-8 ‘7-5 Commands description’ for the type of commands. 7-4 03/2003 CHAPTER 7ޓRS-232C control z Format of abnormal response message Start code 1 character Response code 2 characters End code 1 character Head φ ޓޓޓޓޓޓޓޓޓޓޓޓޓޓψ End z Description of abnormal response message Name Description NAK (15h) fixed. Start code Response code End code This is a code to recognize the abnormal response message besides to identify the beginning of the message. The cause of abnormality is informed with a 2 digit number. ޓޓ10: Not ended with ETX ޓޓ11: Command name is not correct. ޓޓ12: Sub-command is not correct. ޓޓ13: Command other than ALRM command is not accepted because of being in alarm state. ޓޓ14: The data length or type of character is not correct. ޓޓ15: Format of data part is not correct. ޓޓ16: Specified head is not connected. ޓޓ17: EEPROM access error ޓޓ18: The information of the head is not identical when EEPROM is read. ޓޓ19: Unregistered number is specified when EEPROM is read. EXT (03h) fixed. This is a code to recognize the end of the message. 7-5 03/2003 CHAPTER 7 RS-232C control 7-4 Cautions When using RS-232C transmission function, take care of the following. z Panel lock setting RS-232C cannot be used unless the panel lock setting is set to ON. Please refer to page 6-117 ‘ عPanel lock setting’ for setting details. z Hand shake Do not send command messages continuously. Make sure to check the response message first, and then send the next command. After a command message is sent, the controller does not accept the next command till the response message is returned. z Setting change through RS-232C In case each setting is changed through RS-232C (in case the message sub-command ‘W’ is sent ), save the changed setting into the EEPROM before RS-232C mode is canceled. Otherwise, the change is not stored. (Carry out Save of ‘MMRW’.) z Command message to specify the write-in of setting and command message to access the EEPROM If the message of sub-command ‘W’ is sent in each command or if ‘MMRW’ command is sent, wait for approx. 400ms after receiving the response message before sending the next message. z Operation in error state During ‘system error’ or ‘RS-232C communication error (required power supply OFF error) ’, no sending/receiving is possible. During ‘other errors’, commands other than ‘ALRM’ command cannot be used. However, during ‘measurement error’, all commands can be used as in the normal condition. ෳޓ⠨ REFERENCE Please refer to page 9-1 ‘9-1 Error indication’ for errors. 7-6 03/2003 CHAPTER 7ޓRS-232C control z 0-ADJ in RS-232C mode Even if 0-ADJ memory is in the ON state, 0-ADJ is not stored in case the time 0-ADJ was carried out is till the setting is changed through RS-232C and the setting is stored into EEPROM. 0-ADJ memory function operates correctly till the setting is changed after entering into RS-232Cmode, or the setting is changed again after the setting is stored into EEPROM. z Gain setting through RS-232C In case gain setting is done through RS-232C, optimum gain described on page 6-12 ‘ عCH 1/CH 2 gain setting’ cannot be set. Therefore, take care of the following. After gain setting, if the set gain is not optimum, BRIGHT or DARK error may occur. Specifically, if a high gain level is selected for an object having high reflectance which should normally result in a BRIGHT state, the measurement value might be displayed, instead of BRIGHT state error being shown in the measurement mode. In this case, take care that the measurement value is highly inaccurate. 7-7 03/2003 CHAPTER 7 RS-232C control 7-5 Commands description Table of commands Command Description Page TMST Output terminal state read out 7-9 ALRM Alarm state confirmation 7-10 MSVL 5 digit LED display value read out 7-12 DPHL Display value hold setting / cancel 7-13 MMNM Read out the memory No. of the setting currently used 7-14 MMRW Memory SAVE / LOAD 7-15 ITFS Setting / read out of interference prevention ON / OFF 7-16 GIN1 CH 1 gain setting / read out 7-17 GIN2 CH 2 gain setting / read out 7-18 REST Response time setting / read out 7-19 CA1C CA2C EXHD CH 1 calculation setting / read out in single measurement mode CH 2 calculation setting / read out in single measurement mode Change calculation item ( Switch A to B for calculation in calculation mode) 7-20 7-21 7-22 CA12 Calculation setting / read out in calculation mode 7-23 DPSL 5 digit LED display setting / read out 7-24 ZSPS Display zero-suppress setting / read out 7-25 CMPS Decimal point position setting / read out 7-26 LWZS Lowest bit zero setting / read out 7-27 DPSP Display sleep setting / read out 7-28 DPOF Display offset setting / read out 7-29 FCSL Calculation mode setting / read out 7-30 CHSL Channel selection / read out 7-32 ANHD Analog output hold setting / read out 7-33 7-8 03/2003 CHAPTER 7ޓRS-232C control Description of each command The following describes the function, command message and the format of the data part contained in the normal response message in each command. By putting the format described for each command into the data part of the command message or the normal response message, a message format, which is communicated between the controller and the external device, is created. ෳޓ⠨ REFERENCE Please refer to page 7-3 ‘7-3 Message format’ for command message and the format of normal response message. z TMST It reads out the current output terminal state. As output terminal state cannot be controlled externally, allowable command is ‘R’ only. 1) The format of the data part in the command message is as follows. When sending with a sub command ‘W’: Not possible When sending with a sub command ‘R’: 0 character long (no data part) 2) The format of the data part in the normal response message is as follows. When sending with a sub command ‘W’: Not possible When sending with a sub command ‘R’: 3 characters long HI terminal state GO terminal state 1 character 1 character Head φޓޓޓޓޓޓޓޓޓޓޓޓޓޓ LO terminal state 1 character ψ End Each character from the first indicates, in order, the state of HI terminal, GO terminal and LO terminal. Character ‘0’ indicates OFF. Character ‘1’ indicates ON. 7-9 03/2003 CHAPTER 7 RS-232C control z ALRM It reads out the current alarm state (error state). As output terminal state cannot be controlled externally, allowable command is ‘R’ only. 1) The format of the data part in the command message is as follows. When sending with a sub command ‘W’: Not possible When sending with a sub command ‘R’: 0 character long (no data part) 2) The format of the data part in the normal response message is as follows. When sending with a sub command ‘W’: Not possible When sending with a sub command ‘R’: 6 characters long Major alarm state Minor alarm state 3 characters 3 characters Head φ ޓޓޓޓ ޓޓޓޓޓޓޓޓޓޓψ End The first 3 characters indicate the alarm code for major alarm, and 3 characters from the 4th digit indicate the alarm code for minor alarm. However, in case a major alarm occurs, as RS-232C mode is canceled, the major alarm cannot be actually confirmed with this command. Please refer to 9-1 ‘9-1 Error indication’ for error. Please refer to page 7-6 ‘7-4 Cautions’ for RS-232C mode operation. ෳޓ⠨ REFERENCE 7-10 03/2003 CHAPTER 7ޓRS-232C control Alarm code for major alarm and its description. (Confirming major alarm is actually impossible) ‘001’: CH1 sensor head EEPROM abnormality ‘002’: CH2 sensor head EEPROM abnormality ‘003’: CH1 wire-break detection ‘004’: CH2 wire-break detection ‘005’: Controller EEPROM abnormality ‘007’: Sensor head not connected ‘010’: EEPROM READ abnormality ‘011’: EEPROM WRITE abnormality ‘012’: Internal process 1 abnormality ‘013’: Internal process 2 abnormality ‘020’: Receiving time-out ‘021’: Sending time-out ‘022’: Parity error ‘023’: Framing error ‘024’: Over-run error (Er-01) (Er-02) (Er-03) (Er-04) (Er-05) (Er-07) (Er-10) (Er-11) (Er-12) (Er-13) (Er-20) (Er-21) (Er-22) (Er-23) (Er-24) Alarm code for minor alarm and its description ‘001’: BRIGHT CH 1 ‘002’: BRIGHT CH 2 ‘003’: DARK CH 1 ‘004’: DARK CH 2 ‘005’: NEAR CH 1 ‘006’: NEAR CH 2 ‘007’: FAR CH 1 ‘008’: FAR CH 2 ‘029’: Interlock ‘030’: Over-current protection (bri1) (bri2) (dAr1) (dAr2) (nEAr1) (nEAr2) (FAr1) (FAr2) (-----) (Er-30) 7-11 03/2003 CHAPTER 7 RS-232C control z MSVL The measurement value displayed on the 5 digit LED display is read out. (Even if on ‘sleep’, the measurement value can be read.) As the displayed value on the 5 digit display cannot be controlled externally, allowable subcommand is ‘R’ only. 1) The format of the data part in the command message is as follows. When sending with a sub command ‘W’: Not possible When sending with a sub command ‘R’: 0 character long (no data part) 2) The format of the data part in the normal response message is as follows. When sending with a sub command ‘W’: Not possible When sending with a sub command ‘R’: 7 characters long Measurement value on 5 digit LED display 7 characters Head φޓޓޓޓޓޓޓޓޓޓޓޓ ޓޓޓψ End In case the display setting is ‘displacement monitor’ or ‘distance monitor’ The first character is the sign. For minus, ‘-’ is put, and for plus, ‘+’ is put. Five characters from the second digit are a number and one of them is a decimal point. (The position of the decimal point may change depending on the setting) In case the display setting is ‘comparative decision monitor. When HI: ‘HI’ When GO: ‘GO’ When LO: ‘LO’ Regardless of the display setting, in case of the following alarm in minor alarm When BRIGHT: ‘ BRIGHT’ When DARK: ‘DARK’ When NEAR: ‘NEAR’ When FAR: ‘FAR’ ෳޓ⠨ REFERENCE Please refer to page 6-45 ‘ عDisplay contents selection’ for display settings. 7-12 03/2003 CHAPTER 7ޓRS-232C control z DPHL This is for hold setting of the measurement value on 5 digit LED display and reading out the current hold setting. 1) The format of the data part in the command message is as follows. When sending with a sub command ‘W’: 1 character long Display hold instruction 1 character Head φ ޓޓޓޓޓޓޓޓ ޓޓޓޓޓޓψ End Hold cancel instruction with a character ‘0’ and hold start instruction with a character ‘1’. When sending with a sub command ‘R’: 0 character long (no data part) 2) The format of the data part in the normal response message is as follows. When sending with a sub command ‘W’: 0 character long (no data part) When sending with a sub command ‘R’: 1 character long Display hold state 1 character Head φޓޓޓޓޓޓޓޓޓޓޓޓޓޓ Character ‘0’ indicates ‘no hold’. Character ‘1’ indicates ‘on hold’ . 7-13 03/2003 ψ End CHAPTER 7 RS-232C control z MMNM This reads out the currently used memory No. If it is desired to move the current memory No. to another memory No., use a command ‘MMRW’. The allowable sub-command is ‘R’ only. 1) The format of the data part in the command message is as follows. When sending with a sub command ‘W’: Not possible When sending with a sub command ‘R’: 0 character long (no data part) 2) The format of the data part in the normal response message is as follows. When sending with a sub command ‘W’: Not possible When sending with a sub command ‘R’: 2 characters long Memory No. 2 characters Head φޓޓޓޓ ޓޓޓޓޓޓޓޓޓޓޓψ End It is expressed by unit of 1 within ‘01 to 20’. ‘01’ to ‘16’: User’s memory (u-01 to u-16) is indicated. ‘17’ to ‘20’: Default memory is indicated. 17㧩d-01, 18㧩d-02, 19㧩d-03, 20㧩d-04 ෳޓ⠨ REFERENCE Please refer to page 6-4 ‘6-2-2 Default memory and user memory’ for memory No. 7-14 03/2003 CHAPTER 7ޓRS-232C control z MMRW This stores the currently used memory into user’s memory (EEPROM) (when sub command is ‘W’), or reads out the memory from user’s memory & default memory (when sub command is ‘R’). 1) The format of the data part in the command message is as follows. When sending with a sub command ‘W’: 2 characters long User memory No. where stored 2 characters Head φ ޓޓޓޓޓޓޓޓޓޓޓޓޓޓψ End It is expressed by unit of 1 within ’01 to 16’. This number expresses the user’s memory No. as it is. When sending with a sub command ‘R’: 2 characters long Memory No. which is read 2 characters Head φޓޓޓޓޓޓޓޓޓ ޓޓޓޓޓψ End It is expressed by unit of 1 within ‘01 to 20’. ‘01’ to ‘16’: User’s memory (u-01 to u-16) is indicated. ‘17’ to ‘20’: Default memory is indicated. 17㧩d-01, 18㧩d-02, 19㧩d-03, 20㧩d-04 2) The format of the data part in the normal response message is as follows. When sending with a sub command ‘W’: 0 character long (no data part) When sending with a sub command ‘R’: 0 character long (no data part) 7-15 03/2003 CHAPTER 7 RS-232C control z ITFS This sets interference prevention and reads out the set value. 1) The format of the data part in the command message is as follows. When sending with a sub command ‘W’: 1 character long Interference prevention instruction 1 character Head φޓޓޓޓޓ ޓ ޓޓޓޓޓޓޓޓψ End Single setting is indicated with a character ‘1’. Master setting is indicated with a character ‘2’. Slave setting is indicated with a character ‘3’. When sending with a sub command ‘R’: 0 character long (no data part) 2) The format of the data part in the normal response message is as follows. When sending with a sub command ‘W’: 0 character long (no data part) When sending with a sub command ‘R’: 1 character long Interference prevention state 1 character Head φޓޓޓޓޓޓޓޓޓޓޓޓޓޓ Character ‘1’ indicates Single setting. Character ‘2’ indicates Master setting. Character ‘3’ indicates Slave setting. 7-16 03/2003 ψ End CHAPTER 7ޓRS-232C control z GIN1 This sets gain setting for CH 1 side and reads out the set value. 1) The format of the data part in the command message is as follows. When sending with a sub command ‘W’: 3 characters long Gain classification instruction 1 character Head φޓޓޓޓޓޓ SELECT No. instruction 2 characters ޓޓޓޓ ޓޓޓޓψ End A character on the first digit is for gain classification selection. Character ‘0’ for SELECT Character ‘1’ for AUTO 2 characters from the second digit are to specify the SELECT No. for SELECT classification and the setting can be in unit of 1 within ‘01 to 11’. When gain classification is set to AUTO, set the SELECT No. to ‘00’. When sending with a sub command ‘R’: 0 character long (no data part) 2) The format of the data part in the normal response message is as follows. When sending with a sub command ‘W’: 0 character long (no data part) When sending with a sub command ‘R’: 3 characters long Gain classification state 1 character Head φޓޓޓޓޓޓ SELECT No. state 2 characters ޓޓޓޓ ޓޓޓޓψ End A letter on the first digit is to select gain classification. Character ‘0’ indicates SELECT. Character ‘1’ indicates AUTO. 2 characters from the second digit specify the SELECT No. for SELECT gain classification and the setting can be in unit of 1 within ‘01 to 11’. When gain classification selection is set to AUTO, the SELECT No. is fixed to ‘00’. 7-17 03/2003 CHAPTER 7 RS-232C control z GIN2 This sets gain setting for CH 2 side and reads out the set value. 1) The format of the data part in the command message is as follows. When sending with a sub command ‘W’: 3 characters long Gain classification SELECT No. instruction instruction 2 characters 1 character Head φ ޓޓޓ ޓޓޓޓޓޓޓ ޓޓޓޓψ End A character on the first digit is for gain classification selection. Character ‘0’ for SELECT Character ‘1’ for AUTO 2 characters from the second digit are to specify the SELECT No. for SELECT classification and the setting can be in unit of 1 within ‘01 to 11’. When gain classification selection is set to AUTO, set the SELECT No. to ‘00’. When sending with a sub command ‘R’: 0 character long (no data part) 2) The format of the data part in the normal response message is as follows. When sending with a sub command ‘W’: 0 character long (no data part) When sending with a sub command ‘R’: 3 characters long Gain classification state 1 character Head φޓޓޓޓޓޓ SELECT No. state 2 characters ޓޓޓޓ ޓޓޓޓψ End A letter on the first digit is to select gain classification. Character ‘0’ indicates SELECT. Character ‘1’ indicates AUTO. 2 characters from the second digit specify the SELECT No. for SELECT gain classification and the setting can be in unit of 1 within ‘01 to 11’. When gain classification selection is set to AUTO, the SELECT No. is fixed to ‘00’. 7-18 03/2003 CHAPTER 7ޓRS-232C control z REST This sets the response time and reads out the set value. 1) The format of the data part in the command message is as follows. When sending with a sub command ‘W’: 2 characters long Response time instruction 1 character Head φޓޓޓޓޓޓޓ SELECT No. instruction 1 character ޓޓޓޓޓޓޓ ޓψ End A character on the first digit is for response time selection. Character ‘0’ for SELECT Character ‘1’ for AUTO. A character on the second digit specifies the SELECT No. when SELECT in response time selection is set and the setting can be in unit of 1 within ‘1’ to ‘8’. Character Response time (ms) 1 2 3 4 5 6 7 8 0.5 1 10 20 30 40 100 300 When response time selection is set to AUTO, set the SELECT No. to ‘0’. NOTE In order to set response time selection to AUTO, the measurement function selection ‘FCSL’ must be set to normal. When sending with a sub-command ‘R’: 0 character long (no data part) 2) The format of the data part in the normal response message is as follows. When sending with a sub command ‘W’: 0 character long (no data part) When sending with a sub command ‘R’: 2 characters long Response time state 1 character Head φޓޓޓޓޓޓޓ SELECT No. state 1 character ޓޓޓ ޓޓޓޓψ End A character on the first digit is for response time selection. Character ‘0’ indicates SELECT. Character ‘1’ indicates AUTO. A character on the second digit specifies SELECT No. when SELECT in response time selection is set and the setting can be in unit of 1 within ‘1’ to ‘8’. Character 1 2 3 4 5 6 7 8 Time(ms) 0.5 1 10 20 30 40 100 300 When response time selection is set to AUTO, the SELECT No. is fixed to ‘0’. 7-19 03/2003 CHAPTER 7 RS-232C control z CA1C This sets the calculation selection for CH 1 side head in single measurement mode and reads out the set value. 1) The format of the data part in the command message is as follows. When sending with a sub command ‘W’: 1 character long Calculation type instruction 1 character Heard φޓޓޓޓ ޓޓޓޓޓ ޓޓޓޓψ End Character ‘1’ specifies normal calculation. Character ‘2’ specifies L-A calculation. When sending with a sub-command ‘R’: 0 character (no data part) 2) The format of the data part in the normal response message is as follows. When sending with a sub command ‘W’: 0 character long (no data part) When sending with a sub command ‘R’: 1 character long Calculation type state 1 character Head φޓޓޓޓޓ ޓޓޓޓޓޓޓޓޓޓψ End Character ‘1’ indicates normal calculation. Character ‘2’ indicates L-A calculation. NOTE In case normal calculation is selected, the display offset ‘DPOF’ is set to OFF. 7-20 03/2003 CHAPTER 7ޓRS-232C control z CA2C This sets the calculation selection for CH 2 side head in single measurement mode and reads out the set value. 1) The format of the data part in the command message is as follows. When sending with a sub command ‘W’: 1 character long Calculation type instruction 1 character Head φޓޓޓޓޓޓޓޓޓ ޓ ޓޓޓޓψ End Character ‘1’ specifies normal calculation. Character ‘2’ specifies L-A calculation. When sending with a sub command ‘R’: 0 character long (no data part) 2) The format of the data part in the normal response message is as follows. When sending with a sub command ‘W’: 0 character long (no data part) When sending with a sub command ‘R’: 1 character long Calculation type state 1 character Head φޓޓޓޓޓ ޓ ޓޓޓޓޓޓޓޓޓψ End Character ‘1’ indicates normal calculation. Character ‘2’ indicates L-A calculation. NOTE In case normal calculation is selected, the display offset ‘DPOF’ is set to OFF. 7-21 03/2003 CHAPTER 7 RS-232C control z EXHD This sets calculation item change and reads out the set value. It specifies the head substituted for A in the calculation formula for the calculation function in calculation mode. 1) The format of the data part in the command message is as follows. When sending with a sub command ‘W’: 1 character long Calculation head change instruction 1 character Head φޓޓޓޓޓޓޓޓ ޓޓޓޓޓޓ ψ End Character ‘1’ is for A=CH 1. Character ‘2’ is for A=CH 2. When sending with a sub command ‘R’: 0 character long (no data part) 2) The format of the data part in the normal response message is as follows. When sending with a sub command ‘W’: 0 character long (no data part) When sending with a sub command ‘R’: 1 character long Calculation head change state 1 character Head φޓޓޓޓޓ ޓޓޓޓޓޓޓޓ Character ‘1’ indicates A=CH 1. Character ‘2’ indicates A=CH 2. 7-22 03/2003 ޓψ End CHAPTER 7ޓRS-232C control z CA12 This sets calculation selection in the calculation mode and reads out the set value. 1) The format of the data part in the command message is as follows. When sending with a sub-command ‘W’: 1 character long Calculation selection instruction 1 character Head φޓޓޓޓޓ ޓޓޓޓޓޓޓޓ ޓψ End Character ‘1’ is for A + B calculation Character ‘2’ is for A − B calculation Character ‘3’ is for (A + B) / 2 calculation Character ‘4’ is for L − (A + B) Character ‘5’ is for L − (A − B) calculation NOTE When setting ‘1’ ,‘2’ or ‘3’ is specified, the display offset ‘DPOF’ becomes OFF. When sending with a sub command ‘R’: 0 character long (no data part) 2) The format of the data part in the normal response message is as follows. When sending with a sub command ‘W’: 0 character long (no data part) When sending with a sub command ‘R’: 1 character long Calculation selection state 1 character Head φ ޓ ޓޓޓ ޓޓ ޓޓޓޓޓޓޓޓψ End Character ‘1’ indicates A + B calculation. Character ‘2’ indicates A − B calculation. Character ‘3’ indicates (A + B) / 2 calculation. Character ‘4’ indicates L − (A + B). Character ‘5’ indicates L − (A − B) calculation. 7-23 03/2003 CHAPTER 7 RS-232C control z DPSL This specifies the display setting on the 5 digit LED display and reads out the set value. 1) The format of the data part in the command message is as follows. When sending with a sub command ‘W’: 1 character long 5 digit LED display setting instruction 1 character Head φ ޓޓޓޓ ޓޓޓޓ ޓޓޓޓ ޓޓψ End Character ‘0’ specifies the displacement monitor display. Character ‘1’ specifies the distance monitor display. Character ‘2’ specifies the comparative decision monitor display. When sending with a sub command ‘R’: 0 character long (no data part) 2) The format of the data part in the normal response message is as follows. When sending with a sub command ‘W’: 0 character long (no data part) When sending with a sub command ‘R’: 1 character long 5 digit LED display setting state 1 character Head φޓ ޓޓޓޓޓޓ ޓޓޓޓޓޓޓψ End Character ‘0’ indicates displacement monitor display. Character ‘1’ indicates distance monitor display. Character ‘2’ indicates comparative decision monitor display. 7-24 03/2003 CHAPTER 7ޓRS-232C control z ZSPS This sets zero-suppress on the 5 digit LED display and reads out the set value. 1) The format of the data part in the command message is as follows. When sending with a sub command ‘W’: 1 character long 5 digit LED display zero-suppress instruction 1 character Head φޓޓޓޓޓޓޓ ޓޓ ޓޓޓޓޓψ End Character ‘0’ makes zero suppress invalid. Character ‘1’ makes zero suppress valid. When sending with a sub command ‘R’: 0 character long (no data part) 2) The format of the data part in the normal response message is as follows. When sending with a sub command ‘W’: 0 character long (no data part) When sending with a sub command ‘R’: 1 character long 5 digit LED display zero suppress state 1 character Head φޓޓޓޓޓޓޓ ޓޓޓޓޓ ޓޓޓψ End Character ‘0’ indicates that the zero suppress is invalid. Character ‘1’ indicates that the zero suppress is valid. 7-25 03/2003 CHAPTER 7 RS-232C control z CMPS This sets the position of the decimal point on the 5 digit display and reads out the set value. 1) The format of the data part in the command message is as follows. When sending with a sub command ‘W’: 1 character long Decimal point position instruction 1 character Head φޓޓޓޓޓ ޓޓޓ ޓޓޓޓޓޓޓψ End Character ‘0’ specifies AUTO for setting the decimal point. Character ‘1’ specifies one digit after decimal point. Character ‘2’ specifies two digits after decimal point. Character ‘3’ specifies three digits after decimal point. When sending with a sub command ‘R’: 0 character long (no data part) 2) The format of the data part in the normal response message is as follows. When sending with a sub command ‘W’: 0 character long (no data part) When sending with a sub command ‘R’: 1 character long Decimal point position state 1 character Head φޓ ޓޓޓޓޓޓޓޓޓޓޓޓޓψ End Character ‘0’ indicates AUTO for setting the decimal point. Character ‘1’ indicates one digit after decimal point. Character ‘2’ indicates two digits after decimal point. Character ‘3’ indicates three digits after decimal point. 7-26 03/2003 CHAPTER 7ޓRS-232C control z LWZS This sets the lowest digit on the 5 digit LED display to zero and reads out the set value. 1) The format of the data part in the command message is as follows. When sending with a sub command ‘W’: 1 character long Zero-setting instruction 㧝 character Head φޓޓޓޓޓޓޓޓޓޓޓޓޓ ޓψ End Character ‘0’ specifies zero setting OFF. Character ‘1’ specifies zero setting ON. When sending with a sub command ‘R’: 0 character long (no data part) 2) The format of the data part in the normal response message is as follows. When sending with a sub command ‘W’: 0 character long (no data part) When sending with a sub command ‘R’: 1 character long Zero-setting state 1 character Head φޓޓޓޓޓޓޓޓ ޓޓޓޓޓޓψ End Character ‘0’ indicates zero setting OFF. Character ‘1’ indicates zero setting ON. 7-27 03/2003 CHAPTER 7 RS-232C control z DPSP This sets 5 digit LED display sleep and reads out the set value. 1) The format of the data part in the command message is as follows. When sending with a sub command ‘W’: 1 character long Display sleep instruction 1 character Head φޓޓޓޓ ޓޓޓ ޓޓޓޓޓޓޓ ψ End Character ‘0’ specifies display sleep OFF. Character ‘1’ specifies display sleep ON. When sending with a sub command ‘R’: 0 character long (no data part) 2) The format of the data part in the normal response message is as follows. When sending with a sub command ‘W’: 0 character long (no data part) When sending with a sub command ‘R’: 1 character long Display sleep state 1 character Head φ ޓ ޓޓޓ ޓ ޓޓޓޓޓޓޓޓޓψ End Character ‘0’ indicates display sleep OFF. Character ‘1’ indicates display sleep ON. 7-28 03/2003 CHAPTER 7ޓRS-232C control z DPOF This sets display offset for 5 digit LED display and reads out the set value. 1) The format of the data part in the command message is as follows. When sending with a sub-command ‘W’: 9 characters long Offset presence / absence Offset amount instruction instruction 8 characters 1 character Head φޓޓޓޓޓޓޓޓޓޓޓޓޓޓޓ ޓޓޓޓޓޓޓޓ ޓޓψ End A character on the first digit specifies display offset ON/OFF. Character ‘0’ specifies display offset absent. Character ‘1’ specifies display offset present. 8 characters from the second digit specify offset amount and it can be set in unit of 1 within ‘−5,000,000’ to ‘+5,000,000’. When display offset absent is to be specified, set the offset amount to ‘00000000’. When sending with a sub command ‘R’: 0 character long (no data part) 2) The format of the data part in the normal response message is as follows. When sending with a sub command ‘W’: 0 character long (no data part) When sending with a sub command ‘R’: 9 characters long Offset presence / absence Offset amount state state 8 characters 1 character Head φޓޓޓޓޓޓޓޓޓޓޓޓޓޓޓ ޓޓ ޓޓޓ ޓޓޓޓψ End A character on the first digit indicates display offset ON / OFF. Character ‘0’ indicates display offset absent. Character ‘1’ indicates display offset present. 8 characters from the second digit specify offset amount and it is indicated in unit of 1 within ‘−5,000,000’ to ‘+5,000,000’. 7-29 03/2003 CHAPTER 7 RS-232C control z FCSL This sets the measurement mode and reads out the set value. 1) The format of the data part in the command message is as follows. When sending with a sub command ‘W’: 5 characters long Measurement mode Simple average number instruction instruction 4 characters 1 character Head φޓޓޓޓޓޓޓޓޓޓޓ ޓ ޓޓޓޓޓޓޓޓޓޓޓޓޓψ End A character on the first digit selects the measurement mode. Character ‘0’ specifies normal measurement. Character ‘1’ specifies peak-peak measurement. Character ‘2’ specifies peak hold measurement. Character ‘3’ specifies bottom hold measurement. Character ‘4’ specifies simple average measurement. 4 characters from 2nd digit specify the average number in the simple average measurement and it can be set in unit of 1 within ‘0002 to 1024’. When selecting measurement other than simple average measurement, set the simple average number as ‘0000’. NOTE In order to set the measurement mode selection to ‘1’, ‘2’, ‘3’ or ‘4’, the response time classification ‘REST’ must be set to SELECT. When sending with a sub command ‘R’: 0 character long (no data part) 7-30 03/2003 CHAPTER 7ޓRS-232C control 2) The format of the data part in the normal response message is as follows. When sending with a sub command ‘W’: 0 character long (no data part) When sending with a sub command ‘R’: 5 characters long Measurement mode Simple average number state state 4 characters 1 character Head φޓޓޓޓޓޓޓޓޓޓޓޓޓޓޓޓ ޓޓޓޓޓޓޓޓޓψ End A character on the first digit shows the measurement mode selection. Character ‘0’ indicates normal measurement. Character ‘1’ indicates peak-peak measurement. Character ‘2’ indicates peak hold measurement. Character ‘3’ indicates bottom hold measurement. Character ‘4’ indicates simple average measurement. 4 characters from 2nd digit specify the average number in simple average and it is indicated in unit of 1 within ‘0002 to 1024’. When measurement other than simple average measurement was selected, the simple average number is fixed as ‘0000’. 7-31 03/2003 CHAPTER 7 RS-232C control z CHSL This sets change of channel and reads out the set value. Specifically, it selects single measurement mode/calculation mode and CH 1/CH 2 in case of single measurement mode. 1) The format of the data part in the command message is as follows. When sending with a sub command ‘W’: 1 character long Used head 㧒 channel instruction 1 character Head φޓޓޓޓ ޓޓޓޓޓޓޓޓޓޓψ End Character ‘1’ specifies single measurement mode & CH 1. Character ‘2’ specifies single measurement mode & CH 2. Character ‘3’ specifies the calculation mode. When sending with a sub command ‘R’: 0 character long (no data part) 2) The format of the data part in the normal response message is as follows. When sending with a sub command ‘W’: 0 character long (no data part) When sending with a sub command ‘R’: 1 character long Head to use & channel state 1 character Head φޓޓޓޓޓޓޓޓ ޓޓޓޓޓޓψ End Character ‘1’ indicates single measurement mode & CH 1. Character ‘2’ indicates single measurement mode & CH 2. Character ‘3’ indicates calculation mode. 7-32 03/2003 CHAPTER 7ޓRS-232C control z ANHD This sets analog output hold and reads out the set value. 1) The format of the data part in the command message is as follows. When sending with a sub command ‘W’: 1 character long Analog output hold instruction 1 character Head φޓޓޓޓޓޓޓޓޓޓޓޓޓ ޓ ψ End Character ‘0’ specifies hold OFF. Character ‘1’ specifies the hold ON. When sending with a sub command ‘R’: 0 character long (no data part) 2) The format of the data part in the normal response message is as follows. When sending with a sub command ‘W’: 0 character long (no data part) When sending with a sub command ‘R’: 1 character long Analog output hold state 1 character Head φޓޓޓ ޓޓޓޓޓޓޓޓޓޓ Character ‘0’ indicates hold OFF. Character ‘1’ indicates hold ON. 7-33 03/2003 ޓψ End CHAPTER 8 DESCRIPTION OF TERMS 03/2003 CHAPTER 8 Description of terms Full Scale (F. S.) In case of LH-CS6(P) and LH-CD6(P) when used in single measurement mode (measurement with one sensor head only), full scale indicates the following values: Item ޓޓޓޓޓSensor head Full scale distance LH-54 LH-58 LH-512 20mm (r10mm) 40mm (r20mm) 10V 16mA 60mm (r30mm) Full scale analog voltage output Full scale analog current output In case LH-CD6(P) is used in calculation mode with two sensor heads connected, full scale distance indicates the following values, depending on the sensor head combination. HEAD 2 side LH-54 LH-58 LH-512 LH-54 LH-58 LH-512 40mm (r20mm) 60mm (r30mm) 80mm (r40mm) 60mm (r30mm) 80mm (r40mm) 100mm (r50mm) 80mm (r40mm) 100mm (r50mm) 120mm (r60mm) Linearity When measuring displacement, the displacement of the measured object and the measured displacement value given by the sensor should ideally match, and if a graph is drawn, it should be expressed as a straight line. However, in practice, there is a slight difference between the displacement of the measured object and the measured displacement value. The linearity gives the range of deviation of the measured displacement value from the ideal straight line. For this product, the linearity has been defined as the deviation from the ideal straight line for a white ceramic board as the measured object. The linearity may differ depending on the measured object. The data mentioned gives the deviation from the ideal straight line expressed as a percentage of the full scale value. (% of F.S.) Example: In case the deviation is +0.1 % of F.S. for LH-54 Since the full scale of LH-54 is 20mm (r10mm), a deviation of 㧗0.1 % of F.S. is 20mm0.1% = 0.02mm. ޓޓޓޓޓ Ideal straight line Measured displacement value Linearity 8-1 03/2003 CHAPTER 8 Description of terms Resolution When the analog output of the displacement sensor is processed by the controller, a deviation results due to the signal’s S/N. The resolution is defined as twice the standard deviation of the measured value at the center measuring distance. Response time The response time is the rise time or the fall time (10 to 90%) of the analog displacement output for a step change in the displacement. Displacement 90㧑 90㧑 10㧑 10㧑 Analog output Response time 8-2 03/2003 Response time CHAPTER 8 Description of terms ̆ MEMO 㧙 8-3 03/2003 CHAPTER 9 ERROR INDICATION AND TROUBLESHOOTING 9-1 Error indication............................................9-1 9-1-1 9-1-2 9-1-3 9-1-4 System errors....................................9-1 RS-232C communication errors............9-2 Measurement errors..........................9-3 Other errors.......................................9-4 9-2 Troubleshooting............................................9-5 03/2003 CHAPTER 9 Error indication and troubleshooting 9-1 Error indication In case of abnormality of the sensor, or depending on the measurement conditions, an error signal appears on the display panel. The table below gives the error display, its cause and remedy. Should there be a need to contact our office, please inform the error displayed. 9-1-1 System errors Error display Cause Remedy An EEPROM access error occurred for the CH 1 sensor head. An EEPROM access error occurred for the CH 2 sensor head. Access error EEPROM. 1 occurred in the CPU After turning the power OFF once, turn it ON again. Read error 1 occurred in the CPU EEPROM. Write error 2 occurred in the CPU EEPROM. If the error occurs again, please contact our office. A CPU internal processing (1) error occurred. A CPU internal processing (2) error occurred. After turning the power OFF once, Sensor head was not connected when the connect the sensor power was turned on. head, then turn the power ON again. 9-1 03/2003 CHAPTER 9 Error indication and troubleshooting 9-1-2 RS-232C communication errors Error display Cause Remedy Reception time out occurred in RS-232C. Transmission time out occurred in RS-232C. Parity error occurred in RS-232C. Framing error occurred in RS-232C. Overrun error occurred in RS-232C. 9-2 03/2003 After turning the power OFF, turn it on again. Also, reconfirm the communications command, and execute again. CHAPTER 9 Error indication and troubleshooting 9-1-3 Measurement errors Error display Cause Remedy Light intensity received at the CH 1 sensor head has reached the saturation level. Light intensity received at the CH 2 sensor head has reached the saturation level. Light intensity received at the CH 1 sensor head is insufficient. Light intensity received at the CH 2 sensor head is insufficient. Reference page Change the gain or other settings and eliminate the state where the sensor heads are receiving excess or insufficient light. 6-12 CH 2 sensor head is outside the measuring range (near Set the sensor head side). so that it is within the CH 1 sensor head is outside measuring range. the measuring range (far side). 3-1 CH 1 sensor head is outside the measuring range (near side). CH 2 sensor head is outside the measuring range (far side). 9-3 03/2003 CHAPTER 9 Error indication and troubleshooting 9-1-4 Other errors Error display Cause Remedy Emission is OFF due to operation of remote interlock Short-circuit the interlock terminals. Overcurrent protection function is activated. Remove the cause of the overcurrent state. When the power is turned on, the sensor head connection information recorded most recently in memory differed from the previous sensor head connection information. (Note 1) A condition which is impossible to set was selected during setting of measurement conditions. NOTE The error indication will blink, so press any key. This will result in memory read out condition, so select the memory No. Reference page 3-8, 9, 15 6-6 After blinking for approximately 2 sec., it becomes possible to select the setting again. Sensor head connection information gives the model type of the sensor head connected to the HEAD 1 side or HEAD 2 side connector and the combination of those types. 9-4 03/2003 CHAPTER 9 Error indication and troubleshooting 9-2 Troubleshooting In case there are symptoms which indicate abnormal operation, first check the following items. If the operation is still abnormal, please contact our office. Trouble Cause Remedy Power is not ON. Turn the power ON. Nothing is displayed in the Set the display sleep Display sleep setting is set 5 digit LED display. setting to the OFF to the ON state. state. Short-circuit the Emitting LED does not light interlock terminals up and [- - - - -] is displayed Interlock is functioning. (ԟ - Ԡ). in the 5 digit LED display. The error display will Sensor head connection blink, so press any state stored most recently in key. This will be "Er-40" is blinking in the 5 memory differed from the result in memory digit LED display. sensor head connection read out condition, state when the power was so select the turned ON this time. memory No. Remove the dirt from Sensor head's emitter and the sensor head's receiver surfaces are soiled. emitter and receiver surfaces. Check the sensor head's mounting Sensor head or the condition and the measured object is tilted. measured object's setting condition. Set the gain Gain setting is not correct. correctly. Measurement values vary Set the response Set response time is too (analog output, display). time to a suitable short. period. Remove the dirt from Measured object is soiled. the measured portion. Check the sensor Sensor head mounting head mounting direction is not correct. direction. Measurement value display Use the sensor head is unstable near the to measure within boundaries of the measuring the measuring range. range. 9-5 03/2003 Reference page 3-10 6-52 3-15 6-6 3-1 3-1 6-12 6-59 3-1 3-1 CHAPTER 9 Error indication and troubleshooting Trouble Measurement value (analog output) differs from the display. Cause Remedy Analog voltage/current output offset setting is set to the ON state. Check the analog voltage/current output offset setting value. Check the setting value of display offset (L value). Change the setting of display contents selection to the appropriate setting from among ‘displacement monitor,’ ‘distance monitor’ or ‘comparative decision monitor.’ Set the lowest bit zero setting to the OFF state. Display offset is set. Display contents selection is not set correctly. Lowest bit zero setting is set to the ON state. Decimal point position Measurement value is not setting is set. displayed correctly. There is no analog output corresponding to the displacement of the connected head. Check the decimal point position setting. Check the calculation Calculation mode is not set mode setting in the correctly. ‘Other settings’. Clear the 0-ADJ 0-ADJ setting is done. setting or use it correctly. Perform the shift and Shift and span span adjustments adjustments were not correctly. performed correctly. Remove the dirt from Sensor head's emitter and the sensor head's receiver surfaces are emitter and receiver soiled. surfaces. Remove the dirt from Measured object is soiled. the measured portion. Clear the shift and Shift and span span adjustments. If adjustments have been necessary, set them set. again. If the calculation settings are set, the sum of the measuring Calculation settings are set ranges of the in LH-CD6 (P). connected heads becomes the full scale of the analog output. 9-6 03/2003 Reference Page 6-88 6-91 6-54 6-15 6-21 6-45 6-50 6-49 6-63 6-75, 112 6-78, 83, 102, 106 3-1 6-78, 83, 102, 106 6-21 CHAPTER 9 Error indication and troubleshooting Trouble Even if 0-ADJ is performed, once the power is turned off, the setting returns to the original setting. Display doesn't become ‘0’ even when 0-ADJ is performed. Even if the UP and DOWN keys are pressed simultaneously for 1 sec. or more during setting, the setting operation is not canceled. Only ‘bri1, bri2’ is displayed. Only ‘dar1, dar2’ is displayed. Only ‘SLAVE’ is displayed. When reading memory, memory numbers are being skipped during display. The memory number that is to be used for measurement cannot be read. Cause Remedy 0-ADJ store setting is in the OFF state. ‘r’ is selected when writing to memory. Change the 0-ADJ store setting to the ON state. Write the data in user memory u-01 to u-16. Reference page 6-73 6-10 Display offset (L) is set. Check the display offset (L) setting value. 6-54 6-15 6-21 After all reset operation, memory write was not performed. Carry out memory write once, then return to the measurement mode. 6-110 An object which reflects a lot of light is being measured. A mirror-like object is being measured and specularly reflected light enters the receiving section. An object which reflects very little light is being measured. A mirror-like object is being measured and reflected light is not entering the receiving section at all. Interference prevention setting is set on Slave, but the controller connected to the interference prevention I/O terminal is not set as Master. Lower the gain. Else, increase the measurement distance. 6-12 A sensor head of a model different from the type used when the memory was set is connected. 9-7 03/2003 Tilt the sensor head. Raise the gain. Also, decrease the measurement distance. 6-12 Tilt the sensor head. Connect a controller which is set as master. 6-99 When reading memory, only those memory numbers which match the setting conditions of the connected sensor head are displayed. Either connect a sensor head which is of the same model as the type connected when the memory setting was performed or carry out memory setting once more. 6-6 CHAPTER 9 Error indication and troubleshooting Trouble Communications cannot be carried out with the connected device through RS-232C. An error response message is returned by RS-232C. Cause The wiring of the pins of the modular connector is faulty. The bit rate / data length / parity / stop bit and other settings are not correct. The transmission command / ASCII code is not correct. 9-8 03/2003 Remedy Check the wiring of the modular connector. Set the values in the controller so that they are the same as the values set in the external device. Transmit the correct command / ASCII code. Reference page 7-2 6-94 ~ 98 7-1 ~ Chapter 7 CHAPTER 9 Error indication and troubleshooting ̆ MEMO 㧙 9-9 03/2003 CHAPTER 10 SPECIFICATIONS 10-1 Sensor head.............................................10-1 10-2 Controller.................................................10-2 03/2003 CHAPTER 10 Specifications 10-1 Sensor head Controller response 䇭time 䇭Designation Item 䇭Model No. Applicable controller Center measuring distance Measuring range Emitting element Spot diameter䇭(Note 2) 300ms 100ms 䇭40ms 䇭30ms Resolution (Note 3) 䇭20ms 䇭10ms 䇭䇭1ms 0.5ms Linearity (Note 4) Ambient temperature Ambient humidity Ambient illuminance (Incandescent light) Protection (Except connector part) Material Cable Cable extension Weight LED type optical displacement sensor LH-54 LH-58 LH-512 LH-CL6 (P), LH-CS6 (P), LH-CD6 (P) 40mm 80mm 120mm 㫧10mm 㫧20mm 㫧30mm Red LED (modulated) (Peak wavelength: 650nm) 㱢1.6mm or less 㱢2.0mm or less 㱢3.0mm or less 2 㱘m 4 㱘m 20 㱘m 4 㱘m 8 㱘m 40 㱘m 5 㱘m 14 㱘m 65 㱘m 6 㱘m 16 㱘m 75 㱘m 7 㱘m 28 㱘m 92 㱘m 10 㱘m 40 㱘m 130 㱘m 20 㱘m 120 㱘m 400 㱘m 40 㱘m 160 㱘m 580 㱘m Within 㫧0.2䋦䇭F.S. 0 to 㧗45͠ (No dew condensation) Storage: 㧙20 to 㧗60͠ 35 to 85% RH, Storage: 35 to 85% RH 3,000lx or less 2,000lx or less IP67 (IEC) Enclosure: PEI, Enclosure cover: Aluminum 2 0.22 mm 11-core composite cabtyre cable, 0.2m long, with a connector at the end Extension up to total 10.2m is possible with optional cable. 70g approx. (with cable), 45g approx. (without cable) Notes: 1) Conditions which have not been specified are to be taken as: 24V DC power supply, 20͠ ambient temperature, SELECT gain setting, 300ms response time setting, center measuring distance, interference prevention function not used and white ceramic board object. 2 2) This is the value at the center measuring distance, and is based on the definition of 1/e (13.5%) of the beam axis light intensity. Take care that some amount of light spreads out of the specified spot diameter and, depending on the conditions around the measured object, may affect the measurement accuracy. 3) This is the typical value at the center measuring distance for a white ceramic board object. 4) This is the value for white ceramic board object. The linearity may differ depending on the measured object. The value is for the analog output of the applicable controller. 10-1 03/2003 CHAPTER 10 Specifications 10-2 Controller Designation Type Item Model No. Applicable sensor head Connectable sensor heads (Max.) Supply voltage Current consumption (Note 2) Sampling frequency Gain setting Analog output Analog voltage output Analog current output Response time (Note 4) Linearity (Note 5) Temp. characteristics Span adjustment Shift adjustment Comparative output (HI, GO, LO) Output operation Short-circuit protection Strobe output Output operation Short-circuit protection LED type optical displacement sensor General purpose controller NPN output type PNP output type 1-head type 2-head type 1-head type 2-head type LH-CS6 LH-CD6 LH-CS6P LH-CD6P LH-54, LH-58, LH-512 1 No. 2 Nos. 1 No. 2 Nos. 24V DCr10% Ripple P-P 10% or less 300mA or less 350mA or less 300mA or less 350mA or less 5kHz approx. CH1 or CH2 setting: 5kHz approx. Calculation setting: 2.5kHz approx. 5kHz approx. CH1 or CH2 setting: 5kHz approx. Calculation setting: 2.5kHz approx. AUTO (Note 3) / SELECT (settable in 11 steps) Analog voltage 䊶Output voltage: 䋭5 to䋫5V 䊶Output impedance: 100㱅 Analog current 䊶Output current: 4 to 20mA 䊶Load resistance: 300㱅 less When set to SELECT: 0.5ms/1ms/10ms/20ms/30ms/40ms/100ms/300ms selectable by key When set to AUTO: 0.5ms/1ms/10ms/20ms/30ms/40ms/100ms/300ms automatically selected depending on the measured object Within 㫧0.2䋦䇭F.S. Within 㫧0.04䋦䇭F.S./㷄 Within 㫧30䋦䇭F.S. (Note 6) Within 㫧30䋦䇭F.S. (Note 6) PNP open-collector transistor NPN open-collector transistor Maximum source current: 30mA Maximum sink current: 30mA Applied voltage: 30V DC or less Applied voltage: 30V DC or less ޓbetween comparative output between comparative output and䋫V and 0V Residual voltage: 1.5V or less Residual voltage: 1.5V or less (at 30mA sink current) (at 30mA source current) 0.4V or less 0.4V or less (at 16mA sink current) (at 16mA source current) ON when threshold level is reached Incorporated PNP open-collector transistor NPN open-collector transistor Maximum source current: 30mA Maximum sink current: 30mA Applied voltage: 30V DC or less Applied voltage: 30V DC or less (ޓbetween strobe output and䋫V) (between strobe output and 0V) Residual voltage: 1.5V or less Residual voltage: 1.5V or less (at 30mA sink current) (at 30mA source current) 0.4V or less 0.4V or less (at 16mA sink current) (at 16mA source current) ON when comparative output is effective Incorporated 10-2 03/2003 CHAPTER 10 Specifications Type Item Model No. Alarm output Output operation Short-circuit protection 0-ADJ input Remote interlock input BUSY input No. of inputs Calculation hold reset input Timer function Interference prevention function (Note 7) Serial communication Display Ambient temperature Ambient humidity Material Connection method Weight Accessories NPN output type PNP output type 1-head type 2-head type 1-head type 2-head type LH-CS6 LH-CD6 LH-CS6P LH-CD6P PNP open-collector transistor NPN open-collector transistor Maximum source current: 30mA Maximum sink current: 30mA Applied voltage: 30V DC or less Applied voltage: 30V DC or less (between alarm output and䋫V) (between alarm output and 0V) Residual voltage: 1.5V or less Residual voltage: 1.5V or less (at 30mA sink current) (at 30mA source current) 0.4V or less 0.4V or less (at 16mA sink current) (at 16mA source current) OFF when DARK, BRIGHT, NEAR, FAR or other error is displayed. High (䋫V): 0-ADJ operation Low (0 to 1V): 0-ADJ operation 䊶Applied voltage: 30V DC or less 䊶Applied voltage: 30V DC or less Low (0 to 1V): Emission High (䋫V): Emission High (䋫V or open): Emission stopped Low (0 to 1V, or open): Emission stopped 䊶Applied voltage: 30V DC or less 䊶Applied voltage: 30V DC or less Low (0 to 1V): High(+V): Measurement stopped Measurement stopped 䊶Applied voltage: 30V DC or less 䊶Applied voltage: 30V DC or less 1 ch. 2 ch. 1 ch. 2 ch. Low (0 to 1V): High(+V): Calculation result reset Calculation result reset 䊶Applied voltage: 30V DC or less 䊶Applied voltage: 30V DC or less Incorporated (operates on comparative output and alarm output) Incorporated䇭(up to two units) Standard: RS-232C (RD/SD/SG) Connector: 6 pin modular jack Operation: user setting external switching, function detail external setting, measurement data transmission, etc. 5 digit red LED display 0 to 䋫50͠ (No dew condensation), Storage: 㧙20 to 䋫60͠ 35 to 85% RH, Storage: 35 to 85% RH Enclosure: Polycarbonate Terminal block connection 120g approx. ATA4811 (Controller mounting frame): 1 set Notes: 1) Conditions which have not been specified are to be taken as: 24V DC power supply, 20͠ ambient temperature, SELECT gain setting, 300ms response time setting, center measuring distance, interference prevention function not used and white ceramic board object. 2) Including the sensor head. 3) Take care that when the gain is set to AUTO, the linearity and the resolution may deteriorate. 4) For LH-CD6 and LH-CD6P, this is the response time for CH 1 or CH 2 setting. The response time for Calculation setting is twice this value. Also, take care that when the response time is set to AUTO, the linearity, resolution and the response time would vary. 5) This is the value for white ceramic board object. The linearity may differ depending on the measured object. Further, in case of LH-CD6 or LH-CD6P, this is the value for CH 1 or CH 2 setting. For calculation setting, the linearity is approx. twice the value given in the above table. 6) The linearity of the sensor head and the controller has been adjusted at the time of shipment. Carry out the shift adjustment and the span adjustment to suit the operating conditions. 7) Take care that the linearity, resolution and the response time may deteriorate when the interference prevention function is used. 10-3 03/2003 CHAPTER 11 DIMENSIONS 11-1 Sensor head........................................11-1 11-2 Controller........................................11-2 03/2003 CHAPTER 11 ޓDimensions 11-1 Sensor head Unit: mm 4.5 30 1.3 17 46 2-φ 3.4 mounting holes hh θ 34 39 46 3.5 39 3.5 φ6 cable 0.2m long 43 14.7 Center measuring Emission/Reception distance h angle ǰ ᷹ቯਛᔃ〒㔌 ᛩฃశⷺᐲ LH-54 40mm 20.5㩩 䌨 㱔 LH-58 80mm 䋲䋰䋮䋵䉙 11.5㩩 䌌䌈䋭䋵䋴 䋴䋰䌭䌭 LH-512 120mm 䋱䋱䋮䋵䉙 8.3㩩 䌌䌈䋭䋵䋸 䋸䋰䌭䌭 䌌䌈䋭䋵䋱䋲 䋱䋲䋰䌭䌭 䋸䋮䋳䉙 Model No. Extension cable Totalో㐳ޓ㧸 length L 43 43 Ǿ 14.7 φ14.7 43 43 Ǿφ14 14 Ǿ φ66 Model No. Total length L ో㐳ޓ㧸(mm㧕 LH-CCJ2ဳᑼฬ 2,000mm 㧸㧴㧙㧯㧯㧶㧞 ޓ㧞,㧜㧜㧜 LH-CCJ5 5,000mm 㧸㧴㧙㧯㧯㧶㧡 ޓ㧡,㧜㧜㧜 LH-CCJ10 10,000mm 㧸㧴㧙㧯㧯㧶㧝㧜 㧝㧜,㧜㧜㧜 11-1 03/2003 CHAPTER 11 ޓDimensions 11-2 Controller Unit: mm z LH-CS6 (P) 77.5 48 (4.5) 23.5 73 44.5 10 z LH-CD6 (P) 77.5 48 (4.5) 73 23.5 9.8 87 26.5 40.55 44.5 3.5 4.5 11-2 03/2003 CHAPTER 11 ޓDimensions 㧙 MEMO 㧙 11-3 03/2003