1
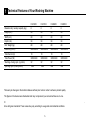
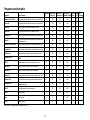
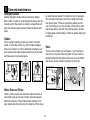
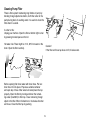
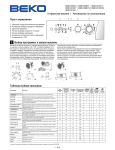
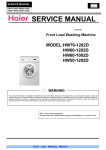
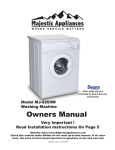
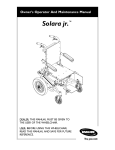
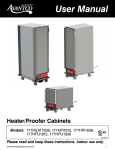
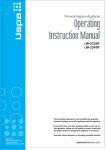
D 6102 B D 6101 B D 6082 B D 6081 B
Washing Machine
User’s Manual
Dear Customer,
We wish that this product, manufactured at modern facilities with total quality notions, will deliver you
the best performance. In order to guarantee this, please read this instruction manual thoroughly and
keep it for your future reference.
3
Contents
1
Technical Features of Your Washing Machine
5
2
Warning
7
3
Preparation
9
4
Program Selection and Starting Machine
13
5
Care and maintanence
18
6
Installation
20
7
Helpful tips on stain removal
23
8
Before calling service
24
4
1
Technical Features of Your Washing Machine
D 6102 B
D 6101 B
D 6082 B
D 6081 B
Maximum dry laundry capacity (kg.)
6
6
6
6
Height (cm.)
85
85
85
85
Witdh (cm.)
60
60
60
60
Depth (cm.)
54
54
54
54
Net Weight (kg.)
68
68
68
68
Electricity (V/Hz.)
220-240/50
220-240/50
220-240/50
220-240/50
Total Current (A)
10
10
10
10
Total Power (W)
2200-2450
2200-2450
2200-2450
2200-2450
Washing -rinsing cycle (cyc/min)
52
52
52
52
Spinning cycle (max cyc/min)
1000
1000
800
800
There amy be changes in the technical featues without prior notice in order to enhance product quality.
The figures in the manual are schematical and may not represent your actual machine one-to-one.
�
tions with given standards. These values may vary according to usage and environmental conditions.
5
-
Your Washing Machine
1
2
5
3
6
4
6
1
Top Lid
2
Front Panel
3
Handle
4
Kick Plate Cover
5
Front door
6
Kick Plate
2
Warning
• This product is designed for home use.
• Your washing machine is adjusted to 220V.
• If the fuse in your house is less than 16A than have a
certified electrician deploy an 16A fuse.
•
•
•
•
•
•
•
In case of transformer or non-transformer use,
grounding installation must be performed with a
licensed electrician. Any use before grounding is not
our responsibility.
Never place your machine over a carpet covered
floor. Otherwise electrical parts of your machine may
overheat. This may cause malfunction of your machine.
stains will be fixed. Before washing your laundry with
stain keep your attention on cleaning the laundry as
explained in following pages.
•
Lifetime of your product is 10 years.
This is period of keeping spare parts for your machine
to operate.
•
Because of quality control procedures there might be little
amount of water in your machine.
This does not have any damage to your machine.
• Your machine is programmed for starting operation
again when electricity is off and on afterwards. You can
not press On/Off button to cancel program. Machine
will go on program when electricity is on. To CANCEL
the program press >Start/Pause/Cancel< button for
three seconds. (See. Canceling a program)
Make sure hot and cold taps are connected correctly.
Otherwise your laundry may come out hot and torn .
Please call certified service for a failure of electric plug/
cable.
•
Be careful about your water hoses are not old. Do not
use old/torn water hoses. This may cause stain in your
laundry .
At first use, washing must be performed at Cotton 90°C
program without loading with laundry for getting your
machine ready for washing.
Performance of your washing machine depends on
the quality of water and hygiene compound used. If
low quality and unfitting cleaning material is used the
•
7
If pre-wash additional function led is blinking than your
machine is in child-proof-lock position. (See. childproof-lock)
If “Ready” led on program progress display is blinking
program selection knob is middle position. In this
case turn the knob and adjust it again. If the warning
continues call authorized service.
After your machine starts operation if Start/Pause/
Cancel key starts blinking than door is not locked.
Open and close the door again begin washing program
•
•
•
again.
If “washing” led on program progress display is blinking
either there is no water or tap is off. Check your taps.
Turn your machine off and on. If the problem persists
unplug your machine, turn off tap water and call
authorized service.
If program is started or program selection can not be
performed your machine might be in protection mode
due to infrastructure problem (voltage, water pressure,
etc.) Press and hold the > Start/Pause/Cancel < button
for 3 seconds in order to switch machine to factory
settings. Simultaneously, “Cancel” will appear on the
display.
Most of the warnings resulting in calling an authorized
service are due to infrastructure problems. For
this reason applying to an Authorized Service is
recommended.
8
3
Preparation
Before starting your machine please beware of
below mentioned points:
Opening Front door
Pull the handle to open the front door. Your machine’s front
door is designed for opening during only machine is not
operating. If the led displays “ready” than door can open.
Did you plug the cable?
Did you connect draining hose correctly?
Did you close front door?
Did you open tap water?
Loading machine with laundry
Fill the machine by unfolding and not squeezing laundry.
Place hand-woven garments inside-out to the machine.
Make sure there is no laundry jammed between bellow and
front-door.
Close the loading door by pushing. If loading door is not
perfectly closed machine will not start.
If you haven’t installed your machine please read to
“Installation” section.
Sorting the Laundry
Sort laundry according to type of fabric, color, level of
dirtiness and allowed washing temperature. Do not wash
white laundry together with colored ones. Remove hard
parts like belt, wrist button, curtain buttons, etc. or place
laundry in a cloth bag. Empty pockets. Zip off and button
up. Very tiny laundry like baby clothes may get into inside
of drum, midst of bellow, pump filter, hose, etc. in order to
prevent this it is advised to place such laundry in a special
laundry string bag or large laundry. See practical and useful
information section for soiled laundry. Your machine can
wash “Machine Wash” or “No-matting” labeled woolen with
special woolen program. Delicate laundry with “Do not
wash” or “hand wash” label (silk, cashmere, pure wool,
etc.) can be washed in the special hand-wash program.
Selection of detergent and softener
Quantity of the detergent used depends on hardness of
water and how soiled laundry is. Recommended values are
indicated on the package. If your laundry is low soiled and/
or hardness of water is low use less detergent as indicated
on the package. Otherwise it may result in excessive foam.
You should use detergent specially designed for automatic
washing machines. Avoid using bleach product containing
sulfur or chlorine. Place powder detergent and softener
in appropriate drawer compartment and close detergent
drawer.
9
a. Compartment I, powder detergent drawer for pre-wash.
b. Compartment II, powder detergent drawer for main
wash.
c. Siphon
d. Softener drawer
Fill the softener as indicated (usually <100ml; 1
tea bag) on package. Never fill more than “MAX”
level. Excess amount will drain to suction cup and
be wasted. You might need to fill softener again. If
softener is thickened over time add some water for
thinning. Softener may obstruct suction cup and block
flow.
10
Control Panel
2
1
9
8
7
3
4
5
6
1- Program progress display
2- Time delay selection button
3- Time display
4- Spin speed selection knob
5- Program selection knob
6- Anti-creasing
7- Rinse Plus
8- Quick Wash
9- On/Off button
11
Additional Functions
Quick wash
Shortens washing time for lightly soiled fabrics. This function can be used for cotton and synthetic programs for
temperatures below 60°C.
Rinse plus
By using this function your machine will add another rinse
process to the three rinse processes that it has already
done. This additional rinse will reduce any affects on sensitive skin by washing leftover detergent.
Anti- creasing
To avoid wrinkling of your clothes, select this function.
When Anti-Creasing is choosen please load less cloth, this
way a special washing and spinning profile will reduce the
wrinkles and your clothes will be easy to iron.
12
4
Program Selection and Starting Machine
Plug you machine to outlet. Turn on the machine by pressing “On/Off” key. Open the door by pulling the handle and
load the machine without exceeding loading capacity and
close the door. Specify the appropriate program by looking at program selection table according to type of laundry,
degree of soiledness and washing temperature. Position
program selection key to desired washing program-temperature. Select convenient spin cycle related to selected
program. If you are using additional function press desired
additional function key.
Afterwards place appropriate detergent and softener to
your machine’s detergent drawer. Start your machine by
pressing Start/Pause/Cancel button. Start/Pause/Cancel
key’s led will be on. After your machine starts, you can follow from the program progress display at which step your
machine is.
13
Program selection table
Program
Program
Type of laundry
Max Load Program Du(kg)
ration (min)
Water ConEnergy ConQuick Rinse Antisumption (lt) sumption (kWh) wash Hold Creasing
Prewash + Cotton 90
Heavy soiled Durable fabrics made of cotton and linen
6
160
65
2.60
Cotton 90
Heavy soiled Durable fabrics made of cotton and linen
6
150
55
2.50
Cotton 60*
Normal soiled cotton and linen durable to heat
6
135
49
1.14
Cotton 40
Less soiled cotton and linen sensitive to heat
6
125
49
0.70
Intensive 60
Heavy soiled Durable fabrics made of cotton and linen
6
135
49
1,14
Baby 65
Heavy soiled Durable fabrics made of cotton and linen
(baby clothes etc.)
6
160
60
1.40
Prewash + Synthetic 60
Heavy soiled cotton/synthetic blended durable to heat
3
125
60
1,15
Synthetic 60
Normal soiled cotton/synthetic blended durable to heat
3
110
50
0.90
Synthetic 40
Less soiled cotton/synthetic blended durable to heat
3
100
50
0.50
Synthetic cold
Very Less soiled or cotton/synthetic blended sensitive
to heat
3
90
50
0.30
Mix 40
Normal soiled cotton and linen sensitive to heat
3.5
95
45
0.50
Delicate 40
Delicate, sensitive synthetic, cotton blended
2
66
50
0.35
Delicate 30
Delicate, sensitive synthetic, cotton blended
2
60
50
0.25
Woolen 40
Woolen and delicate blended with machine wash label
1.5
66
50
0.30
Woolen Cold
Woolen and delicate laundry with machine wash sign
1.5
55
50
0.05
Handwash 30
Special program for silk, cashmere or laundry with no
machine wash sign
1
66
35
0.15
Mini 30
Special program for Less soiled linens
2.5
30
50
0.20
Rinse
Rinse Program
6
42
30
0.10
Spin
Spin Program
6
9
-
0.05
Pump
Pump Program
-
2
-
-
Intensive60*: Energy Labeling Program (EN 60456)
14
•
•
•
•
•
•
•
•
•
•
•
•
•
•
•
•
•
•
•
•
•
•
•
•
•
•
•
•
•
•
•
•
•
Pressing “On/Off”
By pressing “On/Off” key you can make your machine
ready for selecting program. When “On/Off” key is pressed
“Ready” led will displayed meaning “door can open”. Press
“On/Off” key again for turning your machine off.
Pressing “On/Off” does not mean program started operation. You must press “Start/Pause/Cancel” for starting the
program.
Function Selection
Additional functions selectable according to selected
program can be selected by pressing related key. Led of
selected function will be on.
If not selected together some additional functions go off
when it is not selected with other one. For example; when
using cotton program, pre-wash and fast program additional functions can not be selected together. After selecting pre-wash program, if fast program key is pressed fast
program will be on and pre-wash function led will go off.
Child-proof lock
During washing laundry in order to maintain that program
progress is not affected by pressing keys by children there
is child-proof lock. To enable child-proof lock, after washing
begins, press Pre-wash and fast program function buttons
together simultaneously for three seconds. Pre-wash additional function led will always blink.
Program Progress
After machine starts operation relevant program led on program progress display will be on. When a step is completed
that step’s led is off and next step’s led is on. When “On/Off
button is pressed “Ready” led will be on. After washing program is selected when “Start/Pause/Cancel” key is pressed
“Washing” led on program progress display will be on. At
the final step “Cycle” led is on. When program is completed
“Ready” led will be on again.
During machine operation you can press “Start/Pause/Cancel” key for getting machine to “Pause” position. In this
After program ends in order to start a new program or alter
the program you have to disable child-proof lock. To do this
press same buttons for three seconds and Pre-wash function led will be off.
15
case “Start/Pause/Cancel” led will blink.
Pause/Cancel” key for continuing program.
Changing Program
Time delay for program start
You can use this feature for washing laundry in the same
textile group for washing at lower or higher temperatures.
For example, instead of Cotton60, Cotton40 can be used.
For selecting Cotton40 instead of Cotton60 by pressing
“Start/Pause/Cancel” key machine is switched to pause
position. Program knob is turned for selecting Cotton40
program.
Even program selection button is changed during the
program initially selected program will be executed. For
changing washing program continuing program must be
cancelled. (See Cancelling a program)
For selecting additional functions or spin cycle necessary
changes can be performed after pressing Start/Pause/Cancel button. Although selected additional program must be
compatible with washing program. For example when your
machine is main wash mode you can select additional rinse
function but you can not select pre-wash.
Use time delay key you can start 3 hour,6 hours or 9 hours
later for starting selected washing program.
When time delay key is pressed one 3hours delay is adjusted and led will go on. If same key is pressed once more
delay is 6hours, and if it is pressed once more 9 hours
delay is selected. If time delay key is pressed again delay
is cancelled. After selection of time delay when “Start/
Pause/Cancel” is pressed program can be started with
delay. During delay period door can be opened or laundry
can be added
After time delay is initiated by pressing “Start/Pause/Cancel” you can switch machine to “Pause” mode and change
delay time.
Adding laundry
If you want to add laundry to your machine after program
begins press Start/Pause key for switching machine to
pause mode. If water level in the machine is appropriate
“ready” led on program progress display is on and laundry
can be added to the machine. If “ready” led is not on after
one minute than water level in the machine is not appropriate and laundry can not be added. You can press “Start/
Canceling a Program
For canceling a program “Start/Pause/Cancel” key is
pressed for three seconds. After this period “Start/Pause/
Cancel” and all other leds will be off .You can select a new
program and start washing.
16
End of Program
If cancel task is performed during washing “Spin led on
display will go on, machine pumps and when “Spin” led
is off “Ready led will be on, door can be opened and new
program can be selected.
Even program selection button is changed during the
program initially selected program will be executed. For
changing washing program “Canceling a program” must be
performed afterwards new program can be selected and
started
After machine starts operation even spin cycle or washing temperature is changed, initial cycle and temperature
is valid. In order to change spin cycle of temperature after
pressing “Start/Pause/Cancel” new cycle or temperature
can be selected.
When program end “ Ready” led will be on and door can
be opened and machine is ready for next washing. Press
“On/Off” for turning machine off.
Emptying Laundry
After program ends machine automatically stops. Turn off
tap water. Pull the handle and open loading door. Turn off
your machine by pressing “On/Off”. After taking laundry
out keep the loading door open and let the drum ventilate.
Check the bellow and clean.
17
55 Care and maintanence
Detergent Drawer
be when they are soiled. For doing this, turn off tap water.
Pull out water inlet hoses. Clean top of water inlet valve
filter with a brush. If filters are extremely soiled you can
pull it out with a pincer. You can take out flat side of water
inlet hoses with its seal and clean with tap water. (2 filters
in Single water inlet machines, 4 filters in double water inlet
machines)
Powder detergent residue may accumulate in drawer
after a while. In order to clean detergent drawer press the
marked point of the siphon on softener compartment and
push the drawer towards yourself. Wash the drawer with
water
Siphon
Do not neglect cleaning suction cup when it becomes
soiled. In order take suction cup out first take detergent
drawer out. Clean it in order to eliminate blocking by softener residue. After cleaning place suction cup to its place
and make sure it is placed properly.
Hose
There is risk of freezing in cold region, if your machine is
placed in a cold place remaining water in hoses must be
drained with pump filter when machine is not used. Water
inlet hoses can be drained by taking it out from tap.
Water Entrance Filters
There is a filter at each flat end where water inlet hose is
connected to tap and at each of water inlet valve placed
behind the machine. These filters blocks entrance of foreign objects and dirts entering to the machine. Filters must
18
Cleaning Pump Filter
There is filter system maintaning long lifetime of pump by
blocking foreign objects like button, cloth fiber enter to the
pump during drain of washing water. It is useful to clean the
filter when it is soiled.
In order to this:
Unplug your machine. Open the filter at bottom right corner
by pressing marked space on the lid.
Hot water risk: There might be 15 lt., 90°C hot water in the
drum. Open the filter carefully.
Caution!
If the filter and hose tap does not fit, it leaks water.
Before opening filter drain water with drain hose. Pull out
drain hose from its place. Prepare a suitable container
and open tap of hose. After water is drained place the tap
properly. Open the filter by turning and drain the remaining water (max30ml) to filter tap. Clean remaining foreign
object in the filter. When finished turn in clockwise direction
and close. Close the filter tap by pushing.
19
6
Installation
2. Leveling the feet
If your system is not ready, let a certified plumber make it
ready.
Or order to operate your machine without noise and
vibration it must be properly on balance. Four feet of your
machine can be adjusted. First loosen plastic counter bolt.
Tighten the counter bolt after adjusting the feet for leveling
your machine.
1. Removing the transportation locks
Before the washing machine is operated, the transit bars
must be removed! In order to do this:
1. Loosen “C” bolts by rotating them counter clockwise with
a suitable spanner
2. Remove transportation locks by turning.
3. Place “P” plastic covers onto the openings of transportation locks by rotating in direction of arrow and pushing.
3. Water Connections
a) Water Inlet Hose
Your machine is connected to water supply by special
hoses supplied by the machine. Red hose or hose written
red on it is hot water inlet, blue hose or hose written blue
on it is cold water inlet.
Attention please! Store the transit bars for using when
machine is to be transported again. Always transport your
machine with transportation locks.
There plastic seal (4 for double water inlet models, 2
for single water inlet models) on hose or plastic bag for
eliminating any leakage in connections points. These seals
must be used on each side of the connection. Seals on
machine side must be connected filter cannal.
20
Connection points are below water pressure there turn on
tap water after connection. Check all connections for leaks
In order to eliminate any risk due to water leakage keep
the taps off when machine is not used.
Do not connect single inlet machine to hot water. If machine is connected with Y part to a double inlet and over
40˚C for single inlet machines, machine may switch to
protection mode.
b) Water drain hose
Your machine will operate efficiently if the water from tap is
minimum 1 and maximum 10 bars. Practically 1 bar means
8 liters of water in one minute when tap is fully on.
Connect dirsekli end to the machine. Tighten bolts with
hand power, do not use spanner.
Double inlet models can be used with blind cap as a single
inlet machine. Connect blind cap to hot water inlet. Seal
must be for stopping water leakage.
Water drain hose could be placed either at the side of the
bath tub, or directly to the drain. The hose should not be
bent. Water drain hose should be secured with the elbow
so that it would not fall down on the ground.
The hose should be placed between 40 and 100 cm. from
the ground.
Water drain hose could be placed directly to the drain
water inlet.
21
4. Electrical connection
Connect the power cord to the appropirate electrical
system which is being supported by the maximum
voltage and current rating indicated on the rating plate
placed inside the kick plate.
Look! Page 1, Steps before operating Fullautomatic
Washing Machine and safety precautions.
Make sure that you have grounded power outlet.
Attention! Before any operation of the machine check
the following.
• Did you close the front door?
• Is the tap open?
• Is water drain hose placed properly?
• Is power connected?
22
7
Helpful tips on stain removal
The following �
fabric manufacturer.
Alcoholic baverages: Wipe the fabric first with water, then water-glycerine solution and rinse with vinegar-water solution.
Blood stain: Leave the fabric for30 minutes in the cold water.
Use ammonia solution to remove the stain. (4 liters water3 spoonful of ammonia.)
Shoe polish: Without harming the fabric, remove the stain carefully and grind it with detergent. If this doesn’t help, prepare a
water to alcohol solution (2 to 1) and rub the fabric, then wash it
with warm water.
Ice-cream, milk and cream: Place the fabric into cold water for
a period of time. Rub it with soap or detergent and wash it with
the warmest water that the fabric can withold. If any grease
stain leftover wipe it with oxygen water.
Tea and coffee: Pour hot water on to the stain and the fabric is
white, pour some bleach and rinse it with water.
Mildew: Do not let mildew stains stay for long periods of time.
Place the fabric into cold water for a period of time. Rub it with
soap or detergent and wash it with the warmest water that
the fabric can withold. If any grease stain leftover wipe it with
oxygen water.
Bubblegum: Harden the gum stain by putting an ice on it. Then
scrape off the stain carefully.
Chocolate and cocoa: Place the fabric into cold water for a period of time. Rub it with soap or detergent and wash it with the
warmest water that the fabric can withold. If any grease stain
leftover wipe it with oxygen water.
Fruit: Pour cold water on to the stain and do not use warm water to rinse. Let it sit for 2 hours and wipe it with white vinegar
and rinse.
Ink: Let the cold water run on the stain and wait until the stain
is gone. Later rub it with lemon juice and detergent, let the stain
stay for five minutes and rinse the fabric.
Tomato paste: Scrape the hardened paste and leave the fabric
for 40 minutes into cold water. Rub it with detergent and wash.
Egg stain: If the stain is hardened scrape the stain and wipe it
with wet sponge or a soft cloth. Rub it with detergent and wash
with cold water.
Grass stain: Rub the stain with detergent. If the fabric lets, use
bleachinng element. Wools should be wiped with alcohol.
Grease stain: Scrape the stain and rub it with detergent. Then
wash the fabric with warm water.
Paint: Use thinner to remove the stain. Put a cotton cloth on the
wool fabrics. Rub the stain with detergent and rinse with cold
water.
Mustard: Use glycerin and rub the fabric with detergent. If
unsuccesful, wipe the stain with alcohol. (Colored and synthetic
fabrics need 2 cups water and 1 cup alcohol solution.)
Burnt stains: Use bleach if permissable. For wool fabrics place
a oxygen water inserted cotton cloth on the stain and iron.
Rinse completely and wash the fabric.
23
8
Before calling service
Water coming from beneath the machine.
Check the water intake and drain hoses. Tighten the connections. The washers of the hoses may be worn out. If
non of the both, the pump filter is not closed properly.
You turned the machine on, but the leds are off on the
panel.
Check the grounding on the power cable or a blown fuse.
Check the front door proper closure.
Foam coming out of the detergent dispenser.
Check whether your detergent is suitable for automatic
machines. Next time use less detergent.
Machine does not take water.
Check the front door for proper closure. Either taps are
closed or water intake filters are clogged.
Pump does not drain water.
Clean the pump filter. Check whether the drain hose is
bent or not. If there is need to clean the pump filter, refer
to the pump filter cleaning section of the manual.
Taken water is directly discharged.
Check if the discharge hose placed as described in the
users manual or not.
Descriptions of the international textile care label (ITCL) symbols
24