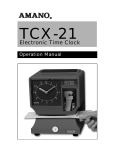
1
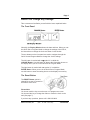
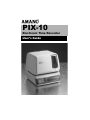
®
PIX-10
Electronic Time Recorder
User’s Guide
Thank you…
for purchasing another fine product from
Amano Cincinnati, Inc.
IMPORTANT
The Daylight Saving Time date settings have been preset.
DO NOT change the Daylight Saving Time date settings unless you
live in Arizona, Hawaii, parts of Indiana, or any other area that does
not use Daylight Saving Time. Do not return this clock to the
retailer. If you have any questions or need assistance,
please call us toll free
1-800-253-9836
Visit us on the web at
http://www.pix10.com
Proprietary Notice
This document contains proprietary information and such information may
not be reproduced in whole or part without the written permission from
Amano Cincinnati, Inc. 140 Harrison Ave., Roseland, New Jersey 07068.
Amano Cincinnati, Inc. reserves the right to make equipment changes and
improvements which may not be reflected in this document.
We recommend that this document be read in its entirety before any attempt is
made to operate the equipment.
Page 1
Your PIX-10
Removing the Cover & Packing Materials
Please Note:
You must remove the packaging spacers from the printer block and the
Printer Carriage before attempting to use your PIX-10.
1. Lift the printer block and
remove the spacer.
Amano Cincinnati, Inc.
(Mon. - Fri. 8:00 - 5:00 PST)
1-800-253-9836
Page 2
2. Insert the key provided
and turn clockwise to
open the case. Lift the
cover to remove.
3. Remove the spacer
between the Ribbon
Cartridge and the Printer
Carriage.
4. Re-install the cover. Your
PIX-10 is ready for use!
1-800-253-9836
(Mon. - Fri. 8:00 - 5:00 PST)
Amano Cincinnati, Inc.
Page 3
Before You Change Any Settings
Take a moment to familiarize yourself with the items explained below.
The Front Panel
Normally, the Display Window shows the date and time. When you use
the Quick Set or Program Mode to change the settings of the PIX-10,
the instructions to change the clock are shown in this window.
The two buttons on the front panel are used to navigate through the
Quick Set and Program Mode to change the clock’s settings.
The left button is marked with a t symbol. It is called the
CHANGE Button. Use this button to change the information shown on
the display when you are in the Quick Set or Program Mode.
The right button is marked with a l symbol. It is called the
ENTER Button. When you are in the Quick Set or Program Mode,
use this button to enter the setting shown on the display into memory.
The Reset Button
The RESET Button (which is
shaped like a post) is located on
the bottom of the clock.
Please Note:
You do not need the key to set the time or to program the clock!!
You do need the key to change the ribbon or mount the clock on the
wall (See page 7).
If you have any questions, please call 1-800-253-9836.
Amano Cincinnati, Inc.
(Mon. - Fri. 8:00 - 5:00 PST)
1-800-253-9836
Page 4
Make a Test Print
1. Plug in the power cord.
2. Insert a piece of paper or time card into the PIX-10. The clock will
automatically print YEAR, MONTH, DATE and TIME with AM or PM
(in Pacific Time).
Note: The PIX-10 will automatically adjust for Daylight Saving Time.
3. If the imprint is satisfactory, and you are going to place the PIX-10 on
a desk, table, or shelf, the PIX-10 is ready to be used.
4. In order for you to set the time or change the print style, you must
enter a code. Choose a code from the list below that best fits your
needs. Continue to the next page for instructions on how to enter
your code.
Code
6510
6210
6810
6520
6620
6820
6530
6630
6830
6570
6071
6072
6073
6074
6075
6076
6077
6078
6079
6070
Print Style
DAY, 12H, 60th
DAY, 24H, 10th
DAY, 24H, 100th
DATE, 12H, 60th
DATE, 24H, 60th
DATE, 24H, 100th
MONTH, DATE, 12H, 60th
MONTH, DATE, 24H, 60th
MONTH, DATE, 24H, 100th
YEAR, MONTH, DATE, 12H, 60th
YEAR, MONTH, DATE, RCV’D
YEAR, MONTH, DATE, SENT
YEAR, MONTH, DATE, FAX’D
YEAR, MONTH, DATE, VOID
YEAR, MONTH, DATE, PAID
YEAR, MONTH, DATE, CFM’D
YEAR, MONTH, DATE, APR’D
YEAR, MONTH, DATE, CMPL’D
YEAR, MONTH, DATE, ORIGN
YEAR, MONTH, DATE, FILE
Print Direction
Right Side Printing
Right Side Printing
Right Side Printing
Right Side Printing
Right Side Printing
Right Side Printing
Right Side Printing
Right Side Printing
Right Side Printing
Right Side Printing
Right Side Printing
Right Side Printing
Right Side Printing
Right Side Printing
Right Side Printing
Right Side Printing
Right Side Printing
Right Side Printing
Right Side Printing
Right Side Printing
Note: If you cannot locate the desired print style from the above list,
please contact us at 1-800-253-9836 for assistance.
1-800-253-9836
(Mon. - Fri. 8:00 - 5:00 PST)
Amano Cincinnati, Inc.
Page 5
Entering the Clock Program
The following steps describe how to get into the clock program. To set
the print style and time, use a code chosen from the list.
1. To Enter the Code
a. Press and hold the RESET button on the bottom of the
clock. (Refer to Page 3 for location.)
b. While holding down the RESET button, press and hold
the l right button on the front panel.
c. While holding the l right button, release the RESET
button.
d. When Pro9 flashes in the display,
release the l right button.
e. Tap the l right button again. The
display will show 0000.
f. Tap the t left button until the first
number of your code appears, then
tap the l right button.
g. Tap the t left button until the second
number of your code appears, then
tap the l right button.
h. Tap the t left button until the third
number of your code appears, then
tap the l right button.
i. Tap the t left button until the fourth
number of your code appears, then
tap the l right button.
j. When the display flashes all four digits,
tap the l right button again.
k. When the display flashes Pl dA E, tap
the t left button.
Amano Cincinnati, Inc.
(Mon. - Fri. 8:00 - 5:00 PST)
1-800-253-9836
Page 6
2. Set the Time
When setting the time you must use 24 hour format (i.e.
13:00 = 1:00 pm). This will NOT make the clock print
military time, it simply tells the clock am from pm.
a. When the display flashes P2 CLoc, tap
the l right button.
b. The small “12” will flash. Tap the
l right button again.
c. The hour digits will flash. Tap the
t left button until the correct hour
appears. Remember to use a 24 hour
format (2:00 pm = 14:00). Then tap the
l right button.
d. The minutes digits will flash. Tap the
t left button until the correct minutes
appear, then tap the l right button twice.
e. When the display flashes P2 CLoc, tap the
t left button until you see End, then
tap the l right button.
3. The PIX-10 is ready for use!
Note: If you do not use Daylight Saving Time, you need to disable
the Daylight Saving Time feature. Putting the same dates in program
level P3 and P4 does this. If you need assistance or have any
questions, please contact us at 1-800-253-9836.
1-800-253-9836
(Mon. - Fri. 8:00 - 5:00 PST)
Amano Cincinnati, Inc.
Page 7
Replacing the Ribbon
1. Insert the key into the key hole (see page 2
for keyhole location) and turn the key.
2. Grab the cover on both sides and lift to
remove it.
3. Pull the two catches (B) upward and hold
them with your index and middle fingers.
Remove the ribbon cassette.
Note: If the print mechanism is in the down position and a piece
of paper cannot be inserted, press the RESET button to move the
carriage up. This will make the ribbon installation easier.
4. Insert a new ribbon between the ribbon guide (C) and the printer
head (D).
5. Turn the knob on the cassette clockwise one turn to take up any
slack in the ribbon.
6. To replace the cover, remove the key, align the lower back corners
to the base of the clock and snap the cover down into position.
Mounting the Clock
1. Remove the cover as per the instructions above.
2. With the clock facing you, remove the mounting bracket by pulling
the top tabs (A) towards you, and then pushing the tabs down
(see below).
3. Securely mount the PIX mounting bracket on the wall using three
#10 wood screws or equivalent.
4. Place the PIX-10 on the Mounting Bracket by sliding the top tabs
into the slots on each side of the case. Push the PIX-10 back and
down against the Mounting Bracket until the PIX-10 snaps into
place. Be careful not to pinch the power cord with the bracket.
Installing the cover will secure the PIX-10 to the mounting bracket.
Amano Cincinnati, Inc.
(Mon. - Fri. 8:00 - 5:00 PST)
1-800-253-9836
Page 8
Error Messages
Possible Error Messages:
If any of these messages appear on the display, unplug the clock from
your outlet then plug it back in again. If the message still appears on
your display, please contact us at 1-800-253-9836 for assistance.
CAUTION:
Do not use any chemical solvents or oils to clean or lubricate your
PIX-10. This will damage your clock. To clean the inside of your clock,
blow it out with air.
Specifications
Power Requirements: For PIX-10 Input: AC16.5V, 60Hz, 0.6A (Max.)
For AC Adapter: AC120V ± 10%, 60Hz
AC230V ± 10%, 50Hz
AC240V ± 10%, 50Hz
Ambient Temperature: -10°C to 45°C (14°F to 113°F)
Ambient Humidity:
10% to 90% (no condensation)
Dimensions:
140mm (W) x 150mm (H) x 165mm (D)
(5½” x 6” x 6½”)
Weight:
1.8Kg (4.2 lbs.)
Environment:
Indoor use only; dust-free environment
Keep out of direct sunlight
For PIX-10 with 120V AC Adapter:
Listed and Certified by Underwriters Laboratories, Inc.
E50230 Canadian Standards Association LR-55921
1-800-253-9836
(Mon. - Fri. 8:00 - 5:00 PST)
Amano Cincinnati, Inc.
A Business Unit of the AMANO Group of Companies
140 Harrison Avenue, Roseland, NJ 07068
http://www.amano.com
AJR-249603 Copyright © 2001 Amano Cincinnati, Inc. Printed in U.S.A. 8/01/6M