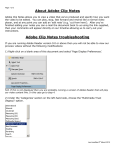
1
ATRACS Operators Manual
March 2006
Draft Copy
ATRACS Operators Manual
Version 2.04
Revised March 2006
Borer Data Systems Ltd. makes no warranty for the use of its products and assumes no responsibility
for any errors which may appear in this document nor does it make any commitment to update the
information contained herein.
Borer retains the right to make changes to these specifications at any time, without notice.
Borer Data Systems Ltd, Gotelee House, 6 Market Place, Wokingham, Berks. RG40 1AL
Phone: 0118 9791137 Fax: 0118 9773526 Email: [email protected] Web: www.borer.co.uk
1
ATRACS Operators Manual
March 2006
How ATRACS works
Starting ATRACS
Signing On
Main Window
Signing Off
Acknowledging Alarms
Searching for a record
Update Personnel Details
Update Personnel - General data
Update Personnel - Access Control
Update Personnel – Notes
Update Operators
Update Departments/ Groups
Update Network Interface Modules (NIMs)
Update Readers And Other Devices
Update Readers And Other Devices (General page)
Update Readers And Other Devices (Details page)
Device Parameters
Update Readers And Other Devices (Reader Rules page)
Update Reader Rules
Update Reader Rules
(Time Bands 1 to 5)
Update Reader Rules
(Emergency Rules)
Update Areas
Update Muster Points
Update Alarms
Access Control Settings
Update Access Groups
Update Time Zones
PERSONNEL
Select Personnel
Personnel Search
PERSONNEL GROUPS
OPERATORS
CARD READERS
Reader Rules
AREAS
MUSTER POINTS
DIGITALS
ALARMS
HOLIDAYS
ACCESS CONTROL SETTINGS
Acknowledge Alarms
Relocate Personnel
Terminate Muster / Emergency
Check Database Integrity
Curb Log files
Update Network Interface Modules (NIMs)
Calculate Time on Site
2
Error! Bookmark not defined.
6
9
Error! Bookmark not defined.
10
11
13
14
15
16
20
21
24
26
30
31
32
Error! Bookmark not defined.
35
37
38
38
40
40
41
41
44
49
Error! Bookmark not defined.
Error! Bookmark not defined.
55
Error! Bookmark not defined.
57
60
60
Error! Bookmark not defined.
Error! Bookmark not defined.
Error! Bookmark not defined.
Error! Bookmark not defined.
Error! Bookmark not defined.
Error! Bookmark not defined.
Error! Bookmark not defined.
Error! Bookmark not defined.
71
74
71
Error! Bookmark not defined.
74
74
76
ATRACS Operators Manual
March 2006
Roll Call Report
77
Roll Call Display
80
Personnel Status Report
Error! Bookmark not defined.
Remote Events Log
82
System Events Log
85
Time On Site Reports
Error! Bookmark not defined.
Day Report/Adjustments
Error! Bookmark not defined.
Period Report/Adjustments
Error! Bookmark not defined.
Period Summary
Error! Bookmark not defined.
17 Week Report
Error! Bookmark not defined.
General: Update System Configuration
86
Log File Curbing/ ATRACS web: Update System Configuration
87
Terminal Configuration
88
System Registry
90
File Paths
90
Client / Server Selection
91
Personnel Note Labels
91
Badge Maker
Error! Bookmark not defined.
Print Template
Error! Bookmark not defined.
Badge Templates
Error! Bookmark not defined.
Design
Error! Bookmark not defined.
Locker Control
Error! Bookmark not defined.
View ASCII Import/Export
92
List Access Group RTZ Combinations &
Error! Bookmark not defined.
List Reader Time Zone Combinations
Error! Bookmark not defined.
SQL Trace
93
Digital I/O Diagnostic
94
Digital Status/Control Diagnostic
93
List Personnel General Data
93
ATRACS Appendix 1: Glossary of terms
97
Controller - unit used to control / monitor the activities of one or more hardware devices.
97
ATRACS Appendix 2: Card Transaction Error/ alarm messages
99
ATRACS Appendix 3: Card Reader Related Alarms
102
3
ATRACS Operators Manual
March 2006
1. ATRACS Introduction
The ATRACS (Automated Time Recording Access Control and Safety) system is a PC-based system
that communicates with one or more card readers and/or alarm monitoring devices. Each system user
interacts with the system by holding a uniquely encoded identity card near to one of the card readers to
announce his/her presence. In response, depending upon the type of card reader, either a barrier will (if
appropriate) be unlocked to allow the person access (Access Control reader), or the time of day will be
noted for Time and Attendance purposes (T/A reader), or the person’s locker will be unlocked (locker
control reader) or the person will be registered as being in a safe location (Muster reader).
The main functions that the ATRACS system is designed to perform are:
Access Control: The system can be used to control where and when people can gain access to areas of
a site (or multiple sites). When a card is presented at a card reader the card identity is read. (Each user
can, if required, be forced to type in a 4 digit PIN code in addition to presenting his/her card to the card
reader). The database is checked and if the access rules that have been defined by the system operators
mean that the card is allowed access at that reader at that time then the barrier (door/turnstile etc.) will
be released. The barrier will be monitored and when operated/opened, the cardholder will be logged as
having passed through. Any problems such as not passing through or trying to enter an area not
allowed will be logged on the database and can be reviewed at a later date.
Roll Call/Muster: The system can be used to determine where people are currently located and hence,
during a fire/emergency, which people may be in danger. Muster readers can be placed at safe muster
points. When each cardholder uses his/her card at a Muster card reader, the system identifies the owner
of the card and marks him/her as being at a safe location.
Time Recording: The system can be used to produce Time and Attendance information for people who
use it. When a card is presented at a T/A card reader the card identity is read. Optionally the card
holder can type in a two digit Absence Code at the T/A card reader to tell the system that he/she is
going to be away on, for instance, holiday or a doctor’s appointment. The identity of the cardholder,
together with the date and time of the card transaction and any Absence code typed in, are written to
the ATRACS database. At the end of the working day the ATRACS system will use T/A rules defined
by the system operators to calculate how many hours each card holder has worked, which ones were
late, who worked overtime etc..
Locker Control: The system can be used to allocate lockers to people and to monitor and control the
operation of the lockers.
Visitor Management: The system can be used to book visitors in advance and log them in when they
arrive and out when they depart.
Photo ID Card Production: The system can be used to design and print identity badges. These can be
personalised with a name, photograph etc..
Alarm Monitoring: Events such as the triggering of a fire alarm or the unauthorised use of a fire door
can be monitored within the ATRACS system. If necessary the system can be set to unlock doors
automatically in the event of a fire alarm etc.
Any or all of the above functions can be enabled within the ATRACS system.
4
ATRACS Operators Manual
March 2006
The system software centres around a program called ATRACSPOLL which controls the
communication (via one or more reader management devices called Network Interface Modules)
between the ATRACS database and the card readers and alarm monitors. ATRACSPOLL writes
information from the card readers and alarm monitors (card holder transactions, card reader status
changes etc.) into the database, and sends database changes (such as newly-defined card holder records
and updated access control rules) from the database to the card readers.
The main operator interface to the ATRACS system is provided by a program called ATRACS.
ATRACS allows the system operators to view information received from the card readers etc. and to
make changes to the database e.g. adding new card holder records or altering Time and Attendance
rules.
The system users (i.e. card holders) may, optionally, also be given access to a small subset of the
information held within the ATRACS database via a web-based program called ATRACSWEB. Using
ATRACSWEB, a system user can access the ATRACSWEB web page from the PC on his/her own
desk to acquire roll call information, view his/her own Time and Attendance information and even
request appropriate changes to the Time and Attendance information.
In its simplest form the ATRACS system consists of a PC containing the ATRACS database and the
ATRACS and ATRACSPOLL programs, together with the Network Interface Module (NIM) software,
connected to one or two card readers.
At the other end of the scale an ATRACS system can have a central server containing the ATRACS
database, the ATRACSPOLL program and hosting the ATRACSWEB web page, several networked
client PCs (perhaps each in a different town) running the ATRACS program and several networked
NIMs (perhaps each in a different town) with card readers attached.
5
ATRACS Operators Manual
March 2006
2. Starting ATRACS
Starting ATRACS
To start ATRACS, double click the ATRACS icon
If the ATRACS system has a mixture of old-style DOS-based NIMs and new style IP NIMs, the
following window will be displayed. This allows you to select whether ATRACS should run in ‘old’
Legacy DOS Mode (not documented in this manual) or ‘new’ Island Site Mode. Usually Island Site
Mode is the mode that is required, but if you wish to perform certain actions, in particular setting up
Access Control criteria, relating to the DOS-based NIMs, then Legacy DOS Mode should be selected.
Main Window
Once ATRACS has been started the ATRACS main window will be displayed:
The ATRACS main window displays the following ‘real-time’ information:
Date and Time - the current date and time are displayed in the bottom right hand corner.
Unacknowledged Alarms - alarms that require operator acknowledgement but as yet remain
unacknowledged are displayed in the Unacknowledged Alarms display. To acknowledge these alarms
you must be signed on to the system.
6
ATRACS Operators Manual
March 2006
Remote Events - the most recent events reported by the card readers and alarm monitors are displayed
in the Remote Events display. These events may be cardholder transactions (displayed in green in the
case of a successful transaction, otherwise in red), or reader/alarm monitor status changes (tamper,
communications failure, fire alarm etc., displayed in red on occurrence and black on clearance).
NIM Status - the middle two sections on the status line at the bottom of the window show the status of
any NIM that is not in the normal state. If more that one NIM is in an abnormal state the NIM statuses
are displayed one after the other in rotation. NIMs can be reported as Contact Lost (if they have not
communicated for a few minutes), Muster Situation if a Muster Situation involving the use of Muster
card readers is in progress on the NIM and Emergency Situation if an Emergency Situation, due to a
fire alarm etc., is in progress on the NIM.
By selecting the appropriate tab the Main window can be made to display the following in place of the
Unacknowledged Alarms and Remote Events lists:
Log File Status - the status of the ATRACS log files (Remote Events, System Events and Attendance
Data) is displayed. If the display shows that any of the files has gone past its configured maximum size
the system will continue to function as normal. The only detrimental effects will be that obtaining data
from the file will take longer, and the ATRACS database will increase in size.
Reader Status - the status of each card reader and alarm monitor that is currently indicating a fault
condition is displayed in the Reader Status display. Fault conditions include Disconnected (contact
lost), Tamper (someone is trying to break into the card reader) and Door Unsecure (a door is propped
open). If you double left click on a particular card reader a Reader Status Details window is displayed.
This shows information which includes the date and time at which the card reader or alarm monitor
went into the fault state.
7
ATRACS Operators Manual
March 2006
Note that right clicking on either the Reader Status or the Remote Events display will cause ATRACS
to display a window that allows you to select which types of information should be shown in these
displays; for instance you could select all card readers to be shown in the Reader Status display, or
alternatively you could select only card readers that are currently in a fault condition to be displayed.
8
ATRACS Operators Manual
March 2006
3. Signing On
Signing On
Before you can access the system you must identify yourself by signing on. Select the “Sign-On”
option at the top of the main window.
The following window will be displayed to request your operator name and password:
As shipped, the only operator defined within the system is named BORER and the associated password
is also BORER. You may log on using this operator name and password (note that password input is
case sensitive) when you first run up the system and then establish your own operator record for future
sign-ons. Once your operator name and password combination have been accepted, the following
window will be displayed:
9
ATRACS Operators Manual
March 2006
The date on which your current password will expire is displayed. During a normal sign-on press the
Close button. However, if you wish to change your password, press the Change button to display the
following window.
When changing your password, enter your new password in both text boxes. Press the OK button if
you wish to continue with the password change, otherwise press the Cancel button to abort the change
but remain signed on.
Once you have signed on the Sign-on option at the top of the ATRACS main window is replaced by a
Sign-off option.
Use this option if you wish to sign off. Otherwise you may access whichever menu items (Update, List
etc.) are available to you. However, if you do not use the keyboard or mouse for a while you will be
prompted to re-enter your operator password, as shown below:
Type in your operator password and press the Ok button if you wish to remain signed-in, otherwise
press the Exit button if you wish to exit from the ATRACS program. Every time that you press a key
or use a mouse button a time-out timer (defined within your operator record) returns to its full value.
This feature means that if you leave your PC unattended whilst signed on to ATRACS, after a period of
time ATRACS will become unusable to anyone who tries to use it but does not know your password.
10
ATRACS Operators Manual
March 2006
Acknowledging Alarms
Once you have signed on you may acknowledge any alarms that require operator acknowledgement.
Double left click on the alarm that you wish to acknowledge and the following window will be
displayed:
Details about the selected alarm are displayed. You may acknowledge the alarm by pressing the button. You may also navigate backwards and forwards through all of the currently unacknowledged
alarms, acknowledging those that you wish. In addition, you can acknowledge all outstanding alarms
by pressing the All button, although to do so may not be as desirable as you may be acknowledging
alarms that you have not seen.
Signing Off
To sign off press the Sign-Off button.
To exit from ATRACS completely select File, then Exit.
11
ATRACS Operators Manual
March 2006
4. Update Menu
The Update menu is composed of menu items that allow you to create, alter or delete records within the
database. For instance you can add a new cardholder to the personnel file, or amend the name of a card
reader in the card readers file.
Each of the standard Update menu items presents you with a navigator that allows you to move from
record to record, save or delete the current record, or create new records within the database.
The navigator buttons provide (in order from left to right) the ability to:
• Search for a specific record
• Display the first record in the file
• Display the previous record in the file
• Display the next record in the file
• Display the last record in the file
• Create a new record
• Delete the displayed record
• Save the displayed record
• Undo the changes made to the displayed record since the last save
• Create a new record by copying the displayed record.
Note that if you step from one record to another, any changes that you have made to the initial record
will automatically be saved to the database.
12
ATRACS Operators Manual
March 2006
Searching for a record - press the Search button and a window similar to the one shown below will be
displayed. Identify the record that you wish to locate and then press the Ok button to select and display
the record. You can search for a record by number or name or, in the case of personnel records, card
number or extended card number (if enabled).
Copying a record - allows you to create records based on existing records in order to save time
editing. For instance you might wish to create a new access group, which differs only slightly from an
existing access group. It may be quicker to copy the existing access group into a new record and then
make the small change required to the new record. When you press the copy button a window similar
to this will be displayed:
The text box suggests a reference number to allocate to the new record (this being the lowest unused
reference number in the file), but you may overwrite this with a preferred number. When you press Ok
a new record will be created that contains the data currently displayed on the screen. However, it is
important to remember a couple of points when making use of the copy facility:
o
The system will not allow two identical records of any particular type, as each record must
have a unique reference number. In addition some other fields within certain record types
must be unique to each record (e.g. the communications address of a card reader) and in most
record types the description field must also be unique. Uniqueness is automatically checked
when you press the Ok button on the Copy window. Fields that must be unique should be
altered on the record that is to be copied but, rather than that record then being saved, the
Copy button should be used to create the new record.
o
When the copy has been performed, the original record (not the new record) will be displayed.
This enables you to confirm that you have not inadvertently modified the original record. To
view or modify the new record you must locate it by using the Search button. (Alternatively,
since in general new records will be given a higher reference number than the existing
records, it is often possible to locate the new record by pressing the Last record button in the
navigator).
13
ATRACS Operators Manual
March 2006
Update Personnel
The Update Personnel window allows you to create, amend or delete Personnel (cardholder) records. In
addition to the standard navigator buttons, the Update Personnel window includes four more buttons:
The three buttons on the left control the order in which records are displayed when using the navigator
to step through the file. They allow you to select personnel number order, name order or card number
order. The fourth button allows you to limit which cardholders are displayed to one or more selected
personnel groups.
On the left of the Update Personnel window there is space for the cardholder’s photograph.
Below the photograph five buttons are provided. The Select Image button (on the left) allows you to
associate a JPEG or BMP photograph file to the cardholder. The Clear Image button (second to left)
allows you to remove a photograph link.
The Take Photo button allows you to take a photograph using a camera, directly or via an interface
card, with drivers that provide an MCI interface. The Print Current Badge button allows you to print
an ID card for the cardholder currently on display. The Print Badge Selection button allows you to
perform a batch print of ID cards for one or more selected cardholders.
Several tabbed pages are provided within the Update Personnel window to allow data to be displayed
and altered. Some tabs will be missing if the system has been configured in such a way that they are
unnecessary; for instance the Time tab will be absent if the time and attendance function has not been
enabled within the system
The General page contains general data, the Badge page contains data specific to badge design, the
Time page contains data specific to time and attendance recording, the Access page contains data
specific to access control, the Notes page contains general notes and the Web page contains data
specific to the ATRACS web-based interface program – ATRACSWEB. Whichever page is selected,
the following two fields will be displayed:
14
ATRACS Operators Manual
March 2006
Personnel Reference Number - The personnel reference number field provides the main reference for
the record within its file. It must be unique, and cannot be altered when editing the record. You may
wish to use this number, which may contain up to 7 digits, as simply a system record number (starting
with 1 and increasing sequentially). Alternatively you may wish to enter the person’s existing
identification number if your company operates a personnel-numbering scheme.
Name - If the Title, First Name and Last Name fields are to be used to auto-fill the Name field (see
below), then this field does not need to be set up by the operator. Otherwise the person’s name should
be entered in this field (surname first). This Name field is the one that appears in the various
personnel lists and reports within the system.
Update Personnel - General
The General page of the Update Personnel window allows you to view/alter the following information
within a cardholder’s record:
Title / First Name / Last Name - The person’s title, first and last names can be entered into these
fields. The use of these fields is optional. They can be used in conjunction with the Employee Name
Format setting (in the Update System Configuration item in the Tools menu) to auto-fill the Name field
(above). These name fields are not used in personnel lists and reports within the system. They are,
however, available for use by BadgeMaker (the ATRACS ID Card production package) such that ID
Cards can be produced with, for example, the just the cardholder’s first name appearing on the card.
Personnel Category - These three buttons are used to specify whether the cardholder is a member of
staff, a contractor or a visitor.
Department/Contractor/Company - This field specifies the personnel group (staff department,
contractor company name or company name of visitor) to which the cardholder belongs. System
printouts and reports containing cardholder details are normally sequenced in personnel group order.
Card/Token Number - This field specifies the unique number encoded onto the card/token that
is issued to the cardholder. If auto-generation of card numbers has been enabled within the Update
System Configuration item in the Tools menu , then an Auto-Generate button will be visible to the
right of this field. Pressing the button will cause the field to be filled in with the next free card number.
Extended Card No. (D) - When there is a requirement for two formats of identity card technology e.g.
magnetic stripe and proximity to be used by the same person, or when the single card technology used
requires a numerical value greater than the 6 digits supported by the Card/token Number field, this
field holds the second or long card number. The format can be either Decimal (D) or hexadecimal (H).
This is set globally for the system within the Update System Configuration item in the Tools menu.
15
ATRACS Operators Manual
March 2006
Start/End Date - These fields specify the period during which the cardholder is considered by the
system to be active. Outside this period the cardholder will not be able to gain access at access control
card readers. In addition, time and attendance calculations will not be carried out for a cardholder
outside this period.
Home Location - This field is usually set to (Not Defined). However in a multi-site application this
field can be set to the location where the person is based. If this is done, only system operators who
have been given access to data relating to that location will then be able to modify the person’s record.
Update Personnel - Badge
The Badge page of the Update Personnel window allows you to view/alter information within a
cardholder’s record that is related to ID card production:
Badge Template Name - This field specifies the badge template that should be used when this
cardholder’s ID card is printed. The badge templates themselves are set up using the BadgeMaker item
in the Tools menu.
Badge Print Required - This field is used to indicate that the cardholder’s ID card needs to be
(re)printed.
Signature - In addition to being associated with a picture file containing the cardholder’s photograph,
each cardholder’s record can, if required, be associated with another file containing the cardholder’s
signature. Three buttons are present to the right of the signature.
The top button allows a signature to be captured, preferably using a signature capture device. The
signature is then stored and associated with the cardholder’s record. The middle button allows an
existing signature file (jpeg or bmp) to be imported and associated with the cardholder’s record. The
bottom button causes the signature to be ‘cleared’ by removing from the cardholder’s record any
reference to the signature file.
16
ATRACS Operators Manual
March 2006
Update Personnel - Time
The Time page of the Update Personnel window allows you to view/alter information within a
cardholder’s record that is related to their Time and Attendance rules:
T/A Schedule - This field specifies which Attendance Schedule the cardholder is has. The Attendance
Schedule, which is set up using the Time Accounting Rules / Attendance Schedules item in the Update
menu, determines which set of attendance rules the cardholder will follow on any particular day. It
also determines when each accounting period will start and end.
Max Carry Fwd - This field specifies, in hours and minutes, the maximum positive time balance that
the cardholder may carry forward from one accounting period to the next.
Cost Per Hour - This field specifies the cardholder’s hourly rate but is not currently used in the Time
and Attendance calculation or reports.
Area Check / Areas Allowed (1-7) - These fields are used in relation to the ATRACS legacy function
‘T/A Area Check’ that is supported in ATRACS systems that have old-style Network Interface
Modules (NIMs) but not in ATRACS systems that have the more modern TCP/IP NIMs. If the Area
Check field is ticked, the cardholder will be limited to using T/A card readers in areas corresponding to
those ticked in the Areas Allowed (1-7) fields. Note that the area numbers specified in the Areas
Allowed (1-7) fields equate to the Local Area number fields within the T/A card reader records.
17
ATRACS Operators Manual
March 2006
Update Personnel - Access
The Access page of the Update Personnel window allows you to view/alter information within a
cardholder’s record that is related to access control. The page is displayed in two parts, one part visible
at a time as selected by two buttons.
Part 1 of the Access page of the Update Personnel window allows you to view/alter information within
a cardholder’s record as follows:
Locations / Access Groups - These fields allow you to select which Access Group (set of access
control rules – i.e. where and when cardholders are allowed access) the cardholder should belong to at
each Location. Note that one Location exists for each NIM defined within the system. In a small
ATRACS system there will be only one NIM and hence one Location. In a large system there could be
several NIMs (and hence Locations), perhaps spread across the country, connected to the ATRACS
server via the company intranet.
To select an Access Group for a particular Location simply left click on the Location in the Location
list and then left click on one of that Location’s Access Groups in the Access Group list. A green tick
appears in front of the selected Access Group and in front of the Location. To select no Access Group
(i.e. no access at any time) for a particular Location simply left click on the Location in the Location
list and then left click on the (No Access Group Allocated) entry in the Access Group list. A red ‘No
Entry’ sign appears in front of the selected Access Group and in front of the Location. To remove all
access rights from a cardholder press the button below the Location list.
Also below the Location list is an indicator panel that shows whether the cardholder’s access rights are
blocked for any reason other than because of the Access Group(s) that he/she belongs to.
18
ATRACS Operators Manual
March 2006
If any of the four indicators are red, the cardholder’s access is partially or completely blocked. If all
four indicators are green, any limiting of the cardholder’s access is determined purely by which Access
Group(s) he/she belongs to. The indicators have the following meanings:
X:
If red, this indicates that the current date is prior to the cardholder’s Start Date or after his/her
End Date (see Update Personnel – General).
O:
Indicates that an ATRACS system operator has blocked the cardholder’s access (see below).
I:
Indicates that access has been blocked in accordance with a request from an imported HR file
(see below). Note that this facility is not available in most ATRACS systems.
Q:
Indicates that access has been partially blocked because the cardholder has been marked as no
longer qualified. The cardholder can still gain access as usual at card readers that are not
marked as Qualified Only, but is barred from using card readers that are marked as Qualified
Only (see below).
Part 2 of the Access page of the Update Personnel window allows you to view/alter information within
a cardholder’s record as follows:
Trace Required - generates an alarm every time a cardholder uses his or her card to gain access.
Access Blocked Oper - An ATRACS system operator can tick this field to cause all access for the
cardholder to be blocked, regardless of which Access Group(s) he/she belongs to.
Access Blocked Import - If ticked, this field will cause all access for the cardholder to be blocked,
regardless of which Access Group(s) he/she belongs to. ATRACS automatically updates this field in
accordance with a request from an imported HR file. Note that this facility is not available in most
ATRACS systems.
Access Blocked Qual - If ticked, this field will cause access for the cardholder to be blocked at card
readers that are marked as Qualified Only (see the Card Readers etc. / Readers / Other Devices item in
the ATRACS Update menu). By using this field a cardholder can be barred from accessing some areas
of site (e.g. those that are dangerous, sensitive etc). if his/her level of training, clearance etc. becomes
out of date or otherwise invalid, whilst allowing access to other areas of site to continue as usual.
Allow Locker Allocation - This field, if ticked, indicates that the cardholder is allowed to be allocated
a locker, using the ATRACS locker management package.
19
ATRACS Operators Manual
March 2006
Update Personnel - Notes
The Notes page of the Update Personnel window allows you to view/alter free-format notes fields
within a cardholder’s record. The page is displayed in two parts, one part visible at a time as selected
by two buttons.
Part 1 of the Notes page of the Update Personnel window allows you to view/alter information within a
cardholder’s record as follows:
Seven notes fields are available for you to record information about the cardholder. Note that the field
labels (e.g. ‘Number/Street’ above) are configurable. You can set them up by using the Personnel Note
Labels Configuration item in the ATRACS Tools menu.
Part 2 of the Notes page of the Update Personnel window allows you to view/alter information within a
cardholder’s record as follows:
Three notes fields and a memo field are available for you to record information about the cardholder.
20
ATRACS Operators Manual
March 2006
Update Personnel - Web
The Web page of the Update Personnel window allows you to view/alter fields within a cardholder’s
record that relate to the cardholder’s access to ATRACSWEB, the ATRACS web-based program. The
page is displayed in five parts, one part visible at a time as selected by five buttons.
Part 1 of the Web page of the Update Personnel window allows you to view/alter information within a
cardholder’s record as follows:
Start Date - This field specifies the first date that this cardholder will be able to use ATRACSWEB.
Password - This field is used to specify the cardholder’s ATRACSWEB password. Input is echoed on
the screen with * characters.
Account Disabled - If ticked, this field will disable the cardholder’s access to ATRACWEB.
User Cannot Change Psw - If ticked, this field will prevent the cardholder from changing his/her
ATRACSWEB password within ATRACSWEB itself. The password will have to be changed by an
ATRACS system operator.
Change Psw Next Log-on - If ticked, this field will force the cardholder to change his/her password
the next time that he/she logs onto ATRACSWEB.
Password Never Expires - If ticked, this field will allow the cardholder to continue to use
ATRACSWEB even after his/her password would normally have expired. (The password expiry
period is set up using the Update System Configuration item in the ATRACS Tools menu).
21
ATRACS Operators Manual
March 2006
Part 2 of the Web page of the Update Personnel window allows you to view/alter information within a
cardholder’s record as follows:
View Group Roll Call - If ticked this field will allow the cardholder to use ATRACSWEB to obtain
roll call information (including current location and date/time of latest successful card transaction) on
cardholders who belong to the same personnel group as the cardholder.
View Site Roll Call - If ticked this field will allow the cardholder to use ATRACSWEB to obtain roll
call information on all cardholders.
Locate An Individual - If ticked, this field will allow the cardholder to use ATRACSWEB to obtain
roll call information on a specified cardholder.
View Own T/A Data - If ticked, this field will allow the cardholder to use ATRACSWEB to view
his/her own T/A data.
View Group T/A Data - If ticked, this field will allow the cardholder to use ATRACSWEB to view
the T/A data of any cardholder who belongs to any of the personnel groups selected in part 3 of the
Web page of the Update Personnel window (see below).
Request Own T/A Adj. - If ticked, this field will allow the cardholder to use ATRACSWEB to request
adjustments to his/her own T/A data; e.g. to add a missing clocking. Note that ATRACS will not
implement the requested adjustments until they have been authorized by a supervisor.
Request Group T/A Adj. - If ticked, this field will allow the cardholder to use ATRACSWEB to
request adjustments to the T/A data of any cardholder who belongs to any of the personnel groups
selected in part 3 of the Web page of the Update Personnel window (see below). Note that ATRACS
will not implement the adjustments until they have been authorized by a supervisor.
Authorize Group T/A Adj. - If ticked, this field will allow the cardholder to use ATRACSWEB to
authorize requested adjustments to the T/A data of any cardholder who belongs to any of the personnel
groups selected in part 3 of the Web page of the Update Personnel window (see below). ATRACS will
then implement the adjustments.
Can’t Authorize Own Adj. - If ticked, this field will prevent the cardholder from authorizing his/her
own adjustment requests.
Web Clocking - If ticked, this field will allow the cardholder to use ATRACSWEB to clock on/off
instead of using a T/A card reader. The clocking is made for the current date/time and is automatically
authorized.
22
ATRACS Operators Manual
March 2006
Part 3 of the Web page of the Update Personnel window allows you to view/alter information within a
cardholder’s record as follows:
AtracsWeb Group Access - Any personnel groups that are ticked in this list will be available to the
cardholder when he/she is accessing T/A data using ATRACSWEB, but only if he/she has View Group
T/A Data ticked (see above). You can use the two buttons under the list to tick or untick all personnel
groups in one go.
Part 4 of the Web page of the Update Personnel window allows you to view/alter information within a
cardholder’s record as follows:
Access To VisitorWeb - If ticked, this field will allow the cardholder to access VISITORWEB (a
visitor management package that optionally forms part of ATRACSWEB).
May Add Visitors For Other Employees - If ticked, this field will allow the cardholder to book
visitors for other people.
May View The Diary Of Other Employees - If ticked, this field will allow the cardholder to view the
visitor diary of other people.
23
ATRACS Operators Manual
March 2006
Part 5 of the Web page of the Update Personnel window allows you to view/alter information within a
cardholder’s record as follows:
VisitorWeb Group Access - Any personnel groups that are ticked in this list will be available to the
cardholder when he/she is using VISITORWEB. You can use the two buttons under the list to tick or
untick all personnel groups in one go.
Update Peronnel Groups
Each cardholder defined within the ATRACS database is allocated to a Personnel Group. The identity
of the Personnel Group to which a cardholder belongs is one of the parameters that is entered into the
cardholder's personnel record. Several ATRACS functions, in particular the production of personnel
reports, use Personnel Groups to group people together.
The Update Personnel Groups window allows you to create, amend or delete Personnel Group records.
Personnel Group Number - The Personnel Group Number field provides the main reference for the
record within its file. It must be unique, and cannot be altered when editing the record.
Description - This field enables you to give each personnel group record a description.
description must be unique; i.e. not used by any other Personnel Group.
The
Category - This field specifies the cardholder’s category; i.e. Staff, Visitor or Contractor.
Default Personnel Group - If ticked, this Personnel Group will become the default group. All
personnel records, when first created, will be allocated to this Personnel Group.
24
ATRACS Operators Manual
March 2006
Update Operators
The Update Operators window allows you to create, amend or delete system Operator records. Only
people who have an Operator record can sign on to the ATRACS system. Several tabbed pages are
provided.
The General page contains general data, the View, Create, Alter and Delete pages define which system
record types the operator is allowed to view, create, alter and delete, the Report page defines which
reports the operator is allowed to access, the Action page defines which system functions the operator
is allowed to carry out and the Locations page defines which Locations the operator is allowed to
monitor. Whichever page is selected, the following two fields will be displayed:
Operator Number - The Operator Number field provides the main reference for the record within its
file. It must be unique, and cannot be altered when editing the record.
Name - This field is used to give each system operator record a name. The name must be unique; i.e.
not used by any other system operator record.
Update Operators - General
The General page of the Update Operators window allows you to view/alter the following information
within a system operator’s record:
Password - This field specifies the system operator’s (case sensitive) password. When signing on to
the ATRACS system the operator will type in his/her name (as held in the operator record) and this
password. For maximum system security, each operator should have a unique password, and it should
be altered regularly. The password is echoed on the screen as * characters.
Confirm Password - You should type into this field the same password as you typed into the Password
field. ATRACS will check that both fields contain identical information before letting you save the
record. The purpose of this is to ensure that you have actually typed in the password that you think
you have typed in. It should be noted that, when editing an operator’s record, you should fill in this
field even if you have not altered the password field, otherwise you may not be able to save the record.
Expiry Date - This field specifies the date on which this operator’s current password will expire. If the
operator does not change his/her password before the start of this day, he/she will no longer be able to
log on to the system.
25
ATRACS Operators Manual
March 2006
Expiry Increment - This field specifies the number of days that the operator’s password will remain
valid after it has been altered.
Time-Out (secs) - This field specifies the length of time in seconds that the system will wait for an
operator to press a key or click the mouse before requesting that the operator types in his/her password
again.
Global Access - When ticked, this field gives the operator full rights in the View, Create, Alter, Delete,
Report and Action pages of the Operator Update window.
Security Operator - If ticked this field indicates that the operator is allowed access to access control
data. This is used in, for example, Update Personnel, where the Access tab is hidden unless the
operator has the Security Operator field ticked.
T/A Operator - If ticked this field indicates that the operator is allowed access to time and attendance
data. This is used in, for example, Update Personnel, where the Time tab is hidden unless the operator
has the T/A Operator field ticked.
Update Operators - View
The View page of the Update Operators window allows you to view/alter the following information
within a system operator’s record:
View Records - For any data types that are ticked here the system operator will be allowed to access
the appropriate Update/List function and view the data. For instance if the Personnel field is ticked the
operator will be allowed to access the Update Personnel window and view personnel records and will
also be able to list personnel records in the List menu.
26
ATRACS Operators Manual
March 2006
Update Operators - Create
The Create page of the Update Operators window allows you to view/alter the following information
within a system operator’s record:
Create Records - For any data types that are ticked here the system operator will be allowed to create
new records using the appropriate Update function. For instance if the Personnel field is ticked the
operator will be allowed to create new personnel records using the Update Personnel window.
Update Operators - Alter
The Alter page of the Update Operators window allows you to view/alter the following information
within a system operator’s record:
Alter Records - For any data types that are ticked here the system operator will be allowed to alter
records using the appropriate Update function. For instance if the Personnel field is ticked the operator
will be allowed to alter personnel records using the Update Personnel window.
27
ATRACS Operators Manual
March 2006
Update Operators - Delete
The Delete page of the Update Operators window allows you to view/alter the following information
within a system operator’s record:
Delete Records - For any data types that are ticked here the system operator will be allowed to delete
records using the appropriate Update function. For instance if the Personnel field is ticked the operator
will be allowed to delete personnel records using the Update Personnel window.
Update Operators - Report
The Report page of the Update Operators window allows you to view/alter the following information
within a system operator’s record:
Reports - The system operator will be allowed to run any of the report types ticked here.
28
ATRACS Operators Manual
March 2006
Update Operators - Action
The Action page of the Update Operators window allows you to view/alter the following information
within a system operator’s record:
Actions - The system operator will be allowed to carry out any of the actions ticked here.
Update Operators - Locations
The Locations page of the Update Operators window allows you to view/alter the following
information within a system operator’s record:
Actions - The system operator will be allowed to access data relating to the ticked Locations.
29
ATRACS Operators Manual
March 2006
Update Card Readers etc.
The Update Card Readers etc. menu allows you to select which card reader-related record type you
wish to update. You may select from Readers / Other Devices (card readers, digital alarm monitors
etc.), Reader Rules (time banded rules that access control readers etc. should follow), Areas (individual
parts of one or more sites that have access in and out controlled by card readers), Muster Points (places
where muster card readers are located), Lockers (card reader controlled lockers) and Network Interface
Modules (NIMs - devices which monitor and control groups of card readers etc and communicate back
to ATRACS).
Update Readers And Other Devices
The Update Readers And Other Devices window allows you to create, amend or delete Reader records
for each card reader or other device that is in communication with the ATRACS system. In the case of
card readers you may determine the function (access control, muster point, time recording etc.) and the
characteristics of the reader, and the rules governing how it should operate. Non card reader device
types include alarm monitor units (SLIOs) which can be used to monitor digital outputs from fire alarm
panels, fire door monitors etc.
Up to three tabbed pages (depending upon device type) are present within the Update Readers And
Other Devices window to allow data to be displayed and altered:
The first page deals with general data (device type, addressing information etc.), the second with
details (device location, door release time etc.), and the third, for access control readers etc., lists the
time-banded rules that each reader must follow. Whichever page is selected, the following two fields
will be displayed:
Device Number - The Device Number field provides the main reference for the record within its file.
It must be unique, and cannot be altered when editing the record.
Description - This field is used to give each device a description. The description must be unique; i.e.
not used by any other device.
30
ATRACS Operators Manual
March 2006
Update Readers And Other Devices - General
The General page of the Update Readers And Other Devices window allows you to view/alter the
following information within a device’s record:
Device Type - These radio buttons are used to identify the type of device being defined. Available
options are Access Control Card Reader, Time Recording Card Reader, Muster Card Reader, Digital
I/O Unit (SLIO), Locker Control Card Reader, CAN Hub, Auto locker Ctrl and Assembly card reader.
Interface Module - This field specifies which Network Interface Module (NIM) the device is
connected to.
Device Address - This field specifies the number used to identify this device within the NIM. The
number must be in the range 1 to 248 and must be unique within the NIM. In systems with 248 or less
devices the easiest way to set up this field is simply to use the same number as in the Device Number
field.
Location - This field is filled in automatically by ATRACS. It specifies the Location of the NIM to
which the reader is connected.
Factory Settings - Each device leaves the factory with version information and a unique identifier
programmed into it. This information must be typed into the Factory Settings fields. The Version and
Release fields together specify the version of software present within the device. The Type field
contains a number which identifies the hardware type of the device. The Batch field contains a number
which identifies the production batch number for this type of the device. The Serial field contains a
number which specifies the serial number of the device within its production batch. Together the type,
batch and serial number fields provide the device with a unique identifier. The NIM uses this identifier
to match the hardware device with the corresponding device record in the ATRACS database.
CAN Channel No. - Each NIM can communicate with hardware devices (card readers etc.) on a
number of separate communication channels, using a communication protocol called CAN. The CAN
Channel No. field specifies which of these channels has this device on it. In the case of NIMs that have
an internal CAN card the number of available channels is usually 4, each of which is cabled directly to
the CAN card. If networked CAN bridges are used instead then one CAN channel is available on each
bridge that the NIM communicates with.
CAN Device No. - This field specifies which number, in the range 1 to 60, the device will be uniquely
identified by on its CAN channel.
31
ATRACS Operators Manual
March 2006
Update Readers And Other Devices - Details
The Details page of the Update Readers And Other Devices window (which is available for all device
types except CAN Hubs and Auto Locker Control devices) allows you to view/alter the following
information within a device’s record:
Area Details - (Access Control, Time Recording, Muster, Locker Control and Assembly readers only).
ATRACS designates parts of a site that have access both in and out controlled by Access Control card
readers as Areas. Within the Area Details the From field specifies the Area from which cardholders
approach the card reader and the To field specifies the Area in which they will find themselves if they
successfully use the card reader. Typically in the case of card readers other than Access Control card
readers, the To and From Areas are the same i.e. the card reader is situated within an Area, not acting
as a gateway from one Area to another. Access Control card readers also often have To and From
Areas set to the same value. This is the case whenever the card reader controls access through a door
where exit through the door is achieved by use of a button or handle rather than by a card reader.
The use of Areas, with Access Control card readers controlling entry to and exit from the areas, allows
the system to know which area each cardholder is in by examining his/her last card reader transaction.
Areas are also used by the new Lan/Wan TCP/IP NIMs to carry out 'anti-passback' checks to make sure
that a card holder does not pass his card back to another cardholder who has lost of forgotten his card.
Area Details (Local) - (Access Control, Time Recording, Muster, Locker Control and Assembly
readers only). These fields are used by the older Dos and Windows type NIMs. They are not used by
the new Lan/Wan TCP/IP NIMs. The To and From fields correspond to those in Area Details, and for
simplicity they can be set to the same number as the Area specified in Area Details. For instance, if the
To field in Area Details is an Area called XYZ and XYZ is Area number 3, then 3 can be entered in the
To field in Area Details (Local). These fields are used by the older NIMs to perform 'anti-passback'
checks etc. The From and To Internal fields are used to specify whether or not the Area is ‘internal’ to
the NIM. For instance a NIM controlling card readers in a building on a site with lots of other
buildings would treat all areas within the building as internal, but the area outside the building as
external (even though cardholders in that Area would still be on-site). Again these settings are used by
the older NIMs as part of 'anti-passback' checking.
Arrive On Site / Depart from Site - (Access Control, Time Recording, Muster, Locker Control and
Assembly readers only). These fields are used to indicate whether a cardholder should be logged onto
or off site when he/she uses this card reader.
32
ATRACS Operators Manual
March 2006
If only the Arrive indicator is set, cardholders who use this reader will be flagged as being on site.
If only the Depart indicator is set, cardholders who use this reader will be flagged as being off site.
If neither indicator is set, cardholders who use this reader will retain their current on/off site status.
If both indicators are set the reader is capable of registering cardholders as going on and off site – for
instance Time Recording card readers are often used to register both arrival and departure.
Local Decisions - (Access Control, Time Recording, Locker Control and Assembly readers only).
This field, if ticked, indicates that the card reader is to operate in “local decisions” mode. In this mode
the reader will immediately start making decisions (e.g. whether or not to unlock a door for a particular
cardholder) in the event of no reply being obtained from the NIM, rather than giving a ‘Red’ to the first
cardholder transaction and then starting to make local decisions if the NIM remains out of contact.
Time Recording - (Access Control and Assembly readers only). This field, if ticked, indicates that
cardholder transactions at this reader should be used for time recording purposes.
Local Alarm - (Access Control, Locker Control and Assembly readers only). Each Access Control,
Locker Control or Assembly reader’s door controller has an alarm output. If this field is ticked the
alarm output can be used to control an audible/visual alarm local to the card reader. If this field is not
ticked the alarm output can be set to shunt (bypass) an alarm belonging to another system.
Qualified Only - (Access Control and Assembly readers only). This field, if ticked, indicates that this
reader requires that a cardholder should not only have valid access permissions etc. to be allowed
access, but must also have a flag set in his/her record to indicate that he/she is qualified. The kind of
qualification that is required might be a current permit to work, a current health/training certificate etc.
If a qualification lapses or otherwise becomes invalid, the system operator can mark the cardholder as
not qualified and prevent him/her from accessing certain areas of site (where a qualification is required)
whilst still allowing access as usual to other areas of site (where no qualification is required).
Turnstile - (Access Control readers only). This field, if ticked, indicates that this reader controls a
turnstile rather than a door.
Single Manning - (Legacy Access Control readers using barcode technology only). This field, if
ticked, indicates that this reader is to be used to control access to a room where single-manning
detection is required. Single-manning detection involves reporting whenever any cardholder is alone in
a particular room for more than a few seconds. Such rooms are intended always to be either empty or
with two or more personnel in attendance. Readers designated as single-manning readers are also able
to monitor the single-manning area for movement by using P.I.R. devices, and will produce an intruder
alarm if movement is detected in an area which is currently thought to be unmanned. When setting up
a single-manning situation you must remember to program each door controller involved in the singlemanning activity. A door controller should be programmed as either a master or an auxiliary. A
master door controller will administer the single manning for all the doors leading into the singlemanning area. Controllers on all the doors other than that designated as the master must be set up as
auxiliary controllers.
Passback Switch - (Access Control readers only). This field, if ticked, indicates that this reader has an
exit switch or button wired into it to allow cardholders to exit. It should not be ticked if cardholders
exit by using a handle that is not wired to the card reader or by using a second card reader.
Swipe – (Legacy readers using barcode technology only). This field, if ticked, indicates that this reader
is a ‘swipe’ rather than an ‘insert’ reader.
Extended Card No. - (Access Control and Assembly readers only). This field, if ticked, indicates that
this card reader will be used to read cards whose numbers relate to the extended card number field
within the each cardholder’s personnel record rather than the card number field.
Read Card Serial No. - (Access Control and Assembly readers using Mifare technology only). If
Disabled is selected, the card reader will read the card number from the data area of the card.
Otherwise the card reader will read the card’s serial number, inverting it if Read Swap Mifare is
selected.
33
ATRACS Operators Manual
March 2006
Initiate Muster Situation - Muster readers only). If this field is ticked the first cardholder to use this
card reader when the NIM is not already in a muster situation will trigger a muster situation on the
NIM. ATRACS will display a Muster Initiated alarm and report the NIM as being in a muster
situation. This will alert the system operators who may then monitor the situation using roll call /
missing persons reports etc.
Initiate Emergency - (Muster readers only). If this field is ticked the first cardholder to use this card
reader when the NIM is not already in an emergency situation will trigger an emergency situation on
the NIM. ATRACS will report the NIM as being in an emergency situation and the NIM will
broadcast a message to all card readers to indicate that those card readers that have emergency Reader
Rules defined should follow these rules instead of their usual rules. For instance, the emergency rules
might tell a card reader to unlock the door to allow free access to people trying to evacuate a building.
Time Embargo (mins.) - (Access Control and Assembly readers only). This field specifies the time,
in the range 0 to 250 minutes, which must have elapsed since a cardholder's previous card reader
transaction before he/she can successfully use this card reader. The actual period for which the time
embargo is applied is only accurate to the nearest minute. An embargo of 1 minute will actually
operate for 0 - 1 minutes. An embargo of 2 minutes will operate for 1 - 2 minutes. Transactions
occurring within the embargo period will result in an appropriate alarm being generated, and the
transaction will be rejected. The time embargo facility must be activated by setting the appropriate
indicator in the reader rules record(s) associated with this reader. (See Update Reader Rules).
Clocking Interval (mins.) - (Time Recording readers only). This field specifies the time, in the range
0 to 250 minutes, which must have elapsed since a cardholder's previous Time Recording card reader
transaction before he/she can successfully use this card reader. This field acts in a similar way to the
Time Embargo field, but is triggered by having a non-zero value rather than being controlled by any
associated Reader Rules records.
Door Release (secs.) - (Access Control and Assembly readers only). This field specifies the time, in
the range 0 to 250 seconds, that the door or turnstile associated with this card reader is to be unlocked
in order to allow access.
Locker Release (secs.) - (Locker Control readers only). This field specifies the time, in the range 0 to
250 seconds, that the lockers associated with this card reader are to be unlocked in response to a card
transaction.
Alarm Shunt (secs.) - (Access Control, Locker Control and Assembly Readers only). This field
specifies the time, in the range 0 to 250 seconds, for which this card reader should shunt (bypass) its
'door-open' alarm whenever it releases the door to let someone through. The alarm shunt time should
be set to a value greater than the door release time in order to avoid spurious alarms.
Muster Point - (Muster readers only). This field specifies which muster point, (a safe point at which
cardholders gather during an emergency), is to be associated with this card reader. Several co-located
readers may share the same muster point.
Associated Entry Reader - (Access Control and Assembly readers only). This field is used to
associate a card reader that allows cardholders to exit from a room/building with another card reader
that allows cardholders into the same room/building using the same access point. Once this association
has been made, the entry reader will send a message to the exit reader to unlock the door whenever a
cardholder requests access. This gives increased security since the door is opened by a device on the
secure side rather than the unsecure side of the door.
Base Locker I/O Device - (Locker Control readers only). This field is used to associate a Locker
Control card reader with a SLIO that is monitoring/controlling one or more lockers. Several SLIOS
may be associated with a single Locker Control reader, so long as they have consecutive CAN device
numbers. This field is used to specify the SLIO with the lowest CAN device number.
34
ATRACS Operators Manual
March 2006
SLIO Sub Type - (Digital I/O Units only). This field specifies which mode this Digital I/O Unit
(SLIO) is intended to operate in. The available modes are as follows:
Standard I/O Module - In this mode the SLIO is used to monitor digital outputs from fire alarm panels,
fire door contacts etc. By associating Digital Inputs to the input channels on the SLIO (see Update
Digitals), changes in state of the inputs can be alarmed within ATRACS. For example ATRACS can
display a fire alarm when a fire panel indicates that a fire has been detected.
Security Control Unit - In this mode the SLIO is used in association with a card reader to control access
through a door. The card reader is mounted on the outside of the door and the SLIO on the inside.
When a cardholder uses the card reader a message is sent to the SLIO to open the door. This gives
increased security since the door is opened by a device on the secure side rather than the unsecure side
of the door.
Locker Control - In this mode the SLIO is used in association with a Locker Control card reader to
control access to one or more lockers. When a cardholder uses the Locker Control card reader a
message is sent to the appropriate SLIO to unlock the appropriate locker.
Associated Device 1 - (Digital I/O Units only). These fields specify which device, if any, this SLIO is
associated with, and what type the association is. The available types of association are as follows:
Security Control Host (In) - This type of association exists when the SLIO is to operate as a Security
Control Unit. The associated device will be a card reader that controls entry through a door.
Locker Control Reader - This type of association exists when the SLIO is to operate in a locker control
mode. The associated device will be a Locker Control card reader.
Associated Device 2 - (Digital I/O Units only). These fields specify a second device that this SLIO is
associated with, and what type the association is. The only available type of association is as follows:
Security Control Host (Out) - This type of association exists when the SLIO is to operate as a Security
Control Unit for both the In and Out card readers at a particular door. The associated device will be the
card reader that controls egress through the door.
Process Scripting Enabled - (Digital I/O Units only). This field, if ticked, indicates that this Standard
I/O Module type SLIO is to run a process script created using the Script Editor item in the Tools menu.
The process script might, for example, carry out an airlock door function whereby two doors would be
monitored and each door would be prevented from opening if the other door was already open. The
script itself resides in the Script subdirectory of the ATRACS directory on the ATRACS server. The
script has a name that includes the device number of the SLIO. For instance the script file for SLIO
number 25 would be named s0025.txt.
Initiate Local Emergency - (Digital I/O Units only). This field, if ticked, indicates that if the state of
input number 1 of this Standard I/O Module type SLIO goes into the alarm state, the SLIO should issue
an Emergency Situation broadcast to all the devices on the same communication channel. Note that in
general this field should be left unticked. To achieve an automatic emergency situation in response to a
fire alarm etc. it is normally preferable instead to associate a Digital Input to the relevant SLIO input
(see Update Digitals) and set the Digital Input to trigger an emergency situation.
Clear Local Emergency - (Digital I/O Units only). This field, if ticked, indicates that if the state of
input number 1 of this Standard I/O Module type SLIO goes into the non-alarm state, the SLIO should
issue an Emergency Situation cleared broadcast to all the devices on the same communication channel.
Note that in general this field should be left unticked (see Initiate Local Emergency above).
In Alarm When In State 1 - (Digital I/O Units only). This field, if ticked, indicates that the SLIO
should treat the 1 state of digital input 1 as the alarm state. If not ticked the SLIO should treat the 0
state of digital input 1 as the alarm state.
35
ATRACS Operators Manual
March 2006
Update Readers And Other Devices - Reader Rules
The Reader Rules page of the Update Readers And Other Devices window (which is available only for
Access Control, Locker Control and Assembly readers), allows you to view/alter the following
information within a device’s record:
Reader Rules - Reader Rules govern the operational parameters (whether a PIN code is required etc.)
that apply to Access Control, Locker Control and Assembly card readers during various time bands
within a day. Several readers may share a single set of Reader Rules. There are eight Reader Rules
fields for each card reader. The first seven fields are used to set the rules required for each day of the
week starting with Monday. The last set of reader rules governs reader operation on days defined as
holiday type days. (See Update Reader Rules for information about the Reader Rules themselves, and
Update Holidays for information on how to define a day as a holiday type day).
The Set All To The Same As Monday button provides a fast way of making Monday’s Reader Rules
apply to all other day types.
36
ATRACS Operators Manual
March 2006
Update Reader Rules
The Update Reader Rules window allows you to create, amend or delete Reader Rules records. Reader
Rules are time banded rules that govern how access control card readers etc. should operate. They can,
for instance, be used to make an access control card reader unlock a door and allow free access during
working hours but lock it and require card use during non-working hours. Any number of card readers
can be allocated the same set of Reader Rules. Which set of Reader Rules each card reader will use on
any given day of the week is configured as part of the card reader set-up (see Update Card Readers And
Other Devices to learn how to associate readers with reader rules). Each set of rules is divided into five
time bands so that different parameters (rules) may apply at different times of the day. A further set of
parameters within each set of reader rules is available to accommodate emergency situations.
Time bands operate as follows: If a time band’s start and end times are both 00:00 it is not used,
otherwise it operates between the specified times. A time band must not span midnight. Every set of
reader rules must account for the whole day, (i.e. every minute within the day must be included within
at least one of the time bands). Time bands may be nested (one band contained within another band),
with the higher time band number always having precedence during the overlap period. For example
time band 1 might run from 00:00 to 24:00 and time band 2 from 08:00 to 18:00. The rules contained
within time band 1 will be actioned between 00:00 and 08:00 and between 18:00 and 24:00. Both time
bands cover the period between 08:00 and 18:00, but time band 2 has the higher time band number and
hence will take precedence.
Four tabbed pages are present within the Update Reader Rules window to allow data to be displayed
and altered:
The first page deals with whether the Reader Rules are to be made available to card readers at all
locations or limited to a single location, the second deals with the details of time bands 1 and 2 of 5, the
third deals with the details of time bands 3 and 4 of 5 and the fourth deals with the details of time band
5 of 5 and the emergency rules (the rules that will apply in the event of an emergency situation being
declared e.g. in response to a fire alarm). Whichever page is selected, the following two fields will be
displayed:
Reader Rules Number - The Reader Rules Number field provides the main reference for the record
within its file. It must be unique, and cannot be altered when editing the record.
Description - This field is used to give each set of Reader Rules a description. The description must
be unique; i.e. not used by any other set of Reader Rules.
37
ATRACS Operators Manual
March 2006
Update Reader Rules - General
The General page of the Update Reader Rules window allows you to view/alter the following
information within a Reader Rules record:
N. I. M. (Not Defined = All N. I. M.s) - This field allows you to limit the availability of this set of
Reader Rules to card readers at a particular NIM/Location and to system operators who have access to
information relating to that NIM/Location. This feature is only of use if it is desired that system
operators at one Location should not be able to modify Reader Rules relating to another location. In
general this field should be left set to ‘(Not Defined)’; i.e. available to all card readers and system
operators.
Update Reader Rules - Time Bands 1 to 5
Each time band group box displayed within the Update Reader Rules window allows you to view/alter
the following information within a Reader Rules record:
Start Time – This field specifies the time of day that the current time band becomes active.
End Time - This field specifies the time of day that the current time band ends. If both the Start and
End Time values are 00:00 the band is not used. Note that midnight at the end of the day is denoted as
24:00.
38
ATRACS Operators Manual
March 2006
Unlock Door – This field, if ticked, causes the door controlled by any reader that is employing this set
of reader rules during the current time band to be unlocked, thereby allowing free access to everybody.
It will also cause the door alarm to be shunted, such that any door alarm conditions will be inhibited.
Shunt Alarm - This field, if ticked, causes any reader that is employing this set of reader rules during
the current time band to energize its alarm shunt relay, thereby inhibiting any alarm condition should
the door be forced or held open.
Inhibit Entry - This field, if ticked, causes access to be prohibited to all cardholders at any reader that
is employing this set of reader rules during the current time band.
Time Emb. - This field, if ticked, causes any reader that is employing this set of reader rules during the
current time band to perform time embargo checking. This facility, along with anti-pass-back
checking, is intended to make it difficult for more than one person to gain access with a single card. If
a cardholder attempts to use an access control reader within a few minutes of using the same or another
reader, access will be denied. The length of time that the embargo is to be applied is held in the Time
Embargo field within the reader record.
Report APB - This field, if ticked, causes any reader that is employing this set of reader rules during
the current time band to perform “anti-pass-back” checking. Infringements of the anti-pass-back rules
will be reported as alarms but access will still be allowed. (Anti-pass-back checking makes sure that a
cardholder appears to move onto, around and off the site in an orderly fashion. For example a
cardholder should not turn up at an inner area of the site without first entering the site. Anti-pass-back
checking is not only useful when deterring two people from sharing a single card, but also for ensuring
that there are no gaps in the access control strategy and that roll calls are reliable. For instance, a
cardholder might use a reader when leaving site, but then arrive on site the next day in the back of a
van without using a reader. Not only will that cardholder have achieved access to site in an “illegal”
way, but also if there is an emergency he/she will not appear on any roll call printouts. As soon as the
card holder subsequently uses a card reader he/she will be reported as infringing the anti-pass-back
rules, thereby highlighting the fact that something was wrong with his/her activities).
Enforce APB - This field, if ticked, causes any reader that is employing this set of reader rules during
the current time band to perform “anti-pass-back” checking. Infringements of the anti-pass-back rules
will be reported as alarms and access will be denied.
P.I.N. Codes - This field, if set, causes any reader that is employing this set of reader rules during the
current time band to require a P.I.N. (Personal Identity Number) code to be entered at the reader before
access will be granted.
39
ATRACS Operators Manual
March 2006
Update Reader Rules - Emergency Rules
The emergency rules group box displayed within the Update Reader Rules window allows you to
view/alter the following information within a Reader Rules record:
Emergency – This field contains the number of the emergency situation that this set of reader rules
will respond to. Currently it is always set to 1. During an emergency situation the emergency reader
rules will take precedence over the rules that would normally be active during the current time band.
An emergency situation is typically triggered by a monitored fire alarm which is associated with an
ATRACS Digital Input that has been configured to trigger an emergency situation (see Update Digital
Inputs).
Enabled – This field, if ticked, causes the emergency rules to be enabled. If not set the rules will not
be actioned even if an emergency situation arises.
In addition the emergency rules include the same fields as each of the preceding time bands with the
exception of the time band start and end times (which are not required because the emergency rules are
controlled by the start and end of an emergency situation rather than by time of day).
40
ATRACS Operators Manual
March 2006
Update Areas
The Update Areas window allows you to create, amend or delete Area records. Apart from area
number 1 (the offsite area), all area records refer to locations that are regarded as being onsite (for
example a building, a room or the general area inside a perimeter fence). Each card reader has a
“To/From area” assigned to it, and this allows the system to identify where cardholders are (or at least
where they were when they last used a reader) for roll call and “anti-pass-back” purposes.
Area Number - The Area Number provides the main reference for the record within its file. It must be
unique, and cannot be altered when editing the record. Area Number 1 is reserved as the offsite area.
Onsite areas are numbered 2 upwards.
Description - This field is used to give each Area record a description. The description must be
unique; i.e. not used by any other Area record.
Location - This field identifies the Location of this Area and is filled in automatically when a card
reader record is allocated to this Area (using the card reader’s Location).
Update Muster Points
The Update Muster Points window allows you to create, amend or delete Muster records. One or more
muster card readers can be associated with each Muster Point. During a muster situation, system
operators can use the Roll Call item in the Reports menu to list all people currently present at any
particular muster point.
Muster Point Number - The Muster Point Number provides the main reference for the record within
its file. It must be unique, and cannot be altered when editing the record.
Description - This field is used to give each Muster Point record a description. The description must
be unique; i.e. not used by any other Muster Point record.
Location - This field identifies the Location of this Muster Point and is filled in automatically when a
muster card reader record is allocated to this Muster Point (using the card reader’s Location).
41
ATRACS Operators Manual
March 2006
Update Lockers
The ATRACS system has an optional locker control package. A bank of lockers can be connected to a
SLIO (defined as a Locker Control SLIO – see Update Reader / Other Devices) which monitors the
open/closed state of the locker doors and unlocks/locks the locker doors as required. One or more of
the SLIOs communicates with a Locker Control card reader. A cardholder uses his/her card at the card
reader and the card reader instructs the appropriate SLIO to unlock the appropriate locker door.
Allocation of lockers to cardholders is achieved by using the Locker Manager program (a separate
program to ATRACS which is described later in this document).
Each locker must have a record in the lockers file. The Update Lockers window allows you to create,
amend or delete Locker records.
Number - The Locker Number provides the main reference for the record within its file. It must be
unique, and cannot be altered when editing the record.
Description -This field is used to give each Locker record a description. The description must be
unique; i.e. not used by any other Locker record.
Locker Control Reader - This field specifies which Locker Control card reader is in charge of access
to this locker.
Locker I/O Device - This field specifies which SLIO monitors and controls this locker.
Locker I/O Channel Number - This field specifies which channel on the SLIO is used to monitor and
control this locker.
Locker Location - This field specifies which Location the locker is present at. The field is filled in
automatically by ATRACS, using the Location defined within the Locker Control card reader.
Locker Label Prefix – It is intended that each locker will be physically identified by a two character
label. This field specifies the first character (‘A’-‘Z’) of the label and identifies which bank of lockers
that the locker is in. The second character of the label is a number between 1 and 8 which corresponds
with the Locker I/O Channel Number.
Locker Label – This field specifies the label that will be used to physically identify the locker. It is
filled in automatically by ATRACS.
Locker Enabled – This field, if ticked, indicates that the locker is enabled and hence is available to be
allocated to a cardholder by using the Locker Manager program.
42
ATRACS Operators Manual
March 2006
Update Network Interface Modules
The ATRACS system communicates with the card readers, alarm monitor units etc. via one or more
Network Interface Modules (NIMs). In the case of an ATRACS Express system the NIM software
runs within the same computer as the ATRACS software. In a distributed ATRACS system each NIM
consists of a separate networked NIM computer running NIM software. Each NIM must have a record
defined for it within the ATRACS system.
The Update Network Interface Modules window allows you to create, amend or delete NIM records.
NIM Number - The NIM Number provides the main reference for the record within its file. It must be
unique, and cannot be altered when editing the record.
Description -This field is used to give each NIM record a description. The description must be unique;
i.e. not used by any other NIM record.
Type - This field defines which type of NIM this record refers to. The types available for selection are:
Dos NIM - This is the original (now regarded as legacy) type of NIM. It supports card readers that use
RS485 as their communications protocol. Typically these are barcode card readers.
Windows NIM - This type of NIM (now also regarded as legacy) supports card readers that use CAN
as their communications protocol. Typically these are proximity card readers. Each NIM contains a
CAN card to which the card readers are wired. This type of NIM does not support bridges (which are
networked devices that allow NIMs to communicate with card readers that are remote from the NIMs
themselves).
Lan/Wan TCP/IP NIM - This type of NIM supports card readers that use CAN as their communications
protocol. Typically these are proximity card readers. Each NIM can contain a CAN card to which card
readers are wired. Alternatively this type of NIM can use bridges to communicate with card readers
which may be remote from the NIM itself.
RAS Dial Up TCP/IP NIM - This type of NIM is not yet available, but is intended to communicate via
dial-up TCP/IP, via remote bridges, with card readers that use CAN as their communications protocol.
Typically these are will be proximity card readers.
CAN Baud Rate - These fields are used in the case of Windows NIMs to specify the communications
speed that the NIM should use on each of the four CAN channels that are supported by the NIM’s
internal CAN card. The default baud rate, which is generally the baud rate that is required, is 125000.
43
ATRACS Operators Manual
March 2006
Location - This field specifies the Location record that is associated with this NIM record and hence
the physical location of the NIM. At present the number of the Location and the number of the NIM
must be the same.
IP Address - This field must be set up for TCP/IP type NIMs to allow ATRACS to communicate with
them. It specifies the IP address of the NIM in the form XXX.XXX.XXX.XXX where XXX is a
number between 0 and 255.
Re-Install Data - If this button is pressed a fresh set of data (personnel records, card reader records
etc.) will be sent to the NIM. This should only be done if it is suspected that the data that the NIM
holds is out of step with that in the ATRACS database.
NIM Enabled – This field, if ticked, indicates that the NIM is active, and communication between
ATRACS and the NIM (e.g. the sending of personnel information whenever it is updated by a system
operator) can proceed.
Emergency Acts Across NIM Channels - If this field is ticked and an emergency situation is
triggered by a SLIO or Muster reader connected to one of the CAN channels that this NIM controls, the
fact that there is an emergency situation will be broadcast to card readers on all of this NIM’s CAN
channels, not just to those on the channel which triggered the emergency situation.
Daily Break In Time Broadcasts – If this field is ticked Windows NIMs and earlier versions of
TCP/IP NIMs will, in the early hours of each morning, cease to broadcast the time to the card readers
for a period of about four minutes. This is required for the card readers to operate in an optimum mode
with these types of NIM.
44
ATRACS Operators Manual
March 2006
Update Digitals
The Update Digitals. menu allows you to select whether you wish to update Digital Input or Digital
Output records.
Update Digital Inputs
The ATRACS system is able to monitor digital events and produce appropriate alarms and actions in
response. The digital events can be physical (using SLIO digital input monitoring to monitor the state
of fire panels, fire doors, motion detectors etc.) or logical (the occurrence of specified alarm conditions
sent back by card readers). In addition Digital Inputs can be grouped such that an action occurs if any
digital state within the group goes into alarm. The actions that can be taken as a result of a Digital
Input going into an alarm state are principally to put the system into an emergency situation (whereby
Reader Rules will operate their emergency rules, perhaps to unlock doors) and/or to put the system into
a muster situation (whereby cardholders will be expected to attend muster points). Some of the
features and settings relating to the Digital Input records are only relevant in the case of ATRACS
systems that use a legacy third party package to provide additional event-related processing. This
package will not run with the more recent versions of Windows (Windows 2000, Windows XP etc.).
The Update Digital Inputs window allows you to create, amend or delete Digital Input records.
Number - The Digital Input Number provides the main reference for the record within its file. It must
be unique, and cannot be altered when editing the record.
Description -This field is used to give each Digital Input record a description. The description must be
unique; i.e. not used by any other Digital Input record.
45
ATRACS Operators Manual
March 2006
Type / Device / Channel - These fields define which type of Digital Input this record refers to and
from where it is to source its data. The types available for selection are:
I/O Module Input – This is the most commonly used type. The Digital Input is used to monitor the
state of one of the input channels on a SLIO (Digital I/O Module). The Device and Channel fields
identify the associated SLIO and channel number.
Reader Status Input – This type of Digital Input is used to monitor the occurrence of card reader alarm
conditions such us an the detection of an unsecure door or the operation of the card reader tamper
switch. The Device and Channel fields identify the associated card reader and card reader alarm type.
Transaction Input – This type of Digital Input is used to monitor the occurrence of cardholder
transaction-related alarm conditions such us an the use of an incorrect PIN. The Device and Channel
fields identify the associated card reader and cardholder transaction alarm type.
Digital Group – This type of Digital Input is used to group together other Digital Inputs in such a way
that if any of the others enters the alarm state this digital input also enters the alarm state and stays in
alarm until all the others have left the alarm state. Digital Group type Digital Inputs do not have an
associated device, channel or alarm, and are only used in conjunction with a legacy third party package.
Alarm - This field specifies which alarm ATRACS should display when this Digital Input goes into an
alarm state. Available alarm records are those numbered 101 to 199 in the alarm records file.
Group - This field specifies which Digital Input group, if any, this Digital Input should form part of.
Alarm On State 1 - This field, if ticked, specifies which monitored state (0 or 1) the Digital Input
should treat as being the alarm state. For instance when monitoring a fire panel output, depending on
which kind of output the fire alarm panel provides, the alarm state may be when the electrical contacts
are open or when they are closed.
Latch On State 1 - This field is used in conjunction with a legacy third party package. If the field is
ticked, when the Digital Input goes into the 1 state ATRACS will hold the Digital Input in this state
(even if whatever is being monitored has returned to the 0 state) until the third party package has
indicated that it has noted the state and the input can be freed up again.
Latch On State 0 - This field is used in conjunction with a legacy third party package. If the field is
ticked, when the Digital Input goes into the 0 state ATRACS will hold the Digital Input in this state
(even if whatever is being monitored has returned to the 1 state) until the third party package has
indicated that it has noted the state and the input can be freed up again.
Momentary Alarm - This field is used in conjunction with a legacy third party package. If the field is
ticked, every state change of the Digital Input, no matter how brief, is made available to the third party
package. If not ticked, momentary changes of state are not made available to the third party package.
Declare Emerg. - This field, if ticked, indicates that when this Digital Input enters the alarm state an
emergency situation should be declared. During the emergency situation any Reader Rules that are set
to respond to an emergency situation will implement their emergency rules (perhaps to unlock doors).
Auto-Clear Emerg. - This field, if ticked, indicates that when this Digital Input leaves the alarm state
the emergency situation should be cleared down, causing any Reader Rules that are configured to
respond to an emergency situation to return to their normal time-banded operation. Note that in general
this field is not ticked because most users of ATRACS prefer to have a system operator clear an
emergency situation rather than having it happen automatically (see Terminate Muster/Emergency).
Declare Muster - This field, if ticked, indicates that when this Digital Input enters the alarm state a
muster situation should be declared and cardholders will be expected to attend muster points.
PR Report (RMU) - This field is only used in older legacy systems. If ticked it indicates that the NIM
should automatically print a report of all people present on site.
46
ATRACS Operators Manual
March 2006
Update Digital Outputs
The ATRACS system is able to issue commands to SLIOs (digital I/O modules) to cause a SLIO output
channel to be made open or closed circuit, thereby causing an action to occur; e.g. a motion detection
system could be armed (at night) and disarmed (by day). Digital Outputs are only used in conjunction
with a legacy third party package.
The Update Digital Outputs window allows you to create, amend or delete Digital Output records.
Number - The Digital Output Number provides the main reference for the record within its file. It
must be unique, and cannot be altered when editing the record.
Description -This field is used to give each Digital Output record a description. The description must
be unique; i.e. not used by any other Digital Output record.
Digital Output Type - This field indicates which type of Digital Output record this is. The only
available type is I/O Module Unit i.e. this Digital Output record refers to an output channel on a SLIO.
Device Description -This field specifies which SLIO this Digital Output is on.
Channel Identity -This field specifies which SLIO output channel this Digital Output is on.
Update Locations
The ATRACS system is able to communicate, via NIMs (Network Interface Modules), with card
readers at multiple remote locations. Each NIM needs to be associated with a Location record. System
operators can be barred from having access to information relating to specified Locations.
The Update Locations window allows you to create, amend or delete Location records.
Location Number - The Location Number provides the main reference for the record within its file. It
must be unique, and cannot be altered when editing the record.
Description -This field is used to give each Location record a description. The description must be
unique; i.e. not used by any other Location record.
47
ATRACS Operators Manual
March 2006
Update Alarms
Alarm messages are produced by the system to alert the system operator(s) about cardholder
transaction errors and other alarm conditions. Each alarm condition has its own record. Each record
contains the alarm text, the operator action text and a set of rules which tells the system how to process
the alarm. The Update Alarms window allows you to create, amend or delete Alarm records. Alarms
fall into three categories:
Reader alarms
Digital monitor alarms
Cardholder alarms
Number 1-99
“Door Unsecured”, “Power Failed”, “Tamper” etc.
Number 100-199 “Fire Alarm”, “Intruder alarm” etc.
Number 201-250 “Incorrect P.I.N”, “Access Prohibited” etc.
Digital alarms are operator-defined alarms triggered by changes of state in digital I/O monitor devices
(SLIOs). The operator may select any alarm number that he/she wishes from the range 101 to 199, and
define whatever alarm message he/she wishes. However the meaning and alarm number allocation of
reader alarms and cardholder alarms within the system is fixed. For instance, alarm number 2 always
refers to an access point that is not secure, and 201 always means that a P.I.N. has been entered
incorrectly. The system, when shipped, contains a set of default alarm definitions. If you wish to view
the existing definitions, use the Alarms item in the List menu.
The Update Alarms window allows you to create, amend or delete Alarm records.
Alarm Number – This field provides the main reference for the record within its file. It must be
unique, and cannot be altered when editing the record.
Description - This field specifies the text that will appear on the screen when the alarm occurs.
Action - This field specifies the text (displayed in the Acknowledge Alarms window) that describes the
action to be taken by the operator in the event of the alarm condition occurring.
Display Alarm - This field, if ticked, indicates that the alarm should be displayed on the screen.
Print Alarm - This field, if ticked, indicates that the NIM should print the alarm to its alarm printer
(DOS legacy NIMs only).
Acknowledge Required - This field, if ticked, indicates that the alarm should be displayed in the
Unacknowledged Alarms window until acknowledged by an operator.
Sound Type – This field specifies the type of sound that is to accompany any occurrence of this alarm
type. Available options are System Default (the Windows default sound in PCs with a sound card,
otherwise a beep), Custom Sound (a user-supplied WAV sound file) and No Sound.
Custom Sound – These buttons are used to Select, Clear or Play a user-supplied WAV sound file. The
Select button allows you to load the file name of a WAV file of your choice into this alarm’s record.
This WAV file will be played by the system every time this type of alarm occurs, provided that the
Sound Type is set to Custom Sound. The Clear button allows you to erase the current WAV file name
from this alarm’s record. The Play button allows you to play this alarm record’s WAV file. Note that
the sound in a WAV file short be as short as possible to minimize impact on system performance.
48
ATRACS Operators Manual
March 2006
Update Holidays
System rules related to Access Control and Time and Attendance (T/A) need to take bank holidays,
works holidays etc. into account. For instance there may be Reader Rules defined that cause the front
door of a building to be unlocked from 09:00 to 17:00 on weekdays but locked all day at weekends
because the building is unmanned at weekends. On a bank holiday Monday the building would also be
unmanned so it would be sensible not to unlock the front door as would normally happen on a Monday.
Similarly any employee who did not arrive for work on a normal Monday would be marked by the
ATRACS T/A package as absent without leave, but to do so on a bank holiday Monday would be
wrong. To accommodate bank holidays etc. the ATRACS system uses Holiday records.
Each Holiday record specifies a date and, among other fields, two fields (Access Control Day Type and
Time Accounting Day Type) that allow the system operator to specify how the day should be treated
from an Access Control and from a T/A point of view. Typically bank holidays are treated like a
Sunday for the purposes of Access Control and T/A, but any other day of the week can be selected if
required. There is also an ‘8th’ day type called Hol and, in the case of the Time Accounting Day Type,
two further day types called Alternative 1 and Alternative 2. These extra day types can be used to
specify rules that do not match those that apply on any of the standard weekdays.
For instance, in the case of a company that works half a day on Christmas Eve, a Holiday record could
be defined for the day and the Hol day type specified as the Access Control and Time Accounting day
type. The Access Control and T/A rules could then be set up to operate for a half day on Hol type days
(e.g. the Reader Rules for the Hol day type could specify that the building’s front door should be
unlocked from 09:00 until 13:00 and then locked again).
The Update Holidays window allows you to create, amend or delete Holiday records.
Holiday Date - This field specifies the date on which this record will be active.
Access Control Day Type - This field specifies how the Access Control rules should treat the day.
Time Accounting Day Type - This field specifies how the T/A rules should treat the day.
Attendance Code - This field, if set to other than ‘(Not Defined)’, specifies an Attendance Code (e.g. a
works holiday code) that should be used to justify a full day’s absence for all cardholders on this date.
Override Existing Code - This field, if ticked, indicates that all long term absentees (e.g. people on
annual leave) should be credited with the attendance code specified above rather than with their
ongoing absence code.
49
ATRACS Operators Manual
March 2006
Update Access Control Settings
The Access Control Settings menu allows you to select which access control-related record type you
wish to update. You may select from Access Groups / Time Zones (access control rules), Personnel
Classes and Personnel Ranks. The Personnel Class and Personnel Ranks record types are only used in
certain legacy systems which have DOS NIMs.
Update Access Groups
ATRACS treats each Location separately when it comes to setting up access control rules. Each
Location has its own set of Time Zones (when access is allowed), and these are referenced by a set of
Access Groups (where and when access is allowed). Individual cardholders are then assigned to one
Access Group at each Location (see Update Personnel).
The Update Access Groups window allows you to create, amend or delete Access Group and Time
Zone records.
50
ATRACS Operators Manual
March 2006
The Update Access Groups window is split vertically into two parts. On the left hand side is a ‘tree
view’ that allows you to select specific data to view or change. The data itself is then displayed on the
right hand side and can be altered if required. Sometimes a branch in the tree view has a + to the left of
it. If you click on the + it will change to a – and the branch will expand to show its sub-branches. To
contract a branch, click on the – to the left of the branch.
Initially all that is present in the tree view is a list of Locations, with the top one highlighted (selected).
In the right hand part of the window the 32 Time Zones associated with the selected Location are listed,
with the top one highlighted (selected). To select another Time Zone simply click on it. Each Time
Zone defaults to an inactive state and has a default description made up of the start of the Location’s
name followed by TZ-XX where XX is the Time Zone number from 01 to 32.
The selected Time Zone record can be edited using the area at the bottom of the window. Enter a
meaningful description for the Time Zone in the Description field. Use the Start and End fields to
specify the period during the day when the Time Zone will be active. If the Time Zone is to end at
midnight, tick the Midnight field. Finally select, by clicking on them, the days of the week when the
Time Zone will be active. As you click on each weekday the associated indicator changes from red to
green to show that it has been selected. To deselect a day, click on it again and the associated indicator
will revert to red. Note that the Hol day type may apply on certain days that are configured as holidays
(see Update Holidays). Note also that Changes to Time Zone records are saved by the system
automatically.
Once you have defined the Time Zones for a selected Location you can start to define Access Groups.
Press the Create Access Group button and the following window will be displayed:
Enter the required Access Group description and press the OK button.
51
ATRACS Operators Manual
March 2006
A newly created Access Group will appear as a branch within the selected Location. The Access
Group is highlighted (selected) and expanded to show a list of all access control card readers present at
the Location. The right hand part of the window displays a summary of which Time Zones are
allocated to each card reader within this Access Group. This is blank at this stage because no Time
Zones have been allocated to card readers within this Access Group yet.
To allocate one or more Time Zones to a card reader click on the card reader’s description to highlight
(select) it and a list of all the active Time Zones at the selected Location is displayed. Double click on
any Time Zones that you wish to apply to the selected card reader for the selected Access Group. The
red indicator to the left of the Time Zone description will turn green.
52
ATRACS Operators Manual
March 2006
Click on the selected Access Group again and this time the there will be some data for the Reader and
Active Time Zone Summary to display.
To create another Access Group at a Location, click on the Location description and press the Create
Access Group button as described above. You can edit an Access Group’s description by clicking on
the Access Group’s description and pressing the Edit Access Group button.
When editing an Access Group’s description you also have the option of ticking the Default Access
Group field. If you do so the Access Group will become the default Access Group within its Location.
Newly-defined cardholders will automatically be assigned to this Access Group. Only one Access
Group can be selected as the default Access Group for any particular Location.
If you edit an Access Group and make it the default Access Group when previously it was not, on
exiting from the Edit Access Group window you will be presented with a message that says “Allocate
All Personnel Who Are Not Allocated To Any Access Group At This Location To This Access
Group?” and asked to press a Yes or a No button. This feature has been added to make life easier when
new Locations are added to the system. It allows you to define a default Access Group for the
Location and then allocate all cardholders to it instead of having to go to every cardholder’s record and
allocate the Access Group manually (see Update Personnel).
You can delete an Access Group by clicking on the Access Group’s description and pressing the Delete
Access Group button. Any cardholders who were allocated to the Access Group will, after the
deletion, not be allocated to any Access Group at the Location.
53
ATRACS Operators Manual
March 2006
You can copy an Access Group by clicking on the Access Group’s description, pressing the Copy
Access Group button and typing in a description for the new Access Group.
The new Access Group will be identical to the one that was copied apart from its description.
Mass allocation of cardholders to Access Groups can be achieved by using the Access Group Wizard
button. First you are prompted to specify whether you wish to create a new Access Group or update an
existing one. If you want to create a new Access Group you will be prompted to specify the Location
and Access Group name for the new Access Group, otherwise you will be prompted to select an
existing Access Group. You will then be prompted to select whether you wish to add/merge all people
into the selected Access Group who are
a.
b.
c.
allocated to a particular existing Access Group or
belong to a particular Personnel Group or
have a particular home Location.
You will then be presented with a final window which is currently inactive but which is intended in the
future to allow you to exclude cardholders, according to various criteria, from being allocated to the
Access Group. Press the Finish button and the allocation of cardholders to the specified Access Group
will commence.
54
ATRACS Operators Manual
March 2006
5. List Menu
The List menu is composed of menu items that allow you to list records within the ATRACS database.
In general there is one item in this menu for every item in the Update menu.
When selected, each of the List menu items previews the first page of the requested print-out on screen
and presents you with the following tool bar:
The buttons on the tool bar allow you to:
• Send the print-out to the printer
• Jump to the first page of the printout
• Step back a page
• Step forward a page
• Jump to the last page of the printout
• Zoom in
• Zoom out
• Open a previously saved print-out file
• Save the print-out to a file
Note that print-outs can be saved to file in either .qrp or .txt format. If saved in .qrp format the printout is saved exactly as it was displayed, but can only be accessed again by using a program such as
ATRACS that can read .qrp files. If saved as a .txt file a monochrome approximation of the print-out is
saved. Because of font size differences in the original some characters may be lost during the
conversion to .txt. The advantage with .txt files is that they can be read by many programs in common
usage such as NotePad.
55
ATRACS Operators Manual
March 2006
List Personnel
The List Personnel menu allows you to select which kind of personnel list you require. The kinds of
list available depend on how the system is configured. For example the Time Accounting Data list is
only available if the Time and Attendance package has been enabled.
List Personnel – Select Location and Personnel
In the case of List Personnel – Access Control Data you will be prompted to select a Location. This is
because the access rules that apply to each person are Location-based. In the case of all the personnel
lists except Personnel Search you will be prompted to select which personnel you wish to list and
which order they should be listed in.
Select Personnel Range – You can choose to list personnel belonging to any or all Personnel Groups,
or you can limit the list to staff or contractors or visitors, or you can (depending on the type of list)
limit the list to personnel who belong to a particular Access Group or Attendance Schedule, or you can
select a single person. If you have chosen to select personnel who belong to any or all Personnel
Groups you will be prompted to choose which Personnel Group(s) are to be included. If you have
chosen to select personnel who belong to a particular Access Group or Attendance Schedule you will
be prompted to choose an Access Group / Attendance Schedule. If you have chosen to select a single
person you will be prompted to specify the required person’s identity.
Select Grouping – You can, depending on the type of list, choose to group personnel by Personnel
Group, Access Group or Attendance Schedule.
Select Order – You can choose to list personnel in name order, reference number order or card number
order.
56
ATRACS Operators Manual
March 2006
List Personnel – General Data
Personnel are listed to show general data.
List Personnel – Card/Token Data
Personnel are listed to show card-related data.
List Personnel – Time Accounting Data
Personnel are listed to show T/A-related data.
57
ATRACS Operators Manual
March 2006
List Personnel – Access Control Data
Personnel are listed to show Access Control-related data.
List Personnel – Personnel Search
Personnel Search enables you to find individual or multiple personnel records by searching for
specified text strings within the notes fields and memo field of the personnel records. This method of
searching for personnel records supplements the methods available in the other types of Personnel List
(see above and below) where individual personnel records can be located by reference number, name,
card number or extended card number and multiple personnel records can be located by Personnel
Group, Access Group, Attendance Schedule etc.
Search Text - These fields specify which text string(s) should by used in the search, and how they
should be used. You can either use a single text string (typed into the leftmost textbox) in the search,
or you can use two text strings. If two text strings are to be used you can select (using the (Select)
drop-down list) whether they must both find a match in a record (And) or whether just one or them
needs to find a match in a record (Or) for the record to be regarded as having met the search criteria.
You can also specify whether the match needs to be a full text match or whether a partial match will
suffice. For instance, if you are searching within a personnel notes field that contains a car number
plate and you only know part of the number plate then you should select partial text matching. If, on
the other hand, you are searching within a personnel notes field that contains a numerical value then
you should select full text matching otherwise when you search for a small number such as 1, any
record that specifies a number that contains 1 (e.g. 31) will be reported.
58
ATRACS Operators Manual
March 2006
Select Notes To Search - This list allows you select which of the 10 Notes fields within each
personnel record should be searched, and whether or not the memo field should be included in the
search.
Select Personnel Groups - This list allows you limit the search to one or more Personnel Groups.
Display – These radio buttons allow you to select whether the all the Notes fields and the memo field
should be displayed for records that are listed, or whether just the person’s details should be displayed.
Report Order - These radio buttons allow you to select whether the list should be produced in name
order or reference number order.
Grouping - This field, if ticked, indicates that the personnel records should be listed grouped by
Personnel Group.
List Personnel – PIN Codes
Personnel are listed to show PIN Code data.
59
ATRACS Operators Manual
March 2006
List Personnel Groups
Personnel Group records are listed.
List Operators
The List Operators menu allows you to select which kind of Operator list you require.
List Operators - General
Operator records are listed to show general data (name, expiry parameters etc.).
List Operators - Permissions
Operator records are listed to show permission data (which system functions the operator may access,
which types of records the operator may edit etc.).
60
ATRACS Operators Manual
March 2006
List Card Readers etc.
The List Card Readers etc. menu allows you to select which card reader-related record type to list.
List Readers / Other Devices
The List Readers / Other Devices menu allows you to select which kind of reader list you require.
List Readers / Other Devices – Full Listing
Reader / other device records are listed to show all available configuration data.
61
ATRACS Operators Manual
March 2006
List Readers / Other Devices – Concise (Main)
Reader / other device records are listed to show their main configuration settings.
List Readers / Other Devices – Concise (Rules)
Reader / other device records are listed to show their Reader Rules allocations.
List Readers / Other Devices – Concise (Details)
Reader / other device records are listed to show configuration details.
62
ATRACS Operators Manual
March 2006
List Readers / Other Devices – Concise (CAN Addressing)
CAN Reader / other device records are listed to show their CAN addressing configuration.
List Readers / Other Devices – Concise (CAN SLIOs)
CAN SLIOs are listed to show their SLIO settings.
List Readers / Other Devices – Concise (CAN Associations)
CAN Reader / other device records are listed to show association settings.
63
ATRACS Operators Manual
March 2006
List Reader Rules
The List Reader Rules menu allows you to select which kind of Reader Rules list you require.
List Reader Rules - General
Reader Rules records are listed to show general data (description, Location etc.).
List Reader Rules – Time Bands
Reader Rules records are listed to show time band data (time band starts, ends and other settings).
List Areas
Area records are listed.
64
ATRACS Operators Manual
March 2006
List Muster Points
Muster Point records are listed.
List Lockers
Locker records are listed.
List Network Interface Modules
Network Interface Module (NIM) records are listed.
65
ATRACS Operators Manual
March 2006
List Digitals
The List Digitals menu allows you to select which kind of Digitals (Inputs or Outputs) you require.
List Digital Inputs
Digital Input records are listed.
List Digital Outputs
Digital Output records are listed.
List Locations
Location records are listed.
66
ATRACS Operators Manual
March 2006
List Alarms
Alarm records are listed.
List Holidays
Holiday records are listed.
67
ATRACS Operators Manual
March 2006
List Access Control Settings
The List Access Control Settings menu allows you select whether to list Access Group or Time Zone
records.
List Access Groups
The Access Groups List window allows you to list Access Group information in four different ways.
Report Type – You are presented with a choice of four different list types.
Access Group(s) - Access Group information showing where and when each selected Access Group
gives access will be listed.
Single Person Access – Access Group information showing where and when a single person can make
access will be listed. When this option is selected the Access Group list to the right of the screen is
replaced by a button that allows you to select the required person.
Single Reader Access (Access Groups) - Access Group information showing which Access Groups
give access to a single reader and when will be listed. When this option is selected the Access Group
list to the right of the screen is replaced by a card reader list that allows you to select the required card
reader.
Single Reader Access (Personnel) - Access Group information showing which cardholders have access
to a single reader and when will be listed. When this option is selected the Access Group list to the
right of the screen is replaced by a card reader list that allows you to select the required card reader.
Report Parameters – The format of the information presented in the Access Group list can be
adjusted by using these settings.
Concise List / Detailed List – If the Concise List option is selected instead of the Detailed List option
the Access Group List will, where appropriate, identify card readers, Access Groups and Time Zones
by their numbers instead of their descriptions, thereby greatly reducing the size of the list.
Include Time Zone Information – If this option is selected the Access Group list will include the
descriptions or numbers of the Time Zones that are involved in allowing access. If this option is not
selected the Time Zone information will not be displayed, thereby making the list smaller.
Include Null Time Zone (i.e. No Access) – If this option is selected the Access Group list will not only
list information relating to access permission but also information relating to access refusal. This
option has been included so that you can, for example, list access at a particular card reader and see not
only the identities of the cardholders who have access but also those that do not. Where there is no
access the Time Zone column of the list will not display a Time Zone description/number. This option
can only be selected if the Include Time Zone Information option has also been selected.
68
ATRACS Operators Manual
March 2006
Access Group(s) List: Access Group records are listed.
Single Person Access List: Access information for a single person is listed.
69
ATRACS Operators Manual
March 2006
Single Reader Access (Access Groups) List: Information relating to which Access Groups give access
to a specified card reader is listed.
Single Reader Access (Personnel) List: Information relating to which cardholder have access to a
specified card reader is listed.
List Time Zones
Time Zone records are listed.
70
ATRACS Operators Manual
March 2006
6. Actions Menu
The Actions menu provides list functions that allow you to perform a variety of different jobs.
Acknowledge Alarms
Alarms that are configured to require acknowledgement by a system operator (see Update Alarms) will
appear in the Unacknowledged Alarms window. To acknowledge an alarm a system operator can
either sign on and double click on the alarm in the Unacknowledged Alarms window (see Signing On –
Acknowledging Alarms) or they can access the same process by selecting Acknowledge Alarms from
the Action menu.
Terminate Muster / Emergency
An emergency situation can be triggered by a Digital Input (see Update Digital Inputs) or by a
cardholder using a muster card reader (see Update Readers / Other Devices). During an emergency
situation any Reader Rules that are set to respond to an emergency situation will implement their
emergency rules (perhaps to unlock doors). The Terminate Muster / Emergency window allows you to
terminate an emergency situation, causing any Reader Rules that are set to respond to an emergency
situation to implement their normal rules instead of their emergency rules.
A muster situation can be triggered by a Digital Input (see Update Digital Inputs) or by a cardholder
using a muster card reader (see Update Readers / Other Devices). During a muster situation
cardholders will be expected to attend muster points. The Terminate Muster / Emergency window
allows you to terminate a muster situation. Any cardholders marked by the system as ‘mustered’ (i.e.
at a muster point and hence safe) will be marked as no longer ‘mustered’.
71
ATRACS Operators Manual
March 2006
The Terminate Muster / Emergency window lists any Network Interface Modules (NIMs) that are
currently in either a muster situation or an emergency situation in the NIM drop down list. Once you
have selected a NIM and selected either to terminate a muster situation or an emergency situation, press
the OK button to carry out the action.
Remote Release
The Remote Release window allows you to instruct a single card reader to unlock its door as though a
cardholder had used his/her card at the card reader. It allows you to give a cardholder who has perhaps
forgotten his/her card ‘single-shot’ access to a door. You might wish to do this to allow a cardholder
through the front door so that he/she can access the building to pick up a temporary card.
To issue a remote release, select an available (grey) card reader by clicking on it, then press the Release
button. Note that this facility will only work with card readers that are controlled by TCP/IP NIMs.
72
ATRACS Operators Manual
March 2006
Check Database Integrity
The Check Database Integrity window allows you to check the ATRACS database for records that
contain invalid data. For example if a Remote Event record dated prior to the year 1992 is detected, a
database integrity error will be reported. Note that this check will not detect errors in the structure of
the database such as missing pages, corrupt indices etc.
Select the database table to be checked and press the Check Table Integrity button. If an inconsistency
is detected, key fields from the record will be displayed and you will be prompted with a message
indicating what the problem is and the options that are available to you. Most of the problems that can
be detected can be fixed by the system. Where this is the case you will be prompted to specify whether
or not you wish the system to fix the problem.
The fix offered in the example above is to alter the date/time of the Remote Event record with the
spurious date of 1991 to the same date/time as the Remote Event preceding it in the table. If you wish
to accept this fix press the Yes button. If you wish to accept this fix for this and any other similar
inconsistencies encountered within the selected table, press Yes To All. If you do wish to accept this
fix press the No button and the program will continue to search for inconsistencies without fixing the
current one. If you do not wish to accept the fix for this inconsistency or any other similar
inconsistencies encountered within the selected table, press No To All and the program will continue to
search for inconsistencies but will not prompt you with (or fix) any inconsistencies similar to this one.
If you wish to abort the database integrity checking process for the currently selected table, press the
Abort button.
73
ATRACS Operators Manual
March 2006
Curb Log files
Log files can grow very big as they collect events on a day-by-day basis. If files grow too large they
may become inefficient and slow down the system. File Curbing parameters (which are defined in
System Configuration in the Tools menu) determine how many days of information are to be held
within each of the three main ATRACS log files (Remote Events, Time Accounting Attendance Data
and System Events). The maximum size and curbed size for each of the files can be configured,
together with a flag to specify whether file curbing should be performed automatically by the system or
whether it should be left to the system operator. The maximum size determines how many days of
information can be held by each log file before curbing becomes due, while the curbed size parameter
determines how many days of information will be left after curbing has occurred. When a file is
curbed (automatically or by the system operator) the oldest data within the file is deleted. If curbing is
not set to take place automatically, then it will be necessary to manually curb the log files. The Curb
Log Files window allows you to do this. Note that the curbing of the Remote Events Log file will not
occur if records with spurious date/time values are detected within it. If such records are detected it
may be possible to ‘fix’ them by using the Check Database Integrity function (see above). If not then
you should be able to ‘fix’ them using Borer’s database engineering program DBEdit.exe. Contact
Borer for a copy of the program and assistance in using it.
Update NIMs
If you suspect that the data held on any particular NIM (Network Interface Module) is out of date or
incorrect you can use the Update NIMs window to force a download of data to the NIM.
First select the required NIM from the drop-down list of NIMs. Then select the table that you wish to
send to the NIM and press the Update NIM button. To send a complete set of data to a NIM, repeat
this process for all the tables.
74
ATRACS Operators Manual
March 2006
Relocate Personnel
Occasionally the system may report a cardholder as being in the wrong Area. For instance a cardholder
may have used a card reader when arriving on site, but left in a car without using a card reader. The
system will assume that the person is still on site. ATRACS includes two functions that allow you to
relocate cardholders from their current Area. These are Relocate Individually (which can be used to
relocate individual cardholders) and Relocate En Masse (which can be used to relocate all cardholders
or cardholders who are registered as having been on site for a long time).
Relocate Individually
The Relocate Individually window allows you to relocate individual cardholders.
Select a cardholder from the list to the left of the window. Information about where the cardholder is
currently located and when he/she last used a card reader is displayed to the right of the window. If
you wish to relocate the cardholder to another Area press the Area button and select an Area from the
drop-down list of Areas. If you wish to relocate the cardholder to a Muster Point press the Muster Point
button and select a Muster Point from the drop-down list of Muster Points. Then press the OK button.
Relocate En Masse
The Relocate En Masse window allows you to relocate cardholders en masse.
If you wish to relocate all cardholders who are registered as having been on site for a long time to the
off site Area, select Move All Long-Term Attenders Off Site, select a date and time and press the OK
button. All cardholders who are recorded as being on site but who have not used a card reader since
before the specified date/time will be relocated to the off site Area. To relocate all cardholders to the
off site Area select Move All People Off Site and press the OK button.
75
ATRACS Operators Manual
March 2006
Calculate Time on Site
In addition to the optional full Time and Attendance package ATRACS includes a second, simpler
‘Time On Site’ T/A package. This package allows reports to be produced for individual cardholders
and for Personnel Groups showing total time spent on site, number of days of site attendance etc.
Before reports can be produced the system operator must instruct the system to perform a calculation
on the raw data (remote events) by using the Time Calculation window.
To carry out a Time On Site calculation set the start date to the date following the end date of the
previous calculation, set the end date to the last date for which a full day’s worth of remote events is
available and press the Calculate button. Reports can then be produced by using the Time On Site item
in the Reports menu.
76
ATRACS Operators Manual
March 2006
7. The Report Menu
The Report menu is composed of menu items that allow you to produce various historical event reports
and current status reports.
Roll Call Reports
The Roll Call Reports menu allows you to select either a Roll Call Report (which can be previewed on
the screen and then printed if required) or view a ‘real time’ Roll Call Display.
Roll Call Report
The Roll Call Report window includes five options that allow you to list information relating to the
current whereabouts of cardholders (Roll Call Report, Muster Report, Missing Persons Report, LongTerm Presence Report and Long Term Absence Report) and one option that allows you to list
information relating to where cardholders were at a given date and time in the past (Historical Roll Call
Report).
The Muster Report indicates which Muster Point each cardholder is at and the date and time that they
arrived there. The other roll call reports indicate which Area each cardholder is in and the date and
time that they arrived there.
Note that for roll call reporting to operate successfully a site must have card readers that register
cardholders arriving on site and departing from site, otherwise the system cannot know where
cardholder are. Similarly the site can only be broken up into Areas for the purpose of roll call reporting
if access into and out of each Area is controlled by a card readers.
77
ATRACS Operators Manual
March 2006
The Roll Call report selection window prompts you to specify the type of report required.
Report Type – The available report types are:
Roll Call – The roll call report lists cardholders who are on site (and, if the Include Offsite Area
checkbox is ticked, people who are offsite as well). The Area that each cardholder is in and the date
and time of his/her last successful card transaction are listed.
Muster Report – The muster report lists cardholders who are registered as being at Muster Points.
Typically this report might be used in an emergency or during a fire drill when cardholders are
expected to make their way to the Muster Point(s). The Muster Point that each cardholder is at and the
date and time of his/her arrival there are listed.
Missing Persons – The missing persons report lists cardholders who are recorded as being on site but
who have not reached a muster point Typically this report might be used in an emergency or during a
fire drill when cardholders are expected to make their way to the Muster Point(s). The Area that each
cardholder is in and the date and time of his/her last successful card transaction are listed. The date and
time of the cardholder’s last recorded card transaction should be taken into account before sending
someone into a burning building to locate the cardholder. If the cardholder has not used a card reader
today he/she may actually not be on site, having left site on a previous day without using a card reader.
Long-Term Presence – The long-term presence report lists cardholders who have been on site since
before a particular date and time. A date and time selection panel replaces the Areas selection list
when this option is chosen, allowing you to specify the required date and time. The Area that each
cardholder is in and the date and time of his/her last successful card transaction are listed. This report
is primarily used to identify cardholders who are recorded as being on site but who may not be. For
instance a contractor might have an access control card to move about a site, but might then leave site
without using a card reader and not return to site for weeks. The system will record him as still being
on site so during an emergency situation he will incorrectly show up as a missing person. However, by
regularly using the long-term presence report to list cardholders who are recorded as being on site but
have not used a card reader for perhaps the last 24 hours, within a day the contractor would appear as a
long-term attender. The system operator could then carry out enquiries to confirm that he is indeed off
site and then use the Relocate People Individually item in the Action menu to move him off site.
78
ATRACS Operators Manual
March 2006
Long-Term Absence – The long-term absence report lists cardholders who have been off site since
before a particular date and time. A date and time selection panel replaces the Areas selection list
when this option is chosen, allowing you to specify the required date and time. The Area that each
cardholder is in and the date and time of his/her last successful card transaction are listed. This report
is primarily used to identify cardholders who are not longer using the system. For instance a
cardholder may no longer be employed, but perhaps the operators of the ATRACS system were not
told. By regularly using the long-term absence report to list cardholders who have not been onsite for
perhaps the last month the system operator can identify cardholders who should potentially have their
access permissions removed (in case someone else acquires their card and tries to access the site).
Historical Roll Call – The historical roll call allows you to list which people were present in which
Areas at a specified point in time, or at some point during a specified period of time, in the past. The
Area that each cardholder was in and the date and time of his/her last successful card transaction at the
time are listed. When you select this type of report and press the OK button you will be prompted to
enter more selection criteria before the report is produced. You will be asked to specify whether you
are interested in which cardholders were present at a particular point in time or which cardholders were
present at some point during a particular period of time. You will be prompted to specify the date and
time of the point in time or the date and time of the start and end of the time period. You will also be
prompted to indicate how far back in the remote events table you wish the program to search for
relevant data. This is because the system works out where cardholders were at a given time by
monitoring their card transactions during the hours (or days) leading up to that time. Customers whose
business closes down at night would typically specify that the system should check cardholder
transactions from the start of the day that includes the time point/period for which the report is being
taken. Customers who have staff who might be in attendance for perhaps three days at a time without
leaving site would probably specify that the system should check cardholder transactions from four
days before the day that includes the time point/period for which the report is being taken.
Grouping – You may select whether or not you wish the report to group cardholders by Personnel
Group or, where appropriate, by Area or Muster Point.
Order By – You may select whether you wish cardholders to be listed in name order or reference
number order.
Select Personnel – You may select that a single specified cardholder be reported on or that all
cardholders who belong to one or more specified Personnel Groups be reported on.
Select Area(s) – You may select which Areas should be included in the report, including or excluding
the off site area. In the case of a muster report this is replaced by a Muster Point selection list.
The Roll Call Report lists where personnel are currently located and the date and time of their last
successful card transaction.
79
ATRACS Operators Manual
March 2006
The Muster Report lists which personnel are currently at Muster Points and the date and time of their
arrival there.
Roll Call Display
The Roll Call Display allows you to view where cardholders are currently located. The display is
updated in ‘real time’.
The Personnel Totals at the top of the window indicate how many people are present on site, how many
are offsite, how many have never used any card readers (‘Other’), and how many cardholders there are
in total. The Count Of Personnel In Each Area list shows how many cardholders are present in each
Area. If you click on an Area in this list the reference numbers and names of the cardholders in the
selected area are displayed in the List Of Personnel In Selected Area list.
80
ATRACS Operators Manual
March 2006
Personnel Status Report
The Personnel Status Report allows you to list cardholders whose access control permissions have been
partially or completely blocked for various reasons.
Select Personnel Status Categories – You may select any or all of the following personnel status
categories:
Person’s End Date Is Between mm/dd/yyyy And mm/dd/yyyy – If you select this category, cardholders
will appear in the report if their End Date (see Update Personnel) is within the specified date range.
The default date range is 01/01/1980 to yesterday’s date. This will cause all cardholders whose records
have ‘expired’ (and who therefore are barred from using any access control card readers) to be included
in the report. The date range can, if required, be specified to be in the future. For instance you could
list all people who will expire during the rest of this month by setting the start date to today and the end
date to the last day of the month.
Person Has Not Yet Started - If you select this category, cardholders will appear in the report if their
Start Date (see Update Personnel) has not yet been reached. These cardholders are barred from using
any access control card readers.
Access Blocked By Operator - If you select this category, cardholders will appear in the report if they
have had their access to all access control card readers blocked by a system operator (see Update
Personnel).
Access Blocked By Import - If you select this category, cardholders will appear in the report if they
have had their access to all access control card readers blocked in response to a request from a third
party system that has been configured to interact with the ATRACS database via data imported by
ATRACSPOLL (see Update Personnel).
Person Not Qualified - If you select this category, cardholders will appear in the report if they are
marked as not qualified (see Update Personnel). These cardholders are barred from using any access
control card readers that require cardholders to be marked as qualified (see Update Readers / Other
Devices), but can continue to use card readers that do not have this requirement so long as the
cardholder belongs to an Access Group that allows access at the card reader.
None Of The Above - If you select this category, cardholders will appear in the report if their access is
not blocked by any of the above criteria.
81
ATRACS Operators Manual
March 2006
Grouping – You may select whether or not you wish the report to group cardholders by Personnel
Group.
Order By – You may select whether you wish cardholders to be listed in name order or reference
number order.
Select Personnel Group(s) – You may limit the report to cardholders who belong to one or more
specified Personnel Groups.
The Personnel Status Report lists cardholders whose access control permissions have been blocked.
Reader Status Report
The Personnel Status Report allows you to list cardholders whose access control permissions have been
partially or completely blocked for various reasons.
Report Type – You may choose to include in the report:
1) only readers that are in an alarm state (e.g. Reader Disconnected) or
2) only readers that are in an alarm state or are downloading or
3) all readers.
Order By – You may select whether you wish readers to be listed in reader number order or reader
description order.
82
ATRACS Operators Manual
March 2006
The Reader Status Report lists current reader status information.
Remote Events Log
The remote events log stores information reported by the system’s card readers and alarm monitor units
(SLIOs). The information can take the form of cardholder card transaction events or alarm
occurrences/clearances detected by card readers and SLIOs.
The Select Remote Event Search Parameters window prompts you to specify the type of report
required.
Date / Time Range - The From and To Date/Time fields allow you to specify the time period for
which you wish to have remote events reported.
Select Personnel – You may select that only remote events for cardholders from one or more specified
Personnel Groups should be included in the report. Alternatively you may select a single cardholder.
Select Reader(s) - You may select that only remote events from one or more specified card readers or
other devices should be included in the report.
83
ATRACS Operators Manual
March 2006
(A) NIM Authorisation – This checkbox, if ticked, indicates that the report should include TCP/IP
NIM Authorisation events. These events occur whenever the NIM authorises access for a cardholder.
By default the NIM does not send these events to ATRACS but it can be made to if necessary.
(G) Normal Greens This checkbox, if ticked, indicates that the report should include successful
cardholder card transactions (which cause the green LED on the card reader to illuminate). Note that
the reporting of successful key-coded transactions at time recording card readers and successful
transactions at muster card readers is controlled by separate checkboxes (see below).
(K) Key-Coded Greens This checkbox, if ticked, indicates that the report should include successful
cardholder transactions at time recording readers where a T/A code has been entered using the keypad.
(M) Muster Greens - This checkbox, if ticked, indicates that the report should include successful
cardholder card transactions at muster readers.
(T) Wrong T/A Reader - This checkbox, if ticked, indicates that the report should include cardholder
transactions at out-of-bounds T/A readers controlled by pre-TCP/IP NIMs.
(R) Red Transactions This checkbox, if ticked, indicates that the report should include unsuccessful
cardholder card transactions which cause the red LED on the card reader to illuminate. The report will
also include other types of transactions that result in a transaction alarm (alarms numbered 201
upwards – see List Alarms) but do not necessarily cause a red LED at the card reader. These include
Trace alarms and Muster Initiated alarms.
(P) Passback Switches - This checkbox, if ticked, indicates that the report should include uses of
reader-monitored exit switches.
(+) Reader Alarms - This checkbox, if ticked, indicates that the report should include the occurrence
of reader-monitored alarms such as Reader Disconnected or Tamper.
(-) Reader Alarms Clear - This checkbox, if ticked, indicates that the report should include the
clearance of reader- monitored alarms.
(S) Digital Alarms - This checkbox, if ticked, indicates that the report should include the occurrence of
SLIO-monitored alarms such as fire alarms.
(U) Digital Alarms Clear - - This checkbox, if ticked, indicates that the report should include the
clearance of SLIO-monitored alarms.
The Remote Events Report lists cardholder transactions and reader/SLIO-monitored status changes.
84
ATRACS Operators Manual
March 2006
System Events Log
The system events log is a historical log of system-related events (such as contact being lost with a
NIM) and system operator-related events (such as the creation or deletion of a cardholder’s record).
The System Events Log window allows you to view information in the system events log. You may
select the range and type of information required and then press the Display button to display it. If
required you can save the displayed information, in compressed form, to disk by using the Save button.
Start/End Report – These fields allow you to select the start and end date/time range for which you
wish information to be displayed.
Event Type – By default all types of event will be displayed. However you can use this drop-down list
to specify that one particular type of event should be displayed. For example, if you only wanted to see
events relating to the creation or altering of personnel records you would select EmployeeChanged.
Terminal Number (0=All) – By default events relating to all ATRACS terminals (i.e. the ATRACS
server and any ATRACS clients) are displayed. However you can use this field to specify that only
events relating to one particular ATRACS terminal should be reported. Note that the terminal number
of the computer that ATRACS is running on is set-up in the Registry item within the Tools menu.
Include Form Shows/Hides – Every time that ATRACS displays a form (i.e. a window) a form show
event is stored in the system events log. Every time that ATRACS ceases to display a form a form hide
event is stored in the system events log. This checkbox, if ticked, indicates that the showing and hiding
of forms (i.e. windows) within ATRACS should be included in the information displayed.
Include Operator Sign On/Offs – Every time that an ATRACS system operator signs onto ATRACS
or signs off a sign on/off event is stored in the system events log. This checkbox, if ticked, indicates
that system operator sign on/offs should be included in the information displayed.
For each event, the information that is displayed comprises the date and time of the event, the
ATRACS terminal number that the event occurred on (in the ‘T’ column), the event type (e.g.
NIMContactLost) and text giving details about the event (e.g. in the case of an EmployeeChanged
event the number and name of the person whose record was changed is displayed).
If you click on an event to highlight it, the number and name of the system operator who caused the
event (if any) is displayed, as is the number of the event within the system events table.
85
ATRACS Operators Manual
March 2006
8. Tools menu
The Tools menu comprises configuration tools for setting up system, terminal and registry information
etc., a script editing tool (to allow scripts intended for use in SLIOs to be created) and a badge design /
review / printing tool.
The Update System Configuration allows you to view four pages:
The OK button saves information, which has been entered or changed, the CANCEL button exits the
screen and any information, which has been changed or entered, will not be included:
General: Update System Configuration
The general update page provides you with the opportunity to choose which items you wish to access
on the ATRACS system. If items are not ticked (which you can do by pressing the left mouse button
over the boxes) you will not be able to access them.
86
ATRACS Operators Manual
March 2006
•
•
•
•
•
•
Main form caption - This appears at the top of the main ATRACS window
Access Control – configures ATRACS for access control
Time Accounting – configures the system for full time accounting (optional)
Time on Site – configures the system for “time on site” reporting
ATRACS Web Intranet – enables the intranet option
Badge Maker – enables the Badge Maker photo-capture option
Log File Curbing/ ATRACS web: Update System Configuration
Log File Curbing determines how many days of information are to be held within each of the three
main ATRACS log files. The maximum size and curbing parameters for each of the files are set here,
together with a flag to specify whether file curbing should be performed automatically by the system or
whether it should be left to the operator. The maximum size determines how many days of information
each log file can hold before curbing becomes due, while the curbed size parameter determines how
many days of information will be left after curbing has occurred. When a file is curbed (automatically
or by the system operator) the oldest data within the file is deleted.
The Log File Curbing and ATRACS Web page has two features.
• It enables you to determine how many days the system will hold information in the database. This
can be changed at any point and it does not affect the system although if the period before curbing
is vast this may slow the database down in retrieving information. You can hold information for
four hundred days maximum however; obviously you can alter this to your requirements.
• It allows you to access the ATRACS Web option, which determines access to the alteration,
viewing and requests of time accounting on the web. The Intranet Configuration section states
how many days you may log-on to the system, how many days you can use your password, how
many incorrect attempts you can have before you are locked out of the system, the period of time
that the account is locked out for before you can access it again and it provides you with an access
code allocated by Borer Staff so that Intranet ATRACS Web can be used. This access code is not
designed to be altered by those whom gain the ATRACS package.
87
ATRACS Operators Manual
March 2006
Terminal Configuration
The terminal configuration option enables you to access different options for the system. It has two
pages the first being preferences which you can set to your own requirements and the second being
photo capture and badge printing which allows pictures to be kept for employees and visitors.
The terminal configuration window allows you to set up the PC to suit your own preferences.
Status Displays – sets the time interval in seconds for refreshing the status on the bottom line of the
main window.
Event Displays – initiates the time interval between updates of the main window Remote Events and
Unacknowledged Alarms displays.
Calendar Date Selection – determines whether or not date inputs on this PC should be done by using a
calendar style date prompt. This window configures the workstation for Photo ID capture and badge
printing. Any workstation equipped with appropriate hardware can be set up for Photo ID capture,
badge printing or both. In an enterprise application you may want to take photographs at any of several
site but issue cards from only one location. ATRACS allows you to do this as photo capture can be
divorced from badge printing.
Terminal Number/Printing – identifies the workstation or file server on which the software is
running.
88
ATRACS Operators Manual
March 2006
Photo Badge Capture / Printing
Photo Capture Enabled - ticked will allow you to take photographs using either a web cam or video
capture card and camera.
Badge Printing Enabled - ticked will allow the workstation to produce ID cards if equipped with a
suitable card printer.
Photo Capture Type
Video (MCI) photo capture - ticked identifies the workstation as equipped with MCI compliant video
frame capture board and CCTV camera.
TWAIN photo acquisition - ticked identifies the workstation as equipped with a TWAIN compliant
Web Cam or Scanner.
Badge Maker Details
Use Badge Maker - ticked identifies that the PC is loaded with Badge Maker software, which will be
used for any photo capture and badge printing.
IDC Path - this is the path to the directory, which holds the Badge Maker database, where template
designs etc. are stored.
Photo Capture Details
The following fields are only active if the native ATRACS photo capture software is to be used instead
of Badge Maker:
Bitmap (.bmp) - ticked causes ATRACS to save all ID images as bitmap files.
JPEG (.jpg) - ticked causes ATRACS to save all ID images as JPEG formatted files.
JPEG compression factor - informs ATRACS as to the compression level you wish to use. A factor of
100 will only apply limited compression for the best quality but sacrificing file size red.
89
ATRACS Operators Manual
March 2006
Hot Keys – Short cuts to display Roll Call or Missing Persons Report
System Registry
The ATRACS System Registry holds basic information required by ATRACS to locate files and
system parameters.
File Paths
R.M.U Directories - specifies the directory, which contains the sub-directories used by ATRACS to
communicate with its NIM(s).
Image Files - specifies the directory path for the storing of photo id images.
Sound Files - specifies the directory path for the storing of sound clips, which are played when specific
alarms occur.
90
ATRACS Operators Manual
March 2006
Client / Server Selection
This group box allows you to select which of the three modes of system operation (Client, Server or
Client/Server) is to be applied at this PC. If this is the only PC that will be running this system, then
Client/Server should be selected. Otherwise, if this is the server PC (i.e. the PC that has been selected
to manage the system’s database and import data from the reader interface unit(s) as and when
available) then Server should be selected if optimum system efficiency is required or Client/Server if
system operators are to use this PC. If this PC is solely for system operator use (i.e. it is not also used
to manage the system’s database etc.) then Client should be selected.
Terminal Number - identifies the individual workstation or server attached to the network. Each PC
must have a unique terminal number. The ATRACS server PC is always terminal number 1.
Sound Card - indicates that the PC is equipped with sound card and speakers and can play WAV files.
WAV files can be played in response to specific alarm conditions to give the user a verbal warning.
Personnel Note Labels
Using this window you can attribute descriptions to each of the Notes fields held in the Personnel
Table.
91
ATRACS Operators Manual
March 2006
9. Diagnostics Menu
The Diagnostics menu lists diagnostic functions that can be run by BORER staff in case of systemrelated problems. They are NOT intended for unsupervised use.
View ASCII Import/Export
A program called ATRACSPOLL runs on the ATRACS server. This program’s main job is to carry
out communication between the ATRACS database and the NIMs. Normally ATRACSPOLL is
hidden from view, but by selecting the View ASCII Import/Export item in the Diagnostics menu the
program can be made visible, allowing its activities to be monitored to make sure that it is running
properly. To hide ATRACSPOLL again press the ‘Invisible’ button on ATRACSPOLL itself. (If you
exit from ATRACSPOLL by using the windows exit button or in any way ATRACSPOLL will be shut
down).
92
ATRACS Operators Manual
March 2006
List Personnel General Data
This screen enables you to list information for all cardholders, groups of cardholders or individual
cardholders. Most of the data within each cardholder’s record, including the associated photograph (if
any), is listed.
Digital Status/Control Diagnostic
The Digital Status/Control Diagnostic shows at a glance the state of Digital Inputs and Outputs defined
within the ATRACS database. Any Digital Inputs in the alarm state or Digital Outputs in the ‘1’ state
are displayed in red. Otherwise they are displayed in green. By double-clicking on an individual
Digital Input/Output you can change its state.
93
ATRACS Operators Manual
March 2006
Digital I/O Diagnostic
The Digital I/O Diagnostic shows the current state of various indicators associated with Digital Input
and Output records within the ATRACS database. Most of these indicators are only relevant in the
case of ATRACS systems that use a legacy third party package to provide additional event-related
processing. This package will not run with the more recent versions of Windows (Windows 2000,
Windows XP etc.).
SQL Trace
ATRACS uses an SQL (Structured Query Language) compliant database. Information is read and
changes are made using SQL commands. This window allows you see the SQL commands that
ATRACS is sending to its database. Various checkboxes allow you to select the kinds of SQL
commands that are of interest. Press the Show button to cause the diagnostic to start listing SQL
activity to the ATRACS main window. Press the Freeze button to temporarily stop the diagnostic
output to the ATRACS main window. Press the Freeze button again to restart diagnostic output. Press
the Save button to write the diagnostic information to disk. Press the Hide button to cease diagnostic
output.
94
ATRACS Operators Manual
March 2006
Multi Site Access Group Upgrade (one time only)
The Multi Site Access Group Upgrade window allows a version of the ATRACS database that is set to
use the legacy mode of Access Group operation to be converted to use the current ‘Island Site’ mode of
operation (whereby each NIM/Location has its own set of Access Groups to which cardholders can be
allocated). This only needs to be run once.
95
ATRACS Operators Manual
March 2006
10. Help Menu
The About Borer Data Systems ATRACS window includes the ATRACS system and database version
numbers.
96
ATRACS Operators Manual
March 2006
ATRACS Appendix 1: Glossary of terms
Abort - stop a function (e.g. report printing) that is currently active.
Access card - identification card encoded with a machine-readable identification number.
Access control - control of entry into secured areas by use of cards/tokens for personal identification.
Individual cards/tokens can be enabled or disabled for access.
Access group - set of rules, which describes the access authorization for a group of card holders. All
card holders who are members of the same access group have the same access authorization (are
allowed through the same doors during the same time periods).
Alarms - events that are out of the ordinary and need to be annunciated.
Anti-passback (hard) - a rule that will produce an alarm and prevent card holder access if an attempt
is made to gain access to an area out of sequence (e.g. entering a building and then attempting to reenter the building without first leaving it).
Anti-passback (soft) - a rule that will produce an alarm if a card holder gains access to an area out of
sequence (e.g. entering a building and then attempting to re-enter the building without first leaving it).
Baud rate - speed at which information is passed through a communication link.
Cardholder - person in possession of an encoded card or token that can be read by devices (card
readers) attached to the system.
Command - operator or system generated instruction that tells a program or hardware device to
perform a particular function.
Communication - transmission of data between devices.
Controller - unit used to control / monitor the activities of one or more hardware devices.
Database - set of data files within a computer system appertaining to a specific application (in this case
access control and/or attendance recording).
De-energize - disconnect power or turn off.
Department - logical grouping of card holders. Card holders within any particular department will be
grouped together for the purposes of system reporting.
Digital I/O Unit - device, which is able to monitor/switch external digital sensors/latches.
Disk - type of device for storing information in a magnetic form. It may be removable from the
computer or built in.
Distributed intelligence - provision of rules and data to hardware devices such as card readers,
enabling them to make decisions without referring to the controlling computer.
Door strike - electronic device that secures a door, unlocking it when told to by a reader.
Energize - apply power or turn on.
Facility code - unique encoding assigned to cards used at a particular installation.
Infrared light source - invisible light (wavelength c.900nm) used to read data encoded on cards.
97
ATRACS Operators Manual
March 2006
Logging - recording of events in time sequence. Each event creates a record stating what happened
and when which can subsequently be printed out.
Menu - list of options on the PC screen from which the operator may make a choice.
Modem - device used to convert information to a different format for transmission down a telephone
circuit or land line.
Modem (dial-up) - modem designed for use over the PSTN.
Modem (short haul) - modem designed for use over unconditioned communication circuits.
Operator time-out - time following an operator's last key press after which the system will revert to a
secured state, requiring a password for access.
Passback - to exit from a secured area by means of a passback switch that is connected to a card reader
controller.
Password - secret identification code entered by the operator and checked by the system before
allowing the operator to log on.
PIN - Personal Identification Number used for added security at card readers.
Polling - technique by which each device on a shared communication line is in turn interrogated for
information.
Section - treated by the system as being synonymous with department.
Software - set of instructions to tell a computing device how to perform.
System - integrated set of hardware and/or software designed to meet a specific need.
System operator - person responsible for all system functions.
Tamper Circuit - micro-switch on the card access unit control box that monitors the opening of the
box such that an alarm is raised when the box is opened.
Timed Task - function that is performed automatically at some pre-determined time.
Time Zone - period of the day during which access is allowed.
Unsecured door - door that is unlocked/ajar when it should be locked and closed.
98
ATRACS Operators Manual
March 2006
ATRACS Appendix 2: Card Transaction Error/ alarm messages
Card reader transactions are monitored for validity. Should a transaction be rejected or result in an error
condition, an appropriate error/alarm message (including the card holder's identity) will be displayed
on the computer's alarm panel, printed on the alarm printer(s) and stored on disk in the transactions
journal. Each transaction error/alarm type has a number, which you can use in the Update Alarms
window to call up the appropriate alarm type and enter your own message and associated operator
action text. A list of the card transaction error/alarm codes together with factory default descriptions
follows:
201 Incorrect pin
A cardholder Personal Identity Number (PIN) entered at an access reader is incorrect.
202 Access group closed
An attempt to gain access has been made by a cardholder who is not assigned to a valid access
group.
203 Reader rules closed
The card access reader does not have a valid set of reader rules assigned for today.
204 Access prohibited
An attempt to gain access has been made by a cardholder without the necessary access
authorization.
205 Entry tried when in
An anti-passback condition has arisen. A cardholder has attempted to gain access when recorded
as being on site.
206 Exit tried when out
An anti-passback condition has arisen. A cardholder has attempted to leave site when recorded as
being off site.
207 In unexpected place
A cardholder is trying to move from an area that he/she was not recorded by the system as being
in, hence causing an anti-passback condition.
208 Access under duress
A duress code has been entered in association with a P.I.N. code as part of an access transaction.
209 Time embargo
A transaction has taken place within the current time embargo span being applied to the cardholder.
210 Reader not authorised
A cardholder has attempted to clock on or off at an attendance terminal he or she is not entitled to
use.
211 Card not recognised
A card has been used which is not defined within the system's personnel file as belonging to
anyone.
212 Invalid absence code
An absence code has been used which is not recognised by the system.
213 Access not made
Cardholder access was granted but not made.
214 Wrong card issue no
The card used has an issue number that differs from the correct issue number for that card.
215 Card expired
99
ATRACS Operators Manual
March 2006
A cardholder is outside the date band within which he/she may make access.
216 Transaction repeat
Access not been granted because the card reader has failed to get confirmation of access from the
PC.
218 Departure assumed
A cardholder is assumed to have left a 'single-manning' area without using an exit card reader.
219 Single-manning alarm
A card access reader controller is warning that only one cardholder is present in a 'single-manning'
area.
222 Overstay error
A cardholder has exceeded the time limit allowed for a stay in a 'single-manning' area.
226 Outside time zone
A cardholder has attempted access outside his/her defined time zone constraints.
228 Trace
This is not an error indication, but simply a real time report of a valid event. Either the cardholder
is on trace or the card reader is set to trace all events.
229 Control card used
This not an error, but an indication that one of the special control cards, supplied with some
systems, has been used.
230 No tag detected
An attempt has been made to gain access to a radioactive area by someone not wearing a film
badge.
231 Tag mismatch
The film badge does not belong to the cardholder.
232 Door forced (IN)
The 'in' monitor of a card access reader controller has sensed a door being opened by means other
than the use of a card or a passback switch.
233 Door forced (OUT)
The 'out' monitor of a card access reader controller has sensed a door being opened by means
other than the use of a card or a passback switch.
234 Faulty card usage
A card reader has repeatedly misread a card.
235 Card invalidated
The cardholder has been barred access at all access points because he/she has had an excessive
number of consecutive P.I.N. errors.
236 Intruder detected
A card access controller at a designated single- manning area has sensed movement while the area
was thought to be unoccupied.
237 Not a visitor escort
A cardholder who is not a designated escort has tried to take a visitor through an access control
point.
100
ATRACS Operators Manual
March 2006
238 Muster initiated
A cardholder has used his/her card in a muster reader and thus caused a muster situation to be
initiated.
239 Muster reader misuse
A cardholder has used a muster reader at an inappropriate time (i.e. not during a muster situation).
101
ATRACS Operators Manual
March 2006
ATRACS Appendix 3: Card Reader Related Alarms
The PC will continually monitor the communication lines to the distributed card readers for
malfunction and abuse. Should a card reader fail to check in or send a distress message, the nature of
the condition together with appropriate action to be taken, will be displayed on the alarm panel and
output to the alarm printer(s). Each alarm type is given a number. The Update Alarms window
together with the alarm type number will enable you to call up the appropriate alarm and alter the
message as well as the text describing action to be taken by the operator. A list of the alarm type
numbers and the factory default alarm messages associated with each alarm follows:
001 Transmission lost
Communications between a card reader and an intermediate device (between the card reader and
the PC) have been interrupted. Either the reader controller has malfunctioned or the transmission
link between reader controller electronics and the other device has been broken. This alarm would
be generated if, for instance, a 'master' reader lost contact with one of its 'slave' readers.
002 Door unsecure
In the case of a card reader, which is controlling access through a door, either the door has been
left unlocked (held ajar or propped open), or the door monitor has failed. In the case of a card
reader, which is controlling access through a turnstile, the turnstile-in-motion relay appears to be
permanently energised (suggesting that the turnstile rotor arm is jammed or the turnstile has come
to rest in an intermediate position).
003 Mains power failed
A controller has sensed a loss of mains power.
004 Tamper alarm
Either the reader front cover has been removed, thereby activating the tamper alarm, or the
transmission line between the reader head and reader control electronics has been broken.
005 Alarm cleared
A previous alarm condition has been cleared.
006 Reader disconnected
Communications between the PC and a card reader have been interrupted. Either the reader
controller has malfunctioned or been switched off, or the communications link between the reader
controller electronics and the PC has been broken.
007/008 Auxiliary monitor ½
An alarm condition has been detected on one of the two auxiliary monitor inputs of the reader
controller.
009 Lock fault
A fault has been detected on the lock/strike control system.
019 Downloading people
A complete set of personnel information is being downloaded to a card reader's database for one of
the following reasons:
a). A database download is occurring (see alarm 20 below).
b). The card reader has recently recovered from a period of communications failure, during
which time personnel-related information was altered on the PC. Because of the communication
failure the PC was unable to download the individual personnel records that needed to be
downloaded, and so booked a complete personnel data download for when communications
recovered.
c). Personnel-related information has been altered so rapidly on the PC that the PC has
been unable to keep track of which individual personnel records need to be downloaded to which card
102
ATRACS Operators Manual
March 2006
readers, and so has initiated a complete personnel data download.
d). The PC has initiated a complete personnel data download because the system operator has made a
gross change to the reader configuration or access control rules relating to this card reader, resulting in
a different set of cardholders being associated with the card reader.
020 Downloading database
A card reader's database has been erased and a new database is being downloaded.
This would either have been triggered by a request for a new database from the card reader itself (see
alarm 25 below), or as a result of a system operator requesting a download to local card readers.
025 Download instigated
A card reader has requested that its database be erased and a new database downloaded. This would
normally only occur when a card reader has just been powered up (and hence contains no database),
but would also occur were a card reader to suffer a reset or a database corruption.
103