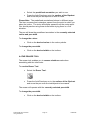
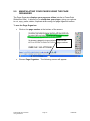
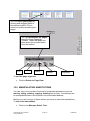
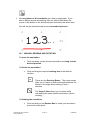
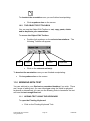
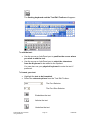
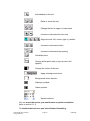
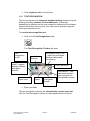
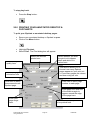
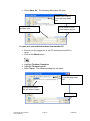
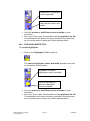
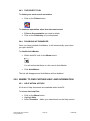
1
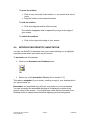
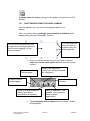
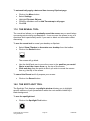
ActivPanel User Guide for Staff Produced by C&IT Services TABLE OF CONTENTS TABLE OF CONTENTS .................................................................................. 2 OVERVIEW...................................................................................................... 4 1.0 WHERE CAN I USE ACTIVPANEL? .................................................... 4 2.0 THE ACTIVPANEL COMPONENTS .................................................... 5 2.1 2.2 2.3 3.0 3.1 3.2 THE LCD TABLET ............................................................................. 5 THE ACTIVPANEL PEN .................................................................... 5 ACTIVPX ........................................................................................... 6 GETTING STARTED WITH ACTIVPANEL .......................................... 6 LAUNCHING ACTIVPX ..................................................................... 6 THE ACTIVPX TOOLBOX ................................................................. 7 4.0 INTRODUCING DESKTOP ANNOTATION .......................................... 8 5.0 INTRODUCING THE FLIPCHART ....................................................... 9 6.0 ANNOTATION TOOLS ....................................................................... 10 6.1 6.2 6.3 6.4 6.5 THE PEN TOOL ............................................................................... 10 THE HIGHLIGHTER TOOL.............................................................. 11 PREDEFINED ANNOTATIONS ....................................................... 11 THE ERASER TOOL ....................................................................... 12 THE CLEAR TOOL .......................................................................... 13 7.0 THE UNDO AND REDO TOOLS ........................................................ 13 8.0 VIEWING YOUR PAGES USING THE PAGE SELECTOR ................ 13 9.0 MANIPULATING YOUR PAGES USING THE PAGE ORGANISER .. 15 10.0 MANIPULATING ANNOTATIONS ..................................................... 16 10.1 10.2 11.0 11.1 11.2 12.0 MOVING, RESIZING AND ROTATING ............................................ 17 THE OBJECT EDIT TOOLBOX........................................................ 18 WORKING WITH TEXT ...................................................................... 18 ADDING TEXT USING THE KEYBOARD ........................................ 18 TEXT RECOGNITION ..................................................................... 21 USING THE RESOURCE LIBRARY................................................... 22 12.1 USING THE RESOURCE LIBRARY TO INSERT IMAGES .............. 23 12.2 USING THE RESOURCE LIBRARY TO INSERT FLIPCHART BACKGROUNDS ....................................................................................... 24 13.0 CREATING LINKS .............................................................................. 24 14.0 THE FILL TOOL ................................................................................. 26 14.1 14.2 14.3 CHANGING THE COLOUR OF ANNOTATIONS AND TEXT ........... 26 CHANGING COLOURS WITHIN IMAGES....................................... 26 CHANGING THE BACKGROUND COLOUR USING THE FILL TOOL 27 Produced By C&IT Services Using ActivPanel Page 2 17/09/2009 15.0 15.1 15.2 15.3 THE CAMERA TOOL ......................................................................... 27 PHOTOGRAPH USING THE AREA CAMERA ................................ 28 PHOTOGRAPH USING THE FULL SCREEN CAMERA .................. 29 MANIPULATING PHOTOGRAPHS ................................................. 29 16.0 THE CALENDAR TOOL ..................................................................... 29 17.0 THE REVEAL TOOL........................................................................... 30 18.0 THE SPOTLIGHT TOOL..................................................................... 30 19.0 RECORDING AND PLAYING BACK YOUR FLIPCHARTS .............. 31 20.0 PRINTING YOUR ANNOTATED DESKTOP & FLIPCHARTS ........... 33 21.0 SAVING YOUR ANNOTATED DESKTOP AND FLIPCHARTS ......... 34 21.1 21.2 SAVING WHEN EXITING ................................................................ 34 SAVING YOUR FLIPCHART WHILST WORKING ........................... 35 22.0 OPENING EXISTING FLIPCHARTS .................................................. 36 23.0 CUSTOMISING ACTIVPX .................................................................. 37 23.1 23.2 24.0 24.1 24.2 24.3 24.4 25.0 25.1 25.2 CUSTOMISING YOUR TOOLBOX .................................................. 37 CUSTOMISING YOUR COLOUR PALETTE ................................... 40 ACTIVMARKER .................................................................................. 40 THE PEN TOOL ............................................................................... 40 THE HIGHLIGHTER TOOL.............................................................. 41 THE DELETE TOOL ........................................................................ 42 DISABLING ACTIVMARKER ........................................................... 42 WHERE TO FIND FURTHER HELP AND INFORMATION ................ 42 HELP WITHIN ACTIVPX.................................................................. 42 C&IT SUPPORT DESK .................................................................... 43 Produced By C&IT Services Using ActivPanel Page 3 17/09/2009 OVERVIEW ActivPanel is the interactive presentation tool installed in many of the lecture theatres and classrooms across the University. ActivPanel comprises of a LCD tablet (monitor), pen and ActivPX software. Together they provide you with the tools needed to highlight important points and interact with your material while you lecture. You can also use the software to record discussion points as they are brought up for later retrieval. This document is designed for lecturers and other staff members who wish to use ActivPanel to enhance their lectures or presentations. 1.0 WHERE CAN I USE ACTIVPANEL? Within the University you can use ActivPanel in all teaching rooms seating 20 or more at Merchiston, Craiglockhart, Craighouse, Canaan Lane and Comely Bank. You can download the ActivPX software from the network. This is recommended as a way to familiarise yourself with the software and allows you to prepare and retrieve information prior to and following your presentations. To download ActivPX: Click Start. Highlight All Programs. Highlight Core. Select ActivPX. ActivPX will open. You can also borrow the ActivPX software from the library to install onto your home PC if required. Produced By C&IT Services Using ActivPanel Page 4 17/09/2009 2.0 THE ACTIVPANEL COMPONENTS 2.1 THE LCD TABLET The ActivPanel LCD tablet is positioned on the lecterns in the rooms which have ActivPanel installed. It can be used with a mouse or the ActivPanel pen. To avoid damaging the LCD tablet you should note and adhere to the following points: 1. 2. 3. 4. 5. 6. Do not scratch the display screen. Avoid placing sharp items on the screen surface. Avoid intensive shock or vibration to the screen or pen. Hitting or dropping the screen will damage the unit. Do not put heavy items on the panel or apply force to it. To clean the display, please use an anti-static cloth or a slightly damp cloth. Do not use cleaners on the display. 7. Do not disconnect the cables from the unit. 8. Any problems should be reported to C&IT Support at x3000. 2.2 THE ACTIVPANEL PEN In the teaching room you will find the ActivPanel pen attached to the desk. The pen resembles a regular pen but with a button on the side which you can use to carry out different actions. Using the pen: To Point Highlight Objects Single left click Double left click Right click Produced By C&IT Services Using ActivPanel Action Move pen over object about 1cm above screen Drag pen over area to be highlighted Tap pen on object Point pen over object and click the wide part of the side button on the pen Point pen over object and click the narrow part of the side button on the pen Page 5 17/09/2009 2.3 ACTIVPX ActivPX is the software that accompanies ActivPanel. You can use ActivPX to: 1. Annotate over your desktop. This is particularly useful if you want to highlight important points within your notes. You can save your annotated notes as a flipchart file for future use. 2. Create flipcharts while you lecture. You can use this feature to annotate on blank pages as you lecture which can be particularly useful when recording points raised during discussion time. The flipchart can be saved for future use. 3. Utilise special effects while you present e.g. the spotlight or reveal tools adding interactivity to your presentation. 4. Use ActivMarker to annotate over Microsoft Office products. This feature makes permanent changes to your Microsoft Office file and can be useful when highlighting important points on a document for future reference. 5. Use the Activ Background Producer. The Background Producer can be used to create or view different backgrounds for your flipchart pages e.g. graphs, dots. 3.0 GETTING STARTED WITH ACTIVPANEL Before you utilise ActivPanel you should: 1. Switch the LCD Tablet on. 2. Switch on the PC. 3. Log in to the PC. 3.1 LAUNCHING ACTIVPX To launch ActivPX: Click on the ActivPX icon on the desktop: The ActivPX floating toolbox will then open. Produced By C&IT Services Using ActivPanel Page 6 17/09/2009 3.2 THE ACTIVPX TOOLBOX The ActivPX toolbox can be dragged around the screen as required and contains all of the icons and buttons needed when utilising the program. The Close button. Close the application by clicking on the close button. You will be prompted to save changes. The Colour Palette. You can select different colours for your annotations using the colour palette. The Menu Button. You access more of the key functions of ActivPX using the menu button. Pen Width Indicator. You can use the pen width indicator to select different sizes for your pen, eraser or highlighter tools. The pen widths are measured in pixels. Pen tool Eraser Selection tool Keyboard tool Hide/Reveal Screen Spotlight tool Calendar Tool Cut Delete Produced By C&IT Services Using ActivPanel Highlighter Clear Objects/Notes. Previous Page Camera Mode Undo Text Recognition Paste Copy Page Edit Text Page 7 Flipchart Annotate over desktop Next Page Resource Library Redo Fill Tool Record Flipchart Duplicate Page 17/09/2009 To move the toolbox: Click on any free area of the toolbox i.e. any area that is free of icons. Drag the toolbox to the desired location. To hide the toolbox: Click and drag the toolbox off the screen. The toolbox disappears and is replaced by a logo at the edge of your screen. To unhide the toolbox: 4.0 Click on the logo at the edge of your screen. INTRODUCING DESKTOP ANNOTATION You can use ActivPX to annotate over your screen allowing you to highlight important points within your notes as you lecture. To annotate over the desktop: Click on the Annotate over Desktop button: OR Select any of the Annotation Tools [refer to section 7.0]. This takes a snapshot of your screen, creating a copy of your desktop which you can annotate on. Remember, the annotated copy will look very similar to your live desktop. You can recognise the annotated desktop as it displays a number at the bottom centre of the screen. You should also notice that the Annotate Over Desktop button is selected and therefore displaying a blue background: Produced By C&IT Services Using ActivPanel Page 8 17/09/2009 The Annotate Over Desktop button is selected. A grey box displaying the page number is visible at the bottom of the annotated desktop. To hide the Annotated Desktop and return to your live desktop: Click on the Return to Live Desktop button: Each time you switch from the live desktop view to the annotated desktop a new desktop flipchart page will be created. The number at the bottom of the screen will indicate which page you are on and you can navigate through your screens using the Page Selector [refer to section 9.0] or manipulate your pages using the Page Organiser [refer to section 10.0] 5.0 INTRODUCING THE FLIPCHART The flipchart is a virtual drawing area with unlimited scope. It is particularly useful for recording points raised during discussion time. To open the flipchart: Click on the Show Flipchart button: The flipchart will open as a blank screen resembling a traditional flipchart or whiteboard on which you can annotate [refer to section 7.0]. Produced By C&IT Services Using ActivPanel Page 9 17/09/2009 You will notice a small “1” displayed at the bottom, centre of the screen. This number indicates that you are on the first page of the flip chart. You can move through the flipchart pages using the Next and Previous page buttons: Previous Page Next Page You will notice the number at the bottom of the screen changing as you move through the pages. To hide the flipchart and return to your live desktop: 6.0 Click on the Hide Flipchart button: ANNOTATION TOOLS These Annotation tools behave the same way whether you are using them in desktop annotation mode or flipchart mode. 6.1 THE PEN TOOL The Pen Tool allows you to draw freehand over the flipchart. To use the pen tool: Click on the Pen Tool: Press the ActivPanel pen onto the surface of the flipchart and move the pen as required to write or draw. The pen will draw in the currently selected colour and pen width. To change the colour: Click on the desired colour in the colour palette. To change the pen width: Click on the desired width on the toolbox. Produced By C&IT Services Using ActivPanel Page 10 17/09/2009 6.2 THE HIGHLIGHTER TOOL The highlighter tool enables you to highlight text or another object using transparent colour. To use the Highlighter Tool: Select the Highlighter Tool: Press the ActivPanel pen onto the surface of the flipchart to highlight the required text/objects. The pen will draw in the currently selected colour and pen width. To change the colour: Click on the desired colour in the colour palette. To change the pen width: Click on the desired width on the toolbox. 6.3 PREDEFINED ANNOTATIONS Within ActivPX you can utilise a number of predefined annotations. To access the predefined annotations: Right click on either the Pen or the Highlighter Tool. The Pen Modifier Toolbox will appear: Straight Line Horizontal Line Square Vertical Line Semi Arc Circle Ellipse Rectangle Callout Produced By C&IT Services Using ActivPanel Corner Arc Arrow Point To Point Page 11 17/09/2009 Select the predefined annotation you wish to use. Press the ActivPanel pen onto the surface of the flipchart and move the pen as required to write or draw. Please Note: The predefined annotations behave in different ways. The lines, squares and rectangles expand from the point in which you place the cursor. The circle and ellipse expand from the centre point. You should practice using these tools before trying them in a „live‟ situation. The pen will draw the predefined annotation in the currently selected colour and pen width. To change the colour: Click on the desired colour in the colour palette. To change the pen width: Click on the desired width on the toolbox. 6.4 THE ERASER TOOL The eraser tool enables you to remove mistakes made when annotating with the other tools. To use the Eraser Tool: Select the Eraser Tool: Press the ActivPanel pen on to the surface of the flipchart and move the pen over the text/objects to be erased. The eraser will operate with the currently selected pen width. To change the pen width: Click on the desired width on the toolbox. Produced By C&IT Services Using ActivPanel Page 12 17/09/2009 6.5 THE CLEAR TOOL The clear tool allows you to clear the flipchart page. To use the Clear Tool: Click on the Clear Tool: Select one of the following 4 options: Clear Annotations: Clear Objects: Clear Background: Clear Page: 7.0 Removes all pen, highlighter and Eraser objects. Clears all images and text. Clears any background images applied to the flipchart page. This removes everything from the page, creating a clean page. THE UNDO AND REDO TOOLS Like many other applications you can use the undo and redo tools to correct any mistakes you make. Click on the undo button to reverse your last action e.g. if you deleted an annotation accidentally: The Undo Button Click on the Redo button to redo the action you reversed, e.g. if you decided that you did want to delete the annotation after all: The Redo Button 8.0 VIEWING YOUR PAGES USING THE PAGE SELECTOR The Page Selector allows you to view each or your flipchart and annotated desktop pages as thumbnails. You can then select a page to view in full screen mode. Produced By C&IT Services Using ActivPanel Page 13 17/09/2009 To use the Page Selector: Click on the page number at the bottom of the screen: Click on the page number. Choose Page Selector. A new window will open displaying each of your pages as a thumbnail: The page you are currently viewing will be surrounded by a red box. Simply click on another thumbnail to view that particular page. To exit the Page Selector: Click on the page number at the bottom of your screen again. Choose Page Selector. You will return to your annotated desktop or flipchart. Produced By C&IT Services Using ActivPanel Page 14 17/09/2009 9.0 MANIPULATING YOUR PAGES USING THE PAGE ORGANISER The Page Organiser displays your pages as slides (similar to PowerPoint Slideshow View). It allows you to manipulate your pages, giving you options to cut, copy, paste, delete, duplicate slides using the page organiser toolbox. To use the Page Organiser: Click on the page number at the bottom of the screen: Click on the page number. Choose Page Organiser. The following screen will appear: Produced By C&IT Services Using ActivPanel Page 15 17/09/2009 You can move your pages by clicking and dragging them to the desired location. This is useful for quickly reordering the pages. You can manipulate the pages using the Page Organiser Toolbox. Select the page and then select the relevant option from the toolbox. Cut Copy Paste Delete Duplicate To exit the page organiser: Click on Return to Page View. 10.0 MANIPULATING ANNOTATIONS You can carry out a number of actions to manipulate annotations such as moving, sizing, rotating, copying, deleting and so forth. Annotations can be manipulated either in the flipchart or the annotated desktop. Before you carry out any of these actions you have to select the annotations. To select the annotations: Click on the Marquee Select Tool: Produced By C&IT Services Using ActivPanel Page 16 17/09/2009 Click anywhere on the annotation you wish to manipulate. If you wish to adjust several annotations then you should hold down the mouse or the button on the ActivPanel pen and select the whole area. You will see the selected area is now surrounded by boxes: 10.1 MOVING, RESIZING AND ROTATING To move the annotation: Click anywhere on the selected annotation and drag it to the desired position. To Resize the annotation: Click and drag the required resizing box to the desired location: These are the Resizing Boxes. The corner boxes allow you to resize in width and height whereas the boxes on the edge allow resizing in only 1 direction. The Aspect Sizer allows you to resize whilst maintaining the same relative dimensions (check wording). To Rotating the annotation: Click and drag on the Rotator Box to rotate your annotation around its centre point: Produced By C&IT Services Using ActivPanel Page 17 17/09/2009 To deselect the annotation once you are finished manipulating: 10.2 Click anywhere else on the screen. THE OBJECT EDIT TOOLBOX You can use the Object Edit Toolbox to cut, copy, paste, delete and/or duplicate your annotations. To access the Object Edit Toolbox: Cut Double click anywhere on the selected annotations. The following Toolbox will appear: Copy Paste Delete Duplicate Click on the relevant action(s). To deselect the annotation once you are finished manipulating: Click anywhere else on the screen. 11.0 WORKING WITH TEXT You can add text to your flipchart or annotated desktop if you wish. There are 2 ways of adding text; you can either type using the virtual or physical keyboard or alternatively you can use the drawing tools to handwrite the text and use the text recognition tool. 11.1 ADDING TEXT USING THE KEYBOARD To open the Floating Keyboard: Click on the Floating Keyboard Tool: Produced By C&IT Services Using ActivPanel Page 18 17/09/2009 The floating keyboard and the Text Edit Toolbox will appear: To add the text: Use the mouse or ActivPanel pen to position the cursor where you wish to add the text. Use the mouse or ActivPanel pen to select the characters from the Keyboard to be added to the flipchart. You can also use your physical keyboard to enter the text if preferred. To format your text: Highlight the text to be formatted. Select the relevant options from the Text Edit Toolbox: The Font Selector The Font Size Selector Emboldens the text Italicise the text Underline the text Produced By C&IT Services Using ActivPanel Page 19 17/09/2009 Add shadow to the text Raise or lower the text Change the text to upper or lower case Increase or decrease the font size Aligns the text: left, centre, right or justified. Increase or decrease indent Increase or decrease line spacing Add bullet point Change bullet point style (a pop up menu will appear) Change the colour of the text Apply a background colour Background colour selector Displays symbols Hides symbols Symbol selector You can move the text as you would move any other annotation [refer to section 11.1]. To deselect the text once you have finished formatting: Produced By C&IT Services Using ActivPanel Page 20 17/09/2009 11.2 Click anywhere else on the screen. TEXT RECOGNITION The text recognition tool interprets freehand writing created using the drawing tools and converts it into editable text. Everyone‟s handwriting is different and the text recognition software will not always interpret the written text correctly, you may need to practise using the tool to get the best out of it. To use the text recognition tool: Click on the Text Recognition button: The Text Recognition Toolbox will open: Text Recognition on/off The Font Selector Recognition Wait Time – adjust the time lapse between writing and recognising Recognition Mode – toggles between numeric and alphanumeric Convert to upper case Undo last action Enter space Insert paragraph break Alternatives – view alternative words if your writing is not recognised correctly Enter your text. The text recognition software will automatically convert your text. Use the Text Recognition toolbox to make adjustments if required. Produced By C&IT Services Using ActivPanel Page 21 17/09/2009 12.0 USING THE RESOURCE LIBRARY The Resource Library contains images and flipchart backgrounds which you can insert into your flipcharts. To open the Resource Library: Click on the Resource Library icon: The Resource Library will open: The Menu Button (see below for further information). Click here to access your personal Resource Library. The Title Bar toggle buttons (see below for further information). The Close Button – Closes the Resource Library Screen. Click here to access the shared Resource Library. Click here to show your images. Click here to show your flipchart backgrounds. Click here to browse for resources in your computer folders. The Library folders section displays all the folders in the collections. Click on a folder to view its thumbnails. The thumbnails enable you to preview your images/backgrounds before adding them to your page. Clicking on the Menu Button will give you access to: Dock: You can dock the Resource Library window to the right, left, bottom right or bottom left of the screen. Thumbnail Size: You can change the thumbnails so they appear large or small. Label: Clicking on Label will display the image name. Produced By C&IT Services Using ActivPanel Page 22 17/09/2009 Help: Clicking on help will give you access to help about the Resource Library. The Title Bar toggle buttons: The up/down arrows expand or collapse the entire Resource Library screen. The left/right arrows narrow or widens the window to display or hide the library folders. 12.1 USING THE RESOURCE LIBRARY TO INSERT IMAGES The Resource Library contains a variety of images which you can insert into your flipcharts. To insert an image: Ensure you have the Resource Library open [refer to section 13.0] Ensure the Show Images button is selected: Navigate to the location of the required image by choosing either Shared Collections, Personal Collections or Browse: Ensure the Library Folders list is expanded. If not then click on the left arrow button to expand: Select the required folder from the Library Folders section. Once you have located the image you wish to use, click on its thumbnail and drag it to the required location on the flipchart page. You can then manipulate the image the same way as you would manipulate other annotations [refer to section 11.0] Produced By C&IT Services Using ActivPanel Page 23 17/09/2009 12.2 USING THE RESOURCE LIBRARY TO INSERT FLIPCHART BACKGROUNDS The Resource Library contains a variety of backgrounds which you can use to replace the default white background on your flipchart. You can also change the colour of the background [refer to section 15.3] To change the background: Ensure you have the Resource Library open [refer to section 13.0]. Select the Show Backgrounds button: Click on the Shared Collections button: Ensure the Library Folders list is expanded. If not then click on the left arrow button to expand: Select the required folder from the Library Folders section. Once you have located the background you wish to use, click on its thumbnail and drag it to the flipchart page. The new background will replace the white flipchart background. 13.0 CREATING LINKS The Link Object feature enables you to link to program files and websites from a flipchart object. To insert a link object: Right click anywhere on the flipchart page. Highlight Insert. Select Link Object. The Create Link Object screen will appear: Produced By C&IT Services Using ActivPanel Page 24 17/09/2009 Enter the required URL or path in the Enter a path/filename or URL section. OR You can click on the Browse button to browse for a file: You should not need to enter any information into the Command Line Parameters unless the file you are linking to is an exe or bat file. In this case the command Line Parameters enable you to specify words, a character sequence or a control to initiate an action when the exe/bat file is opened. In the Add Link as section select either Text or Image Icon. The Text option displays the url or filename as text. For example: http://www.napier.ac.uk The Image Icon displays the link as an icon associated with the file type. For example a web page icon would look like: Once the link is added you simply need to click on the text or icon and the file or webpage will open in a new window. To delete the link object: Click on the Marquee Select Tool: Click and drag the ActivPanel pen over the link text or icon to select it. Click on the Delete Tool: Produced By C&IT Services Using ActivPanel Page 25 17/09/2009 The item will be removed from your flipchart. 14.0 THE FILL TOOL The Fill Tool enables you to fill objects with colour. Annotations, text, images and backgrounds can be colour adjusted. 14.1 CHANGING THE COLOUR OF ANNOTATIONS AND TEXT To use the Fill Tool to change the colour of annotations and text: Click on the Fill Tool within the Toolbox: Select a colour from the Colour Palette: [For information on customising your colour palette refer to section 24.2] 14.2 Click on the annotation or text that you wish to change. CHANGING COLOURS WITHIN IMAGES When you use the Fill Tool to change the colour within images it acts as a colour replacer meaning that it will replace all instances of a particular colour with the new colour. To use the Fill Tool to change colour within images: Click on the Fill Tool within the Toolbox: Select a colour from the colour palette: Produced By C&IT Services Using ActivPanel Page 26 17/09/2009 [For information on customising your colour palette refer to section 24.2]. 14.3 Click on the colour on the image that you would like to replace with the new colour. CHANGING THE BACKGROUND COLOUR USING THE FILL TOOL To use the Fill Tool to change background colour: Click on the Fill Tool within the Toolbox: Select a colour from the colour palette: [For information on customising your colour palette refer to section 24.2] Click anywhere on the flipchart background. 15.0 THE CAMERA TOOL The Camera Tool enables you to capture an image of your flipchart or annotated desktop. You have the option to capture the whole desktop or flipchart or just part of it. Once you have taken your photographs you can annotate over them as required. You can also manipulate your photographs as you would any other annotation [refer to section 11.0] To use the Camera Tool: Ensure that your screen is displaying the image/data that you wish to capture. Click on the Camera Tool: Produced By C&IT Services Using ActivPanel Page 27 17/09/2009 A popup menu will appear giving you the option to select Area or Full Screen. 15.1 PHOTOGRAPH USING THE AREA CAMERA Use this option if you only wish to photograph part of your screen. Once you select Area a rectangle surrounded by a dotted line will appear along with the Photograph Toolbox: You can resize the area you wish to capture using the resizing boxes. You can move the area you wish to capture by clicking anywhere in the box and dragging it to the desired location. Once you have selected the area you wish to capture select one of the paste option buttons from the camera toolbox: Paste to new flipchart page. Paste to My Resource Library (you will be prompted for a filename). Paste to current flipchart page. Close the Camera function. Paste to Shared Resource Library (you will be prompted for a filename). Produced By C&IT Services Using ActivPanel Paste to clipboard. This enables you to paste to other windows applications. The photograph will be taken and the Camera Toolbox will disappear. Page 28 17/09/2009 15.2 PHOTOGRAPH USING THE FULL SCREEN CAMERA You can use this option if you wish to capture an image of your whole screen. Once you highlight Full Screen the paste options appear as a submenu: 15.3 Select the relevant paste option and the full screen will be captured. MANIPULATING PHOTOGRAPHS You can annotate over your photographs as required and you can manipulate your photographs as you would any other annotation [refer to section 11.0] 16.0 THE CALENDAR TOOL The Calendar Tool allows you to mark your flipchart with the date and time that it was created. To stamp your flipchart with the date and time: Click on the Flipchart Timestamp button: The date and time will appear as a text object in the top left corner of the flipchart page. You can format and move the date/time as you would any other text object [refer to section 12.1] Please note: the date stamp does not update itself, to update the date you should delete the existing date stamp and reapply it. Produced By C&IT Services Using ActivPanel Page 29 17/09/2009 To automatically apply a date and time to every flipchart page: Click on the Menu button. Select Settings. Highlight Flipchart Objects. Click the checkbox next to Add Timestamp to all pages. Click OK. 17.0 THE REVEAL TOOL The reveal tool allows you to gradually reveal the screen as you would when uncovering points during a presentation. It can uncover the screen in any of 4 directions and is particularly useful if you want to black out information whilst discussing. To use the reveal tool to reveal your desktop or flipchart: Select Show Flipchart or Annotate over desktop from the toolbox. Click on the Reveal button: The screen will go black. Use the ActivPanel pen to move the cursor to the position you would like to reveal the screen from e.g. the top of the screen. Click and drag from the point at which you wish to reveal the screen from e.g. the top of the screen. To cancel the Reveal and fully expose your screen: Click on the Reveal button. 18.0 THE SPOTLIGHT TOOL The Spotlight Tool displays a spotlight window allowing you to highlight specific sections of your presentation whilst the rest remains hidden by a black background. To use the spotlight tool: Click on the Spotlight Tool button: Produced By C&IT Services Using ActivPanel Page 30 17/09/2009 Select Circular Spotlight or Square Spotlight as required. You can move the spotlight around the screen using the ActivPanel pen. To resize the Spotlight: Press the ActivPanel pen down and drag the cursor towards the centre of the spotlight to make it smaller or vice versa to make it larger. To cancel the Spotlight: Click on the Spotlight button again and the full screen will be revealed. 19.0 RECORDING AND PLAYING BACK YOUR FLIPCHARTS You can use the Flipchart Recorder to record your actions whilst annotating and then play the recording back as an animation. Please be aware, you cannot record when annotating over your desktop, it can only be used when annotating on a flipchart. To record a flipchart: Click on the Flipchart Recorder button: The Flipchart Recorder Toolbox will appear: Playback animation Stop Go to first frame Go to last frame Close Record Time delay between each frame (seconds) Produced By C&IT Services Using ActivPanel Timebar – indicates where you are in the recording Go to previous frame Page 31 Go to next frame 17/09/2009 Click on the Record button: You will be prompted to save the original flipchart: Click on the tick to save. OR Click on the cross if you do not wish to save. The recording will start and you can annotate as required. To stop the recording: Click on the Stop button: To playback your recording: Click on the Go To First Frame button: Click Play: Produced By C&IT Services Using ActivPanel Page 32 17/09/2009 To stop play back: Press the Stop button: 20.0 PRINTING YOUR ANNOTATED DESKTOP & FLIPCHARTS To print your flipchart or annotated desktop pages: Ensure your annotated desktop or flipchart is open. Click on the Menu button: Highlight Flipchart. Select Print. The Print dialog box will appear: Select the relevant printer here. Choose the print quality here. Select whether you wish the print out to appear black and white or in colour here. This section allows you to choose how many flipchart pages appear on your print out i.e. how many pages per column and how many per row. Select the page orientation here. Click here to add a frame around each flipchart page. Click here to add a page number to each page. Enter paper size and size of the blank margin to appear around the edge of the page here. Enter your page range here. Produced By C&IT Services Using ActivPanel Select how many copies are to be printed here. Page 33 17/09/2009 Select the required options. Click on the relevant button: Preview: Print: OK: Cancel: Preview the flipchart before you print. Print the flipchart. Change the settings but don‟t print the flipchart. Cancel the print job. The Flipchart will now print. 21.0 SAVING YOUR ANNOTATED DESKTOP AND FLIPCHARTS You will be prompted to save your Annotated desktop or flipchart when you exit ActivPX. You can also save your flipchart at any time whilst working on it unlike annotated desktops. 21.1 SAVING WHEN EXITING To save your annotated desktop or flipchart when exiting ActivPX: Click on the Close button: The following dialog box will appear: Click on the tick button to save your changes: The following screen will appear: Produced By C&IT Services Using ActivPanel Page 34 17/09/2009 Click here to navigate to the save location (usually your H drive). Enter the file name here. Navigate to the save location. Please Note: C&IT Services always recommend staff save files to their H drive. The H drive is a network drive so you can access your ActivPX files from any networked PC in any lecture theatre as well as from your office PC. The H drive is also backed up regularly and can only be accessed by you unless you share your log in details. 21.2 Enter a name for your file. Click Save. SAVING YOUR FLIPCHART WHILST WORKING When using the flipchart feature you can save at any time whilst working on the flipchart. You cannot do this when working with Annotated Desktops. To save the flipchart: Click on the Menu button: Highlight Flipchart. Produced By C&IT Services Using ActivPanel Page 35 17/09/2009 Select Save. The Save dialog box will appear: Click here to navigate to the save location (usually your H drive). . Enter the file name here. Navigate to the save location. Please Note: C&IT Services always recommend staff save files to their H drive. The H drive is a network drive so you can access your ActivPX files from any networked PC in any lecture theatre as well as from your office PC. The H drive is also backed up regularly and can only be accessed by you unless you share your log in details. Enter a name for your file. Click Save. 22.0 OPENING EXISTING FLIPCHARTS To open an existing flipchart from within ActivPX: Click on the Menu Button: Highlight Flipchart. Produced By C&IT Services Using ActivPanel Page 36 17/09/2009 Select Open. The following dialog box will appear: Click here to navigate to the location in which you saved your file (e.g. your H drive). Click once on the flipchart name to highlight it. Navigate to the folder in which you saved your file. Highlight the file you wish to open. Select Open. Your flipchart will open within ActivPX and you can edit it as required. To open an existing flipchart from My Computer: Open My Computer. Navigate to the location in which you saved your file. Double click on the flipchart you wish to open. ActivPX will automatically open along with your flipchart which you can edit as required. 23.0 CUSTOMISING ACTIVPX 23.1 CUSTOMISING YOUR TOOLBOX You can use the Tool Store to change the buttons that appear on your toolbox. You can also save your personalised toolbox to your H drive so you can open it from any PC using ActivPX. Produced By C&IT Services Using ActivPanel Page 37 17/09/2009 To add buttons to your toolbox: Click on the Menu button: Highlight Toolbox Customise. Select Tool Store. Drag and drop the tools you require from the Tool Store to the Toolbox. Please Note: You can find out the function of a button by hovering the pen or mouse over a button to display a tool tip. To remove a button from your toolbox: Click on the Menu button: Highlight Toolbox Customise. Select Tool Store. Drag and drop the tools you require from the Toolbox to the Tool Store. Please Note: You can find out the function of a button by hovering the pen or mouse over a button to display a tool tip. To save your personalised toolbox: Click on the Menu button: Highlight Toolbox Customise. Highlight Toolbox Layout. Produced By C&IT Services Using ActivPanel Page 38 17/09/2009 Select Save As. The following dialog box will open: Select your H drive from the drop down list. Enter a name for your toolbox here. Click Save to save your toolbox layout. To open your personalised toolbox from another PC: Ensure you are logged on to the PC and ensure ActivPX is open. Click on the Menu button: Highlight Toolbox Customise. Highlight Toolbox Layout. Select Open. The following dialog box will open: Select your H drive from the drop down list. Highlight the layout file you wish to open. Click Open. Produced By C&IT Services Using ActivPanel Page 39 17/09/2009 23.2 CUSTOMISING YOUR COLOUR PALETTE To change a colour on your colour palette: Right click on the colour you wish to change. Select the new colour. The colour will permanently change to your new colour. 24.0 ACTIVMARKER ActivMarker is an add-on program which has been installed alongside ActivPX within Edinburgh Napier University. ActivMarker enables you to annotate over Microsoft Office products such as Word, Excel and PowerPoint. This feature makes permanent changes to your Microsoft Office file and can be useful when highlighting important points on a document for future reference. To enable ActivMarker: Within ActivPX click on the Menu button: Select ActivMarker. The ActivMarker toolbox will appear: This icon indicates which office program you are annotating on. The Selection Tool The Pen Tool The Delete Tool 24.1 The Highlighter Tool THE PEN TOOL To use the pen: Click on the Pen Tool to select it: The current pen colour and width appears as an icon on the bottom of the toolbox: Produced By C&IT Services Using ActivPanel Page 40 17/09/2009 Indication of current pen colour and width. Click on the arrow to alter the pen colour and width. 24.2 Use your mouse or ActivPanel pen to annotate on your document. Once you lift your pen, the annotation will be applied to the file. The annotation can then be moved or resized in the same way as you would move or resize any Office drawing object. THE HIGHLIGHTER TOOL To use the Highlighter: Click on the Highlighter Tool to select it: The current highlighter colour and width appears as an icon on the bottom of the toolbox: Indication of current Highlighter colour and width. Click on the arrow to alter the Highlighter colour and width. Use your mouse or ActivPanel pen to annotate on your document. Once you lift your pen, the annotation will be applied to the file. The annotation can then be moved or resized in the same way as you would move or resize any Office drawing object. Produced By C&IT Services Using ActivPanel Page 41 17/09/2009 24.3 THE DELETE TOOL To delete your most recent annotation: Click on the Delete button: To delete an annotation other than the most recent: 24.4 Click on the annotation you wish to delete. Click on the Delete key on your keyboard. DISABLING ACTIVMARKER Once you have enabled ActivMarker, it will automatically open when you open ActivPX. To disable ActivMarker: Within ActivPX click on the Menu button: You will notice that there is a tick next to ActivMarker Click ActivMarker. The tick will disappear and ActivMarker will be disabled. 25.0 WHERE TO FIND FURTHER HELP AND INFORMATION 25.1 HELP WITHIN ACTIVPX A full set of Help documents are available within ActivPX. To access the help files: Click on the Menu button. Highlight Help. Select Contents. Make your selections from the Help screen: Produced By C&IT Services Using ActivPanel Page 42 17/09/2009 Hide/show hides or shows the Contents table. The Back and Forward buttons enable you to view the previous or next topics. The Print button prints the topic currently being viewed. Contents table lists all the Help topics. You can expand the menu by clicking on the + sign. 25.2 The Index section enables you to search using specific keywords. You can search for occurrences of words using the Search section. C&IT SUPPORT DESK If you require any help or further information please contact the C&IT Support Desk by telephoning ext 3000 (0131 455 300 externally) or emailing c&[email protected]. Produced By C&IT Services Using ActivPanel Page 43 17/09/2009