1
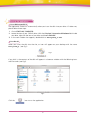
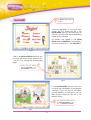
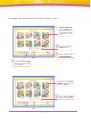
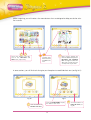
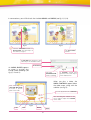
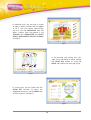
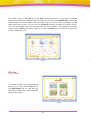
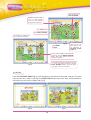
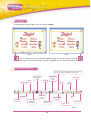
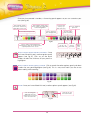
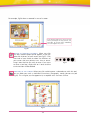
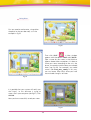
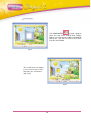
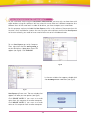
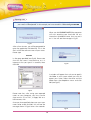
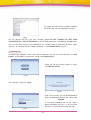
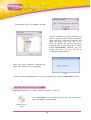
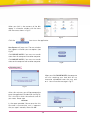
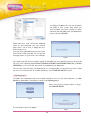
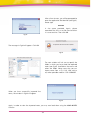
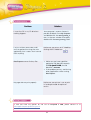
Minimum System Requirements
ñ
ñ
ñ
ñ
ñ
ñ
ñ
Windows 2000/XP/Vista Operating System
Pentium® II 400 MHz CPU
128 MB R∞ª
32 MB RAM graphics card
QuickTime Player 6 or later
CD-ROM drive
16-bit sound card
ñ
ñ
ñ
ñ
ñ
ñ
Mac OS X
G4 @ 200 MHz CPU
256 MB RAM
32 MB RAM graphics card
CD-ROM drive
16-bit sound card
Jenny Dooley - Virginia Evans
Published by Express Publishing
Liberty House, New Greenham Park, Newbury,
Berkshire RG19 6HW
Tel.: (0044) 1635 817 363
Fax: (0044) 1635 817 463
e-mail: [email protected]
http://www.expresspublishing.co.uk
© Jenny Dooley - Virginia Evans, 2008
First published 2008
Made in EU
All rights reserved. No part of this publication may be reproduced, stored in a retrieval system, or
transmitted in any form, or by any means, electronic, photocopying, or otherwise, without the prior
written permission of the publishers.
This book is not meant to be changed in any way.
ISBN 978-1-84862-294-4
2
Part A (User’s Manual)
1. What is an Interactive Whiteboard? .............................................................
2. What equipment do I need to use the IWB software? ............................
3. Running the application ...........................................................................
On an IBM compatible PC ..........................................................................
On a Mac OS ..............................................................................................
4. Navigation .................................................................................................
5. Features .....................................................................................................
Modules .....................................................................................................
Let’s Play! ...................................................................................................
Fun Time! ...................................................................................................
Posters! ......................................................................................................
Extras! ........................................................................................................
6. The toolbar ................................................................................................
7. The toolbar at a glance .............................................................................
8. Using the tools ..........................................................................................
PC Mode ....................................................................................................
Pencil ..........................................................................................................
Highlighter .................................................................................................
Create Text Box ..........................................................................................
Select Pencil/Highlighter Thickness ..............................................................
Select Pencil/Highlighter Colour ..................................................................
Zoom ..........................................................................................................
Eraser and Eraser Thickness ........................................................................
Hide Part of the Screen ..............................................................................
Isolate Part of the Screen ...........................................................................
Page Controls .............................................................................................
Print ...........................................................................................................
Clear Notes ................................................................................................
Undo/Redo .................................................................................................
Save and Load Notes ..................................................................................
Saving Notes ...........................................................................................
Loading Notes .........................................................................................
9. Using Note Exporter on an IBM compatible PC ...........................................
Exporting notes ..........................................................................................
Importing notes ..........................................................................................
10. Using Note Exporter on a Mac OS ..............................................................
Exporting notes ..........................................................................................
Importing notes ..........................................................................................
11. Troubleshooting ........................................................................................
12. Contact support ........................................................................................
Part B (Teacher’s Guide)
3
p.
p.
p.
p.
p.
p.
p.
p.
p.
p.
p.
p.
p.
p.
p.
p.
p.
p.
p.
p.
p.
p.
p.
p.
p.
p.
p.
p.
p.
p.
p.
p.
p.
p.
p.
p.
p.
p.
p.
p.
4
4
5
5
5
6
11
11
15
16
17
17
18
18
19
19
19
19
19
20
20
20
21
21
22
22
22
22
22
22
23
24
25
26
27
28
29
30
32
32
Welcome to Fairyland 2 Interactive Whiteboard (IWB) Software*. This
application is designed to follow the Fairyland course and enhance your own
and your learners’ experience in the language classroom.
What is an Interactive Whiteboard?
An Interactive Whiteboard is a type of touch-sensitive whiteboard, which has the power to
transform any classroom into a dynamic learning environment.
It allows teachers and students to participate interactively in activities projected onto the board
from a data projector which is connected to a computer.
Interactive whiteboards are widely used in schools as they are much more lively and interesting
than conventional teaching. They provide ways to show students anything which can be
presented on a computer (educational software, videos, websites etc). Research has shown that
teaching through interactive whiteboard software has numerous advantages:
ñ
ñ
ñ
ñ
ñ
ñ
ñ
It
It
It
It
It
It
It
can accommodate different learning styles.
is suitable for both small and large groups of students.
helps increase students’ attention span.
assists the assimilation of new information.
dramatically increases real teaching time.
reduces the time teachers need for preparation.
eliminates the need for additional equipment (DVD player, CD player etc).
All in all, it is a powerful teaching tool that will transform your lessons and your classroom!
What equipment do I need to use the IWB software?
ñ
ñ
ñ
ñ
A computer (IBM compatible or Mac OS)
A projector
An interactive whiteboard or a device that turns a plain whiteboard into an interactive whiteboard
Speakers
*Note: All the Express Publishing IWB software includes a User’s Manual in PDF format. After the
software has run automatically, click the ‘X’ button on the top right corner of the screen to exit.
Then go to ‘My computer’, right click on the drive this software is in, and click ‘Explore’. This will
open up a window with all components of the software, including the User’s Manual. Double click
on the name of the manual to open it.
The User’s Manual includes everything the teacher needs to know about using the IWB software.
We strongly suggest that the teacher takes some time to familiarise him/herself with the
applications (i.e. using the toolbar, task types and how to complete them, etc) on the IWB before
proceeding any further.
4
Running the application
On an IBM compatible PC
The application should run automatically when you insert the disk into your drive. If it does not,
please follow these steps:
1. Go to START>MY COMPUTER.
2. Locate the icon of your CD/DVD drive. With the Fairyland 2 Interactive Whiteboard disk inside
your drive, right click the icon of your drive and choose EXPLORE.
3. In the new window that appears, double-click on Fairyland_2.exe.
On a Mac OS
When you insert the disk into the slot, an icon will appear on your desktop with the name
Fairyland_2 (see Fig 1).
Fig 1
If you click it, the contents of the disk will appear in a browser window with the following icons
and file names (see Fig 2).
Fig 2
Click the
icon to run the application.
5
By clicking this button you
can EXIT the application at
any time.
Navigation
Once the application is running in your
system, the first screen you see is the
MAIN MENU (see Fig 3). By clicking any of
the titles, you can enter the corresponding
section of the software.
All sections that appear in the MAIN
MENU lead to SUBMENUS. For example, if
you wish to enter Unit 1, click MODULE 1.
Fig 3
Once in the MODULE MENU (see Fig 4), you
can enter the lesson of your choice in Unit
1 or Unit 2 by clicking the corresponding
pages.
If you click this button,
you can GO BACK to the
MAIN MENU at any time.
Fig 4
In the LESSON MENU the active tasks you
can enter are indicated by an orange circle
(see Fig 5). Click a task to enter. This allows
you the flexibility to skip certain tasks or
pick up from where you left off in the
previous lesson.
This button will take you to
the PREVIOUS MENU; in this
case, the MODULE 1 MENU.
Fig 5
6
For example, Fig 6 shows the screen for Exercise 1 of Lesson 3 in Unit 1.
Click the headphones
icon to LISTEN to the
audio of the sentences.
You can play the audio
as many times as you
wish.
Click this button to
REVEAL the text.
Click this button to GO
TO THE ADDITIONAL
COMPREHENSION TASKS.
Fig 6
Clicking the PLAY VIDEO
button activates the video
of the dialogue.
Clicking any of the SPEECH
BUBBLES in the dialogue will
activate its AUDIO.
Click this button to HIDE
the text of the dialogue.
Fig 7
7
While navigating, you will notice a few more buttons that are designed to help you do the tasks.
For instance:
Fig 8
Fig 9
?
These two buttons will take
you to the PREVIOUS and
NEXT tasks, respectively.
...
Clicking these
buttons shows
the KEY to the
item.
Some exercises provide you
with the additional option of
DELETING THE ANSWER
KEY. Clicking this button will
allow you to restart the task
as many times as you wish.
In some sections, you will find tasks that give you the option to reveal/hide their text (see Fig 10-11).
Fig 10
Fig 11
Click the HEADPHONES to play
the audio of each item.
Click this button to
REVEAL THE TEXT.
8
Click this button to
HIDE THE TEXT (see
Fig 10).
In some sections, you will find tasks that include AUDIOS and VIDEOS (see Fig 12, 13, 14).
Fig 12
Fig 13
Click the TAPESCRIPTS button to
REVEAL/HIDE the tapescripts of
the audio (see Fig 13).
The PLAY VIDEO
button.
A SEEK BAR that operates in the
same way as in the Video section.
PLAY/PAUSE
An AUDIO PLAYER appears
on screen in activities that
include audio recording (see
Fig 6, 7, 12 and 13).
Fig 14
Go to the
BEGINNING/END
of the recording.
A VOLUME control that
operates in the same way as
in the Video section.
When you play a video, the
VIDEO CONTROLS appear below
the video screen, along with the
subtitles (see Fig 15).
Click and drag the
SEEK BAR INDICATOR
to locate a specific
point in the video.
Click to (de)activate the SUBTITLES.
Click and drag this indicator to the
left or right to adjust the VOLUME
of the video.
Fig 15
STOP
PLAY
PAUSE
MUTE
9
All sections, i.e. Modules, Let’s play!, Fun Time!, Posters!, and Extras!, are organised in the same way
(see FEATURES section for more details).
For instance, from the Main Menu, click Extras! section to enter EXTRAS MENU (see Fig 16). Then
click any of the given units, e.g. Happy Halloween! to enter the equivalent UNIT MENU (see Fig 17).
Fig 16
Fig 17
The activated tasks are again circled in orange.
10
Features
The Fairyland IWB Software is designed as a teaching aid for the coursebook and for this reason
they are identical content-wise. Moreover, it includes all the course features such as class posters
and board games, all organised in individual menus for easy access. Wherever possible, additional
interactive activities have been added so as to provide further practice.
The execution of the task types used in the course is naturally slightly different when using an
interactive whiteboard. Whereas you can still use the PENCIL (see PENCIL section) to write your
notes or answers in a task, you may also complete them by either clicking or dragging and dropping.
Below is a short presentation of the task types used in each section.
Modules
As in the coursebook, each module includes two units, each of which is divided into five lessons.
In vocabulary tasks, click the small icons to make them larger (see Fig 18-19). As in Fig 10 and 11,
clicking the HEADPHONES will play the audio of the item and clicking the REVEAL/HIDE TEXT
buttons will reveal/hide the written forms.
Fig 18
Fig 19
You will notice that dialogues have been laid
out slightly differently in the software (see
Fig 20), because the screen is perceived as
one page rather than the two-page spread
of the book. Therefore, in order to avoid
confusion, you may consider presenting the
dialogue with books closed.
The GO TO THE ADDITIONAL
TASK button
Fig 20
11
An additional comprehension task for every
dialogue involves matching the correct
audio sentence to the correct picture (see
Fig 21). Click the HEADPHONES button
below the pictures, listen and then click
the frame of the dialogue it corresponds
to. A correct answer will colour the frame,
whereas a wrong answer will activate a
sound effect.
Click this button to return to the LET’S LISTEN
task of the coursebook (see Fig 20).
Fig 21
Practice tasks vary throughout the software, but all can be completed either by clicking, dragging
and dropping or using the PENCIL tool from the toolbar to directly write your notes, draw lines
etc. For example:
In circling tasks, you can use the PENCIL
tool to circle the correct item on screen.
Alternatively, you can click the SHOW KEY
buttons or click the item itself to circle it
(see Fig 22).
Fig 22
12
Matching tasks can be done by dragging
and dropping each item into your chosen
place, such as in tasks in Fig 23.
Alternatively, you can use the PENCIL tool
to write your own answers.
Fig 23
Speaking tasks generally include all the suggested answers. Clicking the items (see Fig 24), or the SHOW
KEY buttons (see Fig 25), reveals the suggested answers as in the examples.
Fig 24
Fig 25
In Portfolio activities you can either use the
PENCIL tool to draw your own picture and
then describe it or simply click the SHOW
KEY button to reveal the suggested answer
(see Fig 26).
Fig 26
13
In colouring tasks, you may click a crayon
to select a colour and then click the object
to fill it with that colour. Alternatively,
you may use the HIGHLIGHTER tool and
select a colour from the palette in the
TOOLBAR (see HIGHLIGHTER and SELECT
PENCIL/ HIGHLIGHTER COLOUR SECTIONS)
(see Fig 27).
Fig 27
In line drawing and tracing tasks, you
again have the choice of either clicking
the SHOW KEY button or using the
PENCIL tool to draw the lines (see Fig 28).
Fig 28
In writing tasks, you can either click the
SHOW KEY buttons to reveal the
suggested answers or use the PENCIL tool
to write your own (see Fig 29).
Fig 29
14
The stickers activity in LESSON 5 of each UNIT can be carried out in many ways. To provide
listening and vocabulary comprehension practice, you can click the HEADPHONES to play the
audio of each item while students find the stickers and stick them on their coursebook. To help
them check their answers, you can click the SHOW KEY buttons to reveal the correct stickers.
Then, you can provide them with writing practice by inviting students to the board to write each
word, using the PENCIL tool. Alternatively, you can click the PEN button to reveal the written form
of each word (see Fig 30).
Fig 30
Let’s Play!
This section includes four animated board
games (Fig 31). Click the LET’S PLAY icon in
the MAIN MENU (Fig 3) to see the four
board games screen. Then, click the desired
game to play (Fig 32).
Fig 31
15
Click this button to
SPIN THE WHEEL.
Indicates which team’s
turn it is and provides
space to write answers
to questions if desired.
the START point
the TEAM COUNTERS
The number of squares the
team’s counter will move.
Fig 32
the FINISH
POINT
If a team’s counter
lands on one of
these spaces, they
are prompted to
GO BACK TO THE
START line.
If the team answers the question
incorrectly, click the WRONG ANSWER
button. The team’s counter returns to
its previous position.
If the team answers the question correctly,
i.e. in this case name the action, click the
RIGHT ANSWER button. Then the other
team gets a turn on the wheel!
Fig 33
Fun Time!
From the FUN TIME! MENU (Fig 34), click the poster at the centre of the screen to enter. Click each
item to listen to its audio. If you click the SHOW TEXT button the written form will be revealed as
well every time you click an object (see Fig 35).
Fig 34
Fig 35
16
Posters!
Click the posters icons on the MAIN MENU to enter the POSTERS SUBMENU (see Fig 36). Then, click
the desired poster to enter. Click an object in the poster and listen to its audio. Click the
button
to make its word/phrase/sentence appear on the screen (Fig 37).
Fig 36
Fig 37
Extras
Upon entering the EXTRAS SUBMENU (see Fig 38), click any of the pictures to go to the equivalent
optional unit (see Fig 39). The activities include songs, colouring tasks, matching tasks and writing tasks
as in the rest of the coursebook.
Fig 38
Fig 39
17
The toolbar
At the bottom of every screen, you will find the Toolbar.
Fig 40
Fig 41
If for any reason you wish to hide the toolbar during your lesson, you can do so by
clicking the arrow on the left-hand side. To make it reappear, you can click the arrow on the right.
The toolbar at a glance
These little green triangles indicate that there
are further options available for this tool.
Select pencil /
highlighter
colour
Pencil
Create
text box
Highlighter
PC mode
Select pencil /
highlighter
thickness
Zoom
Isolate part
of the
screen
Save notes
Print
Eraser and
eraser
thickness
Undo
Redo
Notes page
controls
Hide part of
the screen
Load notes
Clear notes
Fig 42
18
Using the tools
PC MODE: After you have used one
of the tools, click this to regain your
normal mouse pointer function. This
way you can once again click and
drag and drop.
PENCIL: Click to turn your mouse
pointer into a pencil. Now you can
make your own notes on every screen
provided in this software – a very
useful tool if you want to write
students’ own answers during
prediction warm-up or error correction
(see Fig 43). Make sure you select a
colour and thickness for your pencil
before you actually write anything
(see SELECT PENCIL / HIGHLIGHTER
THICKNESS and COLOUR sections).
Fig 43
HIGHLIGHTER: Click and drag on
every word, phrase or sentence you
wish to highlight in a text (see Fig 44).
Again, you have the option of
selecting the colour and thickness of
your highlighter first.
Fig 44
CREATE TEXT BOX: If you don’t want to use the pointer/electronic pen of your interactive
whiteboard, this is a useful alternative for making notes. Click and drag to create a text
box and type in your notes (see Fig 45).
This is a sample text box:
Drag the grey
bar to MOVE
the text box.
Click and drag the
arrows to RESIZE
the text box.
This is the TEXT
BOX FORMATTING
PANEL.
Fig 45
19
Once you have created a textbox, a formatting panel appears so you can customise your
text (see Fig 46).
This indicator shows
that these colours are
applicable to the text.
This indicator shows that
these colours are applicable
to the background.
Click a colour for your text.
Increase font
size by 1 pt
with each click.
Click a colour for
your background.
Click to underline
your text.
Click to make
your text bold.
Fig 46
Decrease font
size by 1 pt
with each click.
Click to make your background
transparent so you can see your notes
superimposed on the screen.
Click to
italicise
your text.
Click to
bullet
your
text.
SELECT PENCIL/HIGHLIGHTER THICKNESS: Once
you have clicked this tool, another options panel
appears (see Fig 47). Click any of the brush
strokes to select the thickness of your pencil or
highlighter.
Fig 47
SELECT PENCIL/HIGHLIGHTER COLOUR: Click to reveal the colour options panel and select
a colour for your pencil/highlighter (see Fig 48). This is a very useful tool if you like to use
colour-coding while teaching.
Fig 48
ZOOM: Once you have clicked this tool, another options panel appears (see Fig 49).
Click this to exit
the zoom mode.
Click and drag this
diagonally over the
part of the screen you
want to zoom into.
Fig 49
20
For example, Fig 50 shows a zoomed in area of a screen.
In the bottom right corner, there are four
arrows pointing to the top, bottom, left
and right. By clicking them individually
you can navigate the screen.
Fig 50
ERASER and ERASER THICKNESS: When you click
this tool, another options panel appears so you can
select the thickness of your eraser (see Fig 51). Click
the circle of your choice to select the thickness of
your eraser and your pointer turns into an eraser.
Drag it over the area you wish to erase. If you want
to erase a text box, simply click on it once and the
entire text box will be deleted.
Fig 51
HIDE PART OF THE SCREEN: When you click and drag over a selected area with this tool,
you can hide areas such as individual illustrations, paragraphs, words, phrases etc (see
Fig 52). This will give you the opportunity to explore tasks and texts further.
Fig 52
21
ISOLATE PART OF THE SCREEN: When
you click and drag over an area of the
screen with this tool, the section you
have selected will be visible and
therefore focus students’ attention
directly on it. The rest of the screen
fills up with the colour of your choice
(see Fig 53).
Fig 53
PAGE CONTROLS: Clicking this tool will
reveal another options panel so you can
organise your notes in different layers (see
Fig 54). Each layer works as a blank page
you can write your notes on. This page
can be either transparent and visible over
the task screen, or opaque and function
like a conventional whiteboard. The
difference is that now you can prepare
your notes before your lesson, or save
them after the lesson so as to use them
again in the future with the same class or
a different class of the same level.
Current
page.
Click to
go to the
previous
page.
Click to
go to
the next
page.
Total
number
of pages.
Click to
make a
page
opaque.
Click to
make a
page
transparent.
Click to
add a
page.
Click to
delete a
page.
Fig 54
PRINT: Click this to print the screen you are working on, as it is – with notes. Please note
that the preferred printing mode for this feature is landscape.
CLEAR NOTES: Click this to erase all your notes on a particular screen.
UNDO / REDO: Click to undo or redo any action you have just done.
SAVE and LOAD NOTES: These two tools are especially useful if you want to use
the same notes with another class on a different day. Please note that the
Fairyland 2 IWB notes and annotations can be accessed only through this
software; therefore, they will be saved in a file created by the software and
identified by the software alone.
22
Saving Notes
First you need to make notes, using either
the pencil or the text box tool, as in the
example in Fig 55.
Fig 55
Then click SAVE
. A blue window
appears with the options SAVE and CANCEL.
Type a name for your notes in the field that
appears above these two options. It is best to
name your notes according to the unit, the
lesson, the exercise and the date you created
them (see Fig 56). For example, you could
name a file U7L2_Exl_12May. In this way,
you can locate them easily once you have
accumulated a long list of notes.
Fig 56
It is possible that your system will notify you
that ‘Local’, i.e. this software, is trying to
store a file in your computer (see Fig 57). Click
ALLOW.
Now you have successfully saved your notes.
Fig 57
23
Loading Notes
Click LOAD NOTES
to load a page of
notes you have saved. Another blue window
appears with the options LOAD and CANCEL
(see Fig 58). Click the file name of your notes
and then click LOAD.
Fig 58
Your saved notes will appear
in the same manner as they
did when you saved them
(see Fig 59).
Fig 59
24
Using Note Exporter on an IBM compatible PC
As you save notes while using the Fairyland 2 IWB Software, you may wish to share them with
other teachers using this software. You may also wish to use them on a different computer for a
different class of the same level. In order to do either, you have to export your saved notes.
For this purpose, we have included the Note Exporter utility in this software. Please note that this
function is only available for systems that are using the same software and that for Note Exporter
to function correctly, you need to have saved at least one set of whiteboard notes.
To run Note Exporter go to My Computer.
Then, right-click the icon Fairyland_2
on your disk drive. A drop-down menu will
appear (see Fig 60). Click EXPLORE.
Fig 60
In the new window that appears, double-click
the NoteExporter.exe icon (see Fig 61).
Fig 61
Note Exporter will now start. The new window that
appears will offer you two options (see Fig 62).
Click EXPORT NOTES if you want to transfer
notes from this computer to another computer.
Click IMPORT NOTES if you want to transfer
notes to this computer from another computer.
Fig 62
25
Exporting notes
N.B.: Before exporting any notes, you will need to have created a folder in your computer into which
your notes will be exported. In this example, we have named this folder Fairyland2IWB.
When you click EXPORT NOTES the computer
will start searching your hard disk for any
interactive whiteboard notes that may exist
on it. You will see the message in Fig 63.
Fig 63
After a few minutes, you will be prompted to
enter the application file identifier. This is the
file in which the software saves all your notes.
Please type
FLand2
in the space provided (see Fig 64). Please note
that this file name is case-sensitive, so it is
important that you type it in correctly. Now
click OK.
Fig 64
A window will appear that asks you to specify
the folder in your system where you wish to
export your notes. Select the drive and the
folder from the drop-down menu and click
OK (see Fig 65).
Fig 65
Please note that, after saving your exported
notes on your computer, you may transfer
them onto a CD or DVD, a floppy disk or a
USB memory stick.
Once you have specified where you want your
notes to be saved, click OK. You will see the
message shown in Fig 66 after a few seconds.
Fig 66
26
The saved notes files have now been moved to
the folder that the user specified (see Fig 67).
Fig 67
You can rename the file if you wish. However, please DO NOT CHANGE THE FIRST FOUR
CHARACTERS (FL2_) OR THE EXTENSION, as this will make your notes untraceable by the application.
You can now store the file(s) you exported on any storage media, or send them by email. When
you want to use these files on another computer, use the IMPORT NOTES function.
Importing notes
To import your exported notes onto another computer that has the same software, run Note
Exporter as described in the previous section (see Exporting notes).
When you see the window shown in Fig 68,
click IMPORT NOTES.
Fig 68
The message in Fig 69 will appear:
Fig 69
After a few minutes, you will be prompted to
enter the application file identifier. Please type
FLand2
in the space provided (see Fig 70). Again,
please remember that this is a set file name
and that it is case-sensitive. Now click OK.
Fig 70
27
The message in Fig 71 will appear. Click OK.
Fig 71
The next window will ask you to specify the
folder in which you have saved the exported
notes (see Fig 72). Scroll down the menu and
select the folder. Then, click OK. In this
particular example, the user has saved their
exported notes on their computer in a folder
called Fairyland2IWB. However, you can
import notes from a CD, DVD, USB stick or
any other portable medium.
Fig 72
When you have successfully imported the
notes, the window in Fig 73 will appear.
Fig 73
In order to view the imported notes, you may now load them using the LOAD NOTES function.
Using Note Exporter on a Mac OS
Note Exporter operates in a slightly different manner on a Mac OS.
To run Note Exporter, insert the disk into your drive. The icon shown in
Fig 74 will appear on your desktop.
Fig 74
28
When you click it, the contents of the disk
appear in a browser window with the icons
and file names shown in Fig 75.
Fig 75
Click the
icon to run the application.
Note Exporter will now start. The new window
that appears will offer you two options (see
Fig 76).
Click EXPORT NOTES if you want to transfer
notes from this computer to another computer.
Click IMPORT NOTES if you want to transfer
notes to this computer from another computer.
Fig 76
Exporting notes
When you click EXPORT NOTES the computer
will start searching your hard disk for any
interactive whiteboard notes that may exist
on it. You will see the message in Fig 77.
Fig 77
After a few minutes, you will be prompted to
enter the application file identifier (see Fig 78).
This is the file in which the software saves all
your notes. Please type
FLand2
in the space provided. Please note that this
file name is case-sensitive, so it is important
that you type it correctly. Now click OK.
Fig 78
29
A window will appear that asks you to specify
the folder in your system from which you
wish to export your notes (see Fig 79). Select
the drive and the folder from the drop-down
menu and click CHOOSE.
Fig 79
Please note that, after saving your exported
notes on your computer, you may transfer
them onto a CD or DVD, a floppy disk or a
USB memory stick.
Once you have specified where you want your
notes to be saved, click OK. You will see the
message shown in Fig 80 after a few seconds.
Fig 80
The saved notes files have now been moved to the folder the user specified. You can rename the
file if you wish. However, please DO NOT CHANGE THE FIRST FOUR CHARACTERS (FL2_) OR THE
EXTENSION, as this will make your notes untraceable by the application.
You can now store the file(s) you exported on any storage media, or send them by email. When
you want to use these files on another computer, use the IMPORT NOTES function.
Importing notes
To import your exported notes onto another computer that has the same software, run Note
Exporter as described in the previous section (see Exporting notes).
When you see the window shown in Fig 81,
click IMPORT NOTES.
Fig 81
The message in Fig 82 will appear:
Fig 82
30
After a few minutes, you will be prompted to
enter the application file identifier (see Fig 83).
Please type
FLand2
in the space provided. Again, please
remember that this is a set file name and that
it is case-sensitive. Then click OK.
Fig 83
The message in Fig 84 will appear. Click OK.
Fig 84
The next window will ask you to specify the
folder in which you have saved the exported
notes (see Fig 85). Scroll down the menu and
select the folder. Please note that you can
import notes from a CD, DVD, USB stick or
any other portable medium. Click CHOOSE.
Fig 85
When you have successfully imported the
notes, the window in Fig 86 will appear.
Fig 86
Again, in order to view the imported notes, you may now load them using the LOAD NOTES
function.
31
Troubleshooting
Problem
Solution
I insert the CD in my CD drive but
nothing happens.
Your computer’s autorun feature is
possibly disabled. Go to My Computer
and double click the Fairyland_2
icon. In the new window that opens,
double-click the Fairyland_2 icon.
I’ve just written some notes and I
want to go back to using the main
application, but it seems that I cannot
click anything.
Make sure you return to PC Mode by
clicking the PC Mode icon
.
Note Exporter cannot find my files.
ñ Make sure you have typed the
application file identifier correctly.
For Fairyland 2 IWB, the file
identifier is FLand2.
ñ If the problem persists, avoid using
other applications while running
Note Exporter.
My pages do not print properly.
Make sure your printer is set to print
in landscape mode for optimum
results.
Contact support
In case you have any queries on the use of Fairyland 2 IWB, please contact us at
[email protected] .
32
A user-friendly Teacher’s Guide on how to use Fairyland 2 Interactive
Whiteboard Software with the Fairyland course.
MODULES
The IWB software contains the same four modules as the Fairyland 2 Pupil’s Book. Each module is
divided into two units.
UNITS
Here are some suggestions on how to approach each section/activity type encountered within each unit
of Fairyland 2.
❏ Presentation of the new language (Vocabulary)
We suggest that the vocabulary be presented through the IWB software. The teacher refers the pupils
to the items displayed on the IWB. He/She clicks on the items, one at a time, and the headphone
symbol for the pupils to listen and repeat chorally and/or individually. To display the written word the
teacher clicks on the ABC symbol.
This feature of the IWB software is ideal not only for presentation of vocabulary but also for
checking/reviewing vocabulary, reinforcing spelling, dictation feedback and general revision.
❏ Songs
All the songs are fully animated and also have an optional subtitle feature which makes the IWB
software an ideal vehicle to practise the songs in an entertaining way. The teacher refers the pupils to
the animation on the IWB and encourages them to join in the actions and sing along.
In some instances, the songs are accompanied by an activity (e.g. Complete. Then sing.; Listen and circle.
Then sing. etc). In these cases we suggest the activity be completed in the Pupil’s Books while listening
to the song through the IWB software. Then the teacher can check the pupils’ answers through the
IWB software, by clicking on the appropriate button(s), before playing the video.
❏ Activities
There is a wide variety of activities catering for all types of learners and learning styles such as:
ñ Matching
ñ Circling
ñ Colouring/Drawing
ñ Craftwork
ñ Tracing, etc
All activities are to be completed first in the Pupil’s Book. The IWB software can be used for the pupils
to check their answers. (For further information see User’s Manual.)
❏ Dialogues
All of the dialogues on the IWB software offer the following features:
ñ The dialogue is displayed on the IWB and the teacher plays the audio by clicking on the audio
player/symbol for the pupils to listen and follow in their books.
33
Note: The teacher has the option to display the dialogue with or without the speech bubbles by
clicking on the appropriate button (
).
ñ The teacher plays the fully-animated video of the dialogue on the IWB for the pupils to watch
together as a class.
Note: The teacher has the option to display the video with or without the subtitles by clicking on
the appropriate button (subtitles on/off).
The dialogues can be exploited in the following ways:
ñ The teacher clicks on the appropriate button (
) to display the dialogue. Then he/she clicks on
the headphone symbol on each picture in order for the pupils to listen and repeat chorally and/or
individually.
ñ For further practice of the dialogue, the teacher clicks on the appropriate button (
) to reveal
the dialogue in grey scale. Then he/she clicks on the headphone symbol for the pupils to listen to
the exchange and identify which picture it corresponds to.
Extension
i As a means of bringing the dialogue to life, we suggest the teacher assign roles and allow the
pupils some time to rehearse. During this stage, the dialogue is displayed on the IWB to serve as
a prompt. Then the teacher hides the speech bubbles by clicking on the appropriate button and
the pupils, in groups, perform (act out) the dialogue for the rest of the class. The teacher can refer
the pupils to the speech bubbles should they encounter any difficulties.
ii The teacher plays the dialogue through the IWB software. He/She pauses the video at strategic
points, i.e. when an answer is expected, when an action is about to happen, etc, and asks the
pupils to predict what is said/will happen next.
❏ Listening
All listening activities should be done the following way: The pupils work in their Pupil’s Books while
the teacher plays the audio through the IWB software, by clicking on the appropriate audio symbol.
Once the activity is completed, the teacher checks the pupils’ answers through the IWB software by
activating the key button(s).
Extension
i Upon completion of the activity, the teacher encourages pupils to respond to his/her questions,
describe the people/items in the picture(s), play guessing games, etc as a means of activating the
language used in the listening activities.
ii. Upon completion of the activity, the teacher plays the audio again and pauses at strategic points,
i.e. when an item/colour/name is mentioned. He/She encourages the pupils to say the word(s)
that come next.
❏ Portfolio
We suggest that all Portfolio activities are approached exclusively through the IWB software.
First, the teacher displays the model by clicking on the key button. Then he/she points to the picture(s)
and the text and invites pupils to read it. Finally the teacher assigns the Portfolio activity as classwork or
homework.
34
❏ Speaking
We suggest that all types of speaking activities should be exploited with the use of the IWB software
as follows:
ñ First the teacher explains the activity and assigns roles when required.
ñ Then the teacher uses the model, pictures, etc on the IWB software in order to elicit ideas/
vocabulary, etc.
ñ Then the pupils have some time to prepare while the teacher circulates and monitors the activity.
ñ Finally, the pupils perform the activity in front of the class.
Note: We advise that all speaking activities be recorded in order to be included in the Pupils’
Portfolio.
❏ Stickers
All stickers activities should be done the following way: The pupils work in their Pupil’s Books while the
teacher plays the audio through the IWB software, by clicking on the appropriate audio symbol. Once
the activity is completed, the teacher checks the pupils’ answers through the IWB software by
activating the key button(s).
LET’S PLAY! (Board Games)
The board games can be played through the IWB software. The teacher assigns two teams, Team 1 to
represent Woody and Team 2 to represent Frosty, and the class plays the game together: The teacher
clicks on the SPIN! button to select a number. Then he/she invites a member of Team 1 or Team 2 to
name the item displayed. He/She clicks on the tick or cross accordingly and the game proceeds.
Alternatively, the pupils can play the board games in pairs using their Activity Books.
FUN TIME!
This section presents the key vocabulary of the course and can be used for consolidation, revision,
dictation, spell check, etc. The teacher points to an item and elicits the word. Then he/she clicks on
the item for the pupils to listen and repeat. By clicking on the ABC button, the written words are
revealed.
POSTERS
The posters display the vocabulary of the first spread as well as the picture of the first song. The teacher
can consolidate the vocabulary through the IWB software by eliciting the words and clicking on the
ABC button to display the words in written form if needed.
EXTRAS
Fairyland 2 IWB software contains the Optional Units of the course as well as the My Letters section. The
teacher approaches each activity according to the instructions previously mentioned for each activity type
(e.g. Sing, Follow, count and write, etc).
35
How to approach a unit using
Fairyland 2 IWB software.
Below the teachers can find a detailed guide for a selected unit from Fairyland 2.
Module 1 – Unit 2
Lesson
1
Vocabulary (Pupil’s Books closed.) The teacher refers the pupils to the items displayed on the IWB. He/She
clicks on the items, one at a time, and the headphone symbol for the pupils to listen and repeat chorally
and/or individually. To display the written word the teacher clicks on the ABC symbol. This feature of
the IWB software is ideal not only for presentation of vocabulary but also for checking/reviewing
vocabulary, reinforcing spelling, dictation feedback and general revision.
Ex. 1 (Pupil’s Books open.) The pupils complete the activity in their Pupil’s Books. Then the teacher
confirms their answers by clicking on the key buttons. Finally the teacher refers the pupils to the
animation on the IWB and encourages them to join in the actions and sing along.
Ex. 2 (Pupil’s Books open.) The pupils complete the activity in their Pupil’s Books. Then the teacher
colours in the items through the IWB software with prompts from the pupils (e.g. Teacher: Anna,
what colour is your lamp? Anna: My lamp is pink.).
Ex. 3 (Pupil’s Books open.) The pupils work in their Pupil’s Books while the teacher plays the audio
through the IWB software, by clicking on the appropriate audio symbol. Once the activity is
completed, the teacher checks the pupils’ answers through the IWB software by activating the
key button(s).
Extension
i Upon completion of the activity, the teacher encourages pupils to respond to his/her questions.
e.g. Teacher: How old is Sam? Pupil: (He’s) six. etc
ii Upon completion of the activity, the teacher plays the audio again and pauses at strategic points,
i.e. when an age is mentioned. He/She encourages the pupils to say the number that comes next.
e.g. Tapescript: How old are you today, Sam? (pause)
Pupil 1:
I’m six! etc
Lesson
2
Vocabulary (Pupil’s Books closed.) The teacher refers the pupils to the items displayed on the IWB.
He/She clicks on the items, one at a time, and the headphone symbol for the pupils to listen and
repeat chorally and/or individually. To display the written word the teacher clicks on the ABC symbol.
This feature of the IWB software is ideal not only for presentation of vocabulary but also for
checking/reviewing vocabulary, reinforcing spelling, dictation feedback and general revision.
Ex. 1 (Pupil’s Books open.) The pupils complete the task in the Pupil’s Books. The teacher then checks
their answers through the IWB software.
Ex. 2 (Pupil’s Books open.) The pupils complete the task in the Pupil’s Books. Then the teacher colours
in the shapes through the IWB software with prompts from the pupils. (e.g. Teacher: Tom, what
colour is your circle? Tom: My circle is green.)
36
Ex. 3 (Pupil’s Books closed.) The teacher refers the pupils to the animation on the IWB and encourages
them to join in the actions and sing along.
Lesson
3
Ex. 1 (Pupil’s Books open.) The dialogue is displayed on the IWB and the teacher plays the audio by
clicking on the audio player/symbol for the pupils to listen and follow in their books.
Note: The teacher has the option to display the dialogue with or without the speech bubbles by
clicking on the appropriate button (
).
Then he/she plays the fully-animated video of the dialogue on the IWB for the pupils to watch
together as a class.
The dialogues can be exploited in the following ways:
ñ The teacher clicks on the appropriate button (
) to display the dialogue. Then he/she clicks on
the headphone symbol on each picture in order for the pupils to listen and repeat chorally and/or
individually.
ñ For further practice of the dialogue, the teacher clicks on the appropriate button (
) to reveal
the dialogue in grey scale. Then he/she clicks on the headphone symbol for the pupils to listen to
the exchange and identify which picture it corresponds to.
Extension
iii. As a means of bringing the dialogue to life, we suggest the teacher assign roles and allow the
pupils some time to rehearse. During this stage, the dialogue is displayed on the IWB to serve as
a prompt. Then the teacher hides the speech bubbles by clicking on the appropriate button and
the pupils, in groups, perform (act out) the dialogue for the rest of the class. The teacher can refer
the pupils to the speech bubbles should they encounter any difficulties.
iv. The teacher plays the dialogue through the IWB software. He/She pauses the video at strategic
points, i.e. when an answer is expected, when an action is about to happen, etc, and asks the
pupils to predict what is said/will happen next.
e.g. Tapescript: How old are you today, Woody? (pause)
Pupils:
I’m seven today! etc
Lesson
4
Ex. 1 (Pupil’s Books open.) The pupils complete the activity in the Pupil’s Books. The teacher then checks
their answers through the IWB software.
Ex. 2 (Pupil’s Books open.) The pupils complete the task in the Pupil’s Books. Then the teacher colours
in the items through the IWB software with prompts from the pupils. (e.g. Teacher: Liz, what
colour is the clock? Liz: It’s yellow.)
Extension
The teacher names the colour of the item and the pupils say which item it is.
e.g. Teacher: (It’s) blue.
Pupil 1: (It’s the) robot! etc
Ex. 3 (Pupil’s Books closed.) First, the teacher displays the model by clicking on the key button. Then
he/she points to the picture and invites the pupils to say what is on the Birthday card (e.g.
balloons, stars, candles, etc). Then the teacher invites pupils to read the greeting on the card.
37
Finally he/she assigns the Portfolio activity as classwork or homework.
Lesson
5
Ex. 1 (Pupil’s Books open.) The teacher refers the pupils to the pictures and the texts in their Pupil’s Books
and instigates a discussion about birthday parties (e.g. What they wear, who is invited, what they
eat/drink/play, etc). Then the teacher plays the animation on the IWB and encourages the pupils
to join in the actions and sing along.
Ex. 2 (Pupil’s Books open.) The pupils work in their Pupil’s Books while the teacher plays the audio
through the IWB software, by clicking on the appropriate audio symbol. Once the activity is
completed, the teacher checks the pupils’ answers through the IWB software by activating the
key buttons.
38
USER’S MANUAL
& TEACHER’S GUIDE
ISBN 978-1-84862-294-4