1
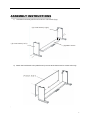
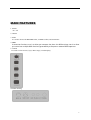
OWNER’S MANUAL
Classenti
CDP 2
1
PRECAUTIONS
PLEASE READ CAREFULLY BEFORE PROCEEDING
*Please keep these precautions in a safe place for future reference.
WARNING
Always follow the basic precaution listed below to avoid the possibility of serious injury or even death from electronic shock,
short-circuiting, fire or other hazards. These precautions include, but are not limited to, the followings:
l Do not open the instrument or attempt to disassemble
the internal parts or modify them in any way. The
instrument contains no user-serviceable parts. If it
should appear to be malfunctioning, discontinue use
immediately and have it inspected by qualified service
personnel.
l Do not expose the instrument to rain, use near water or
in damp or wet conditions, or place containers on it
containing liquids that might spill into any opening.
l If the power cord or plug becomes frayed or damaged,
or if there is a sudden loss of sound during use of the
instrument, or if any unusual smells or smoke appear to
be caused by it, immediately turn off the power,
disconnect the power plug from the outlet, and have the
instrument inspected by qualified service personnel.
l Do not use a voltage other than the indicated power
supply voltage. Use of a voltage other than indicated
may cause fire or electrical shock.
l Before cleaning the instrument, always remove the
power plug from the outlet. Never insert or remove an
power plug with wet hands.
l Check the power plug periodically and remove any dirt
or dust, which may have accumulated on it.
CAUTION
Always follow the basic precaution listed below to avoid the possibility of physical injury or damage to the instrument or
other property. These precautions include, but are not limited to, the followings:
l Do not place the power cord near heat sources such as
heaters or radiators, and do not excessively bend or
otherwise damage the cord, place heavy objects on it, or
place it in a position where anyone could walk on, trip
on, or roll anything over it.
l Do not connect the instrument to an electrical outlet
using a multiple-connector. Doing so can result in lower
sound quality, or possibly cause overheating in the
outlet.
l Unplug the power cords when not using the instrument,
or during electrical storms.
l When removing the power plug from the instrument or
an outlet, always hold the plug itself but not the cord.
l Do not expose the instrument to excessive dust or
vibrations, or extreme cold or heat, (such as direct
sunlight, near a heater, or in a car during the day) to
prevent the possibility of panel disfiguration or damage
to the internal components.
l Before moving the instrument, remove all connected
power cords and other cables.
l When cleaning the instrument, use a soft, dry cloth.
Does not use paint thinners, solvents, cleaning fluids, or
chemical-impregnated wiping cloths. Do not place
vinyl, plastic or rubber objects on the instrument, since
this might discolour the panel or keyboard.
l Before connecting the instrument to other electronic
components, turn off the power for all components.
Before turning the power on or off for all components,
set all volume levels to minimum. Also, be sure to set
the volume of all components at their minimum levels
and gradually raise the volume controls while playing
the instrument to set the desired listening level.
l Do not use the instrument near other electrical products
such as televisions, radios, or speakers, since this might
cause interference which can affect proper operation of
other products.
l Do not place the instrument in an unstable position
where it might accidentally fall over.
l Do not rest your weight on, or place heavy objects on
the instrument, and do not use excessive force on the
buttons, switches and connectors.
l Do not operate the instrument for a long period of time
at a high or uncomfortable volume level, since this can
cause permanent hearing loss. If you experience and
hearing loss or ringing in the ears, consult a physician.
l Avoid the LED/LCD subject to strong impact. It might
break the LED/LCD’s glass and cause personal injury.
If the LCD glass crack or break, do not contact the
liquid inside the LCD, it might cause inflammation and
reddening. If the LCD liquids get in your eyes or skin,
immediately flush with water at least for 15 minutes
and then consult a doctor.
WE CANNOT BE HELD RESPONSIBLE FOR DAMAGE BY
IMPROPER USE OR MODIFICATIONS TO THE INSTRUMENT,
OR DATA THAT IS LOST OR DESTROYED.
2
INDEX
(1) Overview
(2) Assembly instructions
(3) Main features
(4) Play (basic play)
(5) Pedal function
(6) Play the demonstration songs
(7) Practice songs
(8) Tone control
(9) Effect of tone
(10) Function of double timbre
(11) Metronome function
(12) Selection of the function of touch sensitive
(13) Record function
(14) Transpose
(15) MIDI
(16) Set MIDI
(17) Chart of practice & demonstration songs
(18) Technical specifications
3
ASSEMBLY INSTRUCTIONS
◆ Please check you have all parts and screws before assembling your piano
4
ASSEMBLY INSTRUCTIONS
1) Attach the horizontal pedal board to the two side boards (legs)
( 6) si de boar d( r i ght )
( 5) si de boar d( l ef t )
( 8) pedal boar d
2) Attach the back board to the pedal board (4 screws at the bottom and 2 screws at the top)
,
5
MAIN FEATURES
1. Switch
On / off
2. Volume
3. Effect
It is used to choose the REVERB effect, CHORUS effect, and metronome.
4. MIDI
It serves two functions: one is to allow you transpose the piano into different keys; two is to allow
you control over multiple MIDI functions (generated by a computer or external MIDI sequencer.
5. VOICE
It is used to select 8 tones, layer, demo songs, record and play.
Terminal drawing
6
Terminal of pedal
Please connect terminal of pedal with plug of jack.
Terminal of MIDI.
Please refer to function of MIDI
Terminal of AUX input
Terminal of the same of rhythm
Switch of piano body main volume can’t adjust the volume, so connected equipment that should adjust
equipment with volume.
Terminal of AUX output
The same as the sound speaker makes, transmit the sound of piano to other machine to make sound
(magnify, stereo acoustics). Main volume switch of the piano can adjust sound.
Headphone jack
PLAY (BASIC PLAY)
1. Instrument selection
● Hold the VOICE button down, then press the keyboard’s key to select tone (top octave)
Name of instruments
Piano 1
Piano 2
Electronic piano1
Electronic piano2
Harpsichord
Vibraphone
Organ
Strings
Feature
Concert Grand Piano
Bright Grand Piano
Popular Electronic Piano
Melodic Electronic Piano
A Baroque style instrument with strings that are plucked
An instrument similar to a marimba – often used in jazz
Cathedral style pipe organ
Orchestral string ensemble
Keyboard’s key
C7(108)
B6(107)
A6(105)
G6(103)
F6(101)
E6(100)
D6(98)
C6(96)
7
2. Adjust volume
Adjust moderate volume with volume slider.
VOLUM E
3. Play
Choose instrument voice and play.
Features of instruments are as shown.
PEDAL FUNCTION
1. Soft pedal (left)
When engaged, the keyboard volume is reduced slightly
2. Sostenuto pedal (middle)
When engaged, the keyboard sustains any key to the left of middle C that is depressed before the pedal
is engaged. (Used for advanced playing only)
3. Sustain pedal (right)
When the sustain pedal is engaged, there is a gradual decay for as long as you depress pedal.
8
PLAY THE DEMONSTRATION SONGS
1. Start the demonstration play
Holding press the VOICE button, and press the keyboard’s key to select demo songs..
2. Select the song
If you want to select other songs. Repeat last step.
3. Stop the play of demonstration songs
Holding press the VOICE button, then press A-1(keyboard key),to stop playing demo songs.
Table of song
No.
Name of song
No.
Name of song
No.
Name of song
23(B-1)
Polonaise in Ab
34(A0#)
The Moonlight
45(A1)
Minuet in G
24(C0)
Nocturne # 2
35(B0)
Impromptu in Eb
46(A1#)
Liebestraum
25(C0#)
Grande Valse Brilliant
36(C1)
Turkey march (Mozart)
47(B1)
Turkey march (Beethoven)
26(D0)
Raindrop prelude
37(C1#)
Pictures At An Exhibition
48(C2)
Pretty girl with flaxen hair
27(D0#)
“Minute” waltz
38(D1)
Moonlight Sonata
49(C2#)
Sonata K.545, 1st mvt.
9
28(E0)
Fantasia-Impromptu
39(D1#)
Reverie
50(D2)
Impromptu in Gb
29(F0)
Chanson De L’ Adieu
40(E1)
Sonata #20
51(D2#)
Waltz in Ab
30(F0#)
Scherzo in Bbm
41(F1)
Traumerei
52(E2)
Sonata Pathetique, 2nd, mvt.
31(G0)
Military Polonaise
42(F1#)
Pour Elise
53(F2)
Golliwog’s Cake Walk
32(G0#)
Prelude 7 #
43(G1)
Moments Musicaux
54(F2#)
Marche Militaire
33(A0)
Spring song
44(G1#)
Arabesque #1
21(A-1)
DEMO OFF
1. Start the play of the practicing song.
Holding press the VOICE button while pressing the appointed key (B-1—F2#)) to start the play of the
selected song.
----The demonstration light is off and 32 songs begin to play. You can also select other songs during the
play.
2. Stop the play of piano songs
Holding press the VOICE button while pressing the appointed key (A-1) to STOP the play of the selected
song.
EFFECT OF TONE
1. Effect of reverb
Produces a lingering echo that emulates the acoustics of a large concert hall
A. Select reverb
Holding press EFFECT button and press the keyboard’s key(E6-A6), corresponding effect of reverb is
made.
B. Close reverb
Holding press EFFECT button and press the keyboard’s key(C7),close reverb..
It is 4 kinds of reverb effects.
2. Effect of chorus
Make resonance, and the sound becomes chorus.
A.
Make chorus
Holding press EFFECT button and press the keyboard’s key(E5-B5), corresponding effect of chorus is
made.
B. Close chorus.
Holding press EFFECT button and press the keyboard’s key(C6), close chorus .
10
There are 5 types of chorus.
3. Effect of touch
Hold down the EFFECT button and press the keyboard’s key(C3-E3), to select the touch soft, hard, and
normal.
FUNCTION OF DOUBLE TIMBRES
Use this function; the piano can make two timbres at the same time.
1. Make double timbres
Holding press VOICE button and press two keyboard’s key(C6-C7) at the same time.
2. Adjust volume balance of the double timbres.
A. Holding press EFFECT button and press the keyboard’s key(A5 and B5),to adjust volume balance of
the double timbres
3. Quit from the setting of double timbre
Holding press VOICE button and press one keyboard’s key(C6-C7),quit double timbre function.
●Double timbre can not be adjusted under the MIDI function.
●Balance of volume is limited to the timbre combination which is registered when the power is on.
11
High----------------------------------------------------------------------------Volume
right timbre
left timbre
Low
9-1 8-2 7-3 6-4 5-5 4-6 3-7 2-8 1-9
Initial value
METRONOME FUNCTION
1. Hold down the EFFECT button and press the keyboard’s key F0 start metronome
2. Hold down the EFFECT button and press the keyboard’s key(G0 and E1),select metronome.
It is 6 kinds of metronome.
3. Change the speed.
Hold down the EFFECT button and press the keyboard’s key(G1 and A1),adjust the speed of the
metronome.
●the range of speed set: 20-(120)-250
●When the power is on, the speed is 120.
4. Stop metronome function
Hold down the EFFECT button and press the keyboard’s key(F1). The function stops
12
RECORDING FUNCTION
The recording function can record the songs played and playback. It have two track. to record and play.
1. Record.
A. Hold down the EFFECT button and press the keyboard’s key (A-1),to start record. track 1
a. Start the recording
The recording will start when you play (press the keyboard, step the pedal).
b. Stop the recording
Hold down the EFFECT button and press the keyboard’s key (A-1)
c. Hold down the EFFECT button and press the keyboard’s key (C0),to start record. track 2
d. Stop the recording
Hold down the EFFECT button and press the keyboard’s key (C0)
● Memory capacity --about 5000 tones.
Content of record includes pedal operation, change of timbre and the pause etc. example: when the amount
of pedal operation record increase, the amount of record that is played through the keyboard decrease.
● Little recording room
The record light start to twinkle when the record room is running low.
● Use the metronome
Before the recording, operate the metronome, and it will be recorded.
● Change the tempo
Tempo can not be changed during the recording.
●
Change the speed
Speed can not be changed during the recording.
2. Playback
Start and stop to play
●Hold down the EFFECT button and press the keyboard’s key (B-1),start playback track 1.
The play stops after the recording is finished or by holding down the EFFECT button and pressing
13
the keyboard’s key (B-1)
●Hold down the EFFECT button and press the keyboard’s key (D0),start playback track 2.
The play stops after all the record is finished or holding press EFFECT button and press the
keyboard’s key (D0)
●Hold down the EFFECT button and press the keyboard’s key (E0),start playback track 1 and 2.
TRANSPOSE
You can reduce or raise the tone directly without change the play through keyboard.
1. Transpose
Hold down the MIDI button and press the keyboard’s key(F4# and F5),select transpose.
2. Back to the standard tone
Hold down the MIDI button and press the keyboard’s key(F5# ),close transpose.the light is off.
Key
Gb(F#) G
Ab(G) A
Bb(A#) B
C
Db(C#) D
Eb(D#)
E
Modify
-3sound -2
-2
-1
-1
0
+
+1
+1
+2
tone
F
+2
MIDI.
MIDI (musical instrument digital interface) is the world specification is confirmed by main instrument
manufacture in the world. MIDI transmits play data with digital data by cable. Any electronic instrument
with MIDI interface can exchange data.
1. Play with MIDI keyboard.
MIDI signal
MIDI OUT
MIDI IN
As it is shown, output interface of digital piano is connected with MIDI input interface of MIDI keyboard
by MIDI cable.
Connecting by above way, when you play the digital piano, MIDI keyboard make sound of the same song
at the same time, it is the acoustic of equivalent play. Because timbres are set , all kinds of concerts are
14
played.( if AUX OUT and OUTPUT interface of MIDI keyboard is connected with AUX IN interface of
electron piano by using the big junction board, and make the speaker of digital piano sound together. )
●To change the timbre of digital piano, timbre of connected equipments will be changed(when the power is
on, process transmits sender and receiver signal, refer to 20 pages )
2. Using order control unit to play and record.
Digital piano is connected with MIDI interface of order controller by two cables as per drawing
separately. Order controller is set to record, at this time, play electron piano, order controller can record the
play content. Also record again and play automatically.
●
Normally, unit, witch can record the MIDI play content, is called order controller. 2 MIDI interfaces is
installed in the back board (input, output)
3. MIDI IN (input) it is a terminal that receives the data from other unit.
4. MIDI OUT (output) transmits data of digital piano to terminal of other units. Use special MIDI cable
that is sold in the market.
Connection method of cable as per the following drawing, from MIDI IN connection to other units MIDI
IN. plug is being inserted, please pay attention to direction and jack, put it into vertically.
Set MIDI.
Basic operation and button of MIDI operation.
General operation
Press the button of tonal modification or MIDI, and press the appointed, that means, it is going to setting
status is needed. On the condition, setting is made, setting is stopped, that means, the status is removed.
1. set track
MIDI is connected with cable, play signals are transmitted to instruments, and instruments are played at
the same time. Play signals are the same as TV; it is corresponding to different tracks. There are 1-16
tracks. If one play data is received, it should select to change track (receive track). When digital piano is
connected with many units, only unit that is on the same track can transmit data. Unit that transmits data
should have the same track with the digital piano (send track)
A. Set sending track
Holding press MIDI button and press the keyboard’s key (C2 and D3#), select transmit track.sending
track will be changed in 1-16.
B. Set receiving track.
15
Holding press MIDI button and press the keyboard’s key (C0 and D1#), select receive track.receive track
will be changed in 1-16.
●
The power is on, however send or receive, track 1 is always displayed
2. Setting of local ON/OFF.
Holding press MIDI button and press the keyboard’s key (C7), Setting of local ON/OFF.
●
The power is on; it is the state of main ON.
3. OMNI ON/ OFF setting.
Holding press MIDI button and press the keyboard’s key (B6), Setting of OMNI ON/OFF.
●
The power is on; it is the state of turning on for part control.
4. Multi timbres ON/OFF.
Holding press MIDI button and press the keyboard’s key (A6), Setting of multi timbres ON/OFF.
5. Setting of program chang TX/RX ON/OFF
Holding press MIDI button and press the keyboard’s key (G6), Setting of program change TX/RX
ON/OFF.
6. Setting of control chang TX/RX ON/OFF
Holding press MIDI button and press the keyboard’s key (F6), Setting of control change TX/RX
ON/OFF.
CHART OF PRACTICE & DEMONSTRATION SONGS
No.
1
2
3
4
5
Name of song
Waltz No. 1 change E long tone (Hua Li dance)
Illusion the 2nd E long tone 2 of 9
Poland dance the 6th A long tone 53 ( Hero)
Prelude 15th D long tone 28-15( rain drop)
Waltz 6th D long tone 64-1 (a letter dog)
6
7
8
9
10
Impromptu 4th#C short tone 66 ( dream impromptu)
Exercise 3rd E long tone 10-3
Banter 2nd long tone 31
Poland dance 3rd A long tone 40-1( Army)
Prelude 7th A long tone 28-7
11
12
13
Song of spring A long tone-muteness 30th 62-5
Light of moon
Impromptu E tone 90 (D899) 2
Musician
Chopin
Chopin
Chopin
Chopin
Chopin
Timbre name
Piano 1
Piano 1
Piano 1
Piano 1
Piano 1
Time
3:40
4:40
3:10
4:37
1:44
Chopin
Chopin
Chopin
Chopin
Chopin
Piano 1
Piano 1
Piano 1
Piano 1
Piano 1
3:45
4:14
5:15
5:16
0:05
Mendelssohn
Piano 1
Piano 1
Piano 1
3:14
4:11
4:18
16
14
15
16
17
18
19
20
21
22
23
24
25
26
27
28
29
30
31
32
1
2
3
4
5
6
7
8
Piano sonata 11th A long tone KV331-the 3rd chapter
Piano the 14th#C short tone 27-2(moon light) 1st chapter
Dream
Piano sonata the 20th G long tone 49-2 the 1st chapter
(Children scene) works 15
For Elysea
Schumann
Arab No. 1
Munuet G long tone
Dream of lover the 3rd A long tone S541-3
Turkey march music
Pretty girl with flax hair—prelude the 1st book
Piano sonata 15th C tone KV545 1ST chapter
Impromptu G tone 90-3
Waltz 15th 93-5
Field of children
Army march D long tone 51 (D733)-1
Introduce play of timbre
Hua Li dance music
Arab No. 1
Missing for ever
Humorous music
Symphony
Jazz
Fugue music
Brilliance of grassland
Chopin
Piano 1
Piano 1
Piano 1
Piano 1
Piano 1
Piano 1
Piano 1
Piano 1
Piano 1
Piano 1
Piano 1
Piano 1
Piano 1
Piano 1
Piano 1
Piano 1
Piano 1
Piano 1
Piano 1
3:32
5:20
6:10
1:32
4:37
2:35
2:55
1:55
1:45
2:06
3:37
2:15
2:04
4:37
4:35
1:38
4:59
2:38
4:55
Piano 1
Piano 1
Piano 1
Piano 2
Classic piano
glockenspiel
Pipe organ
String
1:30
1:20
1:05
1:20
0:50
0:50
1:20
0:55
17
MODULATOR
TECHNICAL SPECIFICATIONS
Keys
Instruments
Functions
Control
Select the pedal
Terminal
88 Hammer Action Keys
Piano 1, piano 2, e-piano1, e-piano 2, harpsichord, vibraphone, organ,
strings,
Dual sound (layer), transpose, reverb, record, demo songs, metronome,
MIDI,
Power switch, volume control
Soft (left), sostenuto (middle), sustain (right)
Headphone jacks ×2 ,AUX IN,AUX OUT,MIDI IN ,MIDI OUT
Loudspeaker
3*5’×2
Power
40W
110V
Power supply
18