1
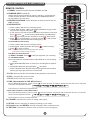
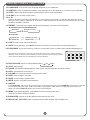
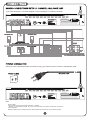
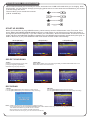
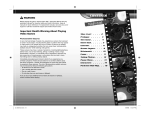
DVD/MP3+G/CD+G DIGITAL RECORDING CONVERTING CD+G TO MP3+G WITHOUT COMPUTER DIRECT ACCESS TO RECORDED SONG PROFESSIONAL KARAOKE PLAYER Model : DV102 SAFETY PRECAUTIONS 3176999 01 IMPORTANT SAFETY INSTRUCTIONS 02 PREPARATIONS BEFORE OPERATION PRECAUTIONS FOR DISCS Placement Put the unit where ventilation is good enough to prevent overheating. Never put the unit in direct sunlight or near heat sources. Put the unit horizontally, never put any heavy object on the unit. To protect the laser, do not put the unit where there is dust. If there is dust on the laser, use a cleaning disc before use. Condensation Water will appear on the pickup lens in the following cases: The unit is suddenly moved from a cold place to a warm place. The unit had been used in a humid place. In this case, the unit will not work. Unload the disc. Cleaning Disc A defective or soiled disc inserted into the unit can cause sound to drop out during playback. Handle the disc by holding its outer edges. Do not touch the surface of the unlabeled side of the disc. Do not stick paper of tape on the surface. Do not expose the disc to direct sunlight or excessive heat. Clean the disc before playback. Wipe the disc from the center outward with a cleaning cloth. NEVER use solvents such as benzine or alcohol to clean the disc. Do not use irregular shape discs (example: heart shaped, octagonal, etc.). They may cause malfunctions. Cleaning the unit Be sure to turn the unit off and disconnect the AC cord before maintaining the unit. Wipe the unit with a dry soft cloth. If the surfaces are extremely dirty, wipe clean with a cloth which has been dipped in a weak soap-and-water solution and wrung out thoroughly, then wipe with a dry cloth. Never use alcohol, benzine, thinner fluid or other chemicals. Do NOT use compressed air to remove dust. Important Note Before transporting the unit, remove any disc from the disc compartment. 03 CONTENTS Thank you for purchasing our DV102 Karaoke system. For operation and security, read this manual carefully and keep it handy for future reference. TABLE OF CONTENTS SAFETY PRECAUTIONS ............................................................................................................................... 01 IMPORTANT SAFETY INSTRUCTIONS ........................................................................................................ 02 PREPARATIONS BEFORE OPERATION ...................................................................................................... 03 CONTENTS .................................................................................................................................................... 04 WHAT'S IN THE GIFT BOX ............................................................................................................................ 05 DESCRIPTIONS & FUNCTIONS................................................................................................................ 06-09 FRONT PANEL ........................................................................................................................................ 06-07 REMOTE CONTROL .............................................................................................................................. 08-09 CONNECTIONS ......................................................................................................................................... 10-11 INSERTING USB OR SD CARD.................................................................................................................. 10 CONNECTING TO AUDIO AND VIDEO COMPONENT ............................................................................. 10 MAKING CONNECTIONS WITH 5.1 CHANNEL ANALOGUE AMP............................................................ 11 POWER CONNECTION ............................................................................................................................. 11 BASIC OPERATIONS .................................................................................................................................... 12 PLAYING DISCS ......................................................................................................................................... 12 KARAOKE OPERATIONS............................................................................................................................ 12 ADVANCED OPERATIONS ........................................................................................................................ 13-14 START UP SCREEN.................................................................................................................................... 13 SELECT YOUR SONG................................................................................................................................. 13 RECORDING................................................................................................................................................ 13 RECORDED PLAYBACK.............................................................................................................................. 14 SKIPPING TRACKS..................................................................................................................................... 14 SEARCH PLAY............................................................................................................................................. 14 PROGRAMMED PLAY ................................................................................................................................ 14 REPEAT PLAY.............................................................................................................................................. 14 REPEAT A SPECIFIC SECTION ................................................................................................................. 14 RECORDING & MP3+G FUNCTIONS........................................................................................................... 15 OTHERS ..................................................................................................................................................... 16-17 TROUBLE SHOOTING ............................................................................................................................... 16 CARE AND MAINTENANCE ....................................................................................................................... 16 MP3+G/CD/CDG CARE TIPS ..................................................................................................................... 17 SPECIFICATIONS ....................................................................................................................................... 17 04 WHAT’S IN THE GIFTBOX DV102 Microphone RCA Cables Disc Remote Control User’s Manual Warranty Card 05 DESCRIPTIONS & FUNCTIONS FRONT PANEL 1 2 3 4 7 5 6 16 15 17 19 18 10. RECORD/STOP 1. DISC/SD/USB Press to change MEDIA (DISC 2. 8 SD Play & Record Operation Procedures: 1).MP3G Recording USB). PLAY/PAUSE a. Insert a USB or SD card as a recording device; b. Load an MP3+G DISC, USB or SD CARD (with MP3G songs), select song from the song list and press [PLAY]: c. If user wants to sing the song and record his vocal with the music then press button screen shows Starts to play the disc or temporary suspends playing. By pressing this button consecutively. Play/Pause mode changed so shown below: PLAY PAUSE RECORD 3. STOP STOP [CARD Ready] or [USB Ready]: User can start singing into the microphone and record. When finish; RECORD 4. DISPLAY WINDOW RECORD d. Press to stop Recording. If user not to press it will go back to MP3G menu automatically after finishing song. 2).CD+G/CD Disc Recording a. Insert a USB or SD card as a recording device; b. At Disc Mode, load & play DISC then press to start recording. c. Press to stop recording. STOP 5. KEY CONTROL BUTTONS Transposes the music key. DOWN button: used to flatten by a half tone. UP button: used to sharpen by a half tone. 6. PREV AND STOP RECORD NEXT STOP RECORD Press it skip to previous or next track STOP 7. MPX=Multiplex=CD+Gs with or without Vocals Activates the multiplex function, which switches to NORMAL (stereo), L-ch monaural and R-ch monaural. Note: * USB or SD CARD must be inserted before start recording. * DVD disc format does not allow to record. Play Back the Recorded File: 1). DIRECT ACCESS: Press button just right after your recording. Note: Most karaoke disc are just CD+G without the Lead Vocal included on them so disc you buy will say MPX or 2). FOLDER ACCESS: Multiplex if have vocal too. Note: Recorded files are default save to RECORD file in your recording device. 8. DISC TRAY a. Press [DISC/SD/USB] button to select your recording Used to load a disc. To insert/remove a disc, device (USB or SD); press the OPEN/CLOSE button located at the b. Select [RECORD] then press [ENTER] all Track#! right of the tray. c. Pick the identical Track Number when the Song/Vocal 9. OPEN/CLOSE was recorded, follow by [PLAY] to play back the Used to open and close disc tray. recorded track. RECORD PLAYBACK 06 , DESCRIPTIONS & FUNCTIONS 9 11 10 12 13 14 4 20 21 11. RECORDED PLAYBACK Press to play latest Recorded song automatically. 12. REPEAT Press this key to play selected item repeatedly. The screen shows as below: REP:[OFF] REP:[REP1] 13. DIRECTION( REP:[REP DIR] REP:[REP ALL] ) Used for navigation within a selection menu. 14. OK Confirm your selection. 15. POWER Turn on / off the Portable karaoke system. POWER LED lit when power on. 16. MIC JACKS Used for connecting microphones. The jacks correspond to MIC volume knobs located above. 17. MIC VOL1/MIC VOL2 Adjust microphone volume 1,2. 18. ECHO Adjust the degree of the echo effect for the microphone. 19. NUMBER KEYS (1 to 9,0) Used to specify a track number for playing, changing, or programming. 20. SD/MMC CARD SD card slot 21. USB DATA USB DATA slot Note: Direct Access = Having all the features on face of the unit so that you do not need a remote control. 07 DESCRIPTIONS & FUNCTIONS REMOTE CONTROL 1. POWER: Switch the system between STANDBY and ON. 1 20 2. NUMBER KEYS (1 to 9, 0) Used to specify a track number for playing, changing, or programming. In PBC function operation, the number keys are additionally utilized for the selection of menu items. 2 3. RECORD PLAYBACK: Press this button to listen the music that you JUST recorded. 4. RECORD/STOP a. Insert a USB or SD card as a recording device; b. Load an MP3+G DISC, USB or SD CARD (with MP3G songs), select song from the song list and press [ ]: c. If user wants to sing the song and record his vocal with the music then press button screen shows [CARD Ready] or [USB Ready]: User can start singing into the microphone and record. When finish; d. Press to stop Recording. If user not to press , it will go back to MP3G menu automatically after finishing song. 2).CD+G/CD Disc Recording a. Insert a USB or SD card as a recording device; b. At Disc Mode, load & play DISC then press to start recording. c. Press to stop recording. Note: * USB or SD CARD must be inserted before start recording. * DVD disc format does not allow to record. Play Back the Recorded File: 1). DIRECT ACCESS: Press button just right after your recording. 2). FOLDER ACCESS: Note: Recorded files are default save to RECORD file in your recording device. a. Press [DISC/SD/USB] button to select your recording device (USB or SD); b. Select [RECORD] then press [ENTER] all Track#! c. Pick the identical Track Number when the Song/Vocal was recorded, follow by [PLAY] to play back the recorded track. 3 21 22 4 23 5 24 25 26 27 6 7 8 28 9 10 29 11 30 12 31 13 14 15 16 17 32 33 REPEAT 18 34 19 5. PLAY: Starts to play the disc with/without the playback control function. 6. KEY-: Transpose the music key down. 7. FLAT: Set the music key as normal. 8. FWD. (Not available in CDG, MP3+G disc.) During DVD/CD playback, press or hold times normal speed as follows: to scan forward. The player will review the disc at 2,4,8 and 20 Press PLAY to resume normal playback. 9. REV. (Not available in CDG, MP3+G disc.) During DVD/CD playback, press or hold times normal speed as follows: to scan reverse. The player will review the disc at 2,4,8 and 20 Press PLAY to resume normal playback. 10.VOLUME-: Decrease the volume of analog audio output. 11.SETUP: Press to setup the TV settings according to your needs. 12. Direction ( ENTER): Used for navigation within a selection menu. 13. RETURN: This button is used to return to a menu screen during play. 08 DESCRIPTIONS & FUNCTIONS 14.LANGUAGE: To show the movie language.(Depends on your media file.) 15. SUBTITLE: Press to display the subtitles. (Only applicable in movie, depends on your disc or your media file.) 16.STEP: Press to play picture by picture, press PLAY to return to normal playback. 17.SLOW: To view a scene in slow motion. 18. A - B Press A - B first to set location A: REPEAT: A-,press again to set location B, and then playback will repeat during the two locations: REPEAT: A - B. Press A - B the third time to cancel the function and return to normal playback: REPEAT: CANCEL. 19.REPEAT: Press this key to repeat selected item repeatedly. The screen shows as below: MP3G/CDG/VCD/SVCD/CD KARAOKE DISC Repeat off Repeat one track Repeat all tracks REPEAT MP3/JPEG/AVI Repeat off Repeat one track Repeat all Repeat DIR 20. EJECT: Used to open and close disc tray. 21.GOTO: During playback, press GOTO show the current time counter position and select playing time. 22. PROGRAM: This is the function provide you to listen the tracks in a desire order. While PROGRAM is on. Input the track numbers by order that you would like them to play. When you have finished, select PLAY then press ENTER to play the tracks in the new programmed order. Select CLEAR then press ENTER to clear all numbers. 23. DISC/SD/USB: Press to change MEDIA (DISC SD USB). 24. STOP: Stops playing. 25. PAUSE: Temporarily suspends playing. Video motion freezes and audio reproduction stops. 26. KEY+: Transpose the music key up. 27.VOLUME+: Increase the volume of analog audio output. 28. NEXT: Press to skip to next track. 29. PREV.: Press to skip to previous track. 30. MUTE: Press to mute and cancel muteness. 31. DISPLAY Press DISPLAY, the screen shows as follows according to the disc: Press DISPLAY the first time, and the screen shows the disc type, total item number, playing item, PBC status and playing time of the item. When you press DISPLAY again, the screen will shut down. 32. MENU: During DVD, playback, press MENU to return to the program menu. Note: This function is subject to the disc. 33.EQUALIZER: This key is set the different sound effect of the music. 34. MP3+G LIST, FILE LIST: Press to change between MP3+G folder and its SONG LIST. 09 INSERTING USB OR SD CARD Due to variances in USB ,SD CARD Flash Drive manufacturing and memory specifications, we can not guarantee all USB, SD CARD Flash Drive brands will work with this machine, If problems arise, please try a different brand USB, SD CARD Flash Drive. Make the connections as shown below if you want to enjoy video & sound through TV. The sound might be faint so you may need to adjust the volume. You can connect your player to a TV set or monitor, and see the lyrics and images of the DVD/ MP3+G/CD+G on the TV or monitor. Plug one end of the supplied video cable to video out jack on karaoke system and the other end into your TV or monitor’s video in jack. AC INPUT AC 110-220V 50/60Hz DVD/CD+G/MP3+G KARAOKE PLAYER MODEL NO.: DV102 AC: 110-220V 50/60Hz POWER: ≤15W SERIAL No.: 3176999 10 CLASS 1 LASER PRODUCT APPAREILA LASER DE CLASS 1 PRODUC TO LASER DE CLASE1 This device complies with part 15 of the FCC Rules. Operation is subject to the following two conditions:(1)This device may not cause harmful interference,and(2)this device must accept any interference received,including interference that may cause undesired operation. If you have Analogue 5.1 channel Amplifier, connect Analogue 5.1 channel, as below: AC INPUT AC 110-220V 50/60Hz DVD/CD+G/MP3+G KARAOKE PLAYER MODEL NO.: DV102 AC: 110-220V 50/60Hz POWER: ≤15W SERIAL No.: 3176999 CLASS 1 LASER PRODUCT APPAREILA LASER DE CLASS 1 PRODUC TO LASER DE CLASE1 This device complies with part 15 of the FCC Rules. Operation is subject to the following two conditions:(1)This device may not cause harmful interference,and(2)this device must accept any interference received,including interference that may cause undesired operation. When you have completed all other connections, plug your system’s power cord into a standard AC outlet. AC INPUT AC 110-220V 50/60Hz DVD/CD+G/MP3+G KARAOKE PLAYER MODEL NO.: DV102 AC: 110-220V 50/60Hz POWER: ≤15W SERIAL No.: 3176999 CLASS 1 LASER PRODUCT APPAREILA LASER DE CLASS 1 PRODUC TO LASER DE CLASE1 This device complies with part 15 of the FCC Rules. Operation is subject to the following two conditions:(1)This device may not cause harmful interference,and(2)this device must accept any interference received,including interference that may cause undesired operation. Note: Line voltage. DV102 has universal power supply:100-220V~ 50/60Hz. Warning: To avoid electrical shock, do not connect the system to AC power until all other connections are completed. Caution: Make sure the voltage of the AC outlet matches the requirement of your karaoke system. 11 BASIC OPERATIONS PLAYING DISCS KARAOKE OPERATIONS 1. Press POWER to turn on the system .The POWER indicator lights up. This player comes with a microphone and two microphone inputs. Connect microphone to either Mic1 or Mic2 jack and adjust volume accordingly. Microphones are readily available in most electronic stores. If purchasing another microphone, request a microphone with a standard 6.3mm (1/4”) cable end. A second microphone is great to have around for duets or a spare if one microphone gets damaged. Note: The microphone supplied with this player is unidirectional. The singer must sing clearly into the top of the microphone, not the sides. Unidirectional microphones limit ambient noises that can be picked up by audiences and environmental sounds. 2. Press OPEN/CLOSE button on the front panel or Eject button on the remote control to open the tray door. When a microphone is plugged into MIC 1 and MIC 2, the system mixes the music with your voice. RE PE 1. Press POWER to turn on the system. The POWER indicator turns on. 2. Load a Karaoke Disc in the CD compartment. 3. Press PLAY/PAUSE to start play. 4. Adjust VOLUME on the remote controller to the desired listening level. AT 3. Place a disc in the compartment tray over the center hub, with the label facing out. 5. Turn on the microphone. 6. Adjust Microphone volume on the player to the desired singing level. 7. Sing directly into the microphone along with the music. While playing a karaoke disc, you can read the lyrics of the songs, (MP3+G, CD+G only) which appear on the TV monitor. 8. Adjust ECHO level on the front panel to the desired singing level. 4. Push back the tray door to close the compartment. 5. Press PLAY/PAUSE to start playing. To temporarily stop play, press PLAY/PAUSE. To resume play, press PLAY/PAUSE again. Note: Do not apply excessive force to the tray door, or press the door while a disc is playing Never place anything except a compact disc in the disc tray. Foreign objects can damage the player. Never place more than one disc on the disc tray at a time. During playback, if the system is subject to a sudden shock or jolt, the speed of rotation might change or some noises might be produce along with distortion of graphics. This is not a malfunction. 12 ADVANCED OPERATIONS Record function allow you to record your vocal and music into a USB or SD card while you’re singing. With this function, you can review, storage your singing performance or even send the recorded file to your friend to share the joy with them. The unit allow you to record the contents From DISC to USB (CD+G and MP3G): MP3+G/CD+G From USB to USB MP3+G/CD+G From DISC to SD card From SD card to SD card START UP SCREEN When you insert Disc or plug USB/SD memory, below start up screen will be shown in the TV screen. First three “MP3G, MP3&RECORDED SONG”folders are virtual folder for our DV series only(Can’t be shown in the regular personal computer). If you don’t make your own folder, “ROOT”will be shown. These three virtual folder will show all KARAOKE and MP3 related files in the USB/SD (Automatically Organized by file type). In USB or SD mode, if you press OPEN/CLOSE it will switch to DISC mode automatically. <DISC(MP3G)> <SD (MP3G) > <USB (MP3G) > SELECT YOUR SONG <DISC> Use [UP] and [DOWN] arrow key then press [PLAY],[OK] or [ENTER] Selected song will play with lyric. <USB><SD> Select MP3G folder then press [OK] or [ENTER], All MP3G KARAOKE files in the USB or SD will be shown like below. RECORDING <MP3+G> a. Press [RECORD/STOP] to start recording. b. Press [RECORD/STOP] one more time to stop recording. <CD+G> a. Press [RECORD/STOP] while playing to start record. b. Press [RECORD/STOP] one more time to stop recording. Note: * USB or SD card must be inserted before start recording * All recorded song will be stored [RECORDED] folder. MP3+G Recorded song will be stored Original File name. CD+G/CD Recorded song will be stored “ Track#”. * Record function can not apply to DVD format disc. * CD disc does not have lyric, you can record the vocal only. 13 RECORDING & MP3+G FUNCTIONS ADVANCED OPERATIONS RECORDED PLAYBACK PLUG 'N' PLAY (on unit) There are two ways to play recorded song. 1). Folder Access Select [RECORDED] folder, select recorded song then play.(The latest recorded song can be in the end of the list.) Recording (on RC) 0001.TRACK001 0002.TRACK002 0003.TRACK003 0004.TRACK004 0005.TRACK005 0006.DONDE IRAS_SALSA 0007.FUEGO LENTO_POP 0008.LAZARANDELA_NAVIDAD MUSIC PICTURE MOVIE Recording MUSIC PICTURE MOVIE PLUG 'N' PLAY PLUG 'N' PLAY MP3G Mp3 RECORDED ROOT\ 0001.TRACK001 0002.TRACK002 0003.TRACK003 0004.TRACK004 0005.TRACK005 Recording MUSIC PICTURE PLUG 'N' PLAY 0001.TRACK001 0002.TRACK002 0003.TRACK003 0004.TRACK004 0005.TRACK005 0006.DONDE IRAS_SALSA 0007.FUEGO LENTO_POP 0008.LAZARANDELA_NAVIDAD MOVIE 2). Direct Access The other HOT KEY FUNCTION is [RECORDED PLAYBACK] function. After recording, press [RECORDED PLAYBACK], screen will show all your recorded songs then automatically play latest recorded song. SKIPPING TRACKS While the disc is stopped, you can skip up or down to select a specific track by pressing PREV / NEXT . To play the selected track, press PLAY. While a disc is playing, press PREV once to skip back to the beginning of the current track. Repeatedly press PREV to search backward to the beginning of the desired track. Repeatedly press Next to search forward to the beginning of the desired track. Recording MUSIC PICTURE MOVIE 0001~0005 Recorded from CD+G/CD 0006~0008 Recorded from MP3+G 3. Repeat the above steps to add more tracks title/chapter in the program list. 4. Press PLAY/PAUSE or highlight the PLAY on the screen and press OK to start programmed playback. Note: These functions only be used when playing in MP3+G/CD+G/CD/MP3 Programmed Play automatically stops at the end of the last programmed track or title/chapter.Highlight the CLEAR on the screen and press OK to delete the last track or title/chapter in the program list. Highlight the CLEAR ALL on the screen and press OK to erase the entire programmed sequence. SEARCH PLAY REPEAT PLAY While the disc is playing, press REV /FWD While playing a disc, press REPEAT on the player or to search backward or forward. Press PLAY to remote control repeatedly to choose a repeat play mode. resume the normal playback. Each time the REV / FWD button is pressed, MP3G/CDG/VCD/SVCD/CD KARAOKE DISC the speed of backward / forward search Repeat off Repeat one track changes at speed: x2, x4, x8, x20. Repeat all tracks Note: In MP3G/CDG the state, these functions can not be used. MP3/JPEG/AVI PROGRAMMED PLAY MP3+G/CD+G/CD/MP3 PROGRAMMING ------------- 5 ---- 9 6 ---- 10 7 ---- 11 8 ---- 12 Repeat one track Repeat all Repeat DIR REPEAT A SPECIFIC SECTION PROGRAM 1 2 3 4 Repeat off ------------PLAY 13 14 15 16 ------------- A-B repeat playback allows a specific section to be repeated. While the disc is playing, press A-B button to set the beginning of the section (point A) to be played repeatedly. CLEAR Press A-B button again to set the end of the section (point B) to be played repeatedly. 1. Press PROGRAM on the remote control, the program menu appears on the TV screen. The unit will then immediately begin replaying the selection (A to B) repeatedly. 2. Use the navigation keys ( / / / ) to select the track for MP3+G/CD+G/CD/MP3/VCD and press OK, the track or title / chapter is added in the program play list. 14 RECORDING & MP3+G FUNCTIONS MP3+G FUNCTION 1. What is MP3+G? MP3+G is simply a normal MP3 audio file with an accompanying CDG graphics (lyrics) files. When a song is selected to play on an MP3+G player, the player will search for both the MP3 and CDG files. If found, it will cue them both to play in sync. If only an MP3 file is found, it will play the audio only. The advantage to MP3+G files are size, convenience and price. They occupy one-eighth the space of normal karaoke files. Instead of buying a disc of which you may only sing half the songs, you can pick and choose which songs you want to download and carry them with you on a USB Flash Drive. 2. Where do you find MP3+G files? SingTheHits.com has a wide selection of songs in many formats to browse, purchase and download. Use your favorite search engine like Google, Bing or Yahoo, etc. to find even more. 3. How you can make your own MP3+G Disc or load a USB Flash Drive(recommended)? After you’ve downloaded MP3+G files, use your computer software to burn your own CDR (preferred) or CDRW disc. Or, connect your USB Flash Drive to your computer and copy the files from computer. 4. How do you get started quickly? Everyone with a new player wants to get started quickly. However, take a few moments to review the connection Illustrations and read the manual. This will prevent common mistakes and make your experience much more exciting. Follow these steps: a. Connect your player to a TV as illustrated on previous pages. b. Insert your disc or USB Flash Drive. c. Turn player on and give it a moment to load songs in the menu. d. Select your song, press [ENTER] key on remote to begin playing music and singing. 5. How do you make a recording? A USB Flash Drive or SD CARD is required to record music and singing. The music source can be a disc or a song on the same USB Flash Drive or SD CARD. Note: All USB Flash Drives or SD CARD are not created equal. If issues arise, you may have to try a different brand USB Flash Drive or SD CARD. a. Insert disc or USB Flash Drive or SD CARD and allow machine to load menu of song titles (MP3+G only). b. Choose your song and press [PLAY]. c. Then press [RECORD]. Your screen should indicate USB ready. Begin singing when music starts. d. When finished recording, press [RECORD] again. 6. How do you playback your recording? 1). Direct Access a. Press [RECORDED PLAYBACK] button to play latest Recorded song Automatically. 2). Folder Access a. Insert your USB Flash Drive or SD CARD with recordings. b. Press [DISC/USB/SD] button to select USB or SD CARD mode. c. Select [RECORDED] folder and press [ENTER]. d. Select the recording you wish to listen to and press [ENTER]. Note:*Press to stop recording, Don’t Press *. 15 TROUBLE SHOOTING If you have problem operating your DVD/MP3+G/CD+G/CD/MP3 Karaoke System, use this chart to determine the problem and find possible solutions. Microphone is in OFF mode Turn on the Microphone It's a DVD disc. Use CDG, MP3G disc only. Memory is full. Keep a curtain space on your recording device. Do not record 1. Keep your karaoke player dry, if it gets wet, wipe it dry immediately. Use and store the karaoke only in normal temperature environments. Handle the karaoke player carefully; do not drop it. 2. Keep the karaoke player away from dust an dirt, and wipe it with a damp cloth occasionally to keep it looking new. 16 Even though these compact discs are durable, treat the disc surface with care. Do not store the discs in high temperature or high humidity areas. They might warp. Keep the discs dry. Water droplets can act as a lens and affect the laser beams focus. Always keep it in its protective case or sleeve when it is not in use. Fingerprints and scratches on the Cds surface can prevent the laser beam from correctly reading the digital information. Note: All copy rights of contents playing in this unit, is not related to manufacturer. DVD, MP3+G, CD+G, AVI, CD, MPEG3, JPG USB port/SD card slot for MP3/MP3G/JPEG/AVI play backs and JPEG viewing 467(W)X122(L)X315(H)mm 17 1185 GOODEN CROSSING ROAD, LARGO, FLORIDA 33778 USA TECH SUPPORT: WWW.KARAOKEUSA.COM DOWNLOAD SONGS: WWW.SINGTHEHITS.COM SALES DEPARTMENT: 1-800-800-8466