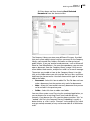
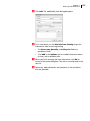
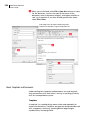
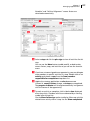
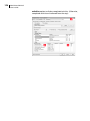
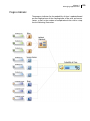
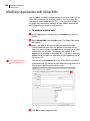
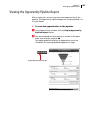
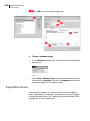
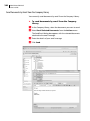
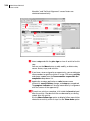
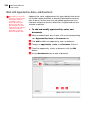
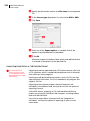
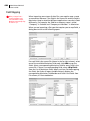
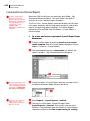
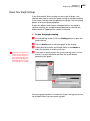
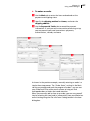
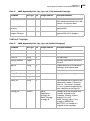
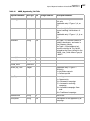
1
User's Guide Notice of Copyright Published by Maximizer Software Inc. Copyright ©1988-2009 All rights reserved. Registered Trademarks and Proprietary Names Product names mentioned in this document may be trademarks or registered trademarks of Maximizer Software Inc. or other hardware, software, or service providers and are used herein for identification purposes only. Applicability This document applies to Maximizer CRM 10.5 R2 software. Maximizer Software Address Information Corporate Headquarters Americas Maximizer Software Inc. 1090 West Pender Street – 10th Floor Vancouver, BC, Canada V6E 2N7 +1 604 601 8000 phone +1 604 601 8001 fax +1 888 745 4645 support [email protected] www.maximizer.com Knowledge Base: www.maximizer.com/knowledgebase Europe, Middle East, and Africa Maximizer Software Ltd 2nd Floor - Apex House, London Road Bracknell, Berkshire RG12 2XH United Kingdom +44-1344-766900 phone +44-1344-766901 fax [email protected] www.maximizer.co.uk Asia Maximizer Asia Limited 17/F, Regent Centre 88 Queen's Road Central, Hong Kong +(852) 2598 2888 phone +(852) 2598 2000 fax [email protected] www.maximizer.com.hk Australia Maximizer Software Solutions Pty. Ltd. Level 10, 815 Pacific Highway Chatswood, New South Wales Australia, 2067 +61 (0)2 9957 2011 phone +61 (0)2 9957 2711 fax [email protected] www.maximizer.com.au Contents i Contents Chapter 1 Welcome to Maximizer...........................................................1 From Prospects to Leads to Repeat Customers............................................2 Maximizer Modules.......................................................................................5 Maximizer Companion Applications ............................................................6 Maximizer on the Web .................................................................................9 Maximizer CRM Editions .............................................................................10 Where to Go from Here... ...........................................................................11 Chapter 2 Finding Information .............................................................13 Overview......................................................................................................14 Press F1 for Help ..........................................................................................15 Opening the Help Table of Contents .........................................................16 Reading the Maximizer Guides Online ......................................................17 Exploring Maximizer with the Sample Address Books..............................18 Chapter 3 Working with Maximizer......................................................19 What is Maximizer CRM? ............................................................................20 Maximizer Windows ............................................................................21 Window Layout ....................................................................................24 Opening an Address Book ..........................................................................25 Connecting to an Address Book..........................................................26 My Work Day View......................................................................................27 Adjust the My Work Day View ............................................................27 Working with Dashboard ...........................................................................29 View Dashboard ...................................................................................29 Customize Dashboard ..........................................................................30 Main Address Book Window ......................................................................35 Address Book Window ........................................................................35 Select Address Book Entries ................................................................37 Adjust the Icon Bar ..............................................................................37 Customizing Maximizer Toolbars and Toolbar Buttons ............................39 Keeping Track of Your Prospects and Customers ......................................44 Add Address Book Entries to Your Address Book ..............................44 Create a Default Address Book Entry .................................................47 Change Several Address Book Entries with Global Edits ...................48 View Address Book Entries ..................................................................50 Use Column Setups to Organize Lists .................................................51 Record Relationships with Related Entries .........................................52 Convert Individuals to Companies and Contacts to Individuals ........54 ii Maximizer CRM 10.5 User’s Guide Using Territory Management......................................................................55 Set Up Territories..................................................................................55 Assign Territories ..................................................................................57 Keeping Notes on Your Address Book Entries...........................................60 Recording Additional Information with User-Defined Fields ...................65 Work with User-Defined Fields............................................................65 Types of User-Defined Fields................................................................67 Set Up User-Defined Fields ..................................................................68 Create New User-Defined Fields..........................................................69 Creating Lists of Entries with Searches ......................................................76 Search for Entries by Fields ..................................................................77 Perform Advanced Searches by All Fields ...........................................78 Use the Undo Search and Last Catalog Searches Menu Items...........81 Create Favorite Lists from Searches ....................................................81 Select and Display Entries in a List ......................................................82 Tracking Your Appointments and Hotlist Tasks .........................................84 Hotlist Window ....................................................................................84 Control Calendar and Hotlist Task Preferences ..................................86 Calendar Window ................................................................................87 Add New Appointments to Your Calendar.........................................89 Use Action Plans to Create Appointments and Hotlist Tasks.............94 View Activities ......................................................................................97 Check Your Co-workers Status with the Peg Board ...........................98 Check the Time in Other Cities Using the World Clock......................99 Using Organizational Charts.....................................................................100 Sharing Your Files in the Company Library..............................................102 Making Entries in Your Journal ................................................................105 Monitoring Income and Expenses ............................................................106 Creating Web Inquiry Forms for Your Website........................................107 Maximizer Web Form Requirements.................................................108 Create Direct Insert Web Forms.........................................................108 Using OrderDesk........................................................................................109 Work with Sales Quotes.....................................................................109 Create and Insert Item Table Merge Fields .......................................113 Create and Edit Catalogs ...................................................................116 Import and Export Catalog Items ......................................................118 Maximizer CRM Gadgets...........................................................................119 Work with the Address Book Gadget ...............................................120 Work with the Sales Dashboard Gadget...........................................121 Chapter 4 Communicating with Your Customers..............................123 Keeping in Touch with Your Customers ...................................................124 Working with Documents and Templates................................................125 Use the Maximizer Word Processor...................................................125 Use Merge Fields in Document Templates........................................129 Insert Files into the Documents Window..........................................131 Broadcasting Documents Using Mail Merge............................................132 Contents iii Setting Up Maximizer to Use Email .........................................................134 Supported Email Clients ....................................................................134 Use Novell GroupWise and Lotus cc:Mail/Mail .................................134 Use Microsoft Outlook Express .........................................................135 Use Microsoft Outlook.......................................................................136 Sending and Receiving Email ...................................................................137 Use the Email window .......................................................................137 Send Email Messages to One or More Address Book Entries ..........139 Create Appointments and Tasks from Email ....................................140 Integrating Maximizer and Outlook ........................................................141 Specify a Maximizer Address Book for Outlook Integration...........142 Select the Outlook Address List to Integrate with Maximizer ........143 Create Address Book Entries from Microsoft Outlook ....................144 View Maximizer Address Book Entries from Outlook .....................147 Use Outlook to Send Email to Address Book Entries .......................147 Save Outlook Email Messages as Documents in Maximizer ............149 Create Customer Service Cases from Outlook ..................................151 Synchronizing Address Book Entries with Microsoft Outlook................152 Appointment and Task Synchronization ..........................................152 Recurring Appointments ...................................................................153 Recurring Tasks...................................................................................153 Group Appointments .........................................................................153 Microsoft Outlook Synchronization and MaxSync for Microsoft Exchange ............................................................................................153 Microsoft Outlook Synchronization and MaxExchange Synchronization .................................................................................154 Synchronization from Outlook to Your PDA....................................154 Prepare Your Outlook Address Book ................................................154 Prepare Your Maximizer Address Book ............................................155 Configure Outlook Synchronization .................................................155 Synchronize Your Maximizer Address Book with Outlook..............158 Keeping Records of Your Telephone Calls ...............................................159 Set Up Automatic Dialing ..................................................................162 Chapter 5 Managing Opportunities ....................................................163 Managing Your Sales Opportunities ........................................................164 Using Opportunities ..................................................................................165 Designing Strategies for Your Opportunities ..........................................166 Break Steps into Activities .................................................................167 Entering Your Strategies in the Strategy Library ....................................169 Entering a Default Opportunity ...............................................................170 Working with Multi-Currency in Opportunities ......................................171 Pursuing Sales Opportunities ...................................................................173 Make it a Team Effort ........................................................................175 Scheduling Strategies for Opportunities .................................................176 Progress Indicator ..............................................................................179 Modifying Opportunities with Global Edits ............................................180 iv Maximizer CRM 10.5 User’s Guide Viewing the Opportunity Pipeline Report ...............................................181 Chapter 6 Managing Campaigns.........................................................183 What are Campaigns? ...............................................................................184 Campaigns Window ..................................................................................185 Work with the Campaigns Window..................................................185 Organizing Your Marketing Efforts..........................................................186 Design Campaign Templates for Traditional Campaigns.................186 Creating Traditional Campaign Templates ..............................................190 Create Traditional Campaigns ...........................................................191 Assign Marketing Teams to Your Campaigns ...................................192 Assign Contacts to Campaign Roles ..................................................193 Delegate Campaign Activities to Team Members and Roles ...........194 Apply and Work the Steps to Complete Campaigns........................195 Pause Traditional Campaigns.............................................................196 Marketing with Automated Campaigns ..................................................197 Design Automated Campaign Template Activities ..........................198 Create Automated Campaign Templates..........................................199 Define Activities for Your Automated Campaign Templates ..........200 Create Message Templates for Automated Campaigns...................204 Launch Automated Campaigns .........................................................206 Managing Automated Campaigns ...........................................................208 View and Modify Automated Campaign Information.....................208 View Campaigns’ Address Book Entry Lists ......................................212 Remove Address Book Entries from Campaigns...............................213 Add Address Book Entries to Campaigns..........................................214 Suspend and Resume Automated Campaigns or Activities .............214 Review and Retry Automated Campaign Activities .........................215 Printing the “Hard Copy” .........................................................................216 Chapter 7 Providing Customer Service...............................................219 Customer Service Windows.......................................................................220 Customer Service Window .................................................................220 View Bar..............................................................................................221 Customer Service Following Window ...............................................221 Case Dialog Box ..................................................................................222 Creating Customer Service Cases ..............................................................223 Create Customer Service Cases from Email.......................................226 Assign Default Field Values to Customer Service Cases ...................228 Modify Cases with Global Edits .........................................................229 Use Favorite Lists ................................................................................230 Case Hotlist Tasks................................................................................230 Assigning or Escalating Cases ...................................................................231 Resolving Cases ..........................................................................................232 Monitoring Cases.......................................................................................234 Creating and Viewing Case Reports .........................................................236 Sending Automatic Email Notification about Cases................................237 Contents v Send Email to Customers and Users Regarding Case Status............237 Default Customer Service Email Notification ...................................239 Recording Case Solutions in the Knowledge Base ..................................240 Record Case Solutions ........................................................................241 Add Articles to the Knowledge Base ................................................242 Control Who Can Access Articles ......................................................243 Save and Send Articles .......................................................................243 Find Articles ........................................................................................243 Chapter 8 Accessing Maximizer on the Web......................................245 Maximizer on the Web .............................................................................246 Maximizer Web Access..............................................................................247 Navigation Tips...................................................................................248 Maximizer Web Access Main Pages ..................................................249 Searching for Entries in Maximizer Web Access......................................251 Search for Address Book Entries .......................................................251 Search by All Fields ............................................................................254 Search for Basic Fields ........................................................................256 Search for Entries by Notes ...............................................................257 Search for Entries by Documents ......................................................258 Working with Lists of Entries....................................................................260 Display Entries in a List ......................................................................260 Work with Favorite Lists ....................................................................261 Use Column Setups to Organize Lists ...............................................263 Export Entries to Excel .......................................................................264 Import Data from MXI or XML Files..................................................265 Working with Address Book Entries ........................................................266 Choose an Address Book List.............................................................266 Create Default Entries .......................................................................266 View and Modify Address Book Entries............................................268 Apply Changes with Global Edits ......................................................269 Add Address Book Entries .................................................................270 View, Modify, and Add Alternate Mailing Addresses......................273 Use Territory Management................................................................274 Move Contacts to Other Companies or Individuals .........................275 Draw Maps of Address Book Entries.................................................276 Log Calls with Address Book Entries .................................................276 Sending and Receiving Email ...................................................................278 Log In to Your Email Server ...............................................................278 Use the Email Page ............................................................................278 Save Email Messages to Entries .........................................................280 View Email Messages from the Documents Tab...............................281 Compose and Send Email Messages from the Email Page ..............282 Send Email Messages from the Address Book Page.........................283 Create Appointments and Tasks from the Email Page ....................285 Working with Your Hotlist........................................................................286 View Hotlist Tasks...............................................................................286 Add Hotlist Tasks ................................................................................287 vi Maximizer CRM 10.5 User’s Guide Reassign Hotlist Tasks.........................................................................288 Modify Hotlist Tasks ...........................................................................288 Delete Hotlist Tasks ............................................................................288 Working with Your Calendar ....................................................................289 View Appointments ...........................................................................289 Add Appointments.............................................................................290 Delete Appointments.........................................................................292 Use the Activities Tab to Track Appointments and Tasks.................292 Working with Action Plans .......................................................................294 Use Action Plans to Create Appointments and Hotlist Tasks...........294 Viewing, Modifying, and Adding Notes ..................................................296 Viewing and Modifying User-Defined Fields ...........................................299 Set Up User-Defined Fields ................................................................300 Work with User-Defined Fields..........................................................301 Working with Documents .........................................................................303 View Documents in the Company Library ........................................305 Work with Microsoft Word................................................................307 Working with Opportunities ....................................................................309 View All Opportunities ......................................................................311 Add and Delete Opportunities ..........................................................312 Apply Strategies to Opportunities ....................................................313 Working with Campaigns .........................................................................316 Create One-Time Campaigns .............................................................318 Working with Customer Service Cases .....................................................319 View Cases ..........................................................................................319 Add Cases............................................................................................321 Delete Cases........................................................................................324 Case Notification from Maximizer Web Access ................................324 Working with the Knowledge Base .........................................................325 View, Add, Modify, and Delete Articles ............................................325 Setting Personal Preferences in Maximizer Web Access .........................329 Viewing Company Information ................................................................331 Check WhereAbouts ..........................................................................332 Dashboard..................................................................................................333 View Dashboard .................................................................................333 Partner Access ............................................................................................334 View and Modify Address Book Entries............................................335 Work with Opportunities, Notes, and Documents...........................336 Work with Customer Service Cases ...................................................337 Customer Access ........................................................................................338 Chapter 9 Using Wireless Access.........................................................339 Wireless Access ..........................................................................................340 Compatible Devices and Browsers ....................................................340 Log In to Wireless Access ...................................................................341 Navigate Pages ...................................................................................342 Accessing Address Book Entries................................................................343 Contents vii Search for Address Book Entries .......................................................343 View Address Book Entries ................................................................345 Add New Address Book Entries.........................................................347 Phone Address Book Entries..............................................................349 Draw Maps .........................................................................................349 Modifying Entries ......................................................................................350 Select Products/Services and Categories ...........................................351 Sending and Saving Email Messages........................................................352 Accessing Opportunities ...........................................................................354 Search for Opportunities ...................................................................354 View Opportunities............................................................................355 Accessing Customer Service Cases ............................................................357 Search for Cases .................................................................................357 View Cases ..........................................................................................359 Add New Cases ...................................................................................360 Associate Contacts with Cases ...........................................................361 Assign, Escalate, and Resolve Cases ..................................................362 Accessing User-Defined Fields ..................................................................364 Accessing Notes .........................................................................................365 Add Notes ...........................................................................................366 Accessing Documents ................................................................................367 Accessing Calendar Appointments and Hotlist Tasks..............................368 View Calendar ....................................................................................368 View Appointments and Tasks ..........................................................370 Add Appointments and Tasks............................................................372 Accessing the Company Library................................................................373 Search for Documents in the Company Library................................374 Send Company Library Documents to Address Book Entries ..........375 Using Favorite Lists....................................................................................376 Viewing Dashboard...................................................................................377 Setting Wireless Access Preferences .........................................................378 Change MaxMobile Synchronization Settings .................................378 Chapter 10 Maintaining Your Address Book .......................................381 Setting Your Maximizer Preferences........................................................382 Customizing Maximizer Toolbars and Toolbar Buttons ..........................385 Backing Up Your Address Book Data .......................................................389 Maximizer CRM Professional Edition and Maximizer CRM Enterprise Edition ................................................................................................389 Maximizer CRM Group Edition .........................................................389 Exporting Address Book Records .............................................................390 Export Address Book Entries .............................................................390 Export Customer Service Cases ..........................................................396 Export Knowledge Base Articles .......................................................398 Importing Address Book Data from MXI or XML Files............................399 Import MXI or XML Files ....................................................................400 Import Knowledge Base Articles .......................................................401 viii Maximizer CRM 10.5 User’s Guide Importing Address Book Entries ...............................................................402 Field Mapping ....................................................................................404 Two-Tier Import ..................................................................................405 Transferring Entries between Address Books ..........................................407 What Happens During Transfers?......................................................407 Transfer Address Book Entries ...........................................................407 Transfer Summary Reports and Logging...........................................409 Chapter 11 Reporting and Graphing ....................................................411 What is Reporter?......................................................................................412 Generate Your Reports Anywhere ....................................................412 Access Reporter Through a Web Browser.........................................412 Generate Reports using Reporter .....................................................413 Print and Export Reports ...................................................................414 Crystal Reports ...........................................................................................416 Create and Access Corporate Reports ...............................................416 Create and Access Personal Reports..................................................418 Printing Reports from Maximizer .............................................................419 Exporting Entries to Microsoft Excel ........................................................421 Graphing and Charting with Maximizer ..................................................422 Graph Your Address Book Entries or Opportunities ........................423 Use Title and Footnote Merge Fields ................................................426 Add “Zip” to Your Graphs .................................................................427 Use Your Graph in Other Applications..............................................428 Reuse Your Graph Settings ................................................................429 Chapter 12 Using eStore Manager ........................................................431 What is eStore Manager? .........................................................................432 Main Window ............................................................................................433 Getting Your Catalog Online ....................................................................434 Designing Your Catalog’s Appearance.....................................................435 The Catalog Template Tags................................................................435 Create the Catalog Template.............................................................436 Sample Catalog Templates.................................................................436 Customize the Order Screen and Confirmation Email .....................437 Letting Your Visitors Know How to Contact You ....................................438 Enter Your Business Contact Information.........................................438 Select Keywords for Internet Search Engines ...................................438 Choosing How to Accept Payment ...........................................................440 Set Up Online Transaction Processing ...............................................440 Building Your Catalog ...............................................................................442 Add Sections to Your Catalog............................................................443 Add Items to a Catalog Section .........................................................443 Making the Finishing Touches and Preview Your Catalog......................447 Choose a Catalog Template ...............................................................447 Edit Additional Files ...........................................................................447 Publishing Your Catalog on the Internet .................................................448 Contents ix Specify the Physical Location of the Catalog Files ...........................448 Enter the URL of Your Preview Site ..................................................448 Adding Linking to the eStore Catalog .....................................................450 Your Customer’s eStore Experience..........................................................451 Your Customer’s Shopping Basket ....................................................452 Enhancing Your Catalog with the Catalog Search Page.........................454 Managing Your Online Orders and Inquiries ..........................................455 Credit Card Transaction Processing ...................................................456 Manually Enter Orders or Inquiries...................................................456 Features of the OrderDesk Window .................................................458 Chapter 13 Using MaxExchange Remote..............................................459 How MaxExchange Programs Work Together.........................................460 MaxExchange Synchronization Server ..............................................460 MaxExchange Remote Synchronization Server ................................460 MaxExchange Server Manager..........................................................461 MaxExchange Remote .......................................................................461 MaxExchange Site Manager ..............................................................461 MaxExchange Administrator’s Guide .......................................................461 Glossary of MaxExchange Terms ..............................................................462 What Data is Synchronized? .....................................................................464 Synchronize Third-Party Data............................................................464 Synchronize Opportunities and Campaigns .....................................465 Microsoft Outlook Synchronization and MaxExchange Synchronization .................................................................................465 How Do I Receive Updates? ......................................................................466 Starting MaxExchange Remote ................................................................467 Receiving the Address Book .....................................................................467 Remote Tasks .............................................................................................469 Initiate the First FTP Transport Session .............................................469 FTP Test Option...................................................................................470 Retry an Unsuccessful FTP Connection..............................................470 Start a Processing Session from Maximizer ......................................471 Set Scheduling Options for Dial-up Email ........................................471 Connect by Dial-up Using FTP ...........................................................473 Set Timing Preferences ......................................................................474 Perform an Immediate Update .........................................................476 Change Email Preferences .................................................................477 Change Your MaxExchange FTP Password .......................................478 Convert Outgoing Packets for Internet Transport ...........................479 Restrict the Size of Packets ................................................................480 Disable the Partial Packet Warning Message ...................................480 Save Outgoing Packets to Disk..........................................................481 Import a Server Packet.......................................................................481 View Synchronized Address Book Properties ...................................482 View Distribution Preferences...........................................................483 Set Up the Troubleshooting Logs......................................................484 Check the Troubleshooting Logs.......................................................485 x Maximizer CRM 10.5 User’s Guide Change Email from LAN to Dial-Up or Vice Versa............................486 Chapter 14 Administration for Maximizer...........................................487 Enabling TAPI with Maximizer .................................................................488 Requirements for Caller ID ................................................................488 Phone Number Matching with TAPI .................................................489 Configure Maximizer to Use TAPI .....................................................491 Phone Masks ..............................................................................................493 Maximizer Field Types ...............................................................................494 Use Key Fields .....................................................................................494 Specify Key Fields by Module ............................................................494 Mandatory Fields................................................................................495 System Fields.......................................................................................495 Updating Maximizer with the Live Update Wizard ................................496 Backing Up and Restoring Address Book Data........................................498 Back Up an Address Book ..................................................................498 Restore an Address Book ...................................................................500 Back Up the Dictionary and Holiday Files ........................................500 Changing Languages for the Maximizer Spell Checker ..........................500 Appendix A Crystal Reports Database Views/Tables Reference ..........503 Overview ....................................................................................................504 Data Population for the Current Window ...............................................504 Database Views for User-Defined Fields ..............................................505 Microsoft SQL View Prefixes ..............................................................505 Database Driver Used to Create Crystal Reports .....................................505 Filtering Data .............................................................................................506 Linking .......................................................................................................507 Controlling Windows ................................................................................507 Customer Service Window Example..................................................508 Including Additional Views in Your Reports ............................................509 User-Defined Fields Example .............................................................510 Notes Example ....................................................................................511 SQL Views and Data Tables .......................................................................512 AMGR_Client View .............................................................................512 Company View....................................................................................517 People View ........................................................................................519 AMGR_Appointments View...............................................................521 AMGR_Hotlist View............................................................................527 AMGR_Resources Table......................................................................529 AMGR_Notes View .............................................................................530 CMGR_Auto_Campaign_Accounts Table ..........................................533 AMGR_CSCases View..........................................................................533 CSCases_View......................................................................................536 .............................................................................................................539 AMGR_Opportunity View ..................................................................540 AMGR_Opportunity_Link Table.........................................................553 ADMN_User_Details Table ...............................................................558 Contents xi ............................................................................................................559 Appendix B Glossary of Terms ...............................................................561 Glossary of Terms.......................................................................................562 Index ....................................................................................569 xii Maximizer CRM 10.5 User’s Guide CHAPTER Welcome to Maximizer 1 Introducing Maximizer CRM “From Prospects to Leads to Repeat Customers” on page 2 “Maximizer Modules” on page 5 “Maximizer Companion Applications” on page 6 “Maximizer on the Web” on page 9 “Maximizer CRM Editions” on page 10 “Where to Go from Here...” on page 11 1 2 Maximizer CRM 10.5 User’s Guide From Prospects to Leads to Repeat Customers You are a growing company, looking to take your organization to the next level. To reach this goal and create long-term, profitable relationships with your customers, you need a cost-effective, flexible Customer Relationship Management solution to keep all your departments working together effectively. Designed for small- and medium-sized businesses, Maximizer CRM 10.5 integrates sales, marketing, and customer service tools, enabling all customer touch points in your organization to face customers and prospects professionally through one voice. Throughout the customer life cycle, as prospects from marketing are turned over to the sales department, and customers are passed onto service departments, Maximizer CRM makes it easy for your staff to share information, communicate with customers through multiple channels, and organize individual and team efforts. Making your customers feel like king, and giving you an edge over your competitors. After all, gaining new customers and retaining satisfied ones is what improving the bottom line and growing your business is all about. Sales—Save Time, Close More Sales Maximizer CRM enables your sales staff to manage, track, communicate, and report through all phases of the sales cycle to help them work more efficiently and close more sales. Only Maximizer CRM enables you to view the big picture of your customers, as well as the details of each one, so you can leverage each customer opportunity and maximize your total revenue. It is the only solution in its class to offer extensive flexibility, workgroup security, and advanced sales automation and collaboration features. Further, Maximizer CRM is easy to use for sales people so they spend less time on administrative tasks and more time on selling. Marketing—Reduce Costs, Generate More Leads Attracting attention and generating leads for the sales department is the foundation of marketing. Now Maximizer CRM integrates marketing in its total CRM solution to enable marketing departments to manage, track, and measure cost-effective marketing campaigns that deliver more qualified leads to your sales people. Using the Campaigns window, you can create highly targeted campaigns through profiling and qualifying to retain customers and increase business. Chapter 1 Welcome to Maximizer 3 Customer Service—Increase Efficiency, Improve Customer Satisfaction Attracting attention to your products and services is the foundation of Sales and Marketing, but consistent, high-quality customer service is the foundation for keeping your customers for life. After all, it is far more expensive to gain a new customer than it is to retain an existing one. Maximizer CRM enables you to cultivate and maintain long-term, profitable relationships by recording and quickly recalling every form of past contact with your customers, so you can exceed your customers’ expectations and recommend the right solutions, at the right time. Cross-selling and up-selling are easy when you know your customer's history better than they can remember it themselves! eBusiness—Generate Leads and Revenue from Your Website A successful business depends on the relationships you build with your customers. But to save time and conduct repeat purchases, buyers are moving to the web. With the built-in eStore Manager, Maximizer CRM lets you easily integrate your web front with your CRM solution for lead generation and online purchases. Anywhere Access Your staff is spread out around the continent or around the world, they're on the go at client locations, but you can't afford to have any downtime or inaccurate customer information. Maximizer CRM’s strength is in its capability to give your staff access to critical data from anywhere, at any time, on any device—at a remote office, through the web, or on a Palm OS/Pocket PC device. Remote Access Through MaxExchange For users in remote offices to effectively team-sell and face clients and prospects with accurate information, they need to have access to up-to-the-minute data. MaxExchange enables Maximizer CRM users to work from a single database that is regularly synchronized to keep everyone current. 4 Maximizer CRM 10.5 User’s Guide Palm, Blackberry, and Handspring Access Through MaxLink and MaxMobile For the mobile sales force, MaxLink and MaxMobile enable you to easily access your Maximizer CRM information from your desktop PC from a Palm OS, Blackberry, or Pocket PC device. You can then update or add information while out of the office. Refer to the MaxLink and MaxMobile online manual for more information. Web Access Maximizer’s web access sites are browser-based tools that improve your organization’s efficiency by enabling you and your staff to carry out everyday tasks, from wherever you are, with any computer. See the Maximizer on the Web chapter for more information. Extend Maximizer CRM to Fit Your Needs The Maximizer CRM Customization Suite includes additional guides for integrating with Maximizer. The Customization Suite enables customers and business partners to customize the Maximizer interface and to integrate with other front-office and back-office solutions. Chapter 1 Welcome to Maximizer 5 Maximizer Modules Maximizer Maximizer CRM is a robust customer relationship management solution that tightly integrates your contact manager, customer service, and sales requirements. Maximizer’s customer service, knowledge base, and order management features allow you to track and retrieve all customer queries, issues, resolutions, and purchases. Opportunities provide customizable sales strategies that can be used by your sales team to track, communicate, and report through all phases of the sales cycle, with the probability of close being calculated at every stage. With the creation of meaningful graphs and charts, companies benefit from complete, detailed intelligence to fully understand their audience and evaluate the performance of their business. The Campaigns window provides you with a tool to set up Automated campaigns—a series of highly-targeted automated email, fax, or print documents—that introduce services, encourage product purchases, promote website visits, or distribute electronic newsletters. Once you have defined the various campaign pieces, and launched the campaign, the process is entirely automated. You can also create “traditional” marketing campaigns that coordinate the activities of marketing team members. Administrator Administrator is typically used by a system administrator or other technically-proficient staff to configure and manage the entire Maximizer application. Among other administrative tasks, Administrator is used to create and manage Maximizer users, apply licensing, and create new databases (or “Address Books”). You can also do tasks that are common to both Maximizer and Administrator such as back up data, import and export data, produce system reports, and set up and manage sales/marketing teams and security groups. Reporter Reporter improves your marketing and selling campaigns by reporting on the success of your current and past strategies. Reporter provides you with several report templates allowing you to produce impressive results in just a few seconds. The module can be accessed through or from the Start menu. See the Maximizer on the Web chapter. 6 Maximizer CRM 10.5 User’s Guide Maximizer Companion Applications There’s more to Maximizer CRM than just the main modules. See the following descriptions of our Maximizer companion products. Microsoft SQL Server Reporting Service Viewer LFor more information on configuring Maximizer for use with Microsoft SQL Server Reporting Services, see the Administrator's Guide. Maximizer CRM includes a Microsoft Report Viewer in the installation. Microsoft Reporting Services is a comprehensive reporting tool that integrates with a diverse set of data sources. The full installation for the SQL Server Reporting Services is available from the Microsoft SQL Server CD. MaxExchange MaxExchange is a separate Maximizer application that is opened from the Start menu. It allows you to synchronize Maximizer data between a server and remote computers. For Maximizer Remote users, refer to “Using MaxExchange Remote” on page 459. For administrators of MaxExchange, refer to the MaxExchange Administrator’s Guide. Workflow Automation Powered by KnowledgeSync Workflow Automation Powered by KnowledgeSync is a separate Maximizer application that allows you to monitor business data within the Maximizer database and other systems. Potential issues are identified before they create problems so that the people who need to know can act on the information. With Workflow Automation, you can apply business rules to all of your data—no matter where it resides—and learn of potential issues while there is still time to act. Using Workflow Automation, you can send flexible real-time alert messages via email, fax, pager, PDA (such as Palm or Handspring), and webcast. It’s easy to schedule and deliver reports. Lead qualification, lead assignment, and lead tracking are completely automated. Powerful and flexible, the Workflow Automation Suite is quickly deployed, simple to use, and easy to administer so you can focus on building successful, profitable customer relationships. Chapter 1 Welcome to Maximizer 7 Accounting Link Maximizer offers two accounting integrations: Accounting Link Designed for Use with QuickBooks®, and Accounting Link for Microsoft Dynamics™ GP. Accounting Link enables you to create estimates, invoices, and purchase orders from within Maximizer and share them with your QuickBooks or Microsoft Dynamics GP software. eStore eStore is an online store that provides you with the tools to automate your web-based sales. eStore includes everything you need—a shopping cart and product configuring tool, online transaction processing, credit card gateway links, and online credit checking. This application is available for Maximizer CRM Professional Edition and Maximizer CRM Enterprise Edition. ecBuilder ecBuilder is an online store that provides the same functionality as eStore. This application is available for Maximizer CRM Group Edition. Refer to your ecBuilder online manual and help installed with the application. You can access the online manual from the Start menu. MaxLink/MaxMobile Combined with Maximizer, MaxLink or MaxMobile form a powerful suite of tools offering you all of the contact management features of Maximizer with the portability and convenience of a handheld device. Whether at work or on the road, you always have access to current information about your clients or customers—names, addresses, appointments, tasks, and notes. Simply use either application to synchronize record additions, changes, and deletions between the two products. When data is synchronized regularly, performance speed is optimal because only records that have been modified are read during the process. MaxAlarm MaxAlarm is a Maximizer companion application that automatically monitors appointments for one or more people in any number of Address Books. MaxAlarm automatically starts when you start your computer, and you can leave it running with or without running Maximizer, and still be notified of appointments. You will know if 8 Maximizer CRM 10.5 User’s Guide MaxAlarm is running because its icon appears in your Windows System Tray, which is in the lower right corner of your screen. MaxAlarm is easy to use. Simply add one or more Address Books to MaxAlarm, minimize it and then forget about it—until the Alarm dialog pops up to remind you of an appointment. With MaxAlarm's Review feature, you can review today's appointments without opening an Address Book in Maximizer. MaxFinder MaxFinder, also a Maximizer companion application, lets you browse or search for entries in a Maximizer Address Book. As with MaxAlarm, MaxFinder automatically starts when you start your computer, and its icon resides in your Windows System Tray. MaxFinder provides a fast alternative for quick lookups and even allows you to record phone calls, time activities, or write notes for any entry in your Address Book without opening a Maximizer Address Book. Maximizer Form Designer Maximizer Form Designer allows you to create custom dialog boxes (forms). When adding or modifying Address Book entries, you can then select the form you want to use. To access Maximizer Form Designer from Maximizer’s Tools menu, you must choose the Maximizer Form Designer option during a custom installation. For more information, refer to the online manual installed with Maximizer CRM (Help menu > Maximizer Form Designer Guide). You can also refer to the Maximizer Form Designer Help for assistance. Chapter 1 Welcome to Maximizer 9 Maximizer on the Web Maximizer’s web access sites give remote users access to the central Maximizer database via the web. Maximizer Web Access Maximizer Web Access is a browser-based application providing you with the functionality of Maximizer from anywhere in the world. You can work with Address Book entry information, notes, calendar appointments, Hotlist tasks, user-defined fields, customer service cases, knowledge base articles, and opportunities, as well as view company documents and other pertinent information. • Reporter improves your marketing and selling campaigns by reporting on the success of your current and past strategies. Reporter provides you with several report templates allowing you to produce impressive results in just a few seconds. • Dashboard is a component of Maximizer Web Access that can be used for monitoring the activity occurring in your company. The information you see in Dashboard is generated in “real-time”, so you have an up-to-date view of the activities taking place in Sales and Marketing. Information such as how many opportunities are in the funnel and your daily revenue from online purchases can be accessed instantaneously. Partner Access Partner Access is a browser-based application providing a two-way flow of information between your organization and its business partners. This allows for a multi-tier distribution group to effectively distribute sales opportunities and leads, and to keep all involved parties informed about the latest news and customer service issues. Customer Access Customer Access is similar to Partner Access. It’s a browser-based application providing a two-way flow of information between your organization and its customers. Customers have access to news, events, and customer service issues. Wireless Access Wireless Access provides access to Maximizer through any wireless Internet-enabled device. 10 Maximizer CRM 10.5 User’s Guide Maximizer CRM Editions There are three Maximizer CRM Editions: • Maximizer CRM Group Edition • Maximizer CRM Professional Edition • Maximizer CRM Enterprise Edition The availability of some functionality varies, depending on the edition you are running. Functionality Module Group Professional Enterprise Territory Management Sales Fax/Print Campaigns Marketing Knowledge Base Customer Service Windows Authentication Security Single Sign-On Security Web Reporting Business Intelligence Workflow Eventsa See footnote a : : : ; ; ; ; ; : ; ; ; ; ; ; ; ; : See footnote d See footnote d ; : ; ; ; : ; ; ; ; Enable/Disable Security Security Global/Local optionc N/A Web access sites N/A ecBuilder N/A eStore N/A Microsoft SQL Server Analytics N/A : : : : : : : ; ; ; ; ; : : Microsoft SQL Server Reporting N/A : Dashboard N/A b a. Additional workflow events (KnowledgeSync) are included in some editions. Maximizer CRM Professional Edition includes additional workflow events in the Business Intelligence and Security modules. Maximizer CRM Enterprise Edition includes additional workflow events in the Sales, Marketing, Customer, Service, Business Intelligence, and Security modules. b. Set in Administrator. (Select File > Preferences > System Options.) If security is disabled, you cannot set the following options: Read Access, Full Access, and Creator. c. This option gives you access to Global and Local Address Book lists. Global Address Books are stored on the Maximizer server application. Local Address Books are stored locally on your computer. d. Pertains only if MaxExchange Remote is installed. Chapter 1 Welcome to Maximizer 11 Where to Go from Here... Explore Maximizer in a safe training ground The Maximizer Training Guide is designed to introduce you to the fundamentals of using Maximizer. Using the example of Escona Estate Wines—a fictitious vintner in the Sonoma Valley—you can follow tutorials that take you through real-world examples of how to use the various components of Maximizer. Daily tasks in marketing, sales, and administration give you the springboard you need as a novice user to start you on your way to being a Maximizer expert. To order the Maximizer Training Guide, contact your nearest Maximizer office or your local Maximizer Business Partner. 12 Maximizer CRM 10.5 User’s Guide CHAPTER Finding Information 2 Access Maximizer CRM Help and User Guides In this chapter... “Overview” on page 14 “Press F1 for Help” on page 15 “Opening the Help Table of Contents” on page 16 “Reading the Maximizer Guides Online” on page 17 “Exploring Maximizer with the Sample Address Books” on page 18 2 14 Maximizer CRM 10.5 User’s Guide Overview Maximizer Help is your comprehensive guide to working with the Maximizer modules. As you work with Maximizer, you probably already know what business task you want to accomplish—such as sending a fax to many recipients, building and publishing your online catalog, and recording your contact management information. Maximizer’s help and guides have the answers you are looking for. The types of documentation you can expect to find to help you with Maximizer include: • F1 Help – Context-sensitive help for all windows and dialog boxes. • Contents Help – Online step-by-step instructions with a table of contents, an index, and search. • Online manuals – On-screen versions of the printed documentation that you can read using Adobe Acrobat Reader. Whether you are looking for help using a particular dialog box or looking for instructions on how to perform an activity, you can always find what you are looking for in the Help. Maximizer Help provides not only step-by-step instructions for each module, but also detailed descriptions of every control in every dialog box and window. See “Press F1 for Help” on page 15 and “Opening the Help Table of Contents” on page 16. Each Maximizer module has its own Help. To find out how to use a module, select Contents from the module’s Help menu or press F1 in any window or dialog box. In addition to the Maximizer User’s Guide (this book), Maximizer also includes online documentation in Adobe PDF format. You can read the PDFs using Adobe Acrobat or Acrobat Reader, which you can download from the Adobe website (www.adobe.com). See “Reading the Maximizer Guides Online” on page 17. Chapter 2 Finding Information 15 Press F1 for Help If you come across a window or dialog box you don’t know how to use, press the F1 key to see brief descriptions of the window or dialog box options. Frequently, F1 Help topics have convenient links to related step-by-step instructions. From the F1 Help window you can search the module’s F1 Help for information on other windows, dialog boxes, or features—simply enter a keyword. Enter a keyword and click List Topics to search for topics containing the keyword. “Shortcuts” like this one link you directly to more information about what you are doing. Topics containing your search keyword are displayed in this list. Click this button to open the selected topic. You can also open a topic by double-clicking it. 16 Maximizer CRM 10.5 User’s Guide Opening the Help Table of Contents You can look up Help topics the same way you would in a book—the table of contents lists the topics in a logical order, and the index lets you look up topics by keyword. Maximizer Help also lets you perform a search for any word or words in any topic. ➤ To open the Help Contents for a module • In any module, select Help > Contents. ➤ To print one topic • Select the topic in the Contents and click Print. ➤ To print multiple topics Select a book in the Contents. Click Print. Select Print the selected heading and all subtopics. ➤ Search for topics by any word or words • In the Search tab, type the word or words you are looking for and click List Topics. Help lists the matching topics and ranks them by how close the topics match your search parameters. Look up keywords here. Use the toolbar to perform common tasks in Help. Look for Help topics using the Contents, Index, or Search tabs. Drag this bar left or right to move the divider. Chapter 2 Finding Information 17 Reading the Maximizer Guides Online A typical installation of Maximizer includes manuals that you can read online using Adobe Acrobat or Acrobat Reader. Having the Maximizer manuals in this format offers the advantage of full-text search, as well as hyperlinks on the table of contents, index, and any cross-references. ➤ Install Adobe Acrobat Reader • You need Adobe Acrobat Reader to open the online manuals. You can download the free Reader from the Adobe website (www.adobe.com). ➤ To access the online guides • From the Help menu, select the guide you would like to use. – or – • From the Start menu, select Programs > Maximizer CRM > Documentation and Help > User’s Guide/Administrator’s Guide. If you want to increase the size of the text, you can easily adjust the magnification. Open the View menu, and select Zoom To. Use the toolbar to navigate—turn the page, change the magnification, search for text in the manual, and more. Click on a heading in the table of contents to open the page you want. Click on a referenced topic page number to go directly to the topic. 18 Maximizer CRM 10.5 User’s Guide The pages appear on the screen as they would if they were printed— all of the graphics and text appear the same as in the printed manual. You can “turn the page” by using the previous and next arrows or pressing the Page Up or Page Down keys. Exploring Maximizer with the Sample Address Books In a typical server installation of Maximizer, the Maximizer setup program creates several complete sample Address Books, one of which is named “Escona Tutorial”. This Address Book is designed to be used as an environment in which you can learn how to use Maximizer. You can supplement your learning experience through the use of the Maximizer Training Guide and CD. Using the example of Escona Estate Wines, a fictitious vintner in California’s Sonoma Valley, the Escona Address Book provides realistic examples of how Maximizer might be used to improve your customer relationship management. The Escona Address Book includes detailed data related to all areas of Maximizer including the following: • List of Address Book entries (Companies, Individuals, and Contacts) • Sample sales opportunities and marketing campaigns • Sample customer service cases • Appointments and Hotlist tasks • Sample Company Library files • Fully enabled web access sites • eStore online catalog project CHAPTER Working with Maximizer 3 Manage Your Address Book Entries In this chapter... “What is Maximizer CRM?” on page 20 “Opening an Address Book” on page 25 “My Work Day View” on page 27 “Working with Dashboard” on page 29 “Main Address Book Window” on page 35 “Customizing Maximizer Toolbars and Toolbar Buttons” on page 39 “Keeping Track of Your Prospects and Customers” on page 44 “Using Territory Management” on page 55 “Keeping Notes on Your Address Book Entries” on page 60 “Recording Additional Information with User-Defined Fields” on page 65 “Creating Lists of Entries with Searches” on page 76 “Tracking Your Appointments and Hotlist Tasks” on page 84 “Using Organizational Charts” on page 100 “Sharing Your Files in the Company Library” on page 102 “Making Entries in Your Journal” on page 105 “Monitoring Income and Expenses” on page 106 “Creating Web Inquiry Forms for Your Website” on page 107 “Using OrderDesk” on page 109 “Maximizer CRM Gadgets” on page 119 3 20 Maximizer CRM 10.5 User’s Guide What is Maximizer CRM? LThroughout this guide, Maximizer CRM is referred to as Maximizer. Maximizer CRM is specifically designed for small and medium-sized businesses and corporate divisions of large companies. By integrating sales, marketing, and customer service tools into one affordable solution, Maximizer CRM helps organizations realize their primary customer management goal of having many profitable and satisfied customers. Throughout the customer life cycle, as prospects move from the marketing department to the sales department, and as customers are passed onto service departments, Maximizer CRM enables an organization to communicate with its customers through multiple channels, to share information, and to organize individual and team efforts. Maximizer CRM is a complete software solution that brings together elements of CRM, enterprise contact management, marketing automation, eCommerce, rapid website development, wireless access, and other related applications to meet the sales, marketing, and customer service challenges of modern businesses. • Managing your company’s lists of Companies, Individuals (people not associated with a Company), and Contacts (people associated with a Company or Individual). • Keeping track of your scheduled appointments and tasks. • Pursuing a sale using a structured sales strategy and team-based selling. • Managing customer service and your knowledge base operations. • Promoting your product through traditional and automated campaigns. • Sending letters, faxes, or email messages to one or many recipients. • Managing incoming orders and inquiries from your online catalog—payment, refunds, shipping, and reporting. • Organizing and accessing your sales and marketing literature in a shared library. • Generating reports from any of the lists—Address Book entries, opportunities, customer service cases, Hotlist tasks, and additional information you keep on your entries. Chapter 3 Working with Maximizer 21 Maximizer Windows The main Maximizer window is the Address Book window, which lists the Companies, Individuals, and Contacts in your Maximizer database (Address Book). The following list provides a brief description of each main window accessible from Maximizer. My Work Day The My Work Day view is an area where everyone in your company using Maximizer can see Hotlist tasks, appointments, and company announcements. They can also access Dashboard from here. Address Book The Address Book window contains all the information about your prospects, customers, business and professional associates, or any other group of people you deal with on a regular basis. It links you to related information about each Address Book entry, such as Contacts, Hotlist tasks, customer service cases, opportunities, campaigns, documents, user-defined fields, and orders and inquiries. Opportunities The Opportunities window helps you and your colleagues manage complex sales that involve the participation of more than one person in the buying decision and require the support of a sales team. Use the Opportunities following window to view the opportunities associated with the entries selected in the Address Book window. Customer Service The Customer Service window supports and enhances your existing customer service business processes. All Address Book entry issues can be recorded, categorized, and escalated appropriately to ensure issues are dealt with in a timely manner. The Customer Service window is tightly integrated with the Knowledge Base window. When a case is resolved, you can enter an explanation of how the case was resolved and save the article in the Maximizer Knowledge Base. The Customer Service following window displays the customer service cases associated with the current entry in the Address Book window. You can add and modify cases for the selected entry only. 22 Maximizer CRM 10.5 User’s Guide Campaigns The Campaigns window allows you to create and manage both traditional and automated campaigns. Marketing efforts are easily coordinated amongst your marketing teams. And, through the use of campaign templates, you can create campaigns quickly by modifying the campaign elements. The Automated Campaigns following window displays all automated campaigns for the current entry in the Address Book window. Knowledge Base The Knowledge Base window provides you with a library-style tool to manage your customer service solutions; the window is tightly integrated with the Customer Service window. An article is typically created for each case solution, answered question, or guideline relating to your products or services. Hotlist The Hotlist is a to-do list of tasks and reminders that are usually timeless. The Hotlist is where you record actions and follow-up activities related to your interactions with Companies, Individuals, and Contacts. For example, you can use the Hotlist to schedule a phone call to a Contact who is out of town for a week. When the week is up, the Hotlist will remind you to call again. Calendar The Calendar window allows you to schedule, print, and view your appointments with Maximizer users or Address Book entries. Because the calendar works with the Peg Board feature, you can make sure that when you have an appointment, others can see when you are busy or out of the office. If you need to be reminded of an appointment, Maximizer can sound an alarm in advance of the appointment or task. Email The Email window provides you with the ability to send, receive, and preview email within Maximizer using your existing email system. Maximizer allows email file attachments and supports the vCard standard for virtual business cards. You can send files, mail-merge documents, and vCards quickly and easily. Additionally, you can transfer data files by email. Chapter 3 Working with Maximizer 23 Contacts The Contacts window displays the current Contacts for the Company or Individual selected in the Address Book, Customer Service, Campaigns, Hotlist, or Opportunities window. You can use this window to add, update, or delete a Contact. Notes The Notes window records your Address Book activities and displays only those notes that belong to the selected Address Book entry, customer service case, campaign, or opportunity. User-Defined Fields The User-Defined Fields window displays the custom fields for the selected Address Book entry, customer service case, campaign, or opportunity. You assign values to these fields, and, if your system administrator has given you the access rights, you can add, change, or delete user-defined fields. Personal The Personal window contains the Journal and Expenses windows, which provide a location to keep notes and financial records that are not associated with Address Book entries. Documents The Documents window displays the document entries for the selected Address Book entry, customer service case, campaign, or opportunity. You can add new documents, as well as files not created in Maximizer, modify documents, campaign, or delete documents. Company Library The Company Library is used to store vital sales and marketing information for everyone to access. The Company Library allows you to preview and open any note and many types of files in the preview pane. OrderDesk When you receive orders or inquiries from your website, you can manage them using the OrderDesk window. You can use the same OrderDesk window to enter a new order, capture a payment for an 24 Maximizer CRM 10.5 User’s Guide order, pre-authorize a payment for an order, complete a preauthorized payment for an order, and refund a payment for orders that come to you by telephone, mail, or other methods. OrderDesk allows you to track the status of your inquiries and orders, whether your customers have received a response or had their order fulfilled. Use the Address Book OrderDesk following window to view the orders and inquiries associated with the entries selected in the Address Book, Opportunities, or Customer Service window. Accounting You can access this window if you have the Accounting Link Designed for use with QuickBooks®, or the Accounting Link for Microsoft Dynamics™ GP add-on component installed. This window contains all your invoices, estimates, and purchase orders for your Address Book entries. You can create these items in Maximizer and the transactions are automatically shared with your QuickBooks or Microsoft Dynamics GP software. For information on using Accounting Link, see the online manual. Window Layout You can control what windows are displayed and how they are laid out. The Window > Window Settings > Window Layout menu provides three Maximizer window views—Classic, Outlook Style, and Custom. • Classic displays the following windows below the controlling (main) windows. This setting is Maximizer’s default window layout. • Outlook Style is somewhat similar to Microsoft Outlook’s display. The controlling windows form the left pane while the following windows occupy the top-right and bottom-right panes. • Custom allows you to control what windows are displayed. For example, use this option if you want only the Address Book and Calendar windows open, without their following windows open. Open the windows you want using the Window menu or the icons on the icon bar, and then tile the windows using the Window > Window Management > Tile feature. Of course, you can manually size any window. You can also control such things as the colors, fonts, and grid lines in your windows. The Window > Window Settings > Set Color and Window > Window Settings > Set Font menu items allow you to do so. Chapter 3 Working with Maximizer 25 Opening an Address Book Address Books can be opened in Administrator or Maximizer. There are no conflicts if you open an Address Book while it is being used by other users. If you are running Maximizer CRM Group Edition (or MaxExchange Remote is installed), you must specify whether to access local or global Address Books in the drop-down list that is provided. A local Address Book is located on your own computer, while a global Address Book is located on a server computer other than yours. Use the global setting to access shared Address Books. ➤ To open an Address Book Select File > Open Address Book. If the option is available, select Local List or Global List. . Select the Address Book to open. The Login dialog box appears. LThe default password for new users and for the users in the sample Address Books is “maximizer”. Type your password and click OK. The name of the Address Book appears in the application title bar. Under certain operating system configurations, your password may expire after a period of time. In this case, Maximizer will prompt you to change it. See your system administrator for more information. 26 Maximizer CRM 10.5 User’s Guide ➤ To log into the current Address Book as another user Select File > Login or double-click in the Users section of the Maximizer status bar at the bottom of the window. The Login dialog box appears. Enter a user ID and password. Click OK. Connecting to an Address Book Maximizer allows you to connect to any shared Address Book on another computer. The computer can be a Maximizer workstation or a server. Once you have connected to an Address Book, you can access the Address Book from the Open Address Book dialog box. LYou can perform this procedure if you have Maximizer CRM Group Edition installed. ➤ To connect to an Address Book From Maximizer, select File > Connect to Address Book. In the Connect to Address Book dialog box, select the computer that hosts the Address Book to which you would like to connect. Select an Address Book from the Available Address Books list and click Open. When you connect to the Address Book, you are prompted with a message saying the connection was successful. Click OK to close the message dialog box. Once the connection to an Address Book is established, it appears in the Open Address Book dialog box. You can use the Remove button in the Open Address Book dialog box to remove it from the available Address Book list. Chapter 3 Working with Maximizer 27 My Work Day View The My Work Day view is an area where everyone in your company using Maximizer can see Hotlist tasks, appointments, company announcements, and Dashboard. Adjust the My Work Day View You can adjust the My Work Day view to suit your own preferences. ➤ To adjust the My Work Day view Use the icons to access the main windows in Maximizer. The tabs along the side of the icon bar represent the various modules. Depending on what tab you have selected, the icons change. You can minimize the size of the icon bar by clicking on the pin graphic. When the icon bar is minimized, click on the pin graphic again to expand the icon bar. Click the Dashboard tab to open the Dashboard. For more information, see “Working with Dashboard” on page 29. LAlthough any user can add a document to the Company Announcements folder, you must be part of the Company Announcement Authors security group before your document is visible in the announcements list. To display an announcement, insert the announcement as a note, or as a text or an HTML document in the Company Announcements folder in the Company Library. You can then select the announcement for display in the page from the dropdown list. You must select View > Refresh or press the F5 key before the announcement is visible in the list. 28 Maximizer CRM 10.5 User’s Guide To view a different company announcement, select an announcement from the drop-down list. To turn off Company Announcements, Activities and Appointments, or Dashboard, click the Settings button. Use the Quick Access section to perform common tasks. The Recent Entries section displays the most recently used Address Book entries. Click on an entry to make it current. Use the Print and Print Activities buttons to print tasks, appointments, activities, and company announcements for the day. To switch to another calendar day in the My Work Day view, click the Calendar button. Chapter 3 Working with Maximizer 29 Working with Dashboard LDashboard can be accessed on the road through Maximizer Web Access. For more information about setting up Dashboard, see the Maximizer CRM Administrator’s Guide. Designed for executives and upper management, Dashboard shows up-to-the-second indicators of your company’s performance. Like a car’s dashboard, Dashboard’s indicators monitor daily activities and events in real time, so you can see at a glance which areas are doing well and which areas need attention. Information such as how many visitors are currently on your website, how many opportunities are in the pipeline, and your daily revenue from online purchases may be accessed instantaneously. Some of the indicators you can choose from include: • Daily Address Books added • Daily Web Orders • Daily Web Sales • Pipeline Reports • Lost Opportunities • Won Opportunities • Value of Opportunities in Progress With this type of information on your screen at all times, you can see in a glance how your company is doing and even see the indicators register activity from moment to moment. For important indicators, such as daily lost or won opportunities, you can configure Dashboard to notify you with an alarm when the indicator passes a certain mark. This helps to notify you when a critical situation has occurred that requires your attention, or when you surpass a goal that you set for your team. View Dashboard LIf the Dashboard tab is not displayed, click the Settings button and ensure that the Show Dashboards checkbox is selected. To access Dashboard, click the Dashboard tab in My Work Day. If the dashboard you want to view is not displayed, select it from the dropdown list. Note that you can access Dashboard only if your system administrator has added you to the Dashboard Users security group. The Dashboard window displays an array of indicators. In some dashboards, the indicators are grouped into sections such as Opportunity Status, Pipeline, and Revenue. When customizing a dashboard, you can select which indicators to display. If you want only Dashboard to display in My Work Day, click the Settings button and deselect the Show Tasks and Appointments checkbox and the Show Company Announcements checkbox. 30 Maximizer CRM 10.5 User’s Guide Customize Dashboard Dashboards may contain toolbars that allow you to customize Dashboard properties. For example, the dashboard templates contain toolbars with Open, Save As, Save, Properties, and Refresh buttons. Use these buttons to add or remove indicators and change indicator properties. LDashboard HTML files reside in the Dashboards folder in the Company Library. These files reference the .KIN files that specify Dashboard properties. Toolbar display is controlled by settings in the dashboard’s HTML file. If the file contains the parameter “ShowToolbar=No”, a toolbar is not displayed, so you cannot customize the dashboard. For more information, see “Customizing Dashboard” in the Maximizer CRM Administrator’s Guide. The following sections show you how to customize dashboards, where applicable. Select Dashboard Indicators What do you need to know on a minute-to-minute basis? Do you want a single gauge of your daily web sales, or a dashboard with as much information as the space shuttle’s control panel? Dashboard can show you as many—or as few—indicators as you need to see. ➤ To select indicators LIf Dashboard is sectioned, click the Properties button in the section in which you want to adjust properties. Click the Properties button. To add an indicator, select it from the Available Indicators list and click Add. To remove an indicator, select it from the Current Indicators list and click Remove. LYou can also drag and drop a gauge directly in the dashboard to change its position. Use the Up and Down buttons to move the selected indicator up or down in the list. The order of indicators in this list represents their order in Dashboard. Chapter 3 Working with Maximizer 31 Click Properties to customize the selected indicator. For more information, see “Set Indicator Properties” on page 32. Click OK. Click the Save button to save your changes. Set General Properties The General tab in the Properties dialog box allows you to set general properties. You can: • Specify how frequently Dashboard updates the indicator values. • Change the background color. The General tab also displays the name of the current .KIN file. This file contains your dashboard configuration. Your customizations are saved to this file. ➤ To set general properties Click the Properties button and click the General tab. Enter a value in the Update every box. Click the arrow to select a different background color. Click Apply. Click OK. Click the Save button to save your changes. 32 Maximizer CRM 10.5 User’s Guide Create Group Indicators You can create group indicators that display data from a number of existing indicators in a chart. There are two types of group indicators: bar charts and pie charts. You can include any of your existing indicators in a group indicator. ➤ To create a group indicator Click the Properties button. Click Create Group Indicator. In the Name field, enter a descriptive name for the indicator. You can also enter a description for the indicator. In the Indicator type drop-down box, select Bar Chart or Pie Chart. In the Indicators tab, select the indicators that you want to group together. Select any existing indicator in the Available indicators area and click Add to move the indicator to the Selected indicators area. Select the style of the indicators. You can choose gradient colors or solid colors. Choose a color for each selected indicator. In the Selected indicators area, select an indicator. In the Style for selected indicator area, select a color for the indicator. In the Settings tab, adjust the color, font and layout settings. For bar charts, you can also change the gadget settings. Click OK to save the properties of the group indicator. You can add the group indicator to your dashboard in the same way that you add any other indicator. See “Select Dashboard Indicators” on page 30 for details. Set Indicator Properties As described in “Select Dashboard Indicators” on page 30, you can set indicator properties in the Properties dialog box. You can also right-click an indicator to quickly and easily set its properties. Select the Indicator Type For each indicator, you can select which type of indicator will be used to display the information. Although your selection of indicator types depends on your installation of Dashboard, six common indicator types are: Chapter 3 Working with Maximizer 33 Angular Gauge – A “speedometer” style needle gauge. Linear Gauge – A horizontal graphical gauge with a “needle” to indicate the value. Numeric LED – A digital readout with the appearance of LED display (like a digital alarm clock). Note that if the value exceeds 99,999 then this type of gauge displays numbers in scientific notation (“E”). Numeric Gauge – A gauge indicator with numbers indicating value. Thermometer – A graphical thermometer indicating value. Color bar – A bar shaped graph indicating value by the color bar. ➤ To select an indicator type Right-click the indicator you want to adjust. The properties dialog box for the indicator opens. On the Indicator Type tab, select a type from the Indicator Type drop-down list. To change the scaling of the indicator, enter a value under Each unit is equivalent to. Click Apply. Click OK. Click the Save button to save your changes. Set Alarm and Target Levels An indicator alarm is useful if you need to be notified when one of your indicators passes a certain level. If the number of lost opportunities gets too high, for example, you would probably want to be notified. The alarm level determines when the alarm is activated. It also sets the redline in linear gauges. An alarm is not necessarily like an alarm clock—you can be notified of an alarm with: • A pop-up message • A beep • An audio file (Windows .WAV format) • All of the above You can also set a target level if an indicator is a color bar or a thermometer. When you set a target level, the indicator displays an arrow that points to the set value. If the alarm is enabled, it will be triggered when the target level is reached. 34 Maximizer CRM 10.5 User’s Guide ➤ To set alarms and notification types Right-click on an indicator and select the Alarm/Settings tab. Choose how you want to be notified. If you have a sound file that you like, you can browse and select it. Enter the level at which to trigger an alarm. This also sets the “redline” for linear gauges. LYou can find some .WAV files in the “Maximizer\MaData6” folder. Click Apply. Click OK. Click the Save button to save your changes. ➤ To set a target level Right-click on a color bar or thermometer indicator and select the Alarm/Settings tab. Enter a value in the Target level box. Click Apply. An arrow pointing to this value is added to the indicator. Click OK. Click the Save button to save your changes. Personalize Your Indicators Dashboard has many options for customizing the appearance of your indicators and the Dashboard window. ➤ To personalize indicators Right-click on an indicator and select the Color Settings or Gauge Settings tab. Adjust the color settings and gauge settings on the corresponding tab. Chapter 3 Working with Maximizer 35 Main Address Book Window Maximizer is a list-based module, which means that all of the information it accesses is displayed in rows and columns. Lists make it easy to see many entries at once and customize your views. Address Book Window LYou can view a Contact in the main Address Book window by selecting a Contact and choosing View [Contact] in Address Book from the Search or shortcut menu. You can also select multiple Contacts and select the corresponding menu option from the Search or shortcut menus to view the entries in the Address Book window. Typically, most of your activities are done in the Address Book window. 36 Maximizer CRM 10.5 User’s Guide ➤ To work with the Address Book window Use the button with the pin graphic on it to hide or display the icon bar view. There are menu options for all tasks you can perform in the Address Book window and toolbar buttons are available for common tasks. Maximizer wizards are available to help you through tasks such as creating appointments, Hotlist tasks, strategies, and web forms. The status indicator shows you when the module is busy when doing tasks such as searches. The Sales, Marketing, and Service tabs provide easy access to the related windows through the icon bar. A Quick Access section is also available for common tasks. The Recent Entries section displays your most recent entries. Icons representing Companies, Individuals, Contacts, Company Sales Leads, Individual Sales Leads, and Contact Sales Leads differentiate the types of entries. Tabbed following windows display information and attached entries for the selected entry in the main window. The view bars in a window or following window contain a view filter and buttons for common tasks and the column setup. You can also use the arrow buttons to move from one entry to the next. The status bar displays help on the item your mouse pointer is over, and shows the current user, the date, and the time. As you work with Maximizer, you will learn to use the many timesaving features. To open one of the Maximizer windows, click an icon in the icon bar or select an item from the Window menu. If you are not sure what a button or icon does, hold your mouse pointer over it to see a “tooltip”—a short description. The status bar also helps you with descriptions of buttons, icons, and menu commands. Toolbars and the Quick Access section of the window give you quick access to frequently used menu commands. You can display only the toolbars you want or even create your own custom toolbars. Some functionality is common to both Maximizer and Administrator. For example, adding user-defined fields and adding users can be done in both programs. Please refer to “Administration for Maximizer” on page 487 for more information. You can also refer to the Maximizer and Administrator Help and the Maximizer CRM Administrator’s Guide for more information. Chapter 3 Working with Maximizer 37 If you have the Maximizer Customization Suite installed, you can use the Interface Customization application to customize Maximizer menu labels, window captions, and icons. For more information, please refer to the Maximizer CRM Customization Suite documentation. Select Address Book Entries There are different ways to select Address Book entries. ➤ To select Address Book entries • To select an Address Book entry, click on the gray box to the left of the entry. To select multiple entries, click on the entries one at a time while holding down the Control key. Or select an entry and, while holding down the Shift key, select another entry, selecting all entries in between the two you initially selected. To select all entries in the current view, click the gray box in the upper-left corner of the Address Book window. Click this box to select all entries in the current view. Adjust the Icon Bar You can adjust the icon bar properties and also choose the state of the icon bar’s visibility. ➤ To adjust the icon bar Select Toolbars from the View menu, or right-click in the toolbar area and select Customize from the shortcut menu. The Toolbars dialog box appears. Select Icon Bar and click Properties. Set your defaults in the General group box: • Select the Visible option to display the icon bar in the Maximizer window. • Select the Show module tabs option to display the Sales, Marketing, and Service tabs. If you deselect this option, the tabs are hidden. By default, the icons for the current module are displayed. To select a different module, click the drop-down arrow. 38 Maximizer CRM 10.5 User’s Guide • Select the Display tooltips option to show information about each icon when you pass the mouse pointer over it. • Click Color to change the background color of the icon bar. Set the icon size to Small or Large. Set the location of the icon bar. The Floating option allows you to place the icon bar anywhere inside the Maximizer window. The Docked option places the icon bar on a border of the Maximizer window. On each of the Sales, Marketing, and Service tabs, select the icons you want to be displayed. Use the Move Up and Move Down buttons to position the icons. Click Edit on the Quick Access tab to add or remove commonly performed tasks displayed in the Quick Access section. To hide the section, deselect the Show Quick Access list option. Set the number of entries to be displayed in the Recent Entries section. To hide the section, deselect the Show Recent Entries list option. Chapter 3 Working with Maximizer 39 Customizing Maximizer Toolbars and Toolbar Buttons LTo change the properties of an existing custom toolbar or toolbar button, select View > Toolbars, select the custom toolbar and click Customize. You can then select a specific button to modify its properties. From a Maximizer custom toolbar you can perform specific actions such as launching another application or performing a specific search that was saved in your search catalog. ➤ To create or modify a custom toolbar Select View > Toolbars from the menu. – or – Right-click in any frame containing a toolbar and select Customize from the shortcut menu. The Toolbars dialog box appears. To create a new custom toolbar, click Add. – or – To add a button to an existing custom toolbar, select the existing custom toolbar, and then click Customize. The Customize Toolbar dialog box opens. Click Add. The Add Toolbar Button dialog box appears. 40 Maximizer CRM 10.5 User’s Guide Under This new button will perform the following action, select one of the following options, and then click Next. • Browse a website To add a button to browse a specific website or website document (usually beginning with http:// or www), select this option. • Open a document or an application To add a button to start an application such as a word processor, spreadsheet, graphics program, or to open a specific document or file, select this option. • Start a user-defined field for an Address Book entry This option enables you to set up a relationship between an alphanumeric user-defined field and a toolbar button. When the toolbar button is clicked, the value of the specified UDF is treated as the fully qualified name of a document or an application that is to be started (opened). • Run a Maximizer macro To add a button to run a Maximizer macro, select this option. This option is grayed out if no macros are present in the current Address Book. • Draw a graph from a defined graph catalog To add a button to run a graph that has been saved in the graph catalog, select this option. The option is grayed out if no graphs have been saved in the catalog. • Retrieve a search catalog in [window] To add a button to perform a search that has been saved in the search catalog, select this option. Also choose the window to which the search pertains from the drop-down list. For example, if you have created a search catalog entry for searching in the Opportunities window, select Opportunity. Chapter 3 Working with Maximizer 41 If you have chosen to Browse a website or Open a document or an application, click Next, and type the path of the document/application or web address (URL). Or, click Browse to locate the document/application or URL to run. If you would like an application to open a specific file, make sure that the application path is enclosed in double quotes and put a space after the path of the application. Then click Next. For example, to launch WordPad and open the file Notes.txt, in the Document/Application text box type the following: “C:\ProgramFiles\Accessories\WordPad.exe” C:\Notes.txt To load a new instance of an already running program, click the Load new instance checkbox. If you have chosen to Start a user-defined field for an Address Book entry, Run a Maximizer macro, or Draw a graph from a defined graph catalog, click Next, and select it from the drop-down list. Then click Next. The lists contain all user-defined fields, macros, and graphs in the current Address Book. 42 Maximizer CRM 10.5 User’s Guide If you have chosen to Retrieve a search catalog, select the search catalog from the drop-down list in the Toolbar Button Properties dialog box, click Next, and then edit the Tooltip and Status Bar Help text if you wish. Then click Next. Select the type of button you would like to display in the toolbar, and then click Finish or Next depending on the option you chose. If you choose to display the default button, Maximizer will select the button automatically and you may go on to step 11. If you choose to use a Standard Maximizer button, select one of the available buttons. Chapter 3 Working with Maximizer 43 If you choose to use an External image file (bitmap), locate the image using the Browse button. Click Finish. If desired, change the position of the new button on the toolbar using the arrows. Click OK and then click OK again to close the Toolbars dialog box. 44 Maximizer CRM 10.5 User’s Guide Keeping Track of Your Prospects and Customers Maximizer’s focus is on Address Book entries—Companies, Individuals, and Contacts. Address Book entries can also be designated as sales leads to help you organize your information. The Address Book window gives you the ability to manage your daily activities with companies, and the people who work for them. In addition to the basic Address Book information, including addresses, phone numbers, and email addresses, you can record other important information, such as relationships between companies or extra details, like the business type. As you work with the Address Book entries in your Maximizer Address Book, you can keep notes on your activities, so you can always have a history of your activities with your customers. Company and Individual type Address Book entries contain Contacts (people associated with a Company or Individual). You can attach notes, userdefined fields, and documents to Address Book entries. A Company represents a company or organization. Company An Individual is a person not affiliated with any company or organization. Individual Contacts Contacts Notes User-defined fields Notes Documents User-defined fields Documents Add Address Book Entries to Your Address Book Typically, “Company” entries represent a corporate entity you would like included in your Address Book. “Individuals” represent a person who is not affiliated with a company or organization. “Contacts” are entries that are always associated with Companies or Individuals. “Address Book entries” refers to all Companies, Individuals, and Contacts in your Address Book window. If you need to add people to your Address Book, add them as Individuals or as Contacts of an Individual or Company. If you need to delete a Contact, its associated notes and documents are automatically transferred to the “parent” Company or Individual, which ensures you maintain a record of all interactions with a company, even during changes. Chapter 3 Working with Maximizer 45 ➤ To add an Address Book entry LNote that the type of entry you are creating determines its available Key Fields. To add an Address Book entry, click the arrow button next to the New button on the toolbar and select one of the options. You can also right-click in the Address Book window and choose an option from the Add menu. If you choose to add one of the lead options, the Sales Lead field is selected by default on the Basic Information tab. To add a Contact for an entry, select the Company or Individual to which the Contact will belong. In the Contacts window, press Insert or right-click and select Add Contact. Alternatively, you can press the New button or right-click in the Address Book window to add a new Contact. Enter the name, the mailing address details, website, phone numbers, and email addresses as required. Phone number and email address description types are entered in the field on the left of the number or address. To enter an alternate address for the entry, click Address. To use an alternate address as the default address, select it in the Mailing Address dialog box and click the Select button. LMandatory user-defined fields and Key Fields are set up in Administrator. Select the Key Fields module and specify a value for the Key Fields. These are commonly used fields that are specific to your company. Up to eight key fields can be specified for the various Address Book entry types (lead and non-leads), opportunities, campaigns, and customer service cases. Key fields are set up in Administrator—they will not appear in Maximizer unless they have been specified. For more information on key fields, refer to “Use Key Fields” on page 494. You can also refer to the Maximizer CRM Administrator’s Guide if applicable. LYou have the option of opening Address Book entries in view mode or edit mode. This setting is controlled in the Address Book window Preferences dialog box (click the Preferences button). You can also control this setting in the System Defaults preferences tab. Enter the Address Book entry details (Company Details, Individual Details, or Contact Details) such as the Address Book entry Category. Click inside the field on the right and then click the ellipsis button for access to the possible field values. If this entry is marked as a Sales Lead, and you would like the entry accessible to a partner, make sure you set the category to partner. You can click the Print button to print an Address Book entry report. LIf you are in view mode in the Address Book entry dialog box, you can click the Copy button to quickly copy the text to your clipboard so you can paste it into other documents. You can click the Favorite List button to see which Favorite Lists to which the entry is assigned. This button also provides you with a way to quickly remove the entry from a Favorite List or add the entry to a Favorite List. 46 Maximizer CRM 10.5 User’s Guide You can click the Properties button for access to information such as the creation date and Address Book entry identification number. You can perform common tasks associated with the Address Book entry by clicking the Actions button. You can click the Preferences button to set the default for opening an Address Book entry to View or Edit mode. You can also set your preference for the mailing address format. LTo view an Address Book entry’s properties, select the entry, right-click, and select Properties. Click the User-Defined Fields tab and fill in any associated user-defined fields. Make sure you select the field and then click inside the field on the right to access the possible values for the field. Selecting the Show Blank Fields option shows all fields in the Address Book, not just those with values defined for the Address Book entry. Chapter 3 Working with Maximizer 47 Create a Default Address Book Entry LDefault entries are user- Creating a default entry provides you with some fields that are already filled in when you create a new Address Book entry. Default entries are useful if you often enter many fields in common, such as the same city or country. Each user in an Address Book can have a unique default entry. LIf you are logged in as the ➤ To create a default Address Book entry specific so each user in the Address Book can have different default entries. MASTER user (or have the Administrator user role), you can edit multiple default entries at once. Select View > Default Entries for All Users, then select the entries you would like to edit, and select Edit > Global Edit. In the Address Book window, select Default Entry from the Edit menu. The Default Entry dialog box appears. Fill in the fields to include as default information. Click the User-Defined Fields tab to include specific fields in the default entry. When you are finished, click OK. LIf you modify the default entry in Maximizer Web Access, the changes will appear in Maximizer. The most recent changes to the default entry, regardless of where it was modified, appear in both applications. Now, when you create a new Company or Individual, the entry screen appears with the default fields already filled in. The default entry affects all the new Address Book entries you create. 48 Maximizer CRM 10.5 User’s Guide Change Several Address Book Entries with Global Edits You can update a number of Address Book entries at the same time with the Global Edit command. For example, you may want to add a FAX Phone extension to several entries. Global Edit is a very powerful feature, so you might consider making a backup of your Address Book before making significant changes using Global Edit. ➤ To perform a global edit In the Address Book window or Contacts window, select the entries you want to modify. Select Global Edit from the Edit menu. The Global Edit dialog box appears. ? For detailed information, see F1 Help. Also refer to Maximizer Help for information on applying global edits to user-defined fields. Apply your edits to the Basic Information or User-Defined Fields tabs. Changes made to these tabs are applied in the same way as when you are entering an Address Book entry. The changes are applied to all Address Book entries included in the global edit. If you do not select any entries, the edits are applied to all your entries in the current list. You can also select Remove for most fields in the Edit Basic Information tab. This option lets you remove existing values for a field without specifying alternative values. Chapter 3 Working with Maximizer 49 Click the Note tab and add a description for the global edit. This adds a note to each of the affected entries. You can also specify the Access Rights for the default note and a Category (categories are created in Administrator preferences). Click the Global Edit Rules tab. Under Mailing Rules, set the mailing address options. You can specify Do not change, Yes, or No for each of the options. LThese options apply to table user-defined fields in the UserDefined Fields tab and in the Edit Basic Information tab (Details list). • The Receives Mail Sent to Company or Individual option applies to Contacts. Select it if you want to send mailings to the associated Contacts when sending mail to the Company or Individual. • The Use Address Book Entry’s Name in Mailing Address option lists the Address Book entry name as well as the Contact name (if applicable) in the mailing address. Select the appropriate item in the User-Defined Field Rules group box. The options in this group box apply only to table user-defined fields. To replace the current user-defined field values with a new list, select Replace Table Field Values. To add new table user-defined field values to existing values, select Add Table Field Values. Note, however, that if the table user-defined field is “single-value only”, the Add Table Field values option does not apply. The new value always replaces the existing one. Select the appropriate items in the Do not solicit by, Category, and MaxExchange Distribution group boxes. These options apply to the three fields with the same names in the Details area of the Edit Basic Information tab. 50 Maximizer CRM 10.5 User’s Guide • To add the selected values to the existing values, select Add table field values. • To replace the existing values with the selected values, select Replace table field values. • To remove the selected values from the existing values, select Remove table field values. Select the appropriate item in the Update Options group box. This option applies only if you have entries selected in your Address Book window. Click OK to perform the global edit. You are prompted with a message to verify that you want to continue with the operation. View Address Book Entries After entering your search criteria and clicking OK, the entries that match the text you entered are displayed in the Address Book window. Chapter 3 Working with Maximizer 51 ➤ To view and modify Address Book entries To view the details of an Address Book entry, click on the entry to open it. To select multiple entries, click on the entries one at a time. To select all entries in the current view, click the gray box in the upper-left corner of the Address Book window. Click this box to select all entries in a list. Use Column Setups to Organize Lists Maximizer provides a selection of column setups you can use for the the Address Book, Opportunities, Campaigns, Customer Service, and Hotlist windows. You can also create your own column setups. This allows you to display different fields in various combinations. ➤ To create a column setup Select Column Setup from the View menu or click the Column Setup button on the View bar. In the Column Setup dialog box, click Add. The Defined View Properties dialog box opens. Type a Name in the Details of View group box. Select an option from the Full Access drop-down list. If you leave Public selected, all users can modify or delete the column setup. If you select a group or user, only members of that group or that particular user can perform these actions. Select an option from the Read Access drop-down list. If you leave Public selected, all users can see and use the column setup. If you select a group or user, only members of that group or that particular user can see and use the column setup. Click a column header in the Columns in View group box. Click the Properties button to modify the column title or width. In the Column Properties dialog box, modify the title and/or width and click OK. Click the plus symbol to expand a fields folder and select a field in the Available Fields list. 52 Maximizer CRM 10.5 User’s Guide Click Add to add it to the current column. Fields in the current column appear in display order in the Selected Fields list. Change the name of the field label in the Field Label field if necessary. Optionally, you can select field separator characters from the drop-down list such as commas, spaces, blanks, or dashes to conserve space and place multiple fields on the same line. Repeat steps 6–10 for each field to add to the column setup. Click OK to save the column setup. ➤ To use a column setup • Retrieve a column setup for use with the current window by selecting View > Column Setups, selecting the column setup view, and clicking Use Now. Record Relationships with Related Entries ? Press F1 in the Related Entries window for more information on related entries. In the course of business, it’s common to have people and companies who are somehow related or connected to each other. For example, one of your contacts might be another’s accountant. Maximizer allows you to record these types of relationships in the Related Entries window. ➤ To relate two entries Select the two entries you wish to relate to each other and select Edit > Relate Entries. – or – Drag an entry and drop it on to another entry. In the resulting dialog box, select Relate the source entry to the target entry. Specify the nature of the connection between the two entries. Chapter 3 Working with Maximizer 53 Each entry appears in the other’s Related Entries window. Any Address Book entry can be related to another. All notes, userdefined fields, and documents associated with a related entry are then linked to the relationship. If an Address Book entry has entries related to it, these are displayed in the Related Entries window. ➤ To unlink Address Book entries • Occasionally, relationships that you set up between two Address Book entries will change, and you will want to remove the relationship. You can “unlink” two entries by selecting one of the related entries in the Related Entries window and selecting Edit > Unlink Selected Entries. 54 Maximizer CRM 10.5 User’s Guide Convert Individuals to Companies and Contacts to Individuals If you originally created an entry as an Individual and now decide the entry would be more appropriate as a Company with Contacts, you can convert the entry. In the conversion, Maximizer copies the entire contents of the Individual to a new Company entry—all data is converted, including the Individual’s Contacts. The original Individual is automatically deleted in the process. Additionally, you can convert Contacts to Individuals. You are asked to confirm if you want the new Individual to inherit the Contact’s address. All data is transferred to the new Individual entry and the original Contact is automatically deleted. Any number of Contacts or Individuals can be converted at once. ➤ To convert Address Book entries • To convert Individuals to Companies, select the Individuals you want to convert and select Edit > Convert Individuals to Companies. To convert Contacts to Individuals, select the Contacts you want to convert and select Edit > Convert Contacts to Individuals. Chapter 3 Working with Maximizer 55 Using Territory Management Use Territory Management to set up territories and assign them to Company and Individual Address Book entries. You can assign the territories manually, or automatically through the application of territory rules. LThe Sales Manager user role is set on the Access Rights tab of the User Properties dialog box. To see your access rights, select File > Users > Properties. LYou cannot set up or align territories on MaxExchange Remotes and Remote Servers. You can, however, assign territories manually. To use Territory Management, you must be a Sales Manager. However, once territories are created and assigned, any Maximizer user can use the Territory and Territory Status fields in everyday tasks such as searching for entries, adding column setups, inserting merge fields, and creating reports. Users who are not Sales Managers can manually assign a territory when creating a new Address Book entry. They can also assign a territory to an existing entry if a territory is not assigned and the Account Manager field is blank. When a user assigns a territory, “Set by user” is displayed in the Territory Status field. Set Up Territories When you set up a territory, you can define rules that an Address Book entry must match to be assigned to the territory during an alignment. To build the rules, use fields such as City, Country, State/ Province and Zip/Postal Code. You can also use user-defined fields. During an alignment, entries are tested against territories in the order the territories appear in the Territory list. If an entry matches the rules of more than one territory, the territory appearing higher in the list is assigned to the entry. All entries match a territory that does not contain any rules. So if you create such a territory, it is placed by default at the bottom of the Territory list. Otherwise, entries matching the rules of territories appearing after it would not be matched to these territories. Instead they would be matched to the territory without rules. 56 Maximizer CRM 10.5 User’s Guide ➤ To set up a territory LThis menu item is available only if you are a Sales Manager. Select Edit > Territory Management. The Territory Management dialog box opens. Click Add. The Add\Modify dialog box opens. Enter a territory name and a description of the territory. From the Account Manager drop-down list, select an account manager. Click Add to select the fields you need to define territory rules. Chapter 3 Working with Maximizer LIf an Address Book entry matches the rules of more than one territory, the territory appearing higher in the Territory list is assigned to the entry. 57 Specify whether Address Book entries must match all, or one or more of the territory rules. Click OK. The new territory is added to the Territory list. If required, use the Move Up and Move Down buttons to move the territory in the list. ➤ To modify or delete a territory Select the territory you want to modify or delete. To modify a territory, click Modify. Make your changes and click OK. To delete a territory, click Delete. Assign Territories You can assign territories manually on the Edit Basic Information tab, or automatically, on the Alignment tab. If you assign territories automatically by aligning them, they override territories set by Sales Managers only if you select the “Overwrite territories set by manager” option. Changes to territory status are logged to the Notes tab. ➤ To assign territories manually In the Address Book window, double-click the Address Book entry to which you want to assign a territory. On the Edit Basic Information tab, click the Territory field, and select the territory you want to assign to the entry from the drop-down list. The Territory status field now indicates that the territory was “Set by manager” or “Set by user”. Select an account manager from the Account Manager dropdown list. Click OK. 58 Maximizer CRM 10.5 User’s Guide ➤ To align territories Select Edit > Territory Management and select the Alignment tab. ? Refer to Maximizer Help for information on specifying alignment conditions and options. Specify the territory alignment conditions. For example, if you want territories aligned for all Address Book entries, select the All Address Book entries option. Specify the alignment options. • Select Unassign territories to unassign territories from Address Book entries. • Select Overwrite territories set by manager to overwrite territories that were set by Sales Managers. Click Align territories. LTerritories set by users are always overwritten by territory alignments. If the alignment assigns a territory to an entry, the name of the territory is displayed in the Territory field, and the value “Set by rule” is displayed in the Territory Status field. If no territory is assigned to an entry (and one has not been set manually), the value in the Territory Status field is “Unassigned”. The value “Set by rule (unaligned)” is displayed in the Territory Status field when: • An entry previously assigned to a territory no longer matches the territory rules. (The rules or the entry have changed.) However, if the entry matches the rules of another territory, it will be aligned to that territory. Chapter 3 Working with Maximizer 59 • A territory that was set by a user at the time of the entry’s creation does not match the rules of the territory it was assigned to or the rules of any other territory. • A territory that was assigned to an entry by a Sales Manager does not match any territory rules, and the “Overwrite territories set by manager” option is selected. 60 Maximizer CRM 10.5 User’s Guide Keeping Notes on Your Address Book Entries Notes are used to record activities associated with Address Book entries, customer service cases, campaigns, and opportunities. The Notes window is a following window, which means it displays notes only for the selected Address Book entry, customer service case, campaign, or opportunity. Use the Notes window to jot down “manual” notes—your ideas and impressions about a customer, a case, or an opportunity. You can enter manual notes for short company profiles or summaries of contracts and business agreements. You have the ability to create a default note for the Address Book, Opportunities, Campaigns, Customer Service, and Journal windows. The default note for each window can be different and is specific to the current user. The text automatically appears as part of the note body when you create a new note. The note owner and category can also have default values. LBy default, notes are logged for all of the main activities you can perform in Maximizer. Logging can be adjusted on the File > Preferences > Logging tab. Other note types are automatically created by Maximizer, providing a history of all your email, phone calls, letters, timed notes, opportunities, appointments, tasks, customer service cases, campaigns, and transferred Address Book entries. The note type descriptions are as follows: • Customer Service – Created when you add a case. • Email – Created in the Address Book window when you send an email message to one or more Address Book entries. Email notes are also created when you send a campaign. • History – Created in the Customer Service, Opportunities, and Campaign windows when cases, opportunities, and campaigns are added or changed. • Mail-outs – Created when you print documents, labels, envelopes, or letters using the Maximizer Word Processor's merge feature. Also created when campaign activities are sent out as email, fax documents, or printed documents. • Manual – Added manually to the Notes window. • Opportunity – Created in the Address Book window when opportunities are added or changed. Opportunity notes can be printed or searched only from the Address Book window. • Other – Third-party or custom notes created by your system administrator. Also, notes created by Maximizer’s web access sites. • Phone calls – Created when you dial a phone number, or log a received call. • Tasks – Created when appointments or Hotlist tasks are scheduled, modified, deleted, or completed. For Hotlist task Chapter 3 Working with Maximizer 61 notes, the current owner of the Hotlist task is included in the note, even when a task is reassigned. For appointment notes, details of the appointment are included when the appointment is scheduled and when an attendee list is modified, an additional note is logged. • Timed – Created when you use the Timer. • Transfer log – Created when you transfer entries between Address Books. ➤ To work with the Notes window Use the Filter to narrow the entries to a specific note type (e.g.,“Customer Service” or “Email”). Choosing <Custom…> enables you to search for notes that contain certain text, notes that were created by a particular user or accessible by a particular user or group, notes in a specific date range, and/or a combination of note types. Use the up and down arrows to view the notes for the previous or next Address Book entry. Use Show All to display all notes for a selected Address Book entry. This includes notes belonging to the selected Company/ Individual and all associated Contacts. If this checkbox is not enabled, only those notes belonging to the Company/Individual or the selected Contact are displayed. Double-click an entry to view the entire note. To add a note, right-click in the Notes window or press the Insert key. 62 Maximizer CRM 10.5 User’s Guide You can perform common tasks by clicking the Actions button in the Notes dialog box. You can also spell check your note text. Select Search > Notes to find any note you want and select Reports > Notes to produce a Notes report. Simply select the types of notes you want in your search or report. ➤ To add a note LYou can also add a note by copying text to the Windows Clipboard, right-clicking in the Notes window, and choosing Paste Link. In a controlling window, drag an entry to the Notes window or to the Note button on the Standard toolbar. – or – From the Notes window, while your entry is selected, right-click and select Add Note. – or – Double-click a blank note cell. In the Add Note dialog box, type your note. Use the Menu Bar at the top of the note for various tasks. See the mouse-over text or F1 Help for a description of each button. For example, you can check the spelling in your note using the Maximizer Spell Checker. Click the Spelling button to initiate the process. LThe Category field is available for only manual notes. Adjust the Date, Time, Creator, Full access, Read access, and Category, if necessary. Categories are created in the System Fields tab of the Administrator preferences. Press F1 for detailed assistance. Chapter 3 Working with Maximizer 63 Click OK. ➤ To add a default note In the Address Book, Opportunities, Campaigns, Customer Service, or Journal windows, select Default Note from the Edit menu. Enter the body text, and if necessary select a user or group for the Full Access and/or Read Access fields. You can also select a note category (these are set up on the System Fields tab in the Administrator preferences). This information appears as part of the note each time a note for an Address Book entry, an opportunity, a campaign, a customer service case, or a journal entry is created. Note that the default note can be different for each type of entry. Use the Menu Bar at the top of the note for various tasks. See the mouse-over text or F1 Help for a description of each button. For example, you can check the spelling in your note using the Maximizer Spell Checker. Click the Spelling button to initiate the process. 64 Maximizer CRM 10.5 User’s Guide Click OK to save the default note for each window. Chapter 3 Working with Maximizer 65 Recording Additional Information with User-Defined Fields Although the information you can record for Address Book entries covers the basics, you probably will want to record additional information, such as budget, income, interests, number of employees, or any other data. You can record this information in Maximizer with user-defined fields, which are custom fields for storing information in any of the following categories: LA user-defined field may • Address Book entries – Available in the Address Book window. Also, up to 10 Address Book user-defined fields can be selected to be available in customer service cases (File > Preferences > Customer Service tab). • Opportunities – Available in the Opportunities window. • Campaigns – Available in the Campaigns window. • Customer Service Cases – Available in the Customer Service window. • User accounts – Available in the User Properties dialog box. belong to only one of these categories. Work with User-Defined Fields User-defined fields for Address Book entries, opportunities, campaigns, and customer service cases are available in the UserDefined Fields following window. Which category of user-defined field is visible in the following window depends on which of the main windows is active. For example, when viewing the Address Book window, the User-Defined Fields following window contains 66 Maximizer CRM 10.5 User’s Guide only user-defined fields that pertain to Address Book entries, as shown in the following graphic. You can also access user-defined fields for Address Book entries, opportunities, campaigns, and customer service cases from the UserDefined Fields tab of the dialog box for each Address Book entry, opportunity, campaign, or case. The folders and field names appear in a list on the left, and the field values on the right. The following graphic shows the User-Defined Fields tab of an Address Book entry. Chapter 3 Working with Maximizer 67 User-defined fields that pertain to user accounts are available from File > Users > Properties > User-Defined Fields. Keep the following points in mind when working with user-defined fields: • By default, user-defined fields are displayed in tree view, where fields are nested within folders. You can also display the fields in an alphabetical list, without their folder structure. You can set your default user-defined field view by selecting File > Preferences, and setting the View User-defined fields in tree view option on the System Defaults tab. • When you select the Show blank fields option on the UserDefined Fields tab, all user-defined fields in the Address Book are displayed, not only the fields with existing values. Doubleclicking on a field in the window allows you to add or modify a user-defined field value. • When you select the Show hidden fields option on the UserDefined Fields tab, fields and folders that are set to hidden appear shaded. When you deselect this option, the fields and folders are completely hidden. • Mandatory fields are denoted with an asterisk displayed after the field name and type. This is not the same as having an asterisk included as part of the field name. System-defined fields are shown in bold, black text. • The kind of Address Book information to which user-defined fields apply—Address Book entries, opportunities, campaigns, customer service cases, or users—controls the window in which the user-defined field is available. For example, if you create an opportunity user-defined field, it will be available in the UserDefined Fields following window only when the Opportunities window is the controlling window. • If a Contact is associated with an entry, the Company and Contact user-defined fields are shown in separate folders. • Your selection of user-defined fields is usually set up by your system administrator using Administrator. However, any user can be given the rights to create, change, or delete user-defined fields in Maximizer. If you have not been given the ability to set up user-defined fields, you can only assign values to existing fields. Types of User-Defined Fields There are four different types of user-defined fields. Each type has different properties and uses. • Table user-defined fields enable you to select a value or values from a list. This type of field is very useful for multiple 68 Maximizer CRM 10.5 User’s Guide choice or multiple value fields. If you create a table user-defined field with the “single value only” attribute, no more than one value can be selected from the list, which is particularly useful for fields where it wouldn't make sense to select more than one value. LEncrypted user-defined fields • Date user-defined fields can store a specific date or an annually recurring date. • Alphanumeric user-defined fields record any alphanumeric text (letters and numbers) up to a maximum number of characters that you specify. You can encrypt alphanumeric fields for security protection. Note that you cannot disable or enable encryption once you have created the field. • Numeric user-defined fields record any numeric value you wish to keep for the Address Book entries. If you specify a number of decimal places for the user-defined field, you can use this field type for monetary amounts. cannot be transferred, imported, or exported. They are also not searchable. Set Up User-Defined Fields User-defined fields are created and modified through the Set Up User-Defined Fields dialog box, which is available from the File menu. The dialog box contains five tabs, one for each category of userdefined field. The user-defined field structure can also be multitiered with multiple levels of user-defined field folders, each of which may contain other folders or user-defined fields. The folder structure may contain a maximum of three folder levels. Chapter 3 Working with Maximizer 69 Mandatory, System, and Key User-Defined Fields Some user-defined fields are displayed in bold or with an asterisk: • Mandatory user-defined fields are denoted with an asterisk displayed after the field type. (This is not the same as having an asterisk included as part of the field name.) • System user-defined fields are shown in bold, black text. • Key user-defined fields are specified on the Key User-Defined Fields preferences tab in Administrator. (File > Preferences > Key User-Defined Fields) Sort order There are two methods of changing the order of user-defined fields and folders: • Drag and drop – You can use the mouse to drag and drop a field or a folder to a different position in the list. Dragging it onto a field places it immediately below that field. Dragging it onto a folder places it at the top of the list inside that folder. Holding the mouse on a folder for about a second expands the folder, and then you can continue dragging the item to a specific position in that folder. • Move Up and Move Down buttons – Click the Move Up and Move Down buttons to move a field or folder up or down in the list. These buttons only move items within their current folder level. You cannot use them to move items in or out of folders. Create New User-Defined Fields Use the Set Up User-Defined Fields dialog box to create new userdefined fields and folders for use with Address Book entries, opportunities, campaigns, customer service cases, and user accounts. The Set Up User-Defined Fields dialog box is available from the File menu in both Administrator and Maximizer, although users can create user-defined fields in Maximizer only if the security settings in their user account allow them to. Create New Folders for User-Defined Fields You can group similar user-defined fields into folders and subfolders to a maximum folder depth of three levels. Grouping user-defined fields into folders is particularly useful if you have a large number of user-defined fields. Grouping them makes them easier to find and reduces the amount of scrolling needed to find the one you are looking for. 70 Maximizer CRM 10.5 User’s Guide ➤ To create a new folder Open the Set Up User-Defined Fields dialog box (File > Set Up User-Defined Fields). Select the tab for the category of user-defined field. To create a top-level folder, select the Address Book name at the top of the list. – or – To create a folder within an existing folder, select the existing folder. Click Add Folder. LUser-defined field and folder names cannot contain forward slash or backward slash characters ( / \ ). LIf you set the folder to hidden, it is not displayed on the UserDefined Fields tab when you deselect the Show hidden fields option. Enter a name for the new folder, and click OK. The new folder now appears in the Set Up User-Defined Fields dialog box. Move the new folder to a different position in the list, if desired. Chapter 3 Working with Maximizer 71 Create New User-Defined Fields You can create user-defined fields in both Maximizer and Administrator, provided that your user account has sufficient privileges. ➤ To create a new user-defined field Open the Set Up User-Defined Fields dialog box (File > Set Up User-Defined Fields). Select the tab for the category of user-defined field to create. Select an existing folder, inside which you want to create a new field. – or – Select a user-defined field. The new field will be created at the same level as the selected user-defined field. Click Add Field. LUser-defined field and folder names cannot contain forward slash or backward slash characters ( / \ ). In the Field Name field, type a name for the user-defined field. Specify the properties of the user-defined field. For detailed information about each of the property fields, click inside the dialog box and press F1. 72 Maximizer CRM 10.5 User’s Guide Click OK. You have now created a user-defined field. Move the new field to a different position in the list, if desired. Add Items to Table User-Defined Fields Table user-defined fields contain a list of similar items from which a user may select one or more items. As part of the process of creating a new user-defined field of this type, you should add the items to the table. However, while using the user-defined field in Maximizer, users may find a need to add an item to the list. A user can add items to a table user-defined field on-the-fly if the user account has sufficient privileges. Both procedures are explained in this section. Chapter 3 Working with Maximizer ➤ To add items to a table user-defined field In the Set Up User-Defined Fields dialog box, select the tabletype user-defined field, and click Items. – or – Double-click the table user-defined field. In the Set Up Items dialog box, click Add. Type a name for the item. 73 74 Maximizer CRM 10.5 User’s Guide LIf you set the item to hidden, you can hide it from the Available Values list by deselecting the Show hidden items option. In the Requested by field, select the name of the user who requested the item creation. Click OK. Repeat these steps to add any additional items to the table userdefined field. ➤ To add an item to an existing table user-defined field In the User-Defined Fields following window, double-click the table user-defined field. LIf you set the item to hidden, you can hide it from the Available values list by deselecting the Show hidden items option. You must also ensure that the item is not selected in the list. If it is, the item will still be displayed. Click Add. Type a name for the item. In the Requested by field, select the name of the user who requested the item creation. Chapter 3 Working with Maximizer 75 Click OK. Modify Existing Table Items You can make changes to a table item by using the following procedure. ➤ To change the properties of an item In the User-Defined Fields following window, double-click the table user-defined field that contains the item you want to modify. The Table Values dialog box opens. Select the item you want to modify and click Modify. Make your changes in the Modify Item dialog box and click OK. Modify Existing User-Defined Fields ➤ To change the properties of a user-defined field Select the user-defined field in the Set Up User-Defined Fields dialog box. Click Properties. Change the properties as required. Click OK. 76 Maximizer CRM 10.5 User’s Guide Creating Lists of Entries with Searches Many of the actions you can perform with Address Book entries, customer service cases, campaigns, and opportunities apply to the entire list of entries in the active window. For instance, when you print a report from the Address Book window, you are generally given a choice between printing the selected entry (or entries) or printing the entire list. When you perform a mail merge, for instance, you generally use the entire current list. LA search retrieves any entries that match the search criteria and that you have the rights to view. Maximizer’s search features let you search any field for the data you specify and modify your current list with the matching entries. If you wanted to create a list of Address Book entries in Washington State, for example, you would search the State/Province field for entries with “WA” in that field. In this example, a search was performed on the full Address Book entry list for all Address Book entries starting with “B”. The list was replaced with the matching entries (below). For assistance with searching for customer service cases and knowledge base articles see chapter 7 “Providing Customer Service” on page 219. Chapter 3 Working with Maximizer 77 Search for Entries by Fields Maximizer makes it easy to search by some of the basic fields, such as Last Name, Company, City/Town, or Email for Address Book entries or by Status, Team Leader, or Revenue for opportunities. The Search menu varies depending on what window is selected. ➤ To search entries by a field From one of the main windows such as the Address Book window, Campaigns window, or Opportunities window, select the field you are searching for from the Search menu. Select Other to see additional fields by which to search your Address Book entries. In the Search By [field] dialog box, specify the search criteria. LEncrypted user-defined fields are not searchable. You can select one of three options for updating the current list with your search results: • Add search results to list searches the entire Address Book and adds the matching entries to your list. • Narrow list searches your current list and reduces it to the matching entries. • Replace list with search results searches your Address Book and replaces your current list with the matching entries. If applicable, specify the Range of the items to search. 78 Maximizer CRM 10.5 User’s Guide LIf you change the maximum entries field to a value less than the system default value, the value will remain as your default value for subsequent searches. If you change this field to a value more than the system default value, it will return to the system default value for subsequent searches. The default values for the number of entries returned in a search is set in Administrator. Specify the Maximum entries to be returned in your search. This number is important to note because it affects what is displayed in your list after your search. Perform Advanced Searches by All Fields LIn the Address Book window, you can click Repeat All Fields to repeat the last search. Once a search is saved in the catalog, you can access the most recent catalog searches right from the search menu. Maximizer’s Search by All Fields feature is useful when you need to search by fields that are not listed in the Search menu or when you want to search by more than one field. In the Search by All Fields dialog box, you can build complex search arguments and even save your search in the catalog for later use. Use the Search by All Fields feature to find user-defined fields or a combination of user-defined fields and other fields to produce a custom list of Address Book entries, opportunities, campaigns, and customer service cases. ➤ To search by all fields In the Address Book window, select Search > All Fields. In the Search by All Fields dialog box, click Add. In the Select Fields for Search dialog box, select one or more fields and click OK. Chapter 3 Working with Maximizer 79 For each field you selected in the previous step, select or specify values in the dialog box that is provided. LSelect the Search for no value checkbox to search for entries where no value is assigned to the selected field. If applicable, indicate under Search conditions whether to return entries that match all values, or that match one or more values. Specify the remaining search criteria in the Search by All Fields dialog box. LTo retrieve all Address Book entries that do not have email addresses, do a search by all fields, choose the email field, leave the search range blank, and then click the Not Equal button. To build a list of entries that excludes a certain group, as in a list of all Address Book entries except those in a certain state or province, use the Not Equal button. In the Modify current entries list group box, select one of the options. • Add search results to list displays the entries that match your search criteria, without removing any currently displayed entries from the list. • Narrow list searches only selected entries (or all currently displayed entries if none are selected), and removes any entries that do not match your search criteria. • Replace list with search results removes all entries currently displayed in the list and replaces them with entries that match your search criteria. You can choose to further narrow the search by specifying options to include or omit sales leads. LUse Last Search and Catalog for previously defined searches. Select or type the Maximum entries you would like to be returned. 80 Maximizer CRM 10.5 User’s Guide Click OK to start the search. ➤ To save your search to the search catalog LSee F1 Help for detailed information on saved search properties. Enter your search criteria in the Search by All Fields dialog box. Click Catalog and click Add. Specify the saved search properties and click OK. The search is added to the search catalog. To retrieve a saved search, click Catalog, select the search, and then click Retrieve. Chapter 3 Working with Maximizer 81 Use the Undo Search and Last Catalog Searches Menu Items You can quickly undo a search or perform a recent search in the Address Book, Opportunities, or Customer Service windows. ➤ To undo a search • After performing a search, select Search > Undo Search. This replaces the current list with the entries from the previous list. ➤ To retrieve a previous catalog search • Select Search > Last Catalog Searches and select a previous search. This retrieves the list of entries associated with the previous catalog search. Create Favorite Lists from Searches After you have performed a search, you can create a Favorite List so it can be easily accessed. Favorite Lists are available in the Address Book window as well as the Customer Service window. ➤ To create a Favorite List of entries Search for the entries you want saved in the Favorite List. Select View > Favorite Lists and then click Add. In the Favorite List Properties dialog box, enter a Name and Description for the list. Select an option from the Full Access drop-down list. If you leave Public selected, all users can modify or delete the Favorite List. If you select a group or user, only members of that group or that particular user can perform these actions. Select an option from the Read Access drop-down list. If you leave Public selected, all users can see and retrieve the Favorite List. If you select a group or user, only members of that group or that particular user can see and retrieve the Favorite List. If you are creating a Favorite List for Address Book entries and want this Favorite List to appear each time you open Maximizer, 82 Maximizer CRM 10.5 User’s Guide select the Retrieve this list when an Address Book is opened option in the Favorite List dialog box. Once this option is selected, the setting overrides the Ask at Address Book startup which list to view option on the System Defaults tab. ➤ To retrieve saved Favorite Lists • To retrieve the list, select View > Favorite Lists and select the list you want to view. You can also use the View > Recent Favorite Lists to retrieve Favorite Lists you have recently accessed. ➤ To add entries or remove entries in a Favorite List In the Address Book or Customer Service window, select the entries to appear in your updated list. Select Add to Favorite List or Remove From Favorite List from the View menu. In the Favorite Lists dialog box, select the Favorite List you are updating. Select Selected entries, Current entries, or All entries. Click OK to confirm that you want to update the list. Maximizer replaces the selected Favorite List with the entries in the current list. Select and Display Entries in a List After you have performed a search, you will most likely want to perform some action on the entries or a subset of the entries. There are a couple of ways to quickly select and display entries in a list. ➤ To select all entries in a list • Click the gray button on the top left of the corner of a main window such as the Address Book window, as shown below. Click this box to select all entries in the current list. Chapter 3 Working with Maximizer 83 ➤ To display only selected entries • If you have selected several entries in your current list, select Edit > Make Selected List Current to remove the deselected entries from the current list and only display the selected entries. 84 Maximizer CRM 10.5 User’s Guide Tracking Your Appointments and Hotlist Tasks LTo learn more about the Hotlist window, press F1. For assistance adding a Hotlist task, select the Wizards button on the Standard toolbar and run the Add Hotlist Task wizard. The Hotlist is a timeless “to-do” list of tasks and reminders. Tasks include calling and writing to customers. Use the Hotlist window to record actions and follow-up on personal activities, such as producing expense reports, or those related to your interactions with Address Book entries. For example, you can use the Hotlist to schedule a phone call to a Contact who is out of town for a week. When the week is up, the Hotlist will remind you to call again. Hotlist Window LTasks can be reassigned to another user. When a Hotlist task is added or reassigned, a note is created in the Notes window. This note includes the name of the person to which the Hotlist task is assigned. Because the Hotlist is a controlling window, all your following windows update with it providing you with instant access to all information about the person or organization with which you are dealing. You can quickly handle all your communications—from phone calls to email—and record the results directly from the Hotlist. The Hotlist window is also associated with the Customer Service window. A Hotlist task, based on a case’s follow-up deadline, is automatically created for the assigned user when a case is created (assuming a user and follow-up deadline are assigned). The task is automatically modified when the follow-up deadline or assigned user is modified. And when the case is resolved, the task is marked as complete. To learn more about customer service cases, see chapter 7 “Providing Customer Service” on page 219. LYour Hotlist can also show tasks for opportunities if you are a member of a sales team. Team leaders assign these tasks to you. ➤ To use the Hotlist window Click the Hotlist icon or select Hotlist from the Window menu. Select the Show Appointments option to have your appointments appear in your list with your tasks. Use the view Filter to select the date range you want to show. To add a new task, select Edit > Add Task. LTo create or modify column setups for the Hotlist window, click the Column Setup button on the View bar. For more information, refer to “Use Column Setups to Organize Lists” on page 51. – or – If a task is associated with an Address Book entry, select the entry in the Address Book window and drag it to the Hotlist icon. You can view or modify an existing task by double-clicking the task. Select a predefined Activity from the drop-down list (click inside the text box to access) or enter an activity. Chapter 3 Working with Maximizer 85 A task can be personal or associated with an Address Book entry. To mark a task as personal, select the corresponding option. Otherwise, the task is created for the current Address Book entry. 86 Maximizer CRM 10.5 User’s Guide Control Calendar and Hotlist Task Preferences Use the Calendar/Hotlist preferences tab to change your Hotlist task and calendar preferences. Most of the options on this tab apply to the calendar. LHotlist and calendar preferences can also be controlled in Administrator using the user preferences Calendar/Hotlist tab. ➤ To set calendar and task preferences Select File > Preferences and click the Calendar/Hotlist tab. Set your calendar and hotlist default options. For detailed information on each option, press F1. You can control which users can view or modify your tasks and appointments using the Full Access and Read Access options. For example, if you want a user or group to be able to view your tasks and appointments, select the name from the Read Access drop-down list. The selected user or members of the group can then view your tasks and appointments by selecting your user name from their Hotlist window View bar. If you want them to be able to add or modify your existing tasks and appointments, use the Full Access option. LAppointments can be reassigned through the Hotlist window. The Full Access option also controls your ability to reassign tasks and appointments to other users, as you can only assign tasks and appointments to other users if they have given you permission. Chapter 3 Working with Maximizer 87 Calendar Window The Calendar window is where you schedule meetings and appointments. You can view, add, update, and delete appointments. LThe daily view shows your day in half-hour intervals—use the Calendar/Hotlist preferences tab to change this interval length. The following views are available in the Calendar window: Daily, Weekly, Weekly List, and Monthly. All views allow you to see your appointments at a glance. To assist you with scheduling, color bars/icons indicate the attendees and booked resources and locations for the appointment. You can display the appointments for other users if they have given you access to their calendars. Calendar access is set on the Calendar/ Hotlist tab in preferences. Your system administrator uses the Utilities > Holiday Editor in Administrator to set up the holidays that are displayed in the Calendar window. These holidays can be changed. For further information, see the Maximizer CRM Administrator’s Guide. ➤ To view appointments in the Calendar window In the Calendar window, click the associated button to choose your calendar view—Daily, Weekly, Weekly List, Monthly, or Today. LIf the appointment is assigned to multiple Address Book entries, all the entries are displayed in the pop-up window. In the monthly view, holding your mouse pointer over a day displays all the appointment details for that day in a pop-up window. You can then hold your mouse over a particular appointment to view the appointment details. Or, you can click on the appointment in the pop-up window to open it. In the weekly, weekly list, and daily views, holding your mouse over an appointment displays the appointment details. Doubleclicking on an appointment opens it. LA scroll bar appears when all the appointments do not fit in the day cell. In the weekly list view, all the appointments for a day are listed in an easy-to-view format. Appointment details such as start/end time and location are displayed. Open another user’s calendar by selecting the user’s name from the Users drop-down list. Both the selected user’s appointments and your own appointments are displayed. You can also view the booked time for meeting locations and resources by choosing the corresponding value in the list. To quickly navigate from one day to the next in the daily calendar view, use the arrow buttons located in the upper-left section of the window. You can also navigate from week to week and month to month using these buttons when in the weekly/weekly list or monthly calendar views. 88 Maximizer CRM 10.5 User’s Guide Use the arrow buttons in the upper-right section of the window to move from one year (monthly view) or month (daily and weekly/weekly list view) to the next. Click on a month or day to show it in the main portion of the Calendar window. The day’s Hotlist tasks are listed in the Hotlist Tasks section. Click a Hotlist task to view the details of the task. You can view another user’s appointment by adding the user to LIf a scheduling conflict with a user or a resource/location occurs, Maximizer prompts you with a message. the Calendar Users list and selecting the checkbox beside the user’s name. Use the Check All and Uncheck All options to quickly select or deselect all users in your Calendar Users list. Use the Edit List option to add users and resources to the calendar, and to set icon colors for these users and resources. Use these buttons to hide the associated section of the Calendar window. Chapter 3 Working with Maximizer 89 Add New Appointments to Your Calendar You can easily schedule an appointment with Address Book entries, other users, or yourself. The Add Appointment dialog box gathers all the information for the appointment—the date and time, the description, and even who will be in attendance. When scheduling appointments, you can set an alarm in advance of the appointment, mark yourself out of the Peg Board, set the priority, and even send an email message to the selected users, the associated Address Book entries, and yourself. You can schedule appointments from any controlling window, or from the Calendar window. If you add an appointment from a controlling window, the appointment is linked by default to the current entry. If you add an appointment from the Calendar window, it is by default created as a personal appointment. LIf the appointment is assigned to multiple Address Book entries, the text “(with multiple Address Book entries)” is displayed in the Name column of the Hotlist task. Appointments can be viewed in the Hotlist window provided you select the Show Appointments option on the Hotlist’s View bar. (If you are using the Outlook Style window layout, you may need to drag the following windows a little to the right.) Calendar appointments can be reassigned to other users through the Hotlist window. Other users can view your appointments, or even schedule them, if you have given them access using your Preferences > Calendar/Hotlist tab. When an appointment is marked as private, even those with access to your calendar cannot see the appointment details. ➤ To schedule an appointment In a controlling window, select an entry if you would like to schedule the appointment with a specific Address Book entry and do one of the following: • Right-click and select Schedule > Meeting. • Click the Appointment button on the toolbar. • Drag the entry from the controlling window to the Calendar Calendar window or the Calendar Icon. – or – In the Calendar window, select a date and do one of the following: • Right-click and select Add Appointment. • Click the Appointment button on the toolbar. • From the Edit menu, select Add Appointment. 90 Maximizer CRM 10.5 User’s Guide In the Add Appointment dialog box, fill in the details of the appointment. For more information, see “Using the Add/Modify Appointment Dialog Box” on this page. Click OK. You can also create appointments from email. See “Create Appointments and Tasks from Email” on page 140 for details. Using the Add/Modify Appointment Dialog Box This dialog box contains a toolbar and three tabs: Appointment, Users, and Address Book Entries. Using the Toolbar The toolbar allows you to set appointment options and perform tasks such as checking spelling and finding free meeting times. LIf a scheduling conflict with a • Click the Scheduling button to open the Find Free time dialog box, where you can find free time slots for locations, resources, and users who have allowed you access to their calendars. • To set lead times for alarms and email reminders, click the Options button. (To control the default setting for alarms, select File > Preferences > Calendar\Hotlist.) user or a resource/location occurs, Maximizer prompts you with a message. Chapter 3 Working with Maximizer 91 • If you want the appointment to change your Peg Board status, click the Options button and select the Sign Out of Peg Board checkbox. • To schedule a recurring appointment, click the Recurring button. See F1 Help for more information. • Click the View in Address Book button to view selected Address Book entries in the Address Book window. • Click the Icon button to select an icon to display with the message in the Calendar and Hotlist windows. • In the Modify dialog box, the Actions menu is available if you select an Address Book entry in the attendee list. If you select a user, this menu is disabled. • Select the Completed checkbox to mark the appointment as completed. Using the Appointment Tab Use this tab to fill in appointment details and view information about the appointment. • When you add an appointment from a controlling window, it is by default linked to the current entry. Information about the entry is displayed in the information bar. If the current entry is an opportunity, case, or campaign, the entry is displayed as a link in the saved appointment. When you open the appointment, you can click the link to view the entry in the associated controlling window. • When you add an appointment from the Calendar window, it is by default created as a personal appointment. You can, however, link the appointment to the current entry or assign entries to it in the Add/Modify Appointment dialog box. 92 Maximizer CRM 10.5 User’s Guide LFor more information on • When creating an appointment, you can unlink the current entry from the appointment by clicking Remove link. • If the appointment you are creating is linked to an opportunity or case, the assigned Contact is added to the Assigned Attendees list on the Address Book Entries tab. If you click Remove link, the Contact is removed from this list. • When an appointment is not linked to an opportunity, case, or campaign, and no Address Book entries are assigned to it, the appointment is designated a personal appointment. • Select a location for the appointment and specify the needed resources. These values are set in Administrator. Use the Scheduling button to look for free times. • To set a priority for this appointment, set a value in the Priority drop-down list. • To keep the appointment details private, select the Private Appointment checkbox. When this option is selected, even those with access to your calendar cannot see the appointment details. The appointment appears in the calendar with the activity displayed as “Private Activity”. • To set an alarm, select the Alarm checkbox. • To send yourself and selected users an email reminder (an email message will not be sent to the associated Address Book entries), select the Reminder checkbox. This generic message lists the basic appointment details; you cannot edit this message. This feature is available if the Maximizer Email Service is running. • You can display products/services and categories related to the appointment by selecting values from the Products/Services and Categories boxes. • The Attendees and response list displays meeting invitees and their responses (blank if no response, Accepted, Tentative, or Declined). • To notify invitees about the meeting and allow them to accept or decline, select the Notify Other Users checkbox. • You can add a note to the appointment in the text box in the lower part of the dialog box. displaying products/services and categories, see Maximizer Help. Chapter 3 Working with Maximizer 93 Using the Users Tab Use this tab to select users to attend the meeting. • Available users are displayed on the Users tab by group (all users, departments, disabled users, divisions, security groups, or teams). If you don’t want to display users by group, deselect the Display Users by Groups option. (Select File > Preferences > System Defaults.) If you don’t want to display a specific group, deselect it on the System Defaults tab. • To add a user to the Assigned Attendees list, select the user and click the right arrow button. To add all the users in a group to this list, select the group and click the right arrow button. To remove a user from the list, select the user and click the left arrow button.. Using the Address Book Entries Tab Use this tab to search for Address Book entries and assign them to an appointment. Also use this tab to unassign the current Address Book entry from the appointment. • Search for entries by Last Name or by Company. Select an entry in the search results list and click the right arrow to add the entry to the Assigned Attendees list. 94 Maximizer CRM 10.5 User’s Guide • To remove an Address Book entry from the Assigned Attendees list, select it and click the left arrow. • If the appointment is linked to a case or opportunity, you cannot remove the assigned Contact from the Assigned Attendees list. Use Action Plans to Create Appointments and Hotlist Tasks You can create Action Plan templates, which can later be scheduled to create appointments and Hotlist tasks for Address Book entries. Action Plans can apply directly to the Address Book entry or to an opportunity or a customer service case for an Address Book entry. You can also schedule Action Plans to create personal appointments and Hotlist tasks. ➤ To create an Action Plan template Select File > Libraries > Action Plan Library. Click Add. In the Add Plan Template dialog box, enter the template name and description. Click Add and select Appointment or Task to add an activity in the template. Enter the Appointment or Hotlist task details and click OK. You will now see the activity listed as part of the template. Repeat steps 4 and 5 for each activity you are adding to the template. Chapter 3 Working with Maximizer 95 If you wish to modify the start date of an activity, change the information in the Schedule activity fields. Click the ellipsis button beside the Assigned to field to assign an activity to another user. By default, the current user is the assigned user. Select the Personal activity option to mark this task as not associated with an Address Book entry. LClick the Properties button to view creation details of the plan such as the Action Plan ID number and creation date. The Properties button is also accessible when you are modifying an Action Plan template. Select a user or group name in the Full Access and Read Access fields to make this Action Plan template accessible to only a particular user or group. ➤ To schedule an Action Plan for an Address Book entry LEach time an Action Plan is scheduled for an Address Book entry, a note is logged in the Notes window. To schedule an Action Plan associated with an Address Book entry, select an entry in the Address Book, Opportunities, or Customer Service window, right-click and select Schedule > Action Plan or Schedule an Action Plan. The Action Plan is scheduled for the associated Address Book entry. Select an Action Plan from the Plan template drop-down list. Optionally, you can modify the Plan name and Description. The Save As button allows you to save a modified Action Plan as a different template. Enter a start date in the Start plan on field. You can click inside the field and then click the ellipsis button to choose a date from a pop-up calendar. 96 Maximizer CRM 10.5 User’s Guide Click Advanced to toggle between the advanced and simplified view of the dialog box. Enter the Action Plan details. The Replace current user with option allows you to assign another user to all appointments and tasks included in the Action Plan. Similarly, you can assign a specific appointment or task to another user when the appointment or task is created or modified. The Skip non-work days option excludes days you have marked as non-work days in your Calendar preferences from the Action Plan. Click More to add a new appointment or task to the Action Plan. You can also modify or delete a selected appointment or task in the Action Plan using the More button. ➤ To schedule a personal Action Plan • To schedule a personal Action Plan, right-click and select Schedule > Action Plan or Schedule an Action Plan without an entry selected. The appointments and tasks associated with the Action Plan are automatically created as personal. Chapter 3 Working with Maximizer View Activities LWhen an Action Plan is scheduled in the Address Book window, it does not appear on the Activities tab in the Opportunity or Customer Service windows. If scheduled in the Opportunities or Customer Service windows, it does appear in the Address Book entry’s Activities tab. LThe Details button allows you to view the details for a selected Action Plan such as the description or properties. The Schedule button allows you to schedule a new Action Plan for the current Address Book entry. 97 You can view activities scheduled for Address Book entries from the Address Book window. You can also view activities specific to an Address Book’s opportunities and customer service cases in the related window. ➤ To view activities for Address Book entries Open the related Address Book entry. Click the Activities tab. By default, all activities are displayed in the Activities tab. You can choose to view only Action Plan activities or filter the list to view only those Action Plan activities related to a specific date range, module, and/or user. Further filtering can be done for the activities list by using the Filter drop-down and User drop-down lists, the Custom Filter button, and also the Show Appointments option. Click the Refresh button to update the list of activities when you add an activity to an Action Plan. Click More to add, modify, or delete an activity in a selected Action Plan. You can also view a list of all your activities by choosing View > Activities [for Address Book entry]. The activities shown in this dialog box are related specifically to Address Book entries, unless you have no Address Book entries in your current list, in which case the list displays personal activities. 98 Maximizer CRM 10.5 User’s Guide ➤ To view activities related to opportunities and cases Open the related opportunity or customer service case in the respective window. Click the Activities tab. Follow the steps listed in the previous heading procedure to filter your activities list or make changes to an Action Plan. Check Your Co-workers Status with the Peg Board In a medium to large office, it’s not always obvious when people are in, out, or busy with an appointment. The Peg Board works with Maximizer’s calendar to show you each user’s current status. ➤ To view the Peg Board Select View > Peg Board. The status indicators denote if a user is busy or not. When a user creates an appointment, the Sign out of Peg Board option must be selected so the Peg Board is updated. To override the calendar status, click on the User Status button to manually set a user’s status. You can see other users’ busy periods if they have allowed you to view their calendars (File > Preferences > Calendar/Hotlist tab). If a user has allowed others to view their calendar, you can click the Appointment button to view the details of the user’s appointment. Chapter 3 Working with Maximizer 99 Check the Time in Other Cities Using the World Clock The World Clock is a utility that allows you to view the time in various locations around the world. You determine which locations are displayed. It’s great if you have international dealings of any kind— from the occasional phone call to regular contact with your international clients. You can set the time for up to six remote locations around the world by adjusting the dials shown in the Clock frame in the World Clock window. ➤ To use the World Clock Select Tools > World Clock. To select a time zone, right-click on one of clocks. To view time zone information, click in the corresponding area of the world map. The shaded area indicates night time. Right-click to turn the Show night option on or off. Click on any time zone in the world map to view the time in the large clock. 100 Maximizer CRM 10.5 User’s Guide Using Organizational Charts You can easily see the hierarchical structure of a Company or an Individual entry using organizational charts. Maximizer users can also be viewed within an organizational chart. Using drag and drop, you can change the structure of the chart as well. ➤ To view an organizational chart for a Company or Individual In the Address Book window, select the Address Book entry for which you would like to view the organizational chart. From the View menu, select Organizational Chart. The organizational chart appears displaying the entry’s associated Contacts in a hierarchical format. • To view the organizational chart for the previous or next entry in the Address Book list, use the Previous entry and Next entry buttons. • Use the Print button to print the organizational chart. • You can choose not to show the details such as a Contact’s position by not selecting the Show details checkbox. • To fit the entire organizational chart into the dialog box, choose the Fit to page option. If a user does not have rights to view a particular Address Book entry, Private Entry displays in place of the entry details. Chapter 3 Working with Maximizer 101 ➤ To view an organizational chart for Maximizer Users From any Maximizer window, select Users from the File menu. Click Org Chart. LDisabled users are shown in organizational charts. The organizational chart appears displaying all Maximizer users in a hierarchical format. ➤ To modify an organizational chart There are two ways to modify the structure of an organizational chart as follows: • Drag and drop a Contact on to the Contact you want the first Contact to report to. For example, if you would like Billie Holly to report to Joe Napoli, you would drag her entry on to Joe’s entry (these are the Escona sample Address Book users). Click OK to confirm the reporting change. – or – • Change the Reports to field on the Contact’s Basic Information tab. 102 Maximizer CRM 10.5 User’s Guide Sharing Your Files in the Company Library LYou can search for files in the Company Library by using the search commands on the Search menu when the window is active. The Search Next command allows you to repeat a previous search. The Search button allows you to search for a filename. You know the value of keeping an organized database of your marketing materials and other company collateral. Brochures, price lists, photos, magazine reviews—all of these materials should be easy to find when you need them. The Company Library provides shared access to a central library of these materials with the security offered by the Maximizer environment. The Company Library window is divided into two panes: the left pane is a tree view, which displays the folders and files in your library; the right pane is a preview area, in which you see a preview of certain file types or type text notes. ➤ To share files in the Company Library Use the toolbar for common tasks, like Open File, Save Note, Close Note, Find, and Preview. The area in the left side of the window lists your folders and files in a tree view—much like Windows Explorer. The area in the right side of the window displays a preview of most file types. You can also view and edit notes here. Deselect the Preview checkbox to display an icon rather than a preview. Use the shortcut menu to perform common tasks in the window such as adding, deleting, or renaming files. • Save files on your computer or a network location by rightclicking on the file and choosing Save As. • Send documents by email by right-clicking on the file and choosing Email Document or Email Document to [current entry]. You can send multiple documents at one time by clicking on the documents while holding the Ctrl or Chapter 3 Working with Maximizer 103 Shift key down and then choosing Email Selected Documents from the shortcut menu. The Company Library can store many different file types. Provided that your system administrator has given you access to the Company Library, you can add files, folders, and notes as either private or public entries. If you use another word processor—such as Microsoft Word or Corel WordPerfect—for your correspondence, you can even open a document from the Company Library, merge it with one or more Address Book entries, and print or send it as an email message. The easiest way to add an item to the Company Library is to rightclick on the folder where you wish to place the new item, and select Add from the shortcut menu. You then choose which type of item to add to the folder: • Document – Select this item to add a file. The file does not have to be a document, but the preview only works for documents. • Note – Select this item to add a text-only document that you can write and edit in the preview pane. • Folder – Select this item to add a new folder. You can either create a new file using the associated application, or you can browse for an existing file on your hard disk drive or network. If you browse for a file, you can choose to either “link” or “embed” the file in the Company Library. Embedding is usually a better choice, as a link is only a “shortcut” to the original file, which may get moved, renamed, or may not be accessible to all Maximizer users. 104 Maximizer CRM 10.5 User’s Guide Most file types are supported in the Company Library if you have the associated application installed on your computer. These include the following file types: • .DOC and .RTF files – Microsoft Word • .XLS files – Microsoft Excel • .PPT files – Microsoft PowerPoint • .HTM and .HTML • .BMP files – bitmaps • .TXT files – text and Company Library notes • .JPG, .GIF, and .TIF files – graphic files • .PDF files – Adobe Portable Document Format files • .MXD files – Maximizer Documents • .MSG files – Outlook Email Messages Chapter 3 Working with Maximizer 105 Making Entries in Your Journal The Journal window provides you with a location to keep personal records. Journal entries can be business activities, reference notes, and personal ideas. These entries are similar to notes, except they are not attached to Address Book entries. LIf you always want a journal entry to appear at the top of the list in the Journal window, type or select a date that is a few years in the future. You can add journal entries up to 9,216 characters in length. By default, journal entries are stamped with today’s date. You can change the date stamp if you want to add an entry for a past or future time period. You can automatically log your Address Book activities as journal entries, and search most Maximizer note types from the Journal window, if you choose the Journal or Both options on the File > Users > [user ID] > Preferences > Logging tab. ➤ To use the Journal window Select Window > Journal. To add a journal note, right-click and select Add Journal Note. Filter your journal entries by selecting one of the following items from the view filter—List All, Today, Yesterday, This Week, or This Month. To search for a note by date range or text, click the corresponding search icon. 106 Maximizer CRM 10.5 User’s Guide Monitoring Income and Expenses LExpense/income entries cannot be imported from another Address Book. Use the Expenses window to record your income and expense items in separate accounts. ➤ To use the Expenses window Select Window > Expenses. Right-click in the window and select Add Account. Type a Name and Description for the entry. Choose to make it an Expense or Income. You can mark the entry as Public to let others see the entry. Then open the account, choose the day to which the expense or income applies (the current day is the default), enter the dollar amount and choose to add, subtract, or replace the amount. Chapter 3 Working with Maximizer 107 Creating Web Inquiry Forms for Your Website LWhen using a direct insert, you must first set up a virtual directory. Note that Maximizer must also be installed on the designated web server. Maximizer can help you create an inquiry form to collect pertinent information from your website visitors. The collected information is sent to the specified email addresses as an .MTI or .XML file and then imported directly into Maximizer as Address Book entries by doubleclicking on the file. You can also use a direct import (direct insert) of information. Open the Web Inquiry Form Wizard by selecting Web > Create Web Form. Follow the instructions on each of the wizard pages. Use the Web Inquiry Form wizard to create “data collection” forms for your website. Use Maximizer’s Web Inquiry Form wizard for the following tasks: • Save the web form settings as a template for future editing, so you can customize the form as the need arises. • Select the Maximizer fields, including user-defined fields, you want to appear on the form. • Change displayed field names. • Designate mandatory fields, in addition to the last name and email address fields. 108 Maximizer CRM 10.5 User’s Guide • Create rules to manage when collected information is sent to the website administrator). • Use HTML to customize the look of the areas above and below the web form. • Use HTML to customize the Success page and the areas above and below the Failure page. • Preview the web form and return to the respective wizard screens to make the required adjustments. Maximizer Web Form Requirements If you are creating forms using the Web Inquiry Form wizard in Maximizer, you must consider some mandatory circumstances regarding your Internet Service Provider (ISP). First, your ISP must support HTML file readings and CGI execute permissions. Second, if your ISP is running a UNIX server, you must ensure the ISP installs the following Perl modules: • CGI • Net::SMTP • MIME::Base64 Third, you may have to ask your ISP to install the “winqcgi.pl” file into a folder that has execute permissions. You may also have to modify the generated web form HTML page to target the winqcgi.pl file installed by the ISP. To do so, modify the following line: <FORM action=”winqcgi.pl” method=”post” name=”mtiform”> to <FORM action=”/cgi-bin/winqcgi.pl” method=”post” name=”mtiform”> Create Direct Insert Web Forms You can set up your web forms so that they insert new entries directly into a Maximizer Address Book. In order to create direct insert forms, Maximizer must be installed on the web server that is hosting your web form. ➤ To create a direct insert web form Create a folder for the web form. Select Web > Create Web Form. The Web Inquiry Form Wizard starts. Chapter 3 Working with Maximizer 109 Follow the instructions in the Web Inquiry Form Wizard. On the Server and File Options page, select the Direct Insert option. Copy the form’s .html files and the winqcgi.exe (for Windows servers) or winqcgi.pl (for Unix servers) file to the folder. Launch IIS and create a virtual directory pointing to the folder. For more information on IIS and virtual directories, see the Maximizer CRM Administrator’s Guide. If your web server runs Windows 2003 Server, you also need to add a web service extension for the web form. See the “Troubleshooting” chapter in the Maximizer CRM Administrator’s Guide for details. Using OrderDesk LUse the Address Book OrderDesk following window to view orders, inquiries, and sales quotes associated with the entries selected in the Address Book, Opportunities, or Customer Service window. When you receive orders or inquiries from your website, you can manage them using the OrderDesk window. You can use the same OrderDesk window to enter, process, and manage orders that come to you by telephone, mail, or other methods. See “Managing Your Online Orders and Inquiries” on page 455 for more information. You can also use the OrderDesk window to: • Work with sales quotes. • Create and edit catalog projects. ➤ To open the OrderDesk window LThe OrderDesk icon is available only when the Sales tab is selected. • Click the OrderDesk icon or select Windows > OrderDesk. ➤ To open the Address Book OrderDesk window • Select Windows > Address Book OrderDesk. If OrderDesk menu items are unavailable, enable OrderDesk as follows: Select File > Preferences, select the Enable OrderDesk option, and then restart Maximizer. Work with Sales Quotes Sales quotes are a valuable sales tool. Use OrderDesk to easily generate and manage sales quotes. You can later convert your sales quotes to orders. The following sections show you how to: • Generate a sales quote • Create and insert item table merge fields 110 Maximizer CRM 10.5 User’s Guide Generate Sales Quotes You can generate sales quotes for Address Book entries, opportunities, or customer service cases. To generate sales quotes, use the Quote dialog box. You can access this dialog box from either the OrderDesk or the Address Book OrderDesk window. The Quote dialog box has two tabs: • Main tab. Use this tab to set up the sales quote. You can add items to use in the quote, specify the currency, set the quote status, and apply discounts to items. • Shipping & Tax tab. Use this tab to record shipping information such as the name and address, shipping charges, and applicable tax information. The following procedures show you how to set up a sales quote, apply discounts to items, add shipping and tax information, and save the sales quote. ➤ To set up a sales quote Select the Address Book entry, opportunity, or customer service case for which you are generating the sales quote. LYou must be in the OrderDesk or Address Book OrderDesk window to access OrderDesk menu items. Select Edit > Add Quote. The Quote dialog box opens. If required, adjust the currency. Specify values under Quote status. Chapter 3 Working with Maximizer 111 Click Add. The Add/Modify Item dialog box opens. Fill in item details, or click Get Info from Catalog to get this information from an existing catalog. • The Item name, Quantity, and Unit price fields are mandatory fields. • Click Add in the Options section to add information about an item, such as product color. When you finish entering the item information, click OK to return to the Quote dialog box. The item is now displayed in the item list. Optionally, add information and comments in the text boxes that are provided. 112 Maximizer CRM 10.5 User’s Guide ➤ To apply discounts to an item LYou can also apply discounts to items in the Order dialog box. (Select Edit > Add Order). On the Main tab, click the ellipsis button beside Discount (in the lower half of the dialog box). The Discounts dialog box opens. Create discounts. For each discount, enter a discount name, select Amount or Percentage from the Type drop-down list, and enter an amount or percentage. Select an item and click Apply Discount to apply a discount. Click OK. The discount amount is displayed in the Discount field. ➤ To add shipping and tax information Click the Shipping & Tax tab. Under Shipping details, enter the information required to successfully ship the order. Click Charges to enter or change shipping costs. Under Tax details, click Apply Taxes. Chapter 3 Working with Maximizer 113 Define tax types. Enter a name for each tax type, and the tax rate (in percentage). Also specify whether the tax is applicable to shipping. Select an item and click Apply Taxes to apply the relevant taxes. Click OK to close the Apply Taxes dialog box. Enter shipping address information manually or click Retrieve to automatically retrieve it from the selected entry. ➤ To save a sales quote • After you finish creating the sales quote, click OK. The sales quote is generated and saved to the selected entry. When you open the sales quote, you can see that a reference number has been automatically generated. Create and Insert Item Table Merge Fields You can create item table merge fields for use with Microsoft Word documents. When you insert one of these merge fields, an item table is added to your document. The item table contains the columns you selected when creating the merge field. The following columns are available to select: Item Name, Item Code, Item Promotion, Item Price, Item Unit, Item Quantity, Item Shipping Cost, Item Extended Price, Item Options (Line separated), and Item Options (Comma separated). The table 114 Maximizer CRM 10.5 User’s Guide also contains a row for each product/service item in the sales quote selected for the merge. For example: The following procedures show to how to create, delete, and insert item table merge fields. ➤ To create a merge field In the OrderDesk or Address Book OrderDesk, select Edit > OrderDesk - Item Table Merge Field Setup. Click New. Enter a name for the merge field and click OK. Note that the prefix “Sales Quote” is added to every name. This helps you to locate your merge fields in the Insert Merge Fields dialog box. In the Definition list, select the table columns you want to add to the merge field. To select a table column, click the checkbox beside it. If necessary, use the Move Up and Move Down buttons to arrange the column order. The column order in the list represents the column order in the merged table. Click OK. Chapter 3 Working with Maximizer 115 ➤ To delete a merge field In the Microsoft Word merge field list, select the merge field you want to delete. Click Delete. Click OK to confirm that you want to delete the merge field. ➤ To insert a merge field LOrders, which contain the same fields as sales quotes, can also be selected. In the OrderDesk window, select a sales quote. Open a Microsoft Word document. On the Maximizer toolbar, click the Insert Merge Field button. Select the OrderDesk Entry option and select the merge field you want to insert. Click OK. Information from the selected sales quote is merged into the document. 116 Maximizer CRM 10.5 User’s Guide Create and Edit Catalogs You can use OrderDesk to create and edit online catalogs as follows: • Add or delete catalogs • Add, modify, or delete catalog sections • Add, modify, or delete catalog items To perform these tasks, use the Product Catalog dialog box. ➤ To open the Product Catalog dialog box • In the OrderDesk or Address Book OrderDesk window, select Edit > Product Catalog. Add or Delete Catalogs ➤ To add a new catalog Click Add. In the Project Title box enter a name for the catalog. In the Description box, enter a catalog description. Click OK. The catalog is added to the Select a Catalog list. ➤ To view or modify catalog properties • Click Properties to view or modify the catalog name and description. ➤ To delete a catalog In the Select a Catalog list, select the catalog you want to delete. Click Delete, and then click Yes to confirm the deletion. Chapter 3 Working with Maximizer 117 Add, Modify, or Delete Catalog Sections Before adding, modifying, or deleting catalog sections, select the catalog you want to work with. ➤ To add a catalog section In the Select a Catalog list, select a catalog. Click Add. In the Catalog Section Title box, enter a name for the section. Enter a discount rate and a description of the discount, if required. LUse the Up and Down buttons to organize the folders in the Catalog Sections list. Click OK. The section is added to the Catalog Sections list. ➤ To modify a catalog section In the Catalog Sections list, select the section you want to modify. Click Modify. Modify the information and click OK. ➤ To delete a catalog section In the Catalog Sections list, select the section you want to delete. Click Remove. Click Yes to confirm the deletion. The section is removed from the list. Add, Modify, or Delete Catalog Items Before adding, modifying, or deleting catalog sections, select the catalog you want to work with. ➤ To add a catalog item In the Select a Catalog list, select a catalog. In the Catalog Sections list, select the catalog section you want to add the item to. Under the Catalog Items list, click Add. 118 Maximizer CRM 10.5 User’s Guide In the Product/Services box, enter a name for the item. Fill in other details as required. Note that Regular Price, in the Enter the Pricing Details section, is a required field. LIf you deselect an item in the Catalog Items list, the item will not be available when you use the Get Item Info from Catalog button in the Order or Quote dialog box. Click OK. The item is added to the Catalog Items list. ➤ To modify a catalog item In the Catalog Items list, select the catalog section that contains the item you want to modify. Click Modify. Modify the information and click OK. ➤ To delete a catalog item In the Catalog Items list, select the item you want to delete. Click Remove. Click Yes to confirm the deletion. The item is removed from the list. Import and Export Catalog Items You can import and export catalog items in Maximizer. ➤ To import or export catalog items Open the OrderDesk window or the Address Book OrderDesk following window. From the Edit menu, select Import/Export Catalog Items. Select the catalog to which you are importing or exporting items. Follow the wizard instructions to import or export the catalog items, clicking Next after each screen. Click Finish in the last wizard screen. Chapter 3 Working with Maximizer 119 Maximizer CRM Gadgets If your computer uses Microsoft Windows Vista™, you can add the following Maximizer CRM gadgets to Windows Sidebar: the Address Book gadget and the Sales Dashboard gadget. You add the gadgets from the Gadget Gallery, where all installed gadgets reside. ➤ To add a Maximizer CRM Gadget to Windows Sidebar Click the plus sign at the top of Windows Sidebar to open the Gadget Gallery. LTo remove a gadget from Windows Sidebar, point to the gadget and click the Close button that appears at the top in the upper-right corner. Double-click the Maximizer CRM gadget you want to add. The gadget is now docked to Windows Sidebar. ➤ To log into a Maximizer CRM Gadget Point to the gadget and click the Options button that appears second from the top in the upper-right corner. Or right-click in the gadget and select Options. The Settings page opens. Select an Address Book, enter your Login Name and Password, and then click OK. 120 Maximizer CRM 10.5 User’s Guide Work with the Address Book Gadget Use the Address Book gadget to quickly search for and view Address Book entries and contact information. LIn the detail view, click the Up • To search for Address Book entries, enter search text and click the drop-down arrow to select a search category (last name, first name, company, or phone number). The entries that match the search criteria are displayed. • Click an entry to display details such as email addresses and phone numbers. Click an email address to send an email message to a customer. To view all contacts related to the entry, click View Contacts. • Drag the Address Book gadget from Windows Sidebar to display both the list and details in the gadget window. • When the gadget window is expanded, you can click any column header in the entry list to sort by the information in that column. • To view an entry in Maximizer, select the entry and click the View entry in Maximizer icon. and Down arrows to move from entry to entry. Click the horizontal arrow to return to the entry list. Chapter 3 Working with Maximizer 121 Work with the Sales Dashboard Gadget Use the Sales Dashboard gadget to view opportunity indicators (won and in progress) in a Dashboard format. Click an indicator to drill down to more detailed information. 122 Maximizer CRM 10.5 User’s Guide CHAPTER Communicating with Your Customers 4 In this chapter... “Keeping in Touch with Your Customers” on page 124 “Working with Documents and Templates” on page 125 “Broadcasting Documents Using Mail Merge” on page 132 “Setting Up Maximizer to Use Email” on page 134 “Sending and Receiving Email” on page 137 “Integrating Maximizer and Outlook” on page 141 “Synchronizing Address Book Entries with Microsoft Outlook” on page 152 “Keeping Records of Your Telephone Calls” on page 159 4 124 Maximizer CRM 10.5 User’s Guide Keeping in Touch with Your Customers LFor more information on using the Maximizer Word Processor and the Documents window, see the Maximizer Help. Maximizer makes it easy to maintain good communication with your customers. You can send email, letters, and faxes to any of your Address Book entries. When you want to make a phone call, Maximizer will show you the number to dial, or if you have a modem, Maximizer can dial the number for you. Any communications—via mail, the Internet, or telephone—can be logged and tracked in Maximizer. The Email window works with many popular email service provider applications, such as Microsoft Outlook and others. This means that if you already use one of these service providers, you have access to the powerful email features in Maximizer. You can make a phone call from Maximizer by selecting the Address Book entry you want to phone and clicking the Phone button in the toolbar. As you make the call, Maximizer lets you keep notes on your conversation as it’s happening. With the Documents window, you can keep any documents or files you send to an Address Book entry, or store any files that are somehow related to your activities with an Address Book entry. If you prefer to use another word processor, Maximizer integrates with both Microsoft Word and Corel WordPerfect. Chapter 4 Communicating with Your Customers 125 Working with Documents and Templates To create documents and templates, you can use the Maximizer Word Processor, which is always installed as part of Maximizer. You also have the option of using Microsoft Word or Corel WordPerfect as your word processor. Use the Maximizer Word Processor The Maximizer Word Processor is a separate application with a toolbar and menus that are similar to other commonly used word processors. LTo run a spell check, with the document or template open in the Maximizer Word Processor, place your cursor at the top of the page, and then select Tools > Spell Check or click the Spell Check button on the toolbar. LThe word processor includes fax, invoice, letter, and memo templates. You can customize these templates or create your own custom templates. For more information on templates, refer to“About Templates and Documents” on page 126. ➤ To create a document Launch the Maximizer Word Processor in one of the following ways: • Drag an Address Book entry to the Documents window. • Click the Editor button or the Letter button on the Standard toolbar. • Select an Address Book entry and click the Letter button. • Press F8. • Select Tools > Maximizer Word Processor. • Select Actions > Write a Letter, Write a Fax, or Write a Document. Select File > New if you want to create the document based on one of the word processor’s templates. Enter the document’s name now or enter it when you save the document. Use the toolbars for common tasks and formatting text and paragraphs. If your template has merge fields, the information for the selected Address Book entry—like the address—is inserted in place of the merge fields. 126 Maximizer CRM 10.5 User’s Guide When you are finished, select File > Save As and enter a name for the document. You can also specify the owner of the document, select a document category, and choose whether to save it as a template. If you have already specified the name, select File > Save. In this sample letter, the template includes merge fields and markers to show where to type the body of the letter. About Templates and Documents Understanding how templates and documents are used and how they communicate with each other is the key to working efficiently with this correspondence system. Templates A template is a standard design meant to be used repeatedly to create new documents. Templates are generally designed to be used with a company’s stationery, including default page margins, standard fonts, and merge fields. Chapter 4 Communicating with Your Customers 127 For example, a template might be used for the following: • Create form letters for bulk mailings to clients and prospects. • Provide a default structure for letters and faxes. • Provide a consistent company image. You can create a template in the Maximizer Word Processor by designing a document then selecting “Template” when you save your work. When you next create a new document, you can use your saved template as the basis for the document. You can also customize existing templates to suit your needs. Documents A Maximizer Word Processor document is always specific to an Address Book entry, customer service case, campaign, or opportunity. Typically, documents are created from one of the templates created with the word processor. A document can be a letter, a fax, a flyer, or anything you write with the word processor and send by mail, fax, or email. Location of Templates and Documents When you use the Maximizer Word Processor to save your templates and documents, they are automatically stored in the Microsoft SQL or Microsoft SQL Express database, not the Address Book folder. Therefore, they can be viewed only through the Maximizer Word Processor and not Windows Explorer or another file management tool. 128 Maximizer CRM 10.5 User’s Guide Use Microsoft Word or Corel WordPerfect You can use Word or WordPerfect as your word processor. Both applications are fully integrated with Maximizer. Ensure Word or WordPerfect is installed prior to installing Maximizer. Maximizer adds a button to the Maximizer custom toolbar for launching your word processor, and adds a set of Maximizer buttons to the toolbar in the word processor itself. If you want to use the template files associated with WordPerfect or Microsoft Word, when installing Maximizer, select the Custom installation option. In the features dialog box, choose the related option. Maximizer Macro Security Setting While some of your personal macros may require a “medium” security setting to run, Maximizer macros can operate in Word with a “high” security setting. To adjust your macro security setting, go to Tools > Macro > Security and make your selection in the Security Level tab. After installing Maximizer, and the first time you open Word, you will be prompted to trust the Maximizer macros. Simply select the “Always trust macros from this source” option and click the Enable Macros button; the dialog box will not appear again. Unlinking Merge Fields in Word LDynamic links are created in the Word document only if the the Link checkbox is selected in the Insert Merge Field dialog box. For more information on inserting merge fields, refer to “Use Merge Fields in Document Templates” on page 129. You can insert merge fields from Maximizer into a Word document by using the embedded Maximizer toolbar. The links between the Maximizer fields and the corresponding fields in the Word document are dynamic, which means that the field values in the document change depending on which Address Book entry is selected. Chapter 4 Communicating with Your Customers 129 If you do not want the document’s merged values to change when a different Address Book entry is selected, you can break the merge field links by performing the following procedure. ➤ To keep fields from changing when a different Address Book entry is selected Highlight the entire Word document by selecting Edit > Select All. Press Ctrl+Shift+F9. Use Merge Fields in Document Templates LEnsure the start and end of the merge field reside on a single line. The start of a merge field is denoted by the left brace ({) character and the end of a merge field is denoted by the right brace (}) character. Merge fields are simply place-holders in your document that can be replaced by basic Address Book entry or user-defined field information when you perform a merge. For example, in the body of a letter, you can insert a merge field for a Contact’s name: {First_Name?} When you perform the merge, the name of each recipient will display in place of the merge field. If the entry does not have an assigned value for the chosen merge field, the field does not display. Merge fields are not restricted to Address Book entry information— you can insert merge fields for your own user information, opportunities, customer service cases, and OrderDesk information as well. Note that you can create document templates with merge fields from Maximizer in Microsoft Word or Corel Word Perfect. Follow the steps listed below using the Maximizer toolbar embedded in the word processor to insert the merge fields. In the steps listed below, we are using the Maximizer Word Processor. Hold your mouse over a button to view its description. The merge field button is the first button on the left of the toolbar. ➤ To insert a merge field With a document open in the Maximizer Word Processor, place your cursor where you want to insert a merge field. Select Merge Field from the Maximizer Word Processor Tools menu, or click the Merge Field button on the toolbar. In the Insert Merge Field dialog box, select the type of merge field you would like to insert. Select a merge field from the list and click the Insert button. The selected merge field is inserted in the template. 130 Maximizer CRM 10.5 User’s Guide Select the Blank if Not Used checkbox if you prefer. During a mail-merge, this option leaves a blank space if there is no information available for a field. (By default, if there is no information in the field, the Maximizer Word Processor simply omits the field and leaves no space; it also adjusts the position of the other merge fields accordingly.) Repeat steps 3–5 for each merge field you want to add. When you are finished, click Close. Chapter 4 Communicating with Your Customers 131 Insert Files into the Documents Window You can bring into Maximizer files that you created in other application such as Microsoft Word, Microsoft Excel, Microsoft Paint, and Adobe Acrobat, to list a few. LIf you want workstations other than your own to access a linked file, make sure that the file resides in a location they can access. When inserting the file, specify the full UNC path. For example: \\[server name]\Documents folder\maximizer.doc. You can either embed or link the files. When you embed a file in the Documents window, the file is stored right in the Address Book. A linked file, on the other hand, is saved elsewhere on your computer or network, and only a link to the source file is stored in the Address Book. In a controlling window, click the entry to which to add the file. Select Insert File from the Edit or shortcut menu. Enter a Name and Owner of the file. Select your user name in the Owner field if you do not want to share the file with other users. If you want to link the file, select the Link checkbox. Click Browse to browse to the file you want to insert. Select the file and click Open. The file is inserted in the Documents window. You can also insert files that have been copied to the Windows Clipboard (e.g., from Windows Explorer) by right-clicking in the Documents window and selecting Paste Link. 132 Maximizer CRM 10.5 User’s Guide Broadcasting Documents Using Mail Merge If you wish to send a letter, an email message, or a fax to many recipients, the Maximizer Word Processor’s mail merge is the tool to use. The merge feature allows you to send a single document to multiple Address Book entries by fax, email, or regular mail. This type of merge is called a “broadcast” merge. LTo find out how to insert merge fields into a template, see “Marketing with Automated Campaigns” on page 197. Because the word processor has merge fields for your Address Book information, you can create a document with a merge field in place of a specific name. These merge fields are replaced with the recipient’s information when you perform the merge and send the document. ➤ To send a mail merge To send a document in a broadcast merge, you first create a list of Address Book entries that should receive your merged document. You can create a list by searching for the appropriate entries or simply selecting entries in your current list. In the Maximizer Word Processor, select File > Merge > to Printer, to Email, or to Microsoft Fax. You can also send a mail merge from Microsoft Word or WordPerfect using the Maximizer toolbar embedded in the word processor to insert the merge fields. Chapter 4 Communicating with Your Customers 133 Specify your merge options. Depending on what window you have active, the available merge entries vary. Click OK to continue with the merge. Select Print or Send to merge the document with the first entry in your selected list of entries, or select Send All or Print All to merge the document with all of your selected entries. Click the Skip button to go on to the next entry. 134 Maximizer CRM 10.5 User’s Guide Setting Up Maximizer to Use Email The Email window in Maximizer provides you with the ability to send and receive email within Maximizer. The Email window works with your existing email system so that you can take advantage of some of the benefits of sending and receiving email. Maximizer allows email file attachments and supports the vCard standard for virtual business cards. You can send files, mail-merge documents, and vCards quickly and easily. Maximizer’s Email window works much the same as any email application, but has additional functionality that enables you to easily integrate your Address Book entries with your email. Supported Email Clients To use these features, you must already have a Messaging Application Programming Interface (MAPI) or VIM (Vendor Independent Messaging) email client. Email clients that should work with Maximizer when properly configured include those listed below. • Lotus cc:Mail • Lotus Mail • Lotus Notes • Microsoft Exchange Sever • Microsoft Outlook/Microsoft Outlook Express • Novell GroupWise Please see the Maximizer website at www.maximizer.com for the latest version information of compatible email programs. Use Novell GroupWise and Lotus cc:Mail/Mail If you are using Novell GroupWise, Lotus cc:Mail (MAPI), or Lotus Mail (MAPI), select the corresponding option in Maximizer’s Advanced Email Preferences (File > Preferences > Email tab). If you do not select the correct option, a program fault error will occur when using the Email window. For Lotus cc:Mail and Lotus Mail, you also must have the “Override Extended MAPI” option selected in the File > Preferences > Email tab. Chapter 4 Communicating with Your Customers 135 Use Microsoft Outlook Express Because Outlook Express is a Simple MAPI program, the Maximizer Email window shows the contents of the Outlook Express Inbox only. To use Outlook Express with Maximizer, you must configure settings in both Maximizer and Outlook Express, as described in the following procedures. ➤ Step 1: To Configure Maximizer for Outlook Express 6.x Start Maximizer. If necessary, open the Address Book you use. Select File > Preferences. Select the Email tab. Enable the Override extended MAPI option. Click Advanced. Select Other email system and click OK. Click OK to close the Preferences window. Close Maximizer. ➤ Step 2: To Configure Outlook Express 6.x for Maximizer Start Outlook Express. Select Tools > Options. On the General tab, click the Make Default button beside This application is NOT the default Mail handler. If the button is unavailable, and the option says This application is the default Mail handler, then you can proceed to the next step because Outlook Express is already the default Mail handler. Click Apply, and then click OK. Windows may prompt you to restart your computer. Maximizer is now integrated with Outlook Express. 136 Maximizer CRM 10.5 User’s Guide Use Microsoft Outlook LMaximizer cannot use Extended MAPI with the Internet Mail Only installation type. Ensure the installation type is Corporate or Workgroup. Outlook 2007, Outlook 2003, Outlook 2002, and Outlook 2000 are Extended MAPI programs. This means the Maximizer Email window will show the same folders as Outlook. ➤ To use Outlook with Maximizer In Maximizer, select File > Preferences. Select the Email tab. Find the Override Extended MAPI option and verify this setting is disabled (the checkbox should be cleared). Click Apply, then OK. Exit Maximizer. Restart Maximizer. When you select the Email window (Window > Email), folders such as Inbox, Outbox, Sent Items, Deleted Items, and your personal folders are displayed. For more information on configuring Maximizer for Outlook Synchronization, refer to the Maximizer CRM Administrator’s Guide and to Maximizer Help. Chapter 4 Communicating with Your Customers 137 Sending and Receiving Email LBoth Maximizer and Administrator are used to control email preferences. Select File > Preferences to open the Preferences dialog box. You can use Maximizer’s Email window to send and receive email using your existing email system. You can also send email to Address Book entries directly from Maximizer’s main windows. By default, the Send Email dialog box opens when you compose, reply to, or forward email messages from Maximizer. However, if you disable the “Always display the Send Email options before composing email” option in preferences, this dialog box opens only if you use File > Send Email. Otherwise, the Compose Email Message dialog box opens directly, and default preferences for sending the message are used. To send email to Address Book entries or users when scheduling appointments, see “Add New Appointments to Your Calendar” on page 89.“ Use the Email window The Email window works much the same as any standard email application, but has additional functionality that enables you to easily integrate your Address Book entries with your email messages. Using drag and drop you can quickly associate an email message with an existing entry in your Address Book or create a new entry in a few simple steps. You can also create appointments and Hotlist tasks by dragging email messages to the Calendar window or to the Calendar or Hotlist icon. ➤ To send an email message Click the Compose button in the Email window. The Send Email dialog box opens. If necessary, adjust the Send Email options. Click OK. The Compose Email Message dialog box opens. Compose your email message. Select the Compose in HTML checkbox if you want to use HTML formatting. To attach a file, click Add under File Attachments. 138 Maximizer CRM 10.5 User’s Guide Use the To, Cc, and Bcc buttons to select the recipients of the email message. If you are sending an email message to a single recipient, you have the option of choosing a Maximizer Address Book entry or an Outlook contact. Click Send. Chapter 4 Communicating with Your Customers 139 Email Preview Pane You can preview email in the Email window just as you would in other email applications. To adjust the size of the preview window, move the upper preview border up and down. ➤ To use the email preview pane In the Maximizer Email window, select View > Preview or select the Preview checkbox in the view bar of the Email window. By default, the preview pane is turned on. Adjust the size of the preview window by moving the upper preview border up and down. Send Email Messages to One or More Address Book Entries You can quickly write an email message to one or more Address Book entries from any of the main Maximizer windows: Address Book, Opportunities, Customer Service, or Campaigns. You can also log the email message to selected Address Book entries. 140 Maximizer CRM 10.5 User’s Guide ➤ To send an email message to one or more selected entries LSee “To send an email message” on page 137 for more detail on composing email messages. LIf you want to save a generic note to each Address Book entry, enter the text in the “Note Text for Each Entry” box. To send a message to one selected entry, click the Email button. To send a message to multiple Address Book entries, select File > Send Email. The Send Email dialog box opens. If necessary, adjust the Send Email options. Click OK. The Compose Email Message dialog box opens. Compose the message and click Send. Create Appointments and Tasks from Email You can create an appointment or a task directly from the Email window in Maximizer. You can create the appointment or task for the Address Book entry associated with the email message or for the currently selected Address Book entry, customer service case, opportunity, or campaign. You can also create a personal appointment or task that is not associated with an entry. The subject of the email message becomes the subject of the appointment or the activity of the task. The body of the email message becomes the body note of the appointment. ➤ To create an appointment or a task from an email message In the Email window, select the email message you want to create an appointment or a task for. Do one of the following: • To create an appointment or task associated with an entry: from the Edit or right-click menu, select Create a New > Appointment/Task for <entry>. Depending on the email message, you can select either the Address Book entry associated with the message or the currently selected Address Book entry, customer service case, opportunity, or campaign. • To create a personal appointment or task: from the Edit or right-click menu, select Create a New > Personal Appointment/Task. Enter the appointment/task details and click OK. To save the email message as a document with the entry, specify the properties of the document and click OK. For more information on appointments and tasks, see “Tracking Your Appointments and Hotlist Tasks” on page 84. Chapter 4 Communicating with Your Customers 141 Integrating Maximizer and Outlook LOutlook integration works If Outlook integration is installed and configured, you can use it to save Microsoft Outlook contacts and email messages to a Maximizer Address Book, to open Maximizer Address Book entries from Outlook, to send email to Maximizer Address Book entries, and to create customer service cases from email messages in Outlook. LOutlook integration is not the A typical installation of Maximizer installs Outlook integration by default if the necessary version of Microsoft Outlook is installed on the machine. The following installation screen determines whether Outlook integration is installed. LIf you are using Word as your Outlook integration installs the following toolbars in Outlook. with Outlook XP, 2003, or higher. It does not work with Outlook Express. same as Outlook synchronization. For information about Outlook Synchronization, refer to “Synchronizing Address Book Entries with Microsoft Outlook” on page 152. email editor, the Maximizer Addresses button may not be available in the New email message window. For more information, go to page 148. Toolbar Outlook Window Buttons Mail (Inbox and other incoming email folders.) • Save Contact to Maximizer • Create Customer Service Case • Save Email to Contact in Maximizer • View Contact in Maximizer New email message • Send Email and Save to Contact in Maximizer • Maximizer Addresses Contacts • Save Contact to Maximizer • Create Customer Service Case (disabled) • Save Email to Contact in Maximizer (disabled) • View Contact in Maximizer Contact information • Save Contact to Maximizer • View Contact in Maximizer 142 Maximizer CRM 10.5 User’s Guide LIf you are set up for synchronization with Outlook and you create a Contact through the buttons in Outlook, the Contact is added to the Favorite List and synchronized from that point forward. If you don’t see the Outlook integration buttons on the Outlook toolbar, select View > Toolbars, and make sure “Maximizer Add-In” is checked. Before you can use Outlook integration, you must specify which Address Book to save the contacts and email messages to, as described below. Specify a Maximizer Address Book for Outlook Integration Each Windows user can integrate Outlook with only one Maximizer Address Book on a single machine. If you use Maximizer on more than one machine, you must specify the Address Book for integration on each machine. If you want, you can specify a different Address Book for integration on each machine. If multiple users log in to the same machine using different Windows login accounts, each user must specify the Address Book for integration in Maximizer on that machine. ➤ To specify an Address Book for integration In Maximizer, select File > Preferences and click the Other Options button on the System Defaults tab. LOnly one Address Book can be integrated with Outlook at a time. Click Address Book. If the option is available, choose to display the local or global Address Book list. Select the Address Book to integrate with Outlook, and click Open. Enter your User ID and Password in the Login dialog box. If your Maximizer password changes, or if you ever need to change the User ID you use for Outlook integration with Maximizer, open the Other System Options dialog box, click the Login button, and change your login credentials. Chapter 4 Communicating with Your Customers 143 Click OK to close the Login dialog box, and click OK again to close the Other System Options dialog box. Select the Outlook Address List to Integrate with Maximizer Outlook integration with Maximizer only works with address lists in the Outlook Address Book (such as Contacts), and only with one address list at a time. It does not work with the global address list or other address lists. If Outlook is set to use the global address list or another address list, which might be the case if your organization uses Microsoft Exchange, you will see an error message when you try to save an Outlook contact to Maximizer. If you see such an error message, use the procedure below to select an Outlook address list. ➤ To select an Outlook address list In Outlook, select Tools > Address Book from the menu. In the Address Book dialog box, select Tools > Options. Open the Show this address list first drop-down list, and select one of the items under Outlook Address Book. Typically, 144 Maximizer CRM 10.5 User’s Guide there is only one item in this list, called Contacts. In that case, select Contacts. Click OK, and then close the dialog box in Outlook. Create Address Book Entries from Microsoft Outlook LYou must have the Address Book Insert access right to be able to create Maximizer Address Book entries from Outlook. When you have Outlook integration installed and configured, you can create Maximizer Address Book entries from Outlook contacts or email messages, even if Maximizer is not open. If you are also using Outlook Synchronization for Address Book entries, as described on page 152, Outlook integration adds the newly created Address Book entries to the synchronized Favorite List in Maximizer and category in Outlook, so they will get synchronized in the future. Set Preferences for Creating Entries When you create an entry, by default a Save Contact to Maximizer dialog box opens in which you can view and edit the information that will be used to create the entry. If you want to always use the Maximizer defaults for creating Address Book entries, you can disable the dialog box as follows: In Maximizer, select File Preferences and click the Other Options button on the System Defaults tab. Deselect the Confirm when creating Contact checkbox. Another preference you can set on this tab is whether entries are created from Outlook as Company/Contact or as Individual entries. The default setting is Company/Contact. If you want Address Book Chapter 4 Communicating with Your Customers 145 entries to be created by default as Individuals, select Individual from the Default Contact drop-down list. Create Address Book Entries from Outlook Contacts ➤ To save an Outlook contact to Maximizer Save Contact to Maximizer button in Microsoft Outlook In Outlook, select the contact. Click the Save Contact to Maximizer button. The Save Contact to Maximizer dialog box opens. If necessary, change the Address Book entry type. If you select the Contact for an existing Company/Individual option, click Search to find and select the Address Book entry for which you want to create a contact. Click OK. Edit the information in the available fields as required. 146 Maximizer CRM 10.5 User’s Guide Click OK to save the changes. If you deselected the Confirm when creating Contact checkbox, as described in “Set Preferences for Creating Entries” on page 144, Maximizer creates entries as follows: • If Individual is selected in the Default Contact Type dropdown list, Maximizer creates an Individual Address Book entry. • If Company/Contact is selected in the Default Contact Type drop-down list, Maximizer creates a Company/Contact Address Book entry. If the Outlook contact information does not include a company name, you are prompted to provide one in the Save Contact to Maximizer dialog box. Create Maximizer Address Book Entries from Outlook Email Messages You can also create a Maximizer Address Book entry from an Outlook email message. The entry is created from the email sender (From address). ➤ To save an Outlook email sender to Maximizer Save Sender As Contact to Maximizer button in Microsoft Outlook In Outlook, select the email message. Click the Save Sender As Contact to Maximizer button. The Save Contact to Maximizer dialog box opens. If necessary, change the Address Book entry type. If you select the Contact for an existing Company/Individual option, click Search to find and select the Address Book entry for which you want to create a contact. Edit the information in the available fields as required. Click OK to save the changes. If you deselected the Confirm when creating Contact checkbox, as described in “Set Preferences for Creating Entries” on page 144, Maximizer creates Address Book entries as follows: • If Individual is selected in the Default Contact Type dropdown list, Maximizer creates an Individual Address Book entry. • If Company/Contact is selected in the Default Contact Type drop-down list, you are prompted to supply a Company name in the Save Contact to Maximizer dialog box. Chapter 4 Communicating with Your Customers 147 View Maximizer Address Book Entries from Outlook Use the View Contact in Maximizer button in Outlook to view the related Address Book entry in Maximizer. If Maximizer is not running or a different Address Book is open, clicking this button starts Maximizer and opens the related Address Book. Clicking this button with an email message selected takes you to the Address Book entry related to the message sender. Clicking this button with an Outlook contact selected takes you to the Address Book entry related to that contact. Which Maximizer Address Book entry is associated with the Outlook contact depends on how the association was created: • If you are using Outlook Synchronization, and the Outlook contact is synchronized with Maximizer, the View Contact in Maximizer button takes you to the synchronized Address Book entry. • If the Maximizer Address Book entry was created from Outlook using the Save Sender as Contact in Maximizer button, the View Contact in Maximizer button takes you to the Maximizer Address Book entry that was created previously. • Otherwise, Outlook Integration uses email addresses to associate Outlook contacts with Maximizer Address Book entries, so if more than one Maximizer Address Book entry has the same email address as the selected contact, all matching Address Book entries are highlighted in Maximizer. It matches based on Email 1, 2, or 3 in the Maximizer Address Book entry. ➤ To view a Maximizer Address Book entry from Outlook In a mail or contacts window in Outlook, select an email message View Contact in Maximizer button in Microsoft Outlook or contact. Click the View Contact in Maximizer button. The Address Book window in Maximizer opens. The related entry is highlighted in the list. Use Outlook to Send Email to Address Book Entries You can use Outlook to send an email message to a Maximizer Address Book entry, even if that Address Book entry does not have a related contact record in Outlook. Please note that this method may not be available if you are using Word as your email editor. To determine if Word is your email editor, select Tools > Options from the menu in Outlook, and click the Mail 148 Maximizer CRM 10.5 User’s Guide Format tab. If the “Use Microsoft Office Word to edit e-mail messages” checkbox is selected, the Maximizer Addresses button may not be available in the new email message dialog box. ➤ To use Outlook to send an email message to a Maximizer Address Book entry Maximizer Addresses button in new Outlook email message In Outlook, open a new email message. Click the Maximizer Addresses button. The Maximizer Addresses dialog box opens. Select Last Name or Company and enter the full or partial last name or company name to search for. Click Search. The names and primary email addresses of the matching Address Book entries appear in the “Entries available for assignment from search results” list. Select the Address Book entry from the list, and click the To, Cc, or Bcc button. You can select multiple entries by holding down the Ctrl key or Shift key. Repeat these steps to add any additional Address Book entries, as needed. Click OK. The Maximizer Addresses dialog box closes, and the selected email addresses appear in the new mail message dialog box. Chapter 4 Communicating with Your Customers 149 Save Outlook Email Messages as Documents in Maximizer When Outlook integration is installed and configured, you can save Outlook email messages to Maximizer Address Book entries, even if Maximizer is not open. You can save email messages you have already received, or you can save email messages when you send them. If there are no Address Book entries associated with the email message, you either create an entry yourself or let Maximizer create it for you, depending on your preference settings. The email message is then saved to this entry’s documents. If the email address does not have a record in Outlook contacts, Maximizer creates a corresponding Outlook contact. If you are using Outlook Synchronization for Address Book entries, as described on page 152, Outlook integration also adds the newly created Address Book entries to the synchronized Favorite List in Maximizer and category in Outlook, so they will get synchronized in the future. Set Preferences for Saving Email When you save an email message to Maximizer as a document, by default a Save Email to Maximizer Addresses dialog box opens in which you can view and adjust the entries to which the message will be saved. If you want to use the Maximizer defaults for creating Address Book entries, you can disable the dialog box as follows: In Maximizer, select File > Preferences and click the Other Options button on the System Defaults tab. Deselect the Confirm when saving email checkbox. Save Email to Maximizer Address Book Entries You can save an email message you received in Outlook to the Documents window of one or more Address Book entries in Maximizer. ➤ To save an email message to Address Book entries in Maximizer Save Email to Contact in Maximizer button In Outlook, select the email message to save. Click the Save Email to Contact in Maximizer button. 150 Maximizer CRM 10.5 User’s Guide The Save Email to Maximizer Addresses dialog box opens. Any Address Book entries associated with the sender’s email address are displayed in the Entries assigned for Email Save list. If no such entries exist, this list is empty. If necessary, click Add to create an Address Book entry to save the email message to. The Save Contact to Maximizer dialog box opens. Enter and edit information as required and click OK. LClick View to view an entry in Maximizer. To remove an entry from the Entries assigned for Email Save list, select the entry and click Remove. To save the email message to other Address Book entries: • Search for the entries by Company or Last Name and click Search. • Select the entries from the Entries available for assignment from search results list and click Assign. The entries are moved to the Entries assigned for Email Save list. Click OK. The email message is saved as a document to the assigned entries. If you deselected the Confirm when saving email checkbox in the Other Systems dialog box, Maximizer saves the document only to the Address Book entries that contain the sender’s email address. Chapter 4 Communicating with Your Customers 151 Send Email Messages and Save them to Maximizer Address Book Entries You can save an email message you send from Outlook to the Documents window of one or more Address Book entries in Maximizer. Send Email and Save to Contact in Maximizer button ➤ To send an email message and save it to an Address Book entry in Maximizer Open the Compose dialog box in Outlook. Compose the email message. Click the Send Email and Save to Contact in Maximizer button. LSee the previous section for details on how to work with the Save Email to Maximizer Addresses dialog box. If the Confirm when saving email checkbox is selected, as described on page 149, you can adjust the entries the email will be saved to in the Save Email to Maximizer Addresses dialog box. If no Address Book entries are associated with a recipient’s email address, you may need to create one. If you disabled the Confirm when saving email option, the Maximizer defaults for saving email will be used. Create Customer Service Cases from Outlook You can create customer service cases from email messages within Outlook. ➤ To create a customer service case from Outlook Create CS Case button in Microsoft Outlook In Outlook, select the Create CS Case button. In the Maximizer Customer Service Case dialog box, select the appropriate option. If you are creating a new contact at the same time as the customer service case, enter the information for the new contact in the Save Contact to Maximizer dialog box. See “Create Address Book Entries from Outlook Contacts” on page 145 for details. If necessary, select the Address Book entry in the Save Email to Maximizer Addresses dialog box. If there is an associated Address Book entry for the selected email message, it is displayed in the Entries assigned for Case Creation list. If necessary, search for entries and assign them to the case. In the Case for [Address Book entry] dialog box, specify the most important information about the case. 152 Maximizer CRM 10.5 User’s Guide Synchronizing Address Book Entries with Microsoft Outlook LOutlook Synchronization works with Microsoft Outlook only, not Microsoft Outlook Express. Outlook Synchronization mirrors select appointments, tasks, and Address Book entries between Maximizer and Microsoft Outlook to ensure the entries exist in both programs and that they both contain the same information. Outlook Synchronization settings are configured on a per-user basis, and each Maximizer user has one set of configuration settings. Outlook Synchronization preferences enable you to select which entries will be synchronized: • For appointments and tasks, only entries scheduled within the specified date ranges will synchronize, with the exception of recurring appointments and tasks, as described in the following section. These settings apply to appointments and tasks in both Maximizer and Outlook. • For Maximizer Address Book entries, only the entries belonging to the selected Favorite List will synchronize with Outlook. Those entries will be assigned to the specified Outlook category. • For Outlook contacts, only the contacts assigned to the specified category will synchronize with Maximizer. Those entries will be assigned to the selected Favorite List in Maximizer. • Products/Services and Categories are synchronized to Outlook. Attendees, resources, and any notes you add to an appointment are also synchronized. These items appear as part of the appointment dialog box in Outlook. Outlook Synchronization preferences also enable you to specify how often to synchronize and how to handle conflicts when the same entry has been modified in both Outlook and Maximizer. Appointment and Task Synchronization When Outlook Synchronization is configured, it can synchronize select appointments and tasks between the Maximizer Address Book and Microsoft Outlook. Only those appointments and tasks scheduled within the specified date ranges will synchronize, with the following exceptions: • If an instance of a recurring appointment occurs within the specified date range, all instances of the recurring appointment will be synchronized. • If a task is scheduled prior to the specified date range, but the “Carry forward unfinished tasks” option is selected, the task will be synchronized. You can also specify whether to synchronize private appointments and/or tasks. Chapter 4 Communicating with Your Customers 153 Recurring Appointments Recurring appointments in Microsoft Outlook synchronize to Maximizer as recurring appointments unless they have no end date. If the recurring appointment has no end date, only the first occurrence synchronizes with Maximizer, not the recurrences. To synchronize recurring appointments with Maximizer, always provide an end date. Note that while it is possible to modify the Private property of a single instance of a private appointment in Maximizer, this property can be changed only for the entire series of recurring appointments in Outlook. Therefore, if you change the Private property of a single instance of a recurring appointment in Maximizer, this change will not be synchronized to Outlook. Recurring Tasks If you synchronize a recurring task from Outlook, and then mark the task as complete in Maximizer, Maximizer cannot create the next instance of the recurring task. You should mark the task as complete in Outlook, which will create the next instance of the task, and then re-synchronize with Maximizer. If you synchronize a recurring task from Outlook, and then delete the task in Maximizer, all instances of the recurring tasks are deleted. If you want to delete a single instance of a recurring task, you should delete the task in Outlook and then re-synchronize with Maximizer. Group Appointments When using Outlook Synchronization, group appointments in Maximizer synchronize to Outlook for the current user only. However, the synchronized appointment in Outlook includes all the locations, resources, and attendees information in the appointment notes. To fully synchronize group appointments between Maximizer and Outlook, use MaxSync for Microsoft Exchange. Microsoft Outlook Synchronization and MaxSync for Microsoft Exchange If MaxSync for Microsoft Exchange is installed and configured for the current Address Book, Outlook Synchronization no longer synchronizes appointments or tasks. However, Outlook Synchronization still handles Address Book entry synchronization. If MaxSync for Microsoft Exchange is active, the appointment and task synchronization sections of the Outlook Synchronization configuration properties are disabled. 154 Maximizer CRM 10.5 User’s Guide Refer to the Maximizer CRM Administrator’s Guide or Administrator Help for more information about MaxSync for Microsoft Exchange. Microsoft Outlook Synchronization and MaxExchange Synchronization In a MaxExchange environment with Microsoft Outlook Synchronization enabled, Maximizer can synchronize with Outlook on a single server or remote only. Otherwise, duplication of entries may occur. When MaxExchange is installed, and at least one MaxExchange remote has been added as a distribution site, a MaxExchange Location button appears at the bottom of the Outlook Synchronization tab. Clicking this button opens a dialog box containing a drop-down list of MaxExchange servers and remotes for the current Address Book. Select the MaxExchange server or remote where Maximizer will synchronize entries with an Outlook profile for the selected user. Synchronization from Outlook to Your PDA In addition to synchronizing Maximizer data with Outlook, you can synchronize information from Outlook to your PDA. There are several selections of available software to perform this synchronization. Please consult with your PDA manufacturer or supplier for more information. Prepare Your Outlook Address Book Each Outlook contact that you want to synchronize, must be assigned to a category. Contacts are then synchronized with Maximizer. ➤ To assign a category to an Outlook contact In Outlook, open the Address Book list you selected in the procedure described on page 143. (For example, if you selected the Contacts address list, open Contacts, as shown here.) From the Edit menu, select Select All. From the Edit menu, select Categories. Click the Master Category List and add a new category called Maximizer. In the Available categories list, select the checkbox beside the Maximizer category and click OK. Chapter 4 Communicating with Your Customers 155 All selected Outlook contacts are now assigned to the Maximizer category. Prepare Your Maximizer Address Book In Maximizer, you must create a Favorite List that specifies which Address Book entries are to be synchronized with Outlook. ➤ To prepare your Maximizer Address Book In Maximizer, select Favorite Lists from the View menu. Click Add. Enter a name for your Outlook synchronization Favorite List and click OK. Close the Favorite List dialog box. Configure Outlook Synchronization LFor detailed information about Outlook Synchronization preferences, click inside the dialog box, and press F1. ➤ To configure Outlook Synchronization Select File > Preferences. Click the Outlook Synchronization tab. In the Synchronization frequency group box, specify how often Maximizer should synchronize with Outlook. If you select Never (manual synchronization), the user must synchronize manually by clicking the Synchronize with Outlook toolbar button or selecting Tools > Synchronize with Outlook from the menu bar in Maximizer. In the Conflict resolution group box, select the desired method of handling entries that have been changed in both Maximizer and Outlook since the last synchronization. In the Outlook profile field, enter the name of the user’s Outlook profile. This information must be obtained from the user’s computer. LDo not select Ignore computer name if you use multiple computers and synchronize to a different Outlook profile on each computer. To ignore the computer name when synchronizing, select the Ignore computer name checkbox. To synchronize appointments, select the Synchronize appointments checkbox and specify the date range of appointments to synchronize. Private appointments will not be synchronized unless the Include private appointments checkbox is also selected. 156 Maximizer CRM 10.5 User’s Guide To synchronize tasks, select the Synchronize tasks checkbox and specify the date range of tasks to synchronize. Private tasks will not be synchronized unless the Include private tasks checkbox is also selected. To also synchronize incomplete tasks that are scheduled prior to the specified date range, select the Carry forward unfinished tasks checkbox. To synchronize Maximizer Address Book entries and Outlook contacts, select the Synchronize Address Book entries checkbox. To specify the mapping between Outlook and Maximizer phone number fields, click the Phone Mapping button, and select the Maximizer phone number field to map to each Outlook phone number field. If necessary, use the Move Up and Move Down buttons to prioritize the fields in the phone mapping list. Click OK. Maximizer supports only four phone numbers for an Address Book entry, so when you synchronize from Outlook to Maximizer, only four Outlook phone numbers are synchronized. For information on the process that determines which phone numbers are synchronized, see “How Phone Numbers are Synchronized from Outlook” on page 157. In the Synchronize Address Book entries from Favorite List drop-down list, select the Maximizer Favorite List to synchronize. In the Synchronize Contacts from Outlook Category drop-down list, select the Outlook category to synchronize. If you are a MaxExchange user, click the MaxExchange Location button, select the MaxExchange server or remote where your Outlook profile can synchronize with Maximizer, and click OK. Click OK. Chapter 4 Communicating with Your Customers 157 How Phone Numbers are Synchronized from Outlook LOnly mapped phone numbers are synchronized. In an Outlook to Maximizer synchronization, Maximizer first tries to synchronize mapped phone numbers whose descriptions exist in the default Address Book entry. Maximizer then tries to synchronize mapped phone numbers that appear highest in the phone mapping list. In the following examples, the phone number descriptions in the default entry are Main, Fax, and Cell, and the mapped phone numbers are as shown below: LBecause the fourth phone number description is empty in the default entry, Maximizer fills it with the Pager phone number description. (Main is higher in the phone mapping list, but it’s already been synchronized.) LAs in the previous example, Maximizer uses Pager for the fourth phone number description. In a later pass, Maximizer determines that there is not an Outlook value for Fax, so it replaces the Fax phone number description with Home (the highest, not yet synchronized phone number in the phone mapping list). Example 1 If Outlook values exist for all mapped phone numbers, the following phone numbers would be included in the synchronized entry: Example 2 If Outlook values exist for all mapped phone numbers except Fax, the following phone numbers would be included in the synchronized entry. 158 Maximizer CRM 10.5 User’s Guide Synchronize Your Maximizer Address Book with Outlook After you have prepared Maximizer and Outlook for synchronization, the process is simple. ➤ To synchronize your Maximizer Address Book with Outlook Click the Synchronize with Outlook button on the Maximizer toolbar. Depending on how many Outlook contacts you are synchronizing, the processing time will vary. A message box appears when the synchronization is complete. In Maximizer, open the Address Book window. From the View menu, select Favorite Lists. Select the Favorite List you configured for synchronization with Outlook and click Retrieve. Chapter 4 Communicating with Your Customers 159 Keeping Records of Your Telephone Calls With Maximizer, you can quickly dial an Address Book entry, make a series of phone calls, receive calls, and record incoming and outgoing phone call activities in the Phone Log. Use the Previous and Next buttons in the Phone dialog box to work through the current Address Book entry list. Users can transfer incoming calls to any other phone extension in the phone company’s system. If a note is logged for the phone call transfer (logging must be enabled for phone calls in File > Preferences), the logged note includes the transfer information. If you are using TAPI, follow these steps to take incoming calls. See “Set Up Automatic Dialing” on page 162 for more information on setting up TAPI. ➤ To phone a Company, Individual, or Contact LYou can put a caller on hold by clicking the Hold button. To resume a call, click the Release button. Click the Phone button on the toolbar and click Incoming. – or – Right-click on an Address Book entry and select Phone > Make a Call. Alternatively, you could select Actions > Make a Call. Select or type a Subject for your phone call. Select the number to dial in the Select a phone number to dial section of the dialog box. Select a phone number format from the Dial as field. These formats are set up in Dialing preferences tab (File > Preferences > Dialing tab). Click Dial. In the Phone Call dialog box, choose a response. For example, if the call was answered, choose Answered. LIn order for the Phone notes dialog box to appear automatically, logging must be enabled for Phone Calls in preferences (File > Preferences > Logging tab). After clicking a response, the Phone dialog box appears. Record notes on your call as you talk. Click Hang Up when you are finished, and then click Close. 160 Maximizer CRM 10.5 User’s Guide LTo later view the details of calls you made, access the Phone Log from the View menu. Optionally, you can record the result of the outgoing call in the Phone Call Result dialog box. Click OK to close the dialog box. Chapter 4 Communicating with Your Customers 161 ➤ To receive a call Click the Phone button on the toolbar and click the Incoming button in the Phone dialog box. – or – Right-click on an Address Book entry and select Phone > Receive a Call. Alternatively, you could select Actions > Receive a Call. LIn order for the Phone notes dialog box to appear automatically, logging must be enabled for Phone Calls in preferences (File > Preferences > Logging tab). Select or type a Subject for your phone call. Record notes on your call as you talk. Click the Hang Up button when you are finished. Optionally, you can record the result of the outgoing call in the Phone Call Result dialog box. ➤ To transfer a call When you have an incoming call that you would like to transfer, click the Transfer button in the Phone dialog box. Select a user in the Display name list or enter a valid extension for your company’s phone system. Note that a phone extension does not have to be associated with a user in the current Address Book. Click OK to complete the transfer. 162 Maximizer CRM 10.5 User’s Guide Set Up Automatic Dialing LIf your modem can dial out in other applications, then you can use your modem in Maximizer. If you have a modem installed in your computer, you can configure Maximizer to dial the phone for you when you make a phone call using the Phone feature in Maximizer. Before Maximizer can use your modem, you must first make sure that your modem functions correctly with your computer system, then configure your modem using the Preferences dialog box in Maximizer. Your modem preferences tell Maximizer where your computer’s modem is connected and how it performs. Some of these settings are more critical than others. For example, if you set up your port incorrectly, your modem will not work at all; but if you set up your baud rate incorrectly, the modem will operate, but perhaps at a slower speed. TAPI lets you use your Telephony Application Programming Interface modem to identify and direct signals received by your communications port to the appropriate application. ➤ To configure your modem in Maximizer Select File > Preferences. In the Dialing tab, select Modem or TAPI. If you selected TAPI, click the Properties button to configure the dialing properties for the modem, and click the Device button to configure the Device properties for the modem. – or – LFor a list of each control and how to fill in the field, press F1 while in the Dialing tab. If you selected Modem, fill in the remaining fields. Click OK. Your modem is now ready for use in Maximizer. For more information on setting up dialing preferences, including documentation on using TAPI, refer to the Maximizer CRM Administrator’s Guide. The guide can be accessed from the Help menu in Maximizer. CHAPTER Managing Opportunities 5 Organize Your Sales with Opportunity Management In this chapter... “Managing Your Sales Opportunities” on page 164 “Using Opportunities” on page 165 “Designing Strategies for Your Opportunities” on page 166 “Entering Your Strategies in the Strategy Library” on page 169 “Entering a Default Opportunity” on page 170 “Working with Multi-Currency in Opportunities” on page 171 “Pursuing Sales Opportunities” on page 173 “Scheduling Strategies for Opportunities” on page 176 “Modifying Opportunities with Global Edits” on page 180 “Viewing the Opportunity Pipeline Report” on page 181 5 164 Maximizer CRM 10.5 User’s Guide Managing Your Sales Opportunities Opportunity management helps you and your colleagues manage complex sales. Complex sales involve the participation of more than one person in the buying decision and require the support of a sales team. Prospects for complex sales can range from single businesses to multiple corporations or governments. • Create strategies—detailed plans that identify the factors that influence a sale and the activities you must perform to close the opportunity. • Apply these strategies to opportunities. • Effectively schedule and coordinate the selling process among all members of your sales team. • Ensure that all the right people in your organization have up-todate information about the status of your opportunities. • Forecast the probability of successfully closing your opportunities. • Analyze the effectiveness of your strategies and create new ones for new opportunities. In short, Maximizer helps you define and strengthen your selling methodology. Your sales team can define a strategy—what you need to do to close a sale and how to address the issues and obstacles involved—and then apply this strategy to opportunities. Chapter 5 Managing Opportunities 165 Using Opportunities LYour system administrator uses the Administrator module to set up sales and marketing teams. Keep the following points in mind when working with the Opportunities window: • Use the view bar buttons for common opportunity tasks. • Use the view filter to show all opportunities, team-updated opportunities, or current opportunities. • Double-click an opportunity to view or modify it. • Click the View in Address Book button in the View bar or choose the option from the shortcut menu to view the Address Book entries associated with a single opportunity or multiple opportunities. • View additional information for the selected opportunity in the following windows. • View notes that Maximizer automatically creates to record opportunity activity. 166 Maximizer CRM 10.5 User’s Guide Designing Strategies for Your Opportunities LThe Maximizer Training Guide offers step-by-step exercises that help you learn how to make your own strategies and use them in opportunities. Before you can enter your organization’s sales strategies, you need to gather information from your sales people. The best strategies combine the knowledge and experience of everyone in your organization; therefore, you should involve as many people in this process as possible. The result will be a pattern of success that you can follow like a road map. Be thorough when gathering information for strategies—the more accurate your strategies, the more success you will have in pursuing opportunities and winning sales. Think through the way you do business now, how you want to improve your processes, and what you want your strategies to accomplish. LAn opportunity does not always need to have an assigned strategy. After you have gathered your organization’s strategy information, you can enter this information into the Strategy Library. You can enter an unlimited number of strategies, and you can use the elements of one strategy to build other strategies. A strategy’s primary components are: • A game plan—the “steps” • The actions that form the smallest building blocks of each step— the “activities” • The key people who determine the success of the opportunity— the “roles” • The factors that influence the success of an opportunity—the “success factors” Steps A step is a milestone in the strategy that reflects actions that must be taken when pursuing the opportunity. Each step represents one or more activities that must be accomplished before the step is considered complete. Activities An activity is an action that forms the smallest building block in the strategy. As your organization works through an opportunity, activities are sent to the team members. An activity contains a description of the action, an estimate of the time it will take, and an estimate of its cost. Roles A strategy probably will be applied to many different opportunities, so you may not know the names of the people who will directly influence the outcome of an opportunity. You should, however, identify the key roles that will be assumed by key people. You will then assign each role a weight in the same way that you assign weights to the strategy’s success factors. Chapter 5 Managing Opportunities 167 Success Factors Factors such as cost, features, and customer needs will influence the sale of your product or service. When you develop a strategy, choose success factors that you believe will play a large part in determining the successful outcome of an opportunity. Then assign each success factor a weight based on your assessment of how much it will influence the outcome of the opportunity. By carefully working through the planning process, you define the strategies that work in your organization. Once you create a strategy in the Strategy Library, you can apply the strategy’s particular sales plan to any new opportunity that you create in Maximizer. Break Steps into Activities Some steps may be so simple that there is no need to break them down further. In most cases, however, you will find it easier to develop a strategy that works if you first define the major steps and then break down each step into a series of activities that you can schedule and assign to team members. For instance, for Escona you may use something like the following: Steps Activities Arrange tour and preliminary meeting Send price list and Escona information Call distributor to arrange meeting and tour Write and present agreement Finalize reseller agreement Create final draft of agreement Present agreement to distributor Close deal and sign agreement Coordinate signing of agreement Fill out product order Arrange partnership dinner Each activity is assigned to a single user or sent to a team member. When the team members mark an activity as completed, Maximizer updates the status of the opportunity accordingly. The Strategy Library requires you to define activities separately from steps. This allows you to use an activity in several different steps. When you assign activities to a step, you simply select from a list of available activities. 168 Maximizer CRM 10.5 User’s Guide Define the Strategy Roles The next step in developing your strategy is to determine the key roles—positions assumed by key people that will directly influence the outcome of an opportunity that is assigned to this strategy. When you are defining a strategy, you don’t necessarily know who will fill these roles for each opportunity. If you can define generic roles for your strategies—for instance, the CEO and Purchasing Agent—you can later use people’s names for those generic roles for individual opportunities. Define Strategy Success Factors Strategies include influences called success factors. Choose success factors with care—they are used to estimate the probability of a successful outcome of an opportunity. Success factors should be defined based on the experience of your sales people. After choosing a success factor, you also assign a weight to the success factor based on your assessment of importance. Success factor definitions let Maximizer tell you how the opportunity is progressing and how you can improve your probability of success. Once you have defined a success factor, you can use it in any number of different strategies. Maximizer includes two success factors: • Political Alignment – This success factor measures the impact of the key people who can influence the outcome of an opportunity. • On Schedule – Maximizer uses this success factor to determine whether an opportunity is ahead or behind schedule. Success Factors are defined in Administrator. These two factors, along with the others that you define, must be weighted according to their importance in pursuing the opportunity. You can’t delete the predetermined success factors—if these success factors have no significance, assign the success factors a weight of zero, or don’t assign them to the strategy. Chapter 5 Managing Opportunities 169 Entering Your Strategies in the Strategy Library LFor more detailed instruction, open Maximizer Help and look up “Strategy Library”. Or, click the Wizard button on your Standard toolbar and run the Add Strategy wizard. Once you have your strategy planned on paper, entering it into Maximizer is easy. The Strategy Library is a tabbed dialog box in which you can create a library of roles, success factors, activities, and steps. You use these elements when you add a new strategy to the library. ➤ To define a strategy Each tab lets you construct a different strategy element. Start with the Roles tab and finish with the Steps tab before you construct your strategy in the Strategies tab. These elements are then selected and assembled into your new strategy. Cost and duration are automatically calculated from the cost and effort of the component activities. Use these buttons to add, copy (Save As), rename, or delete strategies. When you are ready to put together the strategy, click a button to begin adding steps, factors, and roles to your new strategy. Click Print to print the selected strategy. After you have designed a strategy, you can apply it to any new opportunity you create. 170 Maximizer CRM 10.5 User’s Guide Entering a Default Opportunity If you frequently assign or enter the same opportunity values and want to save time by having those values pre-entered each time you create an opportunity, you can define default field values in the Default Entry for opportunities. ➤ To define defaults for opportunities LDefault entries are user- specific so each user in the Address Book can have different default entries. Open the Opportunities window. Select Edit > Default Entry. Enter the default values for any fields that you want to have predefined values when an opportunity is created. Click OK to save the Default Entry. Chapter 5 Managing Opportunities 171 Working with Multi-Currency in Opportunities LMulti-currency is enabled in Administrator. If this functionality is not enabled, all related fields, menu items, and dialog boxes are not visible in the Address Book. Once multicurrency is enabled for an Address Book, it cannot be disabled. The corporate, or default, currency for the Address Book is also set in Administrator. For more information on enabling multicurrency, granting users rights to manage multi-currency, and setting the corporate currency, see the Maximizer CRM Administrator’s Guide and Administrator Help. Enabling multi-currency in an Address Book enables users to enter opportunity revenue in other currencies. All other currency fields are displayed in the default currency for the Address Book, otherwise known as the corporate currency. Additional currencies added to the Address Book are known as entry currencies and can be applied to opportunity revenue on a per-entry basis. The corporate currency acts as the exchange rate baseline for other currencies. The corporate currency always has an exchange rate of 1.0, and entry currencies have their own exchange rates. The exchange rates determine the revenue conversion from one currency to another. By default, the corporate currency is US, but this can be changed in Administrator. When designated users are given the “Allow manage currencies” security right in their user access rights, they can add, modify, and delete currencies in the Address Book. Currencies are managed in the Currency Library in Maximizer (File > Libraries > Currency Library). ➤ To add entry currencies In Maximizer, select File > Libraries > Currency Library. Click Add. Select a currency from the Currency drop-down list. The ISO code is entered automatically, but you can change this field or leave it blank if necessary. For example, you may want to use US, rather than USD, for the US Dollar. 172 Maximizer CRM 10.5 User’s Guide L If you change your corporate currency, all currency rates are set to 1. Enter the currency Exchange rate. This is the value of the currency in comparison with the corporate currency. By default this is set to 1. If necessary, select a user from the Requested by field. Your entry currency is now added. You can use this currency as the revenue currency for any opportunity entry. Note that the cost fields are displayed in corporate currency. LWhen you modify an exchange rate for a currency, the new rate is applied to only new opportunities. To modify or delete a currency, select the currency and click the corresponding button. To adjust the format of how your currency symbols and ISO codes are displayed in currency fields, go to the Start > Settings > Control Panel > Regional Options > Currency tab. Changes applied are applied to Maximizer currency fields immediately. Chapter 5 Managing Opportunities 173 Pursuing Sales Opportunities LYou can record opportunities without a strategy, if you wish. Specify “Not using a strategy” in the opportunity’s Sales Plan tab. If you have planned and entered your strategy correctly, it’s easy to implement an opportunity using any strategy in your Strategy Library. You enter new opportunities by selecting an Address Book entry in the Address Book window and adding the new opportunity in the Opportunities window. All opportunities have an associated Address Book entry. ➤ To add an opportunity Select the Address Book entry to which you want to add an opportunity. LYou can view associated Contact details while an opportunity is selected in the Contacts following window. Drag and drop the Address Book entry or Contact to the Opportunities icon. – or – Select Add Opportunity from the Edit menu. – or – Click Insert. A new opportunity dialog box opens. Enter the opportunity Objective. The objective should describe the goal of this opportunity. LFor information on selecting Select the applicable Products/Services and Categories. Enter the Description of the opportunity. LIf you have opportunity data Select the Stage of the opportunity. products/services and categories, see Maximizer Help. you are upgrading from a previous version of Maximizer, ratings are transferred to the Stage field. For example, if you feel confident the opportunity is a good investment of your time, you may select a value such as “Initiate Contact”. The stage coincides with the Probability bar. Note that stages are set up in Administrator in the Opportunity preferences tab. If you are using a strategy, this rating is updated automatically based on the completed success factors in the strategy (steps and activities). If you are not using a strategy, this field is set manually by selecting a stage. You can also enter the Confidence rating. This field is similar to the Stage field, however, it is not linked to the probability of close and is set based on the sales representative’s feeling about the opportunity. 174 Maximizer CRM 10.5 User’s Guide LMandatory opportunity fields are denoted by an asterisk. Select a Key Fields list and then select the appropriate Key Fields for the opportunity. Key Fields are important user-defined fields specific to opportunities and are defined by your administrator in the Administrator’s Key Fields preferences tab. An unlimited number of Key Fields lists can be set up using up to eight opportunity user-defined fields for each list. LIf multi-currency is enabled for your Address Book and currencies other than the default currency have been set up, you can select a specific currency for the opportunity revenue field. For more information, see “Working with Multi-Currency in Opportunities” on page 171. Enter the opportunity’s details such as the Currency and Revenue (potential revenue). You can change this amount later, if necessary. Choose the team (or user) that should work on this opportunity. You can make modifications to the team members for each opportunity. You can perform common tasks by clicking the Actions button from any of the opportunity dialog box tabs. LWhen an Address Book entry has a partner assigned to it, the partner is automatically assigned to any opportunity created for the Address Book entry. Work through the remaining tabs, entering the opportunity’s details including the user-defined fields, strategy, competitors, partners, and status. Chapter 5 Managing Opportunities 175 Make it a Team Effort Maximizer offers you the ability to assign an opportunity to any sales team your system administrator has set up in Administrator. Teams allow you to delegate individual activities of the opportunity to members of the team. These activities appear in the team member’s Hotlist for completion by the scheduled time. Sales Team Members LSales teams are set up in • Team Leader – In a team, one person is designated as a team leader who has the right to make changes to the opportunity as well as the opportunity’s team. • Team Member – A regular team member does not have the right to change the opportunity nor the team. The member’s role is to perform the tasks the team leader assigns. • Team Member with Edit Rights – In Maximizer, the team leader can grant any member the right to edit the opportunity, which essentially gives the same abilities of the team leader. This right must be granted on a per-opportunity basis, unless your system administrator specifies otherwise. Administrator. For more details, see the Maximizer CRM Administrator’s Guide or Administrator Help. Choose a team from the Sales team drop-down list. 176 Maximizer CRM 10.5 User’s Guide Scheduling Strategies for Opportunities Once you have defined your strategies in the Strategy Library, you can schedule a strategy for an opportunity. This will ensure you keep up to date with all of the roles, success factors, and steps that influence an opportunity’s success. Note that if you change the scheduled strategy for an opportunity, all incomplete activities for the initial strategy are removed from the opportunity. Complete activities remain as part of the Sales Plan. After a different strategy is scheduled for an opportunity, the activities associated with that strategy are applied to the Sales Plan. If you had standings associated with roles in the previously scheduled strategy, the standings are carried over to the newly scheduled strategy. ➤ To schedule a strategy for an opportunity Open the opportunity and click the Sales Plan tab. The Show strategy option should be selected by default. Select a strategy from the Strategy template drop-down list. You can click the Details button to view specific properties of the strategy such as the description and cost. Click the Schedule button and specify the Start date for applying the strategy. Click OK to return to the Strategy tab. Once a strategy has been scheduled, the Strategy template name and the Schedule button are inaccessible (grayed out). LFor detailed information on how roles, success factors, and steps determine the probability of closing an opportunity in relation to their weighted scores and standings, see “Designing Strategies for Your Opportunities” on page 166. Select a role and click in the Standing column to choose a standing for the role. You can also select a Contact for the role if necessary by clicking inside the Contact column when a role is selected. Select a success factor and click in the Standing column to choose a standing for this success factor. Note that the “On Chapter 5 Managing Opportunities 177 Schedule” and “Political Alignment” success factors are calculated automatically. Select a step and click the plus sign to view all activities for this step. You can use the More button to add, modify, or delete roles, success factors, steps, and activities or you can use the shortcut menu. If you have a team assigned to an opportunity, you can delegate team members to specific activities in a step. Double-click on an activity and choose a user from the Team member responsible for completion drop-down list. Update the strategy application as roles become more influential, success factors change, and steps are completed. The progress indicator will change automatically in alignment with the success of the opportunity. To mark an activity as complete, click inside the box displayed after the activity. Overdue activities are denoted by a warning symbol after the activity. Use the Show follow-ups option to display follow-up activities related to an activity within a step. Use the Show completed 178 Maximizer CRM 10.5 User’s Guide activities option to display completed activities. (Otherwise, completed activities are removed from the step.) Chapter 5 Managing Opportunities 179 Progress Indicator The progress indicator for the probability of close is updated based on the weighted sum of the standing/score of the roles and success factors, as well as the number of completed activities within a step. See the following illustration: 180 Maximizer CRM 10.5 User’s Guide Modifying Opportunities with Global Edits You can update a number of opportunities at the same time with the Global Edit command. For example, you may want to change the start date of several opportunities. This is a very powerful feature, so you might consider making a backup of your Address Book before making significant changes using Global Edit. ➤ To perform a global edit In the Opportunities window, select the entries you want to modify. Select Global Edit from the Edit menu. The Global Edit dialog box appears. Apply your edits to the various different opportunity tabs. Changes made to these tabs are applied in the same way as when you are entering a new opportunity although not all fields and buttons are available. The changes are applied to all opportunities included in the global edit. If you don’t select any opportunities, the edits are applied to all your opportunities in the current list. LFor more detailed information, see F1 Help and Maximizer Help. You can also select Remove for many of the fields in the Basic Information tab. This option lets you remove existing values for a field without specifying alternative values. Click OK to apply the global edits. Chapter 5 Managing Opportunities 181 Viewing the Opportunity Pipeline Report With a single click, you can view the current opportunities in the pipeline. The Opportunity Pipeline Report can also be modified—it is a Crystal Report. ➤ To view the opportunities in the pipeline In the Opportunities window, click the Display Opportunity Pipeline Report button. You are prompted for which entries to include in the report. Make your selection and click OK. The report graphically displays all opportunities you have included in the report grouped by opportunity stage. Display Opportunity Pipeline Report 182 Maximizer CRM 10.5 User’s Guide ➤ To modify the Opportunity Pipeline report LTo create or modify Crystal Reports, you must have the full program installed. Copy the Opportunity Pipeline report file from the MaData6 folder in your Maximizer program folder to your Crystal Reports working folder. You should make a backup copy of the original report file just in case you need to use the file again. Open Crystal Reports and make your changes. Save your new Opportunity Pipeline report in the MaData6 folder where you have installed Maximizer – (e.g., ...\Program Files\Maximizer\MaData6). For more information on reporting in Maximizer, refer to “Reporting and Graphing” on page 411. CHAPTER Managing Campaigns 6 Market Your Products and Services In this chapter... “What are Campaigns?” on page 184 “Campaigns Window” on page 185 “Organizing Your Marketing Efforts” on page 186 “Creating Traditional Campaign Templates” on page 190 “Marketing with Automated Campaigns” on page 197 “Managing Automated Campaigns” on page 208 “Printing the “Hard Copy”” on page 216 6 184 Maximizer CRM 10.5 User’s Guide What are Campaigns? Campaigns help you and your colleagues to promote your company and to manage complex marketing campaigns. Through the use of Automated campaigns, you can broadcast your marketing message to anyone in your Maximizer Address Book. A campaign can reach out to your entire Address Book or to a single person by email, fax, or print. Other marketing efforts require you to coordinate your marketing team for a common goal—producing an ad in television, radio, or print, for example. Activity 5 Step 5 Activity 4 Step 4 Step 3 Activity 3 Activity 2 Step 2 Activity 1 Step 1 Traditional Campaign Template A Traditional campaign template provides a strategy for your teams that can be reused many times for various marketing campaigns. Automated Campaign Template You can send out Automated campaign message by email, fax, or printed document. An Automated campaign template defines when and what is sent and can be reused for many Automated campaigns. In short, tracking campaigns helps you define and strengthen your marketing methodology. Your marketing team can define a campaign template—what you need to do to launch a marketing campaign and how you will address the issues and obstacles involved—and then apply this campaign template to your campaign. Chapter 6 Managing Campaigns 185 Campaigns Window ? Press F1 in any window or dialog box for help. Like the Address Book window, the Campaigns window is list-based, which means your entries are displayed as items in a list. Work with the Campaigns Window All of your campaign-related activities are done in the Campaigns window. ➤ To work with the Campaigns window Use the icons in the Type column to quickly distinguish Automated campaigns from Traditional campaigns. The tabbed following windows show additional information for the selected entry. Note that the Campaign Roles following window applies to only Traditional campaigns. Double-click on a campaign to open it. Use the view filter to display the different types of notes that are added to record campaign activity. For more information on the various types of notes, see Maximizer Help. 186 Maximizer CRM 10.5 User’s Guide Organizing Your Marketing Efforts LA Traditional campaign template defines a strategy for a marketing team; an Automated campaign template defines a series of automated actions. Complex marketing campaigns require a well-planned strategy. When you launch a new product or promote your website, for example, you need a coherent plan and you need to coordinate the members of your marketing team towards a common goal. Traditional campaigns help you and your team manage your marketing campaigns. Using Traditional campaigns, you can do the following: • Create Traditional campaign templates—detailed plans that identify the factors that influence a marketing campaign and the activities you must perform to complete a campaign. • Apply these campaign templates to one or more marketing campaigns. • Effectively schedule and coordinate the marketing process among all members of your marketing team. • Ensure that all the right people in your organization have up-todate information about the status of your campaigns. • Analyze the effectiveness of your campaign templates and create new ones for new campaigns. The Campaigns window also allows you to record a marketing campaign without a campaign template. Without a campaign template, a campaign simply records the campaign’s goal and allows you to assign a marketing team to achieve the goal; no activities or steps are defined to help your team to achieve the goal. You can use this type of campaign for simple marketing campaign objectives. Design Campaign Templates for Traditional Campaigns Traditional campaigns allow you to launch structured marketing campaigns in a marketing team environment. A Traditional campaign is created using one of the campaign templates in the Traditional Campaign Template Library. Campaign templates are approaches your organization uses in a marketing campaign. LIf you already know how to use strategies and opportunities in Maximizer, you will have no problem learning how to use Traditional campaigns. The process is virtually identical. Before you learn how to create a campaign template for your company, familiarize yourself with the following terms: • Traditional campaign template – A campaign template is a detailed plan that defines the procedures that contribute to a successful marketing campaign. A Traditional campaign template is composed of steps, which are in turn composed of scheduled activities. For example, you could create a simple campaign template that defines the steps, activities, and roles required to place an ad in a magazine. Chapter 6 Managing Campaigns 187 • Steps – Steps are milestones in the campaign that reflect actions you should take when pursuing a campaign. Each step represents one or more activities. One of the steps for placing an ad in a magazine might be to contact the magazine’s advertising department to buy the ad space. • Activities – Activities are actions that form the smallest building block in a campaign. Once a step is started, each activity is turned into a scheduled Hotlist task in Maximizer. An activity in contacting the magazine’s advertising department, for example, might be to make the initial phone call to get pricing information. • Roles – Roles are the known influences caused by people that affect the probability of marketing your product or service. For placing an ad, one of the roles would be your contact person at the magazine’s advertising department. A campaign template must be a detailed plan that defines the procedures that contribute to a successful campaign. Once you create a campaign template in the Traditional Campaign Template Library, you can apply the campaign template’s particular marketing plan to any new Traditional campaign you create. Plan Traditional Campaign Templates on Paper Before you can enter your organization’s marketing strategies as campaign templates, you need to gather information from your marketing people. The best campaign templates combine the knowledge and experience of everyone in your organization; therefore, you should involve as many people in this process as possible. The result will be a pattern of success that you can follow like a road map. Your first step is to design a general plan—a campaign template— that describes your company’s steps, activities, and roles involved in completing the campaign. The most difficult step in creating a new campaign template is in the planning stage. Once you know what the steps, activities, and roles will be, you may then enter the information in the Traditional Campaign Template Library. A campaign template consists of several steps to achieve the goal. Step 1 Step 2 Step 3 Activities Activities Activities Each step is composed of activities— individual tasks to be performed by a member of the team. 188 Maximizer CRM 10.5 User’s Guide On paper, try defining the following elements: • Campaign template steps – A step is a high-level action, such as “Demonstrate the product”. • Activities that compose each step – An activity is the most basic building block—it is an individual task needed to complete the step, “Call to arrange appointment”. • Campaign roles – A role can be any person who influences the progress of a campaign. When you have finished planning your campaign template on paper, enter your new campaign template in the Traditional Campaign Template Library. Break Steps into Activities Some steps may be so simple that there is no need to break them down further. In most cases, however, you will find it easier to develop a campaign template that works if you first define the major steps and then break down each step into a series of activities that you can schedule and assign to marketing team members. Each activity is assigned to a single user or delegated to a team member as a Hotlist task. As the team members mark activities as complete, Maximizer updates the status of the campaign accordingly. The Traditional Campaign Template Library requires you to define activities separately from steps. This allows you to use an activity in several different steps. When you assign activities to a step, you simply select them from the list of available activities. Define the Campaign Roles The next step in developing your campaign template is to determine the key roles—positions assumed by key people that will directly influence the outcome of a marketing campaign. When you are defining a Traditional campaign template, you don’t necessarily know who will fill these roles for each campaign. If you can define generic roles for your campaign templates—for instance, Printer or Graphic Artist—you can later use people’s names for those generic roles for individual campaigns. Chapter 6 Managing Campaigns 189 Traditional Campaign Template Example The following is an example of a campaign template for placing an ad in a magazine. Ad for Magazine Cost: $17,700.00 Duration: 2.47 week(s) To create new ad for a trade publication Steps Develop new advertising campaign Cost: $4,500.00 Duration: 1.19 week(s) Develop new advertising campaign Follow-up program Cost: $1,200.00 Duration: 4.00 day(s) Organize necessary follow-up for marketing program Activities - Develop new advertising campaign Identify appropriate advertisers Identify trade publications and magazines suited for print advertising Cost: $2,000.00 Effort: 1.14 week(s) Priority: With: Advertising Agency Submit ads for the season Submit completed print ads to all advertisers being used Cost: $2,000.00 Effort: 5.00 hour(s) Priority: With: Advertising Agency Brainstorming Brainstorming with entire marketing team and agency for new ideas and new offers for the upcoming season Cost: $500.00 Effort: 3.00 hour(s) Priority: With: Advertising Agency Activities - Follow-up program Telemarketing campaign Develop a telemarketing campaign for the marketing program Cost: $200.00 Effort: 2.00 day(s) Priority: Identify target market Compile list of geographic territories of high income 30–55 yrs & identify retailers in the area Cost: $1,000.00 Effort: 2.00 day(s) Priority: With: Advertising Agency Roles Advertising Agency Printer You can use the above example as a guide in the creation of your campaign template or you can design your own campaign template from scratch. 190 Maximizer CRM 10.5 User’s Guide Creating Traditional Campaign Templates ? For additional help in the Traditional Campaign Template Library, press F1. Once you have your Traditional campaign template planned on paper, entering it into the Campaigns window is easy. The Traditional Campaign Template Library is a tabbed dialog box in which you can create a library of steps, activities, and roles. You then use these elements when you add a Traditional campaign template to the library. After you have designed a Traditional campaign template, you can then apply it to any new Traditional campaign that you create. ➤ To create a Traditional campaign template Select File > Libraries > Traditional Campaign Templates. Click Add and enter a name for the template. LThe Save As button in each tab lets you save the selected campaign template or element under a new name. This can be useful if you want a new campaign template (or template element) but you don’t want to create it from scratch. Use the other buttons to copy (Save As), rename, or delete campaign templates. Fill in the general description for the campaign template. The cost and duration are automatically calculated from the cost and effort of the activities. Each tab lets you construct a different template element. Start with the Roles tab and finish with the Steps tab before you construct your campaign template in the Templates tab. When you are ready to construct your campaign template, click a button (Steps or Roles) to assign the steps and roles to your new campaign template. Chapter 6 Managing Campaigns 191 Click Launch to create a Traditional campaign based on this template. Create Traditional Campaigns LYou can record campaigns without a campaign template, if you wish. Specify “Not using a campaign template” in the campaign’s Template tab. If you have planned and correctly entered your Traditional campaign template, it’s easy to implement a Traditional campaign. ➤ To create a Traditional campaign Select Edit > Add Traditional Campaign or right-click in the Campaigns window and select Add Traditional Campaign. – or – After creating a Traditional campaign template, click the Launch button on the Templates tab. Enter the details for the campaign working your way through the tabs from left to right. Enter the campaign’s potential revenue. The budget is automatically calculated from the total cost of the activities (part of steps) in the campaign. LIn order for campaigns to be synchronized with MaxExchange, the campaign must belong to a team. Assign the marketing team and leader. You can have different team members for each campaign. This assignment determines where the campaigns are synchronized if you are using MaxExchange. On the Templates tab, you can choose a pre-defined template, which includes a selection of roles and steps for a campaign. 192 Maximizer CRM 10.5 User’s Guide After assigning a template, you cannot modify the campaign to use a different template. The user-defined fields that you can assign are specific to campaigns. When a campaign is created, the status is automatically marked as In Progress. You update this when the status is changed. LThe ID number uniquely identifies a campaign. Your system administrator uses Administrator to control whether or not ID numbers are automatically generated. You can begin working on the new campaign any time you wish— see “Apply and Work the Steps to Complete Campaigns” on page 195. Assign Marketing Teams to Your Campaigns Use the Assign button on the campaign’s General tab to assign a Traditional campaign to any marketing team that has been set up by your system administrator. Teams allow you to delegate individual campaign activities to members of the marketing team. These activities appear in the team member’s Hotlist for completion by the scheduled time. Marketing Team Members LSales teams are used for opportunities while marketing teams are used for campaigns. Teams are set up in Administrator. For more details, see the Maximizer CRM Administrator’s Guide or Administrator Help. A marketing team is composed of three types of members: a team leader, a team member, and a team member with edit rights. • Team Leader – In a team, one person is designated as a team leader who has the right to make changes to the campaign as well as to the campaign’s team. • Team Member – A regular team member does not have the right to change the campaign nor the team. The member’s role is to perform the tasks the team leader assigns. Chapter 6 Managing Campaigns • 193 Team Member with Edit Rights – A team leader can grant any member the right to edit the campaign, which essentially gives the same abilities of the team leader. This right must be granted on a per-campaign basis, unless your system administrator specifies otherwise. If a Traditional campaign doesn't have a marketing team assigned, the user who created the campaign is automatically designated as the leader. ➤ To assign a marketing team to a Traditional campaign • Click Assign in the campaign’s General tab to view or change a team’s membership for the current campaign. Assign Contacts to Campaign Roles Before delegating campaign activities to team members and roles, select the Traditional campaign and then assign Contacts to your campaign roles. The same role can be shared among all your campaigns, however, when you assign a Contact to a role, it only applies to the selected campaign. ➤ To assign a Contact to a campaign role LNote that roles apply to only Traditional campaigns using a campaign template. Select View > Review Roles or click the Review Roles button in the View bar. Select a Role you want to delegate and click the Assign button. Search your Address Book for the desired Contact. Select the Contact you are assigning to the role and click OK. 194 Maximizer CRM 10.5 User’s Guide Click OK again when you are finished assigning campaign roles. Delegate Campaign Activities to Team Members and Roles If you are working with a marketing team on a Traditional campaign, and you are a team leader or a member with edit rights, you have the ability to delegate the campaign’s activities to individual members in the team. You can modify the team’s membership or member’s rights at any time. You may have some activities in your campaign that are appropriate for team members with particular skills. The editing of an agreement document, for example, might fall to your writer. In addition to assigning activities to marketing team members, you also can schedule roles and Contacts for each activity. But first, assign a Contact to each campaign role. ➤ To delegate campaign activities to team members From the View menu, select Review Steps. Select a step that contains an activity you want to delegate and click Review. Double-click the activity you want to delegate. Chapter 6 Managing Campaigns 195 Select the team member to whom you are delegating the activity and select the role and Contact with which the activity is scheduled. Apply and Work the Steps to Complete Campaigns After you have delegated the activities to team members and Contacts, you can begin working through the steps of your campaign and marking each Hotlist task as complete. ? Learn more about working through a campaign’s steps by looking up “work the steps in a Traditional campaign” in Maximizer Help. ➤ To apply and review steps Click the Marketing Steps Summary button while a Traditional campaign is selected. – or – Select View > Review Steps. Click Apply to initiate the step. Activities appear in the Hotlist as soon as the step is applied. After applying a step, double-click the step or click Work (the Work button is not available until you have applied the step). Select an activity and click Modify to change or delegate an activity. Double-click the last column of an activity to mark the activity as complete. You may also mark the task as complete in your Hotlist. Click OK to close the Work Step dialog box. 196 Maximizer CRM 10.5 User’s Guide Click OK again to close the Marketing Steps Summary dialog box. Pause Traditional Campaigns Sometimes you need to suspend your efforts in a marketing campaign due to changing conditions or other factors. To pause a Traditional campaign, open the campaign and select the Status tab. ➤ To pause a Traditional campaign Open the Traditional campaign. Under Current working status, select Suspended, enter a reason and comment, and click OK. Any Hotlist tasks are archived (not available from the Hotlist) until you reset the campaign to “In Progress”. Chapter 6 Managing Campaigns 197 Marketing with Automated Campaigns Use an Automated campaign when you want to have Maximizer automatically send out email messages, faxes, or printed documents on a pre-defined schedule. An Automated campaign is very useful if you want to remind customers of a new or upgraded product that you are marketing, encourage a repeat visit to your company’s website, or even just to keep in contact with the customer. You can include merge fields in your outgoing campaign media so all recipients get messages that are customized with their names, companies, or any other fields in their Address Book entry information. You can even include merge fields in the email subject line. LAutomated services are not You can “broadcast” email to any number of Address Book entries to support your marketing campaign. Ask your Internet Service Provider if there is a limit on how many email messages that can be sent concurrently. Use the Preferences > Automated Services tab in Administrator to control the cycle time check; these settings can be viewed by users in the same tab. LThe character set used by the There are two main types of Automated campaigns: available for MaxExchange Remotes. Maximizer Email Service is specified in the Preferences > Automated Services tab in Administrator. Fixed-Date – These campaigns run for a specified time period. When you apply this type of campaign to a new Address Book entry, all activities of the campaign are applied within the fixed time period. For example, if you launched a campaign comprising five activities, and the first two activities were already completed when a new Address Book entry is added to the campaign, these two activities are applied immediately. The remaining activities are applied as scheduled. Ongoing – These campaigns repeat indefinitely unless you change the status to suspended. You can add a new Address Book entry at any time during the campaign cycle. When a new Address Book entry is added, the entire campaign is run from start to finish, at the set time intervals. For example, if there is a duration of one week between a set of four email messages, each message will be sent one week apart, regardless of when an Address Book entry is added to the campaign. Creating an Automated campaign requires that you first define a campaign template. The Automated campaign template defines the actions that occur when you implement a campaign; each template contains a series of scheduled activities that must be performed in order to complete the Automated campaign. When you create a campaign, select which campaign template you want to use, or create an entirely new campaign template with a new set of activities. Think of a campaign as a single implementation of one of your Automated campaign templates. Each time you create an Automated campaign, you are applying an instance of an 198 Maximizer CRM 10.5 User’s Guide Automated campaign template. The same Automated campaign template can be implemented over and over in the form of several campaigns. Automated campaign template First scheduled step X Campaign Second scheduled step Y Campaign Third scheduled step Fourth scheduled step Z Campaign Design Automated Campaign Template Activities ? Press F1 for help with any Automated campaign template dialog box. An Automated campaign template determines the actions that occur during a campaign. The campaign template sets out in precise terms which activities to use and when to send the campaign media (email, fax, or printed document). You can schedule as many activities in a campaign template as you need. Plan Your Activities LAn automated campaign activity is sending an email message, a fax, or a printed document. For reference purposes, an email message, a fax, or a printed document is also referred to in this document as campaign message. When adding activities to a campaign template, you will need to plan some details ahead of time, including the following: • How many email messages, faxes, or printed documents you want to send. • Which file types to use for the campaign activity. • How many days after the campaign is launched that the campaign message is sent. Chapter 6 Managing Campaigns 199 Create Automated Campaign Templates Once you have a plan worked out, you can start adding activities to your campaign template. ➤ To create a new Automated campaign template Select File > Libraries > Automated Campaign Templates. The Automated campaign wizard opens. Click Add. Choose whether you are creating an entirely new campaign template or one that is based on an existing campaign template. If you choose to base the new campaign template on an existing campaign template, Maximizer copies the content of the existing campaign template into your new campaign template. Type a name and description for the new campaign template and click OK. Click Next. In the Activities wizard page, use the Add, Properties, and Delete buttons to define the series of activities that comprise this template. When adding activities, you are prompted to specify the type of activity—email, fax, or print. See “Define Activities for Your Automated Campaign Templates” on page 200 for more information. Click Next. If you want to immediately launch an Automated campaign based on the template you just created, select the Launch a new campaign based on this template option. 200 Maximizer CRM 10.5 User’s Guide Click Finish to save the template. Define Activities for Your Automated Campaign Templates An activity is an email message, a fax, or a printed document that is sent out a certain number of days after an Automated campaign is launched using a campaign template. You can add as many activities as you want. ➤ To define automated campaign activities Select File > Libraries > Automated Campaign Templates. If you are adding a new campaign, click Add and enter a name and description for the template. Leave the Start with a new blank template option selected unless you would like to start with a copy of the selected template, in which case you choose the Duplicate this existing template option. Click OK to close the Add Automated Campaign Template dialog box and then click Next in the Automated Campaign Templates wizard screen. In the Activities wizard page, click Add. Select the type of activity—Email, Fax, or Print. To modify an activity, select it and click Properties. Chapter 6 Managing Campaigns 201 Enter the details of the campaign activity in the Add [Email, Fax, or Print] Activity dialog box. LNew email activities can be • Enter the Name and Description. • For fax and print campaigns, select a printer. The list includes all printers and fax applications installed on the Maximizer Automated Services computer (Maximizer server) that have been initialized for the fax/print service through Administrator. • For email activities, enter an Email subject or click the ellipsis button to insert a standard merge field into the subject line of the email message. • For ongoing campaigns, enter the Delay start [number] of days from campaign start date, which defines the number of days after the campaign template is launched to send this email message. When reviewing an activity, “Delay of days to start activity” becomes “Start date” and a pop-up calendar becomes available for you to select a calendar date. For fixeddate campaigns, choose a Start date. • Specify the Start time, which defines the time of day the campaign media should be sent. • Click the Select Message Body File button to access the list of saved templates (body files). From there, you can create, modify, or import a new template. You can also save templates under a different name or export them to a specified location. It’s important to first save your template in its associated editor before clicking the OK button in the General tab. The actual message body is saved as part of the activity (in the Address Book or database) once you click OK in the General tab of the Activity dialog box. • Choose your Logging options. A note is created for the Address Book entries involved in the campaign if the campaign activity is successful or if the activity fails. created as a Maximizer document (.ETF file) or an .HTML file. Fax and print activities can be created as a Maximizer document or a Microsoft Word document (.DOC file). Message body templates are stored in the Address Book (database), so everyone can access them from the library. 202 Maximizer CRM 10.5 User’s Guide If you are creating an email activity, continue with the following steps. For fax and print activities, click OK to save the activity. LRecipients will see the name and email address that you enter here so it should be recognizable by the recipients. For example, the name could be your company name, as in Maximizer Software, and the address could be something like [email protected]. Select the Email Addresses tab at the top of the Add Email Activity dialog box. Specify a sender name and address. Specify a “reply to” name and address. Replies to the email activity are sent to this address. If you are targeting a large audience, it may be useful to set up an email address specifically for replies. If you wish, use the “Cc:” and “Bcc:” fields to define a “carbon copy” or “blind carbon copy” recipient. This can be useful if you want to send a copy of an email message to yourself or to another person in your company, as well as to the targeted recipients. Use the Include in all the emails or Include in the first email only options to ensure the Automated campaign is working by sending someone, such as yourself, a copy of the email message for this campaign activity. The cc and bcc recipients can receive a Chapter 6 Managing Campaigns 203 message for each Address Book entry (first option) or just the first Address Book entry in a batch (second option). LYour system administrator controls how many automated activities can be sent at one time by grouping them into batches (e.g., 100 email messages) and setting a minimum cycle time between batches (in minutes, hours, days, weeks, or months). This reduces the load on your email server, printer, or fax by spacing out large quantities of activities. Select the Attachments tab and click Add to add any attachments. On the Landing Page URLs tab, specify up to five landing page URLs—these pages apply to email activities only. When you use a Campaign_Redirect_URL merge field in your email message template, the customer is redirected to a landing page URL (when the customer clicks on the Campaign_Redirect_URL merge field). A landing page URL can be any URL—for example, your company website. For more information, refer to “Campaign Merge Fields” on page 205. Click OK to finish creating the activity. Address Book entry recipients are selected when you actually launch the Automated campaign. 204 Maximizer CRM 10.5 User’s Guide Create Message Templates for Automated Campaigns The principal action of an Automated campaign is to send a message to one or more recipients by email, fax, or printed document. These messages are based on templates you create using the Automated Campaign Template Library. Templates can be done using the Maximizer Word Processor (text files) or through any HTML editor (HTML files). When you construct an Automated campaign template, you choose a message template to use for each email. Email templates can contain merge fields that are replaced with the recipients’ information when the email message is sent. For example, your template’s salutation might be “Dear {Mr_Ms?} {Last_Name?}” or “Dear {First_Name?}”. These merge fields are replaced with a Contact’s name, as in “Dear Ms. Kaworski”. ➤ To create email message templates LIf you are using Microsoft Word as your HTML editor, you cannot insert merge fields by using the Merge Field button on the Maximizer toolbar. You must copy the syntax of the merge field from a Maximizer Word Processor document or type the syntax into your HTML document. Open your HTML editor. Edit or write your email template’s content, inserting Maximizer merge fields where appropriate. To insert a merge field, copy the syntax from the Maximizer Word Processor or type in the merge field syntax. For more information on inserting merge fields, see “Use Merge Fields in Document Templates” on page 129. In the above example, an email message will be sent to notify the recipients of a product discount. The message template uses two of the available merge fields for automated campaigns—Campaign_ Chapter 6 Managing Campaigns 205 Redirect_URL and Campaign_Remove_Subscriber_URL. For more information on campaign merge fields, refer to “Campaign Merge Fields” on page 205. You may want to write several message templates for different types of campaigns, such as a thank you message, a reminder to visit your online catalog, or a newsletter. First browse through the existing Maximizer templates to see what you can use. Maximizer is capable of sending text and HTML email messages, in addition to the regular email template file (.ETF) format created by the Maximizer Word Processor. Use an editor of your choice to create your HTML or text files. The easiest way to use merge fields in HTML is to create an email template using the Maximizer Word Processor, inserting the desired merge fields, and then copying the template (with the merge field syntax included) into the HTML file. You can choose the HTML file when you are setting up your activity. Campaign Merge Fields There are merge fields available in the Maximizer Word Processor that are specific to automated campaigns. These merge fields can be extremely useful for tracking customer information regarding resulting visits to your website and opened campaign email. LAlthough some of these merge • Campaign_Opened_Email_Tracking_URL – This merge field tracks the number of customers that have opened an automated campaign email message. It can be used with only HTML message templates. When a customer opens a campaign email message, the “opened count” is updated in the Review Automated Campaign dialog box and in the Automated Campaigns following window (Edit > Open Automated Activities List). ? • Campaign_Redirect_URL – This merge field tracks how many customers hit your website as a result of an automated campaign email message. The redirect URL calls an ASP page, which is installed and configured at the time of installing Maximizer. If necessary, the redirect script location can be modified in File > Preferences > Automated Services tab in Administrator. When a customer clicks on this URL, the website hit is updated in the Review Automated Campaign dialog box and in the Automated Campaigns following window (Edit > Open Automated Activities List). • Campaign_Remove_Subscriber_URL – This merge field unsubscribes customers from an automated email campaign. When a customer clicks on this URL, the Do Not Solicit By field is updated for the entry (Basic Information tab)—the customer’s entry is marked to not be solicited by email. fields can be used in .ETF and .TXT files, they are best suited for HTML. For more information on the dialog boxes where the campaign tracking statistics appear, press F1 to see the context-sensitive help. 206 Maximizer CRM 10.5 User’s Guide • Service_Computer_Name – This merge field identifies the automated services computer (Maximizer server) from which the automated email message was sent. Typically, you could use this internally through a hidden tag in your HTML. This field would be useful when you have more than one automated services computer running campaigns. Following is an example of what your HTML syntax would look like if you use all four merge fields in the body of your email message. <HTML> <body> <img src="{Campaign_Opened_Email_Tracking_URL?}"> <br> Please click on link: <br> <a href="{Campaign_Redirect_URL?}">Landing Page</a> <br> Please click here to remove yourself from any campaign <a href="{Campaign_Remove_Subscriber_URL?}">Unsubscribe from campaign</a> <br> You are receiving email from this Service Computer, {Service_Computer_Name?}. </body> </HTML> Launch Automated Campaigns An Automated campaign is essentially an implementation of one of your Automated campaign templates. You can launch as many campaigns as you like using the same campaign template and manage them in the Campaigns window as you would for a Traditional campaign. An Automated campaign is always associated with one or more Address Book entries—the Address Book entries are the recipients of the messages sent in the campaign. Before you attempt to launch an Automated campaign, you must select the Address Book entry recipients. Chapter 6 Managing Campaigns 207 ➤ To launch an Automated campaign Select Edit > Add Automated Campaign. – or – Right-click in the Campaigns window and select Add Automated Campaign. Choose the type of campaign you want to create—Fixed-Date or Ongoing. Choose the template on which this campaign is based. Also, enter the name, description, budget, and expected revenue. Choose the Address Book entry campaign recipients. The Favorite List option is effective for a large number of subscribers. Select the date to begin the campaign. Select the Validate email addresses option to be notified of any blank email addresses or those missing the @ symbol, or choose Validate fax numbers to be notified of invalid fax numbers. Click Finish to save and launch the campaign. 208 Maximizer CRM 10.5 User’s Guide Managing Automated Campaigns Now that you have created Automated campaigns, you need to manage their progress. Although an Automated campaign will continue without further intervention, sometimes daily events require you to suspend a campaign, view a campaign’s Address Book entries, or remove Address Book entries from a campaign. View and Modify Automated Campaign Information Once a campaign has been created with the Automated Campaign wizard, you can view and modify the details of an automated campaign by opening the campaign and looking at the various tabs. The following procedures outline specific tasks that you would do on some of the tabs. ➤ To view and modify Automated campaign information In the Campaigns window, double-click on the Automated campaign. Automated campaigns are denoted by a special symbol, as shown below, in the Type column. The Basic Information tab contains the basic information about a campaign. Modify the information as necessary. LFor information on selecting products/services and categories, see Maximizer Help. • Select products/services and categories related to the campaign. Select the values for the campaign Key fields. These are userdefined fields defined as important to your company and are set up in Administrator. These fields are specific to all campaigns. Select the values in the Campaign details section of the tab. These are pre-existing fields in Maximizer and cannot be customized. The Subscriber’s opened emails and Subscriber’s visited landing pages are the incremental counts of each time a customer opens one of the email messages in a campaign or each time a customer visits one of the URL landing pages. This count is not incrementally updated for each Chapter 6 Managing Campaigns 209 activity, and it is incrementally updated only once per campaign for each customer. This symbol denotes an Automated campaign. Click the User-Defined Field tab to view and modify information related to campaign user-defined fields. Note that these user-defined fields are specific to campaigns and are defined as user-defined fields for campaigns (the type is 210 Maximizer CRM 10.5 User’s Guide specified in the Add User-Defined Field dialog box). You can add new campaign user-defined fields by clicking New Field. Click the Marketing Plans tab and select the Show Campaign option to view all information related to the campaign. In this tab, you can add, modify, delete, and pause/resume activities in the campaign using the More button. (To modify, delete, or pause/resume an activity, select the activity first.) You can also use the Marketing Plans tab to view, modify, add, and delete non-automated tasks and appointments that are related to the campaign, but are not part of the campaign template. For example, you may want to create a task to arrange for your IT department to set up the URL landing page. These tasks and appointments can be integrated into campaigns as Action Plans—see “Use Action Plans to Create Appointments and Chapter 6 Managing Campaigns 211 Hotlist Tasks” on page 94 for more information on how to create Action Plans. Follow the upcoming procedures for task-specific instructions for common tasks performed in each of the Automated campaign tabs. 212 Maximizer CRM 10.5 User’s Guide View Campaigns’ Address Book Entry Lists Each Automated campaign in your Campaigns window targets one or more Address Book entries. You can quickly retrieve a list of the campaign’s subscribed Address Book entries and display it in the Address Book window. You can also view a list of Address Book entries who have opened an email message for an Automated campaign or a list of entries who have clicked on a campaign landing page URL. Yet another option is to view a list of Address Book entries for a selected campaign activity. ➤ To retrieve a campaign’s list of subscribed Address Book entries LIf you wish to print the list of • Address Book entries retrieved from any of these menu commands, you can print a Column Report. In the Campaigns window, right-click on the Automated campaign and select Retrieve Address Book Entries from the shortcut menu. The current list in the Address Book window is replaced with a list of the campaign’s Address Book entries. You can also retrieve the Address Book entries for which the campaign was not successful by right-clicking and selecting Retrieve Unsuccessful Address Book Entries. This information is also available in the Automated Campaigns following window through the same menu items. ➤ To retrieve a campaign’s list of Address Book entries who have opened email or clicked URLs • In the Campaigns window, right-click on the Automated campaign and select an item from the shortcut menu as follows: To retrieve Address Book entries who have opened email messages, select Retrieve Opened Emails Address Book Entries. To retrieve Address Book entries who have clicked on a landing page URL, select Retrieve Clicked-Through Address Book Entries. Depending on which option you select, the current list in the Address Book is replaced with a list of entries who have opened email or with a list of entries who have clicked on a landing page URL. This information is also available in the Automated Campaigns following window through the same menu items. ➤ To retrieve Address Book entries for campaign activities • In the Campaigns window, right-click on the Automated campaign, select Address Book Entries by Activity, and then select the activity for which you want to retrieve Address Book entries. Options for specifying which entries are retrieved include: All subscribers, Unsuccessful entries, Opened email entries, and Clicked-through entries. Chapter 6 Managing Campaigns 213 Remove Address Book Entries from Campaigns LYou can flag Address Book entries to not be included in specific types of campaign activities by using the “Do not solicit by” field on the Basic Information tab. Occasionally, you may need to remove entries from an Automated campaign. For example, certain recipients may ask to be removed from a mailing list or you may want to modify the list for other reasons. ➤ To remove an entry from a campaign Select the Address Book entry you would like to remove from the campaign in the Address Book window. Open the Automated Campaigns following window. Right-click and select Unsubscribe from Selected Campaign. ➤ To remove several entries from a campaign LYou can test the campaign using the Test tab. When you run a test, all the activities in the campaign are sent to the “test list” at once. Select the entries you would like removed from the campaign in the Subscribers tab of the campaign. Click Remove. The entry is no longer subscribed to the campaign. 214 Maximizer CRM 10.5 User’s Guide Add Address Book Entries to Campaigns You can easily add Address Book entries to a campaign. Entries that are added to a campaign after it is launched are handled differently depending on whether you launched a Fixed-Date or Ongoing Automated campaign. See “Marketing with Automated Campaigns” on page 197 to learn at what point in the Automated campaign the new entries will be added. ➤ To add an Address Book entry to a campaign • Click Add in the Subscribers tab. Suspend and Resume Automated Campaigns or Activities Sometimes you need to suspend your efforts in a marketing campaign due to changing conditions or other factors. To pause an Automated campaign, open the campaign and select the Status tab. ➤ To suspend and resume an Automated Campaign Open the Automated campaign. Select the Status tab. Under the Current working status, select Suspended and click OK. You can resume this campaign any time by changing the status to In Progress. Chapter 6 Managing Campaigns 215 ➤ To suspend and resume an automated activity Open the Automated campaign. Select the Marketing Plans tab and click the Show campaign option. Select the activity you want to suspend, click More, and select the Suspend option. To resume an activity once it has been suspended, select the activity and select the Resume option. Review and Retry Automated Campaign Activities You can review the status of Automated campaign activities for each subscriber and retry activities that have failed. ➤ To review Automated campaign activities for each subscriber of a campaign While the Address Book entry you are viewing activities for is active in the Address Book window, open the Automated Campaigns following window. Select a campaign, right-click, and select Open Automated Activities List. 216 Maximizer CRM 10.5 User’s Guide If a campaign activity has failed, you can try to perform the activity again by selecting the activity and clicking Retry. LThe Set Counters button is available for only print and fax campaign activities. You use the Opened and Clicked columns for tracking fax and print collateral customer responses. Email activities cannot be reset as the count is updated dynamically. To reset the counters for print and fax campaign activities, click Set Counters. These counters are set up through merge fields available for email campaigns. See “Campaign Merge Fields” on page 205 for more information. Printing the “Hard Copy” There are a few different ways to print information from the Reports menu in the Campaigns window. Column reports are a fast way to print information as it appears in your current list, while a Detailed report lets you print more detailed information. The Note report can print your campaign notes. If you need to print more complex reports on your campaign information, use the report options in Reporter or Maximizer. If you have Crystal Reports installed, you can use Maximizer to generate your own Crystal reports. Column Report The Column report is a standard report that lets you print the information in the selected window. Because the Column report prints the information in the same format that appears in your column setup, you know exactly what information is going to be printed. The Campaigns window allows you to change your column Chapter 6 Managing Campaigns 217 setup, so you can display and print as much or as little information as you need. Detailed Report The Detailed report allows you to print more information than the column report. When you print a Detailed report from the Campaigns window, you can choose to print activities, roles, steps, user-defined fields, document summary, and notes. Note Report A Note report prints the notes for the Campaigns window. You can choose to print the notes for all entries or just the selected entry. Following are the note types created related to campaigns: • Email – Created each time an email message is sent as part of an Email activity. • History – Created when campaigns are added or changed. • Manual – Added manually to the Notes window. • Other – Third-party or custom notes created by your system administrator. • Tasks – Created when a Traditional campaign activity is scheduled or completed or when a follow-up task is scheduled. • Mail-outs – Created each time a fax is sent out or a print job occurs for an automated campaign activity. 218 Maximizer CRM 10.5 User’s Guide CHAPTER Providing Customer Service 7 Providing the Key for Success with Customer Service In this chapter... “Customer Service Windows” on page 220 “Creating Customer Service Cases” on page 223 “Assigning or Escalating Cases” on page 231 “Resolving Cases” on page 232 “Monitoring Cases” on page 234 “Creating and Viewing Case Reports” on page 236 “Sending Automatic Email Notification about Cases” on page 237 “Recording Case Solutions in the Knowledge Base” on page 240 7 220 Maximizer CRM 10.5 User’s Guide The Customer Service window supports and enhances your existing customer service business processes. All Address Book entry customer service communication can be recorded, categorized, and escalated appropriately to ensure issues are dealt with in a timely manner. Customer Service Windows The following information introduces you to the Maximizer windows and dialog boxes that pertain to customer service cases. Familiarize yourself with this information before using the procedures in this chapter. Customer Service Window LTo change the displayed columns, select View > Column Setup or click the Column Setup button on the View bar. When working with the Customer Service window, keep the following point in mind: • Cases are displayed in red when they are older than the followup deadline specified for the case. Chapter 7 Providing Customer Service 221 View Bar The Customer Service window is list-based like the other Maximizer windows. For quick access to frequently used options in the Customer Service window, use the View bar buttons. For example, to quickly escalate a case, click the last button, which escalates the case. • Use the Show drop-down list to display cases assigned to you or show other queues. You can also use the Status Filter button to filter cases by status (the filter is also available through View > Status Filter). • Use the View bar buttons to resolve, assign, and escalate cases. • View cases according to deadline using the Deadline dropdown list. • You can view the Address Book entries associated with a single case or multiple cases by clicking the View in Address Book button in the View bar or by choosing the option from the rightclick menu. Customer Service Following Window When the Address Book window is active, you can select the Customer Service following window to display the customer service cases associated with the selected Address Book entry. You can add and modify cases for the selected Address Book entry only. 222 Maximizer CRM 10.5 User’s Guide Case Dialog Box Double-clicking a case in the Customer Service window or following window opens the Case dialog box for an existing case. The toolbar buttons at the top of the dialog box enable you to quickly assign, resolve, escalate, or change the monitoring for a case. The information about the case itself is entered in the Basic Information, User-Defined Fields, and Solution Information & Billing tabs. Chapter 7 Providing Customer Service 223 Creating Customer Service Cases Create customer service cases to track and resolve customer service issues. ➤ To create a customer service case LFor detailed information on each field in the Case dialog box, select the window, dialog box, or tab you want information about and press F1. A customer service case is always associated with a customer, so open the Address Book window and find the Company, Individual, or Contact who is associated with this case. Select the Company, Individual, or Contact entry and drag it to the Customer Service icon or the Customer Service following window. You can also right-click in the Customer Service following window and select Add Customer Service Case from the shortcut menu. The Company/Individual field is filled in automatically with the name of the Company or Individual you selected previously. If you selected a Contact, the Contact field is also filled in automatically. If not, you can click the ellipsis button to select a contact to associate with the case. When assigning a Contact, you can add a new Contact to the associated Company or Individual by clicking the ellipsis button beside the Contact field, and then clicking the New Contact button in the Assign Contact to Case dialog box. LFor information on selecting products/services and categories, see Maximizer Help. In the Products/Services and Categories fields, select the product line(s) or service area(s) to which the case pertains. Select a Subject from the drop-down list. To add a new Subject to the list, select Edit List and add a new entry. LMandatory user-defined fields and Key Fields are set up in Administrator. Enter a Description of the case. Select the Key Fields list (a group of key fields specific to the module) and specify a value for the Key Fields. These are common used fields that are specific to your company. Up to eight Key Fields can be specified for customer service cases. Key Fields are set up in Administrator—they will not appear in Maximizer unless they have been specified. For more information on Key Fields, refer to “Use Key Fields” on page 494. You can also refer to the Maximizer CRM Administrator’s Guide if applicable. 224 Maximizer CRM 10.5 User’s Guide LClick the Favorite List button to view the Favorite Lists for the Address Book entry associated with the case. This button also provides you with a way to quickly remove the entry from a Favorite list or add the entry to a Favorite List. Fill in the remaining Case details. Maximizer prompts you if you are missing mandatory information. A Hotlist task, based on the follow-up deadline, is automatically created for the assigned user when a case is created. The task is automatically modified when the follow-up deadline or assigned user is modified. And when the case is resolved, the task is marked as complete. The Case Owner is the person who is ultimately responsible for the closure of the case. Select the User-Defined Fields tab. Assign values for the fields related to the case. The User-defined fields tab contains Address Book user-defined fields in the Fields for [Address Book entry] folder and Customer Service user-defined fields in the Fields for this case folder. Chapter 7 Providing Customer Service 225 If you cannot see one of the user-defined fields you need, click the Show blank fields checkbox to display all of the fields. User-defined fields for an Address Book entry can belong to the Company/Individual or to the Contact. Fields can be specific to cases as well. These fields are Customer Service type fields. Click Apply to save the case. Once the case has been resolved, the related information will appear in the Solution Information & Billing tab. Note that several customer service merge fields can be included in the case resolution email templates (to customers). Specifically, the Solution Notes can be included by using the Case_Solution_Notes merge field and the related knowledge base article can be included by using the Case_Solution merge field. Email notification templates for customer service are set up in Administrator. For more information, see “Send Email to Customers and Users Regarding Case Status” on page 237 and “Default Customer Service Email Notification” on page 239. 226 Maximizer CRM 10.5 User’s Guide Create Customer Service Cases from Email You can create a customer service case related to an existing or new Address Book entry right from the Email window. ➤ To create a customer service case from an email message LNote that you must have the Customer Service window open before you can create a case from the Email window. LIf you drag and drop email to the Customer Service window icon, a document entry is created containing the information in the email message. With the email message selected for which you are creating the case, right-click and select Create a New > Case for [Address Book entry]. There are two possible menu items that may appear—a menu item for creating a case for the selected Address Book entry in the controlling window and/or a menu item for creating a case based on the email address matching an email address in the Address Book. In the example graphic below, the Address Book entry BridgeHead Winery is selected in the Address Book window, and a menu item is available for creating a case for that entry. A second menu item appears because the selected email message has an email address that matches an email address in the Address Book. In the example graphic below, the email address of the selected email matches the Individual entry for Joe Napoli. Chapter 7 Providing Customer Service 227 Fill in the case details. By default, the email subject becomes the case subject, the email body becomes the case description, and if the logged in user has a default case entry set up, those values are also filled in. Click OK to close the case dialog box. You can also create customer service cases from email in Outlook. See “Create Customer Service Cases from Outlook” on page 151 for details. 228 Maximizer CRM 10.5 User’s Guide Assign Default Field Values to Customer Service Cases LYou can set up custom statuses for cases in Administrator in Customer Service preferences (File > Customer Service tab). If you frequently assign or enter the same case values and want to save time by having those values pre-entered each time you create a case, you can define default field values in the Default Entry for customer service cases. The Company/Individual and Case number fields are automatically assigned when a case is created. ➤ To define defaults for customer service case fields LDefault entries are user- specific so each user in the Address Book can have different default entries. Open the Customer Service window. Select Edit > Default Entry. Enter the default values for any fields that you want to have predefined values when a new customer service case is created. Click OK to save the Default Entry. Chapter 7 Providing Customer Service 229 Modify Cases with Global Edits You can update a number of cases at the same time with the Global Edit command. For example, you may want to change the Case Queue of several entries at once. This feature is very powerful, so you might consider making a backup of your Address Book before making significant changes using Global Edit. ➤ To perform a global edit In the Customer Service window, select the entries you want to modify. Select Global Edit from the Edit menu. The Global Edit dialog box appears. Apply your edits to the Basic Information, User-Defined Fields, Note, and Solution Information & Billing tabs. Changes made to these tabs are applied in the same way as when you are entering a new case although not all fields and buttons are available. The changes are applied to all cases included in the global edit. If you don’t select any cases, the edits are applied to all your cases in the current list. LFor more detailed information, see F1 Help and Maximizer Help. You can also select Remove for many of the fields in the Basic Information tab. This option lets you remove existing values for a field without specifying alternative values. Click OK to apply the global edits. 230 Maximizer CRM 10.5 User’s Guide Use Favorite Lists You can set up Favorite Lists in the Customer Service window to retrieve case lists you frequently use without having to search for the cases. See “Create Favorite Lists from Searches” on page 81 for more information. You can also refer to the F1 help in each of the Favorite List dialog boxes. Case Hotlist Tasks LCase tasks are created regardless of Hotlist access rights. A Hotlist task is automatically created when a user and a follow-up deadline are assigned to a case. When a case is assigned or escalated, a Hotlist task is created for the user to which the case has been assigned or escalated. The original user’s task remains. If a case is assigned or escalated to yet another user, a task is created for that newly-assigned user and so on for each assigned user. When a case is resolved, the original task is automatically marked as complete. The task date and time correspond with the case follow-up deadline. The assigned user, the associated Address Book entry, and the case subject are included as the task details. Chapter 7 Providing Customer Service 231 Assigning or Escalating Cases Cases should be assigned to the customer service team member who is best able to handle the type of issue. A customer service team member is categorized in Administrator as a customer service representative or a customer service manager, though a manager can serve both roles. Cases are assigned to representatives and escalated to managers when representatives are unable to resolve the cases. LCases can be assigned and escalated as often as required. When a case is assigned or escalated, you can type a message to record why the case was assigned or escalated. This message is then included in the logged note. You can send email to the user who is now responsible for the case when you assign or escalate a case. The email message is systemgenerated and cannot be edited in Maximizer or Administrator. See “Default Customer Service Email Notification” on page 239 to see the information the message contains. The customer also can be notified by email when a case is assigned or escalated so the customer always knows who is handling the case although the owner of the case is the person who is ultimately responsible for the closure of a case. If a Contact is associated with the case, the email message is sent to the Contact. Otherwise, the message is sent to the Company/Individual. See “Send Email to Customers and Users Regarding Case Status” on page 237 to create and assign customer notification email templates. ➤ To assign or escalate a case Open the case. Click Assign or Escalate. In the Assign Case dialog box, select a user from the Assign to list. – or – In the Escalate Case dialog box, select a user from the Escalate to list. To be listed in this dialog box and to access the Customer Service window, users must be given sufficient rights using the Customer Service Manager or Customer Service Representative option in Administrator’s File > Users > [user ID] > Security tab. Enter a Note about the case assignment or escalation. The Notes field is a good place to inform the newly assigned user why you are assigning the case to them, as well as any other information about the case that would be useful. 232 Maximizer CRM 10.5 User’s Guide In the Actions box, select the corresponding option to notify the assigned user and/or case owner. Click OK to close the dialog box. Click OK again to close the case. Resolving Cases LYou can set up custom statuses for cases in Administrator in Customer Service preferences (File > Customer Service tab). When you have solved a customer’s issue, you “resolve” the case in the Customer Service window. You can document the details of how the case was resolved, add a new solution (if any) to the knowledge base, and notify the customer and user to whom the case is assigned. You can perform these tasks right in the Resolve Case dialog box. There are two options you can choose from in resolving a case: • Solution involves information from an existing knowledge base article Select this option if an existing knowledge base article resolved the case. Enter the knowledge base article number. • Create a draft knowledge base article from solution notes and link it to this case Select this option if the case was resolved without the assistance of an existing knowledge base article. Type a concise, detailed explanation of how the case was resolved in the Solution notes text box. If the status is set to Abandoned, this option is unavailable. See “Recording Case Solutions in the Knowledge Base” on page 240 to learn more about knowledge base articles. You can send email to the user, the case owner, and the customer (associated Address Book entry) when you resolve a case. See “Default Customer Service Email Notification” on page 239 to see what information the email message contains. ➤ To resolve a case Select the case and click the Resolve button in the View bar of the Customer Service window. – or – Open the case and click the Resolve button. Select a Billing type from the drop-down list. Enter the number of hours worked on the case in the Billable time (hrs) field. Chapter 7 Providing Customer Service 233 Enter the hourly rate in the Billing rate field. If Maximizer prompts you to update the Case fee automatically by multiplying the Billing rate by the Billable time, click either Yes or No to specify your preference. Otherwise, enter the Case fee. LNote that you can include this information in automated email templates for customers by using the Case_Solution_Note merge field. Enter the Solution notes for the case. These notes would include any specific information about how the case was resolved. Select the Solution involves information from an existing knowledge base article option or the Create a draft knowledge base article and link it to this case option. If the case solution involves information from a previous knowledge base article, click Browse to search for the article. Once the article has been selected, click Details to view the related knowledge base article. ? For information about each of these options, click inside the dialog box and press F1. If desired, select one or more of the options in the notification group boxes. Click OK to close the Resolve Case dialog box. 234 Maximizer CRM 10.5 User’s Guide Monitoring Cases LDepending on the volume of cases your organization generates, monitors could potentially receive hundreds of email message each week. Keep this in mind when allocating case monitors. When a case is created, assigned, escalated, resolved, or deleted, or a case note is inserted or modified, email can be automatically sent to one or more users notifying them of the creation or change. These users might not be familiar with the case and might not even have access to the Customer Service window—any user in the Address Book can be a case “monitor”. A default list of monitors is set up in Administrator (File > Preferences > Customer Service tab) and automatically applies to all created and modified cases in the Address Book—users do not need to assign monitors on a per-case basis. However, if desired, and on a per-case basis, users can assign other monitors or disable case monitoring. Whether or not the “Notify the assigned user by email” option is checked in the Assign, Escalate, or Resolve dialog box, an email message is sent to the default case monitors. These users also receive email each time a case note is inserted or modified. The email message is system-generated and cannot be edited in Maximizer or Administrator. The email content sent to users is the same as the email content sent to case monitors. See “Default Customer Service Email Notification” on page 239 to view the email content. Following are the case monitoring choices available to each user for each case: • Do not monitor this case – Removes users from the list so no user receives email regarding this case. • Use the system default case monitoring user list – Displays the users specified in the system default case monitoring list. This list is created and edited using the Users button in Administrator’s File > Preferences > Customer Service tab. • Use the custom list below – Displays the users specified in the default case monitoring list and allows you to modify the user selection. All users with case modification rights can add or remove monitors; case monitoring access rights are not separate from general case rights. If a particular user should not be modifying case monitors, all case modification rights can be removed in Administrator. Chapter 7 Providing Customer Service ➤ To select a user for case monitoring Select a case, right-click and select Case Monitoring. Select one of the case monitoring options. If you select to use a custom list for case monitoring, select the case monitors from the Users list. 235 236 Maximizer CRM 10.5 User’s Guide Creating and Viewing Case Reports You can create custom reports about specific customer service cases, or you can select from a variety of pre-defined reports. Custom reports include the following: • Column Reports – Use the current column setup in the active window. • Detailed Reports – Allow you to select from a pre-defined list of report options from which you can create your report. • Note Reports – Report on the notes associated with selected entries. Pre-defined reports include reports on overdue, unassigned, and workload cases according to the queue, product, and/or customer service representative. ➤ To create a customer service case report LSee “Setting Your Maximizer Preferences” on page 382 to learn more about printing Maximizer reports. In the Customer Service window, create a list of entries to report on. If you would like to include all entries in your report, do not select any entries. Select Reports > Customer Service and select a type of report from the menu. Chapter 7 Providing Customer Service 237 Sending Automatic Email Notification about Cases When a case is created, assigned, escalated, or resolved, an automated email message can be sent to the customer and any users notifying them of the case situation. Maximizer automatically inserts the basic case details in the message so you don’t have to write the email message with case details each time. Case email notification allows you to effectively manage your customer service business processes. Send Email to Customers and Users Regarding Case Status Maximizer can automatically send email to customers, partners, and users when customer service cases are created, assigned, escalated, or resolved. To set up customer service email notification, you must create email notification templates through Administrator. You can create separate templates for each action (create, assign, escalate, or resolve). Each action can also have separate templates for sending email to customers/partners and users. Partners receive the same email notification as their associated customer if the “Carbon Copy the associated Partner when notifying Customers” option is selected. User notification email is sent to the user(s) identified in the Owner and Assigned To field for the case. When writing the email templates, remember that each template applies to all customer service cases of that notification event type. They should be specific to the action they are assigned to but generic enough to apply to all cases with that action. Use merge fields to personalize email messages based on generic templates. LFor MaxExchange Remote users, case email notification is not available. For detailed information on how to create email templates for customer service case notification see the Maximizer CRM Administrator’s Guide. Creation of the templates is done in the Administrator module. Merge Fields Merge fields in the email template personalize the message for each recipient by replacing the merge field code with the actual field value for that Address Book entry. For example, including the {First_Name?} merge field in an email template would replace that code with each email recipient’s actual first name. You can create templates in either .ETF (Maximizer Word Processor) or .HTML format. When creating templates in the Maximizer Word Processor, simply click the Merge Field button and select the merge field to insert into your email template. However, HTML templates are created in an HTML or text editor, which does not contain the Maximizer merge field selection dialog box. While you can manually 238 Maximizer CRM 10.5 User’s Guide type the merge field codes into your HTML document, it’s easier to first create the template in the Maximizer Word Processor and then copy the template (including the merge field codes) into an HTML template. LFor a list of available merge fields to include in the email templates, see the Insert Merge Field dialog box in the Maximizer Word Processor. Press F1 when a field is selected to view its description. Two merge fields that you are likely to use in a case resolution email message are Case_Solution and Case_Solution_Note: • Case_Solution – This merge field includes the related knowledge base article number. • Case_Solution_Note – This merge field includes any notes from the Solution Notes field in the Solution Information & Billing tab of the Case dialog box. The Case_Solution field is the knowledge base article number related to the case and the Case_Solution_Note is the detailed note text from the Solution Notes of the case. Following is a list of other merge fields that typically would be included in case notification email messages: LThe question mark in a merge field is used to alert users to not leave a space if no value is assigned to the related Address Book entry for the merge field. • {My_Name?} – The logged-in user’s full name (first name, initial, and last name). • {My_Company?} – The logged-in user’s company name. • {CS.Case_Number?} – The case number. • {CS.Client_Name?} – The associated Address Book entry’s name. • {CS.Contact_Name?} – This field is not mandatory; therefore, a value may or may not be displayed in the message. • {CS.Subject?} – The case subject. • {CS.Assigned_To?} – For assignment or escalation email only. • {CS.Resolved_By?} – For resolution email only. • {CS.Resolved_Date?} – For resolution email only. • {CS.Resolved_Time?} – For resolution email only. Chapter 7 Providing Customer Service 239 Default Customer Service Email Notification LThe “from” email address for this type of generic email is the same as the “from” address in the Email window (the current email profile). Case monitors receive a generic email message containing the following basic fields each time a case is created, assigned, escalated, resolved, or deleted. These users also receive an email message each time a case note is modified. The message is system-generated and cannot be edited in Maximizer or Administrator. Note that this type of generic email is also sent to users if customer service email notification templates for users have not been defined in Administrator. Customers do not receive any email message if a template has not been defined. The basic fields used in a generic email message include the following: Case number – <case number> Case subject – <case subject> Case description – <case description> Case_Solution_Notes – <solution notes> Company – <Company/Individual name> Contact – <Contact name> Assigned to – <user ID> <user name> Case Owner – <case owner> Case has been modified by – <user ID> <user name> Case changes – <any change in the case e.g., case status has been changed to resolved> 240 Maximizer CRM 10.5 User’s Guide Recording Case Solutions in the Knowledge Base The Knowledge Base window provides you with a library-style tool to manage your customer service solutions; the window is tightly integrated with the Customer Service window. An article is typically created for each case solution, answered question, or guideline relating to your products or services. While working in the Knowledge Base window, keep the following points in mind: LArticles can be added in two formats: standard (text) or document (file attachment). • Find articles using the Search button. • Article numbers are automatically generated by Maximizer. • An article’s status determines who can view the article. • Right-click in the Knowledge Base window to access frequentlyused menu items. The Knowledge Base window displays articles according to number, last modified date, product, category, title, and status. Click on a column heading to sort the articles by the column subject matter. To pop up a convenient list of commands to manage articles, click your right mouse button. Chapter 7 Providing Customer Service 241 Record Case Solutions When you resolve a customer service case, you can type an explanation of how the case was resolved and jot down keywords that best identify the article content. Or, if an existing knowledge base article was used to solve the case, you can assign the article number to the case. ➤ To record a case solution If an existing article helped resolve the case, select it in the Knowledge Base window or make a note of the number before resolving the case. If a new method helped resolve the case, type in an explanation. Choose to notify the assigned user, case owner, or associated Address Book entry of the case status by email. Even when these options are deselected, case monitors receive email. A newly created article is assigned a draft status until it is opened and assigned a different status by the appropriate users. Articles can also have a status of internal, published, or expired. The status determines who can read or modify the article. See “Control Who Can Access Articles” on page 243 for more information. 242 Maximizer CRM 10.5 User’s Guide Add Articles to the Knowledge Base In a similar way to the Company Library, the Knowledge Base window provides a location for general customer service collateral. So articles do not always need to be associated with a specific case. There are two ways to add an article that is not associated with a case: using the standard (text) format and the document (file attachment) format. If the article content is short and straightforward, the former option should suffice. However, if you want to carefully compose the article over a day or two, confirm data with an external source, or run a spell check, you may wish to write the document in Microsoft Word, for example, and then attach the article as a document. When attaching the file, you can browse to any folder on your computer or network to which you have access. ➤ To add a knowledge base article Right-click and select Add Knowledge Base Article. Select Standard Format or Document Format. LFor information on selecting products/services and categories, see Maximizer Help. If you select the Standard format, you type your article text in the Article content text box. If you choose the Document format, you must browse and select an existing file. Chapter 7 Providing Customer Service 243 Control Who Can Access Articles A newly created article is assigned a draft status until it is opened and assigned a different status by the appropriate users. Articles can also have a status of draft, internal, published, or expired. The status determines which users can read or modify articles: • Draft articles can be viewed and modified by creators, owners (users or security groups), and approvers. • Internal articles can be viewed by all users who have knowledge base read rights, excluding external Maximizer web access users (customers and partners). • Published articles can be viewed by all users who have knowledge base read rights, including external Maximizer web access users (customers and partners), and modified by approvers. • Expired articles can be viewed and modified by creators, owners (users or security groups), and approvers. The knowledge base ensures that valuable case solutions are recorded, reviewed for quality assurance, and made available to the appropriate users. Save and Send Articles Any article can be saved or sent by email. However, due to a file naming convention, an article title containing the following characters cannot be saved or sent by email: ?/*:“|\<> If you want to save or send the contents of an article that contain these characters in the file name or article title, Maximizer automatically replaces them with underscores so the file can be saved or sent by email. Find Articles You can search the Address Book's knowledge base for any article that matches the basic article fields you specify, such as creator, owner, and last modification date. To find all articles, leave all the fields blank. The Search by Phrase option searches the article title and keywords and can be fine-tuned using the following options: • Article contains all of the words in phrase – Searches for every word you specify. • Article contains the exact phrase – Searches for the words in the exact order you specify. 244 Maximizer CRM 10.5 User’s Guide • Article contains at least one of the words in phrase – Searches for at least one of the words you specify. You can choose to search the article content, as well as the title and keywords, using the “Include article body contents when executing search” option. Once selected, the three search options just described apply to the article content, as well as to the title and keywords. LIf you are running Maximizer on a SQL server, the Full-Text Search engine must be installed in order to search article content. If this option is grayed out, contact your system administrator or see the Maximizer CRM Administrator’s Guide for information on how to enable the full-text search in SQL. While any file format can be attached as an article, the content of only the following file formats can be searched: • Microsoft Word (*.doc) • Microsoft Excel (*.xls) • Microsoft PowerPoint (*.ppt) • Text (*.txt) • HTML (*.htm) CHAPTER Accessing Maximizer on the Web 8 Use Maximizer Around the Globe In this chapter... “Maximizer on the Web” on page 246 “Maximizer Web Access” on page 247 “Searching for Entries in Maximizer Web Access” on page 251 “Working with Lists of Entries” on page 260 “Working with Address Book Entries” on page 266 “Sending and Receiving Email” on page 278 “Working with Your Hotlist” on page 286 “Working with Your Calendar” on page 289 “Working with Action Plans” on page 294 “Viewing, Modifying, and Adding Notes” on page 296 “Viewing and Modifying User-Defined Fields” on page 299 “Working with Documents” on page 303 “Working with Opportunities” on page 309 “Working with Campaigns” on page 316 “Working with Customer Service Cases” on page 319 “Working with the Knowledge Base” on page 325 “Setting Personal Preferences in Maximizer Web Access” on page 329 “Viewing Company Information” on page 331 “Dashboard” on page 333 “Partner Access” on page 334 “Customer Access” on page 338 8 246 Maximizer CRM 10.5 User’s Guide Maximizer on the Web For many organizations, it’s impractical to send an entire database to each remote machine—the database may be too large; there may be concerns about distributing valuable lead and customer information; or there may be a concern about connection times and the amount of data being sent. Maximizer’s web access sites give remote users access to the central Maximizer database via the web. Remote users can access and work with Address Book entries as they would in Maximizer at the office. Remote users need only a web browser, Maximizer user ID, and password. A travelling business person could step into a web café or borrow someone’s computer to quickly connect to the home office Address Book. Once online, it’s easy to work with contact data, check Hotlist tasks and calendar appointments, customer service cases, and opportunities. The web access sites provide Maximizer database access to people who don’t have Maximizer installed. A company could have its distributor list in Maximizer and allow web access to that list so any other member of the channel—with the proper password—could go online and browse the distributor directory. Maximizer on the Web has four components—Maximizer Web Access, Wireless Access, Partner Access, and Customer Access. Another site is provided to interface a Maximizer eStore with a specific Address Book. Chapter 8 Accessing Maximizer on the Web 247 Maximizer Web Access LYou can access the sample Escona Tutorial Address Book using “jnapoli” as the user ID and “maximizer” as the password. LIf you are using Microsoft Internet Explorer 7.0, you should not run Maximizer Web Access in multiple tabs at the same time. You can access Maximizer Web Access through the Start menu or by entering its URL in a browser. ➤ To access Maximizer Web Access To access Maximizer Web Access through its URL, enter the URL in any web browser. The URL is set by your system administrator. Typically, the URL would look like the following: http://[YourServerName]/MaximizerWebAccess/Default.aspx – or – To access the site through the Start menu, select Start > Programs > Maximizer CRM > Web Access > Maximizer Web Access. Select the Address Book you want to open, and enter your User ID and password. 248 Maximizer CRM 10.5 User’s Guide Navigation Tips Because Maximizer Web Access runs inside your browser, you navigate its pages the same way you navigate a website. To move back a page, click the Back button on your browser’s toolbar. Click the Forward button on the browser's toolbar to move forward. (On the keyboard, you can move backwards and forwards by pressing Alt + left or right arrow key.) The page controls at the top and the bottom of a page allow you to choose the number of entries displayed on a page and to navigate from page to page. Click on a page number to change to a different page. The arrow buttons take you to the next and previous pages, as well as to the first and last page. The ellipsis buttons take you to the next and previous 10 pages. Use the icons to access the main windows in the site. The tabs along the side of the icon bar represent the various modules. Depending on what tab you have selected, the icons change. Click the plus sign to expand the sections for the Maximizer Modules, Administration, Options, Quick Search, Recent Entries, Phone List, and Links. Note that preferences for the Maximizer Modules, Quick Access commands, and Recent Entries are set up in the Maximizer icon bar properties. See “My Work Day View” on page 27 for more information. LIf you log in as the MASTER user, the Administration section is always visible. Note also that the visibility of the Administration section is determined by user access rights. If the user has Administrator, but not UDF setup rights, only the Maximizer Web Access Administrator link is displayed in the Administration section. If the user has UDF setup rights, but not Administrator rights, only the Set Up User-Defined Fields link is displayed. If the user has neither Administrator nor UDF setup rights, the Administration section is not displayed at all. If you repeatedly run Maximizer Web Access from the same computer, create a Favorite or Bookmark to the Login page so you never have to re-enter the URL by doing the following: Chapter 8 Accessing Maximizer on the Web • 249 In Internet Explorer, select Favorites > Add to Favorites. Maximizer Web Access Main Pages LTo move from one main page of the site to another, use the icons in the icon bar. You can also use your browser’s Back button to move to the previous page you had open. Maximizer Web Access allows you to access your company information on the web. Most of the tasks you would perform in Maximizer can be done in Maximizer Web Access. Use the My Work Day Page The My Work Day page is the overview page for Maximizer Web Access. Use the My Work Day page to see the day’s tasks, appointments, and your company announcements. This page works the same way it does in Maximizer. For more information, see “My Work Day View” on page 27. LYou can customize the My Work Day page in your preferences. In the Options section, select Preferences and select the Overview Page tab. For more information, see the Maximizer help. ➤ To use the My Work Day Page Use the icons to access the main windows in the site. The tabs along the side of the icon bar represent the various modules. Depending on what tab you have selected, the icons change. You can minimize the size of the icon bar by clicking on the pin 250 Maximizer CRM 10.5 User’s Guide graphic. When the icon bar is minimized, click on the button below the pin graphic to switch to another module. LThe visibility of the Administration section and its links (Maximizer Web Access Administrator and Set Up UserDefined Fields) is determined by user access rights. Click the plus sign to expand the sections for Maximizer Modules, Administration, Options, Quick Search, Recent Entries, Phone List, and Links. Use the Print button to print tasks, appointments, activities, and company announcements for the day. To switch to another calendar day in the My Work Day view, click the Calendar button. Chapter 8 Accessing Maximizer on the Web 251 Searching for Entries in Maximizer Web Access LEncrypted user-defined fields are not searchable through Maximizer Web Access. In all of the main Maximizer Web Access pages, you can search by various criteria. Search for Address Book Entries There are a few different ways to search for Address Book entries. You can use the Search and Advanced search options in the Quick Search section of the navigation pane or use the Search menu. The “regular” Search option provides you a quick way to find specific information using basic information for entries such as first name. For a more advanced search, you can use the Advanced option to do a search by all fields. You can also choose one of the several options available on the Search menu. The default number of Address Book entries displayed after a search is 500. Select the Personalize link in the Options section to change this setting. ➤ To search using the Quick Search regular Search option In the Address Book page, click the plus sign to expand the Quick Search section. Select the basic information by which you would like to search in the Search By drop-down list. You can search by first or last name, phone number, or company name. Select the type of entry for which you are searching in the Search For drop-down list. You can search for Companies, Individuals, and Contacts. The Person option searches both Individuals and Contacts. Or, you can search all entries in the Address Book. LDepending on the speed of your Internet connection, a broad search of your Address Book may take a long time to display. So if you are looking for Henderson Ltd., for example, do an Exact Match search on “Henderson Ltd.”, rather than searching on “h” or “he”. Depending on what you are searching for, enter the exact first/ last name of the Company, Contact, or Individual or the phone number in the Search Text field. You can also enter just the first few letters of the name. An example of this would be to enter “hen” for Henderson Ltd., or “h” to see all entries beginning with the letter “h”. 252 Maximizer CRM 10.5 User’s Guide Click the Search button when you have selected your search criteria. ➤ To search using the Quick Search Advanced option In the Address Book page, click the plus sign to expand the Quick Search section. LUse the Last Search button to perform previously defined searches. Click Advanced. The Search by All Fields dialog box appears. In the Search by All Fields dialog box, click Add. In the Select Fields for Search dialog box, select one or more fields and click OK. In the Values for Search dialog box, select one or more values and click OK. For each field you have chosen for the previous step, you will be prompted to specify the values. Use the search condition options to further narrow your search. Specify the remaining search criteria in the Search by All Fields dialog box. If you wish to build a list of entries that excludes a certain group, as in a list of all Address Book entries except those in a certain state or province, use the Not Equal button. The matching entries in the Address Book will replace the current Address Book entry list. Select an option according to how you would like the current list to be updated. You can choose to further narrow the search by specifying options to include or omit sales leads. Chapter 8 Accessing Maximizer on the Web 253 Click OK to begin the search. ➤ To search using the Search menu options LIf you are searching by all fields, follow the Advanced Search instructions. In the Address Book page, click the Search button. A list of searching options appears. Select the field by which you would like to search. In the Search By dialog box, select the types of entries you want to retrieve. If you are searching for a specific entry, enter the exact text for which you are searching. If you leave the main search text blank, all entries are retrieved. For example, if you 254 Maximizer CRM 10.5 User’s Guide search by Company Name and leave the field blank, all Companies in the Address Book are retrieved. Search by All Fields Some searches, such as the Search by All Fields, are common to all of the main pages of Maximizer Web Access. This type of search is useful when you need to search by fields that are not listed in the Search menu or when you want to search by more than one field. In the Search by All Fields dialog box, you can build complex search arguments and even save your search in the catalog for later use. ➤ To search by all fields In the Address Book, Opportunities, or Customer Service page, select Search > All Fields. In the Search by All Fields dialog box, click Add. Chapter 8 Accessing Maximizer on the Web LIn order to be able to select more than one field when using the All Fields search, you must have the Allow multiselection in the Search by All Fields option enabled in the Personal Preferences. (Click the Personalize link in the Options section.) This option is off by default. 255 In the Select Fields for Search dialog box, select one or more fields and click OK. In the Specify Field Values for Search dialog box, select one or more values, click Add, and then click OK. For each field you have chosen from the previous step, you will be prompted to specify the values. Use the search condition options to further narrow your search. Specify the remaining search criteria in the Search by All Fields dialog box. LTo retrieve all Address Book entries that do not have email addresses, do a search by all fields, choose the email field, leave the search range blank, and then click the Not Equal button. If you wish to build a list of entries that excludes a certain group, as in a list of all Address Book entries except those in a certain state or province, use the Not Equal button. 256 Maximizer CRM 10.5 User’s Guide LTo set the maximum number of entries returned in a search, click the Personalize link in the Options section. LFor information on saving searches, see Maximizer Web Access Help. Also see “To save your search to the search catalog” on page 80. In the Modify current entries list group box, select one of the options. • Add search results to list displays the entries that match your search criteria, without removing any currently displayed entries from the list. • Narrow list searches only selected entries (or all currently displayed entries if none are selected), and removes any entries that do not match your search criteria. • Replace list with search results removes all entries currently displayed in the list and replaces them with entries that match your search criteria. For Address Book entries, you can choose to further narrow the search by specifying options to include or omit sales leads. Use Last Search and Catalog for previously defined searches. Click OK to start the search. Search for Basic Fields There are a number of basic fields you can search for in the Address Book, Opportunities, and Customer Service pages. In the following example, an opportunity field is the search field. Similarly, you can search by some basic fields in the Company Library such as the author or file name of a document. ➤ To search for a basic field Open the Address Book, Opportunities, or Customer Service page. Click the Search menu, and select the search field. The search dialog box opens. Specify your search criteria and click OK to start the search. Chapter 8 Accessing Maximizer on the Web 257 Search for Entries by Notes You can search for entries that have notes matching search criteria you specify. This example pertains to searching for Address Book entries. ➤ To search for entries by notes Open the Address Book, Opportunities, or Customer Service page. Click the Search menu, and select Notes. The Search by Notes dialog box opens. Specify your search criteria in the Search Criteria, Date Range, Type of Note, and other group boxes, as needed. • To search for entries with notes that contain a specific word or phrase, type the word or phrase in the Text search field. If your system administrator has enabled full-text search, the Perform search using Full-Text Indexing checkbox will be available. This option provides faster, and often more accurate, results. For more information, refer to the Maximizer CRM Administrator’s Guide or your system administrator. • To search for entries with notes created by a specific user, select the user's name from the Creator drop-down list. 258 Maximizer CRM 10.5 User’s Guide • To search for entries with notes that are accessible by a specific user or security group, select the name of the user or group from the Full Access drop-down list. • To search for entries with notes that were created within a specific date range, enter the date range in the From and Until fields. Or select Search all dates. • To search for entries with notes of a specific type, select the type(s) to search for in the Type of Note group box. To search for a specific type of Address Book entry, select the type(s) to search for in the Find Matching group box. To search for Address Book entries that are not leads, entries that are leads, all entries, or your own leads, select the applicable option in the Leads Options group box. To search for an opportunity or a case with a specific status, select the status in the Find Matching group box. In the Modify current entries list group box, select one of the options. • Add search results to list displays the entries that match your search criteria, without removing any currently displayed entries from the list. • Narrow list searches only selected entries (or all currently displayed entries if none are selected), and removes any entries that do not match your search criteria. • Replace list with search results removes all entries currently displayed in the list and replaces them with entries that match your search criteria. Search for Entries by Documents If your system administrator has enabled full-text search, you can search for entries that have documents matching the search criteria you specify. For more information about full-text search, refer to the Maximizer CRM Administrator’s Guide or your system administrator. You can search by the following types of documents: .doc, .xls, .ppt, .txt, and .htm. You may also be able to search by .rtf, .xml, .pdf, and other document types, depending on which document types your system administrator has configured for full-text search. Chapter 8 Accessing Maximizer on the Web 259 ➤ To search for entries by documents Open the Address Book, Opportunities, or Customer Service page. Click the Search menu, and select Documents. The Search by Documents dialog box opens. Specify your search criteria in the Search Options, Date Range, and Size group boxes, as needed. • To search for entries with documents that contain a specific word or phrase, type the word or phrase in the Text in document field. • To search for entries with documents that have a specific name, type the beginning of the name of the document in the Name of document field. The search will look for document names that begin with the characters entered. • To search for entries with documents of a specific category, select the category from the Category drop-down list. • To search for entries with documents created by a specific user, select the user’s name from the Creator drop-down list. • To search for entries with documents that are accessible by a specific user or security group, select the name of the user or group from the Owner drop-down list. • To search for entries with documents that were created within a specific date range, enter the date range in the From and Until fields. Or, select Search all dates. • To search for entries with documents that exceed a given file size, enter the minimum number of kilobytes in the Documents larger than field. To search for a specific type of Address Book entry, select the type(s) to search for in the Find Matching group box. In the Modify current entries list group box, select one of the options. • Add search results to list displays the entries that match your search criteria, without removing any currently displayed entries from the list. • Narrow list searches only selected entries (or all currently displayed entries if none are selected), and removes any entries that do not match your search criteria. • Replace list with search results removes all entries currently displayed in the list and replaces them with entries that match your search criteria. 260 Maximizer CRM 10.5 User’s Guide Working with Lists of Entries You can use the same commands to work with most types of entries in Maximizer Web Access. There are a number of ways to select entries in Maximizer Web Access. ➤ To select or clear entries in a list • Click the gray box to the left of entries. • To select multiple entries, click on the entries one at a time. • To select all entries, select Edit > Select All in Current Page. Or click the gray box in the upper-left corner of the list. Click this box to select all entries in the current view. • To clear selected entries, select Edit > Deselect All. • To reverse which entries in the list are selected, select Edit > Invert Selection in Current Page. Display Entries in a List After you have performed a search, you will most likely want to perform some action on the entries or a subset of the entries. There are a couple of ways to display and remove entries in a list. ➤ To display only selected entries Select the entries that you want to display. On the Edit menu, select Make Selected List Current. The other entries are removed from the page. ➤ To remove all entries in a list • In the Address Book, Opportunities, Customer Service, or Knowledge Base pages, select View > Clear List. Chapter 8 Accessing Maximizer on the Web 261 Work with Favorite Lists After you have performed a search in the Address Book or Customer Service page, you can easily create a Favorite List. ➤ To create a Favorite List If necessary, perform a search to retrieve the entries you want to add to a new Favorite List. Select View > Favorite Lists. Click Add. LFor information on entering details, refer to“Create Favorite Lists from Searches” on page 81. Enter the details for the Favorite List and click OK to save the Favorite List. If you created a Favorite List of Address Book entries that you want to appear by default in the Choose an Address Book List dialog box (in the View Favorite List drop-down list), select the Retrieve this list when an Address Book is opened option. This Favorite List will also display automatically when you open Maximizer. Click Close to close the Favorite List dialog box. 262 Maximizer CRM 10.5 User’s Guide ➤ To retrieve a Favorite List • Select View > Favorite Lists. Select the Favorite List you want to view, and click Retrieve. ➤ To add or remove entries in a Favorite List Select the entries to add to or remove from the Favorite List. Or open an entry. Select View > Add to Favorite List or Remove From Favorite List. – or – If the entry is open, select Favorite List > Add to Favorite List or Remove From Favorite List. Select the Favorite List and specify the details as to what entries you are adding or removing. For example, if you would like to use only the selected entries in the current Address Book list, select Selected Entries. ➤ To view a list of Favorite Lists for an entry Open the entry. Select Favorite List > View Favorite Lists. The View Favorite Lists dialog box opens listing all the Favorite Lists that the current entry belongs to. Chapter 8 Accessing Maximizer on the Web 263 Use Column Setups to Organize Lists Just as in Maximizer, Maximizer Web Access has a selection of column setups you can use for the main pages, including the Address Book, Opportunities, Campaigns, Customer Service, and Hotlist pages. You can also create your own column setups to display different fields in various combinations. ➤ To create a column setup Select Column Setup from the View menu. In the Column Setup dialog box, click Add. Type a Name in the Details of View group box. Select an option from the Full Access drop-down list. If you leave Public selected, all users can modify or delete the column setup. If you select a group or user, only members of that group or that particular user can perform these actions. Select an option from the Read Access drop-down list. If you leave Public selected, all users can see and use the column setup. If you select a group or user, only members of that group or that particular user can see and use the column setup. Click Add on the Edit tab. New Column appears in the Defined columns list and the Insert Field button is enabled. Click Insert Field, select a field in the Available Fields list to include in the column setup, and click OK. The field appears in the Selected Column Details list. If necessary, adjust the Header (field name) and Width of the column. Click Add again. The field you inserted in the Selected column details list is added to the Defined columns list. LClick the Preview tab to preview your column setup. Note you will be prompted to save the column setup before you can preview it. To add your next column, make sure the New Column item is selected and click Insert Field. To add another field to the same column, select the previous field you added and click Insert Field. 264 Maximizer CRM 10.5 User’s Guide Click OK to save the column setup view. ➤ To use a column setup • In the Columns drop-down list, select the column setup that you want to use. – or – • Select View > Column Setup. Select the column setup you want to use and click Use Now. You can click Properties to view and modify the properties of a column setup. Export Entries to Excel You can quickly export a list of entries to Excel from the Address Book, Opportunities, Campaigns, Customer Service, or Hotlist pages in Maximizer Web Access. See “Exporting Entries to Microsoft Excel” on page 421 for more information. Chapter 8 Accessing Maximizer on the Web 265 Import Data from MXI or XML Files You can import Address Book entries, customer service cases, and knowledge base articles from MXI (Maximizer XML Interface) or XML files into Maximizer Web Access. When you import Address Book entries, the imported entries are saved to a favorite list. The favorite list is given a default name that includes the time and date of the import. You can choose not to create a favorite list while importing the file. ➤ To import data from a MXI or XML file In the left navigation pane, click the plus sign beside Administration to open the section. LThe Import option is only available if you have import privileges. Click Import. The Import dialog box opens. Click Browse, and choose the MXI or XML file. In the Lead Handling area, choose if you want to import Address Book entries as leads or not. If you do not want to create a favorite list, delete the text in the Name field. Click Import. The file is imported. LIf you do not have insert or modify rights, the import results will list the entries as “Failed.” When the import is finished, the Import results section updates to show the number of entries that were successfully inserted or modified and the number of entries that failed to be imported. For information on importing data into Maximizer, see “Importing Address Book Data from MXI or XML Files” on page 399. 266 Maximizer CRM 10.5 User’s Guide Working with Address Book Entries Working with Address Book entries in Maximizer Web Access is very similar to the processes used in Maximizer. Choose an Address Book List LIf you deselect the “Ask at Address Book startup which list to view” option in the Personal Preferences dialog box, an empty Address Book list is displayed each time you open the Address Book page. (To open this dialog box, click the Personalize link in the Options section.) When you first open the Address Book page, you are prompted to choose an Address Book list to view. The following options are available for viewing an Address Book: • An empty list (no Address book entries displayed). • The list from your last Maximizer session. • Your last search (All Fields). • A Favorite List. • A saved search. If you want the list you select to be displayed every time you open the Address Book page, select the Make this my default and do not ask again option. If you later decide that you don’t want the list to display by default, open the Personal Preferences dialog box and select the Ask at Address Book startup which list to view option. Create Default Entries LDefault entries are user- specific so each user in the Address Book can have different default entries. You can create a default entry in the Address Book and Customer Service pages. Then when you create a new entry in any of these pages, certain fields are already filled in for you. For example, if you know all your Address Book entries will have the same city and province, these are fields you could provide in a default entry for the Address Book entry page. Chapter 8 Accessing Maximizer on the Web 267 ➤ To create a default entry LIf you already have a default entry created through Maximizer, it will appear in Maximizer Web Access. If you modify the default entry in Maximizer Web Access, the changes will appear in Maximizer. The most recent changes to the default entry, regardless of where it was modified, appear in both applications. In the Address Book or Customer Service pages, select Default Entry from the Edit menu. The Default Entry dialog box appears. Fill in the fields to include as default information. For Address Book page default entries, click the User-Defined Fields tab to include specific fields in the default entry. When you are finished, click Save. To modify a default entry, open the entry and make your changes. These types of default entries cannot be deleted in Maximizer Web Access, but can be modified. 268 Maximizer CRM 10.5 User’s Guide View and Modify Address Book Entries You can view and edit Address Book entries at any time. You can access an entry from the Address Book page or from a customer service case or opportunity attached to the entry. ➤ To view and modify an Address Book entry In the Address Book page, click on the entry to open it. – or – In an open customer service case or opportunity, click the View in Address Book button. To send an email message or visit an Address Book entry’s website, click the related link in the Email addresses/Website section. To modify the details of the entry, click Edit on the Basic Information tab. To view and modify other information related to the entry, click the associated tab—User-Defined Fields, Customer Service, Campaigns, Opportunities, Notes, and Documents. See the following sections for more information on each of these elements. Click Save when you modify an Address Book entry. Chapter 8 Accessing Maximizer on the Web 269 Apply Changes with Global Edits You can edit many Address Book entries at once using global edit in Maximizer Web Access, just as you can in Maximizer. Global edits can also be made for opportunities and customer service cases. ➤ To perform a global edit Select the list of entries for the global edit. If you do not select any entries, only the current entry is changed. From the Edit menu, select Global Edit. Make your changes. Note that not all fields can be modified with a global edit. Also note that you can remove certain fields with a global edit. Click OK to start the global edit. For more information on performing global edits, see “Change Several Address Book Entries with Global Edits” on page 48. 270 Maximizer CRM 10.5 User’s Guide Add Address Book Entries Adding an Address Book entry in Maximizer Web Access is very straightforward—it’s similar to using Maximizer. New entries are added through the site in real time to your Maximizer Address Book. ➤ To add a new Address Book entry In the Address Book page, click Edit and select Add Company, Add Individual, or Add Contact for. Similarly, you can select one of the Lead options to add the entry as a lead type of entry. Fill in the entry’s information. You can use the Tab key to move from field to field. Click Address to enter an alternate address for the entry. When entering the phone numbers for the entry, keep in mind that the first field is for the type of phone e.g., fax, and that the third field is for an optional extension number. When entering email addresses, the first field is for the type of email address. The Key Fields are set up in Administrator. These fields are commonly-used fields that are specific to your company. The Details fields belong to each type of entry by default. The values for these fields are also set up in Administrator. LItems cannot be added to table user-defined fields through Maximizer Web Access. Click the User-Defined Fields tab. Select the Show blank fields option to see blank user-defined fields in the Address Chapter 8 Accessing Maximizer on the Web 271 Book. Select the Show hidden fields option to see user-defined fields and folders that are set to hidden. Click Edit and click on a field to add, modify, or select a value specific to the Address Book entry. Click Save once you are done. Use the buttons at the top of the page for common tasks such as printing a Detailed Report or adding the entry to a Favorite List. See “Add Address Book Entries to Your Address Book” on page 44 for more information on what each button does. 272 Maximizer CRM 10.5 User’s Guide Create Address Book Entries from Email Messages You can create Address Book entries from email messages in the Email page. The email messages are automatically saved to the Documents tab of the new Address Book entries. ➤ To create an Address Book entry from an Email Message In the Email page, select the email message. Select Actions > Create New Address Book Entry from Current Email Message. Select the type of Address Book entry: Individual, Company, or Company and Contact. Then, click OK. Enter the details for the new entry. When finished, click Save. The Add Email to Address Book Entry dialog box opens. LThe document name cannot contain the following characters: \ / : * ? < > | Enter properties of the document including the name, owner, category, and description. When finished, click OK. For more information on using the Email page, see “Sending and Receiving Email” on page 278. Chapter 8 Accessing Maximizer on the Web 273 View, Modify, and Add Alternate Mailing Addresses The main address is added to the Basic Information tab of an Address Book entry in Maximizer Web Access and alternate address information is added by clicking the Address button on the Basic Information tab. ➤ To view, modify, or add alternate addresses If necessary, first run a search to locate the Address Book entry. Open the entry by clicking on it and then click Edit. Click Address. The Mailing Addresses dialog box appears. Click Add to enter an alternate address. If you are modifying an address, select the address and click Modify. LThe Main Address cannot be edited in the Mailing Address page. After adding or editing an alternate address, you can set it as the default (or main) address by clicking Select while the address is selected. The address then appears in the Basic Information tab. 274 Maximizer CRM 10.5 User’s Guide Use Territory Management LFor detailed information on working with Territory Management, refer to “Using Territory Management” on page 55 and Maximizer Web Access Help. Use Territory Management to set up territories and assign them to Company and Individual Address Book entries. You can assign entries manually, or automatically, through the use of territory rules. To use Territory Management, you must be a Sales Manager. However, once territories are created and assigned, other Maximizer users can use the Territory and Territory Status fields in tasks such as searching and creating column setups. They can also assign territories when creating new entries and in other limited circumstances. To use Territory Management, select Edit > Territory Management. If you do not have the Sales Manager role, this menu item is not available. The Territory Management dialog box contains two tabs: • A Setup tab, where you create territories and territory rules. • An Alignment tab, where you automatically align territories to Address Book entries based on territory rules, and the alignment conditions and options you set on this tab. Chapter 8 Accessing Maximizer on the Web 275 Move Contacts to Other Companies or Individuals You can move a contact from one company or individual to another company or individual. The contact’s notes, documents, and userdefined fields move with the contact. Appointments and tasks are updated to reflect the new location. You have a number of options when moving a contact: • Update the contact’s address to the main address of the new company or individual. • Prefix all of the contact’s notes with text indicating that the contact has moved. • Maintain the contact’s association with opportunities and customer service cases. • Maintain relationships between the contact and related entries. • Update favorite lists containing the contact to reflect the contact’s move. • Update campaigns to reflect the contact’s new location. • Delete or save the contact’s entry with the original company. ➤ To move a contact to another company LThe Move Selected Contact option is only available when a contact is selected and for users with permission to insert, modify, and delete Address Book entries. In the Address Book page, select the contact. Select Edit > Move Selected Contact. In the Find Target Address Book Entry dialog box, enter the search criteria, and click Search. Select the company that the contact is moving to, and click OK. In the Move Selected Contact dialog box, select the options for the move. Click OK to complete the move. 276 Maximizer CRM 10.5 User’s Guide Draw Maps of Address Book Entries You can quickly draw a map showing the location of the selected Address Book entry or of the Address Book entry associated with the selected opportunity or customer service case. ➤ To draw a map of an Address Book entry Select or open an Address Book entry, opportunity, or customer service case. Select Actions > Draw a Map. The address of the selected Address Book entry is displayed. Choose an online map site and click Go. The map to the Address Book entry’s location appears. Log Calls with Address Book Entries You can use Maximizer Web Access to log phone calls with Address Book entries. When you phone an Address Book entry or receive a call from an Address Book entry, Maximizer Web Access times the call, creates a phone note for the entry, and prompts for a follow-up activity. LYou can also time and log other tasks by selecting Actions > Time a Task. See the Maximizer Web Access help for details. Depending on your logging preferences, a phone note is automatically saved to the Address Book entry, customer service case, or opportunity entry associated with the call. ➤ To log a phone call Select or open the entry that you want to log the call with. To log an outgoing call, select Actions > Make a Call. To log an incoming call, select Actions > Receive a Call. If you are logging an outgoing call, select the phone number that you are calling, and select a response: LThe Message, No Answer, and Busy options are only available if you have phone call logging preferences set to create notes. • If you select Message, No Answer, or Busy, the log is automatically saved in a note to the entry with the result of the call. • If you select Answered or if you are logging an incoming call, the Phone dialog box opens timing the duration of the phone call. In the Subject field, enter a subject for the phone call or click the ellipsis button and choose a value for the subject. Record notes on your call as you talk. Chapter 8 Accessing Maximizer on the Web LYou can also select a result of the phone call from the Phone dialog box: click the Result button before saving the note. 277 When the phone call is finished, click Hang Up. The timer stops. Edit the note, and click Save. If your phone call logging preferences are set to show results on hang-up, you are prompted to select a result of the phone call. Select a value for the result. Select whether or not you want to schedule a follow-up activity. If you select Yes, specify the properties of the follow-up activity. If you schedule a follow-up activity, the activity is saved to your Hotlist. For more information on using the Hotlist in Maximizer Web Access, see “Working with Your Hotlist” on page 286. 278 Maximizer CRM 10.5 User’s Guide Sending and Receiving Email You can use the Email page in Maximizer Web Access to send and receive email using your existing email system. You can also use the Address Book page to quickly and easily send email to Address Book entries. When you create email messages in the Address Book page, you can insert merge fields into the message text. To set email preferences, click the Preferences link in the Options section and click the Email tab. For more information, see Maximizer Web Access Help. Log In to Your Email Server You may need to log in to your email server before performing your email tasks. ➤ To log in to your email server Click the Email icon in the left navigation pane. The login page opens. If necessary, enter the name of the email server and/or your email server user ID. Enter your email server password. Click the Log In button. Your user ID and password are saved to your email preferences. Use the Email Page When the Email page opens you can begin performing your email tasks. You can send email messages, reply to messages, move messages, and perform other common email tasks. You can also save messages to associated Address Book entries. ➤ To use the email page Select email folders on the left side of the email page. Select items in a folder in the top-right part of the page. You can change the size of this area by changing the number of records that are displayed on each page. Chapter 8 Accessing Maximizer on the Web 279 View the currently selected email message in the preview pane. You can toggle the preview pane on and off with the Preview checkbox in the upper-right corner of the page. Organize Email Messages in the Email Page You can easily move your email messages from folder to folder in the Email page. ➤ LYou can move multiple messages at a time. To do this, select the messages and then select Edit > Move to Folder. To move an email message to another folder Select the message you want to move. Select Edit > Move to Folder. The Move Items dialog box opens. Select the folder you want to move the message to. The name of the selected folder is displayed in boldface. Click OK. The message is moved to the selected folder. Open Address Book Entries from the Email Page You can open Address Book entries associated with email messages directly from the Email page. Email messages must be sent from addresses matching the email addresses of Address Book entries. ➤ To open an Address Book entry from the Email Page In the Email page, select the email message that you want to open. Select Edit > Open Address Book Entry. The Address Book entry opens without leaving the Email page. 280 Maximizer CRM 10.5 User’s Guide Save Email Messages to Entries You can save email messages to existing Address Book entries or customer service cases in Maximizer Web Access. Email messages are saved to the Documents tab of entries. ➤ To save an email message In the Email page, select the email message. On the Actions menu, select Save Email Message to Address Book Entry/Customer Service Case. The Search Address Book or the Search Customer Service Case dialog box opens displaying entries with matching email addresses. You can select one of the entries listed, or you can search for another entry. To search for another entry, select Last name or Company for Address Book entries, or select Basic fields for customer service cases. Then, enter the search criteria. Click Search. The dialog box updates to display the new list of entries. Select an entry and click OK. The Add Email to Address Book Entry or the Add Email to Customer Service Case dialog box opens. Chapter 8 Accessing Maximizer on the Web LThe document name cannot contain the following characters: \ / : * ? < > | 281 Enter properties of the document including the name, owner, category, and description. When finished, click OK. View Email Messages from the Documents Tab You can open and view email messages that have been saved to the Documents tab of an Address Book entry, opportunity, or customer service case. You can also reply to, forward, or print the email message. ➤ To view an email message from the Documents tab In the Address Book, Opportunities, or Customer Service page, open the entry the email message was saved to. Click the Documents tab. Select the email message you want to view and click the Download button. The email message opens in the View Email dialog box. 282 Maximizer CRM 10.5 User’s Guide Compose and Send Email Messages from the Email Page You can compose your message in either HTML or plain text format. To change the format, use the Format drop-down list. You can attach files to your message. If you are using the HTML format, you can also insert hyperlinks. To check the spelling in your message, click the Spell Checker button. ➤ To compose and send an email message In the Email page, select Edit > Compose New Email. The Send Email dialog box opens. Enter email addresses in the To, Cc, or Bcc boxes. (Separate email addresses with a semicolon.) – or – Click the To, Cc, or Bcc buttons to select email recipients. The Add Email Recipient dialog box opens. LDo not use angle brackets, < or >, in the email editor. Any text between the brackets will be removed from the email message. • To select email recipients from the Address Book, select Maximizer Address Book in the Search for recipients drop-down box. You can search by last name or by company. For entries with multiple email addresses, select the desired address from the drop-down list in the row for the entry. • To select email recipients from your global address list, select Global Address List in the Search for recipients dropdown box. You can search by first name, by last name, or by group name. Enter a subject and your email text. If required, change the priority level of the message to Low or High. If the email recipient is associated with an Address Book entry, set the logging options. See “Send Email Messages from the Address Book Page” on page 283 for more information. Click Send. Chapter 8 Accessing Maximizer on the Web 283 Send Email Messages from the Address Book Page You can send email to Address Book entries directly from the Address Book page. The From Address is automatically retrieved from your user properties. If you do not have an email address, your email message will not be sent. ➤ To send an email message Click the Address Book icon to open the Address Book page. Select the Address Book entry or entries you are sending the email to, or create a list of Address Book entries. Choose Actions > Write an Email. - or Open an Address Book entry and click the email address link on the Basic Information tab. In the Send Email dialog box, choose how to use the current Address Book list. You can send the message to only the current entry, to all selected entries, to all entries in the list, or to none of the entries. If an Address Book entry is currently open, you do not choose a recipient at this point. LYou can set a default preference for sending email separately when you are sending email to multiple Address Book entries. The setting is found under Options > Preferences > Email. To send separate email messages to multiple Address Book entries, choose the Separately option in the Send As dropdown list. Leaving the default selection of One email sends the email message to all the selected entries at once. To add more email recipients, click the To, Cc, or Bcc buttons. You can search the current Address Book or your global address list. These options are not available if the Separately option is selected. LDo not use angle brackets, < or >, in the email editor. Any text between the brackets will be removed from the email message. Enter a subject and your email text. Use the toolbar buttons and Font drop-down lists to format your message. If you are sending email to Address Book entries separately, you have the option of inserting merge fields into the message text. To add merge fields, select the Insert Fields button and select fields from the Available Fields list. When the message is sent, the field values corresponding to the Address Book entry are merged into the message. Select any attachments you would like to send with the email message. Set your logging options as follows: • In the Text for note field, enter any additional text you would like to log as part of the note created by the email message. 284 Maximizer CRM 10.5 User’s Guide • Select the Include message body in note option to save the message to the note created. • Select the Save copy to entry’s documents option to save the message as a document for the entry. • Click the Logging Details button and then the Assign More button to log the email details to additional Address Book entries. Chapter 8 Accessing Maximizer on the Web 285 Create Appointments and Tasks from the Email Page You can create an appointment or a task directly from the Email page in Maximizer Web Access. Depending on the menu item you choose, appointments/tasks are either personal or associated with Address Book entries. ➤ To create an appointment or a task from the Email page Select the email message you want to create an appointment or a task for in the Email page. On the Email page toolbar, click the Create Appointment from Current Email Message or the Create Task from Current Email Message button. – or – On the Actions menu, select Create Appointment/Task from Current Email Message. In the Search Address Book dialog box, enter the search criteria and click the Search button. This step is necessary if the related Address Book entry does not appear in the search dialog box. Select the Address Book entry and click OK. Enter the appointment/task details and click OK. Once the appointment/task is created, the Add Email to Address Book dialog box appears notifying you that the selected email message will be added to the associated Address Book entry as a document. ➤ To create a personal appointment or task from the Email page Select the email message you want to create an appointment or a task for in the Email page. From the Actions menu in the Email page, select Create Personal Appointment/Task from Current Email Message. Enter the appointment/task details and click OK. 286 Maximizer CRM 10.5 User’s Guide Working with Your Hotlist When you click the Hotlist icon, Maximizer Web Access displays the current day’s tasks by default. Tasks can also be viewed, modified, and marked as complete from the daily calendar view. View Hotlist Tasks ➤ To view Hotlist tasks LTo view another user’s Hotlist, the user must give you access in Maximizer’s File > Preferences > Calendar/Hotlist tab. You can choose to view Hotlist tasks scheduled for today, tomorrow, yesterday, this week, or next week by selecting the appropriate option from the View bar in the Hotlist window. If you want to view tasks associated with an Address Book entry, select the Address Book entry before clicking the Hotlist icon to see all of the entry’s associated tasks. Select Custom and then specify a Start date and End date to find tasks within a specified date range. To modify the date range for a custom search for tasks, click the Build Hotlist button. You can view old tasks (tasks scheduled for a date prior to the current date) that have not been completed by choosing Carry forward unfinished activities from the View menu. Note that this option is not selected by default. To view appointments, as well as Hotlist tasks, select the Show appointments checkbox. Chapter 8 Accessing Maximizer on the Web 287 Add Hotlist Tasks You can create Hotlist tasks for Address Book entries, opportunities, and customer service cases. You can also create personal Hotlist tasks. Personal Hotlist tasks are not associated with Companies, Individuals, or Contacts. ➤ To add a Hotlist task If necessary, first run a search to locate the Address Book entry, opportunity, or customer service case. Select or open the entry. Click the Actions button and select Schedule a To-Do. Or, if you are in the Hotlist Task page, click the Edit button and select Add Task. LIn the Assign User dialog box, available users are displayed by group (all users, departments, disabled users, divisions, security groups, or teams). If you don’t want to display users by group, go to Maximizer and deselect the Display users by groups option. (Select File > Preferences > System Defaults tab.) Enter the Hotlist task details. To assign the task to a user, click the ellipsis button beside the Assigned to box, select a user from the Assign User dialog box, and then click OK. Select the Personal task option if you want to make the task personal. Click OK to close and save the Hotlist task. You can now view the task in the Hotlist page. 288 Maximizer CRM 10.5 User’s Guide Reassign Hotlist Tasks You can reassign tasks in the Hotlist page. ➤ To reassign a Hotlist task In the Hotlist page, select the task you want to reassign. Click the Edit button and select Reassign. The Reassign Hotlist Tasks dialog box opens. Users are displayed by group as they are in the Assign User dialog box. Select a user and click OK. The task is reassigned. Modify Hotlist Tasks Tasks can be modified in the Hotlist window or the Calendar window. LTo mark a task as complete, click the checkbox in the last column of the task row. You can also open the task in the Hotlist window and click the Task is Completed checkbox. ➤ To modify a Hotlist task In the Hotlist page, select the Hotlist task. Open the Hotlist task you want to modify by clicking on it. If you are in the Calendar page, double-click on the Hotlist task to open it. Make your changes in the Hotlist Task dialog box. Click OK to save the task and close the dialog box. Delete Hotlist Tasks ➤ To delete a Hotlist task In the Hotlist page, select the Hotlist task. Click the Edit button and select Delete Selected Tasks. Chapter 8 Accessing Maximizer on the Web 289 Working with Your Calendar LTo view another user’s calendar, the user must give you access in Maximizer’s File > Preferences > Calendar/ Hotlist tab. You can schedule, modify, and view appointments in Maximizer Web Access. The Calendar window in Maximizer Web Access is very similar to the calendar in Maximizer. See “Calendar Window” on page 87 for more information on the general functionality of the Maximizer calendar. View Appointments Maximizer Web Access displays your calendar in monthly, weekly, weekly list, and daily views. You can view another user’s calendar if that user has given you, or a group to which you belong, access using the Calendar/Hotlist preferences tab in Maximizer. You can also view booked resources. The users and resources/locations must be selected in the Calendar Users section of the page for the associated bookings to appear in the calendar. Color bars/icons for both users and resources/locations indicate a booking. Hotlist tasks are also displayed in the Hotlist Tasks section of the page. These can be modified or marked complete in the calendar. ➤ To view your appointments LTo open the Preferences dialog box, expand the Options section and click the Preferences link. Click the Calendar icon. Choose a calendar view by clicking the Daily, Weekly, Weekly List, or Monthly links in the top of the page. You can adjust the default in the Preferences dialog box, on the Calendar/Hotlist tab. To quickly navigate from one day to the next in the daily calendar view, use the calendar arrow buttons located in the upper-left section of the window. You can also navigate from week to week and month to month using these buttons when in the weekly or monthly calendar views. Use the arrow buttons in the upper-right section of the window to move from year to year (monthly view) or month to month (daily, weekly, and weekly list view). Click on a month to show it in the main portion of the Calendar window. LIn the weekly list view, all the appointments for a day are listed in an easy-to-view format. A scroll bar appears when the appointments don’t fit in the cell. Appointment details such as start/end time and location are displayed. To open an appointment in the monthly view, click on an appointment. In the weekly, weekly list, and daily views, double-click on an appointment to open it. To view another user’s appointments, select the checkbox beside the user’s name in the Calendar Users list. Use the Edit List option to add users and resources and to set their colors. 290 Maximizer CRM 10.5 User’s Guide Holding your mouse over an appointment provides you with more details. Add Appointments Use Maximizer Web Access to add appointments to your Maximizer calendar. You can book locations/resources, invite other users, and assign Address Book entries to the appointment. Add appointments from a main page (Address Book, Opportunities, Customer Service, and Campaigns), or from the Calendar page. If you add an appointment from a main page, the appointment is by default linked to the current entry. If you add an appointment from the Calendar page, it is by default created as a personal appointment. ➤ To add an appointment from a main page If you want to schedule an appointment with a specific entry, select or open the entry. Chapter 8 Accessing Maximizer on the Web 291 Click the Actions button and select Schedule a Meeting. The Add Appointment dialog box opens. Information about the current entry is displayed in the information bar. LAvailable users are displayed in the Appointment dialog box by group (all users, departments, disabled users, divisions, security groups, or teams). If you don’t want to display users by group, go to Options > Personalize and deselect the Display Users by Groups option. Enter the appointment details and invite meeting attendees. For more information, see “Using the Appointment Dialog Box” in Maximizer Web Access Help, or “Using the Add/Modify Appointment Dialog Box” on page 90. Click OK to save the appointment and close the dialog box. ➤ To add an appointment from the Calendar page In the Calendar page, click the Edit button and select Add Appointment. Enter the appointment details and invite meeting attendees. If required, link the appointment to the current entry. Click OK to save the appointment and close the dialog box. 292 Maximizer CRM 10.5 User’s Guide Delete Appointments ➤ To delete an appointment In the Calendar page, go to the daily, weekly, or weekly list view and select the appointment. Click the Edit button and select Delete Selected Appointment. Use the Activities Tab to Track Appointments and Tasks You can view activities scheduled for an Address Book entries or customer service case from the Activities tab of the entry. You can also view activities specific to opportunities on the Sales Plan tab. ➤ To view activities scheduled for an entry Open the related Address Book entry, customer service case, or opportunity. LClick the Show strategy option to show the selected strategy for the opportunity. For Address Book entries or customer service cases, click the Activities tab. For opportunities, click the Sales Plans tab. By default, only tasks are displayed in the Activities tab. You can choose to view appointments as well by selecting the Show Appointments option. Filtering can be done for the activities list by using the Filter drop-down list, User drop-down list, and the Custom Filter button. Click More to add, modify, or delete an activity. Chapter 8 Accessing Maximizer on the Web 293 294 Maximizer CRM 10.5 User’s Guide Working with Action Plans If an Address Book entry has a scheduled action plan, you can view the action plan details on the entry's Activities tab. You can also modify the name and description of the action plan. ➤ To view or modify action plan details Open the Address Book entry and click the Activities tab. Select the action plan you want to view or modify from the Action Plan options drop-down list. Click the Details button. The Action Plan Details dialog box opens. Details for both the action plan and the associated template are displayed. If required, enter a new Plan name or Description. Click the Properties button to view properties such as Creation details and Last modification. Click OK to return to the Activities tab. Use Action Plans to Create Appointments and Hotlist Tasks LYou must have the corresponding access rights (Action Plan Library privilege) as a user to create Action Plan templates. Action Plan templates are created in the Action Plan Library. The Action Plan Library is accessed under the Options link in Maximizer Web Access. ➤ To create an Action Plan template in the Action Plan Library Click the Options link in Maximizer Web Access. Click the Action Plan Library link. Enter the Action Plan details. See “Use Action Plans to Create Appointments and Hotlist Tasks” on page 94 for more information on creating Action Plans. Action Plan templates can be applied to Address Book entries, which create a set of appointments and/or Hotlist tasks. ➤ To schedule an Action Plan for Address Book entries In the Address Book page, select or open the entry or entries. Select Actions > Schedule an Action Plan. Chapter 8 Accessing Maximizer on the Web 295 If you selected multiple Address Book entries, specify the entries for which you want to schedule the Action Plan. You can schedule the Action plan for only the current entry, for all selected entries, or for all entries in the current list. Select an Action Plan template from the Plan template dropdown list. Enter the related details for the Action Plan. You can change the activities and tasks in the Action Plan and you can add more activities and tasks to the Action Plan. To save the changes in a template, click Save As. For more information on using Action Plans and creating Action Plan templates, see “Use Action Plans to Create Appointments and Hotlist Tasks” on page 94. 296 Maximizer CRM 10.5 User’s Guide Viewing, Modifying, and Adding Notes LWhen a note is open, you can use the Previous and Next buttons to scroll through all notes. You can view, edit, and add notes for Address Book entries, campaigns, opportunities, and customer service cases just as you would in Maximizer. You can also add default notes so that the text automatically appears as part of the note body when new manual notes are created. ➤ To view, modify, or add a note If necessary, first run a search to locate the entry for which you are adding the note. Open the entry by clicking on it and then click the Notes tab. To add a note, click Add. Enter the note details. You can control who can see this note by choosing a certain user or security group in the Full Access and Read Access fields. If your system administrator has set up custom note types— called categories—you can optionally select a category. To edit or view a note, click on the note and make your changes. To delete a note, select the note in the Notes tab and click Delete. To check the spelling in your note, click the Spell Check button. Chapter 8 Accessing Maximizer on the Web Click Save to save any changes and return to the Notes tab. 297 Clicking Close returns you to the Address Book, Opportunities, Campaigns, or Customer Service page. 298 Maximizer CRM 10.5 User’s Guide ➤ To add a default note In the Address Book, Opportunities, Campaigns, or Customer Service pages, select an entry. Select Default Note from the Edit menu. Enter the default note text. This information appears as part of the note each time a manual note for an Address Book entry, an opportunity, a campaign, or a customer service case is created. Note that the default note is different for each type of entry. Optionally, select a user or group in the Full Access/Read Access fields and specify the note Category. Chapter 8 Accessing Maximizer on the Web 299 Viewing and Modifying User-Defined Fields User-defined fields are custom fields used to further categorize Address Book, customer service, and opportunity information. Typically, these fields are set up by your system administrator in Administrator, however, users who have been given the access rights can set up user-defined fields in Maximizer Web Access and Maximizer. For more information on user-defined fields, refer to “Recording Additional Information with User-Defined Fields” on page 65. ➤ To view user-defined fields If necessary, first run a search to locate the related Address Book entry, customer service case, or opportunity. LWhen you have a Contact selected in the User-Defined Fields tab, both the Contact’s and the Company’s userdefined fields are displayed. For cases and opportunities, user-defined fields specific to each module are also displayed. Open the entry by clicking on it. Click on the User-Defined Fields tab. All user-defined fields for the current entry are shown in the tab, grouped in folders. Mandatory fields are denoted by an asterisk in brackets following the field name. Select the Show blank fields option to view blank user-defined fields. Select the Show hidden fields option to view userdefined fields and folders that are set to hidden. Click on the plus sign to expand a user-defined field folder. 300 Maximizer CRM 10.5 User’s Guide ➤ To modify user-defined field values In the User-Defined Fields tab, click on a user-defined field. Change the value of a field by entering a new value or selecting a value from the drop-down list or calendar. Set Up User-Defined Fields Use the Set Up User Defined Fields option in Maximizer Web Access to add, modify, or delete user-defined fields. To use this option, you must have the access right to set up user-defined fields. ➤ To use the Set Up User-Defined Fields option In the left navigation pane, click the plus sign beside Administrator to expand the section. Click Set Up User-Defined Fields. The Set Up User-Defined Fields dialog box opens. The user-defined fields and folders are organized in a tree view. There can be multiple levels of folders, each containing other folders or user-defined fields. The folder structure allows a maximum of three folder levels. You can move fields and folders within this structure. Click the tab for the category of user-defined fields you want to work with. For example, if you are creating a user-defined field for Address Book entries, click the Address Book tab. Chapter 8 Accessing Maximizer on the Web 301 Work with User-Defined Fields The following procedures show you how to: LTo select a field or folder, click to the right of it. The field or folder is now highlighted in blue. • Move user-defined fields and folders • Add, modify, and delete fields and folders • Create a copy of a user-defined field • Add items to a table field • Modify and delete table items ➤ To move a user-defined field or folder to a folder Select the field or folder you want to move. Click the Move To button and select the folder you want to move the field or folder to from the Folder name drop-down list. Click Save. ➤ To reposition a user-defined field or folder Select the field or folder you want to reposition. To move the field or folder up one position, click the Move Up button. To move the field or folder down one position, click the Move Down button. ➤ To add a new folder for user-defined fields LIf you set user-defined fields and folders to hidden, users can hide them in certain dialog boxes by deselecting the Show hidden fields option. Note that mandatory fields cannot be set to hidden. Click the Add Folder button. Enter a name for the folder. If required, select the Set to Hidden option. Click Save. ➤ To add a new user-defined field Click the Add Field button and select the type of user-defined field you are creating. For example, select Add alphanumeric to create an alphanumeric field. LThe properties you can set for a field type varies. For more information, refer to “Types of User-Defined Fields” on page 67. Specify the user-defined field properties. Click Save. 302 Maximizer CRM 10.5 User’s Guide ➤ To modify a user-defined field or folder In the Name column, click the user-defined field or folder you want to modify. Modify the properties as required and click Save. ➤ To delete a user-defined field or folder Select the user-defined field or folder you want to delete and click the Delete button. Click OK to confirm that you want to delete the field or folder. ➤ To create a copy of a user-defined field Select the field you want to copy and click the Save As button. Edit the field information as required and click Save. ➤ To add an item to a table user-defined field Select the table user-defined field you want to add an item to and click the Items button. The Set Up Items dialog box opens. Click the Add Item button. The Add a Table Item dialog box opens. LIf a table item is set to hidden, you can hide it from the Edit/ View Value dialog box. (For a single-value table, hide the item by selecting Hide Hidden Items in the Value drop-down list. For a multivalue table, hide the items by deselecting the Show hidden items option.) Type a name for the table item. If required, select the Set to Hidden option. In the Requested by field, select the name of the user who requested the item creation. Click Save. ➤ To modify an item in a table user-defined field In the Set Up Items dialog box, click the item you want to modify in the Item name column. Modify the properties as required and click Save. ➤ To delete an item from a table user-defined field LTo select a table item, click in the row containing the item (in the Requested by, Created Date and Time, or Creator column). In the Set Up Items dialog box, select the item you want to delete. Click the Delete button. Click OK to confirm that you want to delete the item. Chapter 8 Accessing Maximizer on the Web 303 Working with Documents You can work with documents in Maximizer Web Access in many of the same ways as in Maximizer. For information on working with documents in Maximizer, see ‘Working with Documents and Templates” on page 125. You can view, add, modify, and delete documents from the Documents tab of an Address Book entry, customer service case, or opportunity. ➤ To view, add, modify, or delete a document If necessary, first run a search to locate the associated Address Book entry, customer service case, or opportunity. Open the entry by clicking on it and click the Documents tab. View, add, modify, or delete a document as follows: • To view the contents of a document, click on the Download button while the document is selected. This downloads the document from Maximizer Web Access. • To add a document, click Add in the Documents tab, enter the document properties such as the document name, category, and description, and click the Browse button to browse to the document file. Click Save on the Add document page to complete the process. • To modify a document, first make your changes to the document off-line and save it to a network location or your local drive. Then, click Edit in the Documents tab and click the Browse button to browse to the modified document. Alternatively, you can click the Download button, make your modifications, and then click the Edit button to browse to the document. • To delete a document, select the document in the Documents tab and click Delete. 304 Maximizer CRM 10.5 User’s Guide Chapter 8 Accessing Maximizer on the Web 305 View Documents in the Company Library You can view documents from the Company Library in Maximizer Web Access. Not all document types can be opened in Maximizer Web Access, even if they can be opened in Maximizer. Only the following types of documents can be opened: • .DOC and .RTF files – Microsoft Word • .XLS files – Microsoft Excel • .PPT files – Microsoft PowerPoint • .HTM and .HTML • .BMP files – bitmaps • .TXT files – text and Company Library notes • .JPG, .GIF, and .TIF files – graphic files • .PDF files – Adobe Portable Document Format files ➤ To view documents in the Company Library To view Company Library documents, click the Company Library icon in the icon bar. Maximizer Web Access displays the same tree-type folder view as Maximizer. To expand a folder, click on the plus sign shown on the left side of the folder. Click a document to download it. 306 Maximizer CRM 10.5 User’s Guide Send Documents by Email from the Company Library You can easily send documents by email from the Company Library. ➤ To send documents by email from the Company Library In the Company Library, select the documents you want to send. Select Email Selected Documents from the Actions menu. The Send Email dialog box appears with the selected documents attached to the email message. Enter the details of your email message. Click Send. Chapter 8 Accessing Maximizer on the Web 307 Work with Microsoft Word Open MS Word button on the Address Book page You can use Microsoft Word as your word processor while working with Maximizer Web Access. You can launch Word directly from your Address Book with the Open MS Word button. Word integration installs a Maximizer Web Access toolbar menu in Word. The options in the Maximizer Web Access toolbar menu integrate Address Book entries in Maximizer Web Access with Word. This toolbar menu is different from the Maximizer toolbar, which integrates with Maximizer and not with Maximizer Web Access. You can use the Maximizer Web Access toolbar menu to do the following: • Insert merge fields in a document – For information on using merge fields, see “Use Merge Fields in Document Templates” on page 129. • Merge a document – This option updates the merge fields in the current document to reflect values in the selected Address Book entry. • Send a document – This option merges the document with the values in the selected Address Book entry and sends the document to the printer. Set Up Word Integration LThis setup involves downloading Active X controls, which may be disallowed on some networks. Word integration can also be installed from the Maximizer CRM CD. For more information, see the Maximizer CRM Administrator’s Guide. If Word integration is enabled, you can set up Word integration directly from Maximizer Web Access. For information on enabling Word integration, see the Maximizer CRM Administrator’s Guide or your system administrator. ➤ To set up Word integration In the left-hand navigation bar, click the plus sign to expand the Options section. In the Options menu, select Setup. The Personal Setup page opens. Select MS Word Integration. The Personal Setup > Desktop Integration page opens describing the basic steps required to install the files. Click Download. A window opens asking if you want to run or save the file. 308 Maximizer CRM 10.5 User’s Guide Click Run and follow the steps outlined in the setup wizard to install the files. This setup includes the installation of the MS Office Integration for Maximizer CRM Web Access add-in. Next time you run Word, you may be asked whether or not you want to enable macros that were installed. Select the “Always trust macros from this source” option and click the Enable Macros button. Chapter 8 Accessing Maximizer on the Web 309 Working with Opportunities LOpportunity revenue can be displayed in multiple different currencies other than the default currency for an Address Book. See chapter 5 “Managing Opportunities” on page 163 for more information. From the Opportunities page in Maximizer Web Access, you can view, edit, and add opportunities in your Address Book. ➤ To view or modify an opportunity for an Address Book entry If necessary, first run a search to locate the Address Book entry associated with the opportunity. Open the entry by clicking on it and click the Opportunities tab. All of the opportunities for the selected entry are displayed in the list. Open any of the associated opportunities in the list by clicking on the opportunity. You can edit all of the associated opportunity information by clicking Edit. 310 Maximizer CRM 10.5 User’s Guide If you are modifying an opportunity, make your changes and click Save. Clicking Cancel does not save any changes you have made. Clicking Close returns you to the Address Book page. You can also view associated information such as user-defined fields, the opportunity’s competitors/partners, and the opportunity status by clicking on the corresponding tab. Chapter 8 Accessing Maximizer on the Web 311 View All Opportunities ➤ To view all opportunities in the Address Book LOpportunities are displayed chronologically. You can view all opportunities in the Address Book by clicking the Opportunities icon. All current opportunities in the Address Book appear. To view opportunities of a specific type, use the filter dropdown list to narrow the list. To view an opportunity’s details, click on the opportunity. 312 Maximizer CRM 10.5 User’s Guide Add and Delete Opportunities You can add and delete opportunities just as you are able to in Maximizer. ➤ To add an opportunity In the Address Book page, select or open the Address Book entry you wish to be associated with the opportunity. Select Actions > Create an Opportunity. – or – In the Opportunities page, select an opportunity that is already scheduled with the Address Book entry. Select Edit > Add Opportunity. LFor information on displaying products/services and categories in the opportunity, see Maximizer Web Access Help. Enter the opportunity details. Click Save when you are finished. Chapter 8 Accessing Maximizer on the Web 313 ➤ To delete an opportunity In the Opportunities page, select the opportunity. Click the Edit button and select Delete Selected Entries. For more information on working with opportunities and opportunity strategies, see “Managing Opportunities” on page 163. Apply Strategies to Opportunities Once you have strategies set up in Maximizer, you can apply them to opportunities. The process in Maximizer Web Access is very similar to how it works in Maximizer. ➤ To apply a strategy to an opportunity Open the opportunity and click the Sales Plan tab. Select the Show strategy option and click Edit. Select a strategy from the Strategy template drop-down list. You can click the Details button to view specific properties of the strategy such as the description and cost. Click the Schedule button and specify the Start date for applying the strategy. Click OK to return to the Sales Plan tab. LFor detailed information on how roles, success factors, and steps determine the probability of closing an opportunity in relation to their weighted scores and standings, see “Designing Strategies for Your Opportunities” on page 166. Select a role and click in the Standing column to choose a standing for the role. You can also select a Contact for the role if necessary by clicking inside the Contact column when a role is selected. Select a success factor and click in the Standing column to choose a standing for this success factor. Note that the “On 314 Maximizer CRM 10.5 User’s Guide Schedule” and “Political Alignment” success factors are calculated automatically. Select a step and click the plus sign to view all activities for this step. You can use the More button to add, modify, or delete roles, success factors, steps, and activities. If you have a team assigned to an opportunity, you can delegate team members to specific activities in a step. Click on an activity and choose a user from the Team member responsible for completion drop-down list. Update the strategy application as roles become more influential, success factors change, and steps are completed. The progress indicator will change automatically in alignment with the success of the opportunity. To mark an activity as complete, click inside the box displayed after the activity. Overdue activities are denoted by a warning symbol after the activity. Use the Show follow-ups option to display follow-up activities related to an activity within a step. Use the Show done option Chapter 8 Accessing Maximizer on the Web 315 to display completed activities. (Otherwise, completed activities are removed from the step.) 316 Maximizer CRM 10.5 User’s Guide Working with Campaigns You can view all campaigns in Maximizer Web Access as well as modify campaign notes and documents. ➤ To view campaigns Open the Campaigns page by clicking on the Campaigns icon while the Marketing tab is selected. Select a column setup and specify the number of records per page if necessary. Open a campaign by clicking on it. Click the Print button to print the campaign details. Click the Properties button to see the campaign creation details. Click the corresponding tab to view the campaign’s userdefined fields, notes, and documents. Chapter 8 Accessing Maximizer on the Web You can add, modify, and delete notes and documents. ➤ To delete a campaign In the Campaigns page, select the campaign by clicking in the box on the left of the campaign. Click the Edit button and select Delete Selected Entries. 317 318 Maximizer CRM 10.5 User’s Guide Create One-Time Campaigns In Maximizer Web Access, you can create one-time Automated email campaigns from the Address Book page. ➤ To create a one-time campaign LMerge fields are not supported when you create a one-time campaign from the Email page or when you send a campaign to multiple recipients as one email message. In the Address Book page, select all of the Address Book entries to receive the email campaign. Select Actions > Write an Email. In the Send As drop-down box, select Separately. Compose the text of the email message. You can compose the email message in HTML or in plain text. You can use the formatting toolbar to apply additional formatting to the email text. Click the Insert Fields button to insert merge fields in your template. Note that only basic merge fields are available for this type of campaign—campaign merge fields as described in chapter 6 “Managing Campaigns” are not supported with this type of campaign. Click the Email Template button. In the Email Templates dialog box, click Add to add a new email template. Enter a name and description for the template and click OK. Click Close to return to the email message. To reuse this template in the future, select the template in the Email Templates dialog box, and click Retrieve. Enter a subject for the email message, and click Send. Optionally, you can choose logging options to save the email message in the entries’ notes or documents. Chapter 8 Accessing Maximizer on the Web 319 Working with Customer Service Cases You can view, add, modify, and delete customer service cases in the Customer Service page of Maximizer Web Access. View Cases LTo search for cases, select All Fields from the Search menu and then specify a case field as part of the search criteria. ➤ To view or modify a customer service case for an Address Book If necessary, first run a search to locate the Address Book entry associated with the customer service case. Open the entry by clicking on it and click the Customer Service tab. All of the customer service cases for the selected entry are displayed in the list. Open any of the associated cases in the list by clicking on the case. To modify the case, click Edit. 320 Maximizer CRM 10.5 User’s Guide If you are modifying a case, make your changes and click Save. Clicking Cancel does not save any changes you have made. Clicking Close returns you to the Address Book page. You can also view the associated user-defined fields by clicking on the corresponding tab. ➤ To view all customer service cases in the Address Book LOverdue cases (those that are past their follow-up date) are shown in red text. You can view all customer service cases in the Address Book by selecting the Service tab and clicking the Customer Service icon. By default, only unresolved cases assigned to you appear in the list. To view all cases in the Address Book, select All Cases in the Show drop-down list. To view only cases in a specific case queue, select a case queue (e.g., Contract, Priority, or Standard) from the Show drop-down list. To filter cases by their follow-up date, choose one of options from the Deadline drop-down list. For example, you can choose to view only cases with a follow-up date of Today. Or, choose the Custom option to specify a start date and end date to filter cases by date range. Chapter 8 Accessing Maximizer on the Web 321 Select a column setup from the Columns drop-down list to adjust the view of the displayed case fields. Click on a case to open it. Add Cases You can add customer service cases in a number of different ways. Following are two methods of adding a case. ➤ To add a customer service case from the Address Book page In the Address Book page, select or open the Address Book entry you wish to be associated with the case. LYou can also create a case from the Customer Service window by clicking the Edit button and selecting Create a Customer Service Case. Click the Actions button and select Create a Customer Service Case. 322 Maximizer CRM 10.5 User’s Guide LFor information on displaying products/services and categories in the case, see Maximizer Web Access Help. Enter the case details. Click Save when you are finished. ➤ To add a case associated with an email message In the Email page, select the email message that is associated with the Address Book entry for which you are adding the case. Select Actions > Create Customer Service Case from Current Email Message. If there is an associated Address Book entry for the selected email message, it is displayed in the Entries available for assignment from search results list. Select the Address Book entry in the Search Address Book dialog box. If necessary, first Chapter 8 Accessing Maximizer on the Web 323 enter the search criteria to find the Address Book entry and click the Search button. Enter the case details. Click Save and then Close when you are finished. The Add Email to Customer Service Case dialog box appears prompting you to save the email message as a document for the case. Click OK to save the message as a document. Click Cancel if you do not want to save the message as a document for the case. You can later view the email message from this tab. 324 Maximizer CRM 10.5 User’s Guide Delete Cases ➤ To delete a case In the Customer Service page, select the case by clicking on the grey box on the left of the entry (first column). LSee chapter 7 “Providing Customer Service” on page 219 for more information on how to perform other common tasks related to customer service. Click the Edit button and select Delete Selected Entries. Case resolution, assignment, escalation, and monitoring in Maximizer Web Access operate very similar in Maximizer. Case Notification from Maximizer Web Access Case notification for both users and Address Book entries is available in Maximizer Web Access when a case is created, modified, assigned, resolved, or escalated to a user. Custom templates for case notification email can also be set up in Administrator. For more information about case notifications, see “Sending Automatic Email Notification about Cases” on page 237 and, if necessary, the Maximizer CRM Administrator’s Guide. Chapter 8 Accessing Maximizer on the Web 325 Working with the Knowledge Base Access to the knowledge base is very similar to when you are using Maximizer. You can view, modify, add, and delete articles using Maximizer Web Access. For more information about knowledge base articles and knowledge article statuses, refer to “Record Case Solutions” on page 241. View, Add, Modify, and Delete Articles ➤ To view all knowledge base articles LTo search for a knowledge base article, click Search and specify a field or phrase. • To view knowledge base articles, click the Service tab and then click the Knowledge Base icon in the icon bar. Use the Status drop-down list to filter the view of articles. ➤ To add a knowledge base article In the Knowledge Base page, click the Edit button and choose Add standard article or Add document article. Choose the article’s status and owner. Refer to “Control Who Can Access Articles” on page 243 for more information about article status. Enter the article’s description field values. If you are adding a standard article, enter the article content in the Article content group box. If you are adding a Document article, click the Browse button to browse to the document file that you have saved on a network location or local drive. 326 Maximizer CRM 10.5 User’s Guide Click OK when you are finished. LArticle numbers are automatically assigned. For more information on adding articles to the knowledge base, see “Add Articles to the Knowledge Base” on page 242. Chapter 8 Accessing Maximizer on the Web 327 ➤ To modify a knowledge base article In the Knowledge Base page, click on the article to open it. If you are modifying a document article, click the Download button, make your modifications to the article, and save it to a network location or your local drive. Then, click the Browse button, browse to the location where you have saved the modified article, and select the file. If you are modifying a standard article, make your changes in the Article content group box. Click OK when you are finished. 328 Maximizer CRM 10.5 User’s Guide ➤ To delete a knowledge base article On the Knowledge Base page, select the article. Click the Edit button and select Delete Selected Entries. Chapter 8 Accessing Maximizer on the Web 329 Setting Personal Preferences in Maximizer Web Access Click the Personalize link in the Options section to set personal preferences for Maximizer Web Access. The preferences you set are applied only to the Address Book that is currently open. ➤ To set personal preferences In the left navigation pane, click the plus sign beside Options to expand the section. Click the Personalize link. The Personal Preferences dialog box opens. Adjust preferences as required. LClick the Preferences link in the Options section to set user options for Logging, Calendar/ Hotlist, and Email. Changes you make here are also applied to Maximizer Web Access Administrator, Maximizer CRM, and Administrator. See Maximizer Web Access Help for more information. Maximum number of entries returned • Select the maximum number of records you want to search. The default number is 500; other options are 100, 1000, or 2000. If you increase the setting, and run Maximizer Web Access on a dial-up Internet connection, it may take considerable time to search for the records. Display blank UDFs • Controls if employees can view user-defined fields that are in the Address Book, but do not yet have assigned values. A separate setting controls if user-defined fields are displayed in a tree-view or list-view. Show module tabs • Controls the visibility of module tabs (Sales, Marketing, and Service). If the option is selected, all tabs that the user has access to are displayed. If this option is not selected, the tabs are 330 Maximizer CRM 10.5 User’s Guide hidden. Select a module from the drop-down list to display the module’s icons. Allow multi-selection in Search by All Fields (may require website to be in the Trusted Sites zone) • Allows you to select more than one search criterion when searching by all fields. Ask at Address Book startup which list to view LSee “Choose an Address Book • List” on page 266 for information on choosing Address Book lists. Allows you to choose an Address Book list to view when you open the Address Book page. If you deselect this option, an empty Address Book list is displayed when you open the Address Book page. Check Address Book size at login. • Checks whether the Address Book you are logging into is approaching or exceeding the maximum database size. This option is only available in Maximizer CRM Group Edition. Display users by groups • Allows you to display available users by group in dialog boxes such as Add Appointment. If you deselect this option, users will not be displayed by group. There will be only one user-selection list that displays all available users. If you select this option, you can also select the groups that you want to include in user selection lists: all users, divisions, disabled users, security groups, departments, and teams. Password • Enables you to change your password. Under certain operating system configurations, your password may expire after a period of time. In this case, Maximizer will prompt you to change it. For example, it may be required to contain a minimum number of characters. See your system administrator for more information. Chapter 8 Accessing Maximizer on the Web 331 Viewing Company Information You can view and print out a phone list of for all users in an Address Book. The short form of the phone list includes last names, first names, and phone numbers. The long form also includes the phone numbers listed in the Phone 2 field and email addresses. ➤ To view and print a phone list Expand the Phone List section of Maximizer Web Access by clicking on the plus sign. Click on the Short Phone List or Long Phone List link. If you want to print the phone list, select File > Print or rightclick and select Print. 332 Maximizer CRM 10.5 User’s Guide Check WhereAbouts The WhereAbouts section is the same as the Peg Board in Maximizer. At a glance, you can check to see if a specific user is in or if he or she is busy. ➤ To check WhereAbouts Expand the Phone List section of Maximizer Web Access by clicking on the plus sign. Click on the WhereAbouts link. A user list appears with a status column indicating if a user is in/out of the office or if the user is busy with an appointment. To change a user’s status manually, click on a user name and modify the status for the user. Chapter 8 Accessing Maximizer on the Web 333 Dashboard LBefore you can access Dashboard, your system administrator must add you to the Dashboard users security group in Administrator. Available in both Maximizer and Maximizer Web Access, Dashboard provides you with timely information on your company’s performance. Like a car’s dashboard, Dashboard’s indicators monitor daily activities and events in real time, so you can see at a glance which areas are doing well and which areas need attention. Information such as how many visitors are currently on your website, how many opportunities are in the pipeline, and your daily revenue from online purchases can be accessed instantaneously. You can add or remove indicators from Dashboard to optimize your monitoring process. For more information on working with Dashboard, see “Working with Dashboard” on page 29, or see Maximizer Web Access Help. View Dashboard LTo display only Dashboard in the My Work Day page, go to Maximizer, select File > Preferences > Overview Page tab, and then deselect the Show Tasks and Appointments and Show Company Announcements checkboxes. You can also deselect these checkboxes in Administrator. (Select File > Users > Preferences > Overview Page tab.) ➤ To view Dashboard from Maximizer Web Access • Click the Dashboard icon. This method displays the Dashboard without the My Work day tab. - or - • Click the My Work Day icon and click the Dashboard tab. 334 Maximizer CRM 10.5 User’s Guide Partner Access LMaximizer users can access the sample Escona Tutorial Address Book using “Paul” as the user ID and “password” as the password. Partner Access is a web application that creates a two-way flow of information between your organization and its business partners. Organizations with an extended sales force of resellers or dealers need a way to distribute and monitor sales opportunities to these partners. Partner Access allows business partners to access Address Book entries, sales opportunities, customer service cases, and news/ events via the web. Staff can publish news to the site. News items can be filtered for partners based on their interest areas. Customer service cases may be associated with a Contact of a Company or an Individual. Partners (the Contact associated with the case) can then follow the progress of the case. The knowledge base may also be searched for related articles. Partners access Partner Access using the URL and setup PIN sent by email by the site administrator. See the Maximizer CRM Administrator’s Guide for more information about setting up Partner Access. Chapter 8 Accessing Maximizer on the Web 335 View and Modify Address Book Entries Partners can view and modify associated Address Book entries in the site. ➤ To view and modify Address Book entries In Partner Access, click the Address Book icon. All the Address Book entries that are associated with a partner appear (these entries have the partner assigned to them in the Basic Information tab of an entry). Click on an Address Book entry to open it. Click Edit to make modifications to the entry. Use the buttons on the menu bar to print a Detailed report, view the properties of the entry, copy information to the Windows clipboard, and create new opportunities. 336 Maximizer CRM 10.5 User’s Guide Work with Opportunities, Notes, and Documents LOpportunities are assigned to partners by selecting a partner on the Partner tab of the opportunity. Leads are assigned by assigning the partner to the lead on the Basic Information tab of the Address Book entry. Each time a partner is assigned an opportunity or a lead, the partner is notified by email. Opportunities, notes, and documents for those Address Book entries can also be created, modified, or deleted (if provided the necessary right to do so). Partners may view and update opportunities that have been assigned to them via Maximizer. Assigned leads are also available to partners. ➤ To add and modify opportunities, notes, and documents While an Address Book entry is open, click on the corresponding tab—Opportunities, Notes, or Documents tab. Click Add to add a new opportunity, note, or document. To open an opportunity, a note, or a document, click on it. To edit an opportunity, a note, or document, click the Edit button. Use the Download button to open a document. Chapter 8 Accessing Maximizer on the Web 337 Work with Customer Service Cases Partners can view and enter cases in Partner Access. Cases can be limited by the site administrator to only those cases associated with the partner or to all cases in an Address Book. ➤ To view and enter cases Open the Customer Service page by clicking on the corresponding icon. To add a case, click Edit and choose Create a Customer Service Case. A wizard appears where you enter the case details. To open a case, click on it. To print a detailed report of the case, view the case properties, or view a knowledge base article associated with a case, click the corresponding button. Click on the Notes and Documents tabs of a case to see the related notes and documents. 338 Maximizer CRM 10.5 User’s Guide Customer Access LMaximizer users can access the sample Escona Tutorial Address Book using “Mary” as the user ID and “password” as the password. Customer Access offers customers a number of web-based services. The site’s functionality is very similar to Partner Access in that Customer Access can be customized to display information essential to your customers. Staff can publish to the site news such as new products or services; news items can be filtered for customers based on their interest areas. Customers can follow the progress of their customer service cases and even enter cases if given the proper access rights by the site administrator. The knowledge base can also be searched for related articles. For more information, see “Partner Access” on page 334. As with Partner Access, customers use the URL and setup PIN sent by email by the site administrator to access Customer Access. They then set up their own login information. See the Maximizer CRM Administrator’s Guide for more information about setting up Customer Access. CHAPTER Using Wireless Access 9 Access Maximizer from Wireless Devices In this chapter... “Wireless Access” on page 340 “Accessing Address Book Entries” on page 343 “Modifying Entries” on page 350 “Sending and Saving Email Messages” on page 352 “Accessing Opportunities” on page 354 “Accessing Customer Service Cases” on page 357 “Accessing User-Defined Fields” on page 364 “Accessing Notes” on page 365 “Accessing Documents” on page 367 “Accessing Calendar Appointments and Hotlist Tasks” on page 368 “Accessing the Company Library” on page 373 “Using Favorite Lists” on page 376 “Viewing Dashboard” on page 377 “Setting Wireless Access Preferences” on page 378 9 340 Maximizer CRM 10.5 User’s Guide Wireless Access LWireless Access is installed as part of the Maximizer Components for IIS. Check with your system administrator for further information. Instructions for installing, enabling, and configuring Wireless Access are in the Maximizer CRM Administrator’s Guide. Wireless Access is a website that lets you access your Maximizer Address Books from wireless devices. You can access the following types of information in Wireless Access: • Address Book information • Opportunities • Customer service cases • Hotlist tasks and appointments • User-defined fields • Notes • Company Library documents • Dashboard Depending on the type of device you are using, the screens and procedures may vary slightly. Compatible Devices and Browsers LIn order for Wireless Access to display properly on devices, you should enable JavaScript and HTML tables in your web browser. Several devices are compatible with Wireless Access. Check with either Maximizer Software Inc. or your Business Partner for compatibility before deployment. Any HTML web browser is compatible with Wireless Access including the following: • Go.Web for RIM devices • Palm Web Pro for Palm devices • Pocket Internet Explorer for Windows CE devices • Opera for SmartPhones/PDAs • Safari for Apple iPhone Visit the Maximizer website at www.maximizer.com for the most up to date list of supported browsers. Chapter 9 Using Wireless Access Log In to Wireless Access ➤ To log in to Wireless Access On your device, enter the URL for the site into your browser as follows: <Server Name>/MaximizerWireless e.g., http://wirelessweb.maximizer.com/maximizerwireless Select the Address Book, enter your User ID and Password (Maximizer User ID and Password), and then click Enter. The Wireless Access home page appears. 341 342 Maximizer CRM 10.5 User’s Guide Navigate Pages From each of the main Wireless Access pages, you can use the navigation footer to move to the Address Book, Opportunity, Customer Service, Calendar/Hotlist, and Company Library pages. You can also use the Back and Home buttons to navigate the site. You can navigate pages in the following ways: From the Wireless Access home page, click the associated link to access the Address Book, Opportunities, Customer Service, Calendar/Hotlist, Company Library, Dashboard and Preferences pages. From the navigation footer on any of the main pages in Wireless Access, click the Address Book, Opportunity, Customer Service, Calendar/Hotlist, or Company Library icons. Click the Back and Home icons to return to a previous page or go to the Wireless Access home page. Chapter 9 Using Wireless Access 343 Accessing Address Book Entries You can access the Address Book page in the following ways: From the Wireless Access home page, click Address Book. From the navigation footer on the main pages, click the Address Book icon. Search for Address Book Entries You can search for Address Book entries by last name, first name, company name, phone number, or email address in Wireless Access. You can also perform a Quick Search to search for Companies, Individuals, or Contacts directly from the main page. With the Quick Search you can search by Company name or by last name. You can also retrieve all Address Book entries in a Favorite List. See “Using Favorite Lists” on page 376 for more information. ➤ To search for Address Book entries Open the Address Book page. In the Search By drop-down list, select the field that you want to search for. In Search For field, enter the text to search for. In the Matching area, select the types of entries you want to retrieve—Company, Individual, or Contact. 344 Maximizer CRM 10.5 User’s Guide Click Search. The page displays a list of matching Address Book entries. Chapter 9 Using Wireless Access 345 ➤ To perform a Quick Search In the Search Company by Name or Search Person by Last Name field on the Wireless Access home page, enter the name of the Company or person. Click Search. The page displays a list of matching Address Book entries. View Address Book Entries You can view the details of existing Address Book entries in Wireless Access. You can access Address Book entries from searches, from Favorite Lists, or from open opportunities, customer service cases, appointments, and tasks associated with the Address Book entries. 346 Maximizer CRM 10.5 User’s Guide ➤ To view an Address Book entry • After performing a search or retrieving a Favorite List, click on the entry to open it. – or – LThe links in the View section work only if JavaScript is enabled on your device. You can disable the View section in your Navigation Preferences. If the View section is not visible, select View > Company from the Actions drop-down list. • In the View section at the top of an open opportunity, click Company. – or – • In an open case or appointment, click the link to the Address Book entry. – or – • From the Actions drop-down list in an open task, click View Company/Individual/Contact. The page displays all the fields that have values for the Address Book entry. Chapter 9 Using Wireless Access 347 Add New Address Book Entries You can add new Companies and Individuals from the main Address Book page. You can add Contacts from existing Address Book entries. ➤ To add a Company or an Individual From the Address Book page, click Add New Company/ Individual. The New Company or New Individual page opens. Enter the basic information for the Company or Individual. When you are finished, click OK. The Company Information or Individual Information page opens displaying all the fields that have values for the Company or Individual. 348 Maximizer CRM 10.5 User’s Guide ➤ To add a Contact Open an existing Company or Individual. From the Actions drop-down list, select Add > Contact and click Go. The New Contact page opens. Enter the basic information about the Contact. When you are finished, click OK. The Contact Information page opens displaying all the fields that have values for the Contact. Chapter 9 Using Wireless Access 349 Phone Address Book Entries You can phone Address Book entries from the list of entries after performing searches or retrieving Favorite Lists or from open entries. ➤ To phone an Address Book entry LEntries’ phone numbers are displayed only if the column setup includes a phone number field. Your administrator can specify the column setup used in Wireless Access. • In a list of entries, click on the phone number next to the entry. – or – In an open entry, click on the phone number that you want to call. You can choose any phone number that’s specified for the entry. Draw Maps You can quickly draw a map showing the location of an Address Book entry or of the Address Book entry associated with an opportunity or customer service case. ➤ To draw a map of an Address Book entry Open an Address Book entry, opportunity, or customer service case. From the Actions drop-down list, select Draw a Map and click Go. Choose an online map site and click Go. The map to the Address Book entry’s location appears. 350 Maximizer CRM 10.5 User’s Guide Modifying Entries You can modify Address Book entries, customer service cases, appointments, tasks, and notes in Wireless Access. ➤ To modify an entry Open the entry. From the Actions drop-down list, select Modify and click Go. Modify any of the fields. When you are finished, click OK to save the changes. Chapter 9 Using Wireless Access 351 Select Products/Services and Categories LFor more information on displaying products/services and categories see Maximizer Help and Administrator Help. You can select products/services and categories for customer service cases and appointments. ➤ To select products/services and categories for an entry Open the entry. From the Actions drop-down list, select Edit > Products/ Services or Edit > Categories and click Go. The Select values for Products/Services or the Select values for Categories page opens. Select values for the products/services or categories for the entry. Click OK. The items you select are displayed in the entry. 352 Maximizer CRM 10.5 User’s Guide Sending and Saving Email Messages In Wireless Access you can send email to Address Book entries and save the email messages in Maximizer. In addition to the typical email functionality of your wireless device, you can save email messages as notes or documents with Address Book entries. You can send email to Address Book entries in Wireless Access from open entries or from the list of entries after performing a search or retrieving a Favorite List. ➤ To send an email message to an Address Book entry In a list of entries, click on the email address next to the entry. You can choose only the main email address for the entry. – or – In an open entry, click on an email address. You can choose any email address that’s specified for the entry. The Send Email page opens. By default, the current Address Book entry’s email address is included in the To field. To add additional Address Book entries, click the To, Cc, or Bcc button, and search the Address Book. • In the Search by drop-down list, select Last Name or Company. • In the Search for field, enter the text to search for, then click Search. • In the Entries available for assignment section, select the Address Book entries that you want to add to the email. Click OK when you are finished. Specify a subject and body text for the email message. In the Logging section, specify your logging options. LYour logging options for email must be enabled for notes in your user preferences in Maximizer (Preferences > Logging tab) for the logging options to work properly. • Save body text of an email message that is sent to an Address Book entry as a note in the Notes window or as a document in the Documents window. • Specify default text to be included as part of a note. Chapter 9 Using Wireless Access Click Send. 353 354 Maximizer CRM 10.5 User’s Guide Accessing Opportunities You can access the Opportunities page in the following ways: From the Wireless Access home page, click Opportunities. From the navigation footer on the main pages, click the Opportunities icon. Search for Opportunities You can search for Opportunities by Company name and you can filter your searches by opportunity status in Wireless Access. You can also retrieve all opportunities in a Favorite List. See “Using Favorite Lists” on page 376 for more information. ➤ To search for an opportunity Open the Opportunities page. In the Status drop-down list, select the status of the opportunity or select All Opportunities. In the Company field, specify the name of the company that the opportunity is associated with. Chapter 9 Using Wireless Access 355 Click Search. All opportunities matching the search criteria are displayed. View Opportunities You can view the details of existing opportunities in Wireless Access. You can access opportunities from searches, from Favorite Lists, or from Address Book entries associated with the opportunities. ➤ To view an opportunity From the Opportunities page, perform a search or retrieve a Favorite List. – or – LThe links in the View section work only if JavaScript is enabled on your device. You can disable the View section in your Navigation Preferences. If the View section is not visible, select View > Opps from the Actions drop-down list. In the View section at the top of an open Address Book entry, click Opps. 356 Maximizer CRM 10.5 User’s Guide Click on the opportunity to open it. The page displays all the fields that have values for the opportunity. Chapter 9 Using Wireless Access 357 Accessing Customer Service Cases You can access the Customer Service page in the following ways: From the Wireless Access home page, click Customer Service. From the navigation footer on the main pages, click the Customer Service icon. Search for Cases To view customer service cases, you can search by the case status and by the assigned user. You can also retrieve a Favorite List. For more information on Favorite Lists see “Using Favorite Lists” on page 376. ➤ To search for a case Open the Customer Service page. In the Status drop-down list, select the status of the case that you want to retrieve or select All Cases. In the Assigned to drop-down list, select the Maximizer user that the case is assigned to, or select the empty field to retrieve cases assigned to all users. 358 Maximizer CRM 10.5 User’s Guide Click Search. The page displays all cases matching the search criteria. Chapter 9 Using Wireless Access 359 View Cases You can view the details of existing customer service cases in Wireless Access. You can access cases from searches, from Favorite Lists, or from Address Book entries associated with the cases. ➤ To view a case From the Customer Service page, perform a search or retrieve a Favorite List. – or – LThe links in the View section work only if JavaScript is enabled on your device. You can disable the View section in your Navigation Preferences. If the View section is not visible, select View > Cases from the Actions drop-down list. In the View section at the top of an open Address Book entry, click Cases. Click on the case to open it. The page displays all of the fields that have values for the case. 360 Maximizer CRM 10.5 User’s Guide Add New Cases You can add new customer service cases from Address Book entries or from existing customer service cases. When you create a new case from an existing case, the Address Book entry associated with the original case is also associated with the new case. ➤ To add a new case Open the existing entry. From the Actions menu in an Address Book entry, select Add > Case. – or – From the Actions menu in a case, select Create a New Case. The Select Values for Products/Services page opens. Select the Products/Services for the case, and click Next. If Category is a mandatory field, the Select Values for Categories page opens. If Category is not a mandatory field, skip to Step 5. Select the Categories for the case, and click Next. The remaining case information is displayed. Mandatory fields are marked with asterisks (*). Enter the remaining fields for the case. Click OK to save the case. If you associate the case with a Company or Individual, you can associate a Contact with the case only after creating the case. For more information, see “Associate Contacts with Cases” on page 361. Chapter 9 Using Wireless Access 361 Associate Contacts with Cases You can change the Contact associated with an existing case or add a Contact to a case that is associated to only a Company or Individual. ➤ To associate a Contact with a case Open the case. From the Actions drop-down list, select Edit > Contact and click Go. The Modify Contact page opens showing the currently selected Address Book entry and Contact. You can search for other Contacts to associate with the case. In the Search by drop-down list, select Last Name or Company. In the Search for field, enter the text to search for, and click Search. The page refreshes and displays the Contacts matching the search criteria. Select the Contact, and click OK. The Contact is added to the case. 362 Maximizer CRM 10.5 User’s Guide Assign, Escalate, and Resolve Cases You can assign, escalate, and resolve customer service cases in Wireless Access. When you assign cases, you can reassign the cases to any customer service team member. When you escalate cases, you can reassign the cases to only managers. When you resolve cases, you can specify billing information. You can automatically notify the assigned user, the case owner, and the Address Book entry when the case is reassigned or resolved. And you can create a Hotlist task to check on the case when the case is reassigned. ➤ To assign, escalate, or resolve a case Open the case. From the Actions drop-down list, select Action > Resolve/ Assign/Escalate and click Go. In the Assignment area, select the Maximizer user that you are assigning the case to, select the status of the case, and enter a note to accompany the case. – or – In the Case Resolution Information area, select the status of the case, specify the billing information, and enter a note to accompany the case. In the Actions area, specify whether or not you want to apply a follow-up action. Click OK. If you select to assign/escalate/resolve the case without a followup action, the changes are saved to the case. If you select to apply a follow-up action, the Follow-up Actions page opens. Select the follow-up actions that you want to apply to the case— Notify the assigned user by email, Notify the case owner by email, Notify the Address Book entry by email, or Create Hotlist task for myself to check on this case. Chapter 9 Using Wireless Access Click OK. The changes are saved to the case and the selected actions are automatically applied. 363 364 Maximizer CRM 10.5 User’s Guide Accessing User-Defined Fields You can view and modify user-defined fields associated with Address Book entries, opportunities, and customer service cases. ➤ To view and modify user-defined fields LThe links in the View section work only if JavaScript is enabled on your device. You can disable the View section in your Navigation Preferences. If the View section is not visible, select View > UDFs from the Actions drop-down list. Open the entry. In the View section at the top of the entry, click UDFs. The User-Defined Field List page opens. The list may be empty if values are not yet selected for any of the entry’s user-defined fields. To view the blank user-defined fields click Show blank fields. The list displays all user-defined fields for the type of entry. To modify a user-defined field, click on the user-defined field. Then, enter or select a new value, and click OK. The user-defined field is updated. Chapter 9 Using Wireless Access 365 Accessing Notes You can access notes associated with Address Book entries, opportunities, and customer service cases in Wireless Access. ➤ To view a note LThe links in the View section work only if JavaScript is enabled on your device. You can disable the View section in your Navigation Preferences. If the View section is not visible, select View > Notes from the Actions drop-down list. Open the entry. In the View section at the top of the entry, click Notes. In the Type drop-down list, select the type of note that you want to view, or select All Notes. In the Category drop-down box, select the category that the note belongs to, or select All Categories. Click Search. Notes matching the search criteria are returned. For long lists, you can click Next or Previous at the bottom of the page to view more notes. Click on the note to view its details. 366 Maximizer CRM 10.5 User’s Guide Add Notes You can add new notes to existing Address Book entries, opportunities, and customer service cases. ➤ To add a note Open the entry. From the Actions drop-down list, select Add > Note. The New Note page opens. In the Full Access and Read Access drop-down lists, select the user or group that has access rights to the note, or select Public to give full access or read access to all Maximizer users. You can also change the date and time of the note and assign a category to the note. In the Text field, enter the text for the note. Click OK to save the note. Chapter 9 Using Wireless Access 367 Accessing Documents You can access documents attached to Address Book entries, opportunities, and customer service cases in Wireless Access. ➤ To access a document attached to an entry LThe links in the View section work only if JavaScript is enabled on your device. You can disable the View section in your Navigation Preferences. If the View section is not visible, select View > Docs from the Actions drop-down list. Open the entry. In the View section at the top of the entry, click Docs. In the Name field, enter the name of the document. Or leave the field blank to retrieve all documents. In the Category drop-down list, select the document’s category. Or select All Categories. Click Search. Documents matching the search criteria are returned. For long document lists, you can click Next or Previous at the bottom of the page to view more documents. Click on the document to view its details. 368 Maximizer CRM 10.5 User’s Guide Once the document entry is open, you can use the Actions dropdown list to delete it and send it by email. For more information on sending email in Wireless access, see “Sending and Saving Email Messages” on page 352. Accessing Calendar Appointments and Hotlist Tasks You can access the Calendar / Hotlist page in the following ways: From the Wireless Access home page, click Calendar / Hotlist. From the navigation footer on the main pages, click the Calendar / Hotlist icon. View Calendar LThe default calender view follows the settings in Maximizer preferences ((File > Preferences > Calendar/ Hotlist.) If the default calendar view in Maximizer is monthly or weekly list, the default calendar view in Wireless Access is set to weekly. You can view the Calendar/Hotlist in Daily or Weekly view mode. Use the back and forward arrows to move between days or weeks. You can also go directly to a specific date or week by using the Date Picker. To open the Date Picker, click the date link below the Actions drop-down list. Chapter 9 Using Wireless Access ➤ To change the calendar view Open the Calendar/Hotlist. From the Actions drop-down list, select View Daily or View Weekly and click Go. 369 370 Maximizer CRM 10.5 User’s Guide View Appointments and Tasks You can view the details of appointments and tasks in Wireless Access. You can access appointments and tasks from the Calendar or from Address Book entries, opportunities, or customer service cases associated with the appointments and tasks. ➤ To view an appointment or task LTo go back to the calendar view, click the Back icon. Open the Calendar/Hotlist. Locate the appointment or task in the Daily or Weekly view. Click the appointment or task that you want to view. The page displays details of the appointment or task. Chapter 9 Using Wireless Access 371 ➤ To view an appointment or task associated with an entry LThe links in the View section work only if JavaScript is enabled on your device. You can disable the View section in your Navigation Preferences. If the View section is not visible, select View > Appts/Tasks from the Actions drop-down list. Open the entry. In the View section at the top of the entry, click Appts or Tasks. All appointments or tasks associated with the entry are displayed. Click the appointment or task that you want to view. The page displays details of the appointment or task. In appointments, the Appt with: section displays all Address Book entries assigned to the appointment. Entry information includes name, phone number, and email address. 372 Maximizer CRM 10.5 User’s Guide Add Appointments and Tasks You can add personal appointments or tasks. And you can add appointments or tasks associated with Address Book entries or customer service cases. When you add an appointment, the Date, From, and Until fields are filled in automatically, but you can change them if necessary. The Subject field is mandatory and cannot be left blank. ➤ To add a personal appointment or task Open the Calendar. From the Actions drop-down list, select New Appointment/ Task and click Go. Enter the appointment or task details and click OK. ➤ To add an appointment or task associated with an entry Open the entry. From the Actions drop-down list, select Add > Appointment/ Task and click Go. Enter the appointment or task details and click OK. When you create an appointment for a Contact, a link is added to the Contact’s email address in the appointment details. Click the link to compose an email message to the Contact. See “Sending and Saving Email Messages” on page 352 for more information. If your device supports automatic dialing, you can click the Contact’s phone number in the appointment details to make a call. See “Phone Address Book Entries” on page 349 for more information. Chapter 9 Using Wireless Access 373 Accessing the Company Library You can access the Company Library page in the following ways: From the Wireless Access home page, click Company Library. From the navigation footer on the main pages, click the Company Library icon. ➤ To browse in the Company Library Click on a folder to open it and display its contents. In the folder path, click on a parent folder to navigate to a folder further up in the hierarchy. 374 Maximizer CRM 10.5 User’s Guide Search for Documents in the Company Library You can search for Company Library documents by file name, author, creation date, and last modified date. You can search the entire Company Library or you can search a specific folder. ➤ To search for a document in the Company Library Open the Company Library page. To narrow your search to a specific folder, navigate to the folder. From the Actions drop-down list, select the type of search you want to perform—File Name, Author, Creation Date, or Last Modified Date. Click Go. The Document Search page opens. Specify the search criteria. In the Scope of Search area, choose either to search the entire Company Library or to search only the current folder. Click OK. The search results are displayed. Chapter 9 Using Wireless Access 375 Send Company Library Documents to Address Book Entries You can send Company Library documents to Address Book entries by email in Wireless Access. ➤ To send Company Library documents In the Company Library page, select the documents that you want to send. From the Actions drop-down list, select Email document(s) and click Go. The Send Email page opens with the documents attached to the email message. Specify the recipient, the subject, the body, and the logging options for the email message. See “Sending and Saving Email Messages” on page 352 for more information. Click Send. 376 Maximizer CRM 10.5 User’s Guide Using Favorite Lists LTo modify a Favorite List you must have the necessary access rights. You can access Favorite Lists from the Address Book, Opportunities, and Customer Service pages. You can also modify Favorite Lists by adding or removing entries. ➤ To access a Favorite List • In the Address Book, Opportunities, or Customer Service page, select a Favorite List from the Favorite Lists drop-down list and click Search. The entries for the Favorite List are displayed. ➤ To add an entry to a Favorite List Open the entry that you want to add to the Favorite List. From the Actions drop-down list, select Favorite Lists > Add and click Go. The Add current entry to Favorite List page opens. Select the Favorite List you want to add the entry to, and click OK. The entry is added to the Favorite List. ➤ To remove an entry from a Favorite List Open the entry that you want to remove from the Favorite List. From the Actions drop-down list, select Favorite Lists > Remove and click Go. The Remove current entry from Favorite List page opens. Select the Favorite List you want to remove the entry from, and click OK. The entry is removed from the Favorite List. Chapter 9 Using Wireless Access 377 Viewing Dashboard You can view Dashboard in Wireless Access. To view Dashboard, you must be a member of the Dashboard Users security group. You can view only dashboards that are published to the Wireless Access site. For information on publishing dashboards to Wireless Access, see the Maximizer CRM Administrator’s Guide. ➤ To view Dashboard in Wireless Access On the Wireless Access home page, click Dashboard. Select a dashboard from the drop-down list and click Go to view a different dashboard. 378 Maximizer CRM 10.5 User’s Guide Setting Wireless Access Preferences You can change your navigation preferences and your MaxMobile synchronization settings from the Preferences page in Wireless Access. The navigation preferences determine if the view actions are displayed as links or displayed in the Actions drop-down list. ➤ To change the navigation preferences On the Wireless Access home page, click Preferences. Under Wireless Access preferences, click Navigation. Select or clear the Display View actions as links option. • To display the actions as links in open entries, select the option. • To display the actions in the Actions drop-down list, clear the option. Click OK. Change MaxMobile Synchronization Settings LNote that, as a user, you must be enabled for MaxMobile in user preferences to access these settings. You must also have the “Allow sync contacts with external clients” user privilege to be able to access Address Book, Opportunity, Customer Service, Note, and Document synchronization options. You can edit MaxMobile synchronization settings from Maximizer Wireless Access. To mark entries for synchronization with your Mobile device, you must first assign them to a Favorite List. ➤ To change MaxMobile synchronization settings On the Wireless Access home page, click Preferences. From the MaxMobile synchronization settings list, click on the Address Book link. To synchronize Address Book, opportunity, and customer service case entries, select the Synchronize Address Book entries option, and select the Favorite List for synchronization of Address Book entries. Note that the Synchronize Address Book entries option controls the synchronization of Address Book, opportunity, and customer service case entries. The option also controls the synchronization of notes and documents. You must select this option first before you can set synchronization settings for all of these types of entries. Chapter 9 Using Wireless Access 379 Click OK when you are finished setting the Address Book entry synchronization settings. For the synchronization of opportunities, cases, notes, and documents, clicking on any of the module links opens the synchronization settings in read-only mode. Click on the module link and then click the Edit button to edit the settings. You must also select a Favorite List for opportunities and cases. For each of the modules, specify the details for synchronizing notes, documents, and user-defined fields. For more information on notes, documents, and user-defined fields, see the corresponding sections of this guide. For the synchronization of appointments and tasks, click on the Appointments and/or Tasks link and specify the details. Specify your Conflict resolution settings. These settings determine whether Maximizer fields overwrite MaxMobile fields, or MaxMobile fields overwrite Maximizer fields, when changes have been made in both Maximizer and MaxMobile. 380 Maximizer CRM 10.5 User’s Guide CHAPTER Maintaining Your Address Book 10 Maintain Your Address Book In this chapter... “Setting Your Maximizer Preferences” on page 382 “Customizing Maximizer Toolbars and Toolbar Buttons” on page 385 “Backing Up Your Address Book Data” on page 389 “Exporting Address Book Records” on page 390 “Importing Address Book Data from MXI or XML Files” on page 399 “Importing Address Book Entries” on page 402 “Transferring Entries between Address Books” on page 407 10 382 Maximizer CRM 10.5 User’s Guide Setting Your Maximizer Preferences The Preferences dialog box in Maximizer is where you can personalize how Maximizer works for you. This dialog box has various settings that provide a great deal of flexibility in how you work—in other words, Maximizer adapts to the way you want to work. ➤ To set your Maximizer preferences LFor detailed information, select the tab you are interested in and press F1 for a description of each item. Select File > Preferences. Click the tab that corresponds to the area of Maximizer you want to configure. Each tab represents a different area of the program. The options you can set include the following: • System defaults such as Outlook calendar integration options • Date, time, and mailing address formats • Calendar and Hotlist preferences, including the sending of email to appointment attendees • Email options, such as to use text or HTML when composing messages • Viewing preferences for My Work Day (Overview Page) • Dialing options for phones and modems • Transfer options • Printing options for envelopes, labels, and reports • Faxing options (DDE settings for your fax software) Chapter 10 Maintaining Your Address Book 383 ➤ To set your user preferences LFor detailed information, select the tab you are interested in and press F1 for a description of each item. LUser preferences override the general Address Book preferences (File > Preferences). Select File > Users > [your user ID] > Properties, and click the Security tab. These access rights are set up in Administrator. Although you cannot change these settings, it’s useful to know your access rights. The options you can set include the following: • Logging for common actions and activities • Outlook Synchronization for synchronizing your Address Book data • Date, time, and mailing address formats • Calendar and Hotlist preferences, including the sending of email to appointment attendees • Dialing options for phones and modems • Page layout options for printing envelopes, labels, and reports • Faxing options and read-only preferences for page margins • Email options, such as to use text or HTML when composing messages • HTML printing options • Viewing preferences for My Work Day To change your password, choose Users from the File menu, select your user ID, and click Password. Enter your password and enter it again to confirm the change. If you are running Maximizer on a SQL database, and have several Address Books on the SQL server, each of your passwords 384 Maximizer CRM 10.5 User’s Guide must be identical. When you change one password, Maximizer will prompt you; select “Yes” to change the other passwords. Chapter 10 Maintaining Your Address Book 385 Customizing Maximizer Toolbars and Toolbar Buttons LTo change the properties of an existing custom toolbar or toolbar button, select View > Toolbars, select the custom toolbar and click Customize. You can then select a specific button to modify its properties. From a Maximizer custom toolbar you can perform specific actions such as launching another application or performing a specific search that was saved in your search catalog. ➤ To add a custom toolbar and button Select Toolbars from the View menu, or right-click in any frame containing a toolbar and select Customize from the shortcut menu. The Toolbars dialog box appears. To create a new Custom toolbar, click Add. To add a button to an existing Custom toolbar, select that toolbar and then click Customize. The Customize Toolbar dialog box appears. Click Add. The Add Toolbar Button dialog box appears. Under This new button will perform the following action, select one of the following options, and then click Next. • Browse a website To add a button to browse a specific website or website document (usually beginning with http:// or www), select this option. 386 Maximizer CRM 10.5 User’s Guide • Open a document or application To add a button to start an application such as a word processor, spreadsheet, graphics program, or to open a specific document or file, select this option. • Start a user-defined field for an Address Book entry This option enables you to set up a relationship between an alphanumeric user-defined field and a toolbar button. When the toolbar button is clicked, the value of the specified UDF is treated as the fully qualified name of a document or an application that is to be started (opened). • Run a Maximizer macro/No macros present in current Address Book To add a button to run a Maximizer macro, select this option. This option is grayed out if no macros are present in the current Address Book. • Draw a graph from a defined graph catalog/No saved graphs in current Address Book To add a button to run a graph that has been saved in the graph catalog, select this option. The option is grayed out if no graphs have been saved in the catalog. • Retrieve a search catalog in [window] To add a button to perform a search that has been saved in the search catalog, select this option. Also choose the window to which the search pertains from the drop-down list. For example, if you have created a search catalog entry for searching in the Customer Service window, select Customer Service. Take one of the following actions: • If you have chosen to Browse a website or Open a Document or an Application, type the path of the document/application or web address (URL). Or, click the browse button to locate the document/application or URL to run. If you would like an application to open a specific file, make sure that the Chapter 10 Maintaining Your Address Book 387 application path is enclosed in double quotes and put a space after the path of the application. For example, to launch WordPad and open the file Notes.txt, in the Document/ Application text box type the following: “C:\ProgramFiles\Accessories\WordPad.exe” C:\Notes.txt To load a new instance of an already running program, click the Load new instance checkbox. • If you are launching a user-defined field, macro, graph, or saved search, select it from the drop-down list. The lists contain all user-defined fields, macros, graphs, and saved searches in the current Address Book. Edit the Tooltip and Status Bar Help text if you wish, and then click Next. Select the type of icon you would like to display in the toolbar, and then click Finish or Next depending on the option you chose. If you choose to display the default icon, Maximizer will select the icon automatically and you may go on to step 8. If you choose to use a Standard Maximizer icon, select one of the available icons. If you choose to use an External Bitmap, locate the image using the browse button. Click Finish. 388 Maximizer CRM 10.5 User’s Guide You can change the position of the new button on the toolbar using the Move Button Left or Right arrows. Click OK and then click OK again to close the Toolbars dialog box. You can customize Maximizer menus if you have any of the Maximizer Customization Suites installed. See the Customization Suite API Guide for further information. Chapter 10 Maintaining Your Address Book 389 Backing Up Your Address Book Data The procedures vary depending on the Maximizer CRM Edition you are running. Follow the corresponding instructions. Maximizer CRM Professional Edition and Maximizer CRM Enterprise Edition For detailed instructions on backing up an Address Book, see the Maximizer CRM Administrator’s Guide or your Microsoft SQL Server documentation. (Open the Microsoft SQL Server Enterprise Manager Help and look up “backing up” in the index.) Maximizer CRM Group Edition Back up your Address Book on a regular basis. If a problem occurs and you have to restore your data, you will have to re-enter all of the information since that backup. While one backup copy is often enough, you may want to keep two or three copies on a rotating basis. You can store your backup files on a network or on removable media such as a backup tape. You should always have one backup off-site. In Maximizer you can perform only a Quick Backup. In Administrator, there are two types of backup procedures available: LFor more information on performing a Quick Backup, refer to “Quick Backup” on page 498. • Regular Backup. This backup procedure requires the Address Book to be closed. See the Maximizer CRM Administrator’s Guide and Administrator Help for assistance. • Quick Backup. This backup procedure is performed on an open Address Book. You can use this backup method from either Administrator or Maximizer. If security is enabled, you will need access to the MASTER user password. 390 Maximizer CRM 10.5 User’s Guide Exporting Address Book Records You can export Address Book entries, customer service cases, and Knowledge base articles from Maximizer, not Administrator. Export Address Book Entries LEncrypted user-defined fields cannot be exported. Exporting Address Book entries creates a text file or XML file containing information from the current Address Book. It exports any Companies and Individuals selected in the Address Book list. If no Address Book entries are selected, it exports all Companies and Individuals currently displayed in the list. XML Format LThe unique ID is exported with each Company or Individual, but unique IDs for contacts are not exported. By default, exporting Address Book entries in XML format exports name, address, phone number, email address, and company details information from the Basic Information tab of the selected Companies and Individuals (or all entries in the list if none are selected). You can then easily import this file into another Maximizer Address Book. You can optionally export the following additional information: LThese options are available for • Include contacts exports the contacts associated with the exported Address Book entries. • Include Customer Service Cases exports customer service cases associated with the exported Address Book entries. • Include Opportunities works the same way as Include Customer Service Cases from above. It exports Opportunities associated with the exported Address Book entries. • Include UDFs exports all Address Book user-defined fields associated with the exported Address Book entries, along with their attributes, and in the case of table user-defined fields, any items they contain. Keep in mind that exporting user-defined fields increases the length of time required for the export process, and not selecting this option improves speed. • Include notes exports notes associated with the exported Address Book entries, including date and time, owner, creator, type, and text fields. • Include documents exports documents associated with the exported Address Book entries, including date and time, document type, document name, creator, owner, as well as the document data itself. • Support non-English characters converts the contents of the exported XML file to Unicode format, which is required for XML export only, not CSV or tab-delimited exports. Chapter 10 Maintaining Your Address Book languages using more than one byte per character, such as Chinese. If you don’t select this checkbox, characters will be exported in ASCII format. ➤ To export Address Book entries in XML format In Maximizer, open the Address Book window. Select the Companies and Individuals to export. If you don’t select any entries, Maximizer will export all entries currently displayed in the Address Book list. Select File > Export > Address Book entries. The Export Address Book Entries dialog box opens. From the Format drop-down list, select XML. Click Browse. The Select Export File dialog box opens. 391 392 Maximizer CRM 10.5 User’s Guide Specify the destination location and file name for the exported file. In the Save as type drop-down list, select either MXI or XML. Click Save. Select any of the Export options, as needed. Each of the options is described before this procedure. Click OK. Maximizer exports the Address Book entries and additional data as selected in the options to the specified file. Comma-Separated Values or Tab-Delimited Format LUser-defined fields that contain more than one item are not supported in a CSV or tab-delimited export. Use XML export instead. Exporting to comma-separated values (CSV) format creates a file with a .CSV extension, which is readable by spreadsheets such as Microsoft Excel and many other programs. Exporting to tab-delimited format creates a text (.txt) file with tabs separating each field value. This file is readable by any program that supports .txt files. Exporting to these formats exports selected Companies and Individuals in the Address Book, but you do not have the option of exporting Contacts. Unlike XML format, exporting to CSV and tab-delimited format enables you to specify individual fields to export, including Address Book user-defined fields. You can also export Notes associated with the Companies or Individuals. You have the option of exporting all notes or most recent notes. Chapter 10 Maintaining Your Address Book 393 Selecting Fields for Export When exporting to CSV or tab-delimited format, you must select which fields to export, and in which order. The Select Fields for Export dialog box has two columns: the left column lists the Address Book entry basic fields, user-defined fields, and two fields for notes; the right column is initially blank. Select the fields to export from the left column and add them to the right column. The order of fields in the right column is the order in which they will be exported. If you need to change the order of any fields, select each one and click Remove to delete it from the list; then, in the right column, select the field after which you want to place another field. Fields added to the right column appear directly below the field currently selected in the right column. Once you have established the order of export fields as you would like it, you can click the Catalog button to save the export list for future exports. In the Export Catalog dialog box, click Add to create a new saved export list, or click Save to overwrite an existing export list. The Retrieve button opens an existing export list. ➤ To export Address Book entries in CSV or Tabdelimited format In Maximizer, open the Address Book window. Select File > Export > Address Book entries. The Export Address Book Entries dialog box opens. From the Format drop-down list, select Comma Separated Value or tab-delimited. 394 Maximizer CRM 10.5 User’s Guide Click Browse. The Select Export File dialog box opens. Specify the destination location and File name for the exported file. Verify that the format you selected previously appears in the Save as type field. Click Save. Select the DOS text checkbox to export data that is in DOS standard ASCII. If the data is in ANSI ASCII (Windows default), do not select the checkbox. If you want the field names to be exported as the first record in the exported file, similar to a headings row, select the Include field names as first record in export file checkbox. Chapter 10 Maintaining Your Address Book 395 Click OK. The Select Fields for Import dialog box opens. LFor more information about using the Select Fields for Export dialog box, refer to “Selecting Fields for Export” on page 393. From the Available Maximizer fields list, select the fields to export by selecting each field and clicking Add. – or – Click Catalog to retrieve a previously saved export list. Click Export to begin the export process. 396 Maximizer CRM 10.5 User’s Guide Export Customer Service Cases LYou can also export Customer Service Cases from the Export Address Book Entries dialog box, but doing so only exports cases associated with the exported Address Book entries. For more control over which cases are exported, use Export Customer Service Cases. You can export customer service cases, their associated Address Book entries, as well as any related user-defined fields, notes, or documents. Exporting customer service cases exports any cases that have been selected in the Customer Service window (or all cases in the list if none are selected). The export file can be either Maximizer XML Interface (MXI) or XML format. MXI and XML files are both in XML format. However, you can import into Maximizer with MXI files more easily than XML format. To import an MXI file, simply double-click the file and it automatically handles the import. The Export Customer Service Cases dialog box includes the following options: • Include UDFs exports all Customer Service user-defined fields associated with the exported cases, along with their attributes, and in the case of table user-defined fields, any items they contain. Keep in mind that exporting user-defined fields increases the length of time to export, and not selecting this option improves speed. • Include notes exports notes associated with the exported cases, including date and time, owner, creator, type, and text fields. • Include documents exports documents associated with the exported cases, including date and time, document type, document name, creator, owner, as well as the document data itself. • Support non-English characters converts the contents of the exported MXI or XML file to Unicode format, which is required for languages using more than one byte per character, such as Chinese. If you don’t select this checkbox, characters will be exported in ASCII format. ➤ To export customer service cases In Maximizer, open the Customer Service window. Select the cases to export. If you don’t select any cases, Maximizer will export all cases currently displayed in the Customer Service window. Chapter 10 Maintaining Your Address Book 397 Select File > Export > Customer Service Cases. The Export Customer Service Cases dialog box opens. Click Browse. The Save As dialog box opens. Specify the destination location and File Name for the exported file. From the Save as type drop-down list, select either MXI or XML, and click Save. The Save As dialog box closes. Select any of the Export options, as needed. Each of the options is described before this procedure. 398 Maximizer CRM 10.5 User’s Guide Click OK. Maximizer exports the customer service cases, associated Address Book entries, and additional data as selected in the options, to the specified file. Export Knowledge Base Articles LFor an explanation of MXI format, refer to the previous page. As with customer service cases, you can export knowledge base articles to either MXI or XML format. The resulting file contains the content of the article itself, as well as additional information, such as file name, file extension, keywords, product, status, and creator. ➤ To export knowledge base articles In Maximizer, open the Knowledge Base window. Select File > Export > Knowledge Base Articles. Specify the destination location and File Name for the exported file. From the Save as type drop-down list, select either MXI or XML. Click Save. Maximizer exports the knowledge base articles to the destination file. Chapter 10 Maintaining Your Address Book 399 Importing Address Book Data from MXI or XML Files You can use Administrator or Maximizer to import Address Book entries, customer service cases, knowledge base articles, and other data from MXI (Maximizer XML Interface) or XML Files. These MXI and XML files may have been created by exporting from Maximizer or by exporting the information from another source and converting it to XML using the Maximizer XML schema. For more information about the Maximizer XML Schema, refer to the Maximizer CRM Administrator’s Guide. After importing Address Book entries into Maximizer, you can identify the imported records by selecting View > Favorite Lists in the Address Book window. A list of imported Address Book entries is stored in a Favorite List named according to the file format and import date and time. About the MaxExchange Distribution field and XML Import When importing the MaxExchange Distribution field from an XML file, if the destination Address Book hasn't created the field already, a version of this field will be created in the Address Book during the XML import, but it will NOT be the system MaxExchange Distribution field, and therefore will not work with the MaxExchange product. If your XML file contains the MaxExchange Distribution field, please ensure that the destination Address Book has created the field already. (For information about creating the MaxExchange Distribution field, refer to the Maximizer CRM Administrator’s Guide.) This measure will ensure proper MaxExchange distribution in the destination Address Book. Also if the name of the MaxExchange Distribution field has been changed in the XML file, you must rename the field in the destination Address Book to match the name in the XML file before importing it. 400 Maximizer CRM 10.5 User’s Guide Import MXI or XML Files For more control over importing MXI files, or to import XML files, use the Advanced Import method described below, which enables you to specify a number of preferences about how to import the file. Note that customer service cases are always imported as separate records and are never merged with existing cases. ➤ To import from an MXI or XML file LAlways back up the Address Book before importing. Select File > Import > Advanced Import. For the File name field, click Browse and locate the .xml or .mxi file to import. Once you have selected the file to import, Maximizer fills in the Log File field automatically to create a log file with the same name and location as the import file. To change the default Log File, click Browse and provide an alternate log file location and/or name. ? For detailed information about any of the fields in this dialog box, press F1 while the dialog box is active. Select a Log Level from the drop-down list. Specify any additional import options in the other group boxes. Click OK to begin the import. Maximizer imports the data and then displays the number of records inserted, updated, and failed for each record type. Click OK to close the message box. Chapter 10 Maintaining Your Address Book 401 Import Knowledge Base Articles To import knowledge base articles that have been exported from Maximizer in MXI or XML format, use the Import Knowledge Base Articles functionality in Maximizer. Note that knowledge base articles are always imported as separate records and are never merged with existing articles. ➤ To import knowledge base articles LAlways back up the Address Book before importing. Select File > Import > Knowledge Base Articles. For the File name field, click Browse and locate the .xml or .mxi file to import. Once you have selected the file to import, Maximizer fills in the Log File field automatically to create a log file with the same name and location as the import file. To change the default Log File, click Browse and provide an alternate log file location and/or name. ? For detailed information about any of the fields in this dialog box, press F1 while the dialog box is active. Select a Log Level from the drop-down list. Click OK to begin the import. Maximizer imports the data and then displays the number of records inserted, updated, and failed for each record type. Click OK to close the message box. 402 Maximizer CRM 10.5 User’s Guide Importing Address Book Entries Use Administrator or Maximizer to import Address Book information from other sources. Some import methods are available only through Administrator. After importing Address Book entries into Maximizer, you can identify the imported records by selecting View > Favorite Lists in the Address Book window. A list of imported Address Book entries is stored in a Favorite List named according to the file format and import date and time. Administrator provides the following methods of importing data. The best import method depends on the type of data you are importing. • MXI or XML Files: Refer to “Import MXI or XML Files” on page 400 for more information. • Address Book Entries: This method imports entries from a text file that is created when you export from another application. Outlook, for example, can export its address book to a text file. When you import from a text file, you must choose to import all the entries as Companies/Individuals or as Contacts, or you can do a two-tier import to import Companies/Individuals first and then import the associated Contacts. • ACT! or GoldMine Database: Importing an ACT! or GoldMine database is straightforward as Maximizer can detect the ACT! or GoldMine database version and map the fields automatically. In Maximizer CRM Professional Edition and Maximizer CRM Enterprise Edition, this import method is available through Administrator only. In Maximizer CRM Group Edition, this import method is available through Administrator or Maximizer if you are logged in as the MASTER user. For information about importing from ACT! or GoldMine, refer to the Maximizer CRM Administrator’s Guide or Administrator Help (Help > Contents). • Other Contact Manager Database: This option enables you to import a variety of data file formats, including Organizer, Clipper, dBASE, FoxBase, and FoxPro, among others. or GoldMine database version and map the fields automatically. In Maximizer CRM Professional Edition and Maximizer CRM Enterprise Edition, this import method is available through Administrator only. In Maximizer CRM Group Edition, this import method is available through Administrator or Maximizer if you are logged in as the MASTER user. For information about importing from other contact manager databases, refer to the Maximizer CRM Administrator’s Guide or Administrator Help (Help > Contents). Chapter 10 Maintaining Your Address Book 403 Use the following tables to determine which import method to use. File Type Import Method(s) (File > Import > ...) ACT! 1.x, 2.x, 3.x, 4.x, 2000, 6.x (*.dbf) ACT! Database GoldMine 2.x, 3.x, 4.x, 5.x, 6.x (*.dbf), 6.x (MSSQL), 8.x (Firebird SQL, MSSQL) GoldMine Database Organizer 1.x (*.org) Other Contact Manager Database Delimited (*.txt, *.prn) Other Contact Manager Database Comma Delimited (*.csv) Tab Delimited (*.txt) Address Book Entries Clipper Summer '87 (*.dbf) Other Contact Manager Database Clipper 5.x (*.dbf) Other Contact Manager Database dBase III, III+, IV (*.dbf) Address Book Entries dBase V (*.dbf) Other Contact Manager Database Visual dBase 5.x (*.dbf) Other Contact Manager Database FoxBase/FoxBASE+ (*.dbf) Other Contact Manager Database FoxPro 1.x, 2.x (*.dbf) Other Contact Manager Database Visual FoxPro 3.x (*.dbf) Other Contact Manager Database 404 Maximizer CRM 10.5 User’s Guide Field Mapping LWhen you import from a recognized database type, such as GoldMine or ACT!, Maximizer automatically maps the fields for you. When importing some types of data files, you need to map—create an association between—the fields in the source file and the fields in Maximizer. Keep in mind that different applications name their fields differently. For example, the field for a company name is called “Company” in Outlook and “Company or Individual” in Maximizer. When you are importing a file type that requires you to map fields, a dialog box similar to the following opens. For each field in the source file (shown in the far right column), select one of the available Maximizer fields and, click Add to map the fields. Select a corresponding Maximizer field for every field in the source file. If there is no corresponding field, select <Skip Field> from the list of Maximizer fields. When you have finished mapping the fields, the Order of Import (middle column) displays the corresponding Maximizer field beside each field in the Fields from File column, as illustrated below. Chapter 10 Maintaining Your Address Book 405 Two-Tier Import LIf you import a Company record, and an existing Company record in the database has an identical “Company” field, then the records are considered duplicates, and Maximizer will not import the duplicate Company record. However, Maximizer will import duplicate Individual and Contact records. Many contact management programs keep two types of address book entries: • Companies • Contacts for Companies Maximizer keeps its Address Book entries organized in a similar way: • Companies/Individuals • Contacts (associated with a Company or Individual) The Import Address Book Entries function enables you to perform a two-tier import. In a two-tier import, you first import Company entries as Companies/Individuals Address Book entries, and then you import the people as Contacts. Two-tier importing is only applicable to comma-separated value files, tab-delimited files, dBase III, III+, or IV, or XML files using the File > Import > Address Book Entries command. ➤ To import Address Book entries (two-tier import) LAlways back up the Address Book before importing. From the File menu, select Import > Address Book Entries. The Import Address Book Entries dialog box opens. LUser-defined fields containing more than one available item are not supported in a CSV (comma-separated values) import. Use the Advanced Import feature or MTI (Maximizer Transfer Interface) as an alternative. Click Browse and locate the file to import. Select the Companies / Individuals option to import all records in the source file as Company or Individual Address Book entries. (After you complete this procedure, repeat it a second time to import the Contacts. If you choose not to do a two-tier import, just select either Companies / Individuals or Contacts.) In the Lead handling box, select the appropriate option for importing records as lead or non-lead Address Book entries. Click OK. The Select Fields for Import dialog box opens. 406 Maximizer CRM 10.5 User’s Guide In the Available Maximizer fields column, select the field that best corresponds to the first field in the Fields from file <file name> column, and click Add. Repeat this step until you have mapped all the fields from the source file to Maximizer fields. LTo exclude a field from being imported into Maximizer, add <Skip Field> to the middle column for that field position. For example, if the first field in the right column is First Name, select First Name from the Available Maximizer fields. The fields listed in the Available Maximizer Fields column is slightly different, depending on whether you selected Companies / Individuals or Contacts as the Type of Import in step 3. To convert text that is in capital letters (uppercase) into mixed case, select the Convert to name case option. Many comma-delimited data files use the first line as a column header. To exclude the first line from being imported, select the Do not import first record; it is a header option. LYou can save the field mapping for reuse by clicking the Catalog button. Click Import. The data from the source file now imports into Maximizer. Repeat this procedure a second time to import the second tier, except select Contacts instead of Companies / Individuals as the Type of Import in step 3. Chapter 10 Maintaining Your Address Book 407 Transferring Entries between Address Books LEncrypted user-defined fields cannot be transferred to another Address Book. Importing refers to copying data from an external database into a Maximizer Address Book. However, transferring refers to copying data between Maximizer Address Books. Transferring data is ideal for merging Address Books together and sharing entries and setups. Transfer rights can be set on a per-user basis, although some field transfer options apply to all users. What Happens During Transfers? LYou should never use Maximizer Email Transfer (MET) between two MaxExchange-synchronized computers. Using MET and MaxExchange in combination adds records twice on the destination computer—once through MET, and again through MaxExchange. LNote that each Address Book Once you start a transfer, Maximizer uses the following rules to determine which records to copy from the source Address Book into the target Address Book: • Address Book entry IDs — If an Address Book entry ID number from the source Address Book does not exist in the target Address Book, the Address Book entry is inserted into the target Address Book. • Address Book entry names — If the Address Book entry ID number from the source exists in the target Address Book, Maximizer compares the source and target Address Book entry names. entry has a unique ID. If the names are different, Maximizer changes the ID number in the target Address Book and inserts the entry as a new Address Book entry. If the Address Book entry names are the same, they are considered to be duplicate entries. In this case, Maximizer merges duplicate Address Book entries in the target Address Book. • Date and Time — Maximizer also checks the date and time of the record. It will not overwrite data in the target Address Book that has been modified more recently than the data in the source Address Book. Transfer Address Book Entries ? For more information about transferring other information such as column setups, see Maximizer Help. By default, when you transfer Companies or Individuals, the following are included—all associated Contacts, user-defined fields, notes, files, appointments, Hotlist tasks, orders (not available for SQL), and opportunities. Encrypted user-defined fields and customer service cases cannot be transferred. 408 Maximizer CRM 10.5 User’s Guide ➤ To transfer Address Book entries LTo see if you have transfer and export rights, go to File > Users (select your user ID) > Properties > Security. In the Address Book window, select the entries you want to transfer. Select File > Transfer > Address Book entries. Select Direct Address Book Access or Email as the transfer method. If you have chosen to transfer your Address Book entries using Direct Address Book access, select the target Address Book before clicking OK. A login dialog box appears. Type your user ID and password to log in to the target Address Book, and click OK. The Transfer Address Book Entries dialog box appears. Select the transfer options. For example, you can choose to include or not include user-defined fields, documents, notes, appointments, Hotlist tasks, orders, and simple opportunities (not using a strategy). Enter a note to be logged for each Address Book entry affected by the transfer if necessary. To set the advanced options, click the Advanced button. See the F1 Help for more information on each available option. Click OK to begin. When Maximizer finishes, the Transfer Summary displays the results of the transfer. If you chose to send the data by email, Maximizer prepares the transfer file (with an.MET extension) as an email file attachment and displays the Compose Mail Message dialog box. Enter the email address where you would like the transfer sent. See the Chapter 10 Maintaining Your Address Book 409 Maximizer Help topic, Receiving Maximizer Data by Email, for detailed instructions on receiving a transfer by email. Transfer Summary Reports and Logging Each time you transfer Address Book entries, Maximizer displays a transfer summary report. The report indicates the number of data items inserted, modified, bypassed, and deleted. It also displays the transfer setting used and other related information. You can print this report for your records. As well, for each Address Book entry updated in the target Address Book, Maximizer can, optionally, add a note. The note summarizes the fields that have been added, changed, and deleted. This feature can also be used if you want to find the data that has been added or modified. After a transfer, simply do a search by notes. 410 Maximizer CRM 10.5 User’s Guide CHAPTER Reporting and Graphing 11 Report and Make Graphs on the Progress of Your Business In this chapter... “What is Reporter?” on page 412 “Crystal Reports” on page 416 “Printing Reports from Maximizer” on page 419 “Exporting Entries to Microsoft Excel” on page 421 “Graphing and Charting with Maximizer” on page 422 11 412 Maximizer CRM 10.5 User’s Guide What is Reporter? LYou can get help while using Reporter by selecting Help > Contents. The success of any marketing strategy or campaign depends on the ability to monitor your progress and some sort of a built-in improvement mechanism. Using the vast flexibility of Reporter, you are guaranteed increasing effectiveness. No matter where you are in the world, you have access to what's going on in your company and the ability to report on real-time statistics. Generate Your Reports Anywhere LReporter is available if you are running Maximizer on a SQL database. Check with your system administrator. Reporter's flexibility allows you to generate reports from any Internet-connected computer. When you open Reporter in Maximizer, your list of reports is displayed inside the browser window. This is the normal mode of using Reporter and requires no additional setup by your system administrator. Because Reporter is HTML-based, you can access your reports from anywhere in the world, provided you have met the following conditions: • Your computer has an Internet connection and a web browser. • Your system administrator has configured Microsoft Internet Information Server to allow external access to Reporter. Your list of reports appears in a web browser much as it does within the Reporter module. Print, Save, and Edit Your Reports After generating a report, you can easily print the report to your local or network printer. You can also save your reports to a file in one of a few popular formats for later editing. These file formats include Crystal Reports, Microsoft Word, Microsoft Excel, and Rich Text Format. Access Reporter Through a Web Browser LContact your system administrator to find out the URL (the address) of Reporter. If you have access to Maximizer Web Access, click the Reporter icon. Reporter is designed so you can generate reports on your data via the Internet or your company's intranet. You only need a computer with an Internet (or intranet) connection and a web browser, such as Internet Explorer or Netscape Navigator. In the case of Internet access, your system administrator must configure your Microsoft Internet Information Server (IIS) to allow external access to the “Reporter” virtual directory; otherwise, Reporter is only accessible internally (within your company's LAN). Chapter 11 Reporting and Graphing 413 Intranet Access If you are on the same network (LAN) where your IIS server is located, you can open your browser and type the following into the Address field: http://<Server Name>/Reporter/Start.asp The “<Server Name>” is the computer name of the IIS server on your company's network. If you know the server's IP address, you can enter that in place of the server name. Internet Access Reporter is only accessible via the Internet if your system administrator has configured the IIS server to allow external access to Reporter. For security reasons, external access to Reporter may not be desirable. At an Internet-connected computer, type the following in your web browser's Address line: http://<Server URL>/Reporter/Start.asp The “<Server URL>” is the domain URL or IP address of your company's IIS server. Generate Reports using Reporter LFor a more detailed description of the report types available in Reporter, open Reporter Help and look up “Report Types” in the index. Reporter’s browser-based window allows you to easily select and print the report you want. The navigation bar organizes the many pre-formatted reports by subject. Reports on your Address Book entries and opportunities are listed under “Maximizer Reports (Column Style or Graphical Style)”. Similarly, you can obtain reports on your marketing activities under Traditional and Automated Campaign Reports. In addition to column style reports, Reporter can print graphs on your opportunity and campaign information. ➤ To generate reports in Reporter Click a report heading to see the reports that are available. The system reports relate specifically to system administration. For each report you generate, specify the report options. Some reports require you to choose a financial quarter and a year, others—such as team reports—ask for opportunity status, team leader, or perhaps a date range. 414 Maximizer CRM 10.5 User’s Guide Click the Generate Report button once you have specified your options. With the selection of pre-formatted reports available in Reporter, you can produce many sales and marketing related reports and graphs. Print and Export Reports ➤ To print or export the report LYou can integrate custom Crystal Reports with the Reporter module. See the Maximizer CRM Administrator’s Guide for more information. Click the Print Report button to print the report. Click the Export Report button to export the report. You can export your report in one of several formats. Choose the desired format if you are exporting the report. You can also update an existing report by clicking the Browse button and choosing an existing report. Chapter 11 Reporting and Graphing In the generated report, you can use this toolbar to navigate between pages in the report and perform other actions. 415 416 Maximizer CRM 10.5 User’s Guide Crystal Reports LCrystal Reports supports up to 256 linked views when using Microsoft SQL. The Crystal Reports viewer is installed automatically with Maximizer and is accessible from the Reports menu. To create or modify reports, you must have the full Crystal Reports program installed. Maximizer installs a set of standard Sales and Customer Service reports, but you can also create your own custom, shared reports and save them in the MaximizerReports folder (in My Documents) where they can be accessed from the Reports menu. Create and Access Corporate Reports The Maximizer installation provides a standard report set consisting of Sales, Marketing, and Customer Service reports. These reports provide out-of-the-box reporting. The Maximizer CRM Server installation creates the...\All Users\Application Data\Maximizer\SvrShare\Reports\<Address Book name> folder, which contains shared reports. All folders and reports within this folder are accessible from the Reports > Crystal Reports menu in Maximizer. ➤ To launch Crystal Reports • You can launch Crystal Reports through the Reports > Crystal Reports > Personal > Custom Reports menu item in Maximizer or through the Crystal Reports program menu. ➤ To create and access a corporate Crystal Report from Maximizer After you have created your Crystal Report, save it in one of the following folders that are created by the Maximizer installation: • Documents and Settings\All Users\Application Data\Maximizer\SvrShare\Reports\<Address Book name> folder\Sales • Documents and Settings\All Users\Application Data\Maximizer\SvrShare\Reports\<Address Book name> folder\Marketing • Documents and Settings\All Users\Application Data\Maximizer\SvrShare\Reports\<Address Book name> folder\Service Chapter 11 Reporting and Graphing 417 Alternatively, create a folder on the Maximizer server in the following location if you would like to create your own reports folder: • Documents and Settings\All Users\Application Data\Maximizer\SvrShare\Reports\<Address Book name> folder\ If you are upgrading Maximizer from a previous version and you have old reports in the Crystal Reports file structure for Maximizer, the old reports will appear in an archived folder named after the Address Book with a.BAK file extension where your other report files for Maximizer are stored – e.g., Documents and Settings\All Users\Application Data\Maximizer\SvrShare\Reports\<Address Book name>.BAK folder. You can copy the reports to any of your working folders, such as the Sales folder, to access the reports from Maximizer. LIf you create your own folder, it appears as one of the submenu items under the Crystal Reports item. Copy or save the report file in your custom folder, or in the Sales or Service folder. Select Reports > Crystal Reports > Refresh. If you created a folder, it is displayed as one of the available report types (submenu item) and your report is available in the folder where you saved the report. To access a custom report, simply choose it from the Reports > Crystal Reports menu. For example, choose the report from the Sales or Service submenu. Note that for MaxExchange remotes, these reports are installed in the following folder: Documents and Settings\All Users\Application Data\MaximizerGlobalReports 418 Maximizer CRM 10.5 User’s Guide Create and Access Personal Reports LIn order to launch Crystal Reports from the Crystal Reports > Personal > Custom Report menu, you must be part of the Crystal Report Users security group. See the Maximizer CRM Administrator’s Guide for more information. Maximizer CRM installations also create the local folder ...\My Documents\MaximizerReports. This local folder is the default location for a user’s personal report templates. The File > Print > Custom Reports command enables you to create new report templates, edit existing report templates, and to view reports using existing report templates. The Custom Reports command is also available from the Reports > Crystal Reports > Personal menu. ➤ To create and access a personal Crystal Report from Maximizer Create a custom report by choosing Create a new custom report template from the Custom Report dialog box (Crystal Reports > Personal > Custom Report). You are prompted to enter a report name. By default, the report is saved in ...\My Documents\MaximizerReports. LYou are prompted with a login screen when previewing a new report or modifying an existing report. Enter your Maximizer user name and password. Create the report in Crystal Reports and save the report file in the MaximizerReports folder on your local drive. LIf you create your own folder, it appears as one of the submenu items under Crystal Reports > Personal. Select Reports > Crystal Reports > Refresh. To access a custom report, choose the report from Crystal Reports > Personal. Alternatively, you can select Personal > Custom Report from the Reports > Crystal Reports submenu and choose the View a report using an existing Chapter 11 Reporting and Graphing 419 report template option in the Custom Report dialog box. If you would like to edit the report template, choose Edit an existing report template. Printing Reports from Maximizer Column reports are a fast way to print Maximizer information as it appears in your current list, while a Detailed report lets you print more detailed information. Other reports, such as the Notes, Name/ Address/Telephone, and Overdue Cases by Queue reports, allow you to print specific information about your Address Book entries, opportunities, campaigns, and customer service cases. LIf you need to print more complex reports on your Address Book information, try using Reporter. You can print your calendar appointments as a Calendar Book or Appointment Calendar. You can print a Personal Organizer from the Address Book, Contacts, Related Entries or Hotlist window. You can print reports from the Reports or File > Print menus. The Reports menu gives you access to every type of Maximizer report, irrespective of the window that is open. For example, if you are in the Address Book window, and want to print an opportunity report, select Reports > Opportunities > [type of report]. The Opportunities window automatically opens and the report extracts information from the current opportunities list. The File > Print menu item prints reports strictly related to the window that is currently open. The Reports menu allows you to print reports on the following Maximizer information: • Address Book entries • Sales leads • Contacts • User-defined fields • Notes • Opportunities • Campaigns • Customer service cases • Documents • Hotlist 420 Maximizer CRM 10.5 User’s Guide • Calendar • Knowledge base articles • OrderDesk • Journal entries • Expenses • Related entries • Activities • Phone log The following is a summary of some of Maximizer’s reports: LThe Opportunities Executive Report generates many HTML files for its web browser interface. Save this report to a separate folder to keep your files organized. • Column Report – displays the same information you see displayed in a controlling window, such as names and addresses or opportunity information. • Detailed Report – includes mailing address information, appointments, Hotlist tasks, user-defined fields, Contacts, document summaries, and notes for an Address Book entry or opportunity. A detailed report for a customer service case includes mailing address information, user-defined fields, Contacts, document summaries and notes. • User-Defined Field Report – lists the user-defined fields attached to each of your Address Book entries. • Executive Report – generates a highly detailed HTML-based report on all of your opportunities. • Forecast Analysis – provides a summary of the probability of a successful close, the potential sales revenue, and the weighted amount associated with each active opportunity in the opportunity file. • Sales Alert Report – provides a summary of the opportunities that are behind schedule. • Analysis Reports-Detail – lists the opportunities by status with a revenue total. • Analysis Reports-Summary – reports the number of opportunities by status with total revenue. While all Maximizer reports can be sent to a printer, you can additionally generate .RTF (Rich Text Format), .PDF files (Portable Document Format) for most reports in Maximizer. You can also preview most Maximizer reports. Chapter 11 Reporting and Graphing 421 Exporting Entries to Microsoft Excel LMicrosoft Excel must be Maximizer enables you to quickly and easily export selected entries from a Maximizer window to a Microsoft Excel spreadsheet. Maximizer exports the currently selected entries for the active controlling or following window using the columns displayed in that window. If no entries are selected, it exports all displayed entries. LYou must have the “Allow If the column setup includes multiple fields in a single column, each field is displayed in a separate column in Excel, with each column named after the Maximizer field name. installed to be able to export entries to Excel. export” Access Right enabled in your user account to be able to export entries to Excel. If the column setup includes a table user-defined field, multiple table items are combined into a single cell in Excel. Users of Excel 2007 or later have the option of performing an advanced export to Excel. This option lets you apply conditional formatting to numeric user-defined fields. You can choose the same data bars, color scales, and icon sets that are available in Excel. See the Excel documentation for more information on conditional formatting. Note that reports exported to Excel are not dynamic, meaning they will not automatically update when changes to the exported entries are made. To update an exported report, repeat the export process. ➤ To export to Excel Select the window to export entries from. Create a list of entries or select specific entries to export. Select a column setup to use for the export. Click the Export to Excel button or the Advanced Export to Excel button (Excel 2007 or later) on the toolbar. – or – Select Tools > Export to Excel or Tools > Advanced Export to Excel (desktop application only). If you are performing an advanced export to Excel, the Advanced Export to Excel dialog box opens. Select the conditional formatting to apply to each column. Only columns that display numeric user-defined fields are listed. To apply the conditional formatting to total cell, as well as the summed cells in the column, select the Include Totals checkbox. Excel opens and displays the selected entries. To keep the report, save it to your computer with a unique file name. 422 Maximizer CRM 10.5 User’s Guide Graphing and Charting with Maximizer Creating a good presentation is about having good information and presenting it well. When you need to create attractive and meaningful graphs or charts for your presentation, and you need them quickly, Maximizer can do the job. Maximizer gives you the ability to track your customers and find out who they are. Gathering relevant customer information is a key component of successful marketing and ecommerce initiatives. With the creation of meaningful graphs and charts on your Address Book data, you benefit from complete, detailed intelligence to evaluate the performance of your business. When you graph your entries, you generate the graph using the entries listed in the Address Book or Opportunities window. For example, if your Address Book window currently lists all Address Book entries between A and M, only those entries will be graphed. Once your list contains the entries you are trying to graph, click the Graphing button or choose Graphing from the Tools menu to begin the process of constructing your graph. You can graph any table or date field in your Address Book, such as City/Town, State/County/ Province, Opportunity Status, to name only a few, and any table or date user-defined field. Maximizer creates graphs and charts for all kinds of purposes. You can print your completed graph from Maximizer or save it as a highquality image file that you can use in documents and presentations. If you often create the same type of graph, you can save a graph template to a catalog, which you can retrieve at any time. You can even add a custom button to your Maximizer toolbar that instantly creates a graph from one of your saved templates. The Chart wizard walks you through the steps of creating a graph or chart. You can then edit the final product to make it look attractive. Chapter 11 Reporting and Graphing 423 Graph Your Address Book Entries or Opportunities Generating a graph from your current list of entries is a simple process. ➤ To create a graph Create the desired list of entries in the Address Book or Opportunities window, and then click the Graphing button. Alternatively, you can select Tools > Graphing. Choose the fields and values you are graphing. For example, you could graph Address Book entries by the City/Town or State/ County/Province field. Defining the values lets you narrow the range or selection of values to graph. Use the Chart wizard to choose the graph type, style, and layout. Edit your graph in the Graphing window. You can change the appearance of your graph and edit the data. From this window, you can also save your graph as an image file. 424 Maximizer CRM 10.5 User’s Guide Select the Fields and Values for Your Graphs LPress F1 in the Select Field and Values for Graph dialog box to learn more about making your selection. When you click the Graphing button, Maximizer prompts you to choose a field to graph. Your choice of fields depends on the type of entries you are graphing. If the Address Book window is active when you begin graphing, you choose from Address Book entry and userdefined fields, such as Company, City, or State. If the Opportunities window is the active window, you choose from opportunity fields and user-defined fields, as in the Status, Team Leader, or Objective. You can graph any Address Book entry or opportunity field. Some field types require that you specify a range to graph, as in a range of amounts for “Annual Sales”. This example shows the Country Address Book entry field with all possible values selected for graphing. LEach range you provide becomes an item on the X-axis of your graph. If you defined your ranges for the “Anniversary of Business” user-defined field as JanuaryJune and July-December, you would have two columns in a bar graph (or two wedges in a pie graph). Maximizer lets you choose a range of values to graph for the field you select. For a table field, such as City/ Town, you simply select the table items you want to include in the graph. Other field types— alphanumeric, numeric, or date fields—require you to enter a range. For example, if you select “Anniversary of Business”, you would have to provide the date ranges to include in the graph. This allows you to include only the area of interest. Click the Range button to specify a range (or ranges) of values for non-table fields. Finally, choose numeric or alphabetical as the sort order: • Numeric displays charted values in numeric order, from lowest to highest. For example, if you choose a bar chart to graph the values of the City/Town field, the city/town (value) assigned to the least number of Address Book entries is shown on the left of the chart while the city/town assigned to the most number of entries is shown on the right. The legend will list the cities/towns in numeric order. Chapter 11 Reporting and Graphing • 425 Alphabetical displays charted values in alphabetical order, from A to Z. For example, if you choose a bar chart to graph the values of the City/Town field, any city (value) that starts with A is shown on the left of the chart while any city/town starting with Z is shown on the right of the chart. The legend will list the cities in alphabetical order. Define the Appearance of Your Graphs After you choose the field and values for your graph, the Chart wizard opens so you can define the characteristics of your graph. The Chart wizard has four tabs for defining your graph appearance: • Gallery – choose flat (2D) or perspective (3D), and the chart type (Area, Bar, Pie, etc.). • Style – choose the style based on the chart type you chose in the Gallery tab. • Layout – specify the title, footnote, and legend settings. • Axes – label your graph’s axes. These are only the basic characteristics of your graph—after the graph is generated, you can make additional changes to its appearance and even edit the graph data. 426 Maximizer CRM 10.5 User’s Guide Use Title and Footnote Merge Fields When you save a graph to the Graph Catalog, you can insert title (header) and footnote (footer) merge fields that display information such as the current date and time, the total number of entries, and other information. For example, inserting “date” in the title of the graph and then saving the graph to the catalog as a template tells Maximizer to display the current day’s date the next time you generate the graph. The following fields are available for footers and headers: • [count] The total number of entries graphed. • [date] The date the graph is generated. • [login] The user ID of the logged-in user. • [time] The time the graph is generated. • [user] The name of the user specified in the Users dialog box in Maximizer. ➤ To insert a title or footnote merge field Start a new graph. In the Chart wizard, select the Layout tab. Enter any fields you want to appear in the Chart Title and Chart Footnote fields. Remember to surround the field with square brackets, [like this]. Finish creating your graph and save it to the Graph Catalog. The first time you create the graph, the field name will display, not the value (i.e., [user] instead of “Bob Smith”). The next time you generate the graph, the value will display correctly. Chapter 11 Reporting and Graphing 427 Add “Zip” to Your Graphs LPress F1 in the Graphing window to find out more ways to edit your graph. At first, your completed graph may not look like much—by default, it has a plain gray background and the graph’s colors are chosen for you. You can easily add your own touches to your graph by editing it in the Graphing window. Before and after—the graph as generated by Maximizer (above) and the graph after some editing (right). LYou can also right-click inside the graph to display a pop-up menu. You can select and edit each element in the graph, such as the title, legend, or even the bars in a graph. The background, for example, can be a solid color of your choice, a gradient, or a “wallpaper” image. Simply select and double-click the element that you want to edit to display a setting dialog box. A background color can make a plain graph look attractive. To change the background properties, double-click within the area of the graph (but not on the graph itself) so that “selection handles” appear around the graph as shown below. The Format Plot dialog box lets you make many changes to your graph. 428 Maximizer CRM 10.5 User’s Guide LClick the Help button in the Format Plot dialog box for help using any of the settings. You can use this same procedure to change many of the graph elements. Try single-clicking different elements to see which ones show the selection handles; if selection handles appear, you can double-click it to edit that element. Use Your Graph in Other Applications If you are making a presentation, you will probably want to use your graph in handouts or in an on-screen presentation. You can save your graph as an image file that you can use in other applications, such as word processors, spreadsheets, presentation software, and more. Primary Interest Primary Interest presentation software When you save your graph, you have a choice of two image file types: Windows Metafile or Windows Bitmap. If you think you will have to resize the image when you insert it into your document or presentation, you might want to use the Windows Metafile format, as it is “scalable”—you can resize it without getting any jagged edges. Chapter 11 Reporting and Graphing 429 Reuse Your Graph Settings If you find yourself often creating the same type of graph, save yourself some time by saving the graph settings as a graph template in the Graph Catalog. After you generate the graph, use the Catalog button to save your graph template. Graphs for Address Book entries and opportunities are stored in separate catalogs; the available catalog depends on whether the Address Book or Opportunities window is selected. ➤ To use the graph catalog In the Graphing window, click the Catalog button to open the graph catalog. Click the Add button to add your graph to the catalog. Type a descriptive name and choose Public as the Owner to make the template available to all users. LEnsure that access rights to the saved search are adequate. If users do not have read access to the search, they will not be able to generate the graph. For detailed information on saved search properties, see F1 Help. If you have a search saved in the search catalog, select it in the search list to have Maximizer perform the search before generating the graph. Once your graph template is saved to the Graph Catalog, you can use the template when you next create a graph. 430 Maximizer CRM 10.5 User’s Guide CHAPTER Using eStore Manager 12 Build and Publish Your Online Catalog In this chapter... “What is eStore Manager?” on page 432 “Main Window” on page 433 “Getting Your Catalog Online” on page 434 “Designing Your Catalog’s Appearance” on page 435 “Letting Your Visitors Know How to Contact You” on page 438 “Choosing How to Accept Payment” on page 440 “Building Your Catalog” on page 442 “Making the Finishing Touches and Preview Your Catalog” on page 447 “Publishing Your Catalog on the Internet” on page 448 “Adding Linking to the eStore Catalog” on page 450 “Your Customer’s eStore Experience” on page 451 “Enhancing Your Catalog with the Catalog Search Page” on page 454 “Managing Your Online Orders and Inquiries” on page 455 12 432 Maximizer CRM 10.5 User’s Guide What is eStore Manager? LIf you have installed the Escona sample Address Book, you may want to review the Escona Online Catalog as an example of an eStore. eStore Manager is a Maximizer tool for creating and publishing your online store. eStore includes everything you need for an Internet storefront—a catalog, shopping cart, and online credit card transaction processing. eStore gives you plenty of flexibility in adding product descriptions, product images, pricing, applicable taxes, and shipping costs. Setting up your eStore online catalog is a breeze. This diagram shows how an order is created starting with the website visitor’s shopping cart and finishing in the OrderDesk. Shopping Basket Order Screen: choose secure or non-secure Customer Info Screen: eStore site collects customer’s information which is automatically sent to Maximizer. Maximizer: OrderDesk window Order Screen: choose payment method, taxes, shipping, etc. Your online catalog is integrated with Address Book entries and campaigns so your customers’ buying experience is customized each time they visit. Chapter 12 Using eStore Manager 433 Main Window ? Press F1 in any screen or dialog box for help. eStore makes it easy to construct your online catalog—using a series of wizard screens, you provide eStore with all the information needed to build the catalog. 434 Maximizer CRM 10.5 User’s Guide Getting Your Catalog Online eStore makes it easy for you to create and publish your online catalog. To get your catalog online, you need to perform these steps: Create the template for your online catalog. A template is an HTML page used by eStore to control the appearance of your catalog. The template contains special eStore tags that are replaced by catalog content when you publish the catalog. Your order screens—the screens that display a summary of the customer’s order—can also be customized. See “Designing Your Catalog’s Appearance” on page 435. Build and publish your online catalog. eStore’s wizard screens take you through the steps of building your online catalog and publishing it on the web. These steps include providing information about your company, setting up payment methods, and adding catalog sections and items. When you finish building your catalog, the last step is to preview and publish the catalog. Add links from your company’s website to the eStore catalog. The final step is the simplest—add a link (or several, if you like) from your company's website to your online catalog. See “Adding Linking to the eStore Catalog” on page 450. For an example of a completed online catalog, see the Escona sample Address Book that comes with Maximizer. Chapter 12 Using eStore Manager 435 Designing Your Catalog’s Appearance The design of your online catalog is saved as template in an eStore project. Your company probably has a standard layout for its website, so you might want to create a template that uses the same layout. In the completed catalog, eStore replaces the tags with the contents of your catalog. This example shows a detailed product description page from the Escona sample Address Book. You can design your catalog template to look like your company’s website. Just insert the catalog tags in the correct places. This is an example of what a catalog template may look like. The template is simply an HTML file that contains special eStore tags. You can make your page look any way you like, as long as you insert your eStore tags in the right location. You select your catalog template before you preview and publish your eStore catalog. The Catalog Template Tags Your HTML template must contain the following tags: LFor visitors to find your site • with Internet search engines, you must register your site with each search engine. [THE_META_TAGS] - Insert this tag between the Head tags in your HTML file. At the time you publish your catalog, eStore replaces this tag with the correct keyword meta tags, which allow visitors to find your site using Internet search engines. The keywords in these meta tags are your business classification keywords. <HEAD>[THE_META_TAGS]</HEAD> • [THE_HEADER_SCRIPT] - Insert this tag between the Head tags in your HTML file. This tag is replaced by the eStore Javascripts that are needed on certain pages of the site. <HEAD>[THE_HEADER_SCRIPT]</HEAD> • [THE_BODY_TAGS] - Insert this as an element within the Body tag. This tag is used to automatically run eStore Javascript functions. 436 Maximizer CRM 10.5 User’s Guide <BODY [THE_BODY_TAGS]></BODY> • [THE_CATALOG] - Insert this tag between the Body tags where you wish to place the main body of your catalog, which should be the main portion of your page. This tag is replaced by the catalog content. <BODY>[THE_CATALOG]</BODY> LYou can greatly enhance the • capabilities of the search page by installing the “Full Text Search” SQL component. See the Maximizer CRM Administrator’s Guide for more information. [SEARCH] - Use the Search tag in place of a URL in a link. When your site is published, clicking this link opens the eStore catalog search page, which allows the visitor to search your catalog for specific items. This link can be placed anywhere in the Body of your template. <BODY><A HREF="[SEARCH]">Link text</A></BODY> • A link to “Basket.asp” - In any location in the Body of your catalog template, include a link to “Basket.asp”. When a customer clicks on this link, Maximizer displays the current contents of the customer's shopping basket, where the customer can choose to order the items in the basket. The file “Basket.asp” is dynamically generated by eStore. <BODY><A HREF="Basket.asp">Link text</A></BODY> Create the Catalog Template Create the template using your preferred HTML editor, making sure that you add the eStore template tags in the appropriate places in your markup. Below is a sample template file that may be used by eStore. LYou can use this example as a <HTML> <TITLE>Catalog</TITLE> <HEAD> [THE_META_TAGS] [THE_HEADER_SCRIPT] </HEAD> <BODY [THE_BODY_TAGS]> <P><A HREF="[SEARCH]">Search the catalog</A> <P><A HREF="basket.asp">Your shopping basket</A> <BR> [THE_CATALOG] </BODY> </HTML> starting point for your own template. Keep adding to this basic template until you are satisfied with its appearance. Sample Catalog Templates eStore lets you select a sample catalog template in the Online Layout screen by clicking the “Samples...” button and choosing the name of a template. Additional files, including graphics, are listed in the Chapter 12 Using eStore Manager 437 “Additional files used by template file” pane. You can then preview or publish your site using the sample template. Or use the Browse button to select your own template. Use the Add button to bring in additional HTML files and graphics. To learn more about using the Online Layout screen, see “Making the Finishing Touches and Preview Your Catalog” on page 447. Customize the Order Screen and Confirmation Email ? To find out how to modify your order screens or email templates, open the eStore Help and look up “order screen templates” in the index. The order screen uses HTML templates similar to the catalog template. Although the order screen that comes with Maximizer works well, you may wish to customize the order screen to use your company’s logo or to match your company’s website. This is the order screen as it appears at the time the order is made. Notice that the text in square brackets is now replaced with order information. This is an example of one of the default order screen templates (“SecureOption.html”). The tags (in square brackets) are replaced with the appropriate information at the time the order is made. After a successful order, eStore sends a confirmation email message to the customer. 438 Maximizer CRM 10.5 User’s Guide Letting Your Visitors Know How to Contact You The first two screens in eStore collect basic information about your business or organization. eStore uses this information in your online catalog and the order screens. Enter Your Business Contact Information The company address and phone numbers that you enter in the first screen are used in the order screens—when a visitor orders an item, Maximizer displays a summary of the order along with your business name and address. Your company information (above) is displayed when a customer places an order at your catalog website (right). Select Keywords for Internet Search Engines One of the principal ways that customers will find your site on the Internet is through Internet search engines, such as Lycos, Yahoo, Alta Vista, and others. Keywords identify to the Internet where you fit in as a business. The Business Classification screen allows you to specify keywords and keyword phrases that assist people in finding your website. Take your time developing this list. The keywords you provide will directly affect the amount of traffic your site receives through Internet search engines. To ensure that the keywords you select attract the customers you want to your site, keep the following rules in mind. Chapter 12 Using eStore Manager 439 Keyword Rules LDue to technical constraints, some search engines consider repeating the same keyword multiple times during a submission to be “spam”, and will filter out such submissions. • Consider your customers. What words or phrases would they likely use to describe your business, products, or services? • Use common terms (that is, terms that your customers would commonly use to describe your products). • Use words that accurately describe your business and products. • Use synonyms and related words. If your company makes sugarfree gelato, list “gelato” but list “ice cream” too. • Include phrases and keyword combinations. Many people search for phrases such as “economy car rentals” as well as single words. • Use the plural form of most keywords (farms, not farm) to capture those who search for the singular form as well as those who search for the plural form. Consider the spelling. If your business is a bakery, include both “bakery” and “bakeries”. • Use different forms or spellings (even common misspellings) of an important keyword. 440 Maximizer CRM 10.5 User’s Guide Choosing How to Accept Payment The Payment Methods screen allows you to specify the currency you will use for pricing and payment on your website. You can also choose whether you will accept credit cards and other payment methods when visitors place an order from your catalog. In order to accept credit cards online, you must already have a merchant status account with the credit card company, your bank, or both. Once this is set up, you can manage credit card transactions through the OrderDesk window in Maximizer after the customer places the order in your online catalog. Set Up Online Transaction Processing LYou are not required to use online transaction processing—if you wish to use an alternate means of credit card transaction processing, such as manually calling in the transaction, select “[NONE]” in the Transaction Processing screen. If you have a merchant account with a credit card company or your bank, you may wish to set up online transaction processing. Once this is set up, credit card transactions are processed from your website and are tracked and maintained through the OrderDesk window in Maximizer. When you create a payment gateway profile in eStore (or Maximizer), the profile will not immediately appear in an order's Payment & Totals tab or the Payment Gateway Profiles dialog box Chapter 12 Using eStore Manager 441 until orders have been placed on your website and transferred by the eStore server to OrderDesk. The method and procedures for online transaction processing will vary depending on the transaction processing company. Some may allow you to pre-authorize funds, process transactions after the product has shipped, and issue refunds. With another company, you may only process transactions—funds are taken directly out of a customer’s account at the time of purchase. To find out about the transaction processing companies that work with Maximizer, please see the Payment Processing Gateways chapter or the Help. 442 Maximizer CRM 10.5 User’s Guide Building Your Catalog LHave a look at the Escona sample Address Book for an example of an online catalog. The Catalog screen displays a list of all the products and services in each section of your catalog. From this screen, you define sections for your catalog and enter catalog items for each section. You may include any number of products and/or services in your catalog with ample flexibility regarding the number of graphics, descriptions, or pricing schemes you use. eStore catalog items are grouped into sections, which are listed in the published catalog’s section index. eStore Catalog Section index Catalog sections Catalog item pages The left pane of the Catalog screen lists all the sections you have set up for your website. The right pane lists all of your items in the selected section. You must define a section before adding items to your catalog. Chapter 12 Using eStore Manager 443 Add Sections to Your Catalog LIf you create only one catalog section, eStore shows the catalog item list rather than a catalog section index. A catalog section performs two functions. First, it allows you to organize the catalog items into similar groupings, which makes it easier for your visitor to browse your catalog. Second, the section controls the kind of information that eStore presents for the catalog items in that section. When you create a new catalog section, eStore asks for a Business Template. The Generic Business Template might include virtually any type of product; Services could include any type of service; the Real Estate Business Template is best suited for homes and properties. Each of these types lets you enter item information that is best suited to the type of service or product you add to the section. Add Items to a Catalog Section ? To learn more about adding items to your catalog, see the eStore Help. Catalog items are the products or services you are advertising or making available for sale on your website. Each catalog item is assigned to a specific catalog section and may include very specific information. 444 Maximizer CRM 10.5 User’s Guide Add an Item with the Catalog Item Wizard LClick the Add button in the Catalog screen to add a new item with the Catalog Item wizard. You add catalog items using a Catalog Item wizard; click the Add button under the Catalog Items section. The various screens allow you to enter item descriptions, details, specifications, pricing information, related items, and tax/shipping requirements, among others. You may also attach image or media files to specific catalog items. Use the Inventory section to specify the number of items you have in stock. When the stock is depleted, the shopper sees a “Temporarily out of stock” message. Each time an item is purchased, the inventory is decremented by 1 in the eStore catalog; you should regularly check to ensure the inventory number is correct. You can choose to allow ordering when stock is depleted and the inventory will display in negative units. Modify Catalog Items with the Tabbed Dialog Box Click the tab you want and make changes to the catalog item. Click OK when you’ve finished your modifications. When you modify an item entry, the Catalog Item wizard screens appear as several separate tabs in a comprehensive Catalog Item dialog box. Chapter 12 Using eStore Manager 445 Enter the Item Information ? For help on entering item information, open the eStore Help and look up “Adding Items”. LNot all screens are available for all catalog section types. The information that eStore requires for an item depends on the Business Template used by the section to which you are adding the item. A catalog section using the Real Estate Business Template, for example, will require an address for each catalog item, but other Business Templates would not require an address. Below is a listing of all possible the catalog item screens: • Address – The address of the property. • Main – The basic information for the catalog item. May include the name, description, and the main image. • Bulleted Lists – The items you enter here will appear as a list on the catalog item’s web page. • Features – A listing of details about the item. These details appear as a bulleted list. • Specifications – A list of the product’s specifications. These specifications appear as a bulleted list. • Keywords – The keywords let your customer find this item in a catalog search. • Details – Size, weight, and other product information. • Images/Media – This tab lets you include additional images, sounds, or animations for your product. • Price – Information on how the item is priced. • Related Items – This list appears on the items page, offering the customer the chance to upgrade or add onto their purchase. • Options – Specify options such as size or color. • Tax/Shipping – The shipping cost and tax calculations. Upsell Your Product with Related Items or Options LTry to keep your list of related items to a few helpful—and strategic—suggestions. An important feature of an eStore catalog is the ability to show the visitor a list of items or options that are related to the one he or she is viewing. You can use this feature to offer your customer an upgrade or an add-on to their purchase. If your customer is shopping 446 Maximizer CRM 10.5 User’s Guide for a red wine, for example, you might also suggest wine glasses or a corkscrew. LTo open the Catalog Item dialog box, select the item in the Catalog screen and click “Modify”. You add related items using the Related Items/Options tab in the Catalog Item dialog box. This tab lets you browse your catalog for items to add to the list. In your published catalog, the related items appear as a list of links to each item’s page. Add Multimedia and Images to Your Catalog Items In the Catalog Item dialog box, use the Images/Media tab to add graphics, sound, or animations to your item’s web page. Additional images of your product can help your customer get a “feel” for the item. This tab is not available for all Business Template types. Chapter 12 Using eStore Manager 447 Making the Finishing Touches and Preview Your Catalog ? Press F1 in this screen for help. The Online Layout screen allows you to select a catalog template and edit additional catalog files. Choose a Catalog Template LYou can try one of the pre- made sample catalog templates—click the Samples button in the Online Layout screen. Browse for the HTML template file you created for your online catalog. If the template uses additional files, such as graphics or media files, you must click the Add button to add them to the eStore project. If you make a change to your template, you must re-select the template so the updated template is added to your catalog project. You can then publish the catalog again. Edit Additional Files Files associated with the HTML template you are using display in the “Additional files used by...” list in the Online Layout screen. To edit a graphic, for example, select it, click Save To File, and specify a directory. Use a graphics editor like Paint Shop Pro or Photoshop to edit the graphic. Use the Add button to bring it back into the catalog database. The edited file will not overwrite the original if the names are identical; use the Remove button to delete the old version of the file before you add the new version. 448 Maximizer CRM 10.5 User’s Guide Publishing Your Catalog on the Internet ? To learn more about publishing your catalog, open the eStore Help and look up “upload” in the index. The final stage of building your catalog is to publish the catalog. Publishing the catalog is actually a very simple process—eStore generates the files that make up your eStore website, then copies them to a publicly-accessible folder on your company’s web server (the computer running Microsoft Internet Information Server). For security reasons, your production site—the site where you publish the catalog—may be on a different computer than your preview site. Specify the Physical Location of the Catalog Files Make sure you have two virtual directories set up on your IIS server: an internal virtual directory for previewing your catalog and a publicly-accessible virtual directory for the completed catalog. When you specify the location to store the files for preview, you specify the physical location of the preview folder on the IIS server (e.g., “\\servername\catalog”). A virtual directory “points” to the folder in which your catalog’s website files are stored. Enter the URL of Your Preview Site Enter the IIS server’s URL (or the IP address) and the virtual directory of your preview site. If you are working at the IIS server that hosts your site, you can enter “127.0.0.1” as the IP address. eStore uses this URL to display the preview site for you in your web browser. An example of a URL using an IP address would be in this format: “http://xxx.xxx.xxx.xxx/catalogpreview”, where “xxx” is the IP Chapter 12 Using eStore Manager address. You can also use a domain name (e.g., www.esconawines.com) in place of the IP. As soon as you publish the catalog, visitors can go to your catalog using their web browser. 449 450 Maximizer CRM 10.5 User’s Guide Adding Linking to the eStore Catalog LSetting up virtual directories is normally a task for a system administrator or someone familiar with Microsoft IIS. The final step in getting your catalog online comes after you publish your catalog. When you publish your catalog, eStore copies the catalog website files to the folder on the IIS server that you specify in the “Publish Your Store” screen. You or your system administrator can set up a virtual directory in IIS that “points” to this physical folder. It is this virtual directory that is the URL—or the web address—of your catalog. For example, if you create the virtual directory “catalog” on your server, then your catalog’s URL would be “http://www.yourserveraddress.com/catalog”. You can add links from your company's website—perhaps right in a navigation bar or menu—to the catalog’s URL. For example, if you publish your catalog to “http://www.escona.com/catalog”, you could include a link in your company's website like the following HTML example: LYou can also use a relative URL, rather than the full URL shown here (e.g., “\catalog”). <A HREF="http://www.escona.com/catalog/">See our online catalog!</A> Alternatively, you can use a graphic in place of text in your link, as shown in the example below. This is an example of what your site could look like. Chapter 12 Using eStore Manager Your Customer’s eStore Experience Understanding your customer’s experience is an important part of designing your eStore catalog. The illustration below shows an example of a visit to an eStore catalog using the Escona sample website. 1. The customer arrives at your eStore catalog website using his/her browser. 2. Using the Search page, the customer can search for products by keyword or simply browse the catalog. 3. In the shopping basket screen, the visitor clicks the “Order Now” button to continue with the order. 4. The customer is taken to the “order screens” for the catalog. Clicking the Continue button, as illustrated above, ensures credit card information is encrypted. 5. The customer is taken to a customer login page. Information such as the customer’s first and last name is captured. This information is automatically sent to Maximizer. 451 452 Maximizer CRM 10.5 User’s Guide 6. The customer is then taken to the order screen. 7. The customer chooses how the order will be paid for. If you set up online transaction processing, eStore collects the credit card information in another screen. 8. After the transaction is complete, a “thank you” page appears. Further details provide the customer with information about order email transactions, and shipping. From this screen, a customer may also return to the online catalog. To further confirm the order, eStore sends a confirmation email message to the customer using the email address supplied. Your Customer’s Shopping Basket Your customer will likely want to browse your catalog first before buying anything. As your customer shops, he or she can add items to a shopping basket. Just like a real shopping basket, the eStore basket Chapter 12 Using eStore Manager 453 lets customers add items as they shop and, before paying, review the contents of the basket. The shopping basket lets the customer adjust quantities, remove items, and view subtotals before ordering. LSelect the currency in the Payment Method screen. See “Choosing How to Accept Payment” on page 440. The information shown in the shopping basket includes: • The type of currency used • The items, quantities, and options • The item subtotals • The basket subtotal 454 Maximizer CRM 10.5 User’s Guide Enhancing Your Catalog with the Catalog Search Page When a visitor arrives at your site, he or she may already have an idea of what to buy, but your catalog may be large enough to make it hard to find certain items by browsing the catalog sections. You need to include a link to the eStore catalog search page. From the search page, a visitor can search for items by keyword to bring up a list of possible matches. Chapter 12 Using eStore Manager 455 Managing Your Online Orders and Inquiries LUse the Maximizer Web Inquiry Form wizard to create an online data collection form. See “Creating Web Inquiry Forms for Your Website” on page 107. When potential customers visit your ecommerce site, they can complete an online form to either inquire about or order products and services. The data from this form—such as name, address, credit card numbers—is then written to the Maximizer Address Book as an Address Book entry with an attached OrderDesk entry. If you are using eStore, orders and inquiries automatically arrive in the OrderDesk window from your website. If you are using ecBuilder, orders and inquiries arrive in your Maximizer Email window as email messages with an MEC file attachment. Select “All eCommerce Messages” from the Email window’s View bar. Order/inquiry email messages have the subject line “ecBuilder Inquiry”, “ecBuilder Order”, or a similar subject. You may wish to save the MEC files in their own folder and double-click the files to import the order/inquiry information. Order numbers are automatically generated. The prefix indicates the source of the order—MA indicates a manually entered order and OL indicates an order from the online catalog. Double-click an entry to view or change the details. If you do not use an online transaction processing company, you can open the order and manually mark the payment as received. Use the OrderDesk window to enter a new order, capture a payment for an order, pre-authorize a payment for an order, complete a preauthorized payment for an order, and refund a payment for orders that come to you by telephone, mail, or other methods. OrderDesk allows you to track the status of your inquiries and orders, whether your customers have received a response or had their order fulfilled. It lets you mark specific orders or inquiries as urgent, ignore inquiries without deleting them, and track shipping and payment status for your orders. You can open the order or inquiry in the OrderDesk window and send a summary of the inquiry by email to the associated customer (Address Book entry) with an automatic reply. You also can send a summary of the inquiry to one or more Maximizer users. 456 Maximizer CRM 10.5 User’s Guide Credit Card Transaction Processing If you are using a third-party transaction processing company, the OrderDesk window acts as a desktop point-of-sale software solution that supports real-time credit card transactions. This includes preauthorization of credit card information, pre-authorization completion and/or capture of funds, and refunds that generate a credit on the customer’s credit card account. With the use of a transaction processing company, funds from the consumer’s credit card can be captured immediately. Once the credit card information has been verified and the purchase has been authorized, the information can be securely forwarded via a confirmation email message to both the consumer and the merchant. Payment gateway profiles, sometimes referred to as payment gateway guides or merchant account profiles, are used to facilitate online credit-card transaction processing from your website (which you created with ecBuilder or eStore). When you process an order’s credit card transaction using the OrderDesk window, you select the appropriate payment gateway profile from the Payment & Totals tab. To see which transaction processing companies are supported by Maximizer, select the OrderDesk window, click the Add button in the File > Edit Gateway Settings dialog box and view the items in the Company drop-down list. There is one payment gateway profile per transaction processing company. LProfiles also can be set up using ecBuilder and eStore (see the respective documentation). Before you set up a profile in Maximizer, you must contact the company and set up a merchant account. This can be done using the Acquire Merchant Account button in the File > Edit Gateway Settings > Add dialog box. Manually Enter Orders or Inquiries ? To learn more about OrderDesk, look up “OrderDesk” in the Maximizer Help index. Refer also to “Using OrderDesk” on page 109. Because you will likely receive orders from other sources besides your Maximizer website, OrderDesk allows you to enter orders manually, allowing you to manage all your orders using the same application. The order entry screen in OrderDesk gathers the same information as the online forms that your customers fill out on your website. An order or inquiry always must be associated with an Address Book entry, so ensure the appropriate entry is selected before clicking the New button in the OrderDesk or Address Book OrderDesk window. You can also drag an Address Book entry to the OrderDesk icon from the Address Book window. Enter the order or inquiry information, pressing F1 at any time for detailed assistance. Chapter 12 Using eStore Manager 457 ➤ To enter an order Use the Main tab to enter the items ordered and set the payment and shipping status. Specify the shipping method and taxes, and enter the shipping address. Use the Payment & Totals tab to record the payment information. If you have online transaction processing set up, you can process credit card transactions—payments, authorizations, refunds, and more. As shown in the previous example, manually entering an order is a simple three-step process. The “Order Status” settings in the Main tab let you manage and track the progress of orders—you can sort your OrderDesk list by either status column to help you find unshipped orders or orders that need attention. When you manually add an item to an order, you can save yourself time by selecting the item (and its information) from your Maximizer online catalog using the Get Info From Catalog button in the Item dialog box. 458 Maximizer CRM 10.5 User’s Guide Features of the OrderDesk Window To summarize, the OrderDesk window includes the following capabilities: LTo learn more about sales • Ability to manage orders or inquiries from your online catalog site • Manual entry of orders or inquiries received from other sources • Ability to generate and manage sales quotes, which can later be converted to orders • Manual preauthorization, authorization, and refunding of payments made against a consumer’s credit card • Tracking of the inquiry, order, shipping, and payment status • Automatic calculation of taxes and shipping costs • Automatic email to customers or Maximizer users with summary of order or inquiry • Filtering of records to display only specific entries or entry type quotes, see “Work with Sales Quotes” on page 109. CHAPTER Using MaxExchange Remote 13 Working with MaxExchange Remote In this chapter... “How MaxExchange Programs Work Together” on page 460 “MaxExchange Administrator’s Guide” on page 461 “Glossary of MaxExchange Terms” on page 462 “What Data is Synchronized?” on page 464 “How Do I Receive Updates?” on page 466 “Starting MaxExchange Remote” on page 467 “Receiving the Address Book” on page 467 “Remote Tasks” on page 469 13 460 Maximizer CRM 10.5 User’s Guide How MaxExchange Programs Work Together MaxExchange consists of the following applications: • MaxExchange Synchronization Server • MaxExchange Server Manager • MaxExchange Remote Synchronization Server • MaxExchange Remote • MaxExchange Site Manager MaxExchange Synchronization Server One person is usually in charge of setting up and administering the central Address Book. This MASTER user, or a user with Maximizer Administrator privileges, acts as an administrator for the MaxExchange Server, designates a Maximizer Address Book as the central Address Book—or central Address Books if you are using multiple databases—and schedules updates. There is only one server for any given Address Book, but one server can have many remotes. These sites are either remote servers or remotes, which can be connected by LAN, WAN, dial-up access, or through the Internet. The central Address Book is maintained on the MaxExchange server, while the remote computers have different replications of the central Address Book. MaxExchange Server can also be installed as a service on Windows 2000, Windows 2003, and Windows XP. The service runs in the background, as any other Windows service, and typical processing is done automatically. Manual control of processing or any other server tasks are then done through the MaxExchange Server Manager from another machine or on the server. MaxExchange Remote Synchronization Server MaxExchange Remote Synchronization Server acts as a middle tier in a multi-tiered synchronization tree. Remotes run MaxExchange Remote Synchronization Server to synchronize their remote changes with those on the site’s parent server, which is either the MaxExchange Synchronization Server or a MaxExchange Remote Synchronization Server. MaxExchange Remote Synchronization Server has the following two basic functions: • It synchronizes changes from its remotes with the server and receives updates from the server. • It generates and sends its own updates to its remotes. Chapter 13 Using MaxExchange Remote 461 MaxExchange Remote Server acts in the capacity of a server and as a remote. It may be installed as an application and service or as a service only. MaxExchange Server Manager MaxExchange Server Manager is a utility used to access the server from another computer. When you install MaxExchange Server as a service, this utility is used to perform manual tasks on the server. MaxExchange Remote MaxExchange Remote users synchronize the entire image or a subset image of the central Address Book on their remote computers. Remote users also update the central Address Book with changes made on the remotes. MaxExchange Site Manager To determine which portions of the central Address Book go to each remote, using MaxExchange Site Manager, the MASTER user, or a user with Maximizer Administrator privileges, defines remotes/ remote servers and the distribution groups to which the remote sites belong. Other important functions of Site Manager are to perform Address Book maintenance on remotes, send refreshes to remotes, set up event notifications, and generate reports. Site Manager is also used to set up teams for campaign and opportunity synchronization. MaxExchange Administrator’s Guide For information on using MaxExchange Synchronization Server, MaxExchange Synchronization Remote Server, MaxExchange Server Manager, and MaxExchange Site Manager, refer to the MaxExchange Administrator’s Guide. This chapter is to be used by remote users, who, typically, would not be the administrators of MaxExchange. 462 Maximizer CRM 10.5 User’s Guide Glossary of MaxExchange Terms Use this list of terms to help familiarize yourself with the terminology of MaxExchange. Central Address Book – A Maximizer Address Book that you specify for the MaxExchange server to synchronize with its distribution sites. The server maintains the central, master image of this Address Book (often at the head office of a company), while the remote computers maintain either partial or complete images of the same Address Book on the distribution sites. Note that you can synchronize more than one central Address Book at a time and multiple Address Books can be hosted on one server. Although different images of the Address Book are kept on separate computers, together, the server and its remotes effectively work on a single central Address Book, which is periodically updated by the MaxExchange synchronization process. Distribution Group – A Distribution Group comprises several distribution sites that maintain a particular image of the central Address Book. The MASTER user of the central Address Book, or a user with Maximizer Administrator privileges, uses the MaxExchange Site Manager program to determine which distribution sites belong to each distribution group. LFor more information on configuring Maximizer to work with MaxExchange, see the MaxExchange Administrator’s Guide. The MaxExchange Distribution user-defined field, which you create in Administrator, determines which companies and individuals in your central Address Book are distributed to the various remotes. The field is created in Administrator’s System Options preferences by clicking the associated button. This field then appears within your User-Defined Fields list and you add values for your distribution groups as necessary. Distribution Site (Remote or Remote Server) – A computer where MaxExchange Remote is installed. See the Remote glossary definition. DRB Table – A file table that is used by MaxExchange to track the distribution list of Address Book entries and opportunities for each distribution site. This list is created based on the Distribution Group value associated with an Address Book entry for the MaxExchange Distribution field. Remote – A computer where a MaxExchange Remote is installed, and on which a partial or complete image of the central Address Book is stored. Remotes are set up and maintained by the MASTER user, or a user with Maximizer Administrator privileges, using the MaxExchange Site Manager program. Typically, several distribution sites belong to a distribution group. These distribution groups are associated with Address Book entries. You assign default distribution groups to Address Book entries based Chapter 13 Using MaxExchange Remote 463 on the creator of the entry; each user can be assigned a set of distribution groups and when the user creates an entry, the default distribution groups are automatically assigned. User setup for distribution groups is done in the Access Rights tab of user properties in Administrator or Maximizer (File > Users). MASTER User – The MASTER user is the owner or the administrator of a Maximizer Address Book. For MaxExchange, the MASTER user administers the central Address Book from the server. The MASTER user grants users access to the Address Book and, if required, restricts their ability to view, add, or delete data or to perform certain functions. The MASTER user is also the only user authorized to use the MaxExchange Site Manager application to set up remotes and distribution groups or use MaxExchange Server Manager. Note that you can have users with Maximizer Administrator privileges equivalent to the MASTER user. Transaction Journaling – Transaction Journaling is the process by which Maximizer maintains a record of changes made by users to an Address Book. Transaction Journaling is enabled in Administrator in the System Options preferences. This functionality should not be enabled until you are ready to process data so that unnecessary transactions do not occur. User-defined field – User-defined fields (UDFs) are customizable fields in Maximizer that you can use to categorize the Address Book entries and opportunities in your Address Books. You can use UDFs to group Companies, Individuals, Contacts, and opportunities in many different ways such as by occupation, hobby, income level, revenue, or any other criteria you want to use. 464 Maximizer CRM 10.5 User’s Guide What Data is Synchronized? MaxExchange synchronizes all data in an Address Book with the exception of the following: • Automated campaigns (Traditional campaigns are synchronized) • Email templates for Automated Campaigns • Journals • Expenses • Graphs • Search catalogues • Import catalogues • Linked documents • Printer settings • Window layouts • Email settings • Fax settings • Windows authentication settings • External third-party tables (non-Maximizer) • Dashboard settings • Customer service notification templates • Holiday Editor information Synchronize Third-Party Data There are two custom tables available through the use of the Maximizer Customization Suite (listed below) that allow you to integrate third-party data. The data contained in these tables is synchronized by MaxExchange as follows: LFor both the Custom_Independent and Custom_Child tables, the Custom_ID and Custom_Number fields (whether generated automatically or manually entered) on the server and each remote must be unique in a MaxExchange environment. This is to prevent duplicate ID issues from occurring. • Custom_Independent is a top-level data storage table, similar to the Clients table. It is created at database-creation time and contains a number of pre-defined columns. It is always synchronized by MaxExchange, and it synchronizes associated notes, documents, and user-defined fields. • Custom_Child is a mid-level data storage table and is a child of a Custom_Independent record, an Address Book entry, an Opportunity, etc. It is created at database-creation time and contains a number of pre-defined columns, including Client_Id/ Client_Number of the parent record. It is always synchronized by MaxExchange, except on a refresh, in which case child records are synchronized only when the parent record is synchronized. It Chapter 13 Using MaxExchange Remote 465 also synchronizes associated notes, documents, and user-defined fields when the parent record is synchronized. For more information on using custom third-party tables, refer to the Customization Suite documentation. Synchronize Opportunities and Campaigns Address Book entries with opportunities assigned to sales team members are synchronized to remotes, even when corresponding companies are not normally synchronized to those particular remotes (i.e., the Address Book entries are not assigned to the corresponding distribution group). Synchronization of Address Book entries also occurs when a competitor or partner of an opportunity is assigned to a Address Book entry other than the Address Book entry with which the opportunity is associated. When a Contact is assigned to an opportunity (on the Basic Information tab of an opportunity), the Contact is not synchronized unless the Contact’s Company or Individual entry is assigned to a distribution group. Single-user opportunities are synchronized with only the remotes that created the opportunities. For example, if Remote A creates a single-user opportunity, it is synchronized with only Remote A. The opportunity will not be synchronized with Remote B. Single-user opportunities created on the server are not synchronized. This works the same way for Traditional campaigns in that Traditional campaigns associated with a member of a marketing team, are also synchronized. Automated campaigns are not synchronized to any distribution sites. Microsoft Outlook Synchronization and MaxExchange Synchronization In a MaxExchange environment with Microsoft Outlook Synchronization enabled, Maximizer can synchronize with Outlook on a single server or remote only. Otherwise, duplication of entries may occur. When MaxExchange is installed, and at least one MaxExchange remote has been added as a distribution site, a MaxExchange Location button appears at the bottom of the Outlook Synchronization tab. Clicking this button opens a dialog box containing a drop-down list of MaxExchange servers and remotes for the current Address Book. Select the MaxExchange server or remote where Maximizer will synchronize entries with an Outlook profile for the selected user. 466 Maximizer CRM 10.5 User’s Guide How Do I Receive Updates? If your computer is set up for email transport, check to see that your email application is running. Then start MaxExchange Remote. When you communicate with the server for the first time, the server (or a remote server) sends your computer a data packet with an image of all or part of the central Address Book. (Some entries in the central Address Book may not apply to you, so the MASTER user may exclude them from your Address Book image.) From then on, you receive updates to the central Address Book periodically. You run MaxExchange Remote to synchronize your distribution site changes with those on the server. The same information is then stored on both the server and remote computers, so that all files are part of the same, single central Address Book. Although the exact process depends on the chosen transport method, here is an example of how the synchronization process works: • The server assembles Address Book updates in packets, and sends them to your computer, and those of other users at other distribution sites. On your computer, MaxExchange Remote then picks up this data, transfers it to a temporary inbox, and later updates or replaces the data in your central Address Book. • On your computer, MaxExchange Remote assembles Address Book updates in packets, and sends them to the server. MaxExchange server then picks up the data packets, transfers them to a temporary inbox, and updates the server central Address Book files. Occasionally, you may receive a message from the MASTER user informing you that he or she is sending you a refresh (a fresh replacement image of your MaxExchange data). When the refresh arrives and is processed, MaxExchange Remote deletes and completely replaces the image of the central Address Book currently on your computer with the new, refreshed version from the server. You can set MaxExchange Remote to check for updates on a regular schedule. Or, if you prefer, you can request an immediate update at any time. See “Perform an Immediate Update” on page 476 for instructions. Chapter 13 Using MaxExchange Remote 467 Starting MaxExchange Remote ➤ To start MaxExchange Remote • Select MaxExchange Remote from the Maximizer CRM program menu. Or, double-click the MaxExchange Remote icon on the desktop. Receiving the Address Book When your system administrator instructs you to do so, start MaxExchange Remote. You will receive an image of the central Address Book and be prompted to save it in a folder of your choice. If you plan to employ FTP transport, you must first initiate a MaxExchange FTP communication session with the server and pick up the data packet before you can later process it. If you are a dial-up email user, be sure to set up MaxExchange Remote for a dial-up connection. For more information, see “Set Scheduling Options for Dial-up Email” on page 471. If you use email or Network Direct transport, you will receive an image of the central Address Book in the “MaxExchange\Inbox\<hexadecimal>” folder on your distribution site computer assuming you have successful data transport from the server. Note that when you receive an image by email the information arrives in the inbox and is moved to the Hexadecimal folder after processing begins. Please pay special attention to the instructions particular to the transport method your computer will employ with the MaxExchange server. If you are unsure about the transport method you will use, contact your system administrator before proceeding. ➤ To receive the central Address Book Ensure that you have received your first data packet from the server on your computer. Your system administrator will inform you of when an initial data packet has been created and when the packet will be transported to your computer. • FTP – You must first pick up the data packet from the server. See the instructions below on how to initiate your first MaxExchange FTP transport session. • Network Direct – In your “MaxExchange\Inbox \<hexadecimal>” folder, look for two files—one with the 468 Maximizer CRM 10.5 User’s Guide extension ATT and the other with the extension HDR. If they exist, you have received a MaxExchange data packet. • LThe “hexadecimal” folder is actually a folder named with a hexadecimal number that corresponds to the Address Folder ID. This ID is displayed in the Distribution List dialog box in MaxExchange Site Manager. Email – If you see an email message entitled “MaxExchange Data Packet” in your email inbox, you have received a MaxExchange data packet. Start MaxExchange Remote. Depending on the transport method you plan to employ, the methods for initiating the connection with the server vary as follows: • FTP – You must start by initiating a communication session with the MaxExchange server. Select File > Connect New FTP Server. Enter the server IP address (or the server name), port number, Password (the MAXEXCHANGE password entered at the server), and Address Book ID for this distribution site. Click OK when finished. • HTTP – You must start by initiating a communication session with the MaxExchange server. Select File > Connect New HTTP Server. Enter the server URL, password, and Address Book ID for this distribution site. Click OK when you are finished. MaxExchange should immediately initiate an FTP/HTTP session with the server. • LIf you create a new Address Book, you must specify a name that is different from the name of the Address Book on the server. Email or Network Direct – Click the Process Data Packets button. A dialog will appear asking for the Address Book you want to designate as your synchronized MaxExchange folder. You may select an existing folder from the drop-down list or create a new folder. After the Address Book has been established, MaxExchange Remote will inform you that a refresh packet is ready to process. Click Yes. The processing status is displayed in the MaxExchange window. When packet processing has ended, open the synchronized Address Book in Maximizer. Examine your data to ensure that it is correct and complete. Chapter 13 Using MaxExchange Remote 469 Remote Tasks This section outlines the tasks you will perform using MaxExchange Remote. Initiate the First FTP Transport Session MaxExchange FTP transport can be initiated only by the distribution site computer—not the server. Accordingly, a new distribution site needs to enter information into MaxExchange Remote for this transport to start. ➤ To initiate the first MaxExchange transport session with the server You must receive the following information from your system administrator—the server’s IP Address and/or server name, the FTP port number, the MaxExchange FTP password, and your unique Address Book ID (hexadecimal number). Select File > Connect New FTP Server. Enter the server’s IP address or server name, the MaxExchange FTP password, and your unique Address Book ID. Click OK. MaxExchange Remote will immediately open an FTP session with MaxExchange server. If the communication is successful and the first data packet(s) is downloaded to your computer, log into your Address Book. Select File > Process Data Packets. After your initial data packet has been processed successfully, the File > Connect New FTP Server dialog is no longer needed for FTP communication to this particular synchronized Address Book. After the initial successful FTP communication session, you need only to select Process Data Packets to start the synchronization process. All future FTP communications will be handled automatically. 470 Maximizer CRM 10.5 User’s Guide FTP Test Option LSee the F1 Help for detailed information on each of these fields. If the connection fails, try using the FTP Test functionality. This is a method to test the FTP connection providing detailed information of why a connection fails, if necessary. Retry an Unsuccessful FTP Connection If you attempt an initial FTP communications session and receive notification from the program of FTP communication failure, select File > Retry FTP Server Connect to re-enter your FTP settings and reestablish an FTP session with the server. ➤ To retry a failed FTP communication session with the server Select File > Retry FTP Server Connect. Verify that you have entered the correct server’s IP Address and/ or server name, FTP port number, the MaxExchange FTP password, and your unique Address Book ID. Click OK. MaxExchange Remote immediately opens an FTP session with MaxExchange server. If the communication is successful and the first data packet(s) is downloaded to your computer, log into your Address Book. Select File > Process Data Packets. After your initial data packet has been processed successfully, the File > Retry FTP Server Connect dialog is no longer needed for FTP communication to this particular synchronized Address Book. After the initial successful FTP communication, you need only to select Process Data Packets to start the synchronization process. All future FTP communications will be handled automatically. Chapter 13 Using MaxExchange Remote 471 Start a Processing Session from Maximizer You can start a processing session from Maximizer with a simple click of a button. ➤ To start a processing session from Maximizer In Maximizer, click the Process MaxExchange Data Packets button. Alternatively, you can choose Tools > Process MaxExchange Data Packets. An icon appears in your system tray for MaxExchange Remote. The icon appears differently depending on the state of processing. Following are the various states of the processing icon: Processing Processing Finished Failed While processing is taking place, you can click on the Processing icon to open MaxExchange Remote and view the processing details. When the processing session is taking place, the tooltip for MaxExchange Remote says “Processing”. After the processing session is complete, the tooltip says “Processing Finished”. If the connection to the Address Book or FTP server failed, the tooltip says “Failed”. Otherwise, the tooltip says “MaxExchange Remote”. After the processing session, you can close or open MaxExchange Remote by right-clicking on the system tray icon and choosing Exit or Restore. Set Scheduling Options for Dial-up Email If you are using dial-up email to exchange updates with the MaxExchange server, you can set a schedule for processing and sending the updates. You can set up MaxExchange Remote and your email connection to automate the process of dialing into the email system and sending and receiving central Address Book updates. When you set up an automatic dial-up schedule, you do not need to see MaxExchange Remote again until you want to change its settings. You simply set your email application to automatically connect using the same schedule you set for MaxExchange Remote. For more information 472 Maximizer CRM 10.5 User’s Guide about scheduling email connections, see the documentation for your email program. Remote dial-up scheduling can be used only when the following conditions are present: • Email is the Active Transport Method for your MaxExchange data transport. • The third-party email program you employ has its remote email client/driver set. When dial-up email is not installed, the Edit > Remote Dial-Up Preferences dialog is unavailable. ➤ To set remote dial-up scheduling options Select Edit > Remote Dial-Up Preferences. In the Remote Dial-Up Preferences dialog box, select the Enable Remote Dial-Up checkbox. In the Pre-Connect Processing Time field, type the time at which you want to create outgoing data packets for later transmission to the server. In the Communications Time field, type the time at which you want the update data packets placed in your email outbox. You must configure your email program to connect and send and receive mail separately. You should set it to do so sometime later than the Communications Time. In the Post-connect Processing Time field, type the time at which you want MaxExchange Remote to process incoming data packets from the server to update your image of the central Address Book. Click OK. Chapter 13 Using MaxExchange Remote 473 Connect by Dial-up Using FTP When you are using FTP, the connection between the server and remote is always initiated from the remote computer. This can be done through a LAN or a dial-up connection. If a remote is set up for dial-up connections and a connection fails, a Windows Dial-up Connection dialog box appears when a processing session is initiated. This includes when a processing session is automated. ➤ To connect by dial-up using FTP Click the Connect button. You can enable the Connect automatically option if you want to dial in to your Internet service provider when you start a processing session. If you have set up your remote computer to process upon startup, the Windows Dial-up Connection dialog box automatically appears when you log on to Windows. Otherwise, when you click the Process Data Packets on the remote computer, the Dial-up Connection dialog box appears. Note that in your Internet Options, the Dial whenever a network connection is not present option on the 474 Maximizer CRM 10.5 User’s Guide Connections tab must be set in order for the Windows Dial-up Connection dialog box to appear. Set Timing Preferences Timing Preferences in the Edit menu schedules updates for all transport except dial-up email. This includes FTP, Network Direct transport, and LAN email. You can set how frequently MaxExchange Remote processes data packets. At the interval you specify, MaxExchange Remote will transport its updates to the MaxExchange server. Your computer must be on, and MaxExchange and the email system must be operating for MaxExchange synchronization to occur successfully. Your computer must have MaxExchange Remote running, all necessary transport resources must be enabled (e.g., modem turned on), and required transport access to the server must be available. ➤ To set timing preferences Select Edit > Timing Preferences. In the Timing Preferences dialog box, specify your processing and transport times. The behavior of each option depends on the Transport Method used. Choose Manually (transports packets immediately after the initiation of a processing session), Simultaneously (transports immediately after processing), or Independently (process and transport at different times). Transaction Processing Settings allow you to set processing to be activated automatically at a specific time. Chapter 13 Using MaxExchange Remote 475 If no First Process time or Processing Interval is set, data packet processing will occur only when you do immediate processing using the File > Process Data Packets command. If you want to schedule a data processing time, enter the fields as follows: • In the First Process At field, type the time at which processing is to start for the first time after these settings are changed. Specify the time in 12-hour format; for example, 7:00 PM. • In the Processing Interval field, type the frequency and select the units for how often processing should occur; for example, every 15 minutes. You can select intervals as short as every 1 minute or as long as every 24 hours. Transport Time Settings are available only when Independently is chosen above. These settings allow you to transport packets at times independent of when you process data packets. • In the First Transport At field, type the time at which transport is to start for the first time after these settings are changed. Specify the time in 12-hour format; for example, 7:00 PM. • In the Transport Interval field, type the frequency and select the units for how often transport should occur; for example, every 15 minutes. You can select intervals as short as every 1 minute or as long as every 24 hours. Select the Automatically transport packets and process data on Windows login option to automatically start processing when you log into Windows. Disable the Display remote client when automated processing begins option if you do not want the MaxExchange Packet Transport dialog box to appear during an automated processing session. The MaxExchange Remote processing icon will still appear in the Windows system tray. 476 Maximizer CRM 10.5 User’s Guide Click OK. You must exit and restart MaxExchange Remote for your changes to take effect. Perform an Immediate Update When required, you can perform an immediate update of the central Address Book. MaxExchange Remote checks for incoming changes from the MaxExchange server, then makes these changes to the central Address Book. After the incoming changes have been processed, MaxExchange Remote prepares and sends data packets to the server for redistribution to its other distribution sites. Once the overall synchronization is complete, the whole central Address Book (both on the server and at the distribution sites) is up to date. If you are using email as a transport method, your computer must be running and the email system must be operating for MaxExchange to perform an immediate update. Your computer must have MaxExchange Remote running, all necessary transport resources must be enabled (e.g., modem turned on), and required transport access to the server must be available. ➤ To perform an immediate update • Click the Process Data Packets button or select File > Process Data Packets. MaxExchange Remote updates the central Address Book by first checking for updates from the server and processing them, then preparing and distributing your local changes back to the server for redistribution. (If you enable Remote Dial-up, the order of these processes may be reversed. See “Set Scheduling Options for Dial-up Email” on page 471 for more information.) Chapter 13 Using MaxExchange Remote 477 Regardless of which transport method is used, Process Data Packets simply creates a data packet and puts it into a folder for transport to the server. LThe “hexadecimal” folder is actually a folder named with a hexadecimal number that corresponds to the Address Folder ID. This ID is displayed in the Distribution List dialog box in MaxExchange Site Manager. • FTP – The data packet files—.ATT and .HDR—are created and put into the \maxexchange\outbox\<hexadecimal> folder. The distribution site computer will later initiate an FTP transport session and pick up the packet. • Network Direct – A new data packet is created (.HDR and .ATT files) and put into a folder for transport. When the data packet is in the folder, the packet is transported immediately if you have selected Simultaneous in the Processing and Transport Times dialog box. • Email – The data packet is sent immediately to your local email outbox, encapsulated in an email message, and transported during your next email session. Change Email Preferences To optimize MaxExchange Remote operations when using email data transport, you may specify the email system you plan to use in the Email Preferences dialog box. When you select your email system in the Email Preferences dialog box, MaxExchange accounts for the differences in the third party email software to ensure proper transport operation. Email preferences should not have to be changed except under the following circumstances: • You are installing MaxExchange Remote and your chosen transport method is email. • You are changing your email application software. • Your transport method is changed to email. ➤ To set email preferences Select Edit > Email Preferences. Select the email system that applies to your computer. Specify the maximum size of any single packet in kilobytes (KB). This applies to the outgoing packet size on the remote. Email packets are then limited to this size. If a packet is larger than this limit, the packet is spanned into smaller packets within the limit. If the limit is set to 0, the packet size is unlimited. Indicate whether to convert packets so they can be sent over the Internet in its standard, 7-bit email format. If you send packets 478 Maximizer CRM 10.5 User’s Guide over the Internet, you must select this option to ensure that they are reliably transmitted. Enable the partial packet warning if necessary. When the size of a packet exceeds the maximum size set for a packet (if enabled in Maximum Size above), partial packets are created. The sum of these partial packets makes up the entire data packet. For instance, take an example where a system administrator sets the limit on packets to 2 MB (or 2000 KB). Assume that the Server creates a large data packet that is 3.5 MB or 3500 KB. MaxExchange will break this packet into 2 partial packets. If only one of these data packets arrives, but the other is still in transit, the data from the first partial data packet cannot be processed until the second partial data packet is received as well. LEmail account information is set up after your email application is installed. If you are using Microsoft Outlook, you can access this information through the Windows Control Panel. See your system administrator for more information. Enter your email account Email profile/User name and password (if required). The available options vary depending on what type of email application you are using. Click OK. Change Your MaxExchange FTP Password When the MAXEXCHANGE user profile Password changes, all distribution sites need to receive this information so that they can access the MaxExchange FTP server. The MAXEXCHANGE Password can be changed only at the server using the MaxExchange Site Manager. When the Password is changed, and the change is processed by the server, the change is contained in a data packet for each distribution site to pick up. Chapter 13 Using MaxExchange Remote 479 ➤ Changing your MaxExchange FTP password Click Process Data Packets. The data packet containing the Password change is downloaded to your computer. If your computer is set to use FTP transport, and the server FTP password has been changed, you will receive the Server Login dialog: Enter the password given to you by your system administrator. Click OK. To process any additional packets retrieved after the Password change, click Process Data Packets once again. Convert Outgoing Packets for Internet Transport Internet email uses a different encoding standard than many LAN email packages. Therefore, if you send data packets over the Internet to the MaxExchange server, the packets must be converted to 7-bit Internet format. ➤ To convert packets for Internet transport Select Edit > Email Preferences. Select Use 7-bit Internet Format. 480 Maximizer CRM 10.5 User’s Guide Click OK. All subsequent data packet files are converted to 7-bit Internet format before being sent to the server. Restrict the Size of Packets Depending on the potential size of the updates or the file size limits specified in your email system, you may need to limit the size of your MaxExchange data packets to prevent data from being lost. ➤ To limit the size of packet files Select Edit > Email Preferences. In the Maximum Size field, specify the maximum size of the file in kilobytes (KB). (If you do not know your file size limit, consult your network administrator or email documentation.) For no limit on data packet size, leave the field blank. Click OK. MaxExchange Remote ensures that no subsequent data packets are larger than the size you specified. Disable the Partial Packet Warning Message If you set a maximum packet size above, packets created by MaxExchange that are larger must be split into multiple packets that do not exceed the maximum size. Until all such partial packets are received, the distribution site cannot process any of the complete packets’ parts. When MaxExchange Remote cannot process because Chapter 13 Using MaxExchange Remote 481 all of the partial packets are not received, it displays a Partial Packet Warning dialog. The Show Partial Packet warning dialog is enabled on installation. When this warning dialog is enabled, you must respond to the dialog before other packet processing can continue. If the warning dialog is disabled, packet processing can continue without your response, but partial packet occurrence may go unnoticed. ➤ To disable the Partial Packet Warning dialog Select Edit > Email Preferences. Deselect (disable) the Show Partial Packet Warning checkbox. Click OK. Save Outgoing Packets to Disk When necessary, you can save outgoing data packets to disk such as floppy diskettes or other removable media, so the packets can later be imported by the MASTER user into the MaxExchange server. ➤ To save a packet to disk • Select File > Save to Disk. The Save to Disk menu item in the File menu should now have a check mark next to it. All subsequent data packets are saved to disk instead of being transmitted by email. Once the data packets have been saved to disk, you must send the disks to the MASTER user at the server location. Import a Server Packet There may be times when you receive data packets from the MaxExchange server that were saved to disk or a hard drive directory (folder). ➤ To import a server packet Insert the appropriate disk containing the server data packet in your disk drive. Select File > Import Packet. Specify the location and file name of the server data packet. 482 Maximizer CRM 10.5 User’s Guide Click Open. The data packet is copied to a processing queue and will be applied to the central Address Book during the next processing of data packets. View Synchronized Address Book Properties You may view certain transport information for every synchronized Address Book on a distribution site computer. MaxExchange reads transport information contained in the MXZREM.BIN file in the “MaxExchange” program directory. ➤ To view synchronized Address Books on a remote computer. Select View > Synchronized Address Books. The Address Book name, its transport method, Address Book ID, server address, and server port number are shown. You can change the server address and port number if necessary. When finished viewing, click Close to exit the dialog. Chapter 13 Using MaxExchange Remote View Distribution Preferences ➤ To view distribution properties • The distribution preferences can be viewed in MaxExchange Remote by clicking the Preferences button while viewing the synchronized Address Book properties (View > Synchronized Address Books). MaxExchange Remote distribution preferences ➤ To view distribution properties in Maximizer LNote that these Distribution attributes (other than the default preferences option) override the preferences set in MaxExchange Site Manager. • Distribution preferences appear as part of the properties for Company Library documents, knowledge base articles, general documents, and notes (right-click on one of these items and 483 484 Maximizer CRM 10.5 User’s Guide choose Properties). Only the MASTER user has rights to change these preferences in the Properties dialog box (in Maximizer). Distribution preferences for a general document Set Up the Troubleshooting Logs You can log MaxExchange Remote activity in troubleshooting logs. MaxExchange Remote creates two logs (a Packet Summary Log, Packlog.txt, and a Remote Activity log, Rmdmlog.txt), both of which are text files located in the same directory (folder) as your MaxExchange programs. ➤ To create logs Select Edit > Logging Preferences. To log when data packets are received by your computer, select Maintain Packet Summary. Log information is saved in the text file Packlog.txt. To log detailed information about when data packets are sent and received, and what happens to them, select Maintain Remote Activity. Log information is saved in the file Rmdmlog.txt. Indicate the level of log detail you want to see in the Rmdmlog.txt: • To log errors only, select Low. • To log record-level updates (additions, changes, and deletions of Maximizer entries), select Medium. • To log field-level updates (details of changes within Maximizer entries), select High. Chapter 13 Using MaxExchange Remote 485 Click OK. Check the Troubleshooting Logs LIf you employ email transport, you may also check your email system’s conversation log for more information. If you have set the troubleshooting logs to record MaxExchange activity, you can check the logs when you experience problems during a synchronization session or suspect that updates are not being sent or received. Remote Activity Log (Rmdmlog.txt) Check the Rmdmlog.txt by selecting View > Remote Activity Log. The Rmdmlog.txt file can include: • The number of information packets sent. • The number of information packets received. • The number of additions, updates, and deletions made to your image of the central Address Book. The contents of the log depend on the detail level you set when configuring MaxExchange Remote’s log file. Packet Summary Log (Packlog.txt) For information about the date and time information packets were received, check the Packlog.txt by selecting View > Packet Summary Log. 486 Maximizer CRM 10.5 User’s Guide Change Email from LAN to Dial-Up or Vice Versa To change a distribution site computer from a LAN remote to dial-up remote, or vice versa, you must make changes to both the MaxExchange Remote settings and your current mail driver on the distribution site computer. ➤ To change a LAN email remote to a dial-up email remote: Select Edit > Remote Dial-Up Preferences. Set all time fields in the Process and Transport Timing group box and select the Enable Remote Dial-Up checkbox. Change your current mail driver from Network to Remote. Contact your system administrator for additional details. Ensure that the automatic dial-up time of your email communications program corresponds to the processing and communication times set above. CHAPTER Administration for Maximizer 14 Administration for Maximizer In this chapter... “Enabling TAPI with Maximizer” on page 488 “Phone Masks” on page 493 “Maximizer Field Types” on page 494 “Updating Maximizer with the Live Update Wizard” on page 496 “Backing Up and Restoring Address Book Data” on page 498 “Changing Languages for the Maximizer Spell Checker” on page 500 14 488 Maximizer CRM 10.5 User’s Guide Enabling TAPI with Maximizer Maximizer can use TAPI (Telephony Application Programming Interface) to detect incoming phone numbers (using caller ID) and log the phone conversation for the matching Address Book entry. The following requirements must be met to use TAPI with Maximizer: • Your telephone system must be TAPI-enabled. • Your phone system’s TAPI driver must be installed. • Your computer’s modem must be compatible with TAPI. You can configure your modem for TAPI through the Windows Control Panel (Control Panel > Phone and Modem Options > Advanced tab). For more information, refer to your TAPI system and Windows documentation. • Maximizer must be configured for TAPI, as described in this section. Requirements for Caller ID Specific requirements are essential to implement Caller ID detection: • Caller ID service from the local telephone company • TAPI-compliant hardware that is Caller-ID capable • A TSPI component (such as an .INF file driver) for your Caller-ID enabled TAPI hardware (e.g., UniModemV) • Microsoft TAPI software components Even if you meet these requirements, caller ID may not operate properly, especially if your local telephone company uses a different standard for caller ID than your TAPI driver. Call your local phone company to obtain more information regarding your caller ID standard and compare it to the standard used by the TAPI driver. Reasons Why Caller ID May Not Work If you use a TAPI-enabled modem (as opposed to a PBX, H.323, or other TAPI hardware), and your telephone company provide MESGformat caller ID information (rather than SDM, another common format), caller ID call detection is unlikely to work. Microsoft’s UniModemV TAPI driver and MODEM.INF file, provided with most TAPI modems, do not support MESG caller ID format, which means your modem (and Maximizer) may never receive caller ID information from TAPI. If your modem manufacturer provides its own TAPI modem or PBX driver and the appropriate INF file, or you are able to obtain SDM-format caller ID, you might have more success. Chapter 14 Administration for Maximizer 489 Phone Number Matching with TAPI When Maximizer uses TAPI to detect an incoming phone call, it matches the phone call to a Maximizer Address Book entry and logs the call as a note for the entry. Depending on your TAPI configuration in Maximizer, it uses either the “Smart Phone Number Matching” or “Exact Phone Number Matching” algorithm to determine which Address Book entry matches the incoming phone number. Smart Phone Number Matching By default, Maximizer uses the Smart Phone Number Matching algorithm to determine which Address Book entry matches the incoming call. When a call comes in, Smart Phone Number Matching looks for all Address Book entries with phone numbers ending with the incoming phone number string and displays those Address Book entries in a list so you can select the correct entry. For example, if the incoming phone number string is four digits, Maximizer displays a list of all Address Book entries ending in those four digits. Smart Phone Number Matching matches the digits from right to left. The number of matched digits required for matching is equal to the shorter length of the two phone numbers. The following table illustrates Smart Phone Number Matching for four-digit and seven-digit incoming phone numbers. Address Book entry phone number Does the incoming four-digit phone number (2314) match? Does the incoming seven-digit phone number (732-2314) match? 9-604-732-2314 Yes Yes 1-604-732-2314 Yes Yes 403-732-2314 Yes Yes 732-2314 Yes Yes 497-2314 Yes No 2314 Yes Yes 3514 No No 14 Yes Yes 490 Maximizer CRM 10.5 User’s Guide Exact Phone Number Matching If you select the “Enable exact number matching” checkbox in the TAPI preferences in Maximizer, it uses the Exact Phone Number Matching algorithm instead of Smart Phone Number Matching. Exact Phone Number Matching considers an Address Book entry to match the incoming call only if both numbers contain exactly the same phone number with the specified number of digits. By default, Exact Number Matching requires both phone numbers to be seven digits, but you can change the required number of digits. The advantage of Exact Phone Number Matching is that when Maximizer finds an Address Book entry that matches exactly, you do not need to select it from a list of possible matches, as you do with Smart Phone Number Matching. The following table illustrates Exact Phone Number Matching for four-digit and seven-digit incoming phone numbers. Address Book entry phone number Does the incoming four-digit phone number (2314) match? Does the incoming seven-digit phone number (732-2314) match? 9-604-732-2314 No No 1-604-732-2314 No No 403-732-2314 No No 732-2314 No Yes 497-2314 No No 2314 Yes No 3514 No No 14 No No For instructions on enabling and configuring Exact Phone Number Matching, refer to “Configure Maximizer to Use TAPI” on page 491. Chapter 14 Administration for Maximizer 491 Configure Maximizer to Use TAPI Before you can configure Maximizer to use TAPI, you must have a TAPI-enabled telephone system, and your computer’s modem must be configured to use TAPI. You can configure your modem for TAPI through the Windows Control Panel (Control Panel > Phone and Modem Options > Advanced tab). For more information, refer to your TAPI system and Windows documentation. ➤ To configure Maximizer to use TAPI LTAPI can also be configured from Administrator in the Dialing tab of user preferences. In Maximizer, select File > Preferences. Click the Dialing tab. In the Method group box, select the TAPI option. Click Properties. Fill in your location information, and click OK twice to return to the Maximizer Dialing Preferences. Click Device. Select your TAPI device name from the Line drop-down list, and click OK. Select the Detect incoming calls option. Select the Enable exact number matching option, if desired. 492 Maximizer CRM 10.5 User’s Guide If you enabled exact number matching, enter the number of phone number digits to match exactly in the Match # of digits box, or leave the default setting of 7. Click OK to close the Preferences dialog box. Chapter 14 Administration for Maximizer 493 Phone Masks LIf the Phone Mask registry key does not exist, you must create it as a String value. The registry entry (HKEY_CURRENT_USER\Software\Maximizer Software\Maximizer\Modules\AMGR\INTL\Phone Mask) overrides the default format of a phone number with the phone mask provided as a value. The mask uses # to indicate digits and can include any other characters (e.g., + - ,). The mask formats from right to left. For example, if the phone mask value is ###-####, but a user enters a 10-digit phone number (e.g., 1234567890), the result would be formatted as 123456-7890. If the value has fewer digits than the mask allows, the extra (left-most) placeholders are not used. Examples Phone Mask Digits Value Typed in Display Not specified (default) 7 1234567 123-4567 10 1234567890 123456-7890 ###-#### 7 1234567 123-4567 10 1234567890 123456-7890 7 1234567 123-4567 10 1234567890 (123) 456-7890 7 1234567 123-4567 10 1234567890 +1 (123) 456-7890 (###) ###-#### +1 (###) ###-#### ### ## ####-###### 15 123456789012345 123 45 5678-012345 The Phone Mask value effects the display of phone numbers in Maximizer program dialog boxes and window lists. The Phone Mask value is read during program startup. 494 Maximizer CRM 10.5 User’s Guide Maximizer Field Types Use Key Fields Key fields are important user-defined fields that are specific to Address Book entries, opportunities, campaigns, and customer service cases, making them more readily accessible. The user-defined fields that appear as key fields in these tabs is controlled in Administrator. Mandatory user-defined fields can be assigned as key fields, so users don’t miss them when creating a new record. Typically, key fields are frequently used user-defined fields, making it easier for users to quickly enter these values. A key field can be defined for a specific user or group, or for all users. Specify Key Fields by Module When key fields are set up in Administrator, up to eight user-defined fields can be specified for each module. The modules are described in the following table. The user-defined fields available for each module correspond to the related type of user-defined field and the related Maximizer module. For example, the Customer Service Key Fields module may contain only customer service user-defined fields, and these key fields will be available only in the customer service case dialog box in Maximizer. Each type of Address Book module has Lead and Non-Lead versions, which determines the type of Address Book entry the key fields applies to. For example, Individual - Non-Lead key fields appear only in Individual Address Book entries that are not marked as leads. Type of User-Defined Field Visible in Maximizer Module Company - Lead Address Book entry user-defined fields for Companies Companies that are marked as Leads Company - Non-Lead Address Book entry user-defined fields for Companies Companies that are not marked as Leads Individual - Lead Address Book entry user-defined fields for Individuals Individuals that are marked as Leads Individual - Non-Lead Address Book entry user-defined fields for Individuals Individuals that are not marked as Leads Key Fields Module Chapter 14 Administration for Maximizer Type of User-Defined Field Visible in Maximizer Module Contact - Lead Address Book entry user-defined fields for Contacts Contacts that are marked as Leads Contact - Non-Lead Address Book entry user-defined fields for Contacts Contacts that are not marked as Leads Opportunity Opportunity userdefined fields Opportunities Campaign Campaign userdefined fields Campaigns Customer Service Customer Service user-defined fields Customer Service cases Key Fields Module 495 Mandatory Fields There are two types of mandatory fields in Maximizer as follows: • Fields in Maximizer entries that must contain a value when creating certain types of entries. For example, these fields can be designated on the Basic Information tab for Address Book entries. These mandatory fields are designated through File > Preferences > Mandatory Fields in Administrator. • User-defined fields that must contain a value. Mandatory userdefined fields are designated through File > Set Up User-Defined Fields in Administrator or Maximizer. Mandatory user-defined fields are denoted with an asterisk displayed after the field type. System Fields There are two types of system fields in Maximizer as follows: • User-defined fields created by Maximizer rather than by users. Users can modify some properties of these fields but cannot delete them. • All Maximizer fields that are not user-defined fields are system fields. A few system fields have customizable value-selection lists, which can be defined through File > Preferences > System Fields in Administrator. System fields are shown in bold, black text. 496 Maximizer CRM 10.5 User’s Guide Updating Maximizer with the Live Update Wizard The Maximizer Live Update Service is installed automatically with Maximizer CRM server and workstation. It enables users to download updates such as hot fixes and service releases, and you can configure Live Update to provide automatic notification of available updates. The Live Update Wizard on Maximizer workstations connects to your Live Update Server and downloads any available updates. ➤ To start the Live Update Wizard LLive Update options in • Administrator are accessible through the Live Update button on the System Options tab in File > Preferences. If the Enable automatic Maximizer Live Update notification option is selected in the Live Update options in Administrator, a message box (shown below) notifies you when new updates are available. Click OK to start the Live Update Wizard. – or – • In Administrator or Maximizer, select Help > Maximizer Live Update. ➤ To download software updates from the server Start the Live Update Wizard as described above. Click Next. The Live Update Wizard connects to the Live Update Server to check for any available updates. Chapter 14 Administration for Maximizer LThe updates download folder path is specified in the Preferences tab of Live Update Manager. 497 Select the update(s) to download. Click Next to download the selected updates. Click Finish to close the wizard. The downloaded executable file should launch immediately to start the installation. If you need to locate the downloaded file, it is in the user’s Application Data folder (typically C:\Documents and Settings\<CurrentUser>\Application Data\Maximizer\Live Update). 498 Maximizer CRM 10.5 User’s Guide Backing Up and Restoring Address Book Data You can back up and restore Maximizer Address Book data. Note that if your Address Book uses a custom dictionary or holidays you must back up this data separately from the Address Book. See “Back Up the Dictionary and Holiday Files” on page 500 for more information. Back Up an Address Book L For information on backing up Address Books in Maximizer CRM Professional Edition and Maximizer CRM Enterprise Edition, see the Maximizer The following two backup procedures are available in Maximizer CRM Group Edition: • Regular Backup. This backup procedure requires the Address Book to be closed and must be done in Administrator. See the Maximizer CRM Administrator’s Guide and Administrator Help for assistance. • Quick Backup. This backup procedure is performed on an open Address Book. You can perform a Quick Backup from either Administrator or Maximizer. If security is enabled, you will need access to the MASTER user password. CRM Administrator’s Guide and your Microsoft SQL Server documentation. Quick Backup The advantage of using Quick Backup is that you can perform frequent backups of any open Address Book. LIf you are backing up a global Address Book from a workstation, the backup is automatically saved to the default SQL Server Express backup folder. You do not have the option to save the backup to a different location. By default, the backup is saved to the current Address Book folder. If you don’t want to save the backup to this location, you can browse to another one. If you choose to save the backup to the default location, Quick Backup creates a subfolder named Backup in the same folder as the Address Book files. The backup file name includes the current date as an identifier. For example, the following backup file was created from a Quick Backup performed on March 23, 2007. (The backup was saved to the following default location). C:\ProgramData\Maximizer\AddrBks\EsconaTutorial\Backup\EsconaT utorial_20070815_01.BAK The “_01” is added to the file name to differentiate between backups from the same day, so a second backup on the same day would be saved as follows: C:\ProgramData\Maximizer\AddrBks\EsconaTutorial\Backup\EsconaT utorial_20070815_02.BAK Chapter 14 Administration for Maximizer 499 Quick Backup also lets you determine how many backups are kept. If you were to set Quick Backup to retain only five backups, then when you create the sixth backup, Quick Backup deletes the oldest backup. ➤ To perform a Quick Backup Open the Address Book to back up. Select File > Quick Backup. Enter the MASTER user password. If this box is disabled, continue to the next step. Select the backup folder: If you want to save the backup file to the default location (Address Book folder), leave the Backup Location field blank. If you want to save the backup file to a different location, click Browse. Select a folder in the Browse for Folder dialog box and click OK. The location is displayed in the Backup Location field. Specify the number of previous backups to retain if you are: • Backing up a local database on a workstation. • Backing up a global or local database on a server machine. Click OK to begin backing up. When the Quick Backup is complete, a message box confirms that the backup was successful. The backup file name and location are displayed. Click OK. 500 Maximizer CRM 10.5 User’s Guide Restore an Address Book If you have lost or damaged your Address Book, you can restore it to a previously backed up version. The restore procedure replaces existing Address Book data with backup Address Book data. If you are restoring data from a network location, you must have access to the folder where the backup file is saved. See the Administrator's Guide and Administrator Help for further assistance. Back Up the Dictionary and Holiday Files LHoliday files are created in Holiday Editor—a utility in Administrator you can use to add or edit holidays in the Maximizer calendar. By default, the Holiday Editor contains many North American holidays. The holidays listed in the Holiday Editor also appear in the Calendar window in Maximizer. You can use Administrator to modify or delete existing holidays, or add new holidays. The Maximizer dictionary and holiday files are not backed up as part of the Address Book backup procedure(s) described above. Therefore, if you have customized the dictionary or holidays, you need to back up those files separately, especially before upgrading or re-installing Maximizer. To back up the dictionary and holiday files, copy them from the following location and paste them to another location, preferably the same location where your Address Book is backed up. The user dictionary file is unique to each Maximizer workstation, so you will need to back up this file for each workstation. User Dictionary File Location: LBy default, the Maximizer program folder is C:\Program Files\Maximizer. If Maximizer was installed in a different folder, then change the path accordingly. C:\Program Files\Maximizer\MaData6\Userdict.lex Holiday File Location: C:\Program Files\Maximizer\MaData6\Mxzhol.nam Changing Languages for the Maximizer Spell Checker In many of the Maximizer dialog boxes, you can use the Maximizer Spell Checker to check the spelling of text. By default, the selected language is American English, but you can change this language to any other of the following languages: • Brazilian Portuguese • British English • Canadian French • Spanish Chapter 14 Administration for Maximizer ➤ To change the language for the spell checker Open the Maximizer Word Processor. Select Options from the Tools menu. In the Spelling tab, choose a language from the Currently installed languages list. 501 502 Maximizer CRM 10.5 User’s Guide APPENDIX Crystal Reports Database Views/Tables Reference A Maximizer Database Views/Tables Reference In this chapter... “Overview” on page 504 “Data Population for the Current Window” on page 504 “Database Views for User-Defined Fields” on page 505 “Database Driver Used to Create Crystal Reports” on page 505 “Filtering Data” on page 506 “Linking” on page 507 “Controlling Windows” on page 507 “Including Additional Views in Your Reports” on page 509 “SQL Views and Data Tables” on page 512 A 504 Maximizer CRM 10.5 User’s Guide Overview This chapter is a technical reference for using Crystal Reports with Maximizer data. For more how-to information about generating and storing Crystal Reports for Maximizer, refer to “Crystal Reports” on page 416. For information on Maximizer SQL views and tables, refer to the Customization Suite documentation. Data Population for the Current Window LFor more information on user access rights for creating Crystal Reports, see the Maximizer CRM Administrator’s Guide. When you create a new report template or edit an existing report template, the default table/view for the report is based on the current Maximizer window. You are connected to the MAS_[Address Book name] for Microsoft SQL data source by default. If you want to link to additional tables, you must do so in the Database Expert dialog box in Crystal Reports. See “Linking” on page 507 for more information. Following is a list of each controlling window and its associated default table and file names used for Crystal Reports. Controlling Window Views for Microsoft SQL Address Book AMGR_Client Opportunity Opp_View Campaigns AMGR_Opportunity Hotlist AMGR_Hotlist Customer Service CSCases_View If you are not in the controlling window that corresponds with the type of report you choose, you are limited to running the report on all entries in the Address Book rather than a selected or current entry list. Appendix A Crystal Reports Database Views/Tables Reference 505 Database Views for User-Defined Fields When you create a user-defined field, a database view for that userdefined field is also created. You can use these views to report on user-defined fields in Crystal Reports. For example, when a new Address Book user-defined field called “Salary” is created, a new view named “A_Salary” is dynamically created. Based on the type of user-defined field, the view name is prefixed by a designated letter. The following table identifies the view name prefixes for each type of user-defined field. Microsoft SQL View Prefixes The Microsoft SQL driver creates database views for user-defined fields, using the following prefixes. Prefix Type of user-defined field A_ Address Book BP_ Third-Party Integration C_ Campaign CS_ Customer Service O_ Opportunity U_ Users S_ System Database Driver Used to Create Crystal Reports Maximizer uses the native SQL Server driver (MAS_ DSN) exclusively to create Crystal Reports in this version of the software. However, Crystal Reports created in some previous versions of Maximizer were created using the Maximizer ODBC driver. The Maximizer ODBC driver is still supported for compatibility reasons with previous versions of Maximizer. If you are creating new reports for use with Maximizer, use the SQL Server driver. 506 Maximizer CRM 10.5 User’s Guide Filtering Data In order to report on particular types of data, you need to use selections or filtering in Crystal Reports. Use the Select Expert (Report > Select Expert) to select or filter data for your report. In the case of the Address Book table/view, use the Record_Type field to select or filter Address Book entries. For example, to create a report that only shows Company records, use the Select Expert to return only those records where “Record_Type = 1”. You can also filter or select the data for the report using Maximizer. Once a report has been saved, populate the appropriate Maximizer windows with the desired information then run the personal report and select the all entries in the current list option. Maximizer contains default records in many of the common modules. These are denoted by an “@” sign and can be filtered using the Select Expert by using the “does not start with” criteria as illustrated in the following graphic. Address Book Entry Data Type Record Type for Microsoft SQL Company Record_Type = 1 Individual Record_Type = 2 Contact Record_Type = 31 Individual Contact Record_Type = 32 Default Entry Record_Type = 5 Alternate Address for Contact Record_Type = 41 Alternate Address for Individual Record Type = 42 Appendix A Crystal Reports Database Views/Tables Reference 507 Linking Linking determines how the report data elements are related. For example, to report all notes related to an Address Book Entry you would link the Client_Id and Contact_Number fields of the AMGR_Client view to the fields of the same name in Notes. Crystal Reports enables you to specify the type of join and type of link you want to use when linking tables. Joins and links indicates how linked fields in two tables are compared when records are read. Join, enforce, and link options can be specified in the Links Options dialog box. Using the various join enforcement options can ensure that linked tables are included in the SQL query, even when none of the fields in the table are used in the report. The Crystal Reports help files contain more information on Linking options. Controlling Windows As mentioned previously, when you choose to create a new report template or edit an existing template, the default view for the report is based on the active controlling window. Following is an example of a controlling window in Maximizer outlining the associated view name, links, and common selections. 508 Maximizer CRM 10.5 User’s Guide Customer Service Window Example Each customer service case created for an Address Book entry is a record in the CSCases_View view. To report on cases for Address Book entries, you must add the view and link it to the Address Book entry table according to the following table. Case Microsoft SQL Maximizer ODBC Case view name CSCases_View CSCases Links Client_Id => Client_Id Contact_Number => Client_Number Client_Id => Client_Id Contact_Number => Client_Number Appendix A Crystal Reports Database Views/Tables Reference 509 Including Additional Views in Your Reports To include additional views in your reports, you must link them to the parent table of the controlling window. You do so through the Database Expert (Database > Database Expert) by linking to the data source. 510 Maximizer CRM 10.5 User’s Guide User-Defined Fields Example When a new User-Defined Field is created, a new database table or view for that User-Defined Field is also created. User-Defined Fields can be associated with Address Book, Campaign, Opportunity, Customer Service, and Users. Use the Database Expert (Database > Database Expert) to include a user-defined field and link it to the desired parent view/table. The following example is using a user-defined field named “Annual Sales”. User-Defined Field Microsoft SQL Maximizer ODBC User-defined field view name A_<user-defined field name> example: A_ANNUAL_SALES U_<user-defined field name> example: U_ANNUAL_SALES Links Client_Id => Client_Id Contact_Number => Contact_Number Client_Id => Client_Id Contact_Number => Contact_Number Appendix A Crystal Reports Database Views/Tables Reference 511 Notes Example Each note created for an Address Book entry is a record in the view called Notes. To report on notes associated with Address Book entries, you must add the view and link it to the Address Book entry table according to the following table. Note Microsoft SQL Notes view name AMGR_Notes Links Client_Id => Client_Id Contact_Number => Contact_Number 512 Maximizer CRM 10.5 User’s Guide SQL Views and Data Tables Following is an appendix of the most common Maximizer SQL views and tables. AMGR_Client View The AMGR_Client View contains name, address, phone number, and email address information for Address Book entries, including Companies, Individuals, and Contacts, as well as alternate addresses and default entries. Many other tables in the database reference the Client_Id and Contact_Number fields of this table. Note This view supports insert, modify, and delete actions and supports MaxExchange transaction journalling. Table 1 AMGR_Client View Field Name Data Type Len. Foreign Table Ref. Description and Rules Data_Machine_Id Numeric 9 Sequence_Number Numeric 9 Record_Type String 2 Owner_Id String 11 Private Integer 4 Client_Id String 23 Unique client identification string. Contact_Number Integer 4 Unique client identification number. 0 = Company or Individual record < 60,000 = Contact record > 59,999 = Alternate address Name_Type String 1 C = Company I = Individual, Contact, Default entry, or Alternate address Type of Address Book entry: 1 = Company 2 = Individual 5 = Default entries 31 = Company Contact 32 = Individual Contact 41 = Company or Company Contact alternate address 42 = Individual or Individual Contact alternate address Appendix A Crystal Reports Database Views/Tables Reference Table 1 AMGR_Client View Field Name Data Type Len. Foreign Table Ref. Description and Rules Name String 79 One of the following: • Company name • Individual last name • Contact last name • Alternate address description • Default Entry Address_Id Integer 4 0 = Use default address Value other than 0 = Contact_ Number of address to use for this Address Book entry. Last_Modify_Date DateTime 8 Transfer_Date DateTime 8 Date and time when the last transfer occurred. Highest_Alt_Adr_ Number Integer 4 Highest alternate address number in use. Phone_1 String 21 Reverse_Phone_1 String 21 Phone_1_Extension String 21 Phone_2 String 21 Reverse_Phone_2 String 21 Phone_2_Extension String 21 Phone_3 String 21 Reverse_Phone_3 String 21 Phone_3_Extension String 21 Phone_4 String 21 Reverse_Phone_4 String 21 Phone_4_Extension String 21 Highest_Contact_ No Integer 4 513 514 Maximizer CRM 10.5 User’s Guide Table 1 AMGR_Client View Field Name Data Type Len. Foreign Table Ref. Description and Rules Receives_Letters Integer 4 Indicates whether Contact (Record_Type = 31 or 32) receives mail sent to the Company/ Individual: 0 = Contact doesn’t receive mail sent to Company/Individual 1 = Contact receives mail sent to Company/Individual Note: • For Individual records (Record_Type = 2), this value is always 1. • For Company records (Record_Type = 1) and alternate addresses (Record_Type = 41 or 42), this value is always 0. Use_Client_Name Integer 4 Applies to Contacts (Record_Type = 31 or 32) only. Indicates whether the Contact’s Company/Individual name should be included in the address: 0 = Do not include Company/ Individual name in address 1 = Include Company/Individual name in address First_Name String 79 Initial String 79 MrMs String 79 Title String 79 Salutation String 79 Department String 79 Firm String 79 Division String 79 Address_Line_1 String 79 Address_Line_2 String 79 Middle name or initials. The Company Name of an Individual record. Applies to Individual (Record_Type = 2) records only. Appendix A Crystal Reports Database Views/Tables Reference Table 1 515 AMGR_Client View Field Name Data Type Len. Foreign Table Ref. Description and Rules City String 79 State_Province String 79 Country String 79 Zip_Code String 79 Last_Client_Id String 23 Record_Id Integer 4 Creator_Id String 11 Create_Date DateTime 8 Updated_By_Id String 11 AMGR_Client. Updated_By_Id = ADMN_User_ Details.User_Id User_Id of user who most recently updated the Address Book entry. Reports_To_ Contact_Number Integer 4 AMGR_Client. Reports_To_Contac t_Number = AMGR_Client. Contact_Number Contact_Number of Contact (Record_Type = 31 or 32) to whom this contact reports (e.g., contact’s supervisor or manager). Applies only to Contact records (Record_Type = 31 or 32). Assigned_To String 11 AMGR_Client. Assigned_To = ADMN_User_Detail s.User_Id User_Id of user assigned to the Address Book entry as the Account Manager. Applies to Company (Record_Type = 1), Individual (Record_Type = 2), and Default Entry (Record_Type = 5) records only. ReadPriv Integer 2 ReadOnly_Id String 11 Phone_1_Desc String 21 Phone_2_Desc String 21 Phone_3_Desc String 21 Phone_4_Desc String 21 Email_1_Desc String 15 Email_2_Desc String 15 Email_3_Desc String 15 Last Client ID used for transfer. 516 Maximizer CRM 10.5 User’s Guide Table 1 AMGR_Client View Field Name Data Type Len. Foreign Table Ref. Lead_Status Integer 2 0 = Not a sales lead 1 = Sales lead Applies to Company (Record_Type = 1) and Individual (Record_Type = 2) records only. Change_Bits Binary 8 MaxMerge Change Field. Used by Maximizer. Contact_Inherits_ UDFs Integer 2 “New contact inherits user-defined fields” checkbox in Company and Individual Address Book entries. 0 = Contact does not inherit UDFs 1 = Contact inherits UDFs Territory_Status Integer 2 Indicates how the territory was set. 0 = Unassigned 1 = Unaligned 101 = Set by user 102 = Set by rule 201 = Set by manager Note: Unaligned status is used when territory alignment moves an Address Book entry from a defined territory so that it no longer falls under any of the territory criteria. The old territory remains in the Territory_ID field. Territory_ID Numeric 10 AMGR_Client. Territory_ID = AMGR_Territory. Territory_ID Description and Rules Unique identification number. Appendix A Crystal Reports Database Views/Tables Reference 517 Company View The Company View includes fields from AMGR_Client for Company Address Book entries. Note This view is read-only. Table 2 Company View Field Name Data Type Len. Data_Machine_Id Numeric 9 Sequence_Number Numeric 9 Record_Type String 2 Owner_Id String 11 Private Integer 2 Foreign Table Ref. Description and Rules Record identifier. If modified, all contacts and addresses with the same Client_Id will also be modified. Client_Id String 23 Unique identification number. System generated if field is Null and “System to assign Address Book entries’ Identification field values” option is selected in Administrator (File > Preferences > System Options). Must be unique. Non-modifiable. Contact_Number Integer 2 Always 0 Name_Type String 1 Always C Company_Name String 79 Name of Company. Mandatory field. Address_Id Integer 2 Department String 79 Firm String 79 Division String 79 Address_Line_1 String 79 AMGR_Client. (Client_Id, Address_Id) Points to the address to use. 0 to use main address or must already exist in the Address table. >= 60000 means unsigned. 518 Maximizer CRM 10.5 User’s Guide Table 2 Company View Field Name Data Type Len. Foreign Table Ref. Description and Rules Address_Line_2 String 79 City String 79 State_Province String 79 Country String 79 Zip_Code String 79 Last_Modify_Date DateTime 8 Last_Modify_Time DateTime 11 Transfer_Date DateTime 8 Transfer_Time DateTime 11 Phone_1 String 21 Phone_1_Extension String 21 Phone_1_Desc String 21 Phone_2 String 21 Phone_2_Extension String 21 Phone_2_Desc String 21 Phone_3 String 21 Phone_3_Extension String 21 Phone_3_Desc String 21 Phone_4 String 21 Phone_4_Extension String 21 Phone_4_Desc String 21 Change_Bits_Low Binary 8 MaxMerge Change Field 1. Used by Maximizer. Do not use. Change_Bits_High Binary 8 MaxMerge Change Field 2. Used by Maximizer. Do not use. Creator_Id String 11 Creation_Date DateTime 8 Creation_Time DateTime 11 Date and time of transfer. If left empty, it defaults to the system clock. Date and time when Company/ Individual record was created. Default value is current system date and time. Appendix A Crystal Reports Database Views/Tables Reference 519 People View The People view includes fields from AMGR_Client for Individual and Contact entries. Note This view is read-only. Table 3 People View Field Name Data Type Len. Data_Machine_Id Numeric 9 Sequence_Number Numeric 9 Record_Type String 2 Owner_Id String 11 Private Integer 2 Client_Id String 23 Contact_Number Integer 2 Name_Type String 1 Last_Name String 79 Address_Id Integer 2 Department String 79 Firm String 79 Division String 79 Address_Line_1 String 79 Address_Line_2 String 79 City String 79 State_Province String 79 Country String 79 Zip_Code String 79 Foreign Table Ref. Description and Rules Record type indicator. AMGR_Client. (Client_Id, Contact_Number) Unique identification number. Valid values: 0–59999 • 0 = Individual • Value other than 0 = Contact Cannot modify. Pair (Client_Id, Contact_Number) must be unique. AMGR_Client. (Client_Id, Address_Id) Pointer to address record to use: • 0 = Use main address • >= 60,000 (unsigned) = Use alternate address 520 Maximizer CRM 10.5 User’s Guide Table 3 People View Field Name Data Type Len. Foreign Table Ref. Description and Rules Last_Modify_Date DateTime 8 Last_Modify_Time DateTime 11 Transfer_Date DateTime 8 Transfer_Time DateTime 11 Phone_1 String 21 Phone_1_Extension String 21 Phone_1_Desc String 21 Phone_2 String 21 Phone_2_Extension String 21 Phone_2_Desc String 21 Phone_3 String 21 Phone_3_Extension String 21 Phone_3_Desc String 21 Phone_4 String 21 Phone_4_Extension String 21 Phone_4_Desc String 21 Receives_Letters Integer 2 Applies to Contacts only. 0 = Contact does not receive mail 1 = Contact receives mail (default) Use_Client_Name Integer 2 Applies to Contacts only. 0 = Do not include Company/ Individual name in mailing address 1 = (Default) Include Company/ Individual name in mailing address First_Name String 79 Initial String 79 Mr/Ms String 79 Title String 79 Salutation String 79 Date and time of transfer. Salutation (e.g., Dear:) to use in correspondence. Appendix A Crystal Reports Database Views/Tables Reference Table 3 521 People View Field Name Data Type Len. Foreign Table Ref. Description and Rules Change_Bits_Low Binary 8 MaxMerge Change Field 1. Used by Maximizer. Change_Bits_High Binary 8 MaxMerge Change Field 1. Used by Maximizer. Creator_Id String 11 Creation_Date DateTime 8 Creation_Time DateTime 11 Date and time Individual or Contact was created. Default is current system date. AMGR_Appointments View The AMGR_Appointments View includes both personal and Address Book-related appointments. Note This view supports insert, modify, and delete actions and supports MaxExchange transaction journalling. Table 4 AMGR_Appointments View Field Name Data Type Len. Foreign Table Ref. Description and Rules Data_Machine_Id Numeric 9 Sequence_Number Numeric 9 Owner_Id String 11 AMGR_Appointme nts.Owner_Id = AMGR_Resources. Resource_Id – or – ADMN_Users.User_ Id User, location, or resource that the appointment is scheduled with. (There is a separate record for each user, location, and resource participating in the same appointment.) If the Location field includes a location that is not in the AMGR_Resources Table (Owner_Type=101), the Owner_Id value is L@FREEFORM. App_Date DateTime 8 Start date and time of appointment. Mandatory field. Lead_Date DateTime 8 Date and time when the appointment notification should take place. Default is 10 minutes prior to App_Date. 522 Maximizer CRM 10.5 User’s Guide Table 4 AMGR_Appointments View Field Name Data Type Len. Foreign Table Ref. Description and Rules End_Date DateTime 8 Client_Id String 23 Contact_Number Integer 4 Private Integer 4 Type Integer 2 Identifies all records of a single appointment, group appointment, recurring appointment, or recurring group appointment. The value is 0 for a single-user appointment and is another unique value for a group, recurring, or recurring group appointment. Note: Recurring, group, and recurring group appointments consist of multiple records in the AMGR_Appointments Table—one for each user and one for each recurrence. Alert_Flag Integer 2 0 = Alarm not set 1 = Alarm set Priority String 4 Defines the priority text (e.g., Hi, MED, LOW). Completed Integer 2 0 = Appointment incomplete 1 = Appointment complete End date and time of appointment. Default is 30 minutes after App_Date. AMGR_ Appointments. (Client_Id, Contact_Number) = AMGR_Client. (Client_Id, Contact_Number). Client the appointment is associated with. If filled in, the entry must exist in the AMGR_Client View. Cannot modify. Appendix A Crystal Reports Database Views/Tables Reference Table 4 AMGR_Appointments View Field Name Data Type Len. Foreign Table Ref. Description and Rules Icon_Type Integer 2 Icon associated with the appointment: 0 = None 1 = Mail 2 = ToDo 3 = Phone 4 = Travel 5 = Sale 6 = Meal 7 = Presentation 8 = Speech 9 = Meeting Note: Icons can be viewed when an appointment is being created. Rsvp Integer 2 User’s response to appointment invitation: 0 = No response 1 = User accepts appointment 2 = Declined 3 = Tentative response Cannot modify. Recurring_Id Integer 2 Unique recurring ID: • 0 = Not recurring • Other unique value = Identifier for records belonging to a recurring appointment Appt_Rec_Freq Integer 2 Frequency of recurring appointment: 0 = Daily 1 = Weekly 2 = Day of month (e.g., first Monday) 3 = Monthly (e.g., 14th) 4 = Yearly 523 524 Maximizer CRM 10.5 User’s Guide Table 4 AMGR_Appointments View Field Name Data Type Len. Foreign Table Ref. Description and Rules Appt_Num_Occur Integer 2 Identifies relative day of recurring appointment (e.g., second Tuesday). Applies to weekly, day of month, and monthly appointments only. Weekly appointments: 0 = Every ___ 1 = Every second ___ 2 = Every third ___ ... 25 = Every 26th ___ Day of month appointments: 0 = Every 1st ___ of the month 1 = Every 2nd ___ of the month ... 31 = Every Last ___ of the month Monthly appointments: 0 = First ___ of the month 1 = Second ___ of the month 2 = Third ___ of the month 3 = Fourth ___ of the month 4 = Last ___ of the month Appt_Day_Of_ Week Integer 2 Day of recurring appointment (e.g., Friday). Applies to weekly, day of month, and monthly appointments only. Weekly and Monthly appointments: 0 = Sunday 1 = Monday 2 = Tuesday 3 = Wednesday 4 = Thursday 5 = Friday 6 = Saturday Day of month appointments: 0 = Day 1 = Weekday Appendix A Crystal Reports Database Views/Tables Reference Table 4 525 AMGR_Appointments View Field Name Data Type Len. Foreign Table Ref. Description and Rules Skip_Weekend Integer 2 Applies to daily appointments only. 0 = Default 1 = Daily appointments do not occur on weekends. Move_To_Weekday Integer 2 Applies to yearly appointments only. 0 = Default 1 = If appointment occurs on a weekend, move to nearest weekday Rec_Start_Date DateTime 8 Appointment start date. Rec_End_Date DateTime 8 Appointment end date. Mandatory if Rec_Start_Date is used. PegBoardState Integer 2 Peg board state during appointment: 0 = Unknown 1 = Busy 2 = Out (Default) Record_Id Integer 4 Creator_Id String 11 Create_Date DateTime 8 Snooze_End_Date DateTime 8 Date and time when a snoozed appointment will display a reminder. Email_Date DateTime 8 Date and time to send email appointment reminder. Applies only if Email_Flag is set to True (1). Email_Flag Integer 2 0 = Don’t send email reminder 1 = Send email reminder Owner_Type Integer 2 0 = User 1 = Location 2 = Resource 101 = Custom Location 526 Maximizer CRM 10.5 User’s Guide Table 4 AMGR_Appointments View Field Name Data Type Len. Foreign Table Ref. Description and Rules Plan_Id String 23 Unique identification value of the Action Plan template, as defined in AMGR_ActionPlanTemplate. Plan_Number Integer 4 AMGR_Action Template.(Plan_Id, Plan_Number) = AMGR_ActionPlan Template.(Plan_Id, Plan_Number) Master_Id String 23 Master_Number Integer 4 AMGR_Appointme nts.(Master_Id, Master_Number) = AMGR_CSCases. (Case_Id, Case_Number) – or – AMGR_ Opportunity.(Opp_ Id, Opp_Number) Identifies the customer service case or opportunity the appointment is associated with. Entity_Type Integer 4 Type of record this template is applicable to. Entity_Type values correspond to the Client_Id/ Contact_Number pair references on the right: 0 = Not specified (default for old notes) 1 = Address Book entry 2 = Opportunity 3 = Campaign 4 = User 5 = Customer service case 6 = Knowledge base 7 = Order 8 = Order item 9 = Default entry 100 = Custom Independent table 101 = Custom Child table TextCol String 1024 Text description of appointment. Appointment_Id String 24 Appointment identification string. Appointment_ Number Integer 4 Appointment identification number. Sequential number of the activity in the plan. Appendix A Crystal Reports Database Views/Tables Reference 527 AMGR_Hotlist View The AMGR_Hotlist View includes both personal and Address Book related tasks. Note This view supports insert, modify, and delete actions and supports MaxExchange transaction journalling. Table 5 AMGR_Hotlist View Field Name Data Type Len. Data_Machine_Id Numeric 9 Sequence_Number Numeric 9 Owner_Id String 11 Foreign Table Ref. Description and Rules If originated from AMGR_Opportunity_Link, it is the Owner Id of the Team Member responsible for the opportunity. Schedule_Date DateTime 8 Date of task. Mandatory field. Client_Id String 23 Contact_Number Integer 4 Entry_Type Integer 4 Flag for the source of the task. 0 = Manual task 1 = Task associated with follow-up deadline for customer service case 2 = Reserved system value. Do not use. 3 = Task created by a Date userdefined field that has the "Include in Hotlist" attribute 4 = Reserved system value. Do not use. Original_Date DateTime 8 Original date of the task. If left empty, it defaults to the system clock. Type_Id Integer 4 Pointer to date field in the Detail_List table. Cannot modify. AMGR_Hotlist. (Client_Id, Contact_Number) = AMGR_Client. (Client_Id, Contact_Number) Client who the task is associated with. Leave empty for a personal appointment. Otherwise it must already exist in the AMGR_Client table. Cannot modify. Contact_Number = 0–59999 528 Maximizer CRM 10.5 User’s Guide Table 5 AMGR_Hotlist View Field Name Data Type Len. Foreign Table Ref. Status_Id Integer 4 Not in use. Priority String 4 Priority of task. Completed Integer 2 0 = Not complete 1 = Complete Opp_Id String 23 Opp_Number Integer 4 Step_Id Numeric 9 Activity_Id Numeric 9 Must already exist in the AMGR_ Opportunity_Link table. Alarm Integer 2 0 = No alarm set 1 = Alarm set Icon_Type Integer 2 Icon associated with the task: 0 = None 1 = Mail 2 = ToDo 3 = Phone 4 = Travel 5 = Sale 6 = Meal 7 = Presentation 8 = Speech 9 = Meeting Icons can be viewed when the Hotlist task is being created. Lead_Date DateTime 8 Date when alarm is to sound. If left empty, defaults to Schedule_Date. End_Date DateTime 8 Task end date. Record_Id Integer 4 Creator_Id String 11 Create_Date DateTime 8 AMGR_Hotlist. (Opp_Id, Opp_ Number, Step_Id, Activity_Id) = AMGR_ Opportunity_Link. (Opp_Id, Opp_ Number, Step_Id, Activity_Id) Description and Rules Identifier of the associated opportunity related to the AMGR_ Opportunity_Link that the task originated from. Must already exist in the AMGR_Opportunity_Link table. Opp_Number = 0. Must already exist in the AMGR_ Opportunity_Link table, unless it’s a follow-up activity. Appendix A Crystal Reports Database Views/Tables Reference Table 5 529 AMGR_Hotlist View Field Name Data Type Len. Foreign Table Ref. Snooze_End_Date DateTime 8 Date and time when the alarm deferral ends. TextCol String 255 Text of task. Mandatory field. Related_To Integer 4 Type of record this template is applicable to: 0 = Undefined. Defaults to Address Book. 1 = Address Book entry 2 = Opportunity 3 = Campaign 5 = Customer service Plan_Id String 23 Plan_Number Integer 4 AMGR_Hotlist. (Plan_Id, Plan_Number) = AMGR_ActionPlan Template.(Plan_Id, Plan_Number) Description and Rules Unique identification value of the Action Plan, as defined in AMGR_ActionPlanTemplate. Sequential number of the activity in the plan. AMGR_Resources Table The AMGR_Resources table lists the users’ display names (e.g,. Joe Napoli), locations (e.g., Staff Room), and resources (e.g., Projector) available in the Appointments dialog box. Table 6 AMGR_Resources Table Field Name Data Type Len. Record_Id Integer 4 Data_Machine_Id Numeric 9 Sequence_Number Numeric 9 Record_Type Integer 4 Resource_Id String 12 Foreign Table Ref. Description and Rules Resource_Id’s type: 1 = User display name 2 = Location 3 = Resource AMGR_Resources. Resource_Id = ADMN_User_ Details.User_Id Depends on Record_Type: • If Record_Type = 1 (User), then Resouce_Id = User_Id. • If Record Type = 2 (Location) or 3 (Resource), then Resource_Id is the unique ID of the location or resource. 530 Maximizer CRM 10.5 User’s Guide Table 6 AMGR_Resources Table Field Name Data Type Len. Creator_Id String 11 Create_Date DateTime 8 Name String 80 Foreign Table Ref. Description and Rules Friendly name of the user or resource (e.g., Joe Napoli, Staff Room, Projector). Mandatory field. Unique Name. AMGR_Notes View The AMGR_Notes View includes history and notes for Address Book entries, opportunities, campaigns, etc.. Note This view supports insert, modify, and delete actions and supports MaxExchange transaction journalling. Table 7 AMGR_Notes View Field Name Data Type Len. Data_Machine_Id Numeric 9 Sequence_Number Numeric 9 Owner_Id String 11 Client_Id String 23 Contact_Number Integer 4 Foreign Table Ref. Description and Rules This field actually contains the Creator_Id, not the Owner_Id. AMGR_Notes. (Client_Id, Contact_Number) = AMGR_Client (Client_Id, Contact_Number) – or – AMGR_ Opportunity (Opp_ Id, Opp_Number) Client_Id/Contact_Number or Opp_Id/Opp_Number of the record the Note is associated with. Associated record must already exist. Mandatory field. Must provide Client_Id/Contact_Number for insert. Cannot update. Appendix A Crystal Reports Database Views/Tables Reference Table 7 531 AMGR_Notes View Field Name Data Type Len. Typea Integer 4 Private Integer 4 DateCol DateTime 8 TimeCol DateTime 8 NewRecord Integer 4 Owned_By_Id String 11 Record_Id Integer 4 Note_Type String 20 ReadPriv Integer 2 Foreign Table Ref. Description and Rules Can insert. Can update. Valid values: 0–32,767 Standard Maximizer note types and Detail note types may be specified: 0 = Manual note 1 = Mail-out note 2 = Phone call note 3 = Timed note 4 = Transfer note 5 = Completed task or appointment 6 = Scheduled task or appointment 7 = Email sent note 8 = Opportunity created or opportunity status changes 9 = History note 10 = Reassign task note 11 = Reserved for future use 12 = Customer service Date and time when note was created. Default is current system date and time. Can insert. Can update. Maximizer system field. Do not use. Within Maximizer, this string is used only for display purposes to indicate a sub-type of note. If a standard type is defined in the Type field, this string is appended to the standard type name for display. In Maximizer, this field appears as Category on the Note dialog box for manual notes only. Can insert. Can update. 532 Maximizer CRM 10.5 User’s Guide Table 7 AMGR_Notes View Field Name Data Type Len. Foreign Table Ref. Description and Rules ReadOnly_Id String 11 SynchFlags Integer 4 Do not use this field. It is reserved for use by MaxExchange. Entity_Type Integer 2 Specifies the type of parent record the note belongs to. Entity_Type values correspond to the Client_Id/ Contact_Number pair references on the right: 0 = Not specified (default for old notes) 1 = Address Book entry 2 = Opportunity 3 = Campaign 5 = Customer service case 10 = Appointment 100 = Custom Independent table 101 = Custom Child table This field must be specified upon note insert, and it cannot be updated later. TextCol Text 9216 Text of Note. Can insert. Can update. a. Some Maximizer functions, such as purging, searching, and MaxExchange synchronization, do not support user-defined note types, which have a Type value greater than 17. Appendix A Crystal Reports Database Views/Tables Reference 533 CMGR_Auto_Campaign_Accounts Table The CMGR_Auto_Campaign_Accounts Table contains details about the Address Book entries that are subscribed to an automated campaign. Table 8 CMGR_Auto_Campaign_Accounts Table Field Name Data Type Len. Foreign Table Ref. Description and Rules Record_Id Integer 4 CampID String 24 CMGR_Auto_ Campaign_ Accounts.CampID = AMGR_ Opportunity. Opp_Id Unique identifier of the campaign. Insert operations are allowed, but not delete and update operations. ClientID String 24 ContactNo Integer 4 CMGR_Auto_ Campaign_ Accounts.(ClientID, ContactNo) = AMGR_Client. (Client_Id, Contact_Number) Client_Id and Contact_Number of Address Book entries subscribed to the campaign. Insert operations are allowed, but not delete and update operations. StartDate DateTime 8 Date when the Address Book entry was subscribed to the campaign. NextDate DateTime 8 Date when the next campaign activity for the Address Book entry should be processed. Applies to ongoing campaigns. AccStatus Integer 4 Not in use. ActCount Integer 4 Next campaign activity to process for the Address Book entry. ActType Integer 4 Not in use. ActFlag Integer 4 Not in use. AMGR_CSCases View The AMGR_CSCases View stores information about customer service cases. Note This view supports insert, modify, and delete actions and supports MaxExchange transaction journalling. 534 Maximizer CRM 10.5 User’s Guide Table 9 AMGR_CSCases View Field Name Data Type Len. Foreign Table Ref. Description and Rules Record_Id Integer 4 Data_Machine_Id Numeric 9 Sequence_Number Numeric 9 Record_Type Integer 4 0 = Customer service case 1 = Customer service user Case_Id String 23 Case_Number Integer 4 Unique customer service case identifier. Case_Number is always 0. Client_Id String 23 Client_Number Integer 4 Contact_Id String 23 Contact_Number Integer 4 Status Integer 4 Case status: 57999 = Unassigned 57998 = Assigned 57997 = Escalated 57996 = Callback 57995 = WaitCustomer 57994 = Cancelled 57993 = Resolved Pointer to value in System UDFs (60041). Priority Integer 4 Case priority: 57900 = Low 57901 = Medium 57902 = High Severity Integer 4 Case severity: 57900 = Low 57901 = Medium 57902 = High AMGR_CSCases. Reference to client. (Client_Id, Contact_Number) = AMGR_Client. (Client_Id, Contact_Number) AMGR_CSCases. Reference to default contact. (Contact_Id, Contact_Number) = AMGR_Client. (Client_Id, Contact_Number) Appendix A Crystal Reports Database Views/Tables Reference Table 9 535 AMGR_CSCases View Field Name Data Type Len. Foreign Table Ref. Type Integer 4 Case type. Pointer to value in system UDFs (60022). Reason Integer 4 Case reason. Pointer to value in system UDFs (60023). Origin Integer 4 Case origin. Pointer to value in system UDFs (60024). Queue Integer 4 Case queue. Pointer to value in system UDFs (60029). Class Integer 4 No longer in use. Area Integer 4 No longer in use. Fee Float 8 Case fee. (BillRate x BillableTime = Fee). BillRate Float 8 Cost per hour of billable time. BillableTime Float 8 Number of billable hours. Fee_Type Integer 4 Case fee type. Pointer to value in system UDFs (60027). Assigned_To_Id String 11 Deadline_Date DateTime 8 Creator_Id String 11 Create_Date DateTime 8 Modified_By_Id String 11 Last_Modify_Date DateTime 8 Owner_Id String 11 Case owner. Private Integer 4 Not in use. Solution_Id String 24 Solution_Number Integer 4 AMGR_CSCases. Assigned_To_Id = ADMN_User_Detail s.User_Id Description and Rules User_Id of user who the case is assigned to. Follow-up deadline date. AMGR_CSCases. (Solution_Id, Solution_Number) = AMGR_ Documents. (Document_Id, Document_ Number) For resolved cases, it points to a knowledge base article with the case solution. 536 Maximizer CRM 10.5 User’s Guide Table 9 AMGR_CSCases View Field Name Data Type Len. Subject String 128 Article_Number String 24 Notify_Flag Integer 4 Case_Resolved_By String 12 Case_Resolved_ Date DateTime 8 Case_Owner_Id String 12 Description Text 16 Foreign Table Ref. Description and Rules Subject line of the case. AMGR_CSCases. (Article_Number) = AMGR_Documents. (Document_Id, Document_ Number) Points to the solution article in AMGR_Documents table when the Solution_Id and Solution_Number fields are empty. This field is intended for remote users who don’t have access to the knowledge base database but know the article number for this case in the main database. The remote user fills in this field manually, and when the case is synchronized with the main database, it will reference the article in the knowledge base. Customer service case notification flag: 0 = Notification disabled 1 = Notification sent to default list of users 2 = Notification sent to custom list of users AMGR_CSCases. Case_Resolved_By = ADMN_Users. User_Id User ID of the user who resolved the case. Date and time when the case was resolved. Description of the case. CSCases_View The CSCases_View View includes all the fields from the AMGR_CSCases Table and the following additional fields. Note This view is read-only. Appendix A Crystal Reports Database Views/Tables Reference Table 10 537 CSCases_View Field Name Data Type Len. Foreign Table Ref. Description and Rules User_Case_Id String 32 Client_Name String 80 AMGR_CSCases. (Client_Id, Client_Number) Name of Company/Individual who originated the case. Name field from AMGR_Client table. Contact_Name String 160 AMGR_CSCases. (Contact_Id, Contact_Number) Name of the contact for the case. “First_Name, Name” field concatenation from Case Contact. Solution_Name String 256 AMGR_CSCases. (Solution_Id, Solution_Number) Knowledge base article description of this case. Type_Name String 80 AMGR_User_Field_ Defs_Tbl. (Type_Id = 60022, Table_Id = 2, Code_Id) Text value of the Type field Reason_Name String 80 AMGR_User_Field_ Defs_Tbl. (Type_Id = 60023, Table_Id = 2, Code_Id) Text value of the Reason field. Origin_Name String 80 AMGR_User_Field_ Defs_Tbl. (Type_Id = 60024, Table_Id = 2, Code_Id) Text value of the Origin field. Queue_Name String 80 AMGR_User_Field_ Defs_Tbl. (Type_Id = 60029, Table_Id = 2, Code_Id) Text value of the Queue field. Class_Name String 80 No longer in use. Area_Name String 80 No longer in use. Fee_Type_Name String 80 Case identifier for user references. AMGR_User_Field_ Defs_Tbl. (Type_Id = 60027, Table_Id = 2, Code_Id) Text value of the Fee_Type field. 538 Maximizer CRM 10.5 User’s Guide Table 10 CSCases_View Field Name Data Type Len. Foreign Table Ref. Description and Rules Status_Name String 80 AMGR_User_Field_ Defs_Tbl. (Type_Id = 60041, Table_Id = 2, Code_Id) Text value of the Status field: 57999 = Unassigned 57998 = Assigned 57997 = Escalated 57996 = Callback 57995 = WaitCustomer 57994 = Cancelled 57993 = Resolved Assigned_To_Name String 160 Name of the user responsible for the case. Case_Owner_Name String 160 Name of the user who owns the case. Address_Line_1 String 80 Address_Line_2 String 80 Address information of the Company/Individual who originated the case. City String 80 State_Province String 80 Country String 80 Zip_Code String 80 Priority_Name String 80 Text value of the Priority field: 57900 = Low 57901 = Medium 57902 = High Severity_Name String 80 Text value of the Severity field: 57900 = Low 57901 = Medium 57902 = High Appendix A Crystal Reports Database Views/Tables Reference 539 540 Maximizer CRM 10.5 User’s Guide AMGR_Opportunity View The AMGR_Opportunity View contains information about • Sales Opportunities (Opp_Type=0), • Traditional Marketing Campaigns (Opp_Type=30), and • Automated Marketing Campaigns (Opp_Type=10, 15, or 20). Use “Opp_View” on page 106, instead of AMGR_Opportunity view, for reporting on opportunities. Note This view supports insert, modify, and delete actions and supports MaxExchange transaction journalling. Opportunities Table 11 AMGR_Opportunity View – Opp_Type = 0 (Opportunity) Field Name Data Type Len. Data_Machine_Id Numeric 9 Sequence_Number Numeric 9 Client_Id String 24 Contact_Number Integer 4 Opp_Id String 23 Opp_Number Integer 4 Comp_Client_Id String 24 Comp_Cont_No Integer 4 Foreign Table Ref. Description and Rules AMGR_ Opportunity. (Client_Id, Contact_Number) = AMGR_Client. (Client_Id, Contact_Number) Company/Individual that is associated with the opportunity. Mandatory field. Associated entry must already exist in the AMGR_Client table. Cannot modify. AMGR_ Opportunity. (Opp_Id, Opp_Number) = AMGR_Opportunit y_Link.(Opp_Id, Opp_Number) Unique identifier of an Opportunity. System generated. AMGR_ Opportunity. (Comp_Client_Id, Comp_Cont_No) = AMGR_Opportunit y_Link.(Client_Id, Contact_Number) Client_Id and Contact_Number of Competitor that the Opportunity was lost to. Not used. Reserved for future use. Always 0. Unique identifier of an Opportunity. Must be 0. Appendix A Crystal Reports Database Views/Tables Reference Table 11 541 AMGR_Opportunity View – Opp_Type = 0 (Opportunity) Field Name Data Type Len. Foreign Table Ref. Description and Rules Owner_Id String 11 Strategy_Id Numeric 9 AMGR_ Opportunity. Strategy_Id = AMGR_Strategy. Strategy_Id Strategy that has been assigned to the Opportunity. Strategy_Id must already exist in the AMGR_Strategy table. If the strategy is 4294967295 (0xFFFFFFFF), no strategy is assigned to the Opportunity. Team_Id Integer 4 AMGR_ Opportunity. (Owner_Id, Team_Id) = EXCH_Sites. (Owner_Id, Team_Id) Team_Id of Sales team assigned to this Opportunity, or 65535 (0xFFFF) if assigned to a single user. Team_Id must already exist in EXCH_Sites table. Mandatory field. Status Integer 4 Status of the Opportunity: 0 = New 1 = In progress 2 = In progress new 3 = Won 4 = Lost 5 = Abandoned 6 = Suspended Name String 80 Name of Company/Individual that is associated with the Opportunity. Objective String 254 Sales Objective for the Opportunity. Reason_Id Numeric 9 Team member that is chosen as the Opportunity leader. If Team ID is equal to -1 (no Team is assigned, i.e., this is a Personal Opportunity), then it defaults to the Login ID. AMGR_ Opportunity. Reason_Id = AMGR_OMS_ Object.Step_Id Reason why the opportunity was won, lost, abandoned, or suspended. Only the Opportunity Leader user can modify this field. 0 = Opportunity still in progress 542 Maximizer CRM 10.5 User’s Guide Table 11 AMGR_Opportunity View – Opp_Type = 0 (Opportunity) Field Name Data Type Len. Foreign Table Ref. Description and Rules Probability_Closing Integer 2 Percentage probability of closing the opportunity. Based on an internal calculation formula. Valid values: 0–100. Only the Opportunity Leader user can modify this field. (May be updated automatically by selecting “Update Opportunity” in Opportunities window.) Cost Float 8 Running total of the costs associated with activities for the opportunity. Forecast_Revenue Float 8 Revenue anticipated from Opportunity once it is successfully complete. Only the Opportunity Leader user can modify this field. Start_Date DateTime 8 Date when the opportunity was started. If left empty, defaults to the system clock. If 1, only the Opportunity Leader user can modify this field. Estimated_Close_ Date DateTime 8 Start_Date + Strategy Duration = Estimated_Close_Date. Original close date for the opportunity. Must be greater than Start_Date. Only the Opportunity Leader user can modify this field. If specified, becomes the Close_Date by default. Close_Date DateTime 8 Projected or actual close date of the opportunity. Updated as the opportunity's steps are applied before or ahead of schedule. Must be greater than Start_Date. Only the Opportunity Leader user can modify this field. Last_Modify_Date DateTime 8 Close date specified by user, not calculated from steps and activities. (Date and time when campaign was last modified stored in Last_Update_Date.) Appendix A Crystal Reports Database Views/Tables Reference Table 11 543 AMGR_Opportunity View – Opp_Type = 0 (Opportunity) Field Name Data Type Len. Foreign Table Ref. Description and Rules Actual_Revenue Float 8 Record_Id Integer 4 Creator_Id String 11 Create_Date DateTime 8 Suspend_Date DateTime 8 The date an opportunity was suspended. Applies only to opportunities using a strategy. Days_Suspended Integer 4 The number of days an opportunity was suspended. Applies only to opportunities using a strategy, where the opportunity is suspended and then resumed after one day or more. Dynamic_Strat Integer 2 0 = Static strategy 1 = Dynamic strategy Note: A strategy becomes dynamic after it has been assigned to an opportunity and then one or more of the Steps has been modified in that opportunity. Dynamic_Team Integer 2 0 = Static team 1 = Dynamic team Note: A team becomes dynamic after it has been assigned to an Opportunity and then a team member is added or removed from the team for that Opportunity. Opp_Type Integer 2 Opportunity or campaign type: 0 = Opportunity 10 = Fixed-date automated campaign 15 = Ongoing automated campaign 20 = Automated campaign from web 30 = Traditional campaign Actual revenue generated by the opportunity. Applicable only if Status = 3. 544 Maximizer CRM 10.5 User’s Guide Table 11 AMGR_Opportunity View – Opp_Type = 0 (Opportunity) Field Name Data Type Len. Comment String 508 Any comments about the opportunity. Only the Opportunity Leader user can modify this field. Completion_ Comment String 508 Any comments related to the completion of the opportunity. Applicable only if the Status is won, lost, abandoned, or suspended. Last_Update_Date DateTime 8 Date and time when the record was last modified. Updated_By_Id String 11 TestStatus Integer 4 Applies only to records where Opp_Type = 10, 15, or 20. Last_Opp_Id String 23 Stores original Opp_Id when it is changed during transfer between databases. Cont_Client_Id String 23 Cont_Cont_No Integer 4 NextAction String 63 Next action in the Action Plan for this opportunity, as defined by the user. Applicable only when Opp_Type = 0. NextAction_ Projected String 63 Next action in the Action Plan for this opportunity, as defined by the strategy. Applicable only when Opp_Type = 0. 4 Three-character currency ID of the corporate or entry currency for the opportunity. Applicable only if multi-currency is enabled for the Address Book. Revenue_Currency_ String Id Foreign Table Ref. AMGR_ Opportunity. User_Id = ADMN_Users. User_Id AMGR_ Opportunity. (Cont_Client_Id, Cont_Cont_No) = AMGR_Client. (Client_Id, Contact_Number) Description and Rules User_Id of the user who last changed the opportunity. Client_Id of the associated Contact. Applicable only when Opp_Type = 0. Contact_Number of the associated Contact. Applicable only when Opp_Type = 0. Appendix A Crystal Reports Database Views/Tables Reference Table 11 545 AMGR_Opportunity View – Opp_Type = 0 (Opportunity) Field Name Data Type Len. Foreign Table Ref. Description and Rules Revenue_Rate_Typ e_Id Integer 2 Reserved for future use. Do not use. Last_Cal_Date DateTime 8 Not applicable to opportunities. Calculated_Won_ Revenue Float 8 Not applicable to opportunities. Calculated_In Progress_Revenue Float 8 Not applicable to opportunities. Automated Campaigns Table 12 AMGR_Opportunity View – Opp_Type = 10, 15, 20 (Automated Campaign) Field Name Data Type Len. Data_Machine_Id Numeric 9 Sequence_Number Numeric 9 Client_Id String 23 Contact_Number Integer 4 Opp_Id String 24 Opp_Number Integer 4 Comp_Client_Id String 24 Comp_Cont_No Integer 4 Foreign Table Ref. Description and Rules AMGR_ Opportunity. (Client_Id, Contact_Number) = AMGR_Client. (Client_Id, Contact_Number) Not applicable. AMGR_ Opportunity. (Opp_Id) = CMGR_Auto_ Campaign_ Accounts.(CampID) Not used. Reserved for future use. Always 0. Unique identifier of an automated campaign. System generated. Always 0. AMGR_ Opportunity. (Comp_Client_Id, Comp_Cont_No) = AMGR_ Opportunity_Link. (Client_Id, Contact_Number) Not applicable to campaigns. 546 Maximizer CRM 10.5 User’s Guide Table 12 AMGR_Opportunity View – Opp_Type = 10, 15, 20 (Automated Campaign) Field Name Data Type Len. Foreign Table Ref. Owner_Id String 11 Team member that is chosen as the Opportunity Leader. If Team ID is equal to -1 (no team is assigned, i.e., this is a personal opportunity), then it defaults to the Login ID. Strategy_Id Numeric 9 ProgID of the automated campaign. Team_Id Integer 4 Always 65535 (0xFFFF) (single user). Mandatory field. Status Integer 4 Status of the campaign: 0 = New 1 = In progress 2 = In progress new 3 = Completed 5 = Abandoned 6 = Suspended Name String 80 Name of the automated campaign. Objective String 254 Name of the template used for the campaign. Reason_Id Numeric 9 Probability_Closing Integer 2 Not applicable to campaigns. Always 0. Cost Float 8 Campaign budget. Forecast_Revenue Float 8 Revenue expected from campaign once it is successfully complete. Only the Campaign Leader user can modify this field. Start_Date DateTime 8 Start date of the automated campaign. Estimated_Close_ Date DateTime 8 Not applicable to campaigns. AMGR_ Opportunity. Reason_Id = AMGR_OMS_ Object.Step_Id Description and Rules Reason why the campaign was completed, abandoned, or suspended. Only the Campaign Leader user can modify this field. 0 = Campaign still in progress Appendix A Crystal Reports Database Views/Tables Reference Table 12 547 AMGR_Opportunity View – Opp_Type = 10, 15, 20 (Automated Campaign) Field Name Data Type Len. Foreign Table Ref. Description and Rules Close_Date DateTime 8 Actual close date of the campaign. Must be greater than Start_Date. Only the Campaign Leader user can modify this field. Last_Modify_Date DateTime 8 Close date specified by user. (Date and time when campaign was last modified stored in Last_Update_Date.) Actual_Revenue Float 8 Actual revenue generated by the campaign. Applicable only if Status = 3. Record_Id Integer 4 Creator_Id String 12 Create_Date DateTime 8 Suspend_Date DateTime 8 Not applicable to automated campaigns. Days_Suspended Integer 4 Not applicable to automated campaigns. Dynamic_Strat Integer 2 Not applicable to automated campaigns. Dynamic_Team Integer 2 Not applicable to automated campaigns. Opp_Type Integer 2 Opportunity or Campaign type: 0 = Opportunity 10 = Fixed-cate automated campaign 15 = Ongoing automated campaign 20 = Automated campaign from web 30 = Traditional campaign Comment String 508 Description of the campaign. Only the Campaign Leader user can modify this field. 548 Maximizer CRM 10.5 User’s Guide Table 12 AMGR_Opportunity View – Opp_Type = 10, 15, 20 (Automated Campaign) Field Name Data Type Len. Foreign Table Ref. Completion_ Comment String 508 Any comments related to the completion of the Campaign. Applicable only if the Status is Complete, Abandoned, or Suspended. Last_Update_Date DateTime 8 Date and time when the record was last modified. Updated_By_Id String 11 TestStatus Integer 4 0 = Not tested 1 = Tested Applies only to records where Opp_Type = 10, 15, or 20. Last_Opp_Id String 23 Applicable only when Opp_Type = 0. Cont_Client_Id String 23 Applicable only when Opp_Type = 0. Cont_Cont_No Integer 4 Applicable only when Opp_Type = 0. NextAction String 64 Applicable only when Opp_Type = 0. NextAction_ Projected String 64 Applicable only when Opp_Type = 0. Revenue_Currency_ String Id 4 Not applicable to campaigns. Revenue_Rate_Typ e_Id Integer 2 Reserved for future use. Do not use. Revenue_Rate_Typ e_Id Integer 2 Reserved for future use. Do not use. AMGR_ Opportunity. User_Id = ADMN_Users. User_Id Description and Rules User_Id of the user who last changed the campaign. Appendix A Crystal Reports Database Views/Tables Reference Table 12 549 AMGR_Opportunity View – Opp_Type = 10, 15, 20 (Automated Campaign) Field Name Data Type Len. Foreign Table Ref. Description and Rules Last_Cal_Date DateTime 8 Opportunity revenue is calculated as of the date specified in this field. Default is the current date. Calculated_Won_ Revenue Float 8 Revenue generated from won opportunities. Calculated_In Progress_Revenue Float 8 Revenue generated from opportunities still in progress. Traditional Campaigns Table 13 AMGR_Opportunity View – Opp_Type = 30 (Traditional Campaign) Field Name Data Type Len. Foreign Table Ref. Description and Rules Data_Machine_Id Numeric 9 Sequence_Number Numeric 9 Client_Id String 23 Not applicable. Contact_Number Integer 4 Not used. Reserved for future use. Always 0. Opp_Id String 23 Unique identifier of a traditional campaign. System generated. Opp_Number Integer 4 Always 0. Comp_Client_Id String 24 Not applicable to campaigns. Comp_Cont_No Integer 4 Owner_Id String 11 Strategy_Id Numeric 9 Team member that is chosen as the Opportunity Leader. If Team ID is equal to -1 (no team is assigned, i.e., this is a personal opportunity), then it defaults to the Login ID. AMGR_ Opportunity. Strategy_Id = AMGR_Strategy. Strategy_Id Strategy_Id of the Template that has been assigned to the Campaign. Strategy_Id must already exist in the AMGR_Strategy table. If the strategy is 4294967295 (0xFFFFFFFF), no template is assigned to the campaign. 550 Maximizer CRM 10.5 User’s Guide Table 13 AMGR_Opportunity View – Opp_Type = 30 (Traditional Campaign) Field Name Data Type Len. Foreign Table Ref. Description and Rules Team_Id Integer 4 AMGR_ Opportunity. (Owner_Id, Team_Id) = EXCH_Sites. (Owner_Id, Team_Id) Team_Id of the Sales team assigned to the campaign, or 65535 (0xFFFF) if assigned to a single user. Team_Id must already exist in EXCH_Sites table. Mandatory field. Status Integer 4 Status of the campaign: 0 = New 1 = In progress 2 = In progress new 3 = Completed 5 = Abandoned 6 = Suspended Name String 80 Name of the traditional campaign. Objective String 254 Marketing objective of the traditional dampaign. Reason_Id Numeric 9 Probability_Closing Integer 2 Not applicable to campaigns. Always 0. Cost Float 8 Campaign budget. Forecast_Revenue Float 8 Potential revenue anticipated from campaign once it is successfully completed. Only the Campaign Leader user can modify this field. Start_Date DateTime 8 Start date of a traditional campaign that is not using a template. Null for campaigns using a template. Estimated_Close_ Date DateTime 8 Not applicable to campaigns. AMGR_ Opportunity. Reason_Id = AMGR_OMS_ Object.Step_Id Reason why the campaign was completed, abandoned, or suspended. Only the Campaign Leader user can modify this field. 0 = Campaign still in progress Appendix A Crystal Reports Database Views/Tables Reference Table 13 551 AMGR_Opportunity View – Opp_Type = 30 (Traditional Campaign) Field Name Data Type Len. Foreign Table Ref. Description and Rules Close_Date DateTime 8 Actual close date of the campaign. Updated as the campaign’s steps are applied before or ahead of schedule. Must be greater than Start_Date. Only the Campaign Leader or MASTER user can modify this field. Last_Modify_Date DateTime 8 Not applicable to Opp_Type = 30. (Date and time when campaign was last modified stored in Last_Update_Date.) Actual_Revenue Float 8 Actual revenue generated by the Campaign. Applicable only if Status = 3. Record_Id Integer 4 Creator_Id String 11 Create_Date DateTime 8 Suspend_Date DateTime 8 The date the campaign was suspended. Applies only to campaigns using a template. Days_Suspended Integer 4 The number of days a campaign was suspended. Applies only to campaigns using a template, where the campaign is suspended and then resumed after one day or more. Dynamic_Strat Integer 2 0 = Static template 1 = Dynamic template Note: A template becomes dynamic after it has been assigned to a campaign and then one or more of the Steps has been modified in that campaign. Dynamic_Team Integer 2 0 = Static team 1 = Dynamic team Note: A team becomes dynamic after it has been assigned to a campaign and then a team member is added or removed from the team for that campaign. 552 Maximizer CRM 10.5 User’s Guide Table 13 AMGR_Opportunity View – Opp_Type = 30 (Traditional Campaign) Field Name Data Type Len. Opp_Type Integer 2 Opportunity or campaign type: 0 = Opportunity 10 = Fixed-date automated campaign 15 = Ongoing automated campaign 20 = Automated campaign from web 30 = Traditional campaign Comment String 508 Any comments about the campaign. Only the Campaign Leader or MASTER user can modify this field. Completion_ Comment String 508 Any comments related to the completion of the campaign. Applicable only if the Status is complete, abandoned, or suspended. Last_Update_Date DateTime 8 Date and time when the record was last modified. Updated_By_Id String 11 TestStatus Integer 4 Applies only to records where Opp_Type = 10, 15, or 20. Last_Opp_Id String 23 Applicable only when Opp_Type = 0. Cont_Client_Id String 24 Applicable only when Opp_Type = 0. Cont_Cont_No Integer 4 Applicable only when Opp_Type = 0. NextAction String 64 Applicable only when Opp_Type = 0. NextAction_ Projected String 64 Applicable only when Opp_Type = 0. 4 Not applicable to campaigns. Revenue_Currency_ String Id Foreign Table Ref. AMGR_ Opportunity. User_Id = ADMN_Users. User_Id Description and Rules User_Id of the user who last changed the campaign. Appendix A Crystal Reports Database Views/Tables Reference Table 13 553 AMGR_Opportunity View – Opp_Type = 30 (Traditional Campaign) Field Name Data Type Len. Foreign Table Ref. Description and Rules Revenue_Rate_ Type_Id Integer 2 Reserved for future use. Do not use. Last_Cal_Date DateTime 8 Not applicable to traditional campaigns. Calculated_Won_ Revenue Float 8 Not applicable to traditional campaigns. Calculated_In Progress_Revenue Float 8 Not applicable to traditional campaigns. AMGR_Opportunity_Link Table The AMGR_Opportunity_Link Table links various opportunity- and traditional campaign-related information with other tables. The type of information and tables it links depend on the value of the “Type” field. The use of numerous fields in this table also depends on the value of the “Type” field. Table 14 AMGR_Opportunity_Link Table Physical Field Name Data Type Len. Data_Machine_Id Numeric 9 Sequence_Number Numeric 9 Opp_Id String 24 Opp_Number Integer 4 Step_Id Numeric 9 Foreign Table Ref. Description and Rules AMGR_ Opportunity_Link.( Opp_Id, Opp_Number) = AMGR_ Opportunity. (Opp_Id, Opp_Number) – or – AMGR_Client. (Client_Id, Contact_Number) Unique identifier of an opportunity or campaign. System generated. Opp_Number is always 0. Refer to AMGR_Client(Client_Id, Contact_Number) when Type =23. Unique identifier of the step the activity belongs to. Mandatory field. Cannot modify. 554 Maximizer CRM 10.5 User’s Guide Table 14 AMGR_Opportunity_Link Table Physical Field Name Data Type Len. Foreign Table Ref. Activity_Id Numeric 9 ID of the activity linked to the step. Mandatory field. Value must already exist in AMGR_OMS_ Object. Cannot modify. If Type = 1: Unique identifier of the activity. Otherwise, always 0. Type Integer 4 1 = Activity link for opportunity/ campaign step 2 = Step link for opportunity/ campaign 3 = Success factor standing link for opportunity/campaign 4 = Success factor standing link for opportunity role 5 = No longer used 8 = Competitor link for opportunity 13 = Contact link for opportnity/ campaign role 14 = Related entry link 15 = Company Library folder or document reference 20 = Partner link for opportunity 21 = Customer service notification default user 22 = Customer service notification user 23 = Partner link for Address Book entry Client_Id String 24 Contact_Number Integer 4 AMGR_ Opportunity_Link.( Client_Id, Contact_Number) = AMGR_Client. (Client_Id, Contact_Number) AMGR_ Opportunity_Link. (MesName = AMGR_User_Fields. (Client_Id) for Type_Id = 17 in AMGR_User_Fields Description and Rules Company or Individual that is associated with the opportunity. Mandatory field. Associated entry must already exist in the AMGR_Client table. Cannot modify. Appendix A Crystal Reports Database Views/Tables Reference Table 14 555 AMGR_Opportunity_Link Table Physical Field Name Data Type Len. Foreign Table Ref. Description and Rules Status Integer 2 0 = New 1 = In progress 2 = In progress new 3 = Won 4 = Lost 5 = Abandoned 6 = Suspended 3337 = Not applied 3338 = Reviewed 3339 = Behind 3340 = On schedule 3341 = Ahead 3342 = Complete 3676 = Waiting 3677 = Applied (Hotlist entry must exist with same Activity_Id) Duration Numeric 9 Duration of the activity or step, in seconds. Value must be between 0 and 2,500,000,000.0. Applicable only if Type = 1 or 2. Cost Float 8 Running total of the costs associated with activities of the opportunity. Value must be between 0.0 and 9,999,999,999.0. Applicable only if Type = 1 or 2. Start_Date DateTime 8 Date when the activity or step starts. If left empty, defaults to the system clock time. If 1, the date can be updated by the OppLeader only. Applicable only if Type = 1, 2, or 15. End_Date DateTime 8 Date when the activity or step ends. Start_Time DateTime 8 Time when the activity or step starts. If 01/01/1900, not followed by a time, then there is no start time. 556 Maximizer CRM 10.5 User’s Guide Table 14 AMGR_Opportunity_Link Table Physical Field Name Data Type Len. Foreign Table Ref. Description and Rules Icon_Type Integer 2 0 = None 1 = Mail 2 = ToDo 3 = Phone 4 = Travel 5 = Sale 6 = Meal 7 = Presentation 8 = Speech 9 = Meeting Note: Icons can be viewed when a record is being created or modified. Alarm Integer 2 0 = Alarm not set 1 = Alarm set Alarm_Lead_Min Integer 4 Lead time for alarm, in minutes. Value must be between 0 and 5,000,000.0. Up to 999 complete minutes, hours, days, or weeks can be entered in the GUI. (No partial minutes, days, or weeks.) Once 999 minutes has been reached the number must first be rounded up to the nearest whole hour and then converted back to minutes. (I.e., 1000 minutes is rejected but 1020 —17 hours— is accepted.) Once 999 hours has been reached the number must be converted to days and then back to minutes. The same theory applies once 999 days and weeks have been reached. Resp_Mem_Id Integer 4 ID of the team member responsible for activity. Applicable only if Type = 1. With_Role_Id Numeric 9 ID of the role that this activity is to be assigned to. Applicable only if Type = 1. Priority String 4 Priority (HI, LOW, MED, etc.) Applicable only if Type = 1. Appendix A Crystal Reports Database Views/Tables Reference Table 14 557 AMGR_Opportunity_Link Table Physical Field Name Data Type Len. Foreign Table Ref. Description and Rules Standing_Id Numeric 9 ID of the Standing associated with this role. Applicable only if Type = 3, 4, or 15. Score Integer 2 Value (weight) of the success factor standing. Valid values: 0– 100. Applicable only if Type = 1, 3, 4, or 15. MesName String 256 For Type = 15, contains names of folders, documents, and notes in the Company Library. For Type = 14 (related entries), contains relation id. This field is related to the Client_Id field in the AMGR_User_Fields where Type_Id = 60017. Record_Id Integer 4 Creator_Id String 12 Create_Date DateTime 8 Follow_Up_Task Integer 2 Applicable only if Type = 1 (Activity): 0 = No follow-up task 1 = Follow-up task Opp_Type Integer 2 Record type: 0 = Opportunity 10 = Automatic campaign 15 = Automatic recurring campaign 20 = Automaticcampaign from web 30 = Traditional campaign NotReserved String 22 Not in use. Description String 254 Description of the opportunity or campaign. 558 Maximizer CRM 10.5 User’s Guide ADMN_User_Details Table Table 15 ADMN_User_Details Table Field Name Data Type Len. Record_Type Integer 4 User_Id String 11 Old_Password String 511 User_MrMs String 80 User_FirstName String 80 User_Init String 80 User_Name String 80 User_Title String 80 User_Salutation String 80 User_Firm String 80 User_Route String 80 User_Div String 80 User_AddressLine1 String 80 User_AddressLine2 String 80 User_City String 80 User_State_ Province String 80 User_Zip_Code String 80 User_Country String 80 User_Phone_1 String 22 User_Phone_1_ Extension String 22 User_Phone_2 String 22 User_Phone_2_ Extension String 22 User_Phone_3 String 22 User_Phone_3_ Extension String 22 User_Phone_4 String 22 Foreign Table Ref. Description and Rules Appendix A Crystal Reports Database Views/Tables Reference Table 15 559 ADMN_User_Details Table Field Name Data Type Len. User_Phone_4_ Extension String 22 User_Email_ Address String 120 User_WebSite String 120 User_CustomField1 String 120 User_CustomField2 String 120 User_CustomField3 String 120 User_CustomField4 String 120 Creator_Id String 12 Create_Date DateTime 8 LastUpdate_Date DateTime 8 User_ReadAccess Integer 4 WindowLogin String 33 Display_Name String 80 Record_Id Integer 4 Reports_To String 12 Foreign Table Ref. Description and Rules Not in use. Note: The user’s display name is stored in the AMGR_Resources Table. The user ID of the person the user reports to. This information is used in organizational charts generated by Maximizer. 560 Maximizer CRM 10.5 User’s Guide APPENDIX Glossary of Terms B B 562 Maximizer CRM 10.5 User’s Guide Glossary of Terms Use this list of terms to help familiarize yourself with the terminology of Maximizer CRM. Access Rights – security settings for users. Access rights control each user’s permissions to read, insert, modify, or delete various types of Maximizer entries. They also control general Maximizer privileges, user roles, and allowed printing destinations. Access rights determined by the user’s access settings and the access settings of any security groups the user belongs to. Access Settings – there are two types of access settings: user access settings and group access settings. Combined user and group access settings determine a user’s access rights. Accounting Link – a Maximizer add-on that enables users to connect to QuickBooks or Microsoft Dynamics GP through Maximizer. For more information, refer to the Accounting Link User’s Guide or the Maximizer website. Address Book – a Maximizer database. Address Book entry – a Company, Individual, or Contact in the Maximizer Address Book. Administrator – a Maximizer module in which the Address Book administrator can perform system configuration and maintenance for the Maximizer system and Address Books. Administrator’s Guide – a Maximizer reference guide for system administrators. Advanced Import – importing an MXI or XML file into an Address Book. Application Server – see Maximizer Application Server. Automated campaign – a series of automated email messages, faxes, or printed documents that Maximizer sends on a predefined schedule. An Automated campaign is based on an Automated campaign template. Calendar – a Maximizer window in which you can manage your appointments. campaign template – a pre-defined strategy used by Email and Traditional marketing campaigns. See Automated Campaign and Traditional Campaign. catalog – a product listing created using eStore. You build your catalog by adding sections and catalog items, and publish the catalog on your web server. catalog item – an individual product or service in your online catalog. catalog section – a category for classifying types of catalog items. Appendix B Glossary of Terms 563 Company – an Address Book entry used to record information for a company or organization. Company Library – a shared library of company literature. Contact – an Address Book entry used to record information for an individual person associated with a Company or Individual type of Address Book entry. Controlling window – a main Maximizer window, such as the Address Book window, that determines what tabbed following windows are displayed. The contents of the following window depend on which entry is selected in the main controlling window. Crystal Reports – a tool for generating reports. Crystal reports are available for viewing and generation through the Reports menu in Maximizer. default entry – an entry (such as an Address Book entry) containing default field values that are propagated to new entries by default. ecBuilder – a tool to automate web-based sales. eStore Manager – a Maximizer module used to create and publish a web-based catalog in which website visitors can purchase products online. Escona – the Escona Address Book is a sample Address Book included with a typical installation of Maximizer. Using the example of a fictitious vintner in the Sonoma Valley, this Address Book demonstrates many of Maximizer’s possibilities. Following window – a tabbed sub-window of a controlling window. The contents of the following window depend on which entry is selected in the main controlling window. For example, the Contacts window displays only those Contacts that belong to the selected entry in the Address Book window. Global Edit – a Maximizer operation that enables you to apply the same change to multiple Maximizer entries simultaneously. Holiday Editor – a tool in Administrator for adding holidays to the Maximizer Calendar window. Hotlist – a window in Maximizer used to display tasks and appointments in a specific date range. HTML – HyperText Markup Language. A document format used for displaying web pages in a browser. IIS – see Microsoft Internet Information Server. intranet – an internal network—much like the Internet—that is selfcontained with the local area network (LAN). Frequently, a web server is used to display pages that should be accessible only within the company. IP address – a number used to uniquely identify a specific computer on a network. Every network-connected computer has an IP address. 564 Maximizer CRM 10.5 User’s Guide In Maximizer, you use the IIS server’s IP address when you preview or publish your online catalog. Java servlet engine – a Java-based portion of the Payment Gateway Module that is used for online transaction processing. Dashboard – a component of Maximizer Web Access that displays real-time information on your company using dashboard-style instrumentation. Knowledge base – a database containing articles pertaining to solutions for customer service and/or technical issues. lead – an Address Book entry that has been flagged as a potential client or customer. list – a listing of entries in Maximizer. You can create a list using a search or by selecting specific entries and reducing the list to the selection. Most activities are performed for the current list or the current entry. log in – the act of entering your user ID and password to gain access to a Maximizer Address Book. The Login dialog box prompts you for your user ID and password. Macromedia JRun Java Servlet Engine – a Java servlet engine used for online transaction processing. JRun is only one possible Java servlet engine that you may use. See the Maximizer CRM Administrator’s Guide. marketing team – used with campaigns to organize marketing efforts in a team environment. Set up using Administrator. MASTER user – the Address Book administrator’s user ID. This user ID permits access to Administrator. MaxExchange Site Manager – a utility for creating and managing sales and marketing teams. MaxExchange Site Manager is accessed through Administrator. MaxExchange – a Maximizer program used to synchronize an Address Book between a central server and remote distribution sites via FTP, email, or a direct network connection. Maximizer – a Maximizer module in which you can perform contact management and sales force automation activities. Maximizer Application Server – the principal Windows Server where you install Maximizer. Maximizer Remote Workstation (MaxExchange Remote) – a computer that has the Maximizer client components installed and connects to the Maximizer Application Server. Appendix B Glossary of Terms 565 merge field – text inserted into a document or template that is replaced by Address Book information during a mail merge. For example, a merge field can be a Contact’s name, so you can customize a letter’s salutation with the recipient’s name. Microsoft Internet Information Server – Microsoft web server software. IIS 5.0 is included with Windows 2000. Internet Information Server—or “IIS”—is used for many of the Maximizer components. Microsoft SQL Server – a database server used by Maximizer for the Address Book data. Microsoft Windows Server – the operating system used by the servers. note – a text document attached to Address Book entries, Contacts, opportunities, and campaigns. OLE – object linking and embedding (OLE) is a technology that allows you to insert files, portions of files, and links to files into a document or application. You can insert files in the Documents window and the Company Library. Double-clicking the file opens it in the associated (and installed) application. online – information that is “online” is sometimes used to describe information on the Internet or on your computer screen. An “online” user guide or “online” Help is documentation displayed on your screen. opportunity – an entry in Maximizer used to record an opportunity to make a sale. Opportunities can organize a sales team using a structured sales strategy. OrderDesk – a window in Maximizer used to manage orders and inquiries from your online catalog. Outlook Synchronization – a Maximizer feature for synchronizing some Maximizer entries, such as Address Book entries, between Maximizer and Microsoft Outlook. order screens – some of the screens displayed to a customer when he/she orders a catalog item. Order screens can be customized by editing the order screen templates (see the eStore Help). preferences – a collection of program options that allow users to customize how Maximizer functions. Some preferences are set in Administrator; some are set in the modules. prospect – a potential customer. ListsNOW.com lets you acquire and import lists of prospects. You can then use the data for your marketing campaigns or sales prospecting activities. related entries – an entry that records a relationship between two Address Book entries. For example, one Address Book entry might be an accountant for another Address Book entry, which could be recorded as a related entry in Maximizer. 566 Maximizer CRM 10.5 User’s Guide sales team – a team created using Administrator to support teambased work on sales opportunities in Maximizer. search engine – a website on the Internet that keeps a searchable index of websites. You can register your website with a search engine so customers can find your site by performing a search. Examples of search engines are Google and Yahoo!. security group – a set of access settings for a subset of Maximizer users. shopping basket – much like a real shopping basket, the eStore shopping basket lets customers add items as they browse your catalog and see a list of items before they proceed to the order screens. strategies – a structured, team-based approach to pursuing sales opportunities. Strategies define the steps, activities, and roles involved in successfully completing a sale. SMTP – an SMTP server is a server used for outgoing Internet email. SQL – see Microsoft SQL Server. template – a file that outlines the design for a document, email message, or web page. Maximizer uses templates for word processor documents, for automated activities that belong to Automated campaigns, and for HTML pages used by eStore. Templates can contain merge fields for bulk mailings. Also, see Campaign Template. thin-client applications – allow you to remotely access Maximizer Address Book data using the web. “Maximizer on the Web” consists of Maximizer Web Access, Wireless Access, Partner Wireless Access, and Customer Wireless Access. Traditional campaign – used to organize a marketing effort, including a marketing team’s steps, activities, and roles. Training Guide – the Maximizer CRM Training Guide and CD introduces Maximizer using exercises and examples. You can obtain the Maximizer CRM Training Guide and CD where you purchased Maximizer. transaction processing – credit card transactions can be processed from your online catalog using a transaction processing company. UNC – Universal Naming Convention. A kind of network path used to locate files and folders. An example of a UNC path is “\\Escona\MxServer\”. user-defined field – a custom field used to record additional “userdefined” information for Address Book entries, opportunities, campaigns, customer service cases, and users. user ID – a name that uniquely identifies a Maximizer user. Users must enter their user ID and password in order to gain access to a Maximizer Address Book. Appendix B Glossary of Terms 567 virtual directory – an IIS folder that “points” to a physical location on the server. The contents of the physical folder that the virtual directory refers to is accessible to the Internet or intranet via the IIS server. Windows Server – see Microsoft Windows Server. wizard – a series of interactive screens that walk you through the steps necessary to perform an action or procedure in a program. For example, eStore uses a wizard to help you create your online catalog. workstation – see Maximizer Workstation. 568 Maximizer CRM 10.5 User’s Guide Index A access rights about 562 case modification 234 currency management 171 Customer Access 338 default notes 49 Full Access and Read Access 86 user preferences 383 user-defined fields 23, 299 accessing articles in knowledge base 325 Company Library 103 Crystal Reports 416 Customer Access 338 Dashboard 29 Escona Tutorial Address Book 247, 334, 338 Maximizer Web Access 247 Partner Access 334 Reporter 412 Wireless Access 341 Accounting Link about 7 Designed for Use with QuickBooks 24 for Microsoft Dynamics GP 24 ACT!, importing from 402, 404 Action Plans about 94 in Maximizer Web Access 294 activities in Automated campaigns 198 in strategies 166–167 in Traditional campaigns 187–188, 194 marking as complete 195 report 420 viewing 97, 292 activity logs, in MaxExchange Remote 484–485 adding Address Book entries 44, 270, 347 appointments 89, 290, 372 articles 241, 325 campaigns 191 cases 223, 321 Contacts 44, 348 Dashboard indicators 30 entries to Favorite Lists 82, 262, 376 files to Company Library 103 files to Documents window 131 Hotlist tasks 84 inquiries 456 notes 60, 62 opportunities 173, 312 orders 456 sales team 164, 175 strategies 169 tasks 84, 287, 372 Traditional campaign templates 190 user-defined fields 46 See also creating 44 Address Book 44, 389 backing up 389, 498–499 Escona Tutorial 18, 247, 334, 338 exporting data 390–398 importing data 399–406 restoring 500 startup options 82 window 21 Address Book entries 44, 212 adding 44 assigning to Traditional campaign roles 193 associated with Automated campaigns 213 creating from Outlook 144 default 47 duplicates 407 exporting 390–395 Favorite Lists 81, 261–262 graphing 423 importing 399–406 in Maximizer Web Access 266–277 in Partner Access 335 in Wireless Access 343–349 keeping notes on 60 phoning 159 printing reports from 419 related entries 52 retrieving in campaigns’ lists 212 scheduling appointments with 89 searching for 76 selecting 37 transferring 407, 409 unlinking 53 unsubscribing 213 viewing 50 Address Book window 35 adjusting currency 171–172 email preview pane 139 icon bar 37 indicator view in Dashboard 29 macro security settings 128 My Work Day view 27 570 Maximizer CRM 10.5 User’s Guide text size 17 Administrator about 5 user-defined fields in 67, 69 ADMN_User_Details table (SQL) 558 Advanced Import 400–401 alarms appointment 89 Dashboard 33 Alignment tab 58 alphanumeric user-defined fields 68 AMGR_Appointments view (SQL) 521 AMGR_Client view (SQL) 512 AMGR_CSCases view (SQL) 533–534 AMGR_Notes view (SQL) 530 AMGR_Opportunity view (SQL) 540 AMGR_Opportunity_Link table (SQL) 553 AMGR_Resources table (SQL) 529 announcements, displaying 27 appointments 87 adding 89 deleting 292 from email 140, 285 in Maximizer Web Access 289–292 in Wireless Access 368–372 printing 419 reassigning 89 scheduling 89 synchronizing with Outlook 152 articles adding to knowledge base 241 controlling access to 243 exporting 398 finding 243 importing 401 sending by email 243 ASCII 391, 394, 396 assigning activities 194 cases 231, 362 Contacts to campaign roles 193 team members to campaigns 192 templates to campaigns 192 territories 57 automated activities 197 Automated campaigns 197–216 associated Address Book entries 213 batches and intervals 203 fixed-date 197 launching 206 merge fields 205 message templates 204 ongoing 197 pausing 214 retrying failed activities 215 reviewing 215 templates 197–198, 204 using HTML 205 automated email 197 automatic dialing 162 B backing up Address Book 389, 498–499 dictionary file 500 holiday file 500 quick backup 389, 498 bar charts, displaying in Dashboard 32 batches for controlling automated activities 203 BlackBerry 4 blank fields, showing 67 broadcasting documents 132 browsers, for Wireless Access 340 Business Templates for eStore 443, 445 busy periods, viewing 98 C calendar adding appointments to 89 alarms 89 changing holidays 87 in Maximizer Web Access 289–292 in Wireless Access 368–372 printing reports 419–420 reassigning appointments 89 window 22 caller ID, TAPI 488 campaigns about 184 Automated 197–216 email 197 in Maximizer Web Access 316–318 one-time 318 reporting on 419 retrieving opened email 212 Traditional 186 Campaigns window 22 cases adding 223 adding from Outlook 151 assigning 231 escalating 231 exporting 396 Favorite Lists 81 Hotlist tasks 230 in Maximizer Web Access 319–324 in Partner Access 337 in Wireless Access 357–363 Index monitoring 234 notification email 237 recording solutions 241 resolving 232 saving email messages to 280 Catalog Item wizard 444 catalogs creating 116 customer experience of 451 eStore 434–449 file location 448 item information 445 keywords 438 OrderDesk 116–118 organizing items into sections 443 previewing 447 publishing 434, 448 search page 454 shopping basket 452 templates 434–436, 447 central Address Book folder 462 installing at a distribution site 467 updating 466, 476 changing corporate currency 171 toolbars 39 window colors and fonts 24 Chart wizard 422–426 charts, organizational 100–101 cheques 440 Classic window layout 24 CMGR_Auto_Campaign_Accounts table (SQL) 533 Column reports 236 about 216 printing from 419 column setups creating 51 in Maximizer Web Access 263 reports based on 216, 236 retrieving 52, 264 comma-separated values (CSV) 392–393, 405 communicating with customers 124 Companies about 44 converting Individuals to 54 Company Library 102 in Maximizer Web Access 305–306 in Wireless Access 373–375 sending documents from 306, 375 window 23 Company view (SQL) 517 competitors, adding to opportunities 174 confirmation email 437 Contacts about 44 adding 44, 348 assigning 193 associating with cases 223, 361 converting to Individuals 54 deleting 44 moving to other Companies 275 notes 60 reports 419 window 23 See also Address Book entries controlling windows 24, 507 converting Address Book entries 54 copying Crystal reports 417 email templates into HTML 205 text from Address Book entries 45 Corel WordPerfect 103, 124, 128, 132 corporate currency 171 corporate reports 416 creating column setups 51 default entries 47 email message templates 204 online catalogs for eStore 434 user-defined fields 68–69, 71 web inquiry forms 107 See also adding 51 credit card transactions, processing 440, 456 Crystal Reports 416–419 accessing 416 corporate 416 data population 504 database drivers 505 personal 418 refreshing 417 SQL views and tables 512–559 user-defined field tables and views 505 CSCases view (SQL) 536 CSV. See comma-separated values currencies deleting 172 enabling multi-currency 171 in e-store orders 440 modifying 171–172 custom notes 60 Custom window layout 24 Custom_Child 464 Custom_Independent 464 Customer Access 9, 338 customer service 237 notes 60 reports 416 571 572 Maximizer CRM 10.5 User’s Guide See also cases customer service cases. See cases Customer Service window 21 about 220 history notes 60 customers communicating with 124 Customer Access 338 customizing Dashboard 30 Maximizer 37 toolbar and toolbar buttons 39 cycle time in Automated campaigns 197 D Dashboard 29–34 accessing 29 alarms 33 customizing 30 group indicators 32 in Maximizer Web Access 333 in Wireless Access 377 indicator properties 32 window 29 data collection website 107 data packets. See packets database 389 backing up 389, 498–499 drivers for reports 505 user-defined field tables and views 505, 511 date user-defined fields 68 default entries 47 in Maximizer Web Access 266 default notes 63 defining campaign elements 188 campaign roles 188 strategies 166 strategy roles 166, 168 success factors 167–168 delegating campaign activities 194 marketing activities 195 deleting appointments 87, 292 Contacts 44 documents 303 Hotlist tasks 288 notes 296 opportunities 313 detailed reports 419 devices, for Wireless Access 340 dialing preferences 162 dialing, automatic 162 dial-up connection, using FTP 473 dial-up email, scheduling 471 dictionary file 500 direct insert web forms 108 discounts, applying to items 112 disk, saving and importing packets to 481 Distribution List Manager 461 distribution site and central Address Book 467 defined 462 synchronization 154 documents adding to Documents window 131 broadcasting 132 creating 125 deleting 303 in Company Library 102 in Maximizer Web Access 303–308 in Wireless Access 367 location 127 Maximizer Word Processor 126 reports 419 sending using mail merge 132 sharing 102 using merge fields in 129 Documents window 23 domain names 448 draft article 243 E ecBuilder 7 edit mode 45–46 email automated 197 confirmation 437 creating appointments/tasks from 140 in Maximizer Web Access 278–285, 306 in Wireless Access 352, 368, 375 Lotus cc Mail 134 notes 60 Novell GroupWise 134 previewing 139 receiving 137 saving to entries 280 sending 137, 139, 282 sending articles 243 sending to customers 124, 237 supported clients 134 templates 204 transferring Address Book data by 408 using Microsoft Outlook 136 using Outlook Express 135 vCards 134 Email page, in Maximizer Web Access 278 Index Email window about 22, 137 viewing eStore orders and inquiries in 455 enabling multi-currency in Address Book 171 encrypted user-defined fields 68 entering orders and inquiries 455 Enterprise Edition 10 entry currencies 171 escalating cases 231, 362 Escona Tutorial Address Book 18, 247, 334, 338 eStore 432–454 about 7 Business Templates 443, 445 catalog file location 448 catalog sections 443 catalog template tags 435 company address 433, 438 confirmation emails 437 HTML 435 inventory section 444 item information 445 keywords 438 merchant account 440 online catalogs 434 Online Layout screen 447 orders and inquiries 455 overview 432 payment methods 440 publishing catalogs on Internet 448 sample catalog templates 436 stock 444 transaction processing 440 upselling related items/options 445 expenses/income 106 importing entries 106 reports 420 expired articles 243 export and transfer rights 408 exporting Address Book entries 390–395 customer service cases 396 knowledge base articles 398 reports 414 to Microsoft Excel 421 F F1 Help 14–15 Favorite Lists adding or removing entries 82 creating 81 entries assigned to 45 in Maximizer Web Access 261–262 in Wireless Access 376 fax 125 field mapping 406 field types in Maximizer 494 fields 511 graphing 423 key 494 mandatory 67, 107, 495 mapping for import 404 merge 129 system 495 user-defined 46, 67 file formats ASCII 391, 394, 396 comma-separated values (CSV) 392–393, 405 HTML 104, 244 in Company Library 103 saving reports 412 searchable in knowledge base 244 tab-delimited 392–393 XML 390–392, 396, 398, 400–401 files adding to Company Library 103 adding to Documents window 131 HTML 204–205 sharing in Company Library 102 finding articles 243 Fit to page option 100 fixed-date Automated campaign 197 following windows 24 Form Designer 8 FTP changing MaxExchange password 478 transport session 469, 477 troubleshooting connections 470 G gadgets 119 gateway settings 456 generating reports 413 Get Info From Catalog button 457 global Address Books 25 global edit Address Book entries 48 customer service cases 229 in Maximizer Web Access 269 opportunities 180 glossary 562 Goldmine, importing from 402, 404 graphs 413 appearance 425 background 427 color 427 generating 422 handouts 428 selecting fields for 424 573 574 Maximizer CRM 10.5 User’s Guide type 425 using in other applications 428 Group Edition 10 group indicators 32 GroupWise. See Novell GroupWise H Handspring 4 Help and documentation 14 history notes 60 Holiday Editor 87, 563 holiday file 500 holidays, changing in calendar 87 Hotlist in Maximizer Web Access 286–288 in Wireless Access 368–372 preferences 86 reporting on 419 tasks created for cases 230 window 22 See also tasks HTML editor 204 eStore catalog template 435 file format 104, 244 message templates 204–205 using in Web inquiry forms 108 Individuals about 44 converting to Companies 54 See also Address Book entries inquiries entering manually 456–457 online store 455 inquiry form, creating for websites 107 inserting merge fields 128–129 in Automated campaigns 204–205 in graphs 426 in Maximizer Web Access 283 internal article 243 Internet Reporter access 412 search engines 438 Internet transport, converting outgoing packets 479 intervals, setting for Automated campaigns 197, 203 Intranet 413 inventory, tracking in eStore 444 IP address 448 item table merge fields 113 J journal reports 420 window 105 I K icons key fields 494 specifying 45, 494 user-defined 69 keywords for Internet Search Engines 438 knowledge base 240–244 in Maximizer Web Access 325–328 in Partner Access 334 reports 420 See also articles knowledge base articles. See articles Knowledge Base window 22 KnowledgeSync, Workflow Automation 6 adjusting icon bar 37 customizing 37 in Address Book window 36 using to access features 27 importing ACT! databases 402, 404 Address Book entries 399–406 field mapping 404, 406 Goldmine databases 402, 404 income and expenses 106 knowledge base articles 399, 401–406 MXI or XML files 265, 400 two-tier 405 using Other Contact Manager Database option 402 website data into Maximizer 107 income/expenses 106 importing entries 106 reports 106, 420 indicators 30 alarms 33 group 32 redline 33 setting up in Dashboard 30 types 32 L landing page URLs 212 launching Automated campaigns 206–207 layout, windows 24 leads. See sales leads letters broadcasting 132 communicating with customers 124 inserting merge fields 129 logging notes on 60 mail merge 132 Index writing 125 lists generating graphs from 422 in Maximizer Web Access 260–265 users 383 Live Update Wizard 496 local Address Books 25 logging Address Book transfers 409 enabling for phone calls 159 notes 201, 284 preferences 60 logs in MaxExchange Remote 484 Packlog.txt 485 Rmdmlog.txt 485 troubleshooting 484 Lotus cc Mail 134 M macros adding buttons for running 386 in Microsoft Word 128, 308 running 41, 387 security settings 128 mail merge notes 60 using to broadcast documents 132 mail-out notes 60 mandatory fields about 495 in web inquiry forms 107 user-defined 67, 69, 495 manual notes 60 mapping fields for import 404 maps in Maximizer Web Access 276 in Wireless Access 349 marketing campaigns 184, 186, 196–197, 214 marketing teams assigning to Traditional campaigns 192–193 delegating activities to 195 setting up in Administrator 192 MASTER user 463 MaxAlarm 7 MaxExchange 6 MaxExchange Outlook synchronization 154 MaxExchange Remote activity log (Rmdmlog.txt) 485 defined 461 installing central Address Book 467 troubleshooting logs 484 updates 466 MaxExchange Server 460 MaxFinder 8 Maximizer about 5, 20 companion applications 6 configuring for email 134 creating custom dialog boxes 8 customizing 37 editions 10 field types 494 Form Designer 8 importing data from websites 455 modules 5 preferences 382 reports 412 tutorials 18 Maximizer CRM Gadgets 119 Maximizer ODBC driver for Crystal Reports 505 user-defined fields 511 Maximizer Web Access about 9 accessing 247 Action Plans 294 Address Book entries 266–277 calendar 289–292 campaigns 316–318 cases 319–324 Dashboard 29, 333 documents 303–308 email 278–285 Home page 249 Hotlist tasks 286–288 knowledge base 325–328 navigating 248 notes 296–298 opportunities 309–315 preferences 329 searching in 251–259 user-defined fields 299–302 Maximizer Word Processor 125 documents 126 email templates 204 location of templates and documents 127 merge fields 129 templates 126 MaxLink 4, 7 MaxMobile 4 about 7 setting synchronization settings in Wireless Access 378 MEC files 455 meetings, scheduling in calendar 87 menu labels, customizing 37 merchant account eStore 440 575 576 Maximizer CRM 10.5 User’s Guide profiles 456 merge fields creating for sales quotes 113 for automated campaigns 205 in campaigns 205 in documents and templates 129 in Maximizer Web Access 283 inserting 128, 204–205 title and footnote 426 unlinking in Microsoft Word 128 MET transfer file 408 Microsoft Dynamics GP 7 Microsoft Excel 421 Microsoft Outlook 124, 136 Microsoft Outlook Express 135 Microsoft Outlook integration 141–151 Microsoft SQL Server backing up an Address Book 389 driver for Crystal Reports 505 importing databases 402 Reporting Service Viewer 6 Microsoft Word 124, 132 macro settings 128 unlinking merge fields 128 using with Maximizer 128 using with Maximizer Web Access 307 modem, configuring for automatic dialing 162 modifying Address Book entries 335 customer service cases 319 documents 303 entries in Wireless Access 350 Hotlist tasks 288 knowledge base articles 327 multiple entries 48 My Work Day view 27 opportunities 309–310 user-defined fields 300 money orders 440 monitoring cases 234 multi-currency 171 MXI (Maximizer Transfer Interface) files 265, 400–401 Mxzhol.nam 500 My Work Day 21, 27, 249 N navigating eStore 433 Maximizer Web Access 248 Partner Access 334 Reporter 413 Wireless Access 342 notes adding 60 default 63 history 60 in Maximizer Web Access 296–298 in Wireless access 365–366 logging 201, 284 report 419 types 60–61 Notes window 23, 60 Novell GroupWise 134 numeric user-defined fields 68 O ODBC driver, for Crystal Reports 505 on schedule (success factor) 168 one-time campaigns 318 ongoing Automated campaign 197, 207 online accessing items for manual orders 457 catalog 433, 457 documentation 14, 17 help 14 store 432 transaction processing 440 opportunities adding 173 competitors 174 deleting 313 email notes 60 entering details 174 graphing 423 history notes 60 IDs 173 in Maximizer Web Access 309–315 in Wireless Access 354–356 notes 60 partners 174 reports 419 strategies 166, 169, 174 synchronizing 465 Opportunities window 21, 165 Opportunity Pipeline report 181 OrderDesk 455 catalogs 116–118 credit card transactions 456 email summary of order or inquiry 455 reports 420 sales quotes 109–115 transaction processing in eStore 440 window 23, 109, 458 See also orders orders confirmation 437 entering manually 457 in eStore 455 Index online store 455 organizational charts 100–101 Outlook integration. See Microsoft Outlook integration Outlook Style window layout 24 Outlook synchronization 152 P packets converting for Internet transport 479 restricting size of 480 saving to disk 481 Palm 4 Partner Access 9, 334 accessing 334 Address Book entries 335 cases 337 partners opportunities 174 Partner Access 334 sales leads 45 passwords changing 25, 383 Escona Tutorial Address Book 247, 334, 338 MaxExchange FTP 478 pausing Automated campaign 214 Traditional campaign 196 payment gateway profiles 440, 456 payment methods in eStore 440 PDF 14, 17 Peg Board 98 marking yourself out 89 status of co-workers 98 working with calendar 22 People view (SQL) 519 personal organizer, printing 419 personal reports 418 Personal window 23 phone calls 124 in Wireless Access 349 notes 60, 159 receiving and transferring 161 to Address Book entries 159 phone list, in Maximizer Web Access 331 phone log report 420 phone masks 493 pie charts, displaying in Dashboard 32 pipeline report. See Opportunity Pipeline Report political alignment (success factor) 168 preferences 382 calendar 86 distribution 483 for controlling batch size and interval 197 Hotlist 86 logging 60 Maximizer 382 Maximizer Web Access 329 setting 383 user 382 Wireless Access 378 prefixes, for user-defined field SQL views 505 previewing catalogs 447–448 email 139 printing calendar 419 column reports 216 graphs 428 phone list 331 reports 413–414, 419 processing immediate updates 476 published article 243 publishing catalogs 434, 448 Q Quick Access list 38 quick backup of Address Book 389, 498 quick search in Maximizer Web Access 251 in Wireless Access 345 QuickBooks 7 R reassigning appointments 89 Hotlist tasks 86 Recent Entries list 38 recurring tasks 153 Refresh button 97 refreshing Crystal Reports 417 views 27 related entries about 52 reports 420 unlinking 53 related items/options in eStore catalog 445 removing entries from campaigns 213 entries from Favorites Lists 82 Reporter about 5, 412 accessing 412 window 413 See also reports reports exporting 414 generating with Reporter 413 577 578 Maximizer CRM 10.5 User’s Guide income/expenses 106 printing 414, 419 transfer summary 409 types 419 user-defined field tables and views 511 See also Crystal Reports; Reporter requirements for caller ID, TAPI 488 resolving cases 232, 362 restoring Address Book data 500 restricting size of packets 480 retrying Automated campaign activities 215 Review Roles feature 193 reviewing Automated campaign activities 215 steps 194 roles assigning Contacts to 193 in Traditional campaigns 168, 187–188 S sales leads 44–45, 419 sales quotes 109–115 merge fields 113 sales reports 416 sales team 164–165 members and member rights 175 setting up 175 versus marketing team 192 sales teams members 175 saving email messages as Maximizer documents 149 graphs to the Graph Catalog 426, 429 packets to disk 481 scheduling appointments 87, 89 options for dial-up mail 471 strategies for an opportunity 176 transport method options 474 search engines 438 searching Address Book entries 76 articles 243 by all fields 78 by fields 77 catalogs 454 in Maximizer Web Access 251–259 in Wireless Access 343, 354, 357 user-defined fields 78 security settings for Maximizer macros 128 viewing rights 408 selecting entries 37, 260 sending email 139 in Maximizer Web Access 282 in Wireless Access 352, 375 Server computer 460 server URL, Reporter 413 setting up automatic dialing 162 online transaction processing 440 sales and marketing teams 164 territories 55 troubleshooting logs 484 user-defined fields 68 shopping basket 452 Show blank fields 67 Show hidden fields 67 showing all companies in Address Book 253 appointments 84, 89 blank fields 67 completed activities 177 sites about 4, 9, 246 Customer Access 338 Maximizer Web Access 247 Partner Access 334 Wireless Access 340 size, restricting for packets 480 Smart Phone Number Matching 489 sort order in knowledge base 240 of graph values 424 user-defined fields 69 SQL tables ADMN_User_Details 558 AMGR_Opportunity_Link 553 AMGR_Resources 529 CMGR_Auto_Campaign_Accounts 533 SQL views AMGR_Appointment 521 AMGR_Client 512 AMGR_CSCases 533–534 AMGR_Notes 530 AMGR_Opportunity 540 Company 517 CSCases 536 People 519 starting MaxExchange Remote 467 startup options for Address Book 82 status checking using Peg Board 98 in/out 98 searching by 77 steps in strategies 166 in Traditional campaigns 187 Index strategies about 166 adding 169 marketing campaign template 186 roles 168 steps and activities 167 success factors 168 Strategy Library 166, 169 success factors 168 suspending Automated campaign 214 Traditional campaign 196 synchronization times, setting on Remote 474 synchronizing data with MaxExchange 464–465 with Microsoft Outlook 152 System Defaults tab 67, 82 system fields 69, 495 T tab-delimited formats 392–393 table user-defined fields 67 adding items 73 tags, in eStore catalog templates 435 TAPI 159, 162, 488 tasks adding 287 creating from email 140, 285 customer service 230 deleting 288 in Wireless Access 368–372 modifying 288 notes 60 reassigning 86 recurring 153 synchronizing with Microsoft Outlook 152 teams 175, 186 See also marketing teams ; sales teams telephone. See phone templages Maximizer Word Processor 126 templates catalog 434–436, 447 Corel WordPerfect 128 for Automated campaigns 197–198, 204 for eStore 443, 445 location 127 merge fields 129 terms, glossary of 562 territories assigning 57 setting up 55 Territory Management 55–59 text files 205 text size, adjusting 17 third-party notes 60 transaction processing 456 time zones 99 timed notes 61 toolbars, customizing 39 tooltips, displaying 38 tracking income and expenses 106 Traditional campaigns 186–196 activities 187–188 example 189 marketing team members 192 pausing 196 planning 187 reviewing steps 194 roles 187–188, 193 steps 187 team members 192 templates 186, 190 transaction journaling 463 transaction processing 440 gateway 456 setting up online 440 transfer and export rights 408 transfer log notes 61 transfer summary report 409 transferring Address Book entries 407, 409 data by email using MET file 408 phone calls 161 troubleshooting logs for MaxExchange Remote 484 tutorials 18 two-tier import 405–406 U unlinking address book entries 53 unlinking merge fields, in Microsoft Word 128 unsubscribing Address Book entries 213 updates, receiving for MaxExchange Remote 466 updating central Address Book 466, 476 uploading catalogs 448 upselling products in eStore 445 user password, changing 383 user preferences 383 user-defined fields 65–75, 463 adding table items 73 creating 71 database tables and views 505, 511 folders 70 in Maximizer Web Access 299–302 in Wireless Access 364 key 69, 494 mandatory 67, 69, 495 579 580 Maximizer CRM 10.5 User’s Guide modifying 75, 300 related entries 53 report 419 searching 78 setting up 68 sort order 69 system 69, 495 types 67, 69 User-Defined Fields window 23, 65 Userdict.lex 500 users changing passwords 383 general preferences 382 security 408 status 98 transport and export rights 408 viewing busy periods 98 V vCards 134 view mode 45 viewing Address Book entries 50 busy periods 98 organizational charts 101 security rights 408 time in world locations 99 views Calendar window 87 for user-defined fields 505 Maximizer window 24 refreshing 27 W web access sites about 4, 9, 246 Customer Access 338 Maximizer Web Access 247 notes 60 Partner Access 334 Wireless Access 340 web forms, direct insert 108 Web Inquiry Form wizard 107 websites collecting data from 455 forms in 107 WhereAbouts 332 window captions, customizing 37 windows Calendar 87 Company Library 102 controlling 507 descriptions of 21–24 Email 137 Hotlist 84 Income and Expenses 106 layouts 24 Notes 60 Opportunities 165 OrderDesk 455 User-Defined Fields 65 Wireless Access about 9, 340 Address Book entries 343–349 calendar 368–372 Categories 351 Company Library 373–375 customer service cases 357–363 Dashboard 377 documents 367 Favorite Lists 376 logging in 341 MaxMobile synchronization settings 378 modifying entries 350 navigating 342 notes 365–366 opportunities 354–356 preferences 378 Products/Services 351 sending email 352 tasks 368–372 user-defined fields 364 wizards Add Hotlist Task 84 Add Strategy 169 Catalog Item 444 Chart 422–426 Web Inquiry Form 107 WMF file 428 word processor. See Maximizer Word Processor Word. See Microsoft Word WordPerfect. See Corel Word Perfect Workflow Automation powered by KnowledgeSync 6 World Clock 99 X XML files 265, 390–392, 396, 398, 400–401