1
Asset Bank Organisational Units
Administrator User Guide
Author:
Paul Mulvee, Bright Interactive
Date:
December 2, 2010
Version: d3
Contents
1
Aim of this document ............................................................................................. 3
2
What is an Asset Bank Org Unit?............................................................................ 3
3
Managing an Org Unit ............................................................................................ 4
3.1
Approve Items .................................................................................................... 5
3.1.1 Approving Uploads/Edits .......................................................................................... 5
3.1.2 Approving Downloads .............................................................................................. 6
3.2
Upload ............................................................................................................... 7
3.2.1 Single Upload ........................................................................................................... 8
3.2.2 Bulk Upload .............................................................................................................. 8
3.2.3 Unsubmitted ............................................................................................................. 8
3.2.4 Submitted ................................................................................................................. 9
3.3
Admin > Approve Users ....................................................................................... 9
3.4
Admin > Org Units .............................................................................................10
3.5
Admin > Users ...................................................................................................11
3.5.1 Finding Users ......................................................................................................... 12
3.5.2 Adding a User ........................................................................................................ 13
3.5.3 Messaging Users.................................................................................................... 14
3.6
Admin > Groups.................................................................................................15
3.6.1 Access Levels ........................................................................................................ 16
3.6.2 Remove All Users................................................................................................... 17
3.7
4
Admin > Categories............................................................................................17
Managing an Org Unit – Advanced Options .......................................................... 18
4.1
Admin > Groups.................................................................................................18
4.1.1 Edit Group .............................................................................................................. 18
4.1.2 Attribute Exclusions ................................................................................................ 19
4.1.3 Attribute Visibility .................................................................................................... 19
4.1.4 Filter Exclusions ..................................................................................................... 19
4.1.5 Usage Exclusions ................................................................................................... 20
5
Appendix A ........................................................................................................... 21
5.1
Turning off admin alerts .....................................................................................21
Asset Bank, Training Guide
1 Aim of this document
This Training Guide has been created to help new Organisational Unit Administrators (Org
Unit Admins) get up to speed quickly and to act as a reference later. It outlines the main
responsibilities for Org Unit Admins and explains how each of these is managed through
Asset Bank’s interface. For additional information on any area of Asset Bank, please see the
on-line help:
http://www.assetbank.co.uk/support/documentation/
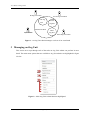
2 What is an Asset Bank Org Unit?
An Org Unit is a subset of a larger Asset Bank, for which administration has been delegated to
local admin users (see figure 1). For example, an international Asset Bank may have Org Units
for each country. This would be beneficial as the following could then be managed locally:
Approving uploads/downloads of assets requested by users in your Org Unit (for
those that need it)
Approving or rejecting users who have registered
Adding additional access levels (if you need to make a distinction between what users
can and cannot see in your Org Unit)
Manage existing users (troubleshooting, re-setting their passwords, etc.)
Group management (determining what members of each group can see and do).
Delegation of such activities is usually most beneficial when:
Local knowledge will speed up the administration task (for example authorising a
download for a reason the Org Unit Admin is aware of)
Time differences may otherwise lead to delays (e.g. approving an urgent download)
There are just too many users to manage centrally.
Note: In addition to Org Unit Admins who look after their separate areas, there are also Super Admins
who look after the entire Asset Bank as a whole.
Page 3 of 21
Asset Bank, Training Guide
UK Org Unit Admin
UK Org
Unit
Global Asset Bank
France Org Unit Admin
France
Org Unit
Other
Org Unit
Super Admin
Other Org Unit Admin
Figure 1 - An Org Unit Admin manages a sub-set of an Asset Bank
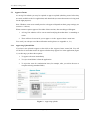
3 Managing an Org Unit
This section now steps through each of the tasks an Org Unit Admin can perform in more
detail. The main menu options that are available to Org Unit Admins are highlighted in figure
2 below.
Figure 2 – Main Org Unit Admin functions highlighted
Page 4 of 21
Asset Bank, Training Guide
3.1
Approve Items
As an Org Unit Admin you may be required to approve uploads (checking assets before they
are made available to the live application) and downloads (to ensure that assets are being used
for the right purposes).
Note: Whether or not users actually need to seek approval depends on their group settings (see
section 3.6.1 below).
When someone requests approval for either of these actions, then two things will happen:
1. All Org Unit Admins will be sent an email notifying them that there is something to
action
2. There will now be assets for you to approve via the ‘Approve Items’ menu item.
You can if you wish opt out of the notification emails (please see Appendix A, 5.1).
3.1.1
Approving Uploads/Edits
If you have new uploads to approve, then click on the ‘Approve Items’ menu link. You will
see the list of assets that need to be approved before they appear live in the application (figure
3). At this stage you have three options:
1. To approve the asset immediately
2. To reject it and delete it from the application
3. To reject the asset for resubmission later (for example, after you advise the user to
complete missing metadata fields).
Figure 3 – Approving uploads
Page 5 of 21
Asset Bank, Training Guide
To help make your decision you can click on the asset thumbnail and you will be taken
through to a page showing all asset information. You can then review this, go back to the
approvals page and make your decision.
Another way to process items that need upload approval is via the ‘Batch approve these
assets’ link. This then takes you through each asset yet to be approved, displaying its full list
of metadata and presenting you with the Approval/Rejection options as you go. This is the
quickest way to process uploads if you need to review all of the metadata for each asset (and
possibly make changes).
3.1.2
Approving Downloads
To check to see if there are any downloads awaiting approval, click on the ‘Downloads’ tab
(figure 4). You get email notifications for these too, unless you have turned off notification
emails as shown in Appendix A 5.1 below.
Figure 4 – Approving downloads
If you click on the [view] link next to a user, you are then shown a summary displaying which
assets they want to download, the intended usage for this asset and any message that they
have added. Approval status is set to pending by default. To approve these assets just change
‘pending’ to ‘approved’, add in a message (if relevant), set an expiry date for the approval
(the date after which the user will no longer be able to download this particular asset without
requesting approval again) and finally click ‘Submit’. See figure 5.
Page 6 of 21
Asset Bank, Training Guide
Figure 5 – Approving downloads for a particular user
To make it easier for an admin to give the same approval to a set of assets, there is a ‘Copy
these values to all items’ link. For example, if you have 10 assets to approve, and you want to
approve all and set the same expiry date for each, then just complete the first one, click on the
link and then the others will now match. Finally, if you then want to set different values for a
particular item, you can now do this before clicking the ‘Submit’ link at the bottom of the
page. This can save administrators time when approving downloads.
3.2
Upload
As an Org Unit administrator you will have upload permissions by default. This allows you to
add new assets to the application.
Uploading the highest quality original
It is important that you upload the highest quality version of the assets that you have available
so that users can use the assets for a wide variety of uses, such as print (high resolution) or
web (lower resolution). The highest quality version will typically have the highest pixel
dimensions and overall file size. Asset Bank will automatically repurpose (i.e. reformat and
resize) images when downloaded from the ‘Quick Download’ page, in order to give users an
appropriate size for their purpose.
Page 7 of 21
Asset Bank, Training Guide
Entering as much metadata as possible
It is also important to add in as much metadata as possible (for example description and
keywords) as this information is used by the application to present the best possible matches
to user when they run a search.
From the upload tab you will see the following options:
3.2.1
Single Upload
Bulk Upload
Unsubmitted
Submitted.
Single Upload
This method is used for uploading one file at a time. You choose the file and then enter all
relevant metadata (ensuring all mandatory fields are completed). One you have done this and
submitted the form, the file will be visible as a new asset to all users with relevant
permissions.
More detail on Single Upload can be found here:
http://www.assetbank.co.uk/go/help/upload/
3.2.2
Bulk Upload
This method is used for uploading a number of files at once. These sets of files tend to have
some metadata in common, such as the category they will be added to. The steps involved for
this are:
1. Upload the files you want to import using the bulk uploader control.
2. Enter the metadata that is common to these files (for example the category they will
appear in) and submit the form to start the import process.
3. Once the files have been imported, use the Batch Update to step through each one in
order to enter any remaining metadata that is specific to each (for example the
description).
More detail on Bulk Upload can be found here:
http://www.assetbank.co.uk/go/help/import/
3.2.3
Unsubmitted
When uploading an asset one of the options available is 'Do not submit yet'. Selecting this
option means the asset will be only available to you until you decide to submit it to ‘live’. The
'Unsubmitted’ page shows those assets in one location so that you can edit and update them
Page 8 of 21
Asset Bank, Training Guide
until you are happy to submit them for other users to view or approve. The page lists all the
unsubmitted assets along with a thumbnail representation of the asset and the actions that can
be performed for each asset ('Submit to live', 'Submit for approval' and/or 'Delete').
The page also provides a link to batch update all the current user's unsubmitted assets.
3.2.4
Submitted
This page shows assets you have uploaded that have been submitted to another user for
approval (if such an approval process is in place). As an Org Unit Admin this page will not be
used as you already have permission to upload to your own Org Unit without the need for
approval.
3.3
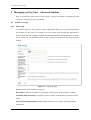
Admin > Approve Users
Org Unit Admins will receive an automatic email notifying them when a new user has
registered for the Org Unit they manage. The admin user can choose to forgo these
notification emails as described in Appendix A 5.1 below. If you receive a notification then
you can go to ‘Admin > Approve Users’, in order to see a list of users awaiting approval to
use the application (figure 6).
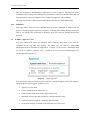
Figure 6 – Approving users
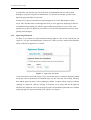
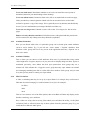
You now need to click on [view] to access each user’s details and approve them. The approve
user page that you get to (figure 7) allows you to:
Approve or reject them
Choose which group to add the user to
Send an email notification of their approval/rejection
Optionally set an expiry date (useful for creating temporary users)
A password (leave blank for a randomly generated one)
An optional message to include in the email the user will receive.
Page 9 of 21
Asset Bank, Training Guide
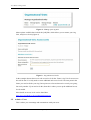
If it looks like someone has registered for your particular Org Unit in error, then you can
explain this in the ‘Rejection Message’, asking to them to register again for the appropriate
one.
Once you have completed the approve user page, click ‘Save’. The user will now be sent
either their approval email complete with password to allow them to start using Asset Bank,
or their rejection email (if ‘Email user?’ is ticked).
Figure 7 – Approve user page
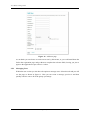
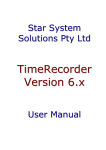
3.4
Admin > Org Units
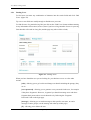
From here (figure 8) you can review how much space your particular Org Unit is using and
any limit that has been set-up by the Super Admin. If your usage is reaching the storage quota
then you should let your Super Admin know and also think about deleting any assets that are
not used. Though of course, it may be more appropriate to seek additional space rather than
delete something that may be useful at some point in the future.
Page 10 of 21
Asset Bank, Training Guide
Figure 8 – Manage your org unit
Other options available here include the [edit] link, which allows you to rename your Org
Unit, and [access levels] (figure 9).
Figure 9 – Org unit access levels
In the example shown, there are no sub-access levels for the ‘France’ Org Unit. In most cases
this will be fine. You only need to create additional sub-access levels if at some point in the
future you need to divide your Org Unit up into sets of assets that can be seen by one group,
but not by another. If you need to do this, then this is where you set up the additional access
levels needed.
More details on access levels can be found here:
http://www.assetbank.co.uk/go/adminhelp/permcats/
3.5
Admin > Users
This is where you can manage and communicate with your users.
Page 11 of 21
Asset Bank, Training Guide
3.5.1
Finding Users
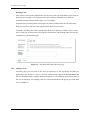
To find users just enter any combination of elements into the search fields and click ‘Find
Users’ (figure 10).
Tip: one or two fields are usually enough to find the user you want.
To find all users of a particular Org Unit just click on the ‘Find Users’ button without entering
in any information. Please note, however, that if you have a large number of users in your Org
Unit then this will result in a long list (and the page may take a while to load).
Figure 10 – Manage users
When you have found the user you are looking for, you then have access to a few other
actions:
[edit] - allowing you to go back in and change user details including the group(s) they
are in
[reset password] - allowing you to generate a new password for the user, for example
if they have forgotten it. However, in general you should encourage users who have
forgotten their passwords to reset it themselves by following the ‘Forgotten
Password?’ link on the login page.
[message] - allowing you to send a message to this specific user (note, to send a
message to entire groups, use the message tab at the top of this page)
[X] - allowing you to delete the user.
Page 12 of 21
Asset Bank, Training Guide
Deleting Users
Only delete a user from the application if you are sure you do not want them to login again in
the future (for example, if an employee leaves the company). Alternatives to delete are
available from the [edit] user link (figure 11), for example:
Suspend User (preventing them from logging in, until you uncheck this box at a later date).
Hide user (as above, but also removing them from the Find Users area).
If in doubt, choosing one of these options will allow you to quickly re-enable a user at a later
date, saving you (or them) from re-keying their information, and ensuring other user stats are
maintained (e.g. download usage).
Figure 11 – The latter half of the [edit user] page
3.5.2
Adding a User
From this page you can create a new user (as opposed to a user registering and then you
approving as per section 3.3 above). Click on ‘Add new user’ and fill in the information that
the user would normally complete themselves (figure 12). In addition, set an expiry date (if
the user is temporary for example), add in a password and choose the groups you wish them
to be a member of.
Page 13 of 21
Asset Bank, Training Guide
Figure 12 – Add user page
As an admin you can choose to create a new user by this means, or you could email them the
link to the registration page and get them to complete the relevant fields, leaving you just to
approve the application as per section 3.3 above.
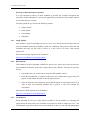
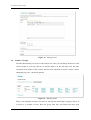
3.5.3
Messaging Users
Within the user section you also have the option to message users. Select this tab and you will
see the page as shown in figure 13. Here you can create a message, preview it and then
quickly send it to one or all of the groups you mange.
Page 14 of 21
Asset Bank, Training Guide
Figure 13 – Message users
3.6
Admin > Groups
From the admin menu you can access the Groups area. Here you can change what users in the
various groups in your Org Unit can see and do (figure 14). We will only cover the most
commonly used features in this section, with the more advanced covered in section 4 below
(Managing Org Unit - Advanced Options).
Figure 14 – Manage groups
There is one important concept to be aware of with regards membership of groups. That is, if
a person is a member of more than one group, then they will inherit the most open
Page 15 of 21
Asset Bank, Training Guide
permissions available in each. So for example, if in one group a user needs approval to upload
images into a particular access level, but in another that user does not, then this means overall
the user does not need approval for upload of assets into this access level.
Related to this, there is a special group called ‘*Logged in users’ that every user (with login
details) is a member of by default. As an Org Unit Admin you will not be able to see this
group as it is managed by the Super Admins of the application. So to summarise, if you
cannot see why a user of one of your groups can see or do something that you think they
should not be able to, then contact your Super Admin and get them to check the permissions
in the ‘*Logged in users’ group.
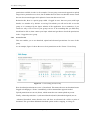
3.6.1
Access Levels
This area enables you to set download, upload and advanced permissions for users of this
group.
As an example, figure 15 shows the access level permissions or the ‘France’ Users Group.
Figure 15 – Users Group [access levels]
Here download permissions are set to 3 (Download). This means the user can download assets
flagged as belonging to ‘France’ immediately, with no intermediate approval needed.
Upload permissions are set to 0 (None), which means the user cannot upload any assets.
Finally, advanced permissions 1 (Advanced download) and 2 (Download originals) are set.
‘Advanced download’ means that the user will have an advanced tab visible at point of
download. This gives them additional download options such as cropping, re-sizing, etc.
Page 16 of 21
Asset Bank, Training Guide
Checking the ‘Download Originals’ checkbox allows the user to download a the original, high
res file - if this is not checked then they can only downloaded converted versions, i.e. usually
images that are lower res.
‘Requires approval for hi-res’ is not ticked. This can be set-up if you need to, for example,
prevent users downloading images at print quality resolutions.
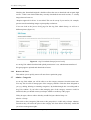
If we now look at the [access level] page for the Org Unit Admin Group, we will see a
different picture (figure 16).
Figure 16 – Org Unit Admin Groups [access levels]
As an Org Unit Admin download and upload permission 4 is set, which means members of
this group approve uploads and downloads of assets.
3.6.2
Remove All Users
This enables you to quickly remove all users from a particular group.
3.7
Admin > Categories
As an Org Unit Admin you will be able to see the category structure from this menu item.
You may also be able to manage part of the category structure if this has been delegated to
you (e.g. adding, deleting or renaming categories). By default though, this is not delegated to
Org Unit Admins. If you believe that managing part of the category structure would be
beneficial, then you should contact your Super Admin to set this up if they agree.
If they do agree, then to achieve this they would find your Admin Group via:
Admin > Groups
Then click on the [categories] link next to this group (this is visible only to Super Admins).
From here they can select the place in the category tree from below which they would like
you to have management rights.
Page 17 of 21
Asset Bank, Training Guide
4 Managing an Org Unit – Advanced Options
Here we describe the other aspects of the Admin > Groups area which are typically not used
on a day to day basis by Org Unit Admins.
4.1
4.1.1
Admin > Groups
Edit Group
As shown in figure 17, here you have various options that allow you to set general limitations
for members of this group. For example, can users email assets through the application at
point of download (for example, instead of downloading and then attaching them to an email).
As an admin you can determine which, if any, of these are appropriate for the groups you
manage.
Figure 17 – Edit group page
Name: Allows you to rename your group.
Description: Optional description to remind you of the purpose of the group for example.
Maximum daily downloads: An option to restrict volume of downloads by members of this
group.
Max download height/width: Another option allowing you to restrict downloaded image
dimensions.
Page 18 of 21
Asset Bank, Training Guide
Users can email assets: Determines whether or not a user can email the asset at point of
download (instead of just downloading to their desktop).
Users can embed assets: If turned on, then users will see an embed link on each asset page.
If they use this they can then generate embed code for an asset that can be used in other
websites to point to a copy of this image. This is generally not on by default, and should only
be set if you are confident that your images should be used this way.
Users can view larger size: If turned on users will see the ‘View larger size’ link on asset
pages.
Editors can only edit their own files: If ticked then users with upload and edit permissions
will be restricted to only editing assets they themselves uploaded.
4.1.2
Attribute Exclusions
Here you can decide what users of a particular group can see based upon certain attributes
(such as Active Status). E.g. if you tick the ‘Active Status > Expired’ checkbox, then
members of this group will not see any assets in the application that have ‘Expired’ set as
their active status.
4.1.3
Attribute Visibility
This is where you can choose to hide attributes from users if you think that seeing certain
values might have a negative impact, or if you just want to simplify things for them. Again, as
mentioned previously, users inherit the most open permissions from groups they are a
member off. This includes the ‘*Logged in users’ group that only super admins can amend.
So if changing something here has no visible affect for a member of this group, and you want
it to, then you may need to contact your super admin.
4.1.4
Filter Exclusions
A filter is something that may be set up by a super admin. For example, they could create a
filter that sits on the homepage. It could contain a list of years for example:
No Filter
2009
2010
Then if a user chooses one of the filter options, then Asset Bank will then only display assets
that have matching ‘year’ attributes.
Now, if this was set-up, then as an Org Unit Admin you would have the ability, via the [filter
exclusions] link, to effectively hide any of these options from the particular group. E.g. you
could choose to hide the 2009 option.
Page 19 of 21
Asset Bank, Training Guide
4.1.5
Usage Exclusions
From here you can choose to hide various usage types (download conversion options) for
users. Generally this is not used unless there is a specific requirement for having a usage type
that is valuable for one set of users, but deemed unsuitable for another.
Page 20 of 21
Asset Bank, Training Guide
5 Appendix A
5.1
Turning off admin alerts
If you would like to turn off notifications being emailed to you (e.g. when someone requests
approval to download assets), then follow this process.
Log in as an Org unit admin
Go to:
Admin > Users
And look up your own account.
Click [edit] and you should now be taken to your own ‘Edit User’ page.
Midway down, you should see a ‘Receives alerts:’ checkbox. If you un-tick this, then you will
no longer receive alerts.
Page 21 of 21