1
Star System
Solutions Pty Ltd
TimeRecorder
Version 6.x
User Manual
TimeRecorder Version 6.x - Table of Contents
About this manual............................................................................ 5
Overview..........................................................................................5
How to use this manual ................................................................... 6
Overview..........................................................................................6
Introduction to TimeRecorder.......................................................... 7
Overview..........................................................................................7
TimeRecorder system ...................................................................... 8
Overview of TimeRecorder structure ....................................................8
Timesheet ...................................................................................... 12
Overview of timesheet ..................................................................... 12
Timesheet line ............................................................................... 14
Overview of a timesheet line............................................................. 14
Expenses ....................................................................................... 19
Overview of an expense line ............................................................. 19
Reports .......................................................................................... 23
Overview of reports and lists ............................................................ 23
Synchronise ................................................................................... 26
Overview of synchronise .................................................................. 26
Overview of synchronise error log ..................................................... 28
Submit Timesheets ........................................................................ 29
Overview of submitting timesheets .................................................... 29
Submit Expenses ........................................................................... 31
Overview of submitting expenses ...................................................... 31
Un-Submit Timesheets/Expenses .................................................. 32
Overview of un-submit..................................................................... 32
Purge old Timesheets .................................................................... 33
Overview of purge old timesheets ..................................................... 33
Preferences ................................................................................... 34
Overview preferences ...................................................................... 34
Main menu ..................................................................................... 38
Moving around ................................................................................ 40
Program Icons ................................................................................ 41
How to access TimeRecorder ............................................................ 43
How to exit TimeRecorder ................................................................ 44
Copyright © 1998-2004 Star System Solutions Pty Ltd.
TimeRecorder V6.x
2
Using TimeRecorder....................................................................... 45
Overview........................................................................................ 45
Access maintenance functions........................................................... 46
Timesheet ...................................................................................... 48
New....................................................................................................................................................48
Change .............................................................................................................................................49
Copy ..................................................................................................................................................50
Delete ...............................................................................................................................................51
Timesheet line ................................................................................ 52
New....................................................................................................................................................52
Change .............................................................................................................................................56
Repeat ..............................................................................................................................................57
Delete ...............................................................................................................................................59
Expense line ................................................................................... 60
New....................................................................................................................................................60
Change .............................................................................................................................................65
Delete ...............................................................................................................................................66
Reports.......................................................................................... 67
Detailed Transaction Log ...........................................................................................................67
Weekly Summary Report ..........................................................................................................69
Transaction Lists...........................................................................................................................72
Master Lists ....................................................................................................................................76
Overtime..........................................................................................................................................78
Travel Diary ....................................................................................................................................80
Task Lists.........................................................................................................................................83
Time Analysis.................................................................................................................................85
Submit........................................................................................... 87
Submit timesheets.......................................................................................................................87
Submit expenses ..........................................................................................................................90
Unsubmit ....................................................................................... 92
Unsubmit timesheets ..................................................................................................................92
Unsubmit expenses .....................................................................................................................94
Synchronise.................................................................................... 96
Synchronise Masterfiles .............................................................................................................96
Purge............................................................................................. 98
Purge old timesheets ..................................................................................................................98
Appendix 1................................................................................... 101
TimeRecorder Preferences .............................................................. 101
Display............................................................................................................................................101
Functions .......................................................................................................................................103
Warnings........................................................................................................................................105
Options ...........................................................................................................................................107
Submit ............................................................................................................................................110
Security ..........................................................................................................................................113
Labels..............................................................................................................................................116
Company Details.........................................................................................................................118
Overtime........................................................................................................................................120
Copyright © 1998-2004 Star System Solutions Pty Ltd.
TimeRecorder V6.x
3
Appendix 2................................................................................... 122
TimeRecorder calculations .............................................................. 122
Productive / Chargeable hours calculation......................................................................122
Charge ratio calculation ...........................................................................................................124
Appendix 3................................................................................... 126
TimeRecorderINI.CSV File .............................................................. 126
Appendix 4................................................................................... 127
Add-Ons (TimeRecorder.INI file) ..................................................... 127
Add-Ons Parameters (TimeRecorder.INI file) .................................... 129
Glossary....................................................................................... 130
Copyright © 1998-2004 Star System Solutions Pty Ltd.
TimeRecorder V6.x
4
About this manual
Overview
This section explains the features of this manual. It is
intended to assist the user in getting the most out of
TimeRecorder, by knowing how to use the manual effectively.
This manual describes and outlines the set up procedures,
maintenance, and day-to-day use of TimeRecorder in a
manner that will fulfil the business requirements of your
company.
The user must ensure they have Adobe Acrobat Viewer
Version 4 or above installed on their computer in order to
display this PDF user manual correctly.
Copyright © 1998-2004 Star System Solutions Pty Ltd.
TimeRecorder V6.x
5
How to use this manual
Overview
Introduction This manual has been written to assist in setting up and using
the TimeRecorder system.
Access aids
There are various access aids to help you to find the
information required.
Table of Contents – The listing of this manual’s
content, which is located at the front of the manual.
Topic titles – The major headings on each page, for
example, the heading “How to use this manual”
located on this page.
Block labels – The minor headings on each page for
example, the heading “Access aids” located on this
page.
Copyright © 1998-2004 Star System Solutions Pty Ltd.
TimeRecorder V6.x
6
Introduction to TimeRecorder
Overview
Introduction This section explains how TimeRecorder is structured and how
it is used to enable the various functions of the system to
operate within the business requirements.
This section
This section is divided into the following topics:
Overview
Overview
Overview
Overview
Overview
Overview
Overview
Overview
Overview
Overview
Overview
Overview
of
of
of
of
of
of
of
of
of
of
of
of
TimeRecorder structure
Timesheet
Timesheet line
Expense line
Reports and lists
Synchronise
Synchronise error log
Submitting timesheets
Un-submitting timesheets/expenses
Submitting expenses
Purge old timesheets
Preferences
Copyright © 1998-2004 Star System Solutions Pty Ltd.
TimeRecorder V6.x
7
TimeRecorder system
Overview of TimeRecorder structure
TimeRecorder is a system used for capturing timesheet
entries electronically.
The system works best when used in conjunction with a
central invoicing system such as Star System Solutions Pty
Ltd’s “Star Projects”.
Each user must be assigned a preferences security level. The
security level assigned controls the allowable access of the
user to the preference tabs and all fields within these tabs.
The default security level adopted when TimeRecorder is
install is – Normal. Changes to the default security level is
normally carried out by the Database Administrator and
should comply with the guideline set out in accordance with
your company standards.
The system consists of the following functions that are
configured to customise TimeRecorder to suit your company’s
requirements.
The functions are:
Timesheet
Timesheet line
Expenses
Reports and Lists
Submit
Synchronise
Un-Submit
Purge
Preferences
Timesheet is the finished combination of a timesheet header
and a number of timesheet lines that have been entered by
the user in order to document the work that they have
performed within that period.
Continued on the next page
Copyright © 1998-2004 Star System Solutions Pty Ltd.
TimeRecorder V6.x
8
Timesheet line is one line within a timesheet that captures
one portion of work: assigned to a particular client, project,
phase, activity & task (if applicable). Each timesheet line can
contain the following fields:
Date
Day
Start time
(optional)
End Time
(optional)
Duration
Client
Project
Phase
(optional)
Activity
(optional)
No charge checkbox (optional)
Task
(optional)
Task Done checkbox (optional)
Task % Complete
(optional)
Suggest Close checkbox
Call out
checkbox
Clientele call number (optional)
Client Ref
(optional)
Location
(optional)
Internal Comments (optional)
Details
Extended Notes
(optional)
(optional)
(optional)
(optional)
Continued on the next page
Copyright © 1998-2004 Star System Solutions Pty Ltd.
TimeRecorder V6.x
9
Expenses allows the user to enter expense lines into the
TimeRecorder system and define each expense line as
chargeable, whether it is to be reimbursed and indicate if a
receipt is supplied. Expenses can be entered in differing
currencies and exchange rates. Each expense line can
contain the following fields:
Expense
Date
Client
Project
Phase
(optional)
Paid With
Currency
Quantity
Natural rate inc. Tax
Extended Amount Inc. Tax
Tax %
Exchange Rate
Tax code
Reimbursement Amount
Reimbursable checkbox
No Charge checkbox
Receipt Obtained checkbox
Details
Client ref
(optional)
Location
(optional)
Reports allow the user to view or print the data that has been
entered into TimeRecorder. The data can be viewed in
various ways using filter buttons. Valid reports and listings
that exist include:
Detailed Transaction Log
Weekly Summary Report
Transaction Lists
Master Lists
Overtime
Travel Diary
Tasks Lists
Time Analysis
Expense Report
Continued on the next page
Copyright © 1998-2004 Star System Solutions Pty Ltd.
TimeRecorder V6.x
10
Submit allows the user to submit a timesheet(s) to the central
invoicing system. The submitting process changes the colour
of the timesheet line text so that the user can distinguish a
timesheet line that has been submitted from one that is at
present unsubmitted. TimeRecorder will not allow the user to
change any information on a submitted timesheet line.
Synchronise allows the user to refresh the TimeRecorder
database to include any new masterfile details that have
occurred in the central invoicing system. The information that
is updated includes any new employees, client; project;
phase, activities and tasks and these changes/additions are
reflected in the TimeRecorder Master lists.
Un-submit allows the user to reverse a submit process for a
selected timesheet. The un-submit process locates and
deletes the submitted file (.TSH) that was created when the
timesheet was submitted. The second part of the un-submit
process involves all lines being flagged as un-submitted. This
allows the user to make any changes required to the
timesheet header or lines and re-submit the timesheet when
complete. The existing .TSH file is renamed to an .UNS file in
way of an audit trail to the unsubmitted process.
View Un-Submitted allows the user to view a list of
unsubmitted timesheets and move directly to a selected unsubmitted timesheet.
Purge allows the user to remove/delete old timesheet records
from the TimeRecorder data directory.
Preferences are values or switches that can be configured to
customise the way functions of TimeRecorder will work for
your company. Preferences are set for each user of
TimeRecorder. Some preferences include user security;
functions and warning triggers.
Copyright © 1998-2004 Star System Solutions Pty Ltd.
TimeRecorder V6.x
11
Timesheet
Overview of timesheet
A timesheet is the combination of a timesheet header and any
number of timesheet lines that have been entered by a user
in order to document the work that they have performed
within a specified period.
There are various functions that can be carried out by a user
from the timesheet screen. These include:
Create a new timesheet or view previously entered
timesheet.
Copy an existing timesheet.
Open an existing timesheet.
Delete an existing unsubmitted timesheet.
Submit a timesheet.
Unsubmit a timesheet.
Purge existing submitted timesheets.
Synchronise from the central invoicing system in order
to update TimeRecorder with current masterfile data.
Edit an unsubmitted timesheet line.
Add a new timesheet line to a submitted timesheet and
then submit the timesheet a second time. Every time
that a timesheet is submitted TimeRecorder will submit
any unsubmitted timesheet lines within it.
Repeat existing timesheet lines within a timesheet.
Run a report / listing.
Add an expense line to either a submitted or
unsubmitted timesheet.
Details that the timesheet screen displays are:
The Employee code and name.
The Week Ending date.
The summarised line details of the highlighted
timesheet line including client code and description;
project code and description; phase code and
description (if applicable); activity code and description
(if applicable).
Continued on the next page
Copyright © 1998-2004 Star System Solutions Pty Ltd.
TimeRecorder V6.x
12
The total hours worked by the user on each day within
the period.
The pro-rata charge ratio percentage achieved by the
user. (For a description on how TimeRecorder
calculates the charge ratio percentage - See Appendix
2.)
The target charge ratio percentage for this user for the
period, which is configured within the resource
Masterfile.
An hour’s calculation summary showing totals for
productive and non-productive hours worked; leave
and total hours. (For a description on how
TimeRecorder calculates the productive hours - See
Appendix 2.)
Detailed view of actual timesheet lines entered
including date, day, start time and end time (if
applicable), duration, client, project, phase (if
applicable), activity (if applicable), no charge checkbox
(if applicable), task (if applicable), task done checkbox
(if applicable), task % complete (if applicable), suggest
close checkbox (if applicable), call out checkbox (if
applicable), clientele call no (if applicable), client
reference (if applicable), location (if applicable),
internal comments (if applicable), details, extended
notes and full log number. All timesheet lines appear
on the timesheet in chronological date and time order
from top to bottom of the timesheet line screen.
A user is able to recognise a timesheet that has not
been submitted from one that has been submitted by
looking at the colour of the timesheet line text. Black
text indicates that the timesheet lines are in an
unsubmitted state and blue text indicates that the
timesheet lines are in a submitted state.
Copyright © 1998-2004 Star System Solutions Pty Ltd.
TimeRecorder V6.x
13
Timesheet line
Overview of a timesheet line
A Timesheet line is a single line on a TimeRecorder timesheet.
Timesheet lines capture one portion of time on a particular
day that when submitted will appear on invoices and reports.
Using the timesheet line the user assigns this portion of time
to a specific client, project, phase, activity and task (if
applicable).
A timesheet line provides fields for the entry of information as
follows:
Date
Day
Start
(optional)
End
(optional)
Duration
Client
Project
Phase
(optional)
Activity
No charge checkbox (optional)
Task
(optional)
Task Done checkbox (optional)
Task % Complete
(optional)
Suggest Close checkbox
Call out checkbox
(optional)
Clientele call number (optional)
Client Ref
(optional)
Location
(optional)
Internal Comments
(optional)
Details
(optional)
Extended Notes
(optional)
(optional)
(optional)
The date field confirms the actual date of the year that this
timesheet line applies to. A user is only able to select a date
that is within the week ending period that this timesheet
relates. The default for each new timesheet line will be the
date that was entered into the previous timesheet line – the
user can however manually select another valid date for this
timesheet line at this time.
Continued on the next page
Copyright © 1998-2004 Star System Solutions Pty Ltd.
TimeRecorder V6.x
14
The day of the week will automatically appear in the day field
of the timesheet line once the user has selected a date for the
line – this is to assist the user to confirm that they have
selected the correct date. The day is controlled by the date
selected and cannot be altered by the user.
The start and end fields define the start and end times for this
timesheet line. TimeRecorder uses these fields to calculate
the duration of the timesheet line. The information entered
into these fields can be set to appear on reports. These fields
can be left blank and the user would then need to manually
enter the duration of time that applies to the timesheet line in
the duration field.
The start and end times, phase, activity, no charge, task, task
done, suggest close, call out, clientele call number, client ref,
location, internal comments and details fields will be visible to
a user when TimeRecorder’ Function Preferences are set to
use these fields.
TimeRecorder will calculate the duration time by using the
start and end times entered less time set in Preferences for
lunch and will automatically fill in the duration. The user can
however manually enter a different duration to deduct a lunch
break for example that should not be included in the duration
if different to time set in Preferences. If the user has chosen
not to enter start and end times within a timesheet line the
user can also manually enter the relevant duration for this
timesheet line at this time. A central invoicing system uses a
rate and scale table in conjunction with the timesheet line
duration to calculate the cost that will appear on an invoice or
report for this timesheet line.
Please note: TimeRecorder will also allow a timesheet line to be saved with
the duration field left blank – in this case the timesheet line
will appear on the invoice and report as usual however the
duration and cost will appear as zero.
The client field is used to apply this timesheet line to the
client that the work was performed for. A central invoicing
system uses this field to apply this timesheet line to the
correct client when invoices and reports are created. This
field cannot be left blank for any timesheet line.
Continued on the next page
Copyright © 1998-2004 Star System Solutions Pty Ltd.
TimeRecorder V6.x
15
The project field is used to apply this timesheet line to a
particular project for the client. A central invoicing system
uses this field to apply this timesheet line to the correct client
project when invoices and reports are created. It cannot be
left blank for any timesheet line. The project field is always
visible.
The phase field is used to apply this timesheet line to a
particular phase that is part of a specified project for the
client. A central invoicing system uses this field to apply this
timesheet line to the correct client project phase when
invoices and reports are created. The user is not required by
the system to make an entry into the phase field for every
timesheet line.
The activity field is used to apply this timesheet line to a
particular activity that is part of a project for the client. A
central invoicing system uses this field to apply this timesheet
line to the correct project activity when reports are printed. If
this field is visible to a user it cannot be left blank for any
timesheet line.
The no charge checkbox allows the user to assign a timesheet
line to a client project phase (if applicable) however by
selecting this checkbox the client cost of this timesheet line
will be shown as no charge on any invoice that is created by a
central invoicing system.
The task field can be set to be required by specific projects
and phases within a central invoicing system. If a project
Masterfile is set to require a task whenever a user enters a
timesheet line applying to that project TimeRecorder will not
allow the user to finish the timesheet line until an entry has
been made into the task field. Tasks listed can be filtered to
show all resources tasks by the preference, options, show
other person’s tasks setting (if applicable).
The task done checkbox allows the user to flag the project
task as completed. This selected checkbox will raise the
completed flag within this timesheet line within the central
invoicing system.
The task % complete field allows the user to enter a
percentage the task is complete by. This field will be used by
the central invoicing system to allocate the client project task
percentage complete.
Continued on the next page
Copyright © 1998-2004 Star System Solutions Pty Ltd.
TimeRecorder V6.x
16
The suggest close checkbox allows the user to flag the
project, phase or activity as completed. This selected
checkbox will raise the completed flag within this timesheet
line within the central invoicing system.
The call out checkbox allows the user to note, by selecting
this checkbox, that this timesheet line should also incur a flat
fee call out charge to cover for example the company for the
users travel. A central invoicing system uses this checkbox to
add a nominated flat fee (maintained in the rate/scale
Masterfile) to the client invoice for each timesheet line that
has this checkbox selected.
The clientele call number field allows the user to enter a
reference that will flow through to the central invoicing
system and allow the user to use an external report writer /
other external program such as ‘Clientele’ to write reports and
gather information linked to a selected clientele call number.
If this field is visible in the timesheet entry screen the use of
it is still optional.
The client ref field can be set to be required by specific
projects and phases within a central invoicing system. If a
project Masterfile is set to require a client ref whenever a user
enters a timesheet line applying to that project TimeRecorder
will not allow the user to finish the timesheet line until an
entry has been made into the client ref field.
The location field is used to apply this timesheet line to a
particular location that is relevant to a project for the client.
A central invoicing system uses this field to apply this
timesheet line to the correct project location when reports are
printed. If this field is visible the user is not required by the
system to make an entry into the location field for every
timesheet line.
The internal comments field is a free form text field that
allows the user to enter unlimited lines of free form text. The
text typed into this field will not appear on invoices and
reports that are prepared by a central invoicing system.
The details field is a free form text field that allows the user to
type one line of text required. Each detail line accepts eighty
characters of alphanumeric entry. The text typed into this
field appears on invoices and reports that are prepared by a
central invoicing system.
Continued on the next page
Copyright © 1998-2004 Star System Solutions Pty Ltd.
TimeRecorder V6.x
17
The extended note field allows the user to enter unlimited
lines of free form text. The text typed into this field appears
on invoices and reports that are prepared by a central
invoicing system. The existence of extended notes on a
timesheet line will cause a .memo file to be created that
contains the extended notes for that line when the timesheet
is submitted. These memo files must be stored with the .TSH
file so that the extended notes are automatically imported
into Star Projects along with the timesheet.
TimeRecorder automatically assigns each timesheet line a
unique log number. This log number can be found at the
bottom left in the grey area of the timesheet entry screen and
enables a central invoicing system to individually track very
timesheet line for enquiry, report and audit purposes.
Please note: Timesheet lines can be repeated within a timesheet for a
defined number of days. This facility copies all details from
every field of the selected timesheet line and duplicates those
records onto timesheet lines for subsequent days within the
timesheet period up to the number of days selected in the
repeat record edit screen. The system will not repeat the
record past the last day within the timesheet week ending
date that is set in the timesheet header when the timesheet
was created.
Copyright © 1998-2004 Star System Solutions Pty Ltd.
TimeRecorder V6.x
18
Expenses
Overview of an expense line
An Expense line is a single line within the expenses screen of
a TimeRecorder timesheet. An expense line captures a cost
that has been incurred by the resource, whilst carrying out
their work on any particular day. Expenses are required to be
recorded in order to facilitate reimbursement of funds to the
resource or on costing of the expense as a disbursement to
the relevant client / project. The TimeRecorder expenses
screen allows the user to enter and maintain all expenses,
print an expense claim form in order to summarise all
expenses incurred within a selected week along with the
facility to maintain travel diary details for the same week (if
applicable).
An expense line provides fields for the entry of information as
follows:
Expense
Date
Day
Client
Project
Phase
Activity
Paid With
Currency
Qty
Natural rate inc. TAX
Extended Amount Inc. TAX
Tax
Exchange Rate
Tax Code
Reimbursement Amount
Reimbursable checkbox
No charge checkbox
Receipt Obtained checkbox
Client Ref (optional)
Location (optional)
Details
Extended Notes
The expense field allows the user to select a relevant expense
from the drop down list to indicate what type of item was
purchased.
Continued on the next page
Copyright © 1998-2004 Star System Solutions Pty Ltd.
TimeRecorder V6.x
19
The date field confirms the actual date of the year that this
expense line applies to. A user is only able to select a date
that is within the period that this timesheet relates if set in
preferences.
The day of the week will automatically appear in the day field
of the expense line once the user has selected a date for the
line – this is to assist the user to confirm that they have
selected the correct date. The day is controlled by the date
selected and cannot be altered by the user.
The client field is used to apply this expense line to the client
that the work was performed for.
The project field is used to apply this expense line to a
particular project for the selected client.
The phase field is used to apply this expense line to a
particular project for the selected client (optional).
The activity field is used to apply this expense line to a
particular activity that is part of a project for the selected
client (optional).
The paid with field allows the user to select a relevant method
of payment from the drop down list to indicate how the item
was paid for.
The currency field allows the user to select a relevant natural
currency from the drop down list to indicate the currency in
which the item was paid.
The quantity field allows the user to enter a quantity amount
if the expense chosen for the selected expense line is
configured to use quantity.
The natural rate inc. tax field shows the user the total dollar
amount that was paid for the individual expense in the
currency selected, including tax if applicable.
The extended amount inc. tax field shows the user the
quantity multiplied by the natural rate inc. tax that is the total
dollar amount that was paid in the currency selected,
including tax if applicable.
Continued on the next page
Copyright © 1998-2004 Star System Solutions Pty Ltd.
TimeRecorder V6.x
20
The tax field calculates the tax amount included in the
extended amount inc. tax, if applicable, or enables multi level
tax amounts to be entered via the ‘…’ button. If the system is
configured to allow overriding of tax this field will be editable.
The exchange rate field allows the user to view the exchange
rate associated with the currency selected. If the system is
configured to allow overriding of exchange rates this field will
be editable.
The tax code field allows the user to view the tax code
associated with the expense selected. If the system is
configured to allow overriding of the tax code this field will be
editable.
The reimbursement amount field displays the total home
currency amount including tax if applicable (relevant to the
home currency of the company that the resource entering the
expense belongs to).
The reimbursable checkbox allows the user to indicate if the
expense line is reimbursable.
The no charge checkbox allows the user to assign an expense
line to a client project, however indicate by selecting this
checkbox that the client is not to be charged.
The receipt obtained checkbox allows the user to indicate if a
receipt was supplied.
The client ref field allows the user to type in a reference
relevant to the client. If this field is visible in the expense
entry screen the use of it is still optional.
The details field allows the user to type in free form text to
describe the expense line in more detail.
The extended note field allows the user to enter unlimited
lines of free form text. The text typed into this field appears
on invoices and reports that are prepared by a central
invoicing system. The existence of extended notes on a
timesheet line will cause a .memo file to be created that
contains the extended notes for that line when the timesheet
is submitted. These memo files must be stored with the .TSH
file so that the extended notes are automatically imported
into Star Projects along with the timesheet.
Continued on the next page
Copyright © 1998-2004 Star System Solutions Pty Ltd.
TimeRecorder V6.x
21
The user is able to the print an expense claim form that will
display all details of each expense line maintained within the
weekly timesheet and total these expenses for reimbursement
and on costing purposes. A general ledger report displaying
any GL codes that the expense is assigned to is also printed
with the expense claim form. The expense claim form is also
formatted in such a manner as to allow the maintenance of
any travel diary details relating to the timesheet (if
applicable).
Please note: The user must submit all expense lines separately to the
timesheet lines within each timesheet. The submitting of
expense lines occurs when the submit button is selected
within the expense grid screen or the submit item is selected
from the file drop down menu. This then creates a .CSV,
.Memo & _MLT.tax files for the expense lines. These files can
then be read into an external accounting system for the
purposes of reimbursement, payment and on costing.
Copyright © 1998-2004 Star System Solutions Pty Ltd.
TimeRecorder V6.x
22
Reports
Overview of reports and lists
TimeRecorder contains reports and lists that users, are able to
print or view. All reports can be accessed via the view menu.
These reports are as follows:
Detailed Transaction Log
Weekly Summary Report
Transaction Lists
Master Lists
Overtime
Travel Diary
Tasks Lists
Time Analysis Summary
Expense Report
TimeRecorder reports can either be viewed to the screen or a
hard copy printed. The reports are non-configurable,
however all parameters available within the report screen will
allow the user to filter the information that the report shows.
The detailed transaction log enables the user to print a hard
copy of any timesheet line that has been entered and saved
on a timesheet. A user can gain access to print this report
from the view menu or immediately ‘Hot printing’ the report
for a selected timesheet line by selecting the button. The
detailed transaction log can be viewed to the screen or a hard
copy printed.
The weekly summary report groups all timesheet lines within
the selected timesheet by client and then project and displays
the total number of hours for each group entered each day of
that week. The user should select the 'Report' button to view
the report to the screen that can then be on printed to a
selected printer. The report also totals the number of hours
worked each day and for the week. A user can gain access
to print this report from the view menu or immediately ‘Hot
printing’ the report for a selected week by selecting the
button. The weekly summary report can be viewed to the
screen or a hard copy printed.
Continued on the next page
Copyright © 1998-2004 Star System Solutions Pty Ltd.
TimeRecorder V6.x
23
The transaction list allows the user to select a client, project,
staff and date range to control the report transactions that
will be displayed. The user can also select to view all projects
before clients within this report. Once the filters are set the
user should select the report button to view the report to the
screen. In order to clear the date filters selected the user
should select the show all dates button. The transaction lists
can be viewed to the screen or the report button selected to
allow the user to print a hard copy of the report. An approval
report can additionally be printed which can be signed and
dated.
The TimeRecorder master lists will display the valid clients,
projects, staff, expenses, no charge reasons and locations
which, exist within the database Masterfiles after being
synchronised from the central invoicing system. The master
lists can only be viewed to the screen.
The overtime menu item allows the user to enter up to 5
levels of overtime and compensatory time against the
highlighted timesheet line. The compensatory time records
time worked by a staff member for later use instead of being
paid extra. This information can be used to track time
worked and time taken off within a central invoicing system
such as Star System Solutions Pty Ltd's "Star Projects".
The travel diary allows the user to select a client, project,
staff and date range to control the report transactions that
will be displayed. The user can also select to view all projects
before clients within this report. Once the filters are set the
user should select the report button to view the report to the
screen. When filters are changed select the show button to
refresh the display. The travel diary can be viewed to the
screen or the report button selected to allow the user to print
a hard copy of the travel diary.
The tasks list will display the valid tasks for a selected client,
project, employee and date range. The user can also select
to view all projects before clients; show unassigned and show
completed tasks by clicking the show button once options
have been selected.
Continued on the next page
Copyright © 1998-2004 Star System Solutions Pty Ltd.
TimeRecorder V6.x
24
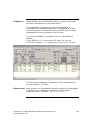
The TimeRecorder time analysis summary allows the user to
run an enquiry for a particular employee, or all employees for
which timesheets exist within the local database. Each
enquiry allows the user to view summary information in both
grid and graphical format of all work performed during the
selected period. The enquiry can be configured to optionally
display all information within the following headings at the
time that the analysis is updated: Employee; Client; Project
and Activity. However once updated, the enquiry data can
then be totalled or grouped by any of the existing levels to
provide a different graphical profile.
The user is able to use their mouse to right click on a number
within the analysis grid in order to access options that allow
them to:
Show the pivot (grouping) controls
Print the graph
Change the data source to another database alias
Copyright © 1998-2004 Star System Solutions Pty Ltd.
TimeRecorder V6.x
25
Synchronise
Overview of synchronise
Synchronise allows the user to update all masterfiles to
include any new information that has been entered and saved
within the central invoicing system. The information that is
updated which therefore allow the user to be able to enter
timesheet lines that apply to any new Masterfile, includes any
of the following:
Activities
Clients
Currency Rates
Currency Codes
Expenses
Locations
Method of Payments
No Charge Codes
Activity, Resource, Resource Class, Company,
Department, Manager, Section and Workgroup
Restrictions
Projects
Resources
Tasks
Tax Codes
Multi Level Tax Codes and Details
Multi Level Tax Types and Details
The extension of all these files that are created by Star
Projects is .LSV.
The concept of updating Masterfile information from a central
invoicing system allows strict control over the users who are
able to enter Masterfile information and thus would assist with
the accuracy of the information within the Masterfiles. Users
with security access to the central invoicing system would be
able to enter, change and delete Masterfile information and all
users can then perform a synchronise at any time in order to
gain access to use this Masterfile information within
TimeRecorder.
Continued on the next page
Copyright © 1998-2004 Star System Solutions Pty Ltd.
TimeRecorder V6.x
26
A parameter can also be set within the submit tab area of
TimeRecorder’ preferences, which will enable TimeRecorder to
automatically perform a Synchronise every time the user
submits a timesheet. This function ensures that every user
would be automatically updated with accurate and up to date
Masterfile information on a regular basis (with every submit).
It also avoids staff having to remember to manually run a
synchronise unless they specifically wanted to update some
new Masterfile information but were not ready to submit their
timesheet as yet.
An additional parameter can be set within the submit tab area
of TimeRecorder’ preferences to synchronise on starting
TimeRecorder or prompt the user to synchronise or not on
starting TimeRecorder.
The synchronise path is set within the submit tab area of
TimeRecorder’ preferences. The path set within this field
defines the location of the Masterfile data to be updated into
TimeRecorder.
Copyright © 1998-2004 Star System Solutions Pty Ltd.
TimeRecorder V6.x
27
Overview of synchronise error log
The synchronise log is a .txt file created by the TimeRecorder
system when a synchronise process is complete. Users have
the choice of creating this log or not via the Preferences,
System option. This text file created, logs all occurrences
during the synchronise thus providing an error log of the
process.
The synchronise log is created within the programs default
directory and is overwritten each time the synchronise
process is run.
Copyright © 1998-2004 Star System Solutions Pty Ltd.
TimeRecorder V6.x
28
Submit Timesheets
Overview of submitting timesheets
Submit enables the user to submit a completed timesheet to
the central invoicing system. The submit process creates
.TSH and .memo file, these files can then be imported into the
central invoicing system and be use it to prepare invoices and
reports.
When a submit is performed all unsubmitted timesheet lines
that have been saved on the timesheet will be submitted.
The text of the submitted timesheet lines will change colour
from black to blue text. Preferences allow the user to choose
colours for submitted lines. The user is unable to edit or
change any timesheet line information within any of the
submitted timesheet lines. New timesheet lines can be added
to a submitted timesheet at any time. This timesheet can
then be submitted for a second time and TimeRecorder will
submit all unsubmitted timesheet lines that had been added
to the submitted timesheet.
A user must submit their timesheet to the central invoicing
system in order for it to have the timesheet details required
to prepare invoices. It is therefore important that a
submitting schedule be drawn up that specifies how often a
user must submit their timesheets. This ensures that the
timesheet line details are submitted to the central invoicing
system at intervals appropriate to when the user responsible
for preparing invoices requires.
Continued on the next page
Copyright © 1998-2004 Star System Solutions Pty Ltd.
TimeRecorder V6.x
29
The submit path is set within the submit tab of TimeRecorder’
preferences. The path set within this field defines the location
that the timesheet files will be submitted to.
Please note: Each user should check all timesheet line details very
carefully prior to submitting a timesheet because once
submitted, the only way that the timesheet lines can be
altered is by processing the unsubmit timesheet command, if
allowed.
Please note: The user must submit all expense lines separately to the
timesheet lines within each timesheet. The submitting of
expense lines occurs when the submit button is selected
within the expense grid screen or the submit item is selected
from the file drop down menu. This then creates both .CSV &
.Memo files for the expense lines. These files can then be
imported into an external accounting system for the purposes
or reimbursement, payment and on costing.
Copyright © 1998-2004 Star System Solutions Pty Ltd.
TimeRecorder V6.x
30
Submit Expenses
Overview of submitting expenses
Submit enables the user to submit all completed expense
lines within a timesheet to the central invoicing system. This
then creates .CSV, .Memo & MLT.tax files for the expense
lines. These files can then be imported into an external
accounting system for the purposes or reimbursement,
payment and on costing.
The submit path is set within the submit tab of TimeRecorder’
preferences. The path set within this field defines the location
that the expense timesheet files will be submitted to.
Please note: The user must submit all expense lines separately to the
timesheet lines within each timesheet. The submitting of
expense lines occurs when the submit button is selected
within the expense grid screen or the submit item is selected
from the file drop down menu.
Copyright © 1998-2004 Star System Solutions Pty Ltd.
TimeRecorder V6.x
31
Un-Submit Timesheets/Expenses
Overview of un-submit
The unsubmit timesheets or expenses command will rename
the file created when the timesheet or expense was submitted
and mark all lines within the timesheet or expense as
unsubmitted. The .TSH file becomes .UNS file, the .CSV &
_MLT.tax files become .UEX once unsubmitted as a way of
providing an audit trail to the unsubmit process.
This function is one that is usually carried out by the database
administrator and can only be carried out by a user who has
permission set within the preferences screen.
Please note: An unsubmit timesheet or expense that is performed can have
substantial implications.
1: If the submitted file is not present to be deleted. (It may
have already been imported into the central invoicing
system.)
2: If a timesheet or expense has been partially submitted on
two occasions and the timesheet or expense has been
imported into the central invoicing system between the times
when the timesheet or expense was submitted. This would
result in the timesheet or expense lines that existed within
the timesheet or expense when it was first submitted and
then imported to be unable to be imported again, thereby
avoiding duplication. See the on line help within
TimeRecorder for more information on this matter.
Copyright © 1998-2004 Star System Solutions Pty Ltd.
TimeRecorder V6.x
32
Purge old Timesheets
Overview of purge old timesheets
The purge old timesheets functionality within the
TimeRecorder system enables the user to delete all submitted
timesheet lines within a selected timesheet from their local
TimeRecorder database.
It is important to note that once a purge process has been
run - the historical timesheet lines that were included in the
purge will NOT be able to be restored unless a backup of the
TimeRecorder data was taken prior to the purge occurring.
Please note: The system will not permit a user to purge a timesheet that
has one or more unsubmitted timesheet lines within it.
Copyright © 1998-2004 Star System Solutions Pty Ltd.
TimeRecorder V6.x
33
Preferences
Overview preferences
Preferences are values or parameters that can be set or
altered to customise the way functions of TimeRecorder will
work. TimeRecorder preferences are accessed via the
Preferences menu item. Within this menu the options are
separated into nine areas, these being:
Display
Functions
Warnings
Options
Submit
Security
Labels
Company Details
Overtime
The Display tab allows the user to set the search mode when
using TimeRecorder, (code or name) and to display the
project before client. Other default options within this area
include being able to show the version number and path in
the window title, show the splash screen on opening
TimeRecorder, and whether the weekly summary report is
able to be accessed by the user. Screen colours can
additionally be set under the display tab.
The Functions tab allows the definition of the fields that will
be seen by the user when TimeRecorder is used for timesheet
entry, or the permission is given to allow the user the
selected functionality within the TimeRecorder timesheet and
expense entry screen. An unselected checkbox ensures that
the field will not appear in the timesheet or expense entry
screen, or the function will not be accessible by the user.
Continued on the next page
Copyright © 1998-2004 Star System Solutions Pty Ltd.
TimeRecorder V6.x
34
The Warnings tab contains parameters that can be set by the
database administrator in order to define what occurrences
will trigger TimeRecorder to deliver the user an error or
warning message. For example a user may be required to
enter detail text on a client and admin line type but not on a
timesheet line that applies to leave.
A warning message suggests to the user that further action
should be taken but does not stop the user.
An error message prevents the user from continuing until the
error is fixed, or certain action is taken.
The Options tab allows the definition of selected parameters
that control the manner in which TimeRecorder functions
during timesheet entry. The fields contained within this
screen are:
Definition of the end of week allowing the week ending
date to be validated when a timesheet header is created.
Definition of the time increment that will control the way
that TimeRecorder will calculate each timesheet duration
from the entered start and end times.
Definition of the callout chargeable time to be added by
TimeRecorder to users hours calculations each time a
timesheet line contains a call out flag.
Maintenance of the reimbursement currency code used by
the system within the expenses screen and decimal point
precision.
Definition of the lunch break time deducted from
automatic calculation of duration for a users lunch break.
Definition of the financial year allowing the financial year
to be validated when running reports based on date
selections.
Maintenance of a set number of hours per week to warn
the user once the set number of hours has been reached.
Enforcement of the requirement to respect all constraints
set within the Masterfiles of the central invoicing system.
Enforcement of the requirement for expenses to be in the
week relevant to the timesheet week ending date range.
Maintenance of travel diary used by the system when
requesting an expense report to ask the user if a travel
diary is required when the Expense Masterfile is set as
travel diary required.
Option to show other persons tasks in the timesheet tasks
field drop down list.
Option to show codes before descriptions on the weekly
summary report.
Option to calculate charge ratio on a standard hours or
actual hours worked basis.
Maintenance of days to exclude as expected working days
in charge ratio calculation based on standard hours.
Continued on the next page
Copyright © 1998-2004 Star System Solutions Pty Ltd.
TimeRecorder V6.x
35
The Submit tab allows paths, submit method, unsubmit,
timesheet creation and synchronise methods to be defined.
The submit timesheet path controls the location that
TimeRecorder places the timesheets and expenses
submitted ready for importing into the central invoicing
system.
The synchronise path controls the location where
TimeRecorder retrieves the Masterfile data from the
central invoicing system.
The master preferences path controls the location where
TimeRecorder retrieves different user preference settings
(from the timerecorderini.csv file).
The database alias is the name that the TimeRecorder
database is known (TimeRecorderCurrentDir is the only
alias).
The submit method allows timesheets to be sent via the
network or email, either zipped or unzipped and a submit
data version defined. The submit data version controls the
format in which the .TSH file is created when the
timesheet is submitted. This ensures that the appropriate
version of Star Projects can read the submitted timesheet
when it is imported. The expenses version is a read only
system setting that enables the correct expense .LSV files
to be synchronised for use within TimeRecorder.
Unsubmit timesheet authority can be allowed.
Timesheet creation can be defined as automatic, copy by
default when a timesheet is submitted and authority to
copy when creating a new timesheet, with the option to
clear quantities on the copy of a timesheet when start and
end times are not being used.
Unsubmitted weeks can be shown when submitting or
after submitting the current week.
Timesheet submitted can be defined to submit with or
without 0 duration lines.
The synchronise method allows the method that
synchronisation is to occur to be defined, on start up or
after submit.
Continued on the next page
Copyright © 1998-2004 Star System Solutions Pty Ltd.
TimeRecorder V6.x
36
The Security tab allows the preference in which the users
access to the TimeRecorder preference screen to be set.
There are five levels of security, which are as follows:
0 - The user has no access to TimeRecorder
Preferences, as a security level has not yet been
set.
No Access– Security has been set – the user has
no access to the preferences screen.
Read Only – The user has read access only to all
preference tabs.
Normal – The user has read only access to all
preference tabs except the display tab. The user is
able to edit the fields within the display tab.
Administrator – The user has unlimited access to
all tabs within TimeRecorder preferences and every
field within each tab.
TimeRecorder can be set to limit timesheet and expense entry
to one person that is the default staff code defined. Access to
purge old timesheets can be set and the host system
integrated with TimeRecorder can be set.
The Labels tab allows the user is to rename the header labels
and productivity labels used within the TimeRecorder system.
The Company Details tab allows the user to set the company
details, which will print on any detailed transaction log printed
from the TimeRecorder system.
The Overtime tab allows the user to specify the breakdown of
a selected timesheet line in to normal hours and up to 5 levels
of overtime. Also the user can assign compensatory time.
This information is then transferred to the external accounting
system during the submit process.
Please note: The preferences are updated at the time of synchronisation
and are controlled by the TimeRecorderini.CSV file, refer to
Appendix 3 for more information.
Copyright © 1998-2004 Star System Solutions Pty Ltd.
TimeRecorder V6.x
37
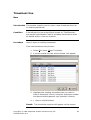
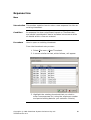
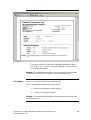
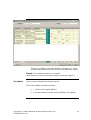
Main menu
TimeRecorder – Main menu. The key functions and screen
buttons are explained in the following diagram.
Title bar
Menu bar
Pane 1
Tool bar
Summary boxes
Timesheet Header
Timesheet line
(Displaying the selected
timesheet line log number)
Continued on the next page
Copyright © 1998-2004 Star System Solutions Pty Ltd.
TimeRecorder V6.x
38
Tool bar – Contains the buttons or icons which, when
selected, displays the additional screen functions.
Menu bar – displays the following list of menu options (usually
a drop down menu.)
File menu – displays general menu options used to
create a New timesheet, Copy timesheet, Open an
existing timesheet, Delete a timesheet, Show
Unsubmitted timesheets, Submit a timesheet,
Unsubmit timesheet (if applicable), Synchronise,
Expense transactions, Purge Old timesheets (if
applicable), Preferences and Exit TimeRecorder.
Edit menu – allows the user to Cut, Copy and Paste
information as well as Repeat, Insert, Append and or
Delete a line, enter a No Charge Reason and Restore
Sort to the Default setting.
View menu – gives the user access to the Detailed
Transaction Log report, Weekly Summary report,
Transaction list, Master Lists, Overtime (if applicable),
Travel Diary, Tasks and Time Analysis available within
TimeRecorder.
Help menu – displays commands used to access the
online help and associated functions.
Summary boxes – display the timesheet line details summary,
hours worked summary, productive / non productive hours
summary and charge ratio (if applicable).
Title bar – displays the screen title and version number (if
applicable).
Pane 1 – Displays such information as the selected timesheet
line log number.
Timesheet line – Displays the timesheet line details in
chronological date and time order within the grid.
Copyright © 1998-2004 Star System Solutions Pty Ltd.
TimeRecorder V6.x
39
Moving around
Introduction TimeRecorder provides a variety of navigational tools that will
assist the user in moving around the system quickly and
easily, including:
Mouse and keyboard
Data entry
Common buttons
Mouse and keyboard – the user can use the keyboard to
perform the same actions as the mouse. Some important
keyboard actions are described below:
Keys
Description
Hot Keys
A hot key is a combination of a and the letter
underlined in a button or menu title. Once
actioned, a hot key will display a menu or
screen.
Example:
a + F will display the File
menu;
a + F + U will display the
Synchronise screen which is on
the File drop down menu.
!
Display the online help.
at
Toggles between TimeRecorder and other open
Windows applications.
Data entry – data can be entered into the field on a screen by
two different ways; by direct entry or from a drop down list.
Direct entry – to enter text into a field place the cursor
inside the field and type in the data.
Drop down list – this is a drop down list button. When
selected, it displays a list of values. Select a value
and it will display into the selected field.
Copyright © 1998-2004 Star System Solutions Pty Ltd.
TimeRecorder V6.x
40
Program Icons
Common buttons – below is a list of the most commonly used
buttons.
Scroll to First record – Scroll to last record
Scroll back to next record – Scroll
forward to next record
Insert Line – Allows the user to insert a
line above the selected timesheet line.
Append Line – Allows the user to add a
line below the last existing timesheet
Repeat Line – Allows the user to repeat
a selected timesheet line.
Save record.
Cancel record.
Copyright © 1998-2004 Star System Solutions Pty Ltd.
TimeRecorder V6.x
41
Common buttons continued
Detailed Transaction Log – Hot prints to the
screen the detailed transaction log for the
selected timesheet line.
Weekly summary report – Opens the
weekly summary screen to view the
timesheet that is selected at the time and
allows the summary report to be printed.
Time Analysis – Opens the time
analysis enquiry tool, prompting the
user to enter the enquiry parameters
and update the analysis.
Reason for No Charge – Opens the
reason for no charge screen for the
selected timesheet line, prompting the
user to enter the code and notes.
Tasks – Opens the tasks screen and
displays the valid tasks for a selected
client, project, employee and date
range.
Expenses – Opens the expenses screen
for the selected timesheet week.
Submit – Is used to submit either a
timesheet or submit saved expense
lines to a central location depending on
which screen is open when the submit
button is pressed.
Copyright © 1998-2004 Star System Solutions Pty Ltd.
TimeRecorder V6.x
42
How to access TimeRecorder
Introduction The security level of each user controls the user’s ability to
access the preferences tab screens and perform functions
within those tabs. The database administrator will establish
the user security level as defined in the security preference
tab.
Conditions
The user must be set up in the external invoicing systems
resource Masterfile and have a security level of ‘Administrator’
or above in order to be able to access the preference tabs.
Procedure
How to log on:
From Program Manager:
1. Double r click on the TimeRecorder icon, or menu option.
If the.…
TimeRecorder screen
appears.
Then….
this procedure
is complete.
Result: You have opened the TimeRecorder program.
Copyright © 1998-2004 Star System Solutions Pty Ltd.
TimeRecorder V6.x
43
How to exit TimeRecorder
Conditions
There are various ways that a user can exit TimeRecorder.
The user must be logged into TimeRecorder before the exit
functions can be performed.
Procedure
How to exit TimeRecorder:
From the timesheet entry screen, select one of the following
options:
Exit from the File menu or press a + F and X
Double r click on the Control box (top left hand
corner icon)
Single r click the Control box and select Close
Single r click on the X (top right hand corner)
Please note: If any changes are pending, the system will prompt you to
save before exiting. r click on the Yes button to save
changes.
Result: You have logged out of TimeRecorder.
Copyright © 1998-2004 Star System Solutions Pty Ltd.
TimeRecorder V6.x
44
Using TimeRecorder
Overview
Introduction This section explains how to create, change and delete each
of the different procedural functions within TimeRecorder.
In this section This section is divided into the following topics:
Access maintenance functions
Timesheet
Timesheet line
Expenses
Reports
Synchronise
Submit
Unsubmit
Purge
Copyright © 1998-2004 Star System Solutions Pty Ltd.
TimeRecorder V6.x
45
Access maintenance functions
Introduction This section will explain the different ways of accessing the
maintenance functions available within TimeRecorder.
The procedures outlined in this manual will concentrate on the
functions of the menu bar.
Condition
There are both keyboard and mouse functions, outlined
below:
Procedure
Context menu
File menu
Icons
(Right Mouse Button)
(Menu bar)
(Tool bar)
For Example: To repeat all fields within a timesheet line onto
another timesheet line.
Context menu (o right mouse button)
1. From TimeRecorder timesheet entry screen.
2. Highlight the information that you wish to repeat.
3. o click and select Repeat.
4. Select the number of days that the timesheet line is
to be repeated for.
5. The line has been repeated.
Continued on the next page
Copyright © 1998-2004 Star System Solutions Pty Ltd.
TimeRecorder V6.x
46
For Example: To repeat all fields within a timesheet line onto
another timesheet line.
File menu (menu bar)
1. From TimeRecorder timesheet entry screen.
2. Select the Edit menu, select Repeat Line.
3. Select the number of days that the timesheet line is
to be repeated for.
4. The line has been repeated.
For Example: To repeat all fields within a timesheet line onto
another timesheet line.
Icon (Tool bar)
1. From TimeRecorder timesheet entry screen.
2. Highlight the line, which you want to repeat.
3. From the Tool bar, r click on the repeat button.
4. Select the number of days that the timesheet line is
to be repeated for.
5. The timesheet line is repeated.
Copyright © 1998-2004 Star System Solutions Pty Ltd.
TimeRecorder V6.x
47
Timesheet
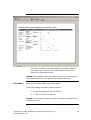
New
Introduction This section explains how a user creates a new timesheet
header.
Conditions
A timesheet has a significant impact on TimeRecorder, and
careful consideration has to be taken into account when
timesheet details are entered.
Procedure
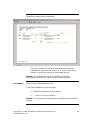
How to create a new timesheet.
From the timesheet entry screen:
1. Select the File menu.
2. Select New Timesheet.
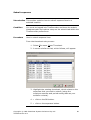
3. A screen similar to that, which follows, will appear.
4. Select the relevant employee code from the drop
down box.
5. Enter the relevant week ending date, or accept the
default.
6. r click on the OK button.
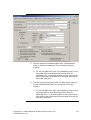
Result: A new timesheet header has been created.
Copyright © 1998-2004 Star System Solutions Pty Ltd.
TimeRecorder V6.x
48
Change
Introduction This section explains how a timesheet is changed.
Conditions
The employee code and period ending date of an existing
timesheet header can not be changed from within the
timesheet entry screen. If either of these details are incorrect
the timesheet needs to be deleted and a new timesheet
created with the correct information.
Procedure
For information on how to delete a timesheet refer to the
Timesheet, Delete, page within this manual.
Copyright © 1998-2004 Star System Solutions Pty Ltd.
TimeRecorder V6.x
49
Copy
Introduction This section explains how to copy a timesheet.
Conditions
The employee code and period ending date of an existing
timesheet header can not be copied from within the
timesheet entry screen. If either of these details are incorrect
the timesheet needs to be deleted and a new timesheet
copied with the correct information.
The allow copy when create new timesheet option on the
submit tab within the TimeRecorder preferences must be
ticked.
Procedure
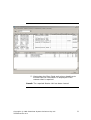
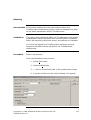
How to copy a timesheet.
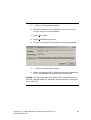
From the timesheet entry screen:
1. Select the File menu.
2. Select Copy Timesheet.
3. A screen similar to that, which follows, will appear.
4. r click on the z button and select the staff code from
the drop down list for the timesheet to be copied to.
5. Select the weekend ending from the drop down
calendar facility for the timesheet to be copied to.
6. r click on the copy button.
Result: The timesheet and all timesheet lines within the
selected timesheet header have been copied to the selected
resource and week ending.
Copyright © 1998-2004 Star System Solutions Pty Ltd.
TimeRecorder V6.x
50
Delete
Introduction This section explains how to delete a timesheet.
Conditions
A timesheet has a significant impact on TimeRecorder, and
careful consideration has to be taken into account when
timesheet details are deleted.
A submitted timesheet cannot be deleted.
When an unsubmitted timesheet is deleted all timesheet lines
within the selected timesheet header are also deleted.
Procedure
How to delete a timesheet.
From the timesheet entry screen:
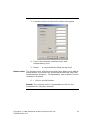
1. Select File menu, Open.
2. Highlight the existing timesheet to be deleted. (using
the employee number and period ending date as your
selection criteria).
3. r click on the OK button.
4. Select the File menu.
5. Select Delete Timesheet.
6. r click on the Yes button to confirm the deletion of
the timesheet and all timesheet lines.
Result: The timesheet and all timesheet lines within the
selected timesheet header has been deleted.
Copyright © 1998-2004 Star System Solutions Pty Ltd.
TimeRecorder V6.x
51
Timesheet line
New
Introduction This section explains how to enter a new timesheet line into
an existing timesheet.
Condition
A timesheet line has a significant impact on TimeRecorder,
and careful consideration has to be taken into account when
all details within a line are entered.
Procedure
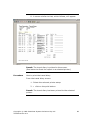
How to open an existing timesheet.
From the timesheet entry screen:
1. Select File menu, Open Timesheet.
2. A screen similar to that, which follows, will appear.
3. Highlight the existing timesheet that you wish to
enter a timesheet line to (using the employee number
and period ending date as your selection criteria).
4. r click on the OK button.
Result: The timesheet required will appear on the screen.
Continued on the next page
Copyright © 1998-2004 Star System Solutions Pty Ltd.
TimeRecorder V6.x
52
Procedure
How to enter a new timesheet line.
From the timesheet entry screen:
1. r click on either the insert or append buttons.
Alternatively r click on the task button (if applicable)
to select a task and r click on the 'Do Task' button.
2. Enter the date required for this timesheet line by
using the drop down calendar function or typing the
date into the field in the following format:
DD/MM/YYYY.
3. Press t to move between fields as required.
4. The day will automatically appear, check to ensure
that it is correct.
5. Using the numeric keys on your keyboard enter the
start time required for this timesheet line. To
automatically enter the actual present time press a “”
(Space bar). (TimeRecorder uses a twenty fourhour clock.)
6. Enter the end time required for this line in the same
manner as was explained above for the start time.
To automatically enter the actual present time press
a “” (Space bar). (TimeRecorder uses a twenty
four-hour clock.)
7. The duration will automatically be calculated, type in
an amended duration or accept the calculation.
8. o right click on the line to access the overtime screen
or press c+M. Type in the overtime and
compensatory time, (if applicable).
Continued on the next page
Copyright © 1998-2004 Star System Solutions Pty Ltd.
TimeRecorder V6.x
53
9. r click on the client code or name from the drop
down list - press # to view the list in code order and
$ to view the list in name alphabetical order.
10.r click on the project code or name from the drop
down list - press # to view the list in code order and
$ to view the list in name alphabetical order.
11.r click on the phase from the drop down list, (if
applicable).
12.r click on the activity from the drop down list, (if
applicable).
13.Select (tick) the no charge checkbox if the client is
not to be charged for this work, (if applicable).
14.o right click on the line to access the reason for no
charge screen or press c+G. Select the reason for
no charge code and type in notes, (if applicable).
15.r click on the task (if applicable) from the drop down
list or r click on the task button, then select the task
and r click on the ‘Do Task’ button.
16.Select (tick) the task done checkbox if the task is
completed, (if applicable).
17.Type in the task percentage complete between 0 and
100, (if applicable).
18.Select (tick) the suggest close checkbox if the project
is completed, (if applicable).
19.Select (tick) the call out checkbox if the client is to be
charged a call out fee relating to this timesheet line,
(if applicable).
20.Type in the clientele call no. as required for this
timesheet line, (if applicable).
21.Type in the client ref number as required for this
timesheet line, (if applicable).
Continued on the next page
Copyright © 1998-2004 Star System Solutions Pty Ltd.
TimeRecorder V6.x
54
22.Select the location from the drop down list, (if
applicable).
23.Type in fee form text as required into the internal
comments field, (if applicable).
24.Type one line of free form text as required into the
details field. The extended notes field will
automatically open once the line is full.
25.Type as much free form text as required into the
extended note field and r click on the OK button.
26.r click on the save button.
Result: The timesheet line has been entered and saved.
Copyright © 1998-2004 Star System Solutions Pty Ltd.
TimeRecorder V6.x
55
Change
Introduction This section explains how to maintain or view a timesheet
line.
Condition
A timesheet line has a significant impact on TimeRecorder,
and careful consideration has to be taken into account when
all details within a line are changed.
Procedure
How to change or view a timesheet line.
From the timesheet entry screen:
1. Select File menu, Open Timesheet.
2. Highlight the existing timesheet that you wish to
change or view (using the employee number and
period ending date as your selection criteria).
3. r click on the OK button.
4. Highlight the relevant timesheet line within the grid.
The summary box shows details relating to the
timesheet line such as client, project, phase and
activity.
5. Make changes or view details as required.
6. Press t to move between fields as required.
7. r click on the save button.
Result: The changes have been saved and information within
the timesheet line viewed.
Copyright © 1998-2004 Star System Solutions Pty Ltd.
TimeRecorder V6.x
56
Repeat
Introduction This section explains how to repeat a timesheet line for a
defined number of days within the timesheet.
Condition
A timesheet line has a significant impact on TimeRecorder,
and careful consideration has to be taken into account when
all details within a line are repeated.
Procedure
How to repeat a timesheet line.
From the timesheet entry screen:
1. Select File menu, Open Timesheet.
2. Highlight the existing timesheet, which contains the
line that you wish to repeat. (using the employee
number and period ending date as your selection
criteria).
3. r click on the OK button.
4. Highlight the relevant timesheet line within the grid.
The summary box shows details relating to the
timesheet line such as client, project, phase and
activity.
5. r click on the repeat button.
Continued on the next page
Copyright © 1998-2004 Star System Solutions Pty Ltd.
TimeRecorder V6.x
57
6. The following screen will appear.
7. Enter the number of days to repeat the current record
for and r click on the OK button.
Please note: The maximum number of days to repeat the current record is
6 days and the selected timesheet line will not be repeated
beyond the last day of the timesheet week ending date.
Result: The timesheet line has been repeated for the
selected number of days or up to the last day of the
timesheet week ending date.
Copyright © 1998-2004 Star System Solutions Pty Ltd.
TimeRecorder V6.x
58
Delete
Introduction This section explains how to delete a timesheet line from a
timesheet.
Condition
A timesheet line has a significant impact on TimeRecorder,
and careful consideration has to be taken into account when
timesheet lines are deleted.
A submitted timesheet line cannot be deleted.
Procedure
How to delete a timesheet line.
From the timesheet entry screen:
1. Select File menu, Open Timesheet.
2. Highlight the existing timesheet, which contains the
line that you wish to delete. (using the employee
number and period ending date as your selection
criteria).
3. r click on the OK button.
4. Highlight the relevant timesheet line to be deleted.
5. Select the Edit menu.
6. Select the Delete Line.
7. r click on the Yes button to confirm the deletion of
the selected timesheet line.
Result: The timesheet line within the selected timesheet has
been deleted.
Copyright © 1998-2004 Star System Solutions Pty Ltd.
TimeRecorder V6.x
59
Expense line
New
Introduction This section explains how to enter a new expense line into an
existing timesheet.
Condition
An expense line has a significant impact on TimeRecorder,
and careful consideration has to be taken into account when
all details within a line are entered.
Procedure
How to open an existing timesheet.
From the timesheet entry screen:
1. Select File menu, Open Timesheet.
2. A screen similar to that, which follows, will appear.
3. Highlight the existing timesheet that you wish to
enter new expenses for (using the employee number
and period ending date as your selection criteria).
Continued on the next page
Copyright © 1998-2004 Star System Solutions Pty Ltd.
TimeRecorder V6.x
60
4. r click on the OK button.
Result: The timesheet required will appear on the screen.
Procedure
How to enter a new expense line.
From the timesheet entry screen:
1. r click on the expenses button.
2. A screen similar to that which follows will appear.
3. Select the insert or append button, or double r click
on the expense line.
Continued on the next page
Copyright © 1998-2004 Star System Solutions Pty Ltd.
TimeRecorder V6.x
61
7. A screen similar to that, which follows, will appear.
8. Select the expense from the drop down list.
9. Press t to move between fields as required.
10.Enter the date required for this expense line by using
either the drop down calendar function or typing the
date into the field in the following format:
DD/MM/YYYY.
11.The day will automatically appear, check to ensure
that it is correct.
Continued on the next page
Copyright © 1998-2004 Star System Solutions Pty Ltd.
TimeRecorder V6.x
62
12.r click on the client code or name from the drop
down list - press # to view the list in code order and
$ to view the list in name alphabetical order.
13.r click on the project code or name from the drop
down list - press # to view the list in code order and
$ to view the list in name alphabetical order.
14.r click on the phase from the drop down list, (if
applicable).
15.r click on the activity from the drop down list, (if
applicable).
16.r click on the paid with method from the drop down
list.
17.r click on the currency from the drop down list.
18.Type in the quantity for this expense line, (if
applicable).
19.Type in the natural rate inc. TAX as required for this
expense line, (if applicable).
20.Confirm or override, (if permitted), the extended
amount inc. TAX for this expense line.
21.Confirm or override, (if permitted), the TAX Code by
r click on the tax code from the drop down list.
22.Confirm or override, (if permitted), the TAX for this
expense line, (if applicable).
23.r click on the ‘…’ button to access the Tax breakdown
screen and manually enter multi level tax amounts, (if
applicable).
Continued on the next page
Copyright © 1998-2004 Star System Solutions Pty Ltd.
TimeRecorder V6.x
63
24.Confirm or override, (if permitted), the exchange rate
for this expense line, (if applicable).
25.Confirm the reimbursement amount.
26.Select (tick) the reimbursable checkbox if the
expense is to be reimbursed to the resource, (if
applicable).
27.Select (tick) the no charge checkbox if the client is
not to be charged for this work, (if applicable).
28.Select (tick) the receipt obtained check box if a
receipt has been supplied for the expense, (if
applicable).
29.Type in free form text as required into the details
field.
30.Type in the client ref as required for this expense
line, (if applicable).
31.Select the Location from drop down list, (if
applicable).
32.r click on the save button.
Result: The expense line has been entered and saved.
Please note: Select the File, Exit menu item to exit the expenses screen
and return to the timesheet entry screen.
Copyright © 1998-2004 Star System Solutions Pty Ltd.
TimeRecorder V6.x
64
Change
Introduction This section explains how to maintain or view an expense line
within an existing timesheet.
Condition
An expense line has a significant impact on TimeRecorder,
and careful consideration has to be taken into account when
all details within a line are changed.
A submitted expense line cannot be changed.
Procedure
How to change or view an expense line.
From the timesheet entry screen:
1. Select File menu, Open Timesheet.
2. Highlight the existing timesheet, which relates to the
expense line that you wish to change or view (using
employee number and period ending date as your
selection criteria).
3. r click on the OK button.
4. r click on the Expenses button.
5. Double r click on the relevant expense line to access
the expense details screen.
6. Make changes or view details as required.
7. r click on the save button.
Result: The changes have been saved and information within
the expense line viewed.
Please note: Select the File, Exit menu item to exit the expenses screen
and return to the timesheet entry screen.
Copyright © 1998-2004 Star System Solutions Pty Ltd.
TimeRecorder V6.x
65
Delete
Introduction This section explains how to delete an expense line within an
existing timesheet.
Condition
An expense line has a significant impact on TimeRecorder,
and careful consideration has to be taken into account when
expense lines are deleted.
A submitted expense line cannot be deleted.
Procedure
How to delete an expense line.
From the timesheet entry screen:
1. Select File menu, Open Timesheet.
2. Highlight the existing timesheet, which relates to the
expense line that you wish to delete (using the
employee number and period ending date as your
selection criteria).
3. r click on the OK button
4. r click on the Expenses button.
5. Highlight the relevant expense line to be deleted.
6. Select the Edit menu.
7. Select the Delete Line.
8. r click on the Yes button to confirm the deletion of
the selected expense line.
Result: The expense line has been deleted.
Please note: Select the File, Exit menu item to exit the expenses screen
and return to the timesheet entry screen.
Copyright © 1998-2004 Star System Solutions Pty Ltd.
TimeRecorder V6.x
66
Reports
Detailed Transaction Log
Introduction This section explains how to print a detailed transaction log.
Condition
You must be logged into TimeRecorder and viewing the
timesheet containing the timesheet line required to print the
detailed transaction log for.
Procedure
How to print a detailed transaction log.
From the timesheet entry screen:
1. Select the timesheet line that is to be reported on.
2. Select View menu.
3. Select Detailed Transaction Log.
Result: The detailed transaction log is printed to the screen.
(See below to direct the report to a selected printer.)
OR
Procedure
From the timesheet entry screen:
1. Select the timesheet line that is to be reported on.
2. r click on the detailed transaction log button on the
tool bar.
3. A screen similar to that, which follows, will appear.
Continued on the next page
Copyright © 1998-2004 Star System Solutions Pty Ltd.
TimeRecorder V6.x
67
The user is able to view the detailed transaction log to
the screen or r click on the print button to print the log
to a selected printer.
Result: The detailed transaction log is printed to the screen.
(See below to direct the report to a selected printer.)
Procedure
How to print the detailed transaction log.
From the detailed transaction log screen:
1. Select the relevant printer setup.
2. r click on the print button.
Result: The detailed transaction log has been printed to the
selected printer.
Copyright © 1998-2004 Star System Solutions Pty Ltd.
TimeRecorder V6.x
68
Weekly Summary Report
Introduction This section explains how to view and print a weekly summary
report.
Condition
You must be logged into TimeRecorder and viewing the
timesheet required to view and print the weekly summary for.
Procedure
How to view a weekly summary.
From the timesheet entry screen:
1. Select View menu.
2. Select Weekly Summary.
Result: The weekly summary is viewed.
OR
Procedure
From the timesheet entry screen:
1. r click on the weekly summary button on the tool
bar.
2. A screen similar to that, which follows, will appear.
Continued on the next page
Copyright © 1998-2004 Star System Solutions Pty Ltd.
TimeRecorder V6.x
69
The user is able to view the weekly summary or r click
on the report button to view or print the selected report.
Result: The weekly summary is viewed.
(See below for how to print the weekly summary report.)
Procedure
How to print a weekly summary report.
From the weekly summary screen:
1. r click on the report button.
2. A screen similar to that, which follows, will appear.
Continued on the next page
Copyright © 1998-2004 Star System Solutions Pty Ltd.
TimeRecorder V6.x
70
The user is able to view the weekly summary report to
the screen or r click on the print button to print the
report to a selected printer.
Result: The weekly summary report is printed to the screen.
(See below to direct the report to a selected printer.)
Procedure
How to print the weekly summary report.
From the weekly summary report screen:
1. Select the relevant printer setup.
2. r click on the print button.
Result: The weekly summary report has been printed to the
selected printer.
Copyright © 1998-2004 Star System Solutions Pty Ltd.
TimeRecorder V6.x
71
Transaction Lists
Introduction This section explains how to view and print a transaction list.
Condition
You must be logged into TimeRecorder. The option to print
the charge ratio in the transaction report must be set as
required on the functions tab within the TimeRecorder
preferences.
Procedure
How to view a transaction list.
From the timesheet entry screen:
1. Select View menu.
2. Select Transaction List.
3. A screen similar to that, which follows, will appear.
Continued on the next page
Copyright © 1998-2004 Star System Solutions Pty Ltd.
TimeRecorder V6.x
72
4. Use the filter fields to select the relevant filters for
the transaction list:
Client - press # to view the list in code order and
$ to view the list in name alphabetical order.
Project - press # to view the list in code order
and $ to view the list in name alphabetical order.
Employee
Start Date and End Date or
Date Range
5. Select (tick) the project before client checkbox to list
the project before client, (if applicable).
Result: The transaction list is viewed.
Procedure
How to print a transaction list.
From the transaction list screen:
1. r click on the report button or approval report button
to prompt the system to generate the report from the
filtered transactions shown.
2. A screen similar to that, which follows, will appear.
Continued on the next page
Copyright © 1998-2004 Star System Solutions Pty Ltd.
TimeRecorder V6.x
73
(Report button selected with preference set to print charge
ratio in transaction report)
Continued on the next page
Copyright © 1998-2004 Star System Solutions Pty Ltd.
TimeRecorder V6.x
74
(Approval report button selected)
Continued on the next page
The user is able to view the transaction or approval
transaction report to the screen or r click on the print
button to print the report to a selected printer.
Result: The transaction list is printed to the screen.
(See below to direct the report to a selected printer.)
Procedure
How to print the transaction list.
From the transaction report screen:
1. Select the relevant printer setup.
2. r click on the print button.
Result: The transaction list has been printed to the selected
printer.
Copyright © 1998-2004 Star System Solutions Pty Ltd.
TimeRecorder V6.x
75
Master Lists
Introduction This section explains how to view a client, project, employee,
expenses, no charge reason, locations and tax codes lists
Condition
You must be logged into TimeRecorder. Master lists cannot
be printed only viewed on screen.
Procedure
How to view a Master List.
From the timesheet entry screen:
1. Select View menu.
2. Select Master List.
3. r click on the tab that the list is to be viewed for:
Client
Project/Phase
Employee
Expenses
No Charge Reason
Locations
Tax Codes
4. A screen similar to that which follows will appear.
Continued on the next page
Copyright © 1998-2004 Star System Solutions Pty Ltd.
TimeRecorder V6.x
76
5. Manipulate the filter fields and column headings to
ensure that the information is displayed in the
manner that is required.
Result: The required Master List has been viewed.
Copyright © 1998-2004 Star System Solutions Pty Ltd.
TimeRecorder V6.x
77
Overtime
Introduction This section explains how to enter overtime and or
compensatory time to a selected timesheet line.
Condition
You must be logged into TimeRecorder and the use overtime
option with the TimeRecorder preferences must be set to use
overtime.
Procedure
How to enter overtime and or compensatory to a selected
timesheet line.
On the timesheet line the overtime or compensatory time is
for:
1. Select View menu.
2. Select Overtime.
Continued on the next page
Copyright © 1998-2004 Star System Solutions Pty Ltd.
TimeRecorder V6.x
78
3. A screen similar to that which follows will appear.
4. Type in the relevant overtime hours and
compensatory time.
5. Press t to move between fields as required.
Please note: The normal hours and overtime fields have been set to adjust
automatically to ensure they always equal the total field (the
timesheet line duration). Compensatory time entered is to be
included in the total.
6. r click on the OK button.
Result: The overtime and or compensatory time for the
timesheet line has been entered.
Copyright © 1998-2004 Star System Solutions Pty Ltd.
TimeRecorder V6.x
79
Travel Diary
Introduction This section explains how to print a travel diary.
Condition
You must be logged into TimeRecorder.
Procedure
How to print a travel diary.
From the timesheet entry screen:
1. Select View menu.
2. Select Travel Diary.
3. A screen similar to that, which follows, will appear.
Continued on the next page
Copyright © 1998-2004 Star System Solutions Pty Ltd.
TimeRecorder V6.x
80
4. Use the filter fields to select the relevant filters for
the travel diary:
Client
Project
Employee
Start Date and End Date or
Date Range
5. Select (tick) the project before client checkbox to list
the project before client, (if applicable).
6. r click on the report button to prompt the system to
generate the report from the filtered transactions.
7. r click on the show button when existing filters are
changed to ensure that all transactions are listed for
the relevant criteria.
Continued on the next page
Copyright © 1998-2004 Star System Solutions Pty Ltd.
TimeRecorder V6.x
81
8. A screen similar to that, which follows, will appear.
Result: The travel diary is printed to the screen.
(See below to direct the report to a selected printer.)
Procedure
How to print the travel diary.
From the travel diary screen:
1. Select the relevant printer setup.
2. r click on the print button.
Result: The travel diary has been printed to the selected
printer.
Copyright © 1998-2004 Star System Solutions Pty Ltd.
TimeRecorder V6.x
82
Task Lists
Introduction This section explains how to view a task list and allocate time
to a selected task.
Condition
You must be logged into TimeRecorder. Task lists cannot be
printed only viewed on screen.
Procedure
How to view a task list and allocate time to a task.
From the timesheet entry screen:
1. Select View menu.
2. Select Tasks.
3. A screen similar to that which follows will appear.
4. Use the filter fields to select the relevant filters for
the transaction list:
Project
Client
Employee
Start and End Date or
Date Range
5. Select (tick) the project before client checkbox to list
the project before client, (if applicable).
Continued on the next page
Copyright © 1998-2004 Star System Solutions Pty Ltd.
TimeRecorder V6.x
83
6. Select (tick) the show unassigned checkbox to list
tasks unassigned to an employee, (if applicable).
7. Select (tick) the show completed checkbox to list
completed tasks, (if applicable).
8. r click on the show button.
Result: The required Task list has been viewed.
Procedure
How to allocate time to a selected task.
From the tasks screen:
9. Select the task that time is to be allocated to.
10.r click on the do task button.
Result: A timesheet line has been created for the selected
task or the task inserted into a current timesheet line for time
to be allocated.
Copyright © 1998-2004 Star System Solutions Pty Ltd.
TimeRecorder V6.x
84
Time Analysis
Introduction This section explains how to run, view and print a time
analysis enquiry.
Condition
You must be logged into TimeRecorder.
Procedure
How to run a time analysis enquiry.
From the timesheet entry screen:
1. Select View menu.
2. Select Time Analysis.
3. The following screen will appear.
4. Select the employee that you wish to analyse or leave
blank to analyse all timesheet data that is maintained
on the local database.
5. Enter the date range that you wish to include.
6. Select the fields to include in the enquiry:
Employee
Client
Project
Activity
Continued on the next page
Copyright © 1998-2004 Star System Solutions Pty Ltd.
TimeRecorder V6.x
85
7. r click on the view analysis button.
8. A screen similar to that, which follows, will appear.
9. The user is able to select the yellow + or – icons (or
o right click on a number in the graph) in order to
change the grouping pivot controls of the enquiry in
order to alter the graphical profile displayed.
10.The user can also o right click on the grid screen in
order to select to print the graph or change the data
source to a different database alias.
Result: The time analysis has been run, viewed and printed.
Copyright © 1998-2004 Star System Solutions Pty Ltd.
TimeRecorder V6.x
86
Submit
Submit timesheets
Introduction This section explains how to submit a timesheet to a selected
location.
Condition
You must be logged into TimeRecorder and have the submit
timesheet path and options setup on the submit tab within the
TimeRecorder preferences.
Procedure
How to submit a timesheet.
From the timesheet entry screen:
1. Select File menu, Open Timesheet.
2. A screen similar to that, which follows, will appear.
3. Highlight the existing timesheet that you wish to
submit (using the employee number and period
ending date as your selection criteria).
4. r click on the OK button.
Continued on the next page
Copyright © 1998-2004 Star System Solutions Pty Ltd.
TimeRecorder V6.x
87
5. Check all details of both the timesheet header and
each timesheet line to ensure that the information is
correct.
6. Select File menu.
7. Select Submit Timesheet.
8. A screen similar to that, which follows, will appear.
Continued on the next page
Copyright © 1998-2004 Star System Solutions Pty Ltd.
TimeRecorder V6.x
88
If…….
The week ending date/s and
submit path is correct
Then……..
Select the copy this timesheet
to next week checkbox, (if
applicable) and press the
submit or submit all button
OR
If the week ending date
is incorrect
Press the cancel button and
change the timesheet so that
the period ending date is
correct and then re-select the
submit button.
OR
If the submit path
is incorrect
Press the cancel button and
change the submit path in the
TimeRecorder preferences and
then re-select the submit
button.
Result: The timesheet has been submitted to the selected
location and a .TSH and .memo file is created.
Please note:
This will not submit expense lines within the timesheet.
These must be submitted separately using the submit button
within the expense grid screen.
Copyright © 1998-2004 Star System Solutions Pty Ltd.
TimeRecorder V6.x
89
Submit expenses
Introduction This section explains how to submit expense lines to a
selected location.
Condition
You must be logged into TimeRecorder and have the submit
timesheet path and options setup on the submit tab within the
TimeRecorder preferences.
Procedure
How to submit expense lines.
From the timesheet entry screen:
1. Select File menu, Open Timesheet.
2. A screen similar to that, which follows, will appear.
3. Highlight the existing timesheet, which relates to the
expenses that you wish to submit (using the
employee number and period ending date as your
selection criteria).
4. r click on the OK button.
5. r click on the expenses button.
Continued on the next page
Copyright © 1998-2004 Star System Solutions Pty Ltd.
TimeRecorder V6.x
90
6. Check all details of each expense line to ensure that
the information is correct.
7. Select File menu.
8. Select Submit Expenses.
9. A screen similar to that, which follows, will appear.
If…….
The week ending date and
submit path is correct
Then……..
Press the submit button
OR
If the week ending date
is incorrect
Press the cancel button and
change the expense sheet so
that the period ending date is
correct and then re-select the
submit button
OR
If the submit path
is incorrect
Press the cancel button and
change the submit path in the
TimeRecorder preferences and
then re-select the submit
button
Result: The expense lines have been submitted to the
selected location and a .CSV, .Memo & MLT.tax files are
created.
Please note: This will not submit timesheet lines within the timesheet.
These must be submitted separately using the submit button
within the timesheet entry screen.
Copyright © 1998-2004 Star System Solutions Pty Ltd.
TimeRecorder V6.x
91
Unsubmit
Unsubmit timesheets
Introduction This section explains how to unsubmit a previously submitted
timesheet.
Condition
You must be logged into TimeRecorder and the allow
unsubmit of timesheets option on the submit tab within the
TimeRecorder preferences must be ticked.
Procedure
How to unsubmit a timesheet.
From the timesheet entry screen:
1. Select File menu, Open Timesheet.
2. A screen similar to that, which follows, will appear.
3. Highlight the existing submitted timesheet that you
wish to unsubmit (using the employee number and
period ending date as your selection criteria).
4. r click on the OK button.
Continued on the next page
Copyright © 1998-2004 Star System Solutions Pty Ltd.
TimeRecorder V6.x
92
5. Select File menu.
6. Select Unsubmit Timesheet.
7. A screen similar to that, which follows, will appear.
8. r click on the unsubmit button.
9. When prompted confirm that the selected timesheet
is to be unsubmitted by selecting the Yes button.
Result: The selected timesheet and all timesheet lines within
it have been unsubmitted and the file created when the
timesheet was submitted has been renamed to a .UNS file.
Copyright © 1998-2004 Star System Solutions Pty Ltd.
TimeRecorder V6.x
93
Unsubmit expenses
Introduction This section explains how to unsubmit previously submitted
expenses.
Condition
You must be logged into TimeRecorder and the allow
unsubmit of timesheets option on the submit tab within the
TimeRecorder preferences must be ticked.
Procedure
How to unsubmit expenses.
From the timesheet entry screen:
1. Select File menu, Open Timesheet.
2. A screen similar to that, which follows, will appear.
3. Highlight the existing timesheet, which relates to the
expenses that you wish to unsubmit (using the
employee number and period ending date as your
selection criteria).
4. r click on the OK button.
Continued on the next page
Copyright © 1998-2004 Star System Solutions Pty Ltd.
TimeRecorder V6.x
94
5. r click on the expenses button.
6. Check all details of the expense to ensure it is the
correct one to be unsubmitted.
7. Select File menu.
8. Select Unsubmit Expenses.
9. The screen similar to that which follows will appear.
7. r click on the unsubmit button.
8. When prompted confirm that the selected expenses is
to be unsubmitted by selecting the Yes button.
Result: The selected expenses have been unsubmitted and
the file created when the expense was submitted is renamed
to a .UNS file.
Copyright © 1998-2004 Star System Solutions Pty Ltd.
TimeRecorder V6.x
95
Synchronise
Synchronise Masterfiles
Introduction This section explains how to synchronise Masterfile data from
a central invoicing system.
Condition
You must be logged into TimeRecorder and have the
synchronise path setup on the submit tab within the
TimeRecorder preferences.
Procedure
How to synchronise Masterfiles.
From the timesheet entry screen:
1. Select File menu.
2. Select Synchronise.
3. A screen similar to that, which follows, will appear.
Continued on the next page
Copyright © 1998-2004 Star System Solutions Pty Ltd.
TimeRecorder V6.x
96
If…….
The directory is correct
Then……..
Press the synchronise button
OR
If the directory is incorrect
Press the cancel button and
change the synchronise path in
the TimeRecorder preferences
and then re-select the
synchronise button
Result: TimeRecorder masterfiles are updated from the
central invoicing system.
OR
If…….
You are unsure
Then……..
Press the cancel button and
seek assistance
Result: TimeRecorder Masterfiles are not updated on the
client computer.
Copyright © 1998-2004 Star System Solutions Pty Ltd.
TimeRecorder V6.x
97
Purge
Purge old timesheets
Introduction This section explains how to purge old submitted timesheets.
Condition
You must be logged into TimeRecorder and the allow purge
old timesheets option on the security tab within the
TimeRecorder preferences must be ticked.
Procedure
How to purge old submitted timesheets.
From the timesheet entry screen:
1. Select File menu.
2. Select Purge Old Timesheets.
3. A screen similar to that, which follows, will appear.
Continued on the next page
Copyright © 1998-2004 Star System Solutions Pty Ltd.
TimeRecorder V6.x
98
4. r click on the z button and select the employee for
which the timesheets are to be purged.
5. Select the week ending from the drop down calendar
facility for which the timesheets are to be purged.
6. r click on the purge button.
7. r click on the Yes button to confirm the deletion of
the timesheet and lines.
Result:
The timesheet and lines for the selected resource and week
ending have been purged or deleted from the system.
Please note: The system will not permit a user to purge a timesheet that
has one or more unsubmitted timesheet lines within it.
If a screen with a warning similar to that which follows
appears – the timesheet that is selected to be purged
contains unsubmitted timesheet lines and cannot be purged
until all lines have been submitted to the central invoicing
system.
Continued on the next page
Copyright © 1998-2004 Star System Solutions Pty Ltd.
TimeRecorder V6.x
99
In a case such as displayed above – the timesheet lines at the
top of the screen (in black text) are the unsubmitted
timesheet lines, which are preventing the timesheet from
being able to be purged.
1. r click on the cancel button
2. Select File / Open Timesheet - or File / Show
Unsubmitted and select the relevant timesheet from
the list.
3. r click on the OK button.
4. Submit the timesheet to the central invoicing system
as usual.
5. Re-open the purge old timesheet screen and run the
purge process for that timesheet as set out in the
steps above.
Result:
The timesheet and lines for the selected resource and week
ending have been purged or deleted from the system.
Copyright © 1998-2004 Star System Solutions Pty Ltd.
TimeRecorder V6.x
100
Appendix 1
TimeRecorder Preferences
Display
Introduction This section explains the display options within the
TimeRecorder preferences screen, with emphasis on how to
set these parameters within TimeRecorder.
Conditions
This option has significant effect on TimeRecorder and careful
consideration has to be taken into account when any details
within the display preference screen are defined or changed.
You must be logged into TimeRecorder and have security
access to edit the display tab within the TimeRecorder
preferences.
Procedure
How to set the display options.
From the timesheet entry screen:
1. Select File menu.
2. Select Preferences.
3. r click on the display tab of the preferences screen.
Continued on the next page
Copyright © 1998-2004 Star System Solutions Pty Ltd.
TimeRecorder V6.x
101
4. A screen similar to that, which follows, will appear.
5. Select (tick) or unselect (untick) the display field
checkboxes to define the options that are to be
applied when TimeRecorder is used.
6. To save the changes exit the screen by select the OK
button.
Copyright © 1998-2004 Star System Solutions Pty Ltd.
TimeRecorder V6.x
102
Functions
Introduction This section explains the functions within the TimeRecorder
preferences screen, with emphasis on how to set these
parameters within TimeRecorder.
Conditions
This option has significant effect on TimeRecorder and careful
consideration has to be taken into account when any details
within the functions preference screen are defined or
changed.
You must be logged into TimeRecorder and have security
access to edit the functions tab within the TimeRecorder
preferences.
Procedure
How to set functions.
From the timesheet entry screen:
1. Select File menu.
2. Select Preferences.
3. r click on the functions tab of the preferences screen.
4. The following screen will appear.
Continued on the next page
Copyright © 1998-2004 Star System Solutions Pty Ltd.
TimeRecorder V6.x
103
5. Select (tick) or unselect (untick) each function
checkbox to define that the relevant function is to be
assessable to the user within TimeRecorder.
6. To save the changes exit the screen by select the OK
button.
Copyright © 1998-2004 Star System Solutions Pty Ltd.
TimeRecorder V6.x
104
Warnings
Introduction This section explains the warnings within the TimeRecorder
preferences screen, with emphasis on how to set these
parameters within TimeRecorder.
Conditions
This option has significant effect on TimeRecorder and careful
consideration has to be taken into account when any details
within the warnings preference screen are defined or
changed.
You must be logged into TimeRecorder and have security
access to edit the warnings tab within the TimeRecorder
preferences.
Procedure
How to set the warnings.
From the timesheet entry screen:
1. Select File menu.
2. Select Preferences.
3. r click on the warnings tab of the preferences screen.
4. A screen similar to that, which follows, will appear.
Continued on the next page
Copyright © 1998-2004 Star System Solutions Pty Ltd.
TimeRecorder V6.x
105
5. Set the type of error or warning message that the
user should receive when the parameters listed are
met.
A) Parameters available:
Admin Detail
Leave Detail
Client Detail
No Charge Codes / Notes
Location
Midnight End Of Day
Charges Per Day Over 24hrs
Entry of Overlapped period
B) Valid types of error or warning messages are:
No message
Error message
- prevents user from continuing
Warning message
– does not prevent user from continuing
6. To save the changes exit the screen by select the OK
button.
Copyright © 1998-2004 Star System Solutions Pty Ltd.
TimeRecorder V6.x
106
Options
Introduction This section explains the options within the TimeRecorder
preferences screen, with emphasis on how to set these
parameters within TimeRecorder.
Conditions
This option has significant effect on TimeRecorder and careful
consideration has to be taken into account when any details
within the options preference screen are defined or changed.
You must be logged into TimeRecorder and have security
access to edit the options tab within the TimeRecorder
preferences.
Procedure
How to set options.
From the timesheet entry screen:
1. Select File menu.
2. Select Preferences.
3. r click on the options tab of the preferences screen.
4. A screen similar to that, which follows, will appear.
Continued on the next page
Copyright © 1998-2004 Star System Solutions Pty Ltd.
TimeRecorder V6.x
107
5. r click on the z button and select the end of week
for timesheets and expenses.
6. Type in the time increment to define the time
increase in duration that the system will use for
calculating each timesheet line duration.
7. Type in the callout chargeable time to define the
hours added by the system when a timesheet line has
the call out checkbox selected.
8. The reimbursement currency code is read only and
defines the currency to reimburse the employee in.
9. The precision is read only and defines the number of
decimal places used to display expense amounts.
10.Type in the lunch break from and to hours to
calculate the duration the system will deduct from the
timesheet line duration when the line start and end
times incorporate the lunch break time.
Continued on the next page
Copyright © 1998-2004 Star System Solutions Pty Ltd.
TimeRecorder V6.x
108
11.Select the financial year start and end period to be
used by the system when running reports.
12.Type in the hours to warn after to define the number
of hours per week allowed to be entered before the
system warns the user of exceeding this many hours.
13.Select (tick) the respect constraints checkbox to
respect the constraints set from within the central
invoicing system rather than the TimeRecorder
preference parameter settings, (if applicable).
14.Select (tick) the expenses must be in week checkbox
to only allow expenses to be saved with a date within
the week defined by the week ending date of the
timesheet the expenses are related to, (if applicable).
15.Select (tick) the ask to include travel diary checkbox
to allow the option of printing or not printing a travel
diary when the expense claim form is printed when
the Expense Masterfile is set as travel diary required,
(if applicable).
16.Select (tick) the show other person’s tasks checkbox
to show task allocated to other resources within the
timesheet task field drop down list.
17.Select (tick) the weekly summary report code before
description checkbox to display and print the client,
project and or phase codes before the descriptions.
18.Select the charge ratio basis as standard hours or
actual hours worked as required.
19.Select (tick) the days to exclude as expected working
days in charge calc, (if applicable).
Please note: All of the options settings define the manner in which
TimeRecorder will function.
20.To save the changes exit the screen by select the OK
button.
Copyright © 1998-2004 Star System Solutions Pty Ltd.
TimeRecorder V6.x
109
Submit
Introduction This section explains the communication methods that
TimeRecorder uses to interface with a central invoicing
system, with emphasis on how to set these parameters within
TimeRecorder.
Conditions
This option has significant effect on TimeRecorder and careful
consideration has to be taken into account when any details
within the submit preference screen are defined or changed.
You must be logged into TimeRecorder and have security
access to edit the submit tab within the TimeRecorder
preferences.
Procedure
How to set the submit methods.
From the timesheet entry screen:
1. Select File menu.
2. Select Preferences.
3. r click on the submit tab of the preferences screen.
4. A screen similar to that, which follows, will appear.
Continued on the next page
Copyright © 1998-2004 Star System Solutions Pty Ltd.
TimeRecorder V6.x
110
5. Set the submit timesheet path that TimeRecorder
uses to submit timesheets to a central invoicing
system.
To set the path the user can manually type it into
the path field or activate the browse box by
selecting the ‘…’ browse button to the right hand
side of the path field box and navigate through to
the path required.
6. Set the synchronise path that TimeRecorder uses to
synchronise Masterfiles from a central invoicing
system.
To set the path the user can manually type it into
the path field or activate the browse box by
selecting the ‘…’ browse button to the right hand
side of the path field box and navigate through to
the path required.
Continued on the next page
Copyright © 1998-2004 Star System Solutions Pty Ltd.
TimeRecorder V6.x
111
7. Set the master preferences path that TimeRecorder
uses to synchronise preferences from a central
invoicing system.
To set the path the user can manually type it into
the path field or activate the browse box by
selecting the ‘…’ browse button to the right hand
side of the path field box and navigate through to
the path required.
8. Set the submit method and options to submit
timesheets and expenses to a central invoicing
system.
9. Select (tick) or unselect (untick) each function
checkbox to define that the relevant function is to be
assessable to the user within TimeRecorder.
Functions available are:
Allow unsubmit of timesheets
Allow copy when create new timesheet
Clear quantities on copy timesheet (applicable
when start and end times are not used)
Allow submit of more than 1 week
Auto create timesheet
Default copy timesheet
Show unsubmitted weeks when submitting
Show unsubmitted weeks after submitting the
current
Do not submit lines with 0 duration
10.Set the synchronise options to define the way
TimeRecorder runs the synchronise process.
Options available are:
Synchronise on start up
No
Prompt
Yes
Synchronise after submit
Create synchronise log
Please note: All of the submit settings define the manner in which
TimeRecorder will function and interact with an external
accounting system.
11.To save the changes exit the screen by select the OK
button.
Copyright © 1998-2004 Star System Solutions Pty Ltd.
TimeRecorder V6.x
112
Security
Introduction This section explains the security options within the
TimeRecorder preferences screen, with the emphasis on how
to set these parameters within TimeRecorder.
Conditions
This option has significant effect on TimeRecorder and careful
consideration has to be taken into account when any details
within the security preference screen are defined or changed.
You must be logged into TimeRecorder and have security
access to edit the security tab within the TimeRecorder
preferences.
Procedure
How to set security.
From the timesheet entry screen:
1. Select File menu.
2. Select Preferences.
3. r click on the security tab of the preferences screen.
4. A screen similar to that, which follows, will appear.
Continued on the next page
Copyright © 1998-2004 Star System Solutions Pty Ltd.
TimeRecorder V6.x
113
5. r click on the z button and select the security level
as required for the user.
Valid security levels are as follows:
0 - The user has no access to TimeRecorder
preferences, as a security level has not yet
been set.
No Access - The user has been set to have no
access to TimeRecorder preferences.
Read Only - The user has read only access to
all of the tabs within the preferences screen.
Normal - The user has read only access to all
of the tabs within the preferences screen
except the display tab, which the user has
read and write access to.
Administrator - The user has unlimited read
and write access to all preference tabs and all
fields within each tab.
Please note: The system default for all security access functions within
TimeRecorder is ‘0’. The database administrator normally
sets up security levels when a new resource is set up within
the central invoicing system and TimeRecorder is
synchronised to access the resource. All settings should
comply with the guideline set out in accordance with company
standards.
6. Select (tick) the limit timesheets to one person
checkbox to ensure that no other resource except the
default employee can enter timesheets into this
program.
7. Enter the serial number to register the software.
8. Set the default staff code.
9. Select (tick) the allow purge old timesheets checkbox
to define that the function is to be assessable to the
user within TimeRecorder.
10.Select the relevant 'Host System' integrated with
TimeRecorder.
Continued on the next page
Copyright © 1998-2004 Star System Solutions Pty Ltd.
TimeRecorder V6.x
114
11.To save the changes exit the screen by select the OK
button.
Please note: The Support Assistance button is used to enable a user to
increase their security level to that of an administrator for one
session to facilitate the editing of one or more preference
parameters:
The support assistance button will prompt the user for a
password to enable the administrator security to be applied
for the current session only.
Copyright © 1998-2004 Star System Solutions Pty Ltd.
TimeRecorder V6.x
115
Labels
Introduction This section explains the labels within the TimeRecorder
preferences screen, with the emphasis on how to set these
parameters within TimeRecorder.
Conditions
This option has significant effect on TimeRecorder and careful
consideration has to be taken into account when any details
within the labels preference screen are defined or changed.
You must be logged into TimeRecorder and have security
access to edit the labels tab within the TimeRecorder
preferences.
Procedure
How to set the labels.
From the timesheet entry screen:
1. Select File menu.
2. Select Preferences.
3. r click on the labels tab of the preferences screen.
Continued on the next page
Copyright © 1998-2004 Star System Solutions Pty Ltd.
TimeRecorder V6.x
116
4. A screen similar to that, which follows, will appear.
5. r click in the relevant header label fields and type the
customised label that is to appear within
TimeRecorder.
6. Press t to move between fields as required.
7. r click in the relevant productivity label fields and
type the customised label that is to appear within
TimeRecorder.
8. To save the changes exit the screen by select the OK
button.
Please note: Once changes have been saved to the labels preferences close
TimeRecorder and re-open to refresh and show new labels
within the system.
Copyright © 1998-2004 Star System Solutions Pty Ltd.
TimeRecorder V6.x
117
Company Details
Introduction This section explains the company details within the
TimeRecorder preferences, with the emphasis on how to set
these parameters within TimeRecorder.
Conditions
This option has significant effect on TimeRecorder and careful
consideration has to be taken into account when any details
within the company details preference screen are defined or
changed.
You must be logged into TimeRecorder and have security
access to edit the company details tab within the
TimeRecorder preferences.
Procedure
How to set the company details.
From the timesheet entry screen:
1. Select File menu.
2. Select Preferences.
3. r click on the company details tab of the preferences
screen.
4. A screen similar to that, which follows, will appear.
Continued on the next page
Copyright © 1998-2004 Star System Solutions Pty Ltd.
TimeRecorder V6.x
118
5. Type in all company details that are to appear on any
detailed transaction log printed from within
TimeRecorder.
6. Press t to move between fields as required.
7. To save the changes exit the screen by select the OK
button.
Copyright © 1998-2004 Star System Solutions Pty Ltd.
TimeRecorder V6.x
119
Overtime
Introduction This section explains the overtime options within the
TimeRecorder preferences screen, with the emphasis on how
to set these parameters within TimeRecorder.
Conditions
This option has significant effect on TimeRecorder and careful
consideration has to be taken into account when any details
within the overtime preference screen are defined or changed.
You must be logged into TimeRecorder and have security
access to edit the overtime tab within the TimeRecorder
preferences.
Procedure
How to set the overtime options.
From the timesheet entry screen:
1. Select File menu.
2. Select Preferences.
3. r click on the overtime tab of the preferences screen.
4. A screen similar to that, which follows, will appear.
Continued on the next page
Copyright © 1998-2004 Star System Solutions Pty Ltd.
TimeRecorder V6.x
120
5. Select (tick) the use overtime checkbox to enable
access to the overtime function within TimeRecorder,
(if applicable).
6. Select (tick) the user overtime 1 to 5 checkboxes to
enable access to the required levels of overtime
within TimeRecorder, (if applicable).
7. Select (tick) the use comp time checkbox to enable
access to the compensatory time function within
TimeRecorder, (if applicable).
8. Type in all overtime labels that are to be used within
Timesheet records to define the levels of overtime, (if
applicable).
9. Press t to move between fields as required.
10.To save the changes exit the screen by select the OK
button.
Copyright © 1998-2004 Star System Solutions Pty Ltd.
TimeRecorder V6.x
121
Appendix 2
TimeRecorder calculations
Productive / Chargeable hours calculation
Introduction This section explains the way that TimeRecorder performs the
productive or chargeable hours calculation that appears in the
summary box of each timesheet.
Please note: The TimeRecorder preferences labels tab allows the user to
define if the labels productive & non productive are to be used
rather than chargeable and non chargeable.
The TimeRecorder preferences options tab allows the user to
define the charge ratio bases as standard hours or actual
hours worked.
Conditions
Productive / chargeable time is the combined hours of all lines
within a timesheet where the lines are assigned to a client
maintained as a client type of ‘Productive and Chargeable’
plus callout productive time for each timesheet line that is
marked as callout.
Non productive time is the combined hours of all lines within a
timesheet where the lines are assigned to a client maintained
as a client type of ‘Non productive and non chargeable’ plus
the hours for each timesheet line that is marked as no charge.
Productive and non chargeable time is the combined hours of
all lines within a timesheet where the lines are assigned to a
client maintained as a client type of ‘Productive and non
chargeable’.
Please note: The TimeRecorder preferences functions tab allows the user
to include non chargeable productive time in the charge ratio
calculation as productive / chargeable time.
Leave time is the combined hours of all lines within a
timesheet where the lines are assigned to a client maintained
as a client type of ‘Leave’.
Continued on the next page
Copyright © 1998-2004 Star System Solutions Pty Ltd.
TimeRecorder V6.x
122
Example 1:
When looking at the timesheet below for charge ratio basis
set either standard hours or actual hours:
The chargeable / productive hours is calculated as a
combination of timesheet lines that are assigned to clients
with client types of ‘Productive’ plus a half an hour for each
timesheet line that is assigned a call out fee.
Then the chargeable / productive hours is calculated as
follows:
Client ABC001 = 5.0 hours plus 0.5 hours for call out
and Client CRU301 = 7.0 hours plus 0.5 hours for call out.
Therefore the chargeable / productive hours calculation for
this timesheet is 13 hours.
Please note: With include non chargeable productive option set chargeable
/ product hours calculation included non chargeable
productive time. Example: 13 + 1.5 = 14.5
Copyright © 1998-2004 Star System Solutions Pty Ltd.
TimeRecorder V6.x
123
Charge ratio calculation
Introduction This section explains the way that TimeRecorder performs the
charge ratio calculation that appears on each timesheet.
Conditions
There must be an entry in the target hours field within the
resource Masterfile for calculation based on standard hours.
When charge ratio basis set as standard hours TimeRecorder
assumes the number of days worked by the day of the last
timesheet line that exists on the timesheet compared to the
end of the week set within the options tab of the
TimeRecorder preferences.
Example:
If the end of week is set to Sunday within the preferences,
and the timesheet in question has entries for Monday,
Tuesday and Thursday only the calculation will be based on 4
days being worked rather than three because Thursday is the
fourth day since Sunday.
Please note: The exclude days as expected working days in charge calc
setting within the preferences / options tab controls the
expected number of days worked for the charge ratio
calculation and a day is only excluded if there is no time
allocated. Hence the example above can be based on 3 days
being worked if the exclude days as expected working days in
charge calc Wednesday checkbox is ticked.
Example:
If the target hours / week as set within the central
invoicing system resource Masterfile = 37.5
Then the total hours that will be expected by the
system to be worked each day in a 5 day week = 7.5
hours.
The charge ratio standard hours calculation is carried out as
follows:
Total hours that are expected to be worked each day (as
defined in the resource Masterfile) X the number of days
worked (do not include any leave days) = (A)
Then:
The productive hours / (A) = (B) displayed as a percentage.
Continued on next page
Copyright © 1998-2004 Star System Solutions Pty Ltd.
TimeRecorder V6.x
124
Therefore: This resource is expected to work 37.5 hours /
week = 7.5 hours / day. When a user enters their timesheet
lines the period as follows:
The charge ratio percentage is calculated as follows:
7.5 X 3 days (less one day of leave) = 7.5 x 2 days = 15
Then 13 / 15 = 0.866666 displayed as a percentage = 87%
Please note: With include non chargeable productive hours the charge ratio
percentage is calculated as follows:
7.5 X 3 days (less one day of leave) = 7.5 x 2 days = 15
Then 14.5 / 15 = 0.966666 displayed as a percentage = 97%
Example:
For resource types defined as 'Contractor' (Master List Staff
Type 1) or charge ratio basis set as actual hours worked the
charge ratio is calculated by the productive hours (including
callout productive time) divided by the worked hours (not
including leave). Example: 13 / 16.5 = 79%
Please note: With include non chargeable productive hours for resource
types defined as ‘Contractor’ or charge ratio basis set as
actual hours worked the charge ratio is calculated by the
productive hours (including callout productive time) plus non
chargeable productive hours divided by the worked hours (not
including leave or callout productive time). Example: (13 +
1.5) / 16.5 = 88%
Copyright © 1998-2004 Star System Solutions Pty Ltd.
TimeRecorder V6.x
125
Appendix 3
TimeRecorderINI.CSV File
Introduction This section explains the way that TimeRecorder uses the
TimeRecorderini.csv file to ensure that the TimeRecorder
preference settings and parameters are also synchronised
from the master file to each users program during the
synchronise process.
Conditions
If the TimeRecorderini.csv is to be used during
synchronisation the user must ensure that the Master
TimeRecorderini.csv is not empty.
Example
If the Master TimeRecorderini.csv file is empty, after
synchronisation occurs the user will be unable to start
TimeRecorder.
Procedure
To ensure that all TimeRecorder preference settings and
parameters are updated at the time of synchronisation the
Master TimeRecorderini.csv should contain all preference
settings to be updated. Any preference settings that do not
need maintenance can be left out of the .CSV file.
User can have more than one .CSV file and difference users
have the different path to the Master Preferences Path set to
the relevant .CSV file.
If the synchronisation process is not to update preference
settings a Master TimeRecorderini.csv file should not exist
within the synchronise path.
Please refer to the TimeRecorderIniCsv document to further
information on each setting within this file.
Copyright © 1998-2004 Star System Solutions Pty Ltd.
TimeRecorder V6.x
126
Appendix 4
Add-Ons (TimeRecorder.INI file)
Introduction This section explains the way that TimeRecorder uses the
TimeRecorder.ini file enabling users to define external
applications (.EXE, .BAT, HTML etc) that can be run from the
Add-Ons menu within TimeRecorder.
Conditions
The TimeRecorder.ini is to contain the path, name and report
group configuration for the defined external applications to be
accessed from the Add-Ons menu.
Example
If the Master TimeRecorder.ini file contains the
following, from within TimeRecorder the Windows
Calculator will run when selected from the AddOns/Programs/Calculator menu item.
[ADD-ONS]
Item0='Special,Programs,NA'
Item1='Programs,"Calculator","C:\WINNT\system32\calc.exe"'
Procedure
In the TimeRecorderini.csv file add the section [Add-Ons]
followed by the path, name and report group configuration for
the defined external applications.
Please note: The following rules apply when defining the path, name and
report group within the TimeRecorder.ini file:
1. Embrace each line with single quotes (')
2. If there are special characters in the field then
embrace this field with double quotes (")
3. Path field cannot be empty
4. To put menu item to level 1 the group name for this
item should be empty.
Continued on the next page
Copyright © 1998-2004 Star System Solutions Pty Ltd.
TimeRecorder V6.x
127
Examples
[ADD-ONS]
Item0='Special,Special,NA'
<---Group Item, level 1
Item1='Special,"This is special report A","c:\Program Files\myreps\special.exe"'
<---menu item level 2
Item2='Special,"This is special report B","c:\Program Files\myreps\special2.exe"'
<---menu item level 2
Item3=',"This is a sample batch file",h:\testbatch.bat' <---menu item level 1
Item4='"System Group","System Group",NA'
<---Group Item, level 1
Item5='"System Group",Notepad,C:\WINNT\system32\notepad.exe'
<--- menu item level 2
Item6='"System Group","Windows explorer",C:\WINNT\explorer.exe'
<--- menu item level 2
Copyright © 1998-2004 Star System Solutions Pty Ltd.
TimeRecorder V6.x
128
Add-Ons Parameters (TimeRecorder.INI file)
Introduction TimeRecorder can pass a number of predefined system
variables to external applications that are run from the AddOns menu. This section explains what the variables are and
how to configure them in the TimeRecorder.ini file.
Conditions
The TimeRecorder.ini containing the external application path,
name and report group is to contain the parameters to be
passed to the defined external application.
Procedure
In the TimeRecorder.ini file after the add-ons path, name and
reporting group add any of the following parameters;
$RESOURCE
- current resource code
$WEEKENDING
- current timesheet / expense week
ending date
$TIMESHEETLINEID
- current timesheet line id
$EXPENSELINEID
- current expense line id
$DATAPATH
- displays current database path
Example
If the Master TimeRecorder.ini file add-on section
contains the following, TimeRecorder will pass the
current timesheet resource and week ending date to
the ExpenseReport.HTA application when the AddOns/Programs/Claim menu item is selected.
Item1='Programs,"Claim","C:\DemoData\ExpenseReport.hta $RESOURCE $WEEKENDING"'
Please note: The external application will be configured to determine how
the parameters passed from TimeRecorder are utilised when
received by the external application.
Windows 2000 and NT operating systems only please note:
When parameters are passed to a crystal report running
against the TimeRecorder paradox files the following BDE
Administrator / Configuration / System / INIT definitions need
to be set to allow multi user access to the data;
LOCAL SHARE = TRUE
SHAREDMEMLOCATION = 5BDE
Copyright © 1998-2004 Star System Solutions Pty Ltd.
TimeRecorder V6.x
129
Glossary
Admin Hours – the number of hours entered on a timesheet
that are within timesheet lines where the client has a client
type of ‘Admin’.
Call Out – a call out is a selection made by the staff member
to charge the client a flat fee charge to cover travel costs.
Chargeable – the combined hours of all lines within a
timesheet where the lines are assigned to a client maintained
as a client type of ‘Productive and Chargeable’ plus one half
hour for each timesheet line that has the call out checkbox
selected. The central invoicing system will raise an invoice for
each relevant client for these hours. See Appendix 2 for how
this calculation is performed. (Please note: the terms
‘Chargeable’ and ‘Productive’ can be interchanged.)
Client Hours – the number of hours entered on a timesheet
that are within timesheet lines where the client has a client
type of ‘Client’.
Database – a file composed of records each containing fields,
with a set of operations for searching, sorting, combining and
other functions.
Database Administrator – an individual responsible for the
design and management of the database. The administrator
determines the content, internal structure and access strategy
for the database, defines security and integrity of the data
structure.
Continued on next page
Copyright © 1998-2004 Star System Solutions Pty Ltd.
TimeRecorder V6.x
130
Expense Line – captures a cost that has been incurred by a
resource, whilst carrying out their work on any particular day.
Expense lines facilitate reimbursement of funds to the
resource or on costing of the expense as a disbursement to
the relevant client / project.
Expense claim form – a printed summary of all expenses
incurred within a selected timesheet.
Hot Print – to automatically print a report without selecting
any print parameters but instead using TimeRecorder default
printer parameters.
Leave Hours – the number of hours entered on a timesheet
that are within timesheet lines where the client has a client
type of ‘Leave.’
Non Chargeable – the combined hours of all lines within a
timesheet where the lines are assigned to a client maintained
as a client type of ‘Non Productive’ or lines marked as "No
Charge". (Please note: the terms ‘Non Chargeable’ and ‘Non
Productive’ can be interchanged.)
Non Productive – the combined hours of all lines within a
timesheet where the lines are assigned to a client maintained
as a client type of ‘Non Productive’ (Please note: the terms
‘Non Productive’ and ‘Non Chargeable’ can be interchanged.)
Not Charged Hours – the total number of hours worked for
one period less the charged hours and less any leave hours.
Continued on next page
Copyright © 1998-2004 Star System Solutions Pty Ltd.
TimeRecorder V6.x
131
Parameters – various selection criteria set in order to define
the way that TimeRecorder performs certain functions.
Period – the length of time between a start date and end
date inclusively. TimeRecorder has a default period of a week
within TimeRecorder.
Productive – the number of hours worked within one
timesheet that will be invoiced to a client from a central
invoicing system. See Appendix 2 for how this calculation is
performed. (Please note: the terms ‘Productive’ and
‘Chargeable’ can be interchanged.)
Timesheet – the completed header and line information
details on a timesheet.
Timesheet Header – the completed header information
fields on a timesheet. TimeRecorder timesheet header
information fields are employee number and week ending
date.
Timesheet Line – the completed line details field information
fields on a timesheet. TimeRecorder timesheet line details
fields can be configured to include date; day; start; end;
client; project; phase; activity; no charge; task; task done;
suggest close; call out; clientele call number; client ref;
location; internal comments; details; extended notes and log
number.
Worked Hours – the total number of hours worked and
entered into a timesheet regardless of whether they are
charged or not charged.
Copyright © 1998-2004 Star System Solutions Pty Ltd.
TimeRecorder V6.x
132