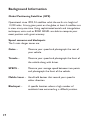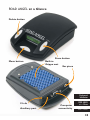
1
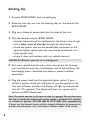
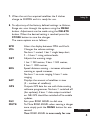
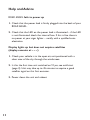
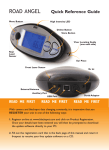
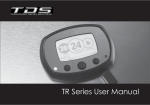
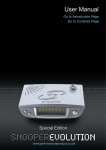
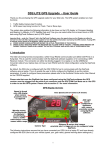
USER GUIDE
Thank you for buying your ROAD ANGEL
As our roads become busier, more congested and more regulated,
staying alert to road and traffic conditions is a challenge to everyone.
Even the most conscientious driver can have a momentary lapse of
concentration that could easily lead to an accident or a fine and points.
ROAD ANGEL is specially designed to be a simple-to-use addition to any
vehicle, to alert and warn you in advance of known danger areas.In the
comprehensive ROAD ANGEL database are stored Police, Local Authority
and Ministry of Transport designated danger spots,including accident
blackspots and speed camera locations.Using the latest Global Positioning
Satellite (GPS) technolog y, ROAD ANGEL compares your position with the
known danger spot locations and gives you an audible and visual warning
as you approach them.An accurate GPS speedometer in the display gives
you time to adjust your driving to the approaching danger.
The safety of you and your passengers is our prime consideration,
and we trust that for all the miles you drive, your
ROAD ANGEL will enhance the safety and
enjoyment of your journey. Join other
ROAD ANGEL users in guarding
your life and licence .
Dave Clark, Managing Director
Blackspot Interactive Ltd.
Note:The directors of Blackspot Interactive Ltd. sell R OAD ANGEL as a road
safety enhancement device. Driving within the speed limits at all times and
within the limitations of the road condition and your abilities is paramount.
The directors of Blackspot Interactive Ltd.take no responsibility for the use of
ROAD ANGEL for other purposes than those stipulated.
In this user guide:
Setting Up
P3
ROAD ANGEL Displays
P5
ROAD ANGEL Self-test
P6
Adding and Deleting Danger Zones
P7
ROAD ANGEL Database and Updating
P9
Help and Advice
P11
ROAD ANGEL and your Motorbike
P13
Locating your ROAD ANGEL
P13
Protecting and Cleaning
P14
Guarantee
P15
ROAD ANGEL Security
P16
Insuring your ROAD ANGEL
P16
Background Information
P17
ROAD ANGEL at a Glance
P18
2
Setting Up
1. Remove ROAD ANGEL from its packaging.
2. Place the non-slip mat into the locating clips on the base of the
ROAD ANGEL.
3. Plug your choice of power lead into the back of the unit.
4. Plan the location of your ROAD ANGEL:
• towards the centre of the dashboard in the driver’s line of sight
• with a clear view of the sky through the windscreen
• where the power wire can be comfortably connected to the
cigarette lighter socket (the unit may also be hardwired via a
fused ignition live)
• where it does not interfere with any vehicle controls
CAUTION: Do NOT place your unit on an airbag panel.
5. Park your vehicle outside with a clear view of the sky through
your windscreen and clear of obstacles such as tall buildings and
overhanging trees. Obstacles may delay or prevent satellite
acquisition.
6. Plug the power lead into the cigarette lighter socket. If your
socket is ignition wired you will need to turn the ignition to on.
The unit will beep and then the display will light up red and self
test all LCD segments.The display will then turn green with 3
dashes and MPH illuminated.
Note: The vehicle must be in the open air (not in a garage). The very first time
the unit is switched on (cold start) it must acquire a minimum of 3 satellites
to establish its position. THIS MAY TAKE UP TO 45 MINS. After approximately
4 hours use the internal battery will be charged sufficiently to memorise its
position and subsequent starts will acquire satellites within 15-30 seconds.
3
7. When the unit has acquired satellites the 3 dashes
change to 000MPH and it is ready for use.
Setting Up
8. To adjust any of the factory defined settings i.e.Volume,
Range etc. scan through the options using the MENU
button. Adjustments can be made using the DELETE
button. When the desired setting is reached press the
STORE button to save the changes.
The menu options are as follows:SPD
VOL
DST
SDS
SAT
GPS
DL9
MUTE
Alters the display between MPH and Km/h.
Changes the volume settings.
No bars = muted, 1 bar = single beep alert,
2 – 5 bars = rising volume levels.
Adjusts the warning range.
1 bar = 250 metres, 2 bars = 500 metres,
3 bars = 1000 metres.
Speed distance sensing – increases advanced
warning as speed increases.
No bars = no auto ranging, 5 bars = auto
ranging.
Displays the amount of satellites in view
(S – number of satellites).
Outputs GPS data for use with Auto-routing
software programmes. No bars = switched off
(for updates), 5 bars = data output switched
on. NB. GPS should be switched off to enable
updates.
Sets your ROAD ANGEL to dial nine.
To Mute ROAD ANGEL when nearing a danger
zone simply push the MENU button for one
second.
Your ROAD ANGEL is now ready for use.
Back To Contents
4
ROAD ANGEL Displays
The custom high quality LCD display is designed to be easily visible
by the driver in all conditions – bright sunlight to night-time driving.
The display brightness is fixed.
1. Normal Display
The LCD will be green and the main display indicates MPH as
measured by the GPS system.The speed is updated every second,
and at constant speed is a highly accurate reading. When
accelerating or decelerating quickly, the display will lag the actual
speed by a small margin.
Along the top of the LCD display are the 4 danger zone
designations:
Fixed –
Mobile –
Permanent Gatso and Truvelo Sites.
Temporary Gatso and Truvelo sites in roadworks and
user defined laser sites.
Average – Average speed detection zones as monitored by the
digital SPECS cameras.
Blackspot – Extreme danger zones where serious accidents
have occurred.
2. Alert Display
When a stored location is approached the display will turn from
green to red along with the type of hazard.The unit will beep slowly
and the first bar of the proximity chart will illuminate. As the
location is neared the bar chart counts up and the beeping increases
in frequency. Your current speed remains displayed at all times.
5
There are a total of 5 display bars.When 5 are visible you
are at the location of the danger point. The audible signal will
sound rapidly and the red display will flash. As soon as the
danger point is passed the unit will return to the green
standby mode.
ROAD ANGEL
Displays
ROAD ANGEL
Self-test
3. Multiple Alerts
Where many danger points are in close proximity, the ROAD
ANGEL will remain in the red alert mode, and the bar chart
will indicate how close you are to the next danger zone.
4. Average Speed Detection
Where the authorities have designated a long section of
road for average speed detection ROAD ANGEL counts up as
normal but remains red throughout the detection zone and
beeps as a reminder every ten seconds.
ROAD ANGEL Self-test
To ensure you ROAD ANGEL is operating correctly you can
run a simple self-test routine. Press the DELETE and
STORE buttons together once to display the software
version number and again quickly to run the self-test. Press
the buttons when prompted to do so. After the sounder has
alarmed the unit will return to standby mode.
Back To Contents
6
Adding and Deleting Danger Zones
CAUTION: Please only add or delete danger zones when it is safe to do so.
Deleting zones
Simply wait until your ROAD ANGEL alerts you to the required
danger zone and then press the DELETE button.The location will
be permanently erased from your ROAD ANGEL.
Adding new locations
You may add new locations to the FIXED, MOBILE, AVERAGE or
BLACKSPOT areas of your database.This will be permanently stored
in your unit and all information relevant to other ROAD ANGEL
users will be verified by our Blackspot technicians next time you
update (see page 9).
Storing new locations
When your vehicle is precisely alongside a new location carry out
the following:
Press STORE once.The unit will beep and display locate and store
the exact location.
Press MENU to choose between FIXED, MOBILE, AVERAGE or
BLACKSPOT.
Press STORE to confirm your choice.
Quick store of a Fixed Camera:
STORE – STORE
Quick store of a Mobile Camera:
STORE – MENU – STORE
Quick store of a Blackspot:
STORE – MENU – MENU – MENU – STORE
7
Adding an Average Speed monitoring section or
SPECS area
The use of SPECS cameras are becoming more frequent,
both in residential areas and on Motorways. A photograph is
taken of your vehicle at the ‘start’ point and then another a
set distance further down the road. If your average speed is
Adding & Deleting
greater than the speed limit between these two cameras
Danger Zones
you are automatically prosecuted.
You can record these areas as follows. Only store an average
speed monitoring area if you are absolutely sure of the start
and finish points.
When passing underneath the first ‘start’ SPECS camera
carry out the following:
Press STORE once to store the first camera position.
Press MENU twice to move the location type to AVERAGE.
Press STORE to confirm type – logging appears on
the screen.
Now wait until you are underneath the finish camera
Press STORE to confirm the finish position.
The section of average speed detection is now stored.
Note: Blackspot Interactive Ltd. are constantly updating the central
database of danger zones. You can be of great value to all ROAD
ANGEL users by noting new information accurately and updating to
our central database. All general information will be verified by
Blackspot Interactive Ltd. before adding it to the central file.
Back To Contents
8
ROAD ANGEL Database and Updating
Your ROAD ANGEL is capable of storing up to 50,000 unique danger
zones. Each unit is pre-programmed with the latest database on
leaving the factory, so it is not necessary to update immediately.
However, road regulations are constantly changing and you will need
to update your database from time to time. The recommended
update frequency is monthly, but if you are a high mileage motorist,
often driving on unfamiliar roads, you may wish to update your
database more regularly.
ROAD ANGEL has been designed to be updated simply and efficiently.
You require the following:•
•
•
•
•
Access to the internet or purchase the optional modem
The ROAD ANGEL update CD (in your pack)
The ROAD ANGEL unit
The PC lead (in your pack)
The ROAD ANGEL Power Supply
Step 1 – Load the PC software on to your computer
(see instructions with CD).
Step 2 – Use the ROAD ANGEL power supply to power your
ROAD ANGEL.
Step 3 – Plug the PC connector into the rear serial socket on
your ROAD ANGEL.
Step 4 – Plug the serial PC lead in to the serial port on
your computer.
9
Once the software is installed on your computer simply left
click on the ROAD ANGEL icon and then right click the
secondary icon in the bottom right corner of your screen.
Clicking SYNCHRONISE initiates dial-up.
Note: If you do not have access to the internet or a computer, we can
supply an optional modem for direct connection via a phone line.
Please call 01327 855586 to order your modem, quoting your ROAD
ANGEL serial number (bottom of the ROAD ANGEL).
Your purchase of ROAD ANGEL includes one year’s
subscription for the updates to the central database. It is
important to return your registration and warranty card as
this validates your guarantee and authorises your free
subscription period (12 months).
ROAD ANGEL
Database & Updating
Your subscription renewal will be £49.00 for one year or
£79.00 for two years including VAT.
Back To Contents
10
Help and Advice
ROAD ANGEL fails to power up
1. Check that the power lead is firmly plugged into the back of your
ROAD ANGEL.
2. Check that the LED on the power lead is illuminated – if the LED
is not illuminated check the internal fuse. If this is fine there is
no power at your cigar lighter – rectify with a qualified autoelectrician.
Display lights up but does not acquire satellites
(display remains at – – –)
1. Check your vehicle is in the open air, unit positioned with a
clear view of the sky through the windscreen.
2. Is this the first time unit switched on? If yes, see cold start
(page 3). Unit may take up to 45 minutes to acquire a good
satellite signal on this first occasion.
3. Power down the unit and reboot.
11
Satellite signal drops out
(display goes from recording speed to – – – –)
1. May happen temporarily due to tunnels, tall buildings,
bridges or overhanging trees cutting out the GPS signal.
Signal should be reacquired in a few seconds.
2. Unit has moved so it can no longer have a clear view of
the sky. Reposition.
3. Bad GPS coverage – very occasionally one or more
satellites are out of sequence and the signal temporarily
drops out. It should be restored within minutes.
Help and Advice
No audible signal
1. Check volume level –
press MENU to move to Volume screen (Vol).
Press DELETE to adjust the volume (settings 1 – 5)
and STORE to store the desired volume setting.
If you are unable to obtain satisfactory performance from
your ROAD ANGEL, please call our technical help line on
01327 855586.
Back To Contents
12
ROAD ANGEL and your Motorbike
ROAD ANGEL can be fitted to any motorbike with 12 volt electrics.
An optional ear-piece provides audible warning inside your helmet.
ROAD ANGEL is not waterproof. It is suggested that a tank bag or
other waterproof holder be used.
Locating your ROAD ANGEL
ROAD ANGEL in its standard form with internal aerial must be
located with an unobstructed view of the sky. The unit can be
mounted under the seat or dashboard but an external or re-radiating
aerial would be needed – please specify when ordering.
Note: Certain vehicles, in particular some modern Mercedes and Renault have
UV screens that interfere with satellite acquisition. These vehicles require an
external or re-radiating aerial in order to support ROAD ANGEL. Some
vehicles with heated front screens also suffer poor reception. Please call our
helpline on 01327 855586.
13
Protecting and Cleaning your ROAD ANGEL
Your unit is made from tough polycarbonate moulded
plastic and is designed to withstand normal daily handling.
Only clean with a dry or slightly damp cloth. Do not use
solvents or a wet cloth. When cleaning the LCD display,
avoid pressing too hard as this may damage the display.
Avoid water or very damp conditions, extremes of heat
(60c) or cold (-10c) and dropping the unit.
ROAD ANGEL and
your Motorbike
Locating your
ROAD ANGEL
Protecting and
Cleaning
Back To Contents
14
Guarantee
Your unit is guaranteed for one year from date of purchase from all
defects that occur with normal use. If your unit fails to perform as
specified in this manual, please return using registered post directly
to Blackspot Interactive Ltd. with the following:
1.
2.
3.
4.
The problem you are encountering
Proof of purchase
Date of purchase
A contact telephone number and address
Note: Please remember to fill in your registration and guarantee card
and post it FREEPOST to Blackspot Interactive Ltd. immediately after
purchase.
Extended Guarantee
An option to extend the guarantee period for your ROAD ANGEL
for a further 1 or 2 years is available. Please call 01327 855586
for details.
15
ROAD ANGEL Security
Due to the high number of thefts from vehicles, we suggest
that on leaving your vehicle you remove ROAD ANGEL
from view.
Each ROAD ANGEL has a unique serial number on the base.
Should your unit be stolen or lost, please telephone
Blackspot Interactive Ltd. on 01327 855586 to report the
loss of your unit.The unit can then be disabled.
Insuring your ROAD ANGEL
Advise your insurance company that you have purchased a
ROAD ANGEL and ask if any particular conditions apply
regarding your premium and loss or theft from your vehicle.
Guarantee
ROAD ANGEL
Security
Insuring your
ROAD ANGEL
Back To Contents
16
Background Information
Global Positioning Satellites (GPS)
Operational since 1990, 24 satellites orbit the earth at a height of
11,000 miles. At any given point on the globe, at least 4 satellites are
in view at any one time. Using sophisticated aerials and triangulation
techniques, units such as ROAD ANGEL are able to compute your
exact position with great accuracy.
Speed cameras and blackspots
The 5 main danger zones are:
Gatso –
Measure your speed and photograph the rear of
your vehicle.
Truvelo –
Measure your speed and photograph the front of
the vehicle along with driver.
SPECS –
Measure your average speed between two points
and photograph the front of the vehicle.
Mobile Laser – Hand-held devices that record your speed in
either direction.
Blackspot –
17
A specific location where a high number of
accidents have occurred e.g. a difficult junction.
ROAD ANGEL at a Glance
Delete button
Store button
Menu button
Built-in
Grippa mat
Ear piece
Background
Information
12v dc
Auxiliary port
Computer
connectivity
ROAD ANGEL
at a Glance
Back To Contents
18
Blackspot Interactive Limited
Unit 5, New Rookery Farm
Silverstone, Northants NN12 8UP
Tel: 01327 855586
Fax: 01327 855587
Email:[email protected]
Web:www.blackspot.com